
305548 - Alarm Clock Bearware - Free user manual and instructions
Find the device manual for free 305548 Bearware in PDF.


| Product type | Mirror alarm clock |
| Brand | Bearware |
| Model | 305548 |
| Power supply | 5 V DC 1 A via USB cable (power adapter not included) |
| Battery type | 1 x 18650 2200 mAh rechargeable (built-in) |
| Battery life | Up to 6 months (depending on usage) |
| Charging time | 2-3 hours |
| Temperature range | 0-50 °C |
| Display | LCD with backlight, 12/24 h format, AM/PM indicator |
| Main functions | Dual alarm (Alarm 1 and 2), snooze, temperature display (°C/°F), music mode (13 sounds), smart wake-up by noise or tapping |
| Volume adjustment | DOWN button in normal mode |
| 12/24 h switching | Brief press on TIME SET in normal mode |
| Smart wake-up | The display automatically turns on in case of noise (≥90 dB) or tapping, then turns off after 6 seconds (disabled while charging) |
| Maintenance and cleaning | Wipe with a dry cloth. Do not use water or abrasive products. Protect from moisture and direct sunlight. |
| Safety | Do not open, do not expose to water or shocks. Keep out of reach of children. Follow battery disposal instructions. |
Frequently Asked Questions - 305548 Bearware
User questions about 305548 Bearware
0 question about this device. Answer the ones you know or ask your own.
Ask a new question about this device
Download the instructions for your Alarm Clock in PDF format for free! Find your manual 305548 - Bearware and take your electronic device back in hand. On this page are published all the documents necessary for the use of your device. 305548 by Bearware.
USER MANUAL 305548 Bearware
ENG: Current drivers, user manuals and other relevant documents for this product can be found on our homepage.
Thank you for choosing a BEARWARE product. Please read the following user manual carefully so that you can enjoy the purchased product for a long time.
1. Scope of delivery
- Mirror alarm clock
- USB charging cable
- User manual
2. Technical data
| Power supply 5V DC 1A | |
| Battery type One 18650 | 2200mAh (rechargeable) |
| Battery life Up to 6 months | (depending on usage behaviour) |
| Charging time 2-3 hours | |
| Temperature range 0-50°C | |
| Features | • Alarm function (alarm)• Temperature display• Snooze function• 12/24-hours display• Backlight |

3. Additional instructions
Before using, make sure that the device is not damaged. If this is the case, then do not use it. The mirror alarm clock should neither be exposed to moisture nor direct sunlight. Before using the product, ensure that the available supply voltage corresponds to the operating voltage indicated on the specification plate. The product is intended only for private use and not for medical purposes or for public information.
Information about the protection film: The screen protection film only protects the screen against scratches and damage when the product is being transported. Remove the protection film completely from the screen when using the device for the first time.

Caution!
Keep the batteries and the device out of the reach of children. Batteries contain harmful acids. Weak batteries should be replaced as soon as possible to prevent leakage! Never use new and old batteries or batteries of different types together. Never throw batteries into a fire and do not short-circuit them. Do not recharge the batteries and please do not take them apart. There is a risk of explosion!
- Product details
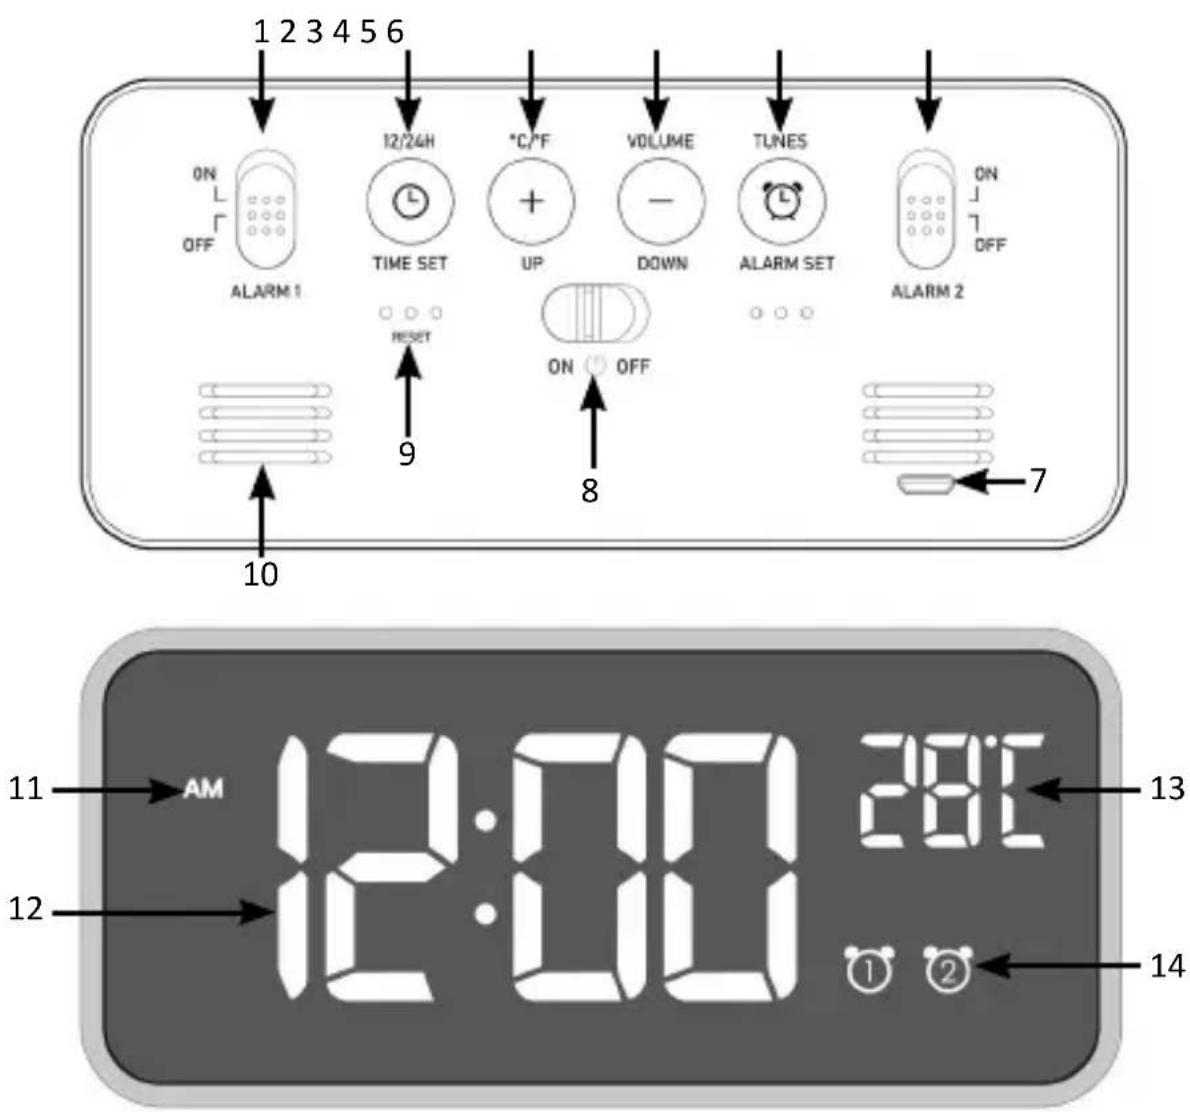
12 English
| 1 Alarm 1 ON / OFF switch |
| 2 TIME SET button |
| 3 UP button |
| 4 DOWN button |
| 5 ALARM SET button |
| 6 Alarm 2 ON / OFF switch |
| 7 USB charging port |
| 8 ON/OFF switch |
| 9 Reset button |
| 10 Speaker |
| 11 AM / PM display |
| 12 Time /Alarm time display |
| 13 Temperature display |
| 14 Alarm display |
5. Initial use
Take the product out of the package and remove all the packaging material. Charge the device fully before using it. To do this, use the supplied USB charging cable and connect it to a 5V DC 1A power adapter and the charging port of the device.
When using this product, if the battery indicator flashes or the alarm sound / music are not completely played, then it means that the battery level is low. Please charge it via the USB.
To switch on the device, slide the ON/OFF switch (8) on the back of the device into "ON" position.
6. Setting the time
Press the "TIME SET" button (2) for 3 seconds, and the hour indicator starts flashing on the LCD display. Press the "UP" (3) and "DOWN" (4) buttons to configure the hour.
Press the "TIME SET" button again, and the minute indicator starts flashing on the LCD display.
Press the "UP" / "DOWN" buttons to configure the minute.
Press the "TIME SET" button again to exit the time.
7. Alarm setting
7.1 Setting the alarm
Press and hold the "ALARM SET" (5) button for 3 seconds to enter the setting for Alarm 1.
Press the "UP" (3) and "DOWN" (4) buttons to set the hour for Alarm 1 and pay attention to the "AM/PM" setting.
Press the "ALARM SET" (5) button again, and the alarm minute starts flashing.
Press the "UP" (3) and "DOWN" (4) buttons to configure the minute for Alarm 1.
Press the "ALARM SET"(5) button to enter the ringtone selection for Alarm 1.
Press the "UP" (3) and "DOWN" (4) buttons to select the ringtone for Alarm 1.
Press the "ALARM SET"(5) button to exit the ringtone setting for Alarm 1 and to open the time setting for Alarm 2.
7.2 Enabling/disabling the alarm
Slide the "ALARM 1" (1) switch to the "ON" position, the symbol is shown on the display.
When you slide the "ALARM 1" (1) switch to the "OFF" position, the symbol is switched off.
The setting procedure for Alarm 2 is the same as for Alarm 1. But, use the "ALARM2" (6) switch for this purpose.
When the alarm goes off, the alarm symbol starts flashing. Press one of the following buttons to stop the alarm. "TIME SET" (2), "UP" (3), "DOWN" (4), "ALARM SET" (5).
The alarm switches off automatically after 2 minutes.
7.3 Snoozing the alarm
While the alarm clock is ringing, press the "SNOOZE" button on the top of the device to stop the alarm clock, the alarm symbol starts flashing. The alarm goes off again after 5 minutes.
Press one of the following buttons to stop the alarm. "TIME SET" (2), "UP" (3), "DOWN" (4), "ALARM SET" (5).
7.4 Turning off the alarm
To turn off an alarm, slide the respective switch to the "OFF" position.
8. 12/24 hour display
Press the TIME SET button briefly in normal-time mode to toggle between the 12/24 hour time system mode. "AM" or "PM" is displayed in the 12-hour mode.
9. Volume adjustment
Press the "DOWN" button (4) in normal time mode to adjust the volume. Press the "TIME SET" (2), UP" (3) or "ALARM SET" (5), to exit the setting.
10. Temperature display
Press the "UP" button in normal time mode to change the temperature display unit between degrees Celsius and degrees Fahrenheit.
11. Music mode
Press the music button ("ALARM SET" (5)) in normal time mode to play music for 5 minutes. The "Brain Wave Sleep Companion / Wake Up" function provides 13 different sounds for sleeping comfort.
12. Brightness adjustment
Press the "SNOOZE" button at the top of the device to adjust the brightness.
13. Intelligent display
If the ambient noise reaches 90 decibels or you lightly tap on the table where the alarm clock is placed, you can turn on the clock indicator which is turned off after 6 seconds.
Note: This function is switched off in USB charging mode.

14. Safety instructions and disclaimer
Never try to open the device to repair or make modifications. Avoid contact with the mains voltage. Do not short-circuit the product. The device is not waterproof, hence please use it only in dry surroundings. Protect it from high humidity, water and snow. Keep the device away from high temperatures. Do not expose the device to sudden changes in temperature or strong vibrations, as this could damage the electronic components. Check the device for any damage before using it. The device should not be used if it was subject to impact or has been damaged in some other manner. Please comply with the local regulations and restrictions.
Do not use the device for purposes other than those described in the user manual. This product is not a toy. Keep it out of the reach of children or mentally disabled persons. Any repair or modification to the device, which is not carried out by the original supplier, will void any warranty and guarantee claims. The device should only be used by those who have read and understood this user manual. The specifications of the device may be changed without any special prior notification.

15. Disposal instructions
In line with the European WEEE directive, electrical and electronic devices should not be disposed of along with domestic waste. Their components have to be separately sent for recycling or disposal, because improper disposal of toxic and dangerous components may permanently damage the environment. According to the electrical and electronic equipment act (ElektroG), you are obliged (as a consumer) to return (free of charge) electrical and electronic devices to the manufacturer, the point of sale or public collection points at the end of their service life. The relevant local laws regulate the details in this regard. The symbol displayed on the product, in the user manual or/and on the packaging refers to these regulations. With this manner of sorting, recycling and disposal of used devices, you make an important contribution towards protecting our environment. For information on authorised collection points in your area, please contact your local city or municipal administration.

16. Instructions for battery disposal
In conjunction with the sale of batteries along with the supply of devices that include batteries, the supplier is obliged to point out the following to the customer: The customer is legally obliged to return used batteries. He can return used batteries which the supplier offers or has offered as new batteries in his assortment free of charge to the supplier's dispatch warehouse (shipping address). The symbols shown on the batteries indicate the following: Pb = battery contains more than 0.004 percent lead by weight, Cd = battery contains more than 0.002 percent cadmium by weight, Hg = battery contains more than 0.0005 percent mercury by weight.

The symbol of the crossed-out dustbin means that the battery should not be disposed of in household waste.

WEEE directive 2012/19/EU WEEE Register no.: DE 67896761
The company WD Plus GmbH hereby certifies that the device 305547 / 305548 complies with the fundamental requirements and all other relevant stipulations. A complete conformity statement can be obtained from: WD Plus GmbH, Wohlenbergstraße 16, 30179 Hannover
MO-FR 9:30am - 18pm CET





- SCOPE OF DELIVERY
- TECHNICAL DATA
- ADDITIONAL INSTRUCTIONS
- CAUTION
- 12 ENGLISH
- INITIAL USE
- SETTING THE TIME
- ALARM SETTING
- 7.1 SETTING THE ALARM
- 7.2 ENABLING/DISABLING THE ALARM
- 7.3 SNOOZING THE ALARM
- 7.4 TURNING OFF THE ALARM
- 12/24 HOUR DISPLAY
- VOLUME ADJUSTMENT
- TEMPERATURE DISPLAY
- MUSIC MODE
- BRIGHTNESS ADJUSTMENT
- INTELLIGENT DISPLAY
- SAFETY INSTRUCTIONS AND DISCLAIMER
- DISPOSAL INSTRUCTIONS
- INSTRUCTIONS FOR BATTERY DISPOSAL
Brand : Bearware
Model : 305548
Category : Alarm Clock