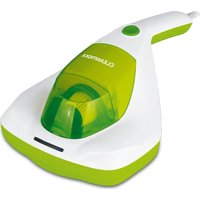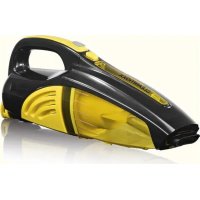
00414 - Vacuum Cleaner Cleanmaxx - Free user manual and instructions
Find the device manual for free 00414 Cleanmaxx in PDF.


User questions about 00414 Cleanmaxx
0 question about this device. Answer the ones you know or ask your own.
Ask a new question about this device
Download the instructions for your Vacuum Cleaner in PDF format for free! Find your manual 00414 - Cleanmaxx and take your electronic device back in hand. On this page are published all the documents necessary for the use of your device. 00414 by Cleanmaxx.
USER MANUAL 00414 Cleanmaxx
natural_image
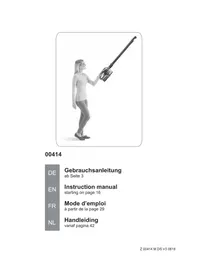
Woman holding a long-handled vacuum cleaner, standing in profile (no text or symbols visible)00414
DE
Gebrauchsanleitung
ab Seite 3
EN
Instruction manual
starting on page 16
FR
Mode d'emploi
www.service-shopping.de
natural_image
Close-up of a mechanical component with cylindrical body and protruding shaft (no visible text or symbols)Bürstendüse
natural_image
Black cylindrical pipe fitting with ribbed end (no text or symbols visible)natural_image
3D rendered image of a gray cylindrical object with a tapered tip, resembling a mechanical tool or cutting edge (no text or symbols visible)Gelenk-Saugrohr
natural_image
Close-up of a black mechanical component with metallic ends, no visible text or symbolsnatural_image
Close-up of a mechanical component with a black arrow pointing to a specific part (no text or symbols visible)natural_image
Close-up of a handheld vacuum cleaner with a black arrow pointing to the cable (no text or symbols visible)natural_image
Abstract grayscale circular design with a stylized crescent shape inside, no text or symbols present.natural_image
Close-up of a mechanical device's internal structure with an arrow pointing to a component (no visible text or symbols)natural_image
Close-up of a mechanical component with a curved arrow indicating rotation or movement (no visible text or symbols)natural_image
Close-up of a mechanical component with a black arrow pointing to a specific part (no visible text or symbols)Safety Instructions 17
Product contents 20
Device overview 21
Before first use 22
Charging the rechargeable battery 22
Assembly 23
Operation 24
Cleaning and storage 24
Troubleshooting 26
Technical data 27
Disposal 27
Explanation of the Symbols



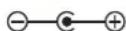

Danger symbols: These symbols indicate risks of injury. Read through the associated safety notices carefully and follow them.
Supplementary information
Read operating instructions before use!
Protection class II
Only use indoors!
Circuit symbol for direct current Polarity of the coaxial connector
Energy efficiency class V
Explanation of the Signal Words
DANGER warns of serious injuries and danger to life
WARNING warns of possible serious injuries and danger to life
CAUTION warns of slight to moderate injuries
NOTE warns of damage to property
Dear customer,
We are delighted that you have decided on this battery-operated handheld vacuum cleaner.
Before using the device for the first time, please carefully read through the instructions and store them for future reference. These instructions are to accompany the device when passed on to others. They form an integral part of the device.
The manufacturer and importer assume no liability in the event the data in these instructions have not been observed!
Please note: The illustrations in these instructions may vary slightly from the real device.
If you have questions about the device or spare parts/accessories, contact customer service via our website:
www.service-shopping.de
Proper use
- This device is designed for vacuum cleaning normal household dust.

On no account should the device be used to suck up the following:
– liquids or wet substances (e.g. wet carpet shampoo)
– glowing ash, cigarette ends, matches, etc.
- i n fl ammable or explosive substances
– very fi ne dust (e.g. concrete dust), ash or toner
- pointed, hard objects such as large pieces of broken glass
- The device is for personal household use only and is not intended for commercial applications.
- The device should only be used as described in these instructions. Any other use is deemed to be improper.
- The following are excluded from the warranty: all defects caused by improper handling, damage or unauthorised attempts at repair. This also applies to normal wear and tear.
Safety Instructions
This device may be used by children aged 8 and over and by people with reduced physical, sensory or mental abilities or a lack of experience and/or knowledge if they are supervised or have received instruction on how to use the device safely and have understood the dangers resulting from failure to comply with the relevant safety precautions.
■ Children must not play with the device.
- Cleaning and user maintenance may not be performed by children, unless they are older than 8 years of age and are supervised.
■ Children younger than 8 years of age and animals must be kept away from the device and the mains cable. - The device must always be disconnected from the mains power when it is left unattended and before assembling, disassembling or cleaning the device.
- Never immerse the device, charging station, mains cable or mains adapter in water or other liquids and ensure that they cannot fall into water or become wet.
- Only charge the rechargeable battery with the enclosed mains adapter and the charging station. Do not charge any devices other than the handheld vacuum cleaner. with the enclosed mains adapter and the charging station.
In the interest of your own safety, you should inspect the device for damage each time before you use it. The device may only be used if it has no visible signs of damage! If the device, the charging station, the mains cable or the mains adapter of the device is damaged, it must be replaced by the manufacturer, customer service department or a similarly qualified person (e.g. specialist workshop) in order to avoid any hazards.

DANGER – Danger of Electric Shock!
■ Use and store only in closed rooms.
- Do not use the device in rooms with high humidity.
- Should the device fall into water, switch off the power supply immediately. Do not attempt to pull the device out of the water while it is still connected to the mains power!
- Never touch the device, charging station, mains cable or mains adapter with wet hands when these components are connected to the mains power.
- Never suck up liquids. Do not pour liquids into the dust container. Keep the main unit away from moisture or wet conditions!
If the device is to be used as a hand-held vacuum cleaner for cleaning a car, ensure that the device is not exposed to rain or moisture.

WARNING – Risk of Injuries!
- Danger of suffocation! Keep children and animals away from the packaging material.
- Danger of strangulation! Make sure that the mains cable is always kept out of the reach of small children and animals.
- Danger of corrosive injury! Rechargeable batteries can be life-threatening if swallowed. Therefore keep rechargeable batteries out of the reach of young children. If a rechargeable battery has been swallowed, you must seek immediate medical attention.
- Danger of corrosive injuryIf the rechargeable battery has leaked, do not allow your skin, eyes and mucous membranes to come into contact with the battery acid. If you touch battery acid, rinse the affected sites with abundant fresh water immediately and contact a doctor as soon as possible.
- Danger of becoming stuck! Keep animals, hair, jewellery, wide clothing, fingers and all other body parts away from the nozzles of the device. They could become stuck to the device. Should the vacuum cleaner become stuck, switch the device off immediately.
- Danger of falling! Make sure that the connected mains cable does not present a trip hazard.

WARNING – Danger of Fire!
- Do not use the device in rooms containing easily ignitable substances or poisonous and explosive fumes.
- Do not set up the charging station in the vicinity of highly flammable materials (curtains, textiles, etc.).
- Do not cover the device during operation in order to prevent it from catching fire. Do not insert anything into the ventilation openings of the device and make sure that these do not become clogged.
In the event of a fire: Do not extinguish with water! Smother the flames with a fire-proof blanket or a suitable fire extinguisher.
NOTICE – Risk of Damage to Material and Property
- Only connect the mains adapter to a plug socket with safety contacts that is properly installed and matches the technical data of the device. The plug socket must also be readily accessible after connection so that the connection to the mains can quickly be isolated.
- Only use suitable extension cables whose technical data is the same as that of the device.
■ Remove the mains adapter from the plug socket if a fault occurs during charging or before a thunderstorm. -
When you pull it out of the plug socket, always pull on the mains adapter and never the mains cable!
■ Make sure that the mains cable is not squashed, bent or laid over sharp edges and does not come into contact with hot surfaces. Do not wrap the mains cable around the device (danger of the cable breaking).
The device should only be used if it has been completely and correctly assembled! The dust container and the filters must be inserted and must not be damaged. If the dirt were to get inside the main unit, this could damage the motor.
■ Never pull or carry the device by the mains cable. -
Protect the device from heat, naked flames, extreme temperatures, persistent moisture, wet conditions and collisions.
■ Use only original spare parts from the manufacturer. - Do not place or lay any heavy objects on the device, the mains adapter or the mains cable.
NOTICE – Risk of Damage to Material and Property from rechargeable Batteries
■ Before inserting the battery pack, check whether the contacts are clean and clean them if necessary.
■ Use only the battery type specified in the technical data.
■ Remove a leaking battery from the device immediately. Clean the contacts before inserting a new battery.
- The battery must not be taken apart, thrown into a fire, immersed in liquids or short-circuited.
Product contents
- Motor assembly / main unit
- Dust container
- Dust filter
- HEPA fi Iter
• Articulated suction tube - Turbo nozzle
- Brush nozzle
- Tile nozzle
- Nozzle adapter
- Charging station
- Mains adapter
- Rechargeable battery
- Instruction manual
Device overview
Device
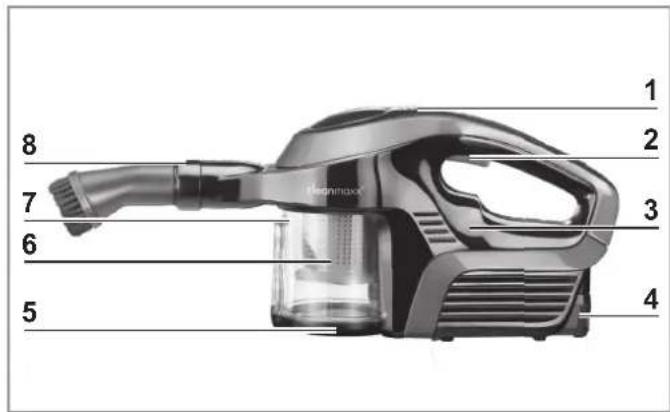
text_image
1 2 3 4 5 6 7 8 Minimax1 Charge control light
2 On / Off switch
3 Motor assembly/main unit
4 Rechargeable battery (removable)
5 Dust container lid
6 Dust filter (located inside of the dust container)
7 Dust container
8 Suction opening
9 Turbo nozzle
10 Brush nozzle
11 Tile nozzle
12 Nozzle adapter
13 Mains adapter
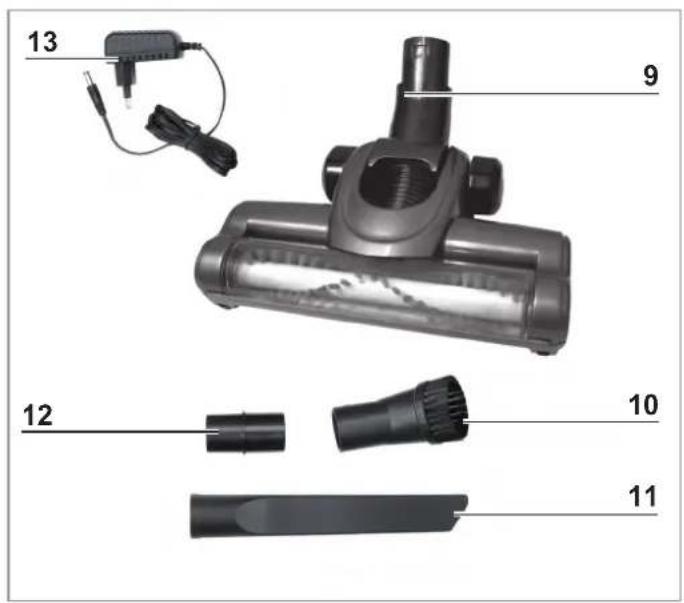
text_image
13 9 12 10 11Accessories
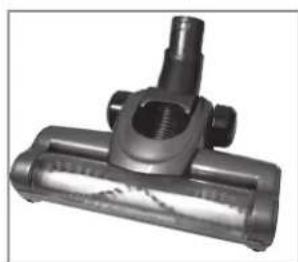
Floor nozzle
natural_image
Close-up of a black and silver vacuum cleaner component with threaded shaft and mounting bracket (no visible text or symbols)The turbo nozzle (9) is suitable both for carpets and smooth floors. It has a rotating cleaning brush to make it easier to pick up hair and fl uff.
Tile nozzle
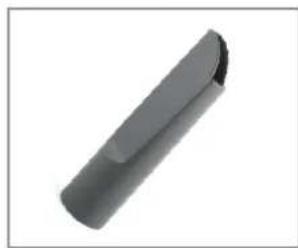
natural_image
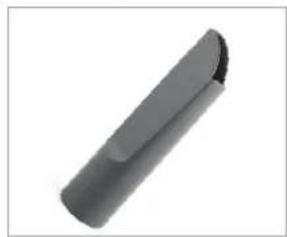
3D rendered image of a cylindrical mechanical part with rounded ends and a flat top (no text or symbols)Use the tile nozzle (11) to vacuum up dirt and dust. It is ideal for places which are hard to get to, such as corners, crevices or recesses.
Brush nozzle
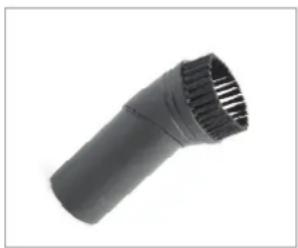
natural_image
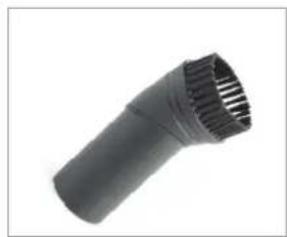
Black plastic pipe fitting with ribbed texture (no text or symbols)The brush nozzle (10) is used for vacuuming upholstery and textiles and for removing dust from delicate objects such as picture frames, lamp shades, keyboards, books etc.
Articulated suction tube
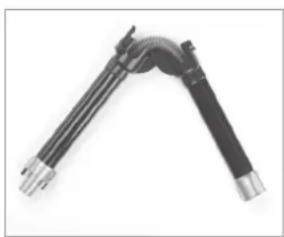
natural_image
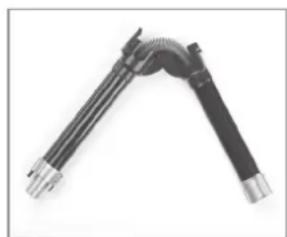
Close-up of a black and silver mechanical tool with curved arms (no text or symbols visible)The articulated suction tube can be used like a normal extension tube. If it is used bent, it can also be used to easily vacuum under sofas, shelves etc.
- Nozzle adapter (12) is required to attach all nozzles, with the exception of the turbo nozzle, to the device or articulated suction tube.
Before fi rst use

PLEASE NOTE!
■ Never remove the rating plate and any possible warnings!
- Make sure that the product contents are complete (see chapter "Product contents") and check for any damages from transport. If you identify damages to the components, do not use them (!), instead contact our customer service centre.
- Before using the device, remove all packaging materials and any labels that may be on the device and are used for protection during transportation or for advertising.
- Charge the rechargeable battery (see chapter "Charging the rechargeable battery").
- Attach the wall bracket (see the "Attaching the Wall Bracket" chapter).
Charging the rechargeable battery

PLEASE NOTE!
- Pull the mains adapter out of the socket if you do not use it for a prolonged period of time.

- Completely charge the rechargeable battery before first use for maximum charge. Charging takes approx. 4 to 5 hours.
- If the rechargeable battery is completely depleted after use, it will take approx. 4 to 5 hours to recharge the rechargeable battery.
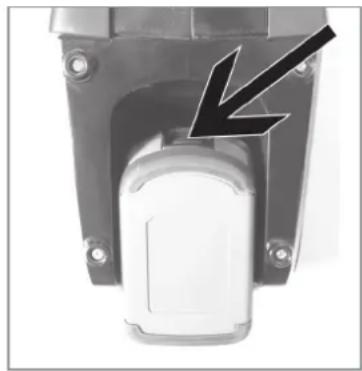
natural_image
Close-up of a mechanical component with a black arrow pointing to a specific part (no text or symbols visible)- Remove the rechargeable battery from the device: Push the latch on the rechargeable battery (see photo) and remove it.
- Insert the rechargeable battery into the charging station.
-
First connect the barrel connector of the mains adapter to the connector jack on the charging station and then to a properly installed, easily accessible socket. The green and the red control light on the charging station will be illuminated. The rechargeable battery will be charged.
-
Let the rechargeable battery of the device charge for approx. 4 to 5 hours in order to reach the maximum charge. If only the green control light is still illuminated, the rechargeable battery has been fully charged.
- First disconnect the mains adapter from the mains supply and then the barrel connector from the charging station.
- Remove the rechargeable battery from the charging station and insert it in the device again.
Assembly
Attaching / Removing Nozzles
With the exception of the turbo nozzle (9), all nozzles are attached with the aid of the nozzle adapter (12).
- Plug the nozzle adapter into the suction opening (8) or the articulated suction tube. Plug the nozzle you want onto the nozzle adapter.
- To take them apart, pull the nozzle and the adapter apart.
Attaching / Removing the Turbo Nozzle and Articulated Suction Tube
No adapter is required for the turbo nozzle (9) and the articulated suction tube.
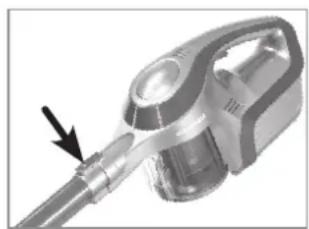
- They are plugged directly onto the suction opening (8). The catches must be heard to engage in place. Attach the turbo nozzle to the articulated suction tube in the same way.
natural_image
Close-up of a handheld vacuum cleaner with a black arrow pointing to the tip (no text or symbols visible)- To detach it, press the release button and pull the turbo nozzle or the articulated suction tube out at the same time.
Removing / Inserting the Dust Container
text_image
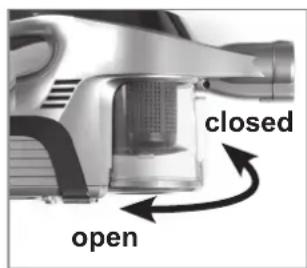
closed open- Removing: Twist the dust container (7) a little bit. It is released from the main unit (3) and can be removed.
- Inserting: Insert the dust container into the main unit. Rotate it slightly as you do this until it engages in the main unit correctly. Then twist the dust container in the main unit to secure it in place. The release button of the dust container
must be located below the suction opening (8) after it has been attached.
Operation
PLEASE NOTE!
■ Make sure that there are no large, pointy objects on the area to be cleaned.
■ Always switch off the device before replacing any accessories.
Pay attention to the dust container's MAX mark. If the mark is reached during use, empty the dust container. Empty and clean the dust container after each use. The fi Iter must also be cleaned regularly to prevent the motor from being overloaded.
- Switch the device off after each surface has been cleaned as this will considerably increase the operating time on each battery charge. Charge up the battery after use (see the “Charging Up the Battery” chapter).
- Do not use the device when it is connected to the mains adapter.
-
Select an accessory as required (see the "Device Overview" chapter, "Accessories" section) and attach it to the device (see the "Assembly" chapter).
-
Switch on the device. There are two possible ways to do this:
-
gently press down the On / Off switch. When you let go, the device switches off automatically again.
-
press the On / Off switch once firmly and then let go of it. If the device is to be switched off again, press the On / Off switch again.
-
The device will start vacuuming immediately.
- Move the nozzle over the surface to be cleaned.
- If the articulated suction tube is to be bent, press the release button on the articulated suction tube and bend the lower part forwards.
If it is to be folded up again, move the lower part back into the straight position. The release button must be heard to engage in place.
- After vacuuming, switch off the device, then empty the dust container and clean it if necessary (see the next "Cleaning and Storage" chapter).
Cleaning and storage
PLEASE NOTE!
■ Ensure that the device has been deactivated before you clean it!
- Never use soap or other cleaners to clean the dust filter. Otherwise this would damage the dust fi iter.
- Do not immerse the HEPA filter in water or rinse it under running water to prevent damage to the filter. It is neither machine-washable, dishwasher-safe nor suitable for tumble drying.
The dust filter is not suitable for the washing machine, dishwasher or dryer! Only air dry the dust filter and do not in any case use a hair dryer.
25 EN
■ Only put the device back together once all parts are completely dry!
- Do not use any corrosive or abrasive cleaners to clean the housing. They could damage the surface. If needed, clean the housing with a damp, soft cloth.

The filter may lose some of its colour over time. This is normal and does not have any adverse effect on function.
Emptying the Dust Container
text_image
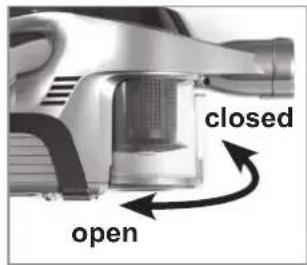
closed open- Remove the dust container (7) from the main unit (3). Turn it a little to do this. It is released from the main unit and can be removed.
-
Hold the dust container over an open dust container. The distance from the dust container should be as small as possible so that the dust does not spread in the surrounding air.
-
Push the release button on the dust container and empty it.
natural_image
Abstract grayscale illustration of a circular object with internal geometric shapes (no text or symbols)-
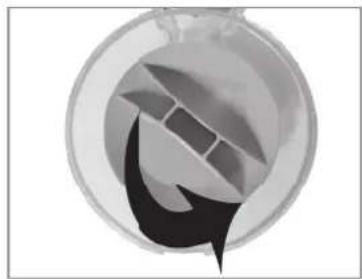
Pull the filters out of the dust container: Turn the dust filter approx. one quarter turn counterclockwise and remove the dust filter with the HEPA filter. Knock all parts out over a rubbish bin and brush them off if necessary.
-
If necessary, clean the dust container and the dust filter with clean, lukewarm water. NOTICE: Do not clean the HEPA fi Iter with water!
- Allow all parts to dry completely before assembling them.
NOTICE: Do not in any case insert the dust filter if it is still moist. Reverse the steps to assemble them. Make sure that the catches on the dust container are inserted into the corresponding recesses on the main unit. Otherwise, the dust container will not correctly lock into the device.
Cleaning the Main unit, Articulated Suction Tube and Nozzles
- Wipe down the main unit (3), articulated suction tube and nozzles with a damp, soft cloth if necessary. Then dry them with a soft cloth.
• Regularly remove hair and fluff from the nozzles and brushes.
Cleaning the Turbo Nozzle
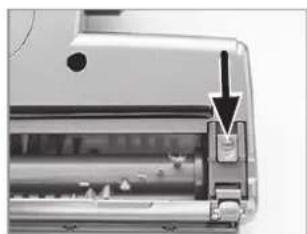
To make it easier to clean, the brush can be removed from the turbo nozzle (9):
natural_image
Close-up of a car air conditioner unit with a black arrow pointing to a component (no visible text or symbols)- Slide the latch fastener on the bottom of the turbo nozzle towards the small wheel on the turbo nozzle.
natural_image
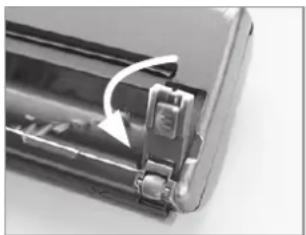
Close-up of a battery internal component with a curved arrow indicating rotation (no text or symbols visible)- Open and remove the latch.
- Take out the brush and remove any contamination.
- Reinsert the brush. When you do this, first insert the end with the star-shaped recess.
- Insert the latch and slide the latch fastener back in place.
Storage
- Store the device in a cool, dry place which is protected from direct sunlight and is out of the reach of children and animals.

If you do not want to use the device for a prolonged period, remove the rechargeable battery to stay on the safe side (see section “Removing the rechargeable battery”).
Troubleshooting
If the device does not work properly, check whether you are able to rectify the problem yourself. If the problem cannot be solved with the steps that are listed, contact the customer service department.

Do not attempt to repair a defective device yourself!
| Problem Possible cause / solution | |
| The device only operates slowly or doesn’t start. | Is the rechargeable battery empty? Charge it.Is the battery too weak? Charge up the battery.Is the dust container (7) full? Empty the dust container.Are the filters heavily laden with dirt? Clean it in accordance with the “Cleaning and storage” chapter.Is the suction opening plugged?Turn off the device and remove the blockage.It is also possible that some particles remain caught in the carpet floor or that they are too large / too heavy for the device to vacuum up. Simply remove the debris by hand. |
| The suction power is weak. | |
| Dust escapes from the device during cleaning. | Check whether the dust container and filter have been inserted correctly and adjust the fit if necessary.Check whether the dust container is closed correctly.Are the filters heavily contaminated? Clean it in accordance with the “Cleaning and storage” chapter.Are the filters worn or damaged? Order a new filter via www.service-shopping.de and replace it. |
| The control light doesn’t illuminate when the device is connected to the mains supply. | • Is the mains adapter properly connected with the socket and the barrel connector with the connector jack on the device?• Is the socket defective? Try another socket.• Check the fuse for your mains connection. |
| Unusual odour | • A new odour is normal when the device is used for the first time; it disappears after a while. |
Technical data
Device
Model number: PC-P008E
Product number: 00414
Voltage supply: 14.8 V (Li-ion 2000 mAh)
Output: 150 W
Rechargeable battery
charging time: approx. 4 – 5 hours
operating time: approx. 15 – 18 minutes
(when fully charged)
Mains adapter
Model number: XS-180050EU / HYCH0101800500G / AD12J180050E
Input: 100 – 240 V \~ 50/60 Hz
Output: 18 V DC, 500 mA
Safety class: II
Charging station
| Input: | 18 | V | |
| Output: | 14,8 | V |

Disposal
The packaging material is recyclable. Dispose of the packaging in an environmentally-friendly manner and make it available to the collection service for recyclable materials.
Dispose of the article in an environmentally friendly manner. It should not be disposed of in the normal household waste. Please dispose of it at a recycling centre for used electrical and electronic devices.
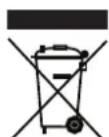
Rechargeable batteries and batteries must be removed and disposed of separately before disposing of the device. To protect the environment, batteries and rechargeable batteries may not be disposed of together with normal household waste. Instead they must be turned in at appropriate collection points.
Removing the rechargeable battery

PLEASE NOTE!
- Do not open the rechargeable battery; there is a risk of a short circuit; irritating vapours or corrosive liquids may also be emitted.
- Do not expose the rechargeable battery to intense sunlight, heat or fire; there is a risk of explosion.
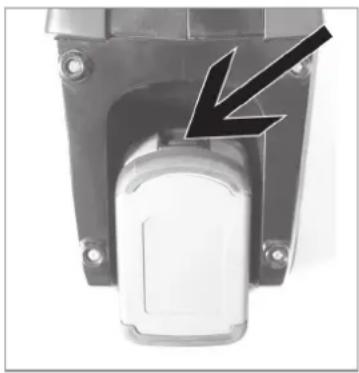
This device has a rechargeable battery (4); it must be removed before disposing of the old device.
natural_image
Close-up of a mechanical component with a black arrow pointing to a specific part (no text or symbols visible)- The rechargeable battery is located on the bottom of the main unit (3).
- Push the latch on the rechargeable battery (see photo) and remove it.
- Dispose of the rechargeable battery in an environmentally-friendly manner (collection points or vendors).
Customer service/ Importer:
(Calls to German landlines are subject to charges. The cost varies depending on the service provider.)
Contenu
www.service-shopping.de
natural_image
Close-up of a black cylindrical mechanical component with a protruding handle and internal shaft (no visible text or symbols)Suceur pour fentes
natural_image
Close-up of a cylindrical mechanical part with a curved edge (no text or symbols visible)natural_image
Black cylindrical pipe fitting with ribbed end, isolated on white background (no text or symbols)natural_image
Close-up of a black mechanical component with metallic connectors (no visible text or symbols)natural_image
Close-up of a mechanical component with a black arrow pointing to a specific part (no visible text or symbols)natural_image
Close-up of a handheld vacuum cleaner with a metallic handle and cable, showing internal components and a black arrow pointing to a component (no text or symbols visible)natural_image
Abstract grayscale graphic with a crescent shape inside a circular frame (no text or symbols)natural_image
Close-up of a car air conditioner unit with a black arrow pointing to a component (no visible text or symbols)natural_image
Close-up of a mechanical component with a curved arrow indicating rotation or assembly (no visible text or symbols)natural_image
Close-up of a mechanical component with a black arrow pointing to a specific part (no text or symbols visible)www.service-shopping.de