
Run X20 GPS - Smartwatch TIMEX - Free user manual and instructions
Find the device manual for free Run X20 GPS TIMEX in PDF.

| Product Type | GPS Smartwatch |
| Brand | Timex |
| Model | Run X20 GPS |
| Location Technology | Built-in GPS |
| Water Resistance | 50 meters (164 feet) – not for diving |
| Power Source | Internal rechargeable lithium-polymer battery |
| Charging | Via USB cable with charging clip, full charge in minimum 3 hours |
| Display | Digital display with INDIGLO® Night-Light backlight |
| Main Functions | Stopwatch, interval workout, session history, alarm, backlight |
| Battery Life | Not specified, estimate: about 8 to 10 hours in GPS mode |
| Weight | Approximately 50 grams |
| Warranty | International 1 year |
| Care and Cleaning | Rinse with fresh water after contact with sweat or seawater |
| Safety | Do not attempt to remove the battery; do not expose to excessive heat; do not use for diving |
| Spare Parts and Repairability | Battery not user-replaceable; repair by Timex only |
| General Information | User guide available in multiple languages; compatible with running and walking sessions |
Frequently Asked Questions - Run X20 GPS TIMEX
User questions about Run X20 GPS TIMEX
0 question about this device. Answer the ones you know or ask your own.
Ask a new question about this device
Download the instructions for your Smartwatch in PDF format for free! Find your manual Run X20 GPS - TIMEX and take your electronic device back in hand. On this page are published all the documents necessary for the use of your device. Run X20 GPS by TIMEX.
USER MANUAL Run X20 GPS TIMEX
Important Safety Instructions and Warnings......2
What's Included....4
Getting Started....4
Introducing the Watch....5
Charging the Watch....7
Navigating the Watch....8
First-Time Setup....9
Going for a Run....10
Interval Training....11
Reviewing Workouts....13
Troubleshooting....13
Full Instructions....14
Water Resistance....15
Warranty 16
Declaration of Conformity....20
Thank you for purchasing the Timex ^® IRONMAN ^® Run x20 GPS watch! Read this Quick Start Guide and begin enjoying your watch right away.
IMPORTANT SAFETY INSTRUCTIONS AND WARNINGS
- To prevent risk of fire, chemical burn, electrolyte leak, and/or injury from the unit's internal Lithium-polymer battery:
a. Do not attempt to remove the case-back or exterior shell of the unit, or to remove its non-user-replaceable battery.
b. Do not leave the unit exposed to a heat source or in a high-temperature location (such as in the sun or in an unattended vehicle). To prevent damage, store the unit out of direct sunlight.
c. Do not puncture or incinerate the unit.
d. When storing the unit for an extended
time, keep it in the 32 to 77°F (0 to 25°C) temperature range.
e. Charge the unit only within the 32 to 113°F (0 to 45°C) temperature range.
f. Do not operate the unit outside the -4 to 131°F (-20 to 55°C) temperature range.
g. Contact your local waste disposal department to properly recycle or dispose of the unit or its battery.
2. Use only the charging cable supplied.
3. This unit is not a medical device and is not recommended for use by persons with serious heart conditions. Always consult your physician before beginning or modifying any exercise program.
4. Do not attempt to read the unit's display while moving: this is unsafe and distracting, and could result in an accident or collision. Read the display only when you can safely do so.
See the instructions for details.
WHAT'S INCLUDED
- Timex ^® IRONMAN ^® Run x20 GPS watch
- Charging cable
GETTING STARTED
Congratulations on your purchase of the Timex IRONMAN® Run x20 GPS watch. For first use, please follow this Quick Start Guide to get started:
- Become familiar with your watch
- Charge your watch
- Learn how to navigate the watch's display
- Configure your watch
- Record your first workout
- Review your performance
INTRODUCING THE WATCH
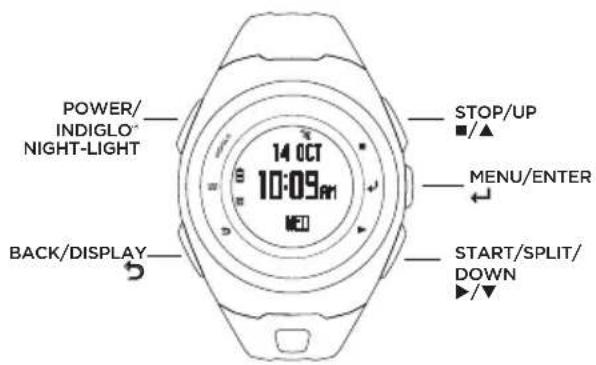
STOP / UP (■ / ▲)
Highlights the previous item in a menu. Moves up in a screen. Pauses a workout. Increases a setting.
MENU / ENTER (←)
Opens the main menu. Selects a highlighted menu option. Moves to the next field in a settings screen. Shows the time display during a workout.
START / SPLIT / DOWN (▶/▼)
Highlights the next item in the menu. Moves down in a screen. Starts a workout. Takes a split. Decreases a setting.
BACK / DISPLAY (→)
Returns to the previous menu. Moves to the next display during a stopwatch workout. Shows total time and distance for a few seconds during an interval workout.
Press to light the night-light for a few seconds. Press and hold to turn the watch on or off.
ICONS
| [32K4] | GPS status | Solid: GPS is acquired.Flashing: Searching for GPS. |
| [WSTA] | Alarm | Alarm is active and will sound at the programmed time. |
 | Battery status | Solid: Battery charge in 25% increments.Flashing: Watch is powered on and charging. |
CHARGING THE WATCH
Before you use the watch the first time, fully charge the battery using your computer or a wall outlet as a power source.
-
Attach the charging cable clip to the watch so the clip's pins align with the contacts on the back of the watch.
-
Select a power source:
- Computer: Insert the free end of the charging cable into a powered USB port on your computer.
• Wall outlet: Insert the free end of the charging cable into a USB power adapter, then insert the adapter into a wall outlet.
- Let the battery charge at least 3 hours.
NAVIGATING THE WATCH
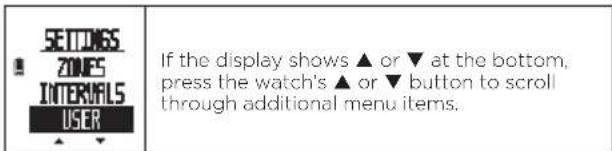
Use the ▲, ▼, ←, and ➤ buttons to access the watch's features.
- Press ▲ or ▼ to highlight a menu item.
- Press ← to select the item.
- Press ➤ to return to the previous menu.
From the watch's initial (Time) display, press to open the main menu.
| # | WORKOUT - Choose a workout: stopwatch (timed) or interval (variable intensity).History - Display your saved workouts.Settings - Customize your watch and workout settings. |
FIRST-TIME SETUP
The first time you power on the watch, you will set up language, units, personal profile, and other required information.
- Press and hold POWER to power on the watch. The watch then begins the first-time setup process.
If first-time setup does not begin, press ↩ to go to the main menu, then select SETTINGS > ABOUT > FACTORY RESET (YES). The watch then powers down. Press and hold POWER to continue. - Follow the instructions shown in the watch's display, using the ▲, ▼, ↔, and ➕ buttons.
GOING FOR A RUN
- From the main menu, select WORKOUT > STOPWATCH. The watch then automatically searches for GPS.
Tip: To acquire GPS more quickly, move away from tall buildings and trees, and stand still. - Select START.
- The stopwatch begins timing. While the workout is running, press ➤ to cycle through workout data.
HANDS-FREE RECORDING
Every time you reach a mile or kilometer (chosen in your Distance settings), the watch automatically records a lap.
STOPPING AND SAVING A WORKOUT
- Press ■ to stop timing.
- Select SAVE, RESUME, or DISCARD.
INTERVAL TRAINING
Use interval training to combine running and walking—or high- and low-intensity running—to improve your endurance and make the most of your workout time.
SETTING UP AN INTERVAL WORKOUT
- From the main menu, select SETTINGS > INTERVALS.
- Select INT 1 to configure and select the Name.
- Select to end the interval after a DISTANCE or after a TIME, and enter the value.
- Repeat for INT 2.
STARTING AN INTERVAL WORKOUT
-
From the main menu, select WORKOUT > INTERVALS.
-
Press ← to confirm the displayed settings. The watch then automatically searches for GPS.
Tip: To acquire GPS more quickly, move away from tall buildings and trees, and stand still.
- From GPS READY, select START.
- During your workout, press ⚙ to see elapsed time and total distance.
- At the end of each interval, the watch beeps and displays the next interval's name and the remaining time.
- When both intervals are complete, the workout repeats and the rep count increases. The intervals continue repeating until you stop the workout.
STOPPING AND SAVING A WORKOUT
- Press ■ to stop timing.
- Select SAVE, RESUME, or DISCARD.
REVIEWING WORKOUTS
The workout summary provides complete data about your recent workouts.
- From the main menu, select HISTORY > STOPWATCH or INTERVALS. This displays your recent workouts from newest (top) to oldest (bottom).
- Select the workout to review, then select SUMMARY.
- Use ▲ and ▼ to scroll through the workout data.
- Press ← to return to the main menu.
TROUBLESHOOTING
PROBLEMS CONNECTING TO GPS
- Always connect from outside. Acquiring GPS is difficult indoors.
-
Move away from buildings and tall trees, which can interfere with GPS.
-
Stand still. Movement can delay GPS acquisition.
- Do not start running or walking until you acquire GPS.
FULL INSTRUCTIONS
For detailed instructions, consult the full-length
User Guide posted at:
http://www.Timex.com/Manuals
For instructional videos, visit:
http://www.YouTube.com/TimexUSA
WATER RESISTANCE
The Run x20 GPS watch is water-resistant to 50 m (164 ft). You can swim with the watch, but the GPS function will not work while swimming.
| Water-Resistance Depth Water Pressure Below Surface | |
| 50 m/164 ft 86 PSIA* | |
* Pounds per square inch absolute
WARNING: To maintain water resistance, do not press watch buttons under water.
- The watch is water-resistant only while the lens, push buttons, and case remain intact.
- Do not use the watch for diving.
- Rinse the watch with fresh water after every exposure to perspiration or salt water.
TIMEX INTERNATIONAL WARRANTY
(U.S. - LIMITED WARRANTY - PLEASE SEE FRONT OF INSTRUCTION BOOKLET FOR TERMS OF EXTENDED WARRANTY OFFER)
Your TIMEX ^® device is warranted against manufacturing defects by Timex Group USA, Inc. for a period of ONE YEAR from the original purchase date. Timex and its worldwide affiliates will honor this International Warranty.
Please note that Timex may, at its option, repair your device by installing new or thoroughly reconditioned and inspected components or replace it with an identical
or similar model. IMPORTANT — PLEASE NOTE THAT THIS WARRANTY DOES NOT COVER DEFECTS OR DAMAGES TO YOUR WATCH:
1) after the warranty period expires;
2) if the device was not originally purchased from an authorized Timex retailer;
3) from repair services not performed by Timex;
4) from accidents, tampering or abuse; and
5) lens or crystal, strap or band, watch case, attachments or battery. Timex may charge you for replacing any of these parts.
THIS WARRANTY AND THE REMEDIES CONTAINED HEREIN ARE EXCLUSIVE AND IN LIEU OF ALL OTHER WARRANTIES, EXPRESS OR IMPLIED, INCLUDING
ANY IMPLIED WARRANTY OF MERCHANTABILITY OR FITNESS FOR PARTICULAR PURPOSE, TIMEX IS NOT LIABLE FOR ANY SPECIAL, INCIDENTAL OR CONSEQUENTIAL DAMAGES. Some countries and states do not allow limitations on implied warranties and do not allow exclusions or limitations on damages, so these limitations may not apply to you. This warranty gives you specific legal rights and you may also have other rights which vary from country to country and state to state.
To obtain warranty service, please return your device to Timex, one of its affiliates or the Timex retailer where the device was purchased, together with a completed original Watch Repair Coupon or, in the U.S. and Canada only, the completed original Watch Repair Coupon or a written statement identifying your name, address, telephone number and date and place of purchase. Please include the following with your device to cover postage and handling (this is not a repair charge): a US\8.00 check or money order in the U.S.; a CAN\10.00 cheque or money order in Canada; and a UK£3.50 cheque or money order in the U.K. In other countries, Timex will charge you for postage and handling. NEVER INCLUDE A SPECIAL WATCHBAND OR ANY OTHER ARTICLE OF PERSONAL VALUE IN YOUR SHIPMENT.
For the U.S., please call 1-800-328-2677 for additional warranty information. For Canada, call 1-800-263-0981. For Brazil, call +55 (11) 5572 9733. For Mexico, call
01-800-01-060-00. For Central America, the Caribbean, Bermuda and the Bahamas, call (501) 370-5775 (U.S.). For Asia, call 852-2815-0091. For the U.K., call 44 020 8687 9620. For France, call 03 81 63 42 51 (10 a.m. - 12 Noon). For Germany/Austria: +43 662 88921 30. For the Middle East and Africa, call 971-4-310850. For other areas, please contact your local Timex retailer or Timex distributor for warranty information.
©2014 Timex Group USA, Inc. TIMEX and INDIGLO are registered trademarks of Timex Group B.V, and its subsidiaries. IRONMAN® and MDOT are registered trademarks of World Triathlon Corporation. Used here by permission.
TIMEX INTERNATIONAL WARRANTY REPAIR COUPON
Original Purchase Date:
(attach a copy of sales receipt, if available)
Purchased by:
(name, address, telephone number)
Place of Purchase:
(name and address)
Reason for Return:
Declaration of Conformity
Manufacturers Name: Timex Group USA, Inc.
Manufacturers Address: 555 Christian Road
Middlebury, CT 06762
United States of America
declares that the product:
Product Name: Timex® Ironman® Run x20 GPS
Model Numbers: M062
conforms to the following specifications:
R&TTE: 2014/53/EU
Standards: EN 300 440-1 V1.6.1 (2010-08)
EN 300 440-2 V1.4.1 (2010-08)
EN 301 489-1 V1.9.2 (2011-09)
EN 301 489-3 V1.4.1 (2002-08)
IC RSS-310 Issue 3, December 2010
LVD: 2006/95/EC
Standards: EN 60950-1: 2006/A2:2013
Digital Device Emissions
Standards: FCC CFR 47 PART 15 B: 2013
EN 55022:2010+AC:2011
EN 55024:2010
Agent:


Sam Everett, Quality Regulatory Engineer
Date: 10 June, 2014, Middlebury, Connecticut, U.S.A.
Sommaire
Middlebury, CT 06762
START / SPLIT / DOWN (▶/▼)
Middlebury, CT 06762
United States of America
START / SPLIT / DOWN (▶/▼)
Middlebury, CT 06762
EUA
Padrões: FCC CFR 47 PART 15 B: 2013
EN 55022:2010+AC:2011
EN 55024:2010
Representante:
Middlebury, CT 06762
Middlebury, CT 06762
USA
START / SPLIT (TUSSENTIJD) / DOWN (OMLAAG) (▶/▼)
Middlebury, CT 06762
Sam Everett, Quality Regulatory Engineer
Datum: 10 juni 2014, Middlebury, Connecticut, VS

natural_image
Completely dark image with no visible content, text, or symbols.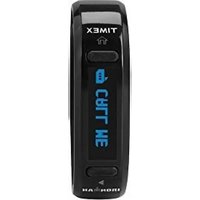

- IMPORTANT SAFETY INSTRUCTIONS AND WARNINGS
- WHAT'S INCLUDED
- GETTING STARTED
- STOP / UP (■ / ▲)
- MENU / ENTER (←)
- START / SPLIT / DOWN (▶/▼)
- BACK / DISPLAY (→)
- CHARGING THE WATCH
- NAVIGATING THE WATCH
- FIRST-TIME SETUP
- GOING FOR A RUN
- HANDS-FREE RECORDING
- STOPPING AND SAVING A WORKOUT
- INTERVAL TRAINING
- SETTING UP AN INTERVAL WORKOUT
- STARTING AN INTERVAL WORKOUT
- REVIEWING WORKOUTS
- TROUBLESHOOTING
- PROBLEMS CONNECTING TO GPS
- FULL INSTRUCTIONS
- WATER RESISTANCE
- TIMEX INTERNATIONAL WARRANTY
- or similar model. IMPORTANT — PLEASE NOTE THAT THIS WARRANTY DOES NOT COVER DEFECTS OR DAMAGES TO YOUR WATCH:
- TIMEX INTERNATIONAL WARRANTY REPAIR COUPON
- Declaration of Conformity
- R&TTE: 2014/53/EU
- LVD: 2006/95/EC
- Digital Device Emissions
- Sommaire
- START / SPLIT (TUSSENTIJD) / DOWN (OMLAAG) (▶/▼)
Brand : TIMEX
Model : Run X20 GPS
Category : Smartwatch