4633 - Deep fryer ARIETE - Free user manual and instructions
Find the device manual for free 4633 ARIETE in PDF.

| Product type | Hot air fryer |
| Brand | Ariete |
| Model | 4633 |
| Power supply | 220-240 V ~ 50/60 Hz |
| Power | 1500 W (estimate) |
| Touch screen | Yes, with digital display |
| Preset cooking programs | 8 programs: frozen fries, fresh potatoes, chicken, steak/red meat, pizza, cakes, fish, reheating/warming |
| Delayed start function | Yes, adjustable from 10 to 180 minutes |
| Shake function | Yes, with audible reminder at mid-cooking |
| Automatic shut-off | Yes, after a few minutes of inactivity |
| Overheat protection | Yes, heating stops at 300°C |
| Cleaning | Basket and non-stick plate dishwasher safe (hand washing recommended) |
| Safety | Safety lock if basket not inserted properly, burn protection, hot surfaces indicated |
| Material | Heat-resistant plastic and metal |
| Weight | Approximately 4 kg (estimate) |
Frequently Asked Questions - 4633 ARIETE
User questions about 4633 ARIETE
0 question about this device. Answer the ones you know or ask your own.
Ask a new question about this device
Download the instructions for your Deep fryer in PDF format for free! Find your manual 4633 - ARIETE and take your electronic device back in hand. On this page are published all the documents necessary for the use of your device. 4633 by ARIETE.
USER MANUAL 4633 ARIETE
natural_image
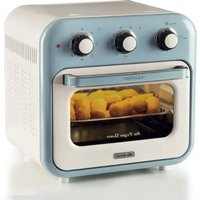
Illustration of a grayscale air fryer with control panel and side door (no text or symbols visible)Friggitrice ad aria Air fryer
Fêteuse sans huile
Luftfriteuse
Freidora de aire
Fritadeira sem óleo
eleluchfrinteus
Φριτέζα αέρα
Фритюрница
مقالة هوائية
natural_image
Two-step illustration of a food preparation step: adding skewers to a bowl, then adding a pan with arrows indicating the process (no text or symbols)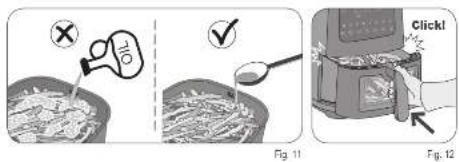
natural_image
Illustration of a hand inserting a plug into an electrical socket (no text or symbols)Fig. 13

Fig. 14
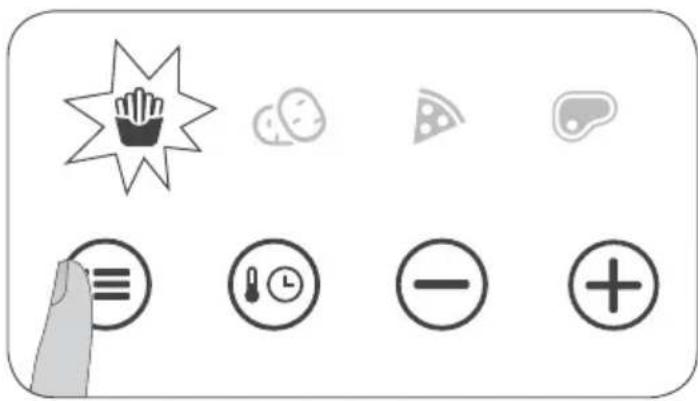
Fig. 15 Fig. 16
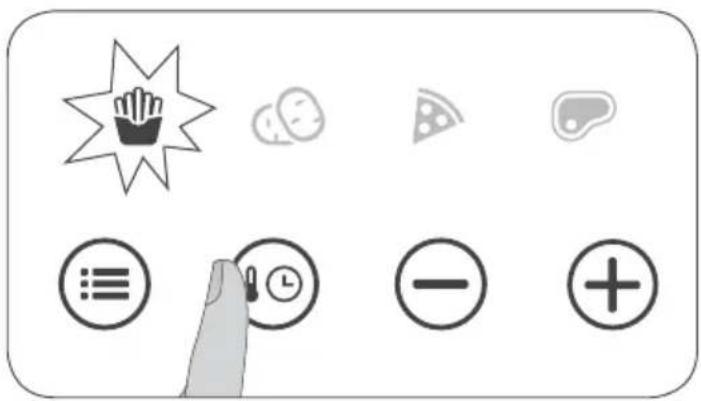
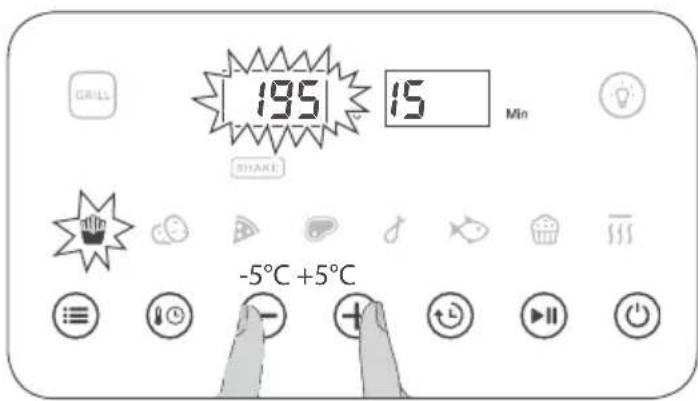
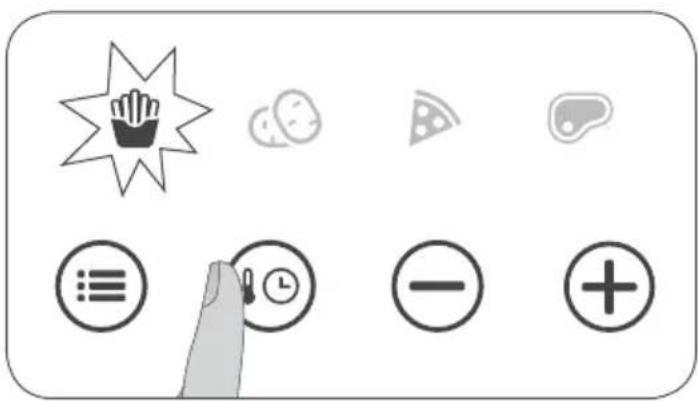
Fig. 17 Fig. 18
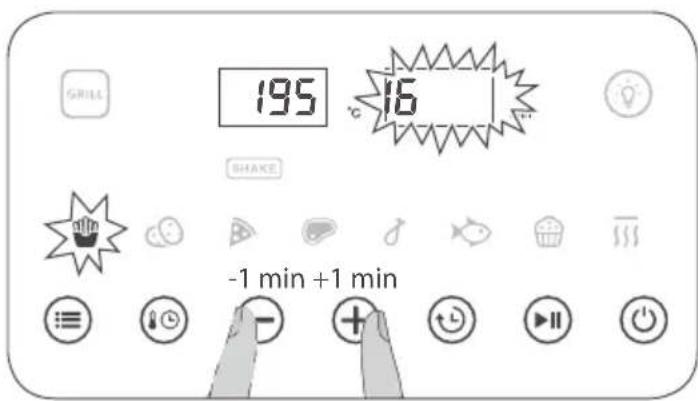
Fig. 19
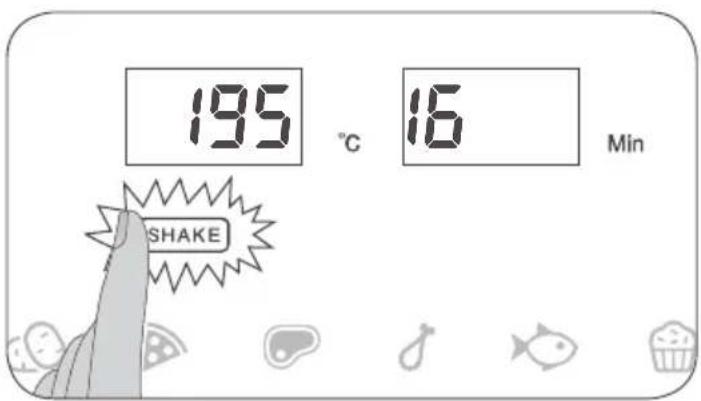
Fig. 20
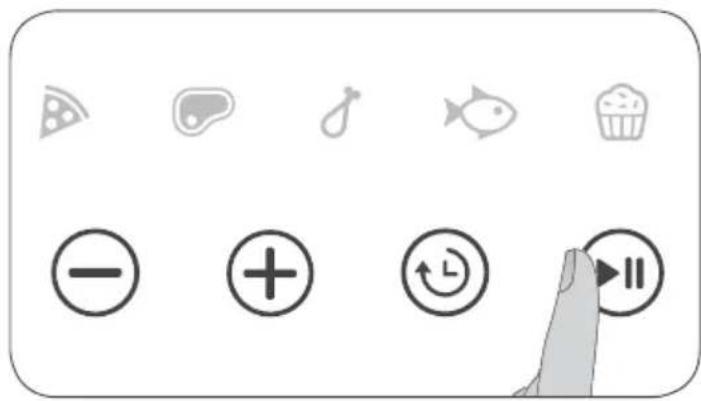
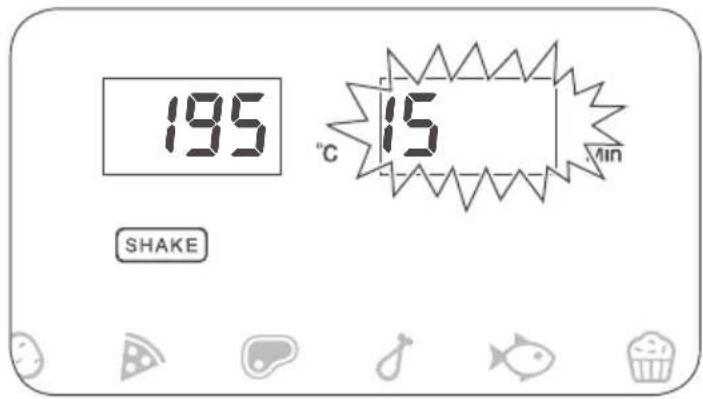
Fig. 21
Fig. 22
natural_image
Illustration of a kitchen air fryer with control panel and door handle (no text or symbols)Fig. 23
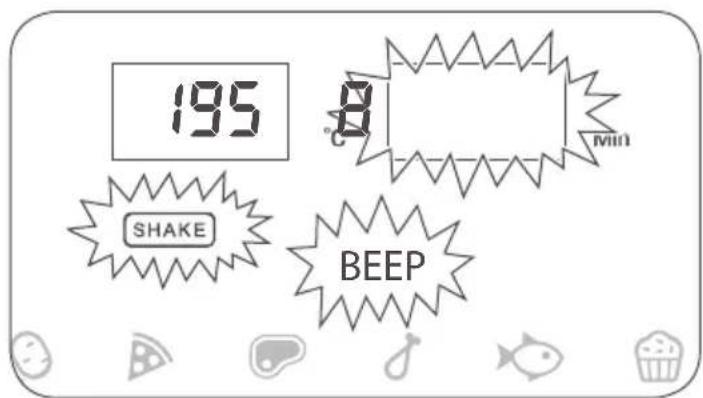
Fig. 24

natural_image
Illustration of a hand using a microwave oven to remove food from a mounted air fryer (no text or symbols visible)Fig. 25

natural_image
Illustration of a hand holding a blender with chopsticks inside, emitting steam lines around it (no text or symbols)Fig. 26 Fig. 27
natural_image
Illustration of a grayscale air fryer with control panel and door handle, showing interior design (no text or symbols)Fig. 28
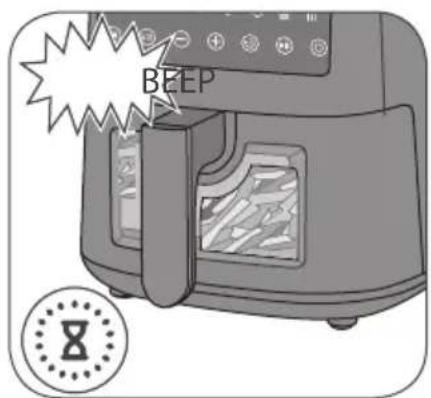
Fig. 29
natural_image
Illustration of a hand using a microwave oven to remove food from a mounted air fryer (no text or symbols visible)Fig. 30
natural_image
Illustration of a bowl of shredded vegetables being lifted by a container (no text or symbols)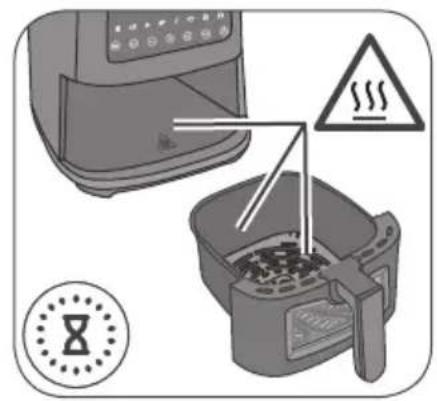
Fig. 31 Fig. 32
The appliance has been manufactured in compliance with the specific European Standards in force and all the parts potentially dangerous to the user are protected. Read this manual carefully before use. Use the appliance only for its intended use to avoid possible injury and damage. Keep this manual handy for future reference. Should you decide to give this appliance to other people, remember to include these instructions as well.
The information provided in this manual is marked with the following symbols, which mean:
Danger for children
Warning of burns
Danger due to electricity
Warning – material damage
Danger of damage due to other causes
INTENDED USE
The appliance can be used to cook solid foods. Do not use the appliance to cook liquid foods. If an excessive amount of liquid is added, it may leak out and damage the appliance.
This appliance must not be used for commercial and industrial purposes.
Any other use of the appliance is not intended by the Manufacturer, which is exempt from any liability for damage of any kind, generated by improper use of the appliance.
Improper use also results in voiding any form of warranty.
RESIDUAL RISKS

Warning of burns. Do not touch the basket, the cooking compartment, the non-stick plate and the internal metal parts of the appliance when the appliance is operational or in the minutes following its shut-down. Wait for the cooling of hot parts.
SAFETY WARNINGS
READ THE INSTRUCTIONS CAREFULLY BEFORE USE.
- The appliance has been designed to be used for household purposes or similar, such as:
- in cooking areas reserved for shop staff, offices and other professional environments
- on farms
- hotels, motels, bed & breakfasts and other residential facilities (for use by guests).
- Do not use the appliance for purposes other than those described in this manual. The manufacturer declines any responsibility for misuse or for any use other
than those specified in this manual. Improper use also results in voiding any form of warranty.
- We suggest keeping the original packaging, as free assistance is not provided for failures resulting from inadequate packaging of the product at the time of shipping to an authorized Service Centre.
- In order not to compromise the safety of the appliance, use only original spare parts and accessories authorized by the manufacturer.
- The appliance complies with the Regulation (EC) No. 1935/2004 of 27/10/2004 concerning the materials intended to come into contact with food products.

Danger for children
- The appliance can be used by children over 8 years of age and by people with reduced physical, sensory or mental capacities, or who lack experience or knowledge, only if they are supervised by a responsible person or if they have received and understood the instructions and the existing dangers when using the appliance.
• Children shall not play with the appliance. - Cleaning and maintenance by the user shall not be carried out by children unless they are older than 8 years and are supervised during the operation.
- Always keep the appliance and the power cord out of the reach of children under the age of 8.
- Do not let the power cord hang in a place where it could be grasped by a child.
- Position the appliance so that children cannot reach the hot parts.
- Do not leave the packaging near children as it is a potential source of danger.
- If you decide to dispose of this appliance as waste, it is recommended to make it inoperative by cutting the power cord. It is also recommended to make harmless the parts of the appliance which could constitute a danger, especially for children who could use the appliance as a game.

Warning of burns
- Unplug the appliance and wait for the hot parts to cool down before carrying out any cleaning and maintenance operations.
- The basket, the cooking compartment, the non-stick plate and the internal metal parts of the appliance can become hot during use. Keep your hands and face away from the hot parts of the appliance.
- Do not touch the basket, the cooking compartment, the non-stick plate and the internal metal parts of the appliance when the appliance is operational or in the minutes following its shut-down. Wait for the cooling of hot parts.
- Grab the basket only by the handle and use pot holders or tea towels to remove the basket.
- Hot steam may escape from the air intake or the cooking compartment of the ap-
pliance during cooking. Keep your hands and face away from the air intake and the cooking compartment.
- Do not fill the basket with oil. Danger of fire.
- During use, air and hot steam are released from the air intake. Keep your hands and face at a safe distance from the air intake.
- When the basket is removed from the cooking compartment, air and hot steam also escape. Keep your hands and face away from the cooking compartment.
- Do not turn the basket upside down when removing food: hot oil residues may leak out of the basket. Danger of burns.
- Warning: hot surface.

Danger due to electricity
- Before connecting the appliance to the power supply, check that the voltage shown on the identification plate under the appliance matches the local voltage supply.
- The use of extension cords not authorized by the manufacturer can lead to damages and accidents.
• Always connect the appliance to an earthed socket. - Do not connect any other high-power equipment (such as stoves, irons, radiators) to the same power outlet. Danger of electric overload.
- Never pull the power cord or the appliance to disconnect the plug from the power outlet.
- Never put live parts in contact with water: risk of short circuit and/or electric shock.
- Do not leave the power cord against sharp parts or sharp edges.
- The power cord shall not touch hot surfaces.
- Unplug the appliance from the power outlet and wait for the hot parts to cool down before carrying out any cleaning and maintenance operations.
- Never immerse the appliance, the plug and the power cord in water or other liquids.
- Do not use the appliance if your hands are wet or if you are barefoot.
- If the appliance is left unused, also for a short period of time, turn it off and always unplug the power cord from the power outlet.
- Do not leave the appliance unattended while connected to the power supply.

Warning - material damage
- The appliance shall be used and left at rest on a stable surface.
- Do not place the appliance on very hot surfaces or near open flames to prevent the coating from being damaged.
-
Do not place the appliance near inflammable materials (such as fabrics, curtains).
-
Do not place the appliance or the power cord near or over hot electric or gas stoves, or near a microwave oven.
- Fully unwind the power cord before use.
- The appliance must not be powered by external timers or separate remote-controlled systems.
- If the appliance produces black smoke during operation, immediately unplug the appliance from the power outlet. Do not remove the basket from the cooking compartment. Wait for the smoke to stop. Contact the nearest authorized technical service centre to solve the problem.
- Never add liquid ingredients into the basket. If necessary for cooking needs, add small quantities of liquid. Always check that the liquid has been absorbed by the solid ingredients before adding more.
- Never exceed the maximum capacity when filling the basket.
- Do not obstruct the air intake when the appliance is operational, to avoid material damage and/or the appliance overheating.
- Put the ingredients only into the basket to prevent the food from touching the electric resistances.
- Always ensure the basket is properly inserted in the cooking compartment before starting the appliance.
- Never use the appliance without inserting the basket in the cooking compartment.
- To avoid damaging the appliance, do not place metal tools or objects into the basket.
- Do not use metal tools to remove food from the basket or the non-stick plate.
- Before putting the appliance into operation, check that the basket and the cooking compartment are free from foreign objects.
- Never place objects on the appliance.
- Do not operate the appliance empty.
- Do not use the appliance outdoors.
- Do not leave the appliance exposed to weathering (such as rain or sun).
- After unplugging the appliance and when hot parts have cooled down, only clean the appliance using a damp, non-abrasive cloth and a few drops of mild, non-aggressive detergent.
- Never use solvents that damage plastic parts.

Danger of damage due to other causes
- Place the appliance at a distance of at least 10 cm from walls, furniture or other appliances.
• In order to lift the appliance, hold it by the body. - Do not move the appliance without removing the food from the basket.
-
Always unplug the appliance from the power outlet before inserting or removing individual components.
-
Place the appliance in an environment that is sufficiently lit, clean and where the power outlet is easily accessible.
- Place the appliance on a flat, stable and heat resistant surface.
- The appliance shall not be used if it has been dropped or if there are visible signs of damage. Do not use the appliance if the power cord or the plug are damaged, or if the appliance is faulty. All repairs, including the power cord replacement, shall be carried out only by authorized Service Centres or technicians, in order to prevent any risk.

For the proper disposal of the product in accordance with the European Directive 2012/19/EU, please read the leaflet attached to the product.
- ALWAYS KEEP THESE INSTRUCTIONS FOR FUTURE REFERENCE.
DESCRIPTION OF THE APPLIANCE
A - Touch screen display E - Handle
B - Body of the appliance F - Basket
C - Cooking compartment G - Power cord
D - Non-stick plate
H - Air intake
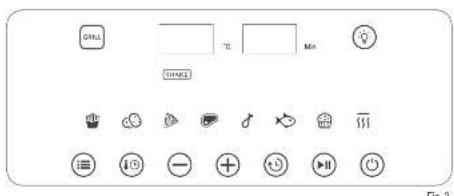
TOUCH SCREEN DISPLAY DESCRIPTION(FIG. 2)
| PRE-SET COOKING PROGRAMS | ||
 | Frozen chips | |
 | Fresh potatoes | |
 | Chicken | |
 | Steak/red meat | |
 | Pizza | |
 | Baked desserts | |
| [SC7K] | Fish | |
| [HXCB] | Heating/keep warm function | |
 | Grill mode | |
| FUNCTION BUTTONS | ||
| Button Description | ||
| On/off button Allows the user to turn on or off the appliance. | ||
| TEMPERATURE/TIME button | Press once to manually set the cooking temperature. Press twice to manually set the cooking time. Press the + or - buttons to increase or decrease the cooking temperature and time. | |
| MENU button | Allows the user to select the pre-set cooking program. | |
| DELAYED START button | Allows the user to set a specific delay time for the start of the cooking process. | |
| START/PAUSE button | Allows the user to start/pause the cooking process. | |
| SHAKE button | Allows the usder to activate or to deactivate the sound signal that indicates the need to shake or mix the food. | |
| Light button | Press the button to turn on the light inside the cooking compartment. | |
Identification data
The following identification data of the appliance are reported on the data plate under the base of the appliance:
• manufacturer and CE marking
- model [Mod.]
- serial number [SN]
• power supply voltage [V] and frequency [Hz]
• electrical power consumption [W]
• assistance toll-free phone number
For any requests to the Authorized Service Centres, specify model and serial number.
BEFORE USE
1 Remove the packing material and check that all components are present (Fig. 3).
2 Check that the content is intact (Fig. 4).
Check the voltage indicated on the data plate under the appliance matches the local voltage supply.

Warning
Place the appliance at a distance of at least 10 cm from walls, furniture or other appliances.

Warning
Never immerse the appliance, the plug and the power cord in water or other liquids. Do not fill the basket with water when it is installed in the cooking compartment.

Warning
Always unplug the appliance from the power outlet before inserting or removing individual components.
3 Place the appliance on a flat, stable and heat resistant surface (Fig. 5).
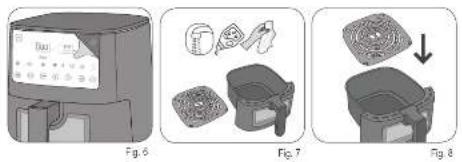
4 Remove the sticker on the display (Fig. 6).
5 Fully unwind the power cord.
Before using the appliance for the first time, wash the removable parts that come into contact with food (Fig. 7).
6 Wash the basket (F) and the non-stick plate (D). Use a common dish detergent and a soft non-abrasive sponge. Dry well.
INSTRUCTIONS FOR USE
The non-stick plate increases the crunchiness of the food. The use of the non-stick plate is optional.
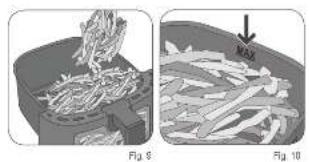
- If you want to increase the crunchiness of your foods, insert the non-stick plate (D) into the basket (Fig. 8).
1 Place the food in the basket (F) (Fig. 9). Do not exceed the maximum level. The maximum level is indicated by the raised line on the basket's internal surface (Fig. 10).
Do not fill the basket with oil.
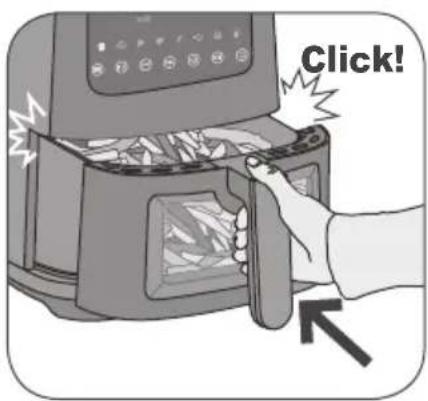
2 Insert the basket into the cooking compartment (C). The correct insertion is done with a "click" (Fig. 12).
The appliance is equipped with a system that prevents its operation if the basket is not inserted correctly in the cooking compartment.
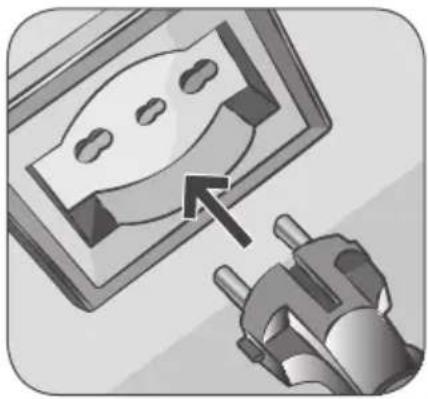
3 Plug the appliance into the power outlet (Fig. 13).
4 Press the ON/OFF button ⏻) (Fig. 14). The appliance beeps.
When using the appliance for the first time, you may notice the release of a slight smell and a little smoke: this is to be considered perfectly normal because some parts have been slightly lubricated, it will stop occurring after a short time. This will have no effect on the operation of the appliance.
5 Press the Menu button (≡) repeatedly until selecting the desired cooking program (Fig. 15). Read the paragraph "Cooking tips" for details on the programs. The symbol of the selected cooking program lights up without blinking on the display.
Each pre-set cooking program has a default cooking time, but it is possible to manually set the cooking temperature and time:
- Press once the TEMPERATURE/TIME button (💡) to manually set the cooking temperature (Fig. 16).
- Press the + or - buttons to set the cooking temperature, in intervals of 5°C (Fig. 17).
- Press twice the TEMPERATURE/TIME button (⑩) to manually set the cooking time (Fig. 18).
- Press the + or - buttons to set the cooking time, in intervals of 1 minute (Fig. 19).
To increase the selection speed, press and hold down the + or - buttons.
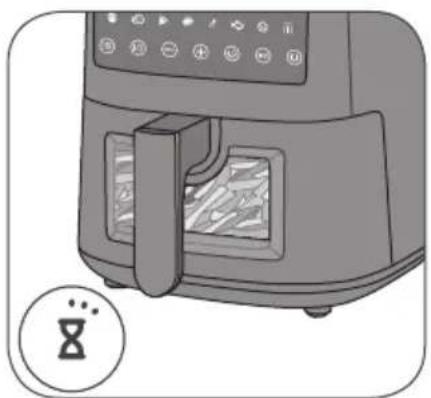
- Press twice the SHAKE button (SHAKE) to activate the function that suggests mixing the foods (Fig. 20). Halfway through cooking, the appliance will emit a sound signal (Fig. 24).
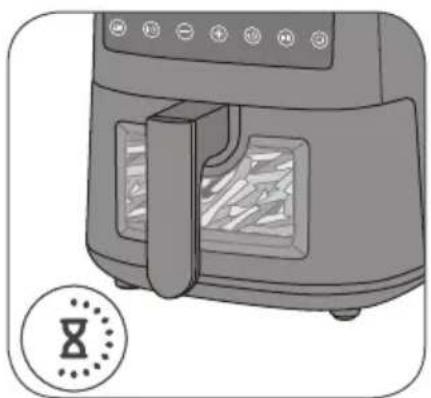
6 Press the START/PAUSE button (▶) (Fig. 21). The appliance starts to cook food. While cooking, the display (A) will alternately show the decreasing time and the set temperature (Fig. 22).
The appliance can be paused at any moment, for example to mix the ingredients independently during the cooking process.

Warning
Danger of burns. Do not touch the basket, the non-stick plate and the metal parts of the appliance.
When the basket is removed from the cooking compartment, air and hot steam also escape. Keep your hands and face away from the cooking compartment.
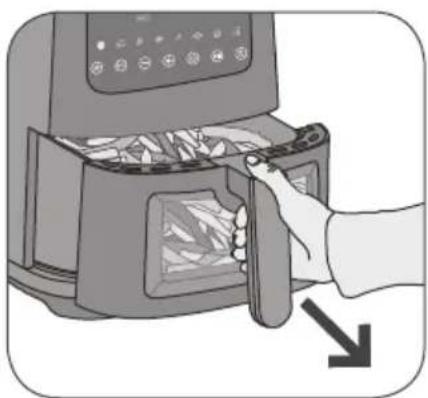
- Grab the handle (E) and remove the basket (F) from the cooking compartment (C) (Fig. 25). The appliance stops the cooking process.
- Shake the basket to cook the ingredients evenly (Fig. 26).
- To resume the appliance operation, insert the basket into the cooking compartment (Fig. 27). The appliance automatically resumes the cooking process (Fig. 28).
Alternatively, press the START/PAUSE (▶) button to pause the appliance operation. To resume the appliance operation, press the START/PAUSE (▶) button again.
Press the Light button (💡) to turn on the light inside the cooking compartment if you want to check the cooking process of the food.
After cooking
When cooking is complete, the appliance beeps a few times (Fig. 29).
If the ingredients are not ready, put the basket back into the cooking compartment and set the timer to a few more minutes.
- To manually stop the cooking process, press the START/PAUSE button (▶). After a few seconds, the appliance turns off.
1 Grab the handle (E) and remove the basket (F) from the cooking compartment (C) (Fig. 30).
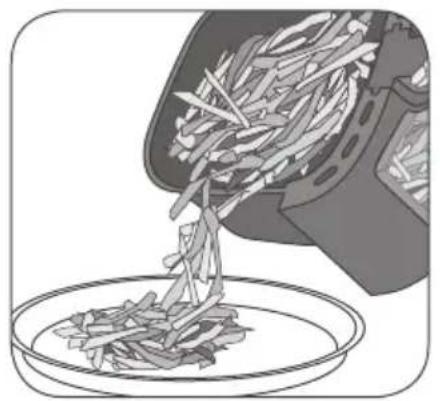
2 Put the food on a plate (Fig. 31). Serve out.

Warning
Do not touch the basket, the cooking compartment, the non-stick plate and the internal metal parts of the appliance when the appliance is operational or in the minutes following its shutdown. Wait for the cooling of hot parts (Fig. 32).
Do not turn the basket upside down when removing food: hot oil residues may leak out of the basket.

Warning
Make sure that the ingredients cooked into the appliance are golden brown and not black or dark. Remove the possible burned parts from the ingredients.
Do not use metal tools to remove food from the basket.
Any oil residue will be collected at the bottom of the basket.
At the end of the cooking process, the appliance can be used immediately to prepare other food.
Grill mode
The grill mode is ideal for grilling meat, fish and vegetables. Place the non-stick plate (D) into the basket (Fig. 8) before placing the food. Press the GRILL button (GRILL) to activate the grill mode.
Auto-off function
This appliance is equipped with an auto-off function. The appliance turns off automatically when not in use for a few minutes.
Delayed start function
The appliance is equipped with a delayed start function that allows the user to set a specific time for the start of the cooking process.
To activate the function:
1 Press the MENU button (≡) to set the desired cooking time.
2 Press the DELAYED START button (💡). The button lights up.
The pre-set setting of the delayed start function is 90 min. Press the + or - buttons to increase or decrease the delayed time from a minimum of 10 min to a maximum of 180 min.
3 Press the START/PAUSE button (▶) to start the function.
Press once the START/PAUSE button (▶) to pause the delayed start. Press the START/PAUSE button (▶) again to cancel the delayed start function.
Overheating protection function
The appliance is equipped with a overheating protection function.
When the temperature of the appliance exceeds 300^ C, heating stops and the display (A) shows the word "E4" accompanied by 3 beeps.
The fan continues to operate for 30 seconds to cool the device.
Forced shutdown function
The appliance is equipped with a forced shutdown function.
Press for a long time the ON/OFF button (💡) to turn off the appliance. All symbols will be turned off, except for the ON/OFF button (💡).
PREPARATION TIPS
Heating the appliance before cooking food optimizes the final result.
The smaller ingredients require a shorter cooking time compared to the bigger ingredients.
A larger amount of ingredients requires a slightly longer preparation time while a smaller amount requires a slightly shorter time.
Stirring the smaller ingredients while cooking optimizes the final result and helps to cook the ingredients evenly.
For a crispier result, add a tablespoon of oil (Fig. 11) to fresh or frozen potatoes and use the provided non stick plates (D).
You can cook in the airy fryer also the snacks that normally you bake.
Use ready-made doughs to prepare stuffed snacks quickly and easily. Ready-made doughs cook faster than the home made ones.
Pre-set cooking programs
The following table shows the pre-set cooking programs available on the touch screen display.
Each symbol corresponds to a pre-set cooking program. The program is set with a recommended cooking temperature and time based on the type of food. The cooking time is approximate, it depends also on the thickness and the quantity of the ingredients used. It is possible to change the time and temperature of the cooking programs.
The SHAKE function can only be activated only for some cooking programs.
| Program | Time | Temperature (°C) | SHAKE function | |||
| Default | Interval | Default | Interval | |||
 | Frozen chips 15 min 1-60 min 200 | 150 - 200 YES | ||||
 | Fresh potatoes 25 min 1-60 min 200 | 130 - 200 YES | ||||
 | Chicken 25 min 1-60 min 190 | 120 - 200 YES | ||||
 | Steak/red meat | 20 min | 1-60 min | 190 | 120 - 200 | YES |
 | Pizza | 12 min 1-60 min 180 | 160 - 200 NO | |||
 | Baked desserts 30 min | 1-60 min | 160 120 - 200 | NO | ||
 | Fish 15 min 1-60 min | 80 120 - 200 | YES | |||
 | Heating/keep warm function | 15 min 1-60 | min 130 60 | - 180 NO | ||
 | Grill 15 min 1-60 min | 200 180 - 200 | NO | |||
The following table shows approximate times and temperatures for different types of food:
| Chips (frozen) | 15 – 20 minutes | 200° |
| Chips (fresh) | 20 - 30 minutes depending on how the potato is cut | 180°200° |
| Fried vegetables 10 – 15 minutes | 200° | |
| Croquettes 12 – 15 minutes | 190° | |
| Chicken nuggets 10 minutes | 200° | |
| Chicken legs 20 – 25 minutes | 190° | |
| Steak 10 – 15 minutes | 190° | |
| Meatballs 8 minutes | 180° | |
| Scampi | 15 – 20 minutes | 160° |
| Cake | 20 – 30 minutes | 160° |
| Quiche | 25 – 30 minutes | 180° |
| Fish | 15 – 20 minutes | 160°180° |
| Pork cutlet | 10 – 15 minutes | 200° |
| Spring rolls | 10 – 15 minutes | 200° |
| Vegetables | 10 - 20 minutes | 180° |
Regular and daily cleaning maintains the appliance efficient and extends the life of the appliance.

Warning
Cleaning and maintenance operations shall be carried out when the appliance is off and unplugged from the power outlet.
Danger of electric shock. Never immerse the appliance, the plug and the power cord in water or other liquids.
Do not fill the basket with water when it is installed in the cooking compartment.

Warning
Unplug the appliance from the power outlet and wait for the hot parts to cool down before carrying out any cleaning and maintenance operations.

Warning
Do not use abrasive cleansers or metal tools to avoid scratching and damaging the coating. Never use solvents that damage plastic parts.
Cleaning the appliance
- Clean the fixed parts of the appliance using a non-abrasive damp cloth to prevent damaging the coating. Dry using a dry cloth.
- Clean the cooking compartment (C) using a non-abrasive cloth, soaked in warm water. Dry using a dry cloth.
- Clean the resistances with a dry cloth to remove residual of food.
Cleaning the components
The non-stick plate and the basket are made of non-stick material: any opacity and mark which may appear after prolonged use is normal and does not affect cooking and food taste.
- The non-stick plate and the basket are dishwasher safe. To extend the life of the non-stick coating, it is recommended to handwash the non-stick plate (D) and the basket (F). Use a common dish detergent and a soft non-abrasive sponge.
- To soften the residues of food in the basket, it is possible to fill it with hot water. Add a few drops of detergent. Let effect for 10 minutes. Wash and dry.
DECOMMISSIONING
In the event of the appliance decommissioning, disconnect the power plug from the power outlet. Should the appliance be disposed of, separate the various materials used in the construction of the appliance and dispose of them according to their composition and the legal provisions in force in the country of use.
| Problems | Possible causes | Solutions |
| The appliance does not work. | The power cord is not plugged in. | Insert the plug into the power socket, which must be earthed. |
| The timer has not been set. | Press twice the TEMPERATURE/TIME button (💡) to manually set the cooking time. Press the + or - buttons to set the desired cooking time. | |
| The basket has not been inserted correctly. | Properly insert the basket into the cooking compartment. The correct insertion is done with a "click" (Fig. 12). | |
| The ingredients are not ready. | The quantity of ingredients in the basket is too big. | Put less ingredients into the basket. Small food quantities are easier to be cooked evenly. |
| The set temperature is too low. | Press once the TEMPERATURE/TIME button (💡) to manually set the cooking temperature. Press the + or - buttons and set a higher cooking temperature. Refer to the recipes book. | |
| The cooking time selected is too short. | Press twice the TEMPERATURE/TIME button (💡) to manually set the cooking time. Press the + or - buttons and set a longer cooking time. Refer to the recipes book. | |
| The ingredients are not cooked evenly. | Some ingredients required to be stirred several times while cooking. | The ingredients on top or that are covered with other ingredients must be stirred while cooking. |
| The fried snacks are not crispy. | You are using snacks that have to be cooked in a traditional way. | Use snacks for the oven or brush the snacks with oil before putting them into the basket. |
| Insert the non-stick plate into the basket to increase the food crunchiness. | ||
| The basket cannot be inserted completely into the cooking compartment. | The quantity of ingredients in the basket is too big. | Put less ingredients into the basket. Small food quantities are easier to be cooked evenly. |
| The basket has not been inserted correctly into the cooking compartment. | Properly insert the basket into the cooking compartment. The correct insertion is done with a "click" (Fig. 12). | |
| White smoke comes out of the appliance. | The ingredients you are cooking are greasier. | When you fry greasier ingredients more oil deposits in the container. The oil produces more white smoke while cooking. This has no effect on the preparation of the ingredients or on the appliance. |
| In the basket there are some residuals of grease left from the previous cooking. | The white smoke is caused by the warming of the grease or oil in the basket. Clean the basket thoroughly after use. | |
| Fresh potatoes, cut in sticks, are not fried evenly. | The type of potatoes used is not suitable for frying. | Use fresh potatoes and make sure to mix them while cooking. |
| Wash and dry the potatoes before frying them. | Wash the potatoes and remove all the starch that has deposited on the potatoes. | |
| The fresh potatoes, cut in sticks are not crispy when I take them out of the fryer. | The crunchiness of the fried potatoes depends on the quantity of water contained in the potatoes and from the quantity of oil introduced into the fryer. | Make sure to dry the water from the external parts of the potatoes before you add the oil. |
| Cut the potatoes in smaller sticks for more crunchiness. | ||
| Add a bit more oil for more crunchiness. | ||
| Insert the non-stick plate into the basket to increase the food crunchiness. |