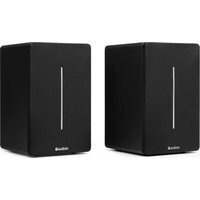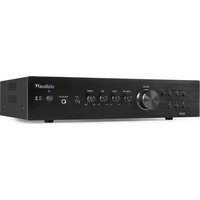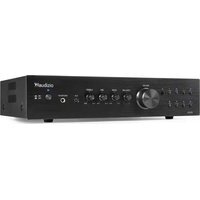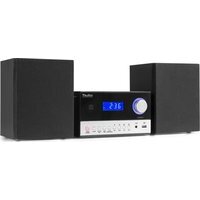
Arles - Hi-fi system Audizio - Free user manual and instructions
Find the device manual for free Arles Audizio in PDF.


User questions about Arles Audizio
0 question about this device. Answer the ones you know or ask your own.
Ask a new question about this device
Download the instructions for your Hi-fi system in PDF format for free! Find your manual Arles - Audizio and take your electronic device back in hand. On this page are published all the documents necessary for the use of your device. Arles by Audizio.
USER MANUAL Arles Audizio
natural_image
Black audio recording device with two speakers and a digital display showing 2:36 (no visible text or symbols on main body)INSTRUCTION MANUAL
GEBRUIKSAANWIJZING
BEDIENUNGSANLEITUNG
MANUEL D'INSTRUCTIONS
V1.1
ENGLISH 4
UNPACKING INSTRUCTION....5
PRODUCT OVERVIEW 5
REMOTE CONTROL....5
TURNING THE UNIT ON/OFF 5
SETTING THE CLOCK....6
SLEEP 6
TIMER 6
DAB+ OPERATION 6
DAB DISPLAY MODES 7
FM DISPLAY MODES....8
CD/USB OPERATION 8
BT OPERATION....9
PRESET EQ....9
MUTE 10
USING THE AUXILIARY INPUT 10
NEDERLANDS....11
UITPAKKEN 12
OVERZICHT 12
AFSTANDBEDIENING....12
AAN-/UITZETTEN 12
KLOKINSTELLINGEN 13
SLEEP 13
TIMER 13
DAB+ 14
DAB WEERGAVEMODI 15
FM RADIO 15
FM WEERGAVEMODI....15
CD/USB 16
BT STREAMING AUDIO....16
VOORINGESTELDE EQUALIZER....17
MUTE 17
AUX INGANG....17
DEUTSCH....18
AUSPACKEN....19
PRODUKTÜBERSICHT 19
FERNBEDIENUNG....19
BT STREAMING AUDIO....24
VOREINGESTELLTER EQUALIZER 24
MUTE (STUMMSCHALTEN)....24
AUX EINGANG 24
ESPAÑOL 25
INSTRUCCIONES DE DESEMBALAJE 26
VISION GENERAL DEL PRODUCTO....26
CONTROL REMOTO 26
ENCENDER/APAGAR LA UNIDAD 26
AJUSTE DEL RELOJ 27
SLEEP 27
TEMPORIZADOR 27
Congratulations to the purchase of this Audizio product. Please read this manual thoroughly prior to using the unit in order to benefit fully from all features.
Read the manual prior to using the unit. Follow the instructions in order not to invalidate the warranty. Take all precautions to avoid fire and/or electrical shock. Repairs must only be carried out by a qualified technician in order to avoid electrical shock. Keep the manual for future reference.
- Prior to using the unit, please ask advice from a specialist. When the unit is switched on for the first time, some smell may occur. This is normal and will disappear after a while.
- The unit contains voltage carrying parts. Therefore, do NOT open the housing.
- Do not place metal objects or pour liquids into the unit This may cause electrical shock and malfunction.
- Do not place the unit near heat sources such as radiators, etc. Do not place the unit on a vibrating surface. Do not cover the ventilation holes.
- The unit is not suitable for continuous use.
- Be careful with the mains lead and do not damage it. A faulty or damaged mains lead can cause electrical shock and malfunction.
- When unplugging the unit from a mains outlet, always pull the plug, never the lead.
- Do not plug or unplug the unit with wet hands.
- If the plug and/or the mains lead are damaged, they need to be replaced by a qualified technician.
- If the unit is damaged to such an extent that internal parts are visible, do NOT plug the unit into a mains outlet and DO NOT switch the unit on. Contact your dealer. Do NOT connect the unit to a rheostat or dimmer.
- To avoid fire and shock hazard, do not expose the unit to rain and moisture.
- All repairs should be carried out by a qualified technician only.
- Connect the unit to an earthed mains outlet (220-240Vac/50Hz) protected by a 10-16A fuse.
- During a thunderstorm or if the unit will not be used for a longer period, unplug it from the mains. The rule is: Unplug it from the mains when not in use.
- If the unit has not been used for a longer period, condensation may occur. Let the unit reach room temperature before you switch it on. Never use the unit in humid rooms or outdoors.
-
To prevent accidents in companies, you must follow the applicable guidelines and follow the instructions.
-
Do not repeatedly switch the fixture on and off. This shortens the lifetime.
- Keep the unit out of the reach of children. Do not leave the unit unattended.
- Do not use cleaning sprays to clean switches. The residues of these sprays cause deposits of dust and grease. In case of malfunction, always seek advice from a specialist.
- Do not force the controls.
- This unit is with speaker inside which can cause magnetic field. Keep this unit at least 60cm away from computer or TV.
- If this product has a built-in lead-acid rechargeable battery. Please recharge the battery every 3 months if you are not going to use the product for a long period of time. Otherwise the battery may be permanently damaged.
- If the battery is damaged, please replace with same specifications battery. And dispose the damaged battery environment friendly.
- If the unit has fallen, always have it checked by a qualified technician before you switch the unit on again.
- Do not use chemicals to clean the unit. They damage the varnish. Only clean the unit with a dry cloth.
- Keep away from electronic equipment that may cause interference.
- Only use original spares for repairs, otherwise serious damage and/or dangerous radiation may occur.
- Switch the unit off prior to unplugging it from the mains and/or other equipment. Unplug all leads and cables prior to moving the unit.
- Make sure that the mains lead cannot be damaged when people walk on it. Check the mains lead before every use for damages and faults!
- The mains voltage is 220-240Vac/50Hz. Check if power outlet match. If you travel, make sure that the mains voltage of the country is suitable for this unit.
- Keep the original packing material so that you can transport the unit in safe conditions.

This mark attracts the attention of the user to high voltages that are present inside the housing and that are of sufficient magnitude to cause a shock hazard.

This mark attracts the attention of the user to important instructions that are contained in the manual and that he should read and adhere to.
The unit has been certified CE. It is prohibited to make any changes to the unit. They would invalidate the CE certificate and their guarantee!
NOTE: To make sure that the unit will function normally, it must be used in rooms with a temperature between 5^ C/41°F and 35^ C/95°F.

Electric products must not be put into household waste. Please bring them to a recycling centre. Ask your local authorities or your dealer about the way to proceed. The specifications are typical. The actual values can slightly change from one unit to the other. Specifications can be changed without prior notice.
Do not attempt to make any repairs yourself. This would invalid your warranty. Do not make any changes to the unit. This would also invalid your warranty. The warranty is not applicable in case of accidents or damages caused by inappropriate use or disrespect of the warnings contained in this manual. Audizio cannot be held responsible for personal injuries caused by a disrespect of the safety recommendations and warnings. This is also applicable to all damages in whatever form.
UNPACKING INSTRUCTION
CAUTION! Immediately upon receiving the product, carefully unpack the carton, check the contents to ensure that all parts are present, and have been received in good condition. Notify the shipper immediately and retain packing material for inspection if any parts appear damage from shipping or the package itself shows signs of mishandling. Save the package and all packing materials. In the event that the product must be returned to the factory, it is important that the product be returned in the original factory box and packing. If the device has been exposed to drastic temperature fluctuation (e.g. after transportation), do not switch it on immediately. The arising condensation water might damage your device. Leave the device switched off until it has reached room temperature.
PRODUCT OVERVIEW
- Open/Close CD compartment
- Volume control
- Lcd display
- IR remote control receiver
- Power ON/Standby
- Source
- Time set/memory
- Menu/info
- Select / Mono/stereo
10.CD: stop ■/BT pair - Play/pause / scan
- Rewind/skip previous▶Tune – Fast forward/skip next ▶Tune +
- Aux input jack
- USB input
- Speaker output connector
- Headphone jack
- DC power input
- Antenna
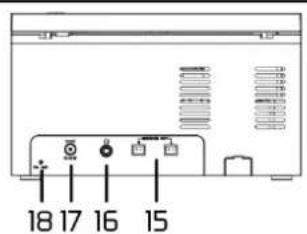
text_image
18 17 16 15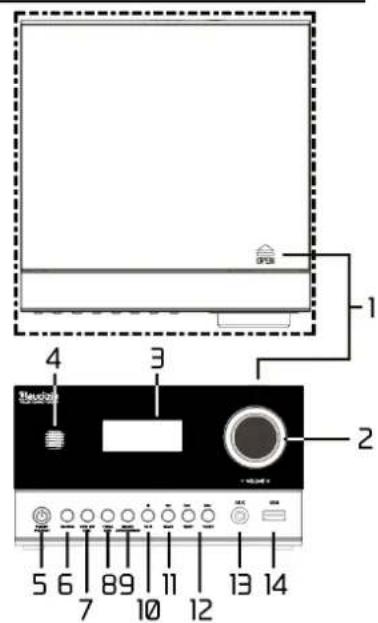
text_image
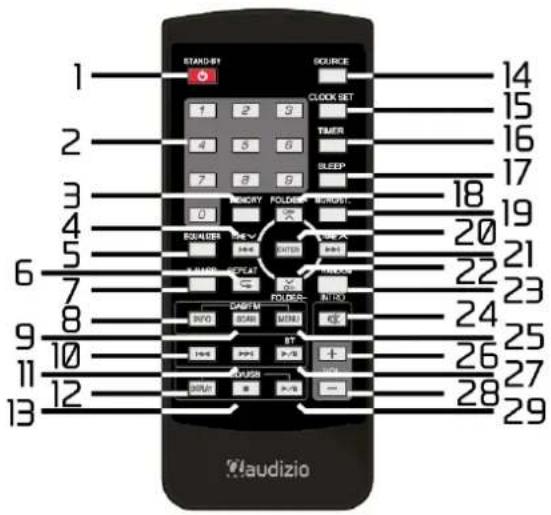
1 2 3 4 5 6 7 8 9 10 11 12 13 14REMOTE CONTROL
- ON/Standby
- Numpad
- Memory
- Previous ▶ Tuner down
- Equalizer
- Repeat
- X-bass
- DAB/FM Info
- DAB/FM Scan
- BT Previous
- BT Next
- CD/USB Display
- CD/USB Stop
- Source
- Clock set
- Timer
- Sleep
- Folder +/Channel +
- Mono/Stereo
- Enter
- Next▶▶Tuner up
- Folder - / Channel -
- Random/Intro
- Mute
- DAB/FM Menu
- Volume +
- BT Play/pause
- Volume -
- CD/USB Play/pause
text_image
1 2 3 4 5 6 7 8 9 10 11 12 13 STAND-SET SOURCE 1 2 9 CLOCK SET 1 2 9 TIMER 1 2 9 SLEEP 1 2 9 RISKORY FOLDES RISKORY 0 ROLLER ENTER POTATO POTATO POTATO POTATO POTATO POTATO POTATO POTATO POTATO POTATO POTATO POTATO POTATO POTATO POTATO POTATO POTATO POTATO POTATO POTATO POTATO POTATO POTATO POTATO POTATO POTUTO POTUTO POTUTO POTUTO POTUTO POTUTO POTUTO POTUTO POTUTO POTUTO POTUTO POTUTO POTUTO POTUTO POTUTO POTUTO POTUTO POTUTO POTUTO POTUTO POTUTO POTUTO POTUTO POTUTO POTUTO POTOTO POTUTO POTUTO POTUTO POTUTO POTUTO POTUTO POTUTO POTUTO POTUTO POTUTO POTUTO POTUTO POTUTO POTUTO POTUTO POTUTO POTUTO POTUTO POTUTO POTUTO POTUTO POTUTO POTUTO POTUTO POTULO- In standby mode, push POWER/STANDBY on the main unit or remote control to turn the unit ON. The unit will turn on, the last selected input mode icon will show on the LCD display.
- To turn the unit OFF (into standby), push POWER/STANDBY on the main unit or remote control again. The LCD DISPLAY will go dim and show the current time. The standby mode indicator lights.
SETTING THE CLOCK
After plugging the DC power adapter into the unit for the first time, "00:00:00" will appear on the LCD display. If you can receive a DAB+ signal at your location, the unit will synchronize to the current local time. After approximately one minute, the unit will switch into standby mode. To set the time manually:
- In Power Off (Standby) mode, press and hold CLOCK SET on remote control or main unit, "TIME SETUP" will appear on display.
- Press CLOCK SET to enter the option to set 12- or 24 hour format.
- Press ▶▶ or ◀◀ on remote control or main unit to select the desired hour format. Press CLOCK SET to confirm.
- Press▶▶or◀◀ on remote control or main unit to select the SET CLOCK option. Press CLOCK SET to confirm.
- The hour digits will blink on the display. Press▶▶ or ◀◀ on the remote control or main unit to adjust the hour.
- Press CLOCK SET on the remote control to confirm the hour setting, the minute digits will flash to prompt for input.
- Press▶▶ or ◀◀ on the remote control or main unit to adjust the minute. Press and hold the button for fast advance/reverse setting.
- Press CLOCK SET on remote control again to complete the setting.
SLEEP
NOTE: The following is only functional by using the remote control.
The sleep timer allows you to turn the unit off automatically after a preset time is reached.
- To activate the sleep timer, turn the unit on and press the SOURCE button to select RADIO, CD, USB, BT or AUX IN.
- Press the SLEEP button on the remote control. "SLEEP SET" appears on the display.
- Repeatedly press the SLEEP button to select a sleep time. The unit will turn off after 10, 20, 30, 40, 50, 60, 70, 80 or 90 minutes. Wait for 3 seconds after your selection for the unit to confirm the selection, the unit will play for the selected length of time then automatically shut down.
- To cancel the sleep timer, press the SLEEP button repeatedly until the timer on the display shows "OFF". To turn the unit off before the selected length of time, press the POWER/STANDBY button at any time.
NOTE: To check the remaining sleep time, press the SLEEP button once. If you are falling asleep to music from an external device connected to the AUX input, the sleep timer will shut off the power to this system but it will not turn off the external device.
TIMER
You can set a time when the device will switch on and off automatically every day.
- Switch the device to standby mode.
- Press and hold the TIMER button until "ON TIMER" is shown on the display, the hour digits flash.
- Use the ▶▶ or ◀◀ button to set the required switch-on time. Select the hours first and confirm by pressing ENTER.
-
Then use the ▶▶ or ◀◀ button to set the minutes and confirm again by pressing ENTER.
-
"OFF TIMER" appears on the display, the hour digits flash.
-
Use the ▶▶ or ◀◀ button to set the required switch-off time. Select the hours first and confirm by pressing ENTER.
-
Use the ▶▶ or ◀◀ button to set the minutes and confirm again by pressing the ENTER button.
-
Then use the ▶▶ or ◀◀ button to select the mode to be used when device is switched on: DAB, FM, CD, USB, BUZZER (alarm tone) and press ENTER to confirm.
-
Use the ▶▶ or ◀◀ button to set the required volume and press ENTER to confirm.
Timer setting is now complete. When done successfully, the Ⓐ symbol is shown on the display. To switch off the timer, proceed as follows:
-
In standby mode, briefly press the TIMER button. The ⏻ symbol on the display turns off.
-
You can activate the timer with the previously configured settings at any time by pressing TIMER again.
NOTE:
If "Wake to CD/USB" is selected but a CD or USB drive are not inserted, the alarm will default to the Beeping Alarm automatically when the alarm time is reached. For 'Wake to Radio', the system will default to the last FM radio station listened to prior to switching off. The alarm will increase to the volume level you have set.
ACTIVATE/DE-ACTIVATE ALARM FUNCTION
- To activate the ALARM, press the TIMER button, and the alarm icon "∅" will show on the LCD display.
- Cancel the ALARM function by pressing the TIMER button again. The alarm icon "∅" will disappear from the LCD display. WAKE TO RADIO, CD/USB OR BUZZER ALARM
- When the alarm time is reached, the CD/USB, radio or beeping alarm will sound for 60 minutes, then shut off and reset itself for the following day (without pressing the snooze button).
- To stop the alarm immediately after it sounds, press the POWER button on remote control or on main unit once. It resets itself for the following day.
- To cancel the following day alarm, tap the TIMER button once, the alarm icon “∅” will disappear from the LCD display.
DAB+ OPERATION
If the unit is connected to the mains power and then switched on from standby for the first time, the unit will automatically enter the DAB mode and perform an automatic scan. During the scan, the display will show "Scanning..." together with a slide bar that indicates the progress of the scan and the number of stations that have been found so far. Once the scan has finished, the unit will select the first alphanumericly found station. To explore the found stations, press the ◀◀ or ▶▶
FULL SCAN
The full scan will search for the entire DAB+ Band III channels. After the scan has finished, the first alphanumerically found station will be automatically selected.
- To activate auto scan, press the SCAN/▶/II button and "Scanning ..." and a progressing slide bar will be shown on display.
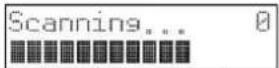
- All the stations that have been found will be stored automatically. To explore and listen to the found stations, press the ◀◀ or ▶buttons to select. Then press ENTER to confirm.
MANUAL TUNING
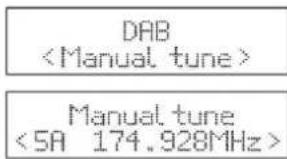
As well as the auto tune function, you can opt to perform a manual tune. This can help you when aligning your aerial or when adding stations that were missed during auto tuning.
-
In DAB mode, press MENU on the remote control to display the menu.
-
Press the ◀◀ or ▶▶I buttons to select MANUAL TUNE, confirm by pressing ENTER.
-
Press the ◀◀ or ▶▶I buttons to cycle through the DAB/DAB+ channels, which are numbered from 5A to 13F.
-
After your desired channel number is selected, press the ENTER button to confirm. The display will show the multiplex.
-
Press the MENU button again to add the selected channel to the station list.
text_image
DABDRC (DYNAMIC RANGE COMPRESSION)
If you are listening to music with high dynamic range in a noisy environment, you may wish to compress the audio dynamic range:
- In DAB mode, press MENU on the remote control to display the menu.
- Press the ◀◀ or ▶▶ buttons to select "DRC" and then press ENTER on the remote control to confirm.
- Press ◀◀ or ▶▶ to select off / high / low. Press ENTER on the remote control to confirm.
PRUNE
To remove all unavailable stations from the list (prune):
- In DAB mode, press MENU on the remote control to display the menu.
- Press ◀◀ or ▶▶ to select "Prune" and press ENTER on the remote control to confirm.
- Press ◀◀ or ▶▶ to select
and press ENTER on the remote control to delete the unavailable stations. - You can press ◀◀ or ▶▶ to select
, then press ENTER on the remote control to cancel.
SECONDARY SERVICES
You may see a “>” symbol after the name of the station, this indicates that there are secondary services available for that particular station. This means the station contains extra services that are related to the primary station (e.g. a sports station has added additional commentaries). The secondary services are stated directly after the primary station in the station list. To select the secondary station, press the MENU button when the “>” appears in the display before the station name. When the secondary service ends, the unit will automatically switch back to the primary station.
PRESET STATIONS
NOTE: The following is only functional by using the remote control.
- Press and hold the MEMORY button. The display will show "Preset Store < 1:(Empty)>".
- Press ◀◀ or ▶▶ to select your desired preset station number. Then press the ENTER button to confirm.
- The station will be stored in a few seconds, the display will show "Preset # Stored".
RECALLING A STORED STATION
NOTE: The following is only functional by using the remote control.
-
Once you have saved a station to one of the preset buttons, you can recall it by pressing the MEMORY button.
-
Press▶▶or◀◀ until your desired station shows on the display; press ENTER to confirm.
DAB DISPLAY MODES
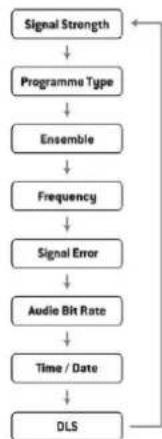
Press INFO on the device, the display will switch between multiple display modes. The information of each display mode is displayed on the lower segment of the display.
SIGNAL STRENGTH
The display will show a bar to indicate the signal strength. The stronger the signal, the longer the bar will be from left to right.
PROGRAMME TYPE
This describes the "style" or "genre" of the program that is being broadcasted.
ENSEMBLE
This displays the name of the multiplex that contains the station you are listening to. A multiplex is a collection of radio stations that is bundled and transmitted on one single frequency. There are national and local multiplexes. Local ones contain stations that are specific to that area.
NOTE: DAB (+), unlike normal radio, groups together several stations and transmits them on one frequency.
FREQUENCY
This displays the frequency of the present station, such as "11C 220.352MHz".
SIGNAL ERROR
This displays a number showing the error rate. If the number is 0, it means the signal received is error free and the signal strength is strong. If the error rate is high, it is recommended to reposition the aerial or unit.
flowchart
graph TD
    A["Signal Strength"] --> B["Programme Type"]
    B --> C["Ensemble"]
    C --> D["Frequency"]
    D --> E["Signal Error"]
    E --> F["Audio Bit Rate"]
    F --> G["Time / Date"]
    G --> H["DLS"]
AUDIO BIT RATE
The display will show the digital audio bit rate being received.
TIME / DATE
This displays the current time and date provided automatically by the broadcaster.
DLS (DYNAMIC LABEL SEGMENT)
Dynamic label segment is a scrolling message that the broadcaster may include with their transmissions. The message usually includes information, such as program details.
FM RADIO OPERATION
To switch the unit to FM mode, press the SOURCE button.
AUTO SCAN
Press SCAN/▶/II until the tuner starts searching for a station. To scan down the frequency band, press and hold the SCAN/▶/II button. Once a station has been found, the scanning will stop automatically.
MANUAL SCAN
To search for FM stations manually, press I or repeatedly until your desired frequency is reached.
SCAN SETTING
This is a setting to choose between letting the radio scan for all stations, or just for stations with a strong signal.
-
Press the MENU button, then press ◀◀ or ▶▶I to select "Scan setting". Press the ENTER button to confirm menu choice.
-
Press the ◀◀ or ▶▶I buttons to select "All stations" or "Strong stations only". Press the ENTER button to confirm setting choice.
AUDIO SETTING
This unit will automatically switch between stereo and mono mode, but you can override this and choose manually.
This can be helpful when having poor signal reception.
-
Press the MENU button, then press the ◀◀ or ▶▶ buttons to select "Audio setting". Press ENTER to confirm.
-
Press the ◀◀ or ▶▶I buttons to select "Stereo allowed" or "Forced mono" and then press ENTER to confirm.
AUDIO MODE
Press MONO/STEREO on the remote control to toggle between the stereo or mono modes.
PRESET STATIONS
You can store up to 30 of your favorite stations. This will enable you to access your favorite stations more quickly and easily.
-
To store a preset, you must be listening to the station that you want to save. Press and hold MEMORY. The display will show "Preset Store < 1:(Empty)>".
-
Press the ◀◀ or ▶▶I buttons to select your desired preset station number and press the ENTER button to confirm.
-
The station will be stored, the display will show "Preset #Stored".
RECALLING A STORED STATION
-
Once you have saved a station to one of the preset buttons, you can recall it by pressing the MEMORY button.
-
Press▶▶or◀◀ until your desired stations show on the display, then press ENTER confirm.
FM DISPLAY MODES
Press the INFO button, the display will change between multiple display modes. The information of each display mode is displayed on the lower segment of the display.
RADIO TEXT
As with DAB, the broadcaster can include a scrolling text that displays information about the current program.
PROGRAM TYPE
This describes the "style" or "genre" of the program that is being broadcasted.
FREQUENCY
Displays the frequency of the present station.
AUDIO TYPE
This displays if the station is in mono or stereo.
TIME / DATE
The broadcaster provides clock and date information automatically, so there's no need to manually set this information.
CD/USB OPERATION
Press the SOURCE button repeatedly on the unit or on the remote control to select CD mode.
-
Place an audio CD on the center spindle with its label side facing out/up towards the CD compartment door. Close the disc compartment.
-
Unit starts to read the disc, "CD READING" shows on the display. After a few seconds, the total number of tracks and the total time of the CD will be shown on the LCD DISPLAY for one second.
-
The first track of the CD/MP3 disc will start playing automatically.
If there is no disc inserted or the disc can't be read, "NO CD" will be shown on the display.
CONNECTING USB DEVICES
USB memory sticks can be inserted into the USB port, which enables music tracks to be played from a USB memory stick.
START/PAUSE/STOP PLAYBACK
Press the button in the CD/USB section of the remote control or press on the main unit to start/pause playback.
Use the ■ button in the CD/USB section of the remote control or ■ on the device to completely stop playback.
SKIPPING TO ANOTHER TRACK
Press to skip backwards to the beginning of the track/previous track or skip to the next track.
Press and hold to perform fast forward/rewind.
REPEAT PLAYBACK
- During stop or playback mode, press the REPEAT button once on the remote control, "REP 1" will show on the display. The CD will play the current track repeatedly.
- Press the REPEAT button twice, "REP ALL" will show on the display. The CD will play all tracks repeatedly.
- Press the REPEAT button once again, the REPEAT function will turn off.
FOLDER SELECTION
If you are playing MP3 files, you can store them in different folders to make it easier to keep an overview of the tracks.
Press either the FOLDER- button or FOLDER+ button to change folder on an MP3 data medium.
RANDOM PLAYBACK
All tracks on the disc can be played in a random order.
- During playback, press the RANDOM button on the remote control. The "RANDOM" indicator will show on the display. All tracks will be played randomly.
- Press the 🔊 buttons to play the next random track.
- After all the tracks have played once, the playback will stop automatically.
- To cancel random playback, press the RANDOM button during random playback. Regular playback will resume.
PROGRAMME SETTING
NOTE: The following is only functional by using the remote control.
Use the programme function to create a music playlist by selecting tracks you want to play. You can specify the order in which the list is played manually:
- Press to stop playback.
- Press the MEMORY button. Position "P01" is shown on the display, followed by the selected track T--001.
- Now press for to select a track.
- Confirm by pressing the MEMORY button and save more tracks in the same way.
- When all tracks have been added, start the programmed playback with pressing ▶/II.
- You can delete a programmed track playing order by pressing ■ for a second time.
PROGRAMME CANCEL
To cancel, press the button twice, or open the disk tray and then close it again.
BT OPERATION
Press the POWER/STANDBY button to turn ON the unit, follow the instructions below to connect with BT.
Pairing a BT streaming capable smartphone (or other BT capable device) to the Audizio Arles:
- Press the POWER/STANDBY button on the main unit or the remote control to turn on the unit.
- Press the SOURCE button on the main unit or remote control to select BT mode, "Pairing" blinks on the display if not connected to any BT device yet.
-
Turn on the BT streaming function of your BT capable device and enable the search or scan function to find the Audizio Arles. Select "Audizio Arles" from the device list when it appears on your devices' screen. If required, enter the pass cod "0000" to pair.
-
After successfully pairing the BT-device and the Audizio Arles, the display will show "connected". You can start playing music from your device wirelessly.
-
After selecting your favorite song, press the PLAY/PAUSE button on the main unit or on the remote control to play or pause the song.
-
Turn the volume control on the main unit or press the volume buttons on the remote control to adjust to the desired volume level.
-
Press the ◀◀ or ▶▶ button on the main unit or on the remote control to skip to the previous or the next song.
-
If you want to pair the Audizio Arles with another BT enabled device, press and hold the PAIR Button for 3 seconds or turn off the BT function of device currently paired with Audizio Arles, then repeat the steps above.
PRESET EQ
NOTE: The following is only functional by using the remote control.
This unit provides 5 different EQ modes to enhance your listening experience. You can select the desired effect by pressing the EQUALIZER button on remote control at following sequence:
$$ \begin{array}{c c c c c} \text {ROCK} \Rightarrow \text {POP} \Rightarrow \text {JAZZ} \Rightarrow \text {FLAT} \Rightarrow \text {CLASSIC} \Rightarrow \text {OFF} \ \updownarrow & \leftrightarrow & \leftrightarrow & \leftrightarrow & \nearrow \end{array} $$
Press the X-BASS button to switch on the bass amplification. "X-BASS ON" will appear on the display. Press the same button again to turn the bass amplification off. "X-BASS OFF" will appear on the display.
MUTE
NOTE: The following is only functional by using the remote control.
Press the MUTE button on the remote control to mute the sound output from the speaker. "MUTE" will appear on the display. Press the MUTE button again to resume to speaker playback.
USING THE AUXILIARY INPUT
NOTE: AUX cable is not supplied.
You can use the auxiliary input jack to connect an external playback device (for example a CD player or MP3 player).
Press the SOURCE button until you see "AUX" appearing on the display.
Plug the end of a 3.5 mm jack – 3.5 mm jack cable into the AUX IN socket on the front panel. Connect the other end of the cable to your external device. Switch on your external device and choose your favorite soundfile.
ANNULATION DU PROGRAMME
Input connections : 3.5mm jack, USB
Output connections : 3.5mm jack
Speaker connections : Speaker 2-pin
Output power : 50W
Impedance : 6 Ohm
Power Supply : 100-240VAC 50/60Hz (9V Adapter)
Dimensions (L x W x H) : Unit: 190 x 180 x 105mm, Speaker: 123 x 130 x 172mm
Weight (per unit) : 2,30 kg
The specifications are typical. The actual values can slightly change from one unit to the other. Specifications can be changed without prior notice.
The products referred to in this manual conform to the European Community Directives to which they are subject:
European Union
Tronios B.V.,
7602KR Almelo, The Netherlands
2014/35/EU
2014/30/EU
2011/65/EC
2014/53/EU

United Kingdom
Tronios Ltd.,
130 Harley Street,
London W1G 7JU, United Kingdom
S.I. 2016:1101
S.I. 2016:1091
S.I. 2012:3032
S.I. 2017:1206

Specifications and design are subject to change without prior notice.
www.tronios.com
Copyright © 2022 by Tronios The Netherlands