51466 - Grass trimmer TORO - Free user manual and instructions
Find the device manual for free 51466 TORO in PDF.

| Product Type | Grass trimmer (battery-powered brush cutter) |
| Brand and Model | Toro 51466 |
| Cutting Width | 25 cm (maximum cutting line) |
| Weight | 4.1 kg (with battery) |
| Power Supply | Rechargeable lead-acid battery (24V, not field removable) |
| Charging Time | 24 hours (first charge and after each use) |
| Cutting Line Type | Toro 1.6 mm diameter nylon monofilament, 9 m max spool |
| Sound Pressure Level (LpA) | 83.5 dBA (at user's ear) |
| Sound Power Level (LWA) | 96 dBA (guaranteed) |
| Vibration (hand-arm) | 1.69 m/s² |
| Use | Brush clearing, edging, work near plants and structures |
| Charger Included | Yes, wall mount (indoor, out of reach of children) |
| Adjustable Handle | Yes, for comfortable and balanced position |
| Carrying Strap | Yes, adjustable length |
| Safety | Blade under deflector, lock button, double switch |
| Line Length Adjustment | Red button on deflector: inner position (short cut) / outer position (25 cm) |
| Line Replacement | Pre-wound spool model 88175/88052/88035 or bulk 1.6 mm line |
| Routine Maintenance | Clean with damp cloth, check fasteners, clear air vents |
| Storage | Unplug charger, recharge every 2-3 months in warm location |
| Disposal | Remove and recycle lead-acid battery according to regulations |
Frequently Asked Questions - 51466 TORO
User questions about 51466 TORO
0 question about this device. Answer the ones you know or ask your own.
Ask a new question about this device
Download the instructions for your Grass trimmer in PDF format for free! Find your manual 51466 - TORO and take your electronic device back in hand. On this page are published all the documents necessary for the use of your device. 51466 by TORO.
USER MANUAL 51466 TORO
WARNING!—When using the machine, the safety rules must be followed. For your own safety and bystanders, please read these instructions before operating the machine. Please keep the instructions safe for later use.
It is essential that you or any other operator of the appliance read and understand the contents of this manual before operating the appliance. Pay particular attention to the safety alert symbol which means CAUTION, WARNING or DANGER—personal safety instruction. Read and understand the instruction because it has to do with safety. Failure to comply with these instructions may result in personal injury, risk of fire, or electrical shock.
The following safety information has been adapted from European Standard EN 786:1996:
- Wear protective glasses or goggles.
- Never allow children or people unfamiliar with the instructions to use the machine.
- Stop using the machine while people, especially children, or pets are nearby.
- Only use the machine in daylight or good artificial light.
- Before using the machine and after any impact, check for signs of wear or damage and repair as necessary.
- Never operate the machine with damaged guards or without the guards in place.
- Keep hands and feet away from the cutting means at all times and especially when switching on the motor.
Take care against injury from the line cutting blade on the underside of the trimmer. After installing new line, always return the machine to its normal operating position before switching it on. - Never use metal cutting elements
-
Never use replacement parts of accessories not provided or recommended by the Toro Company.
Always ensure that the ventilation openings are kept clear of debris. -
The machine weighs 4.1kg .
After use, check the machine for damage. - When not in use, store the machine away from children.
If the trimmer requires repair, take it to an Authorized Toro Dealer. - Use only Toro replacement parts and accessories.
Sound Pressure
This unit has a maximum sound pressure level at the operator's ear of 83.5 dBA, based on measurements of identical machines per Directive 98/37/EC.
Sound Power
This unit has a guaranteed sound power level of 96 dBA, based on measurements of identical machines per Directive 2000/14/EC.
Vibration, Hand/arm
This unit does not exceed a hand/arm vibration level of 1.69m / s^2 based on measurements of identical machines per Directive 98/37/EC.
Safety/Instruction Decals
Important: Safety and instruction decals are located near areas of potential danger. Replace damaged or lost decals.
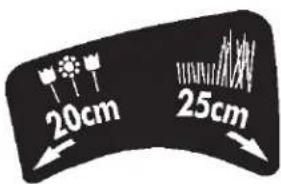
106-1932
-
Shorten the line to 20~cm dia. to cut inside the wire guide.
-
Lengthen the line to 25 cm dia. to cut outside of the wire guide
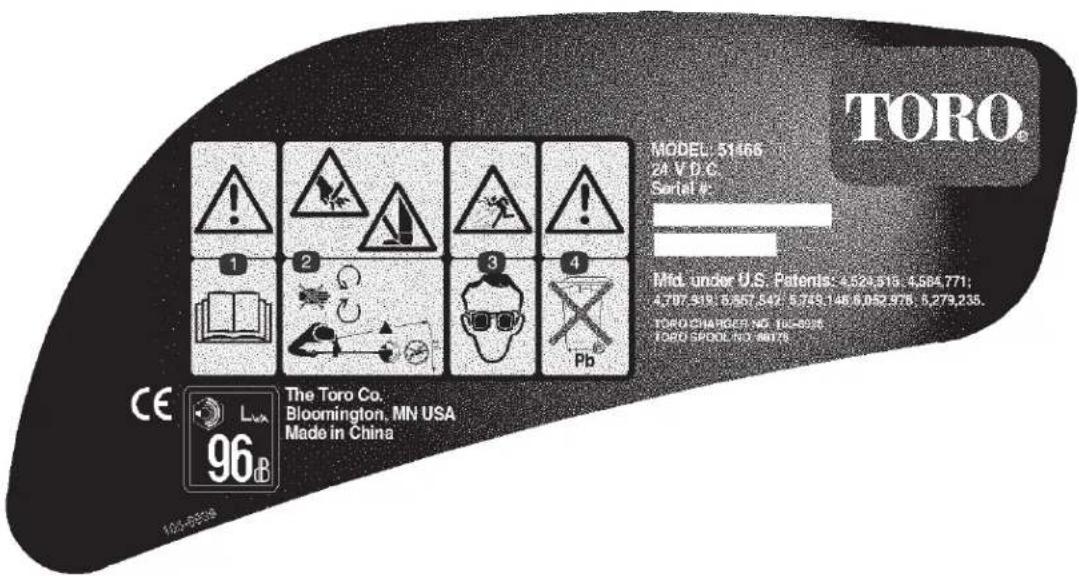
105-6939
- Warning—read the Operator's Manual.
- Cutting hazard of hand or foot—stay away from moving parts. Keep bystanders away.
- Thrown object hazard—wear eye protection.
- Warning—contains lead; do not discard.
Setup
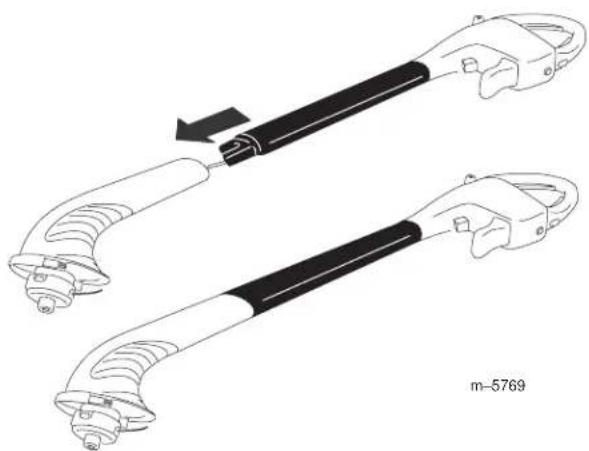
Assembling the Trimmer
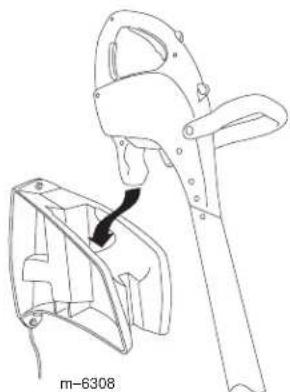
- Insert the cable connecting the two trimmer halves into the black center section.
Note: Ensure that the cable is not twisted. - Connect the black center section to the motor housing.
- Install the upper handle, as shown, using the long bolt and finger nut.
Note: You can adjust the upper handle to a position that is comfortable and balanced for you.
- Install the guard as shown, snapping it into both sides of the trimmer.
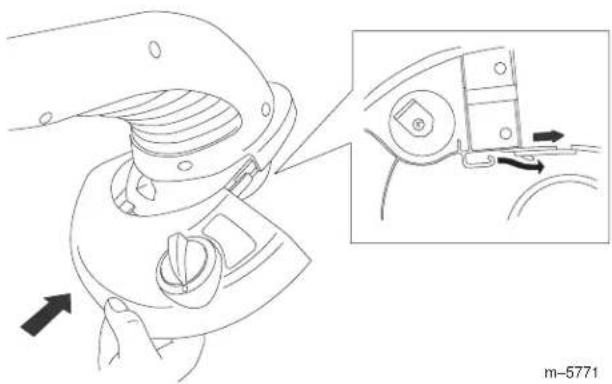
m-5771

The blade under the guard is sharp and can cut you. Be careful when handling the trimmer so that you do not accidentally cut yourself.
- Install the metal wire guide.

- Secure the wire guide with the thumb screw.
m-5784
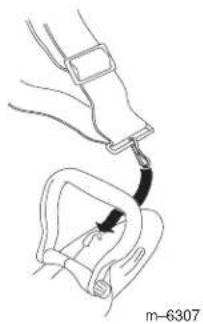
- Connect the shoulder strap to the trimmer, if desired.
- Adjust the strap length by sliding the adjustment buckle to fit you comfortably.
Installing the Charger
Mount the charger indoors (such as a garage or other dry place), near a power outlet, and out of reach of children. Ensure that the area is free of clutter and debris. You must also ensure that the charger is high enough so that the trimmer can hang unobstructed below it.
Two wood screws are provided for mounting the charger. If you want to mount the charger on wall board, purchase two wall anchors for the screws.
- Place the charger against the wall and mark the two hole locations.
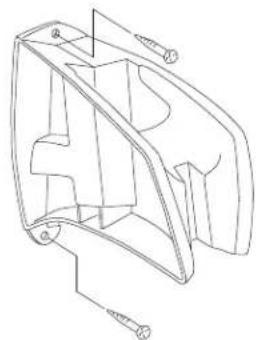
m-5787
- Drill pilot holes as follows:
If installing the charger on wall board, plaster, or cement, drill two holes for the wall anchors (as indicated by the wall anchor manufacturer) at the marked locations.
- If installing the charger on wood, drill two holes, slightly smaller than the diameter of the screw threads, at the marked locations.
- If installing the charger on wall board, plaster, or cement, insert the two wall anchors into the holes.
- Hold the charger against the wall and drive the screws into the wall anchors or holes.
Operation Charging the Battery
Charge the battery for 24 hours before the first use and after each use thereafter in a clean area free of clutter and debris.
Important: Always charge the battery after each use. Storing the unit with a discharged battery will reduce the life of your battery. This lead-acid battery has no memory and does not need to be run dead before charging.
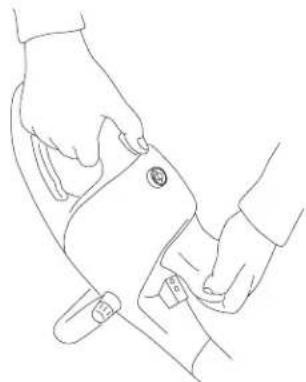
- Insert the trimmer into the charger.
Important: Use only the charger supplied with the trimmer or a Genuine Toro charger obtained from your Authorized Toro Dealer.
- Plug the charger into a wall receptacle.
The red charge light under the handle section of the trimmer lights.
- Charge the battery for 24 hours. When the trimmer is fully charged, the red light turns off and the green light lights.
Note: The trimmer cannot be over charged. Keep it on the charger when you are not using it.
Starting the Trimmer
To start the trimmer, pull the switch on top of the handle rearward and squeeze the trigger.

Stopping the Trimmer
To stop the trimmer, release the trigger and switch.
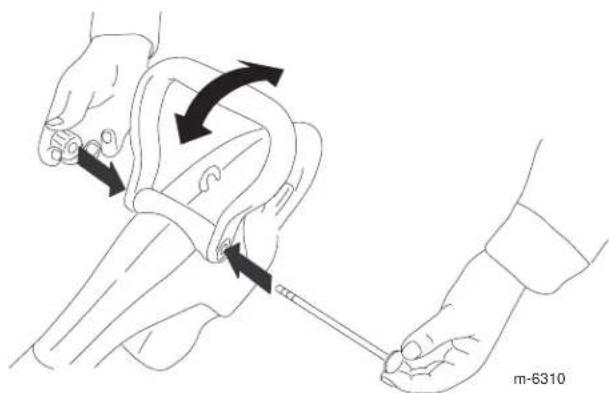
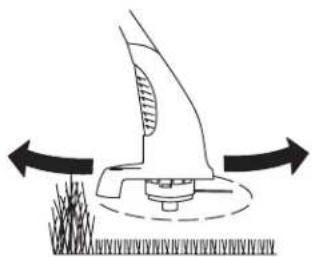
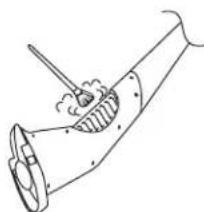
Edging
To use the trimmer as an edger, turn it over and hold the trimmer as shown. This will allow you to run the cutting line perpendicular to the ground.
m-6311
Lengthening the Line
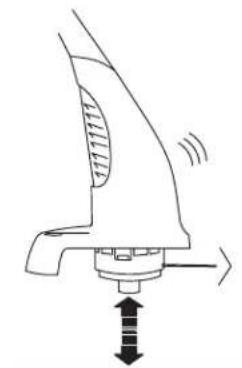
To increase the length of the cutting line, tap the spool on the ground while the trimmer is running.
Note: The blade under the guard will cut the line to the correct length. For information on changing the maximum line length, refer to Adjusting the Maximum Line Length.
Important: Use the following precautions to ensure optimal line performance.
-
Do not hold the spool on the ground.
-
To help prevent line tangle, tap only once to lengthen line. If additional line is required, wait a few seconds before tapping the trimmer head.
-
If the line is not advanced occasionally, it will wear down to the eyelet. When the trimmer stops, the short line may retract into the cutter head. Should this occur, remove spool, refeed the line through eyelet, and assemble spool to trimmer.
Adjusting the Maximum Line Length
You can change the maximum length of the cutting line to either cut just inside the metal wire guide (for trimming next to plants and structures that would be damaged by the line) or to extend past the guide at the full cutting swath (for general trimming and edging).

Caution

The blade under the guard is sharp and can cut you. Be careful when handling the trimmer so that you do not accidentally cut yourself.
To shorten the line to cut just inside the wire guide, push in on the red knob on the guard and turn it counterclockwise.
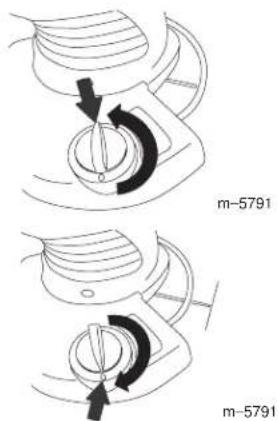
To lengthen the line to cut outside the wire guide at the full 10 in. (25 cm) cutting swath, push in on the red knob on the guard and turn it clockwise.
After changing the knob setting, run the trimmer as normal, advancing the line by tapping the spool on the ground.
Operating Tips
To reduce line wear and improve trimming performance, use the following techniques when trimming:

Warning

When the trimmer is running the cutting head is spinning. If you contact the cutting line or cutting head, you could be injured.
- Keep the cutting head away from your feet and bystanders.
Wear shoes and long pants when using the trimmer. - Ensure that the cutting head has stopped before you service or examine the cutting head. Do not start the trimmer unless your hands are on both handles and the cutting head is down near the ground.
Warning

During operation, the trimmer may throw objects in the operator's or a bystander's direction, causing injury.
Wear safety goggles or other suitable eye protection, long pants, and shoes while operating the trimmer.
- Keep people and pets away from the trimming area.
- Remove any wire, rope or string-like matter which could become entangled in the rotating line from the trimming area.
- Trim only when the grass and weeds are dry.
Slowly move the trimmer in and out of the area being cut.
- Cut grass in excess of eight inches tall or weeds from the top to the bottom in small increments.
- Do not force the trimmer. Allow the very tip of the line to do the cutting.
Replacing Line
For replacement line, you can purchase either a new, pre-wound spool of line (model no. 88175, 88052, or 88035) or bulk line (0.065 in. dia. 1.6mm x 30ft. (9m) ) that you can wind onto the old spool. Both are available from your Authorized Toro Dealer.

Caution

Metal wire, rope, plastic knives, or any material other than Toro .065 in. dia. (1.6 mm) nylon monofilament may overload the motor, possibly causing a fire or electrical shock. Do not use any material other than Toro .065 in. dia. (1.6 mm) nylon monofilament, 30 ft. (9 m) maximum line length.
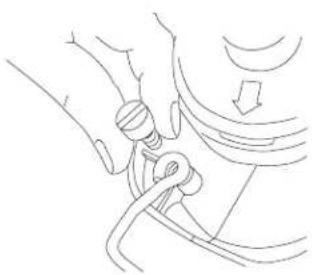
Removing the Spool
- Twist the cap off counterclockwise.
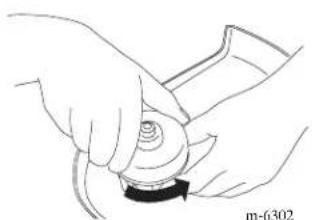
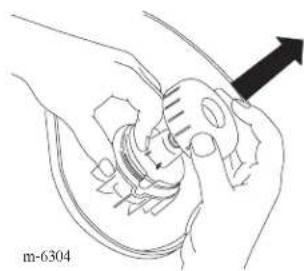
- Remove the cap and spool.
Note: If the spring falls off, install it before installing the spool.
3. Thoroughly clean the cutting head and cap and inspect them for any damaged or worn parts.
Rewinding the Spool
Note: If you are replacing the spool with a new, pre-wound spool, discard the empty spool and skip this section.
- Remove any cutting line left on the spool.
- Hook one end of line all the way into the slot on the spool, allowing no more than 1/8 in. (3 mm) to protrude.
- Wind the line in the direction of the arrow on the spool, in level rows, between the spool flanges.
Note: The trimmer will not function correctly if you wind the line in the wrong direction, the end of the line protrudes more than 1/8 in. (3 mm), or you wind more than 30 ft of line on the spool.
Installing the Spool

Caution

If you do not fully install the spool and cap, the trimmer could throw them during operation, causing injury to you or bystanders. Ensure that you fully install the spool and cap.
- Holding the line and spool, insert the spool into the cutting head and the line into the eyelet.

- Holding the line and spool, place the cap over the spool.
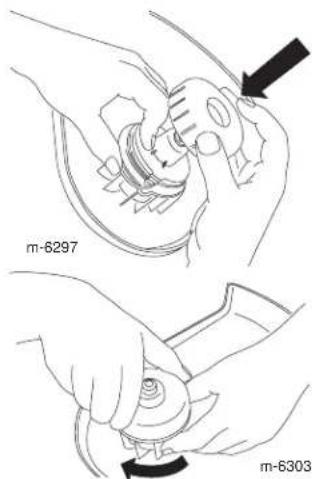
- Twist the cap on securely clockwise.
Maintenance
After each use of the trimmer, complete the following procedures:
- Wipe the trimmer clean with a damp cloth. Do not hose the trimmer down or submerse it in water.
- Wipe or scrape clean the cutter head and spool area any time there is an accumulation of dirt or cuttings.
- Check and tighten all fasteners. If any part is damaged or lost, repair or replace it.
- Brush debris away from air intake vents.
Important: Keep the air intake vents free of grass and debris to prevent the motor from overheating.
Storage
For idle periods of more than a month, disconnect the charger from the wall outlet and trimmer after the trimmer is fully charged. Do not store the trimmer with the charger plugged in. Storing trimmer in a warm area will decrease life of battery. If the trimmer must be stored in a warm area, charge battery for 24hours every 2-3 months when not in use.
Service
Toro has designed this product to give you years of trouble free use. Should it need service, take the product to your Authorized Toro Service Dealer. Your Toro Dealer is specially trained to fix Toro products and will ensure that your Toro stays "All" Toro.
Disposing of the Battery
When the battery no longer holds a charge, you can purchase a new battery and have it installed at your Authorized Service Dealer. If you want to discard the trimmer, remove and recycle the battery before discarding the trimmer.

Warning

Battery posts, terminals, and related accessories contain lead and lead compounds, chemicals known to the State of California to cause cancer and reproductive harm. Wash hands after handling.
- Remove the fasteners securing the two halves of the handle section together and pull the halves apart.
- Remove the battery and disconnect it from the wire leads.
- Discard the trimmer.
- Recycle the lead-acid battery according to local codes.