ESO928 - Oven ELECTROLUX - Free user manual and instructions
Find the device manual for free ESO928 ELECTROLUX in PDF.

User questions about ESO928 ELECTROLUX
0 question about this device. Answer the ones you know or ask your own.
Ask a new question about this device
Download the instructions for your Oven in PDF format for free! Find your manual ESO928 - ELECTROLUX and take your electronic device back in hand. On this page are published all the documents necessary for the use of your device. ESO928 by ELECTROLUX.
USER MANUAL ESO928 ELECTROLUX
natural_image
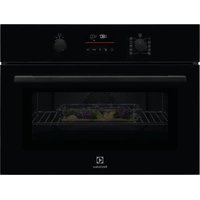
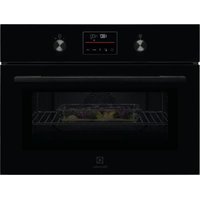
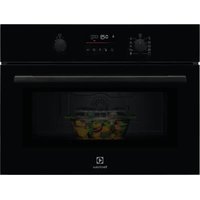
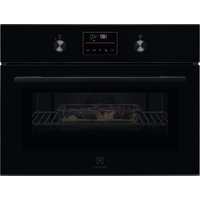
Exterior view of a black electric oven with control knobs and a display screen (no visible text or symbols on the main body)EN INSTRUCTIONBOOK
FR MODED'EMPLOI
Language of introduction Page
| English | 1 - 9 |
| French | 10-19 |
| Dutch | 20-28 |
| Spanish | 29-37 |
| Portuguese | 38-46 |
EN
IMPORTANT SAFETY INSTRUCTIONS
PLEASE READ THE FOLLOWING SAFETY WARNINGS AND THE INSTRUCTIONS CAREFULLY BEFORE USING THE APPLIANCE AND KEEP FOR FUTURE REFERENCE.
Warnings
- This appliance is intended to be used in household and similar applications such as:
—staff kitchen areas in shops, offices and other working environments;
-farm houses;
—by clients in hotels, motels and other residential type environments;
—bed and breakfast type environments.
- If the supply cord is damaged, it must be replaced by the manufacturer, its service agent or similarly qualified persons in order to avoid a hazard.
- This appliance can be used by children aged from 8 years and above and persons with reduced physical, sensory or mental capabilities or lack of experience and knowledge if they have been given supervision or instruction concerning use of the appliance in a safe way and understand the hazards involved.
Children shall not play with the appliance.
Cleaning and user maintenance shall not be made by children unless they are older than 8 and supervised.
- Keep the appliance and its cord out of reach of children less than 8 years.
- The appliance is not intended to be operated by means of an external timer or separate remote-control system.
- The temperature of accessible surfaces may be high when the appliance is operating.
- The door or the outer surface may get hot when the appliance is operating.
- The rear surface of appliance shall be placed against a wall.
- Do not place the appliance in or near hot gas or electric burner, or permit to touch a heated oven or mini oven.
- Do not touch hot surface. Use the handle while moving the product.
- Regarding the instructions for cleaning surfaces in contact with food, refer to the section "CLEANING AND MAINTENANCE" on page 7-8 of the manual.
Caution: Hot Surface.
The surfaces are liable to get hot during use.
Safety Information
- To protect against fire, electric shock and personal injury do not immerse cord, plugs, or any parts of the oven in water or any other liquid.
- Do not let cord hang over edge of table or counter, or touch hot surfaces.
- The use of accessory attachments that are not recommended by the manufacturer may cause hazard or injury.
- Unplug from the mains socket when not in use and before cleaning. Allow cooling before putting on or taking off parts, and before cleaning.
- To disconnect, turn the timer control knob to "0", then remove the plug. Always hold the plug, and never pull the cord.
- Extreme caution must be used when moving an appliance containing hot oil or food.
- Do not cover any part of the oven with metal or cloth, it may cause overheating of the oven.
- Do not place any item on the oven or cover the oven.
- Use extreme caution when removing tray or disposing of hot grease or other hot liquids.
- Do not leave the appliance unattended when in operation.
- Do not clean the inside of the oven with metal scouring pads as pieces can break off the pad and touch electrical parts, creating a risk of electric shock.
- Oversized foods or metal utensils cannot be put into the appliance as they may create a fire or risk of electric shock.
- A fire may occur if the oven is covered or near any flammable material, including curtains, draperies, etc, when in operation. Do not store any item on the oven during operation.
- Extreme caution should be exercised when using cooking or baking containers constructed of anything other than metal or ovenproof glass.
- Be sure that nothing touches the top or bottom elements of the oven.
- Do not place any of the following materials in the oven: plastic, paper, or anything similar.
- Always wear protective, insulated oven gloves when inserting or removing items from the hot oven.
EN
- This appliance has a tempered, safety glass door. The glass is stronger than ordinary glass and will be more resistant to breakage. Be aware that tempered glass can still break, especially around the edges. Avoid scratching the door surface or nicking the edges.
• Children should be supervised to ensure that they do not play with the appliance. - Do not use outdoors.
- Do not use this oven for anything other than its intended purpose.
- The lamp is only for use by ovens, not suitable for household room illumination.
PRODUCTOVERVIEW

text_image
Labeled diagram of a microwave oven with exploded view and interior compartmentsA.Housing
B. Doorframe
C. Doorhandle
D.Glassdoor
E.Controlpanel
F.Temperaturecontrolknob
G.Functioncontrolknob
H. Timercontrolknob
I.Ovenfoot
J.Rotisserie
K.Rotisseriehandle
L.Wirerack
M. Baketray
N.Crumbtray
BEFOREFIRSTUSE
Beforeusingyouelectricovenforthefirsttime,besureto:
• Readallinstructionsinthemanual.
- Makesuretheovenisunpluggedandthetimercontrolknobisinthe"0"position.
- Washallaccessoriesinwarmsoapywater.
- Thoroughlydryallaccessoriesandthenre-assembleintheoven.Plugtheoveninthemainssocket andthenyouarereadytousetheoven.
• Oncereassembledforthefirsttime,itrecommendsthatyouruntheovenatthehighest
temperature(230°C)onthefunction for15minutestoburnoffthepackingresidue.Thiswill removealltracesofodourthatwilloccuronthefirstuse.
PleaseNote: When using the oven for the first time, the oven may produce an odor and demits smoke. The oven is burning off the excess soils in the heating elements and this is normal.
Please familiarise yourself with the followingovenfunctions and accessories before first use:
TemperatureControl: Choosethedesiredtemperature(90°C-230°C).
FunctionControl: There are several function controls depending upon your cooking requirements.
 | OffUpperheating&Rotisserie | ||
 | Upperheating | Stirredair:upperandlowerheating+fan | |
 | LowerheatingUpperheating&Rotisserie&fan | ||
 | Upperandlowerheating |
Timer Control: Set cooking time up to 120 minutes. The oven will automatically turn off once the timer runs out, and a bell will sound to inform you that it has completed. To manually turn off the oven, turn thisknobtothe "0" position.
Whenthesettimeislessthan20minutes,turnthisknobformorethan20minutesandthenturnbackto setthetimeyouwant.
Powerindicatorlight: It will illuminate when the oven is turned on.
Baketray: For use when broiling or roasting meat, poult ry, fish or various other foods. It can also used as a drip tray to collect grease, oil, and liquid which come from the food being rotserie cooked.
Wirerack: Fortoasting, baking and general cooking incasseroledishes and standard pans.
Wirerack cannot be used individually. Always put with baketray. Placethe baketray in the shelf position under wirerack.
Crumb tray: Always keep the crumb tray in place while cooking to collect crumbs and drips during cooking. Thistrayis usually placed at the every bottom of the oven. Cleanthistray regularly.
EN
OPERATION
Placetheovenonaclean, flat and heat resistant surface.
- Ensure that there is enough ventilation around the oven.
- Ensure that theovenis completely dry before use.
- Ensure that the crumb tray is properly installed before use.
• Theovenshouldnotbeplacedonuntreatedwoodensurface.
Plugintheoven.
Forbestresults, it recommends that you prepare the oven for 15 minutes at 230°C.

CAUTION: Thesurface of the oven will get hot during and after use. Keep your hand safe by not touching the surface.
Alwaysuseextremecarewhenremovingbaketray,wirerackoranyhotcontainerfromahotoven.Alwaysusetherackhandle,oranovenmittwhenremovinghotitemsfromtheoven.
HowtoBroil(UpperHeating

TheBROILfunctionisidealforcookingopen-facedsandwiches,thincutsofmeat(likeBacon),poultry andfish,sausagesandvegetables.Broilingcanalsobeusedtobrownthetopsofcasseroles,gratinsand desserts.
- Placethebaketrayattheuppermostposition.
- Placethefoodtobecookedontothebaketrayandclosetheovendoor.
3.Turnthefunctioncontrolknobto - Turnthetemperaturecontrolknobtothedesiredtemperature.
- Turnthetimer control knob to the desired cooking time.
- When broiling is complete, abell will ring to signify the end of the broil cycle. Turn the function
controlknobto □.

- Beforethesetcookingtimehasbeenreached,youmayalsoturnthetimercontrolknobtothe "0"positiontofinishcooking.
HowtoBake(LowerHeating

TheBAKEfunctionisidealforbakingcakes,muffins,browniesandpastries.
- Placethewirerackonthelowestormiddleracksupportguide.
• PositioningtheWireRacks:
Cookies–Usethebottomandmiddlesupportguides.
LayerCakes–Usethebottomsupportguideonly(bakeoneatatime).
Pies–Usebottomandmiddlesupportguides.
-
Placethefoodontothewirerackandclosetheovendoor.
-
Foodshouldbeplacedascloseaspossibletothelowerheatingelementwithouttou chingit.
• Brushthefoodwithsaucesoroil, asdesired. -
Turnthefunctioncontrolknobto

-
Turnthetemperature control knob to the desired temperature.
-
Turnthetimer control knob to the desired cooking time.
• Turnthefoodovermidwaythroughthesetcookingtime.
- When baking is complete, abell will ring to signify the end of the bake cycle. Turn the function
controlknobto.
- Beforethesetcookingtimehasbeenreached,youmayalsoturnthetimercontrolknobtothe "0"positiontofinishcooking.

HowtoToast(Upperandlowerheating
The TOAST function browns and crispsthe outside of your bread while keeping the inside soft and moist. This function is also ideal for English muffins and frozen waffles.
- Placethewirerackorbaketrayintothedesiredposition.
- Placethefoodtobetoastedontothewirerackorbaketrayandclosetheovendoor.

3.Turnthefunctioncontrolknobto
4.Turnthetemperaturecontrolknobtothedesiredtemperature.
5.Turnthetimercontrolknobtothedesiredcookingtime.
6.Whentoastingiscomplete,abellwillringtosignifytheendofthetoastcycle.Turnthefunction
controlknobto □.
- Beforethesetcookingtimehasbeenreached,youmayalsoturnthetimercontrolknobtothe "0"positiontofinishcooking.

Stirredair:upperandlowerheating+fan
This cooking function combines hot air movement using a fan with the toast function. The fangently sends airt o every area of the food, quickly browning, crisping and sealing in moisture and flavour. This function is ideal for use when cooking baked potatoes, roasting meat and vegetables, ready meals, casseroles, stews, bread, cakes and desserts.
- Placethebaketry into themiddle position.
- Placethefoodtobecookedontothebaketrayandclosetheovendoor.

3.Turnth efunctioncontrolknobto.
4.Turnthetemperaturecontrolknobtothedesiredtemperature.
5.Turnthetimercontrolknobtothedesiredcookingtime.
6. When cooking is complete, abell willing to signify the end of the cooking cycle. Turn the function
controlknobto □.
- Before the set cooking time has been reached, you may also turn the timer control knob to the "0" positiontofinishcooking.
Upperheating&Rotisserie

/Upperheating&Rotisserie&fan

- Insert the first spit onto the skewer by pointing inward. Secure the first spit with thumbscrew provided.
- Insert themeator poultry that you are going to cook onto other six skewers, making sure that the meat or poultry is at the center before inserting these second spit onto the skewer. Secure these second spit with the thumbs screw.
- Insert the pointed end of the therotis series, sewer into the drive socket located on the right-hand side of the oven wall.
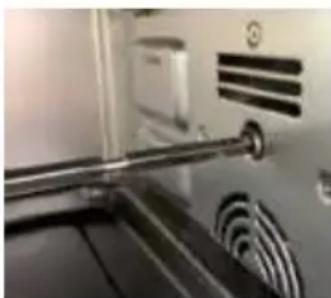
natural_image
Close-up of a kitchen sink with a metal rod and circular filter bands (no visible text or symbols)EN
- Makesurethatthesquareendoftherotisserieskewerrestsonthe rotisserieskewersupportlocatedontheleft-handsideoftheoven wall.
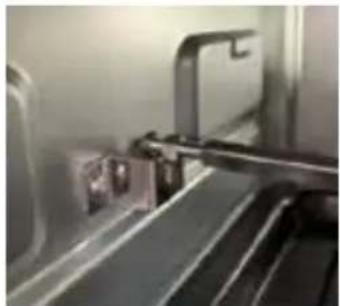
natural_image
Close-up of a mechanical assembly or tool interacting with a metallic bracket (no visible text or symbols)- Placethebaketrayontothelowestpositiontocatchthefooddrippings.
6.Turnthefunctioncontrolknobto

7.Setthetemperaturecontrolknobto230°C.Turnthetimercontrolknobtothedesiredcookingtime.
• Normallyittakesapproximately45minutestoroasta2kgchicken.
- When cooking is complete, the oven bell will ring. Turn the function control knob to

-
Remove the rotisserie skewer from the oven by placing the hooks of the rotisserie handle under the groovesoneithersideoftherotisserieskewer.Lefttheleftsideoftheskewerfirstbyliftingitupand out.Thenpulltherotisserieskeweroutofthedrivesocketandcarefullyremovetheroastfromthe oven.
-
Takethemealorpoultryofftherotisserieskewerandplaceitonacuttingboardorplatter.
Interiorlightilluminationfunction
Alightisprovidedinsidetheo venandwillbeonwhenthetimerisset.
Thisfacilitateseasyviewingofthecookingprocessinsidetheoven.
Attheendofcookingprocess,thelightwillturnoff.Ifyouwanttocheckyourfoodwithoutopeningthe door,turnthetimercontrolknobandthelightwillturnonagain.
CLEANING AND MAINTENANCE
Unplug the appliance and allow it to cool before cleaning.
Do not immerse the appliance in water.
After each, use a damp cloth to clean the interior and exterior of the oven and door, then dry them thoroughly.
Wash all the accessories in warm soapy water with a sponge or cloth. Rinse and dry thoroughly.
Never use abrasive or chemical cleaning agents.
Surfaces in contact with food should be cleaned regularly to avoid cross contamination from different types of food, the use of a damp cloth is advisable when dealing with surfaces that come into contact with food.
Correct food hygiene practices should always be followed at all times to avoid possibility of food poisoning /cross contamination.
Dry all parts and surfaces thoroughly before use.
Make sure that all parts and surfaces are completely dry before plugging in the appliance.
SPECIFICATIONS
Ratings:220-240V\~50-60Hz
1500W

text_image
W H D| Dimensions(outerdimensions) | (H)331x(W)480x(D)407mm |
| Dimensions(cavity/innerdimensions) | (H)261x(W)339x(D)320mm |
| Weight(approx.)9.0kg |
EN
DISPOSAL

Asaresponsiblecompanywecareabouttheenvironment.Assuchweurgeyoutofollowthe correctdisposalprocedurefortheapplianceandpackagingmaterials.Thiswillhelpconservenatural resourcesandensurethatitisrecycledinamannerthatprotectshealthandtheenvironment.
Youmustdisposeofthisapplianceanditspackagingaccordingtolocallawsandregulations.
Because this appliance contains electronic components, the appliance and its accessories must be disposed of separately from household waste when the appliance reaches its endof life.
Contactyourlocalauthoritytolearnaboutdisposalandrecycling.
The appliances should be taken to your local collection point for recycling. Some collection points accept appliance free of charge.
Weapologiseforanyinconveniencecausedbyminorinconsistenciesintheseinstructions,whichmay occurasresultofproductimprovementanddevelopment.
ELECTROLUX16/05/20 22
MISESENGARDEIMPORTANTESES
MERCIDIBENVOLOURIRRESECONSIGNESDESÉCURITÉATTÉNTIVEMIENAMANTAVANT D'UTILISER L'APPAREIL ET DE LES CONSERVER POUR RÉFÉRENCE ULTÉRIEURE.
Avertissements
text_image
Labeled diagram of a microwave oven with parts numbered A through N, showing exploded and assembled views.A.Boîtier
B.Cadredelaporte
C.Poignéedelaporte
D. Porteenverre
E.Panneaudecommande
natural_image
Close-up of a kitchen sink with a metal handle and ventilation grilles (no visible text or symbols)natural_image
Close-up of a mechanical assembly or mounting bracket with no visible text or symbolstext_image
Exploded view diagram of a microwave oven with labeled parts from inner tray to interior panelA.Behuizing
B.Deurkozijn
C.Deurhandvat
D.Glazendeur
E.Bedieningspaneel
F.Temperatuurknop
G.Functieknop
H.Timerknop
I.Voetjes
J.Draaispit
natural_image
Close-up of a kitchen sink with a metal rod and circular filter, no visible text or symbols
natural_image
Close-up of a metallic mechanical component inserted into a vehicle's airfoil (no visible text or symbols)text_image
Exploded diagram of a microwave oven with labeled parts including tray, fan, and control panelA.Carcasa
B.Marcodelapuerta
C.Asadelapuerta
D.Puertadevidrio
E.Paneldecontrol
F.Mandoreguladordetemperatura
G.Mandodefunciones
H.Mandodeltemporizador
I.Piedehorno
J.Rostizar
natural_image
Close-up of a metallic mechanical component with a metallic rod and circular sensor array (no visible text or symbols)natural_image
Close-up of a mechanical assembly with metal components and a bracket (no visible text or symbols)text_image
Exploded diagram of a microwave oven with labeled parts including tray, fan, and heaterA.Estrutura
B.Estruturadaporta
C.Pegadaporta
D. Portadevidro
E.Paineldecontrolo
natural_image
Close-up of a mechanical device with metallic components and a coiled spring (no visible text or symbols)4.Certifique-sedequeaextremidad equadradadoespetode churrasqueiraseapoianosuportedoespetodechurrasqueira localizadonapartelateralesquerdadoforno.
natural_image
Close-up of a mechanical assembly or tool interacting with a metallic component (no visible text or symbols)EU Declaration of Conformity
Product Description:
natural_image
Exterior view of a black electric stove with control knobs and a brand logo (no visible text or symbols on the device body)Marque –
Brand /Merk /Marca:
Electrolux
The object of the declaration described above is in conformity with the relevant Union
harmonisation legislation:
Low Voltage Directive (LVD)
Eco design requirements for energy-related products (ErP)
RoHS
EMC:
EN 55014-1:2017+A11:2020
EN 55014-2:2015
EN IEC 61000-3-2: 2019
EN 61000-3-3:2013+A1:2019
LVD :
EN 60335-2-9:2003+A1:2004+A2:2006+A12:2007+A13:2010
EN 60335-1:2012+A11:2014+A13:2017+A1:2019+A14:2019+A2:2019
EN 62233:2008
ErP :
(EC) No. 1275/2008
(EU) No. 2016/2282
(EU) No. 801/2013
EN 50564:2011
IEC 62301:2011
This declaration of conformity is drawn up under the sole responsibility of the manufacturer.
The person responsible for this declaration is:
Place, Date / Lieu :
Ivry-sur-Seine, mai 13, 2022

text_image
ASSURANCE SERVICE QUALITY FNAC DARTY
natural_image
Abstract geometric design with three white petal-like shapes on a black background (no text or symbols)3484 E ESO928 02 01 0322
Share more of our thinking at www.electrolux.com
electrolux.com/shop

Electrolux Appliances AB
S:t Göransgatan 341
S-105 45 m lohkcotS
Sweden