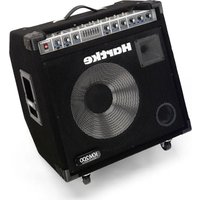
KM200 - Receiver Hartke - Free user manual and instructions
Find the device manual for free KM200 Hartke in PDF.


| Product type | Keyboard amplifier with 4-channel stereo mixer |
| Dimensions (H x W x D) | 46.5 x 56 x 54 cm |
| Weight | 34 kg |
| Power supply | Mains 50/60 Hz |
| Nominal power | 200 Watts |
| Total harmonic distortion | Less than 0.5% |
| Speakers | 15" (381 mm) aluminum cone woofer, 1" (25 mm) titanium dome compression tweeter |
| Speaker impedance | 4 Ohms |
| Channel 1 equalizer | Bass +/-15 dB at 100 Hz, Treble +/-15 dB at 10 kHz |
| Graphic equalizer | 7 bands (100 Hz, 250 Hz, 500 Hz, 1 kHz, 2.5 kHz, 5 kHz, 10 kHz) +/-15 dB |
| Audio inputs | 4 stereo channels (6.35 mm jack), 1 XLR mic input, 2 Aux inputs (RCA), 1 External Mixer input (stereo jack), 1 Into Phones Only input (stereo jack) |
| Audio outputs | 2 Line Out outputs (XLR and 6.35 mm jack), 1 stereo headphone output (6.35 mm jack), 1 Stereo Link Output (6.35 mm jack) |
| Mixing functions | Independent mixes for monitors, front of house, and headphones. Local/Mix selector to cut channel 4 from the built-in amp. Line ON/OFF selector, Volume ON/OFF. |
| Stereo Link | Stereo Link Input/Output connectors to link two KM200s in stereo |
| Max input level (Mic) | -50 dBu |
| Max input level (Line) | -20 dBu |
| Max output level (Line Out) | +4 dBu |
| Max output level (Stereo Line) | 0 dBu |
| Maintenance and cleaning | Clean with a damp cloth. Do not use solvents. Disconnect before cleaning. |
| Safety | Do not expose to rain or moisture. Do not open the enclosure (no user-serviceable parts inside). Use a grounded outlet. Disconnect during storms. |
| Spare parts and repairability | Contact a Hartke authorized service center for repairs. Obtain a return authorization (RA) number before shipping. Keep the original packaging. |
| Warranty | 3 years |
| Included accessories | Casters (to be installed by yourself) |
Frequently Asked Questions - KM200 Hartke
User questions about KM200 Hartke
0 question about this device. Answer the ones you know or ask your own.
Ask a new question about this device
Download the instructions for your Receiver in PDF format for free! Find your manual KM200 - Hartke and take your electronic device back in hand. On this page are published all the documents necessary for the use of your device. KM200 by Hartke.
USER MANUAL KM200 Hartke
natural_image
Concentric elliptical contour lines forming a symmetric pattern around a central gray oval (no text or symbols)Hartke
Safety Instructions/Consignes de sécurité/Sicherheitsvorkehrungen
WARNING
DO NOT EXPOSE THIS EQUIPMENT
TO RAIN OR MOISTURE
AVIS
RISQUE DE CHOC ELECTRONIQUE
NE PAS OUVRIR
CAUTION
FOR CONTINUED PROTECTION AGAINST RISK OF FIRE, REPLACE ONLY WITH SAME TYPE FUSE
ATTENTION
UTILISER UN FUSIBLE DE
RECHANGE DE MÊME TYPE

CAUTION
RISK OF ELECTRIC SHOCK
DO NOT OPEN

WARNING: To reduce the risk of fire or electric shock, do not expose this unit to rain or moisture. To reduce the hazard of electrical shock, do not remove cover or back. No user serviceable parts inside. Please refer all servicing to qualified personnel. The lightning flash with an arrowhead symbol within an equilateral triangle, is intended to alert the user to the presence of uninsulated "dangerous voltage" within the products enclosure that may be of sufficient magnitude to constitute a risk of electric shock to persons. The exclamation point within an equilateral triangle is intended to alert the user to the presence of important operating and maintenance (servicing) instructions in the literature accompanying the product.
Important Safety Instructions
- Please read all instructions before operating the unit.
- Keep these instructions for future reference.
- Please heed all safety warnings.
- Follow manufacturers instructions.
- Do not use this unit near water or moisture.
- Clean only with a damp cloth.
- Do not block any of the ventilation openings. Install in accordance with the manufacturers instructions.
- Do not install near any heat sources such as radiators, heat registers, stoves, or other apparatus (including amplifiers) that produce heat.
- Do not defeat the safety purpose of the polarized or grounding-type plug. A polarized plug has two blades with one wider than the other. A grounding type plug has two blades and a third grounding prong. The wide blade or third prong is provided for your safety. When the provided plug does not fit your outlet, consult an electrician for replacement of the obsolete outlet.
- Protect the power cord from being walked on and pinched particularly at plugs, convenience receptacles and at the point at which they exit from the unit.
- Unplug this unit during lightning storms or when unused for long periods of time.
- Refer all servicing to qualified personnel. Servicing is required when the unit has been damaged in any way, such as power supply cord or plug damage, or if liquid has been spilled or objects have fallen into the unit, the unit has been exposed to rain or moisture, does not operate normally, or has been dropped.
Printed April, 2006 v5.0
Phone: 1-800-3-SAMSON (1-800-372-6766)
www.hartke.com
ENGLISH
Introduction.... 1
KM200 Features 2
Guided Tour - KM200 Front Panel 3
Guided Tour - KM200 Rear Panel 6
Setting Up and Using the KM200 7
KM200 Basic Operation 7
Using the Line Outputs 9
Using the In To Headphones Level 9
Using the In To Phone Only 9
Using the Stereo Link Connections 9
Setting Up and Using The KM200 10
About Equalization 11
FRANÇAIS
Introduction....13
Guided Tour - KM200 Rear Panel 54
Specifications....61
Congratulations on purchasing the Hartke KM200 stereo mixing Keyboard Amplifier! The KM200 is the perfect solution for just about any keyboard player who needs a flexible mix /monitor system to handle a sophisticated instrument rig, and who demands a high quality amplifier that faithfully reproduces the sound, nuances, and soul, of their performance. The KM200 achieved this superior goal by delivering a solid 200 watts of power, driving a classic Hartke 15" aluminum cone low frequency drive unit, working with a 1" titanium compression driver, enclosed in an innovative kickback cabinet, giving you a powerful full-range 2-way professional monitoring system. For players with multiple keyboards and sound modules, an additional mixer isn't needed because the KM200 has one built-in. The mixer features a stereo input with 2-band EQ and Mic input, as well as three additional stereo inputs, giving you a total of 4-stereo channels, plus a stereo Aux in, advanced signal routing and special headphone monitoring capabilities. In fact, you'll have independent control of Local, PA, and headphone monitor mixes. The KM200 also features a powerful 7-band Graphic Equalizer allowing you to set a customized frequency response contour that's perfect for your sound and helps you hear yourself better on stage. The convenient casters make the KM200 easy to transport and the solid construction makes it a reliable performer from night-to-night and venue-to-venue.
Although this unit is designed for easy operation, we suggest you first take some time to go through these pages so you can fully understand how we've implemented a number of unique features. In these pages, you'll find a detailed description of the many features of the KM200 keyboard amplifier, as well as a guided tour through it's front and rear panels, step-by-step instructions for setting up and using the product, detailed discussions about equalization and compression, and full specifications. You'll also find a warranty card enclosed—please don't forget to fill it out and mail it so that you can receive online technical support and so we can send you updated information about these and other Hartke and Samson products in the future.
With proper care and adequate air circulation, your KM200 will operate trouble free for many years. We recommend you record your serial number in the space provided below for future reference.
Serial number: ____
Date of purchase: ____
Should your unit ever require servicing, a Return Authorization number (RA) must be obtained before shipping your unit to Samson. Without this number, the unit will not be accepted. Please call Samson at 1-800-3SAMSON (1-800-372-6766) for a Return Authorization number prior to shipping your unit. Please retain the original packing materials and if possible, return the unit in the original carton and packing materials.
KM200 Features

natural_image
Front view of a Hartke audio amplifier with visible sound waves and buttons (no text or symbols on the main body)The Hartke KM200 keyboard amplifier offers all the newest concepts in Keyboard amplification. Here are some of its main features:
• Four Channel Keyboard amplifier with Stereo Mixer
• 1 stereo channel with 2-band EQ and microphone input, plus 3 additional stereo input channels
• 200 Watts with 2-way Speaker enclosure
- Innovative Kickback enclosure design allows the sound to be projected up at the player
• 15-inch Aluminum Cone Woofer
• 1-inch Throat, 34 mm Titanium Compression Driver
• 7-band graphic equalizer
• Independent Local, PA and Headphone monitor mixing
- Casters included
• Rugged construction makes the KM200 eminently road-worthy
• Three year extended warranty
Guided Tour - KM200 Front Panel
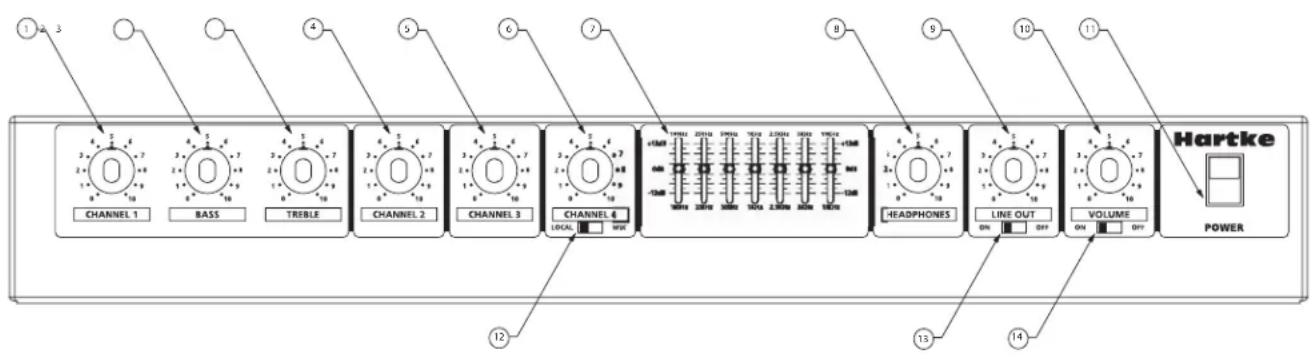
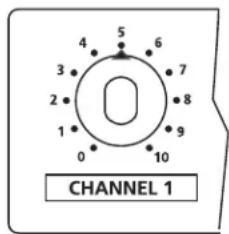
- Channel 1 Volume - Control knob is used to control the overall level of the Channel 1 input.
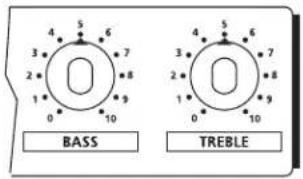
- Bass - This knob controls the low band of the Channel Equalizer, +/- 15 dB at 80Hz .
- Treble - This knob controls the high band level of the Channel Equalizer, +/- 15 dB at 10K.
- Channel 2 Volume – This control knob used to control the overall level of the Channel 2 input.
- Channel 3 Volume - Control knob is used to control the overall level of the Channel 3 input.
- Channel 4 Volume - This control knob is used to control the overall level of the Channel 4 input.
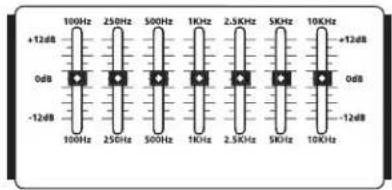
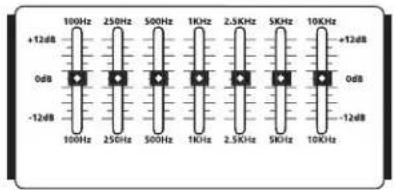
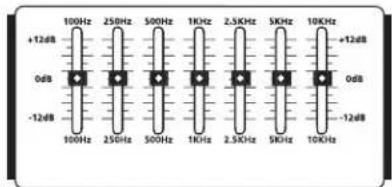
- Graphic Equalizer - These sliders allow you to "draw" the tonal response of the system by adding 12 dB of boost or attenuation to seven different narrow-band frequency areas (100 Hz, 250 Hz, 500 Hz, 1 kHz, 2.5 kHz, 5 kHz, and 10 kHz), affecting the main output signal of the KM200. When a slider is at its center detented ("0") position, the selected frequency area is unaffected (it is said to be flat). When a slider is moved up (above the "0" position, towards the "+15" position), the selected frequency area is boosted, and when it is moved down (below the "0" position, towards the "-15" position), the selected frequency area is attenuated. For more information, see the "About Equalization" section on pages 12 - 13 of this manual.
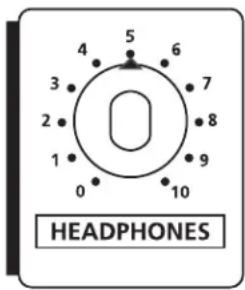
- Headphones - Adjusts the volume of the headphones.
Guided Tour - KM200 Front Panel
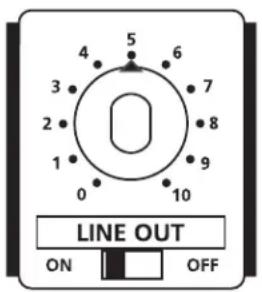
- Line Out – This control knob is used to control the output level the KM200's mixer section that is being sent to the XLR and 1/4-inch LINE OUTPUT connectors.
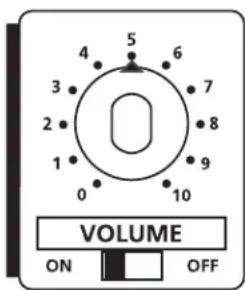
- Volume - Control knob used to control the overall level the KM200 amplifier.
- Power switch - Use this to power the KM200 on or off.
- Local/Mix - This slide switch is used to turn off the channel 4 input signal in the internal amplifier.
- Line ON/OFF - Slide switch used to turn the LINE OUTPUT SIGNAL on or off.
- Volume ON/OFF – This slide switch is used to turn the signal being sent to the KM200's power amplifier and speaker on or off.
Guided Tour - KM200 Input and Output Panel
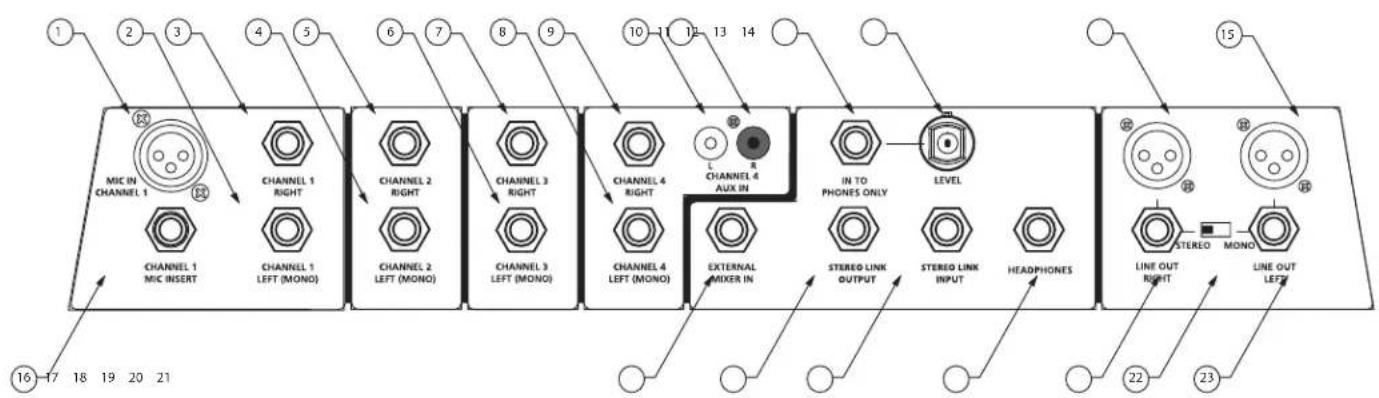
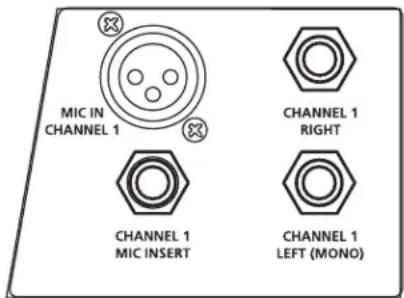
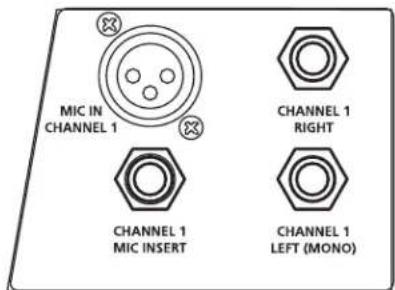
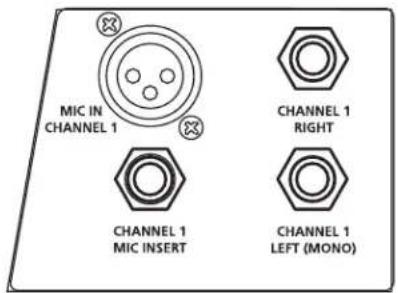
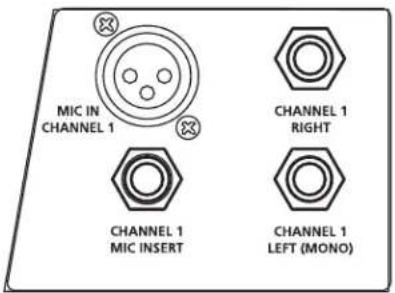
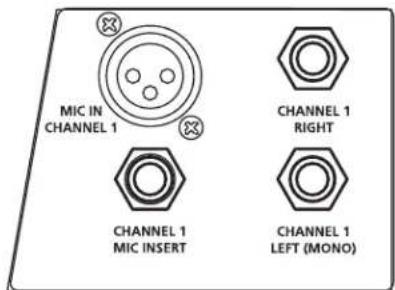
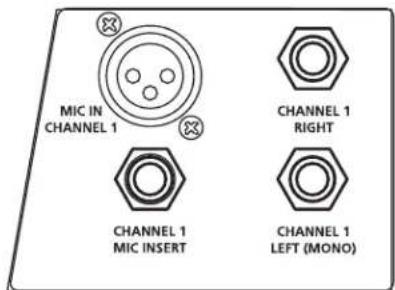
- Channel 1 MIC IN - XLR input connector for connecting to Channel 1's Low-noise Microphone Pre-amp.
- Channel 1 Right Input - 1/4-inch phone jack for connecting line level inputs like those from keyboards and drum machines.
- Channel 1 Left Input (mono) - 1/4-inch phone jack for connecting line level inputs. Use this input if you are connecting a mono signal source.
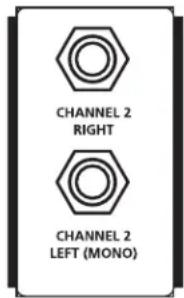
- Channel 2 Right Input - 1/4-inch phone jack for connecting line level inputs like those from keyboards and drum machines.
- Channel 2 Left Input (mono) - This 1/4-inch phone jack is for connecting line level inputs. Use this input if you are connecting a mono signal source.
- Channel 3 Right Input - 1/4-inch phone jack for connecting line level inputs like those from keyboards and drum machines.
- Channel 3 Left Input (mono) - 1/4-inch phone jack for connecting line level inputs. Use this input if you are connecting a mono signal source.
- Channel 4 Right Input - 1/4-inch phone jack for connecting line level inputs like those from keyboards and drum machines.
- Channel 4 Left Input (mono) - This 1/4-inch phone jack is for connecting line level inputs. Use this input if you are connecting a mono signal source.
- Channel 4 Aux Left Input – RCA input for connecting the left side of an external line level signal like those from a CD, MP3 player or sound card.
Guided Tour - KM200 Rear Panel
- Channel 4 Aux Right Input - RCA input for connecting the left side of an external line level signal like those from a CD, MP3 player or sound card.
- In To Phones Only – This input is used to connect line level signals that are sent directly to the internal headphone amplifier, but not to the main amplifier. For example, a click track or the monitor mix from the main PA mixer.
- In To Phones Level – This control knob is used to adjust the level of the signal connected to the IN TO PHONES ONLY input.
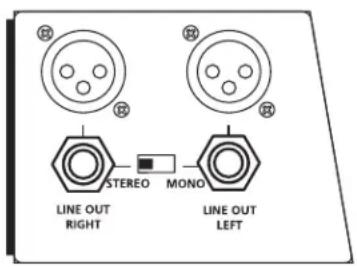
- Line Out Right XLR - This connector carries the Balanced signal from the KM200's mixer RIGHT output and can be used to connect to the main PA mixer.
- Line Out Left XLR - This connector carries the Balanced signal from the KM200's mixer LEFT output and can be used to connect to the main PA mixer.
- CHANNEL 1 MIC Insert - Send and return patch point on TRS (TIP/RING/SLEEVE) jack for interfacing external effects processors on the microphone input.
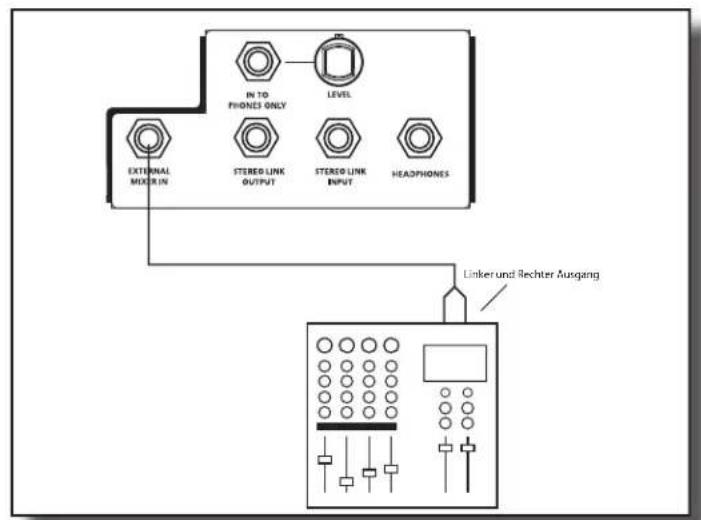
- External Mixer input - This 1/4-inch TRS jack is used to connect a stereo line level signal from a sub mixer.
- Right Bus Send - The right side of the KM200's stereo mixer is sent out this 1/4-inch jack and is used to link a second KM200 when using two for stereo operation.
- Right Bus Return - This 1/4-inch input is used to connect the signal from the RIGHT SIDE SEND of a second KM200 when operating two in stereo.
- Headphones - Connect stereo headphones here.
- Line Out Right 1/4-inch Phone Jack - This connector carries the Balanced signal from the KM200's mixer RIGHT output and can be used to connect to the main PA mixer.
- Stereo/Mono switch - This switch is used to configure the KM200's mixer for stereo or mono operation.
- Line Out Left 1/4-inch Phone Jack - This connector carries the Balanced signal from the KM200's mixer LEFT output and can be used to connect to the main PA mixer.
Setting Up and Using the KM200
KM200 Basic Operation
Setting up your Hartke KM200 Keyboard amplifier is a simple procedure which takes only a few minutes:
- Remove all packing materials (save them in case of need for future service) and decide where the amplifier is to be physically placed. To avoid potential overheating problems, be sure that the rear panel is unobstructed and that there is good ventilation around the entire unit.
- Locate the included casters, which are packed separately in the shipping carton, and follow the installation instructions outlined in Appendix A on page 15 of this manual.
WARNING: Hartke amplifiers can deliver very high power levels. Driven to full power, they can damage connected loudspeakers, regardless of brand, size, or configuration. Care should be taken not to strain connected loudspeakers as this can cause permanent damage and will degrade the performance of the entire system. If you see connected loudspeakers moving excessively, turn your system down immediately or use the equalization and/or compression controls to reduce the amount of sub harmonic (extremely low frequency) signal.
- Next, connect the 3-pin AC plug into any grounded AC socket. Don't turn the amplifier on just yet, though.
- Use standard music instrument cables to connect your keyboards and/or drum machine s to the appropriate Input jack, or jacks, on the top panel. If you are using a mono signal be sure to connect to the Left (Mono) input jack. If you want to connect a microphone, connect a low impedance mic to the Channel 1 XLR mix input.
- On the front panel of the KM200, set the main Volume control to "0" (fully counterclockwise and set channel volume knobs to "5" (the twelve o'clock position). Set channel 1 Bass and Treble knobs to their center "0" position. Finally, set the graphic equalizer sliders to the middle 0dB position.
- Press the front panel Power switch in order to turn on the amplifier.
- Set the output of your keyboard to about 3/4's the way up and then, while playing, slowly turn the main Volume control up until the desired level is achieved. If you hear distortion even at low amplifier Master volume settings, back off the output of your Keyboard (or check for a faulty cable). The main Volume control also includes a convenient ON/OFF for muting the KM200's internal amplifier.
Setting Up and Using The KM200
- The next step is to adjust the Channel 1 Bass and Treble controls to taste. For more information, see the "About Equalization" section on page 12 of this manual. When you get a great setting that complements your instrument and playing style, it's a good idea to write it down for future use.
- Next, experiment with the KM200 graphic equalizer. Begin by setting each of the seven sliders to their flat "0" center detented position. Finally, move each slider in turn as you play your Keyboard. For more information, see the "About Equalization" section on page 12 of this manual. Again, when you get a graphic equalization setting that complements your instrument and playing style, it's a good idea to write it down for future use.
If you have followed all the steps above and are still experiencing difficulties, call Samson Technical Support (516-932-1062) between 9 AM and 5 PM EST.
Setting Up and Using the KM200
Using the Line Outputs
The KM200 provides a stereo Line Output for sending to a main PA mixer or recorder.
- Connect the XLR or 1/4-inch Left and Right Line Outputs to a stereo input on your main PA mixer.
- You can also use the Line Output ON/OFF switch to mute the mix going to out the line input for time that you are setting up sound and don't want you mix to play through.
Note: Be careful to watch the position of this switch to avoid driving your soundman crazy
Using the In To Headphones Level
The Headphones Level control is used to set the level sent to the headphone jack.
Using the In To Phone Only
The KM200 provides a convenient patch point for inserting a stereo signal that will only be heard in the headphone output. This is especially useful for connecting a metronome click track, or the feed from the main PA's monitor mix.
Connect a mono or stereo signal to the In To Phone Only 1/4-inch TRS input jack.
Now, use the Into Phones Only Level control to blend in the signal with the normal instrument mix.
Using the Stereo Link Connections
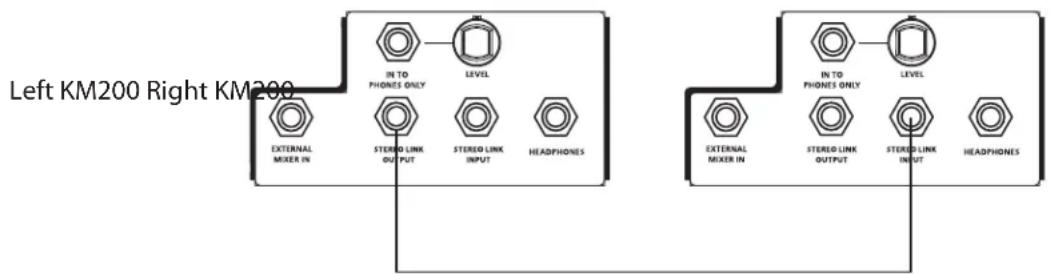
You can use two KM200's together or a stereo keyboard amplification system using the Stereo Link Connections.
First decide which amplifier you will use for connecting your instruments. This will be the Left side amplifier and speaker, so connect your instruments here.
Now, run a standard 1/4-inch instrument cable, or a balance TRS (TIP RING SLEEVE) 1/4-inch cable, from the left KM200's (the one you connected your instruments to) Stereo Link Output to the Stereo Link Input on the second, right side, KM200.
Be sure to set both KM200's main Volume controls to the same level to insure the proper stereo balance.
Once you have both of the KM200's main Volume controls set, use the channel volume controls on the Left KM200 to adjust your instrument mix.
Setting Up and Using The KM200
Using the Channel 1Insert
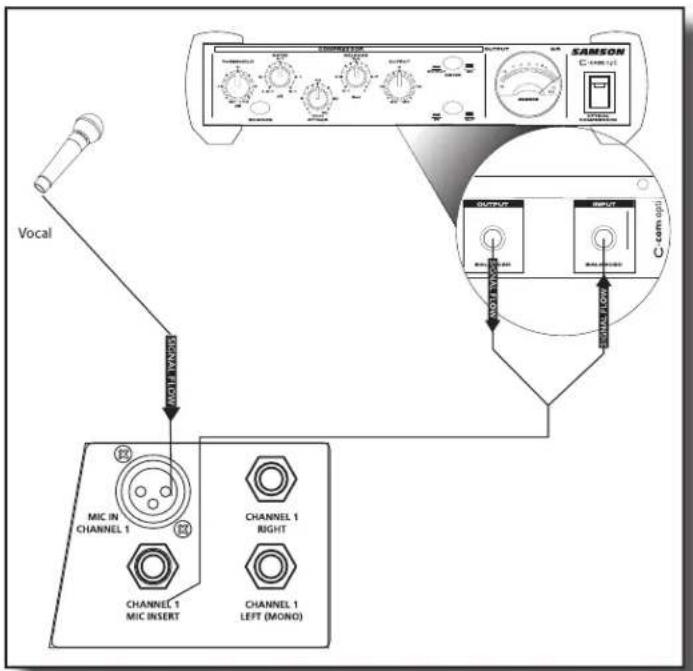
To further control your channel 1 signal, the KM200 features an insertion point, or "effects loop", on one 1/4-inch phone jack, INSERT SEND and RETURN. An insertion point is a patch-point that interrupts the signal, allowing you to bring that signal outside to be processed by another device. You can use these connections to interface an external signal processor like reverb, compressor, noise gate, and other audio devices. A common application for the KM200's insert point is using a compressor on the mic.
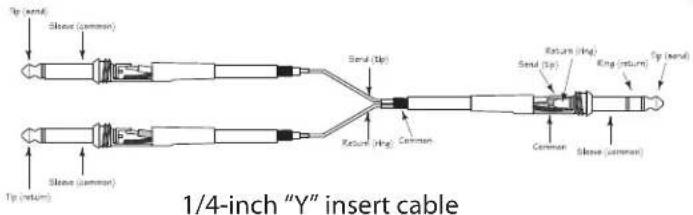
To send a signal to an external processor, use a standard 1/4-inch "Y" insert cable to connect the KM200 channel insert point. Connect the TRS (TIP / RING / SLEEVE) plug to the channel INSERT point, and then connect the 1/4-inch (TIP / SLEEVE), INSERT SEND plug to the input of the external processor. The signal is sent back to the KM200, using the 1/4-inch (TIP / SLEEVE), INSERT RETURN plug connecting to the output of the external processor.
The diagram right shows a typical application for using a compressor (in this example a Samson C com opti) in the KM200's insertion point. Also below, is a diagram showing the wiring for the TRS 'Y' Insert cable.
Using the External Mixer In
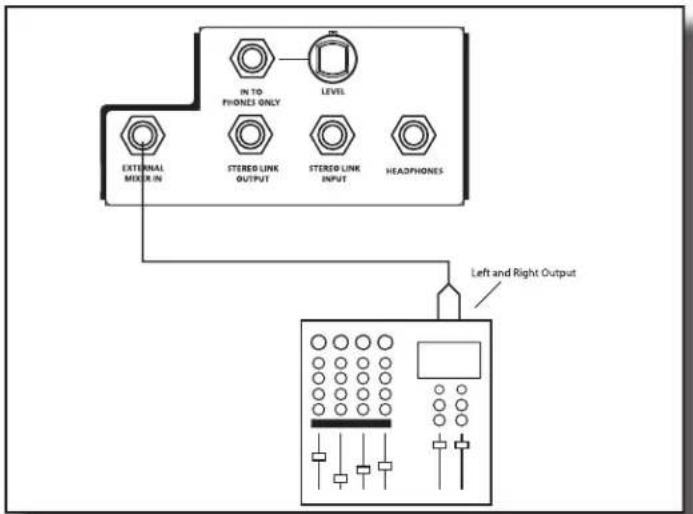
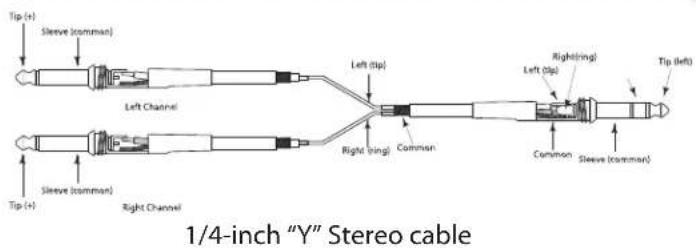
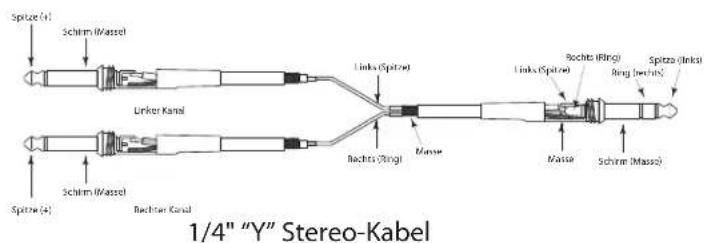
If you need extra channels, you can connect a stereo sub-mixer using the KM200's External Mixer In. The External Mixer In is a TRS (TIP/RING/SLEEVE), 1/4-inch jack configured as a left and right line level input to the KM200's internal mixer.
The diagram right shows a typical application for connecting a stereo mixer in the KM200's External Mixer In.
Also below is a diagram showing the wiring for the TRS'Y" stereo cable used for connecting the left and right input to the External Mixer In.
flowchart
graph TD
    A["Vocal"] --> B["MIC IN CHANNEL 1"]
    B --> C["CHANNEL 1 MIC INSERT"]
    B --> D["CHANNEL 1 RIGHT"]
    B --> E["CHANNEL 1 LEFT (MONO)"]
    F["SAMSON C-Channel"] --> G["OUTPUT"]
    F --> H["INPUT"]
    G --> I["OUTPUT"]
    H --> J["INPUT"]
About Equalization
Channel 1 Bass and Treble controls
The Hartke KM200 Keyboard amplifier gives you enormous control over shaping the sound of your keyboard rig, using a process called equalization. To understand how this works, it's important to know that every naturally occurring sound consists of a broad range of pitches, or frequencies, combined together in a unique way. This blend is what gives every sound its distinctive tonal color. EQ controls allow you to alter a sound by boosting or attenuating specific frequency areas—they operate much like the bass and treble controls on your hi-fi amp, but with much greater precision. The KM200 provides you with two different means for equalizing your Keyboard sound:
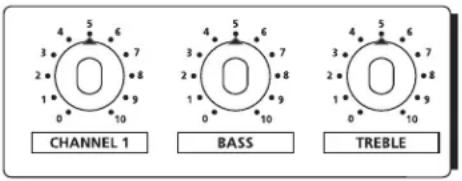
- Bass and Treble controls provide 15 dB of cut or boost in two broad frequency bands for the Channel 1 Mic or Line input.
- A Graphic Equalizer provides 15 dB of cut or boost in seven narrow frequency bands.
Normally, you will adjust the Bass and Treble controls before "fine-tuning" your EQ with the Graphic Equalizer. The Bass control affects a broad band of frequencies with 80 Hz as the center point; similarly, the Treble control affects a broad band of frequencies with 10 kHz as the center point. When either is in its center position ("0"), it is having no effect. When it is moved right of center, the particular frequency area is being boosted; when it is moved left of center, the frequency area is being cut ("attenuated").
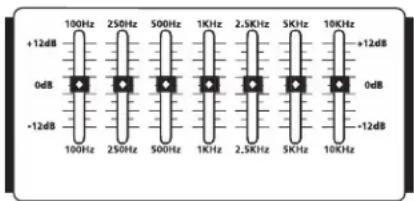
Graphic equalizer
The seven-band graphic equalizer provides ten sliders, each corresponding to a single narrow frequency band (100 Hz, 250 Hz, 500 Hz, 1 kHz, 2.5 kHz, 5 kHz, and 10 kHz). This allows you to "draw" the desired tonal response of your system. When a slider is in its center position ("0"), it is having no effect. When it is moved above center (towards "+15"), the particular frequency area is being boosted; when it is moved below center (towards "-15"), the frequency area is being attenuated. We carefully selected these frequency areas because they have maximum impact on keyboard signals. For example, the lowest slider (100 Hz) affects the very lowest audible frequencies (in fact, most humans cannot hear below 20 Hz), while the highest four sliders affects the mid-range and high frequencies.
About Equalization
To find out how each graphic equalizer slider affects the sound of your particular keyboard, start with all seven bands flat (that is, all seven sliders at their "0" center position). Then, one by one, raise and lower each slider, listening carefully to the effect of each. Note that turning all EQ controls up the same amount will have virtually the same effect as simply turning up the main Volume; conversely, turning them all down the same amount will have virtually the same effect as turning down the main Volume. Both approaches are pointless (after all, that's why we gave you a main Volume control!)
In many instances, the best way to deal with equalization is to think in terms of which frequency areas you need to attenuate, as opposed to which ones you need to boost. Be aware that boosting a frequency area also has the effect of boosting the overall signal; specifically, too much low frequency EQ boost can actually cause overload distortion or even harm a connected speaker.
The specific EQ you will apply to your Keyboard signal is very much dependent upon your particular instrument and personal taste and playing style. However, here are a few general suggestions:
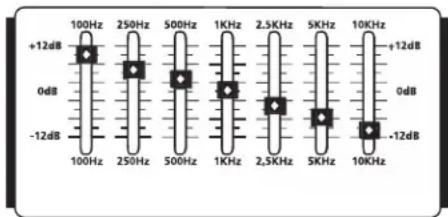
- For that super-deep reggae or techno bass sound, boost low frequencies slightly while attenuating the highest ones (leave mid-range frequencies flat or slightly attenuated), as shown in the illustration on the right.
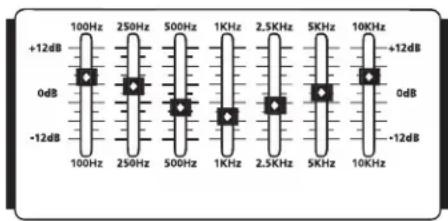
- To remove boxiness and make your instrument sound more "hi-fi," try attenuating mid-range frequencies while leaving low and high frequency settings flat, as shown in the illustration on the right.
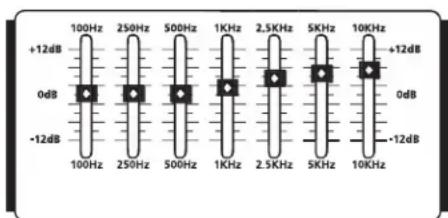
- For a bright, cutting sound, try boosting the high and high mid-range frequencies, as shown in the illustration on the right.
- Whenever you get a really good EQ setting for a particular instrument or song, write it down (you'd be amazed how easy it is to forget these things!).
Finally, as you experiment with the EQ controls of the KM200, don't forget that your keyboard probably provides EQ control, so experiment by using both.
Introduction
natural_image
Front view of a Hartke audio amplifier with visible speaker grille and control buttons (no text or symbols on main body)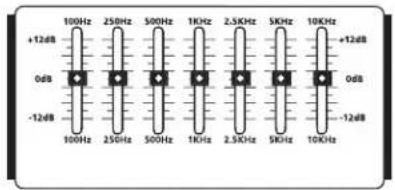
In To Headphones Level-Regler verwenden
natural_image
Front view of a Hartke audio amplifier with visible speaker grille and control buttons (no text or symbols on main body)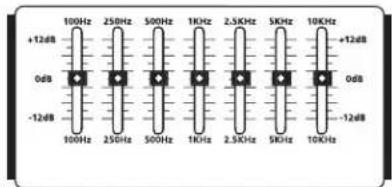
Controles Channel 1 Bass y Treble
natural_image
Front view of a Hartke audio amplifier with visible sound waves and control buttons (no text or symbols on the main body)Guided Tour - KM200 Front Panel
Guided Tour - KM200 Rear Panel
Channel 1 Bass and Treble controls
Nominal Output Level
Line Out +4 dBu
Stereo Line 0 dBu
Rated Output Power 200 watts
Total Harmonic Distortion less than .5%
Equalizer
Channel 1 Bass ±15 dB @ 100 Hz
Channel 1 Treble ±15 dB @ 10 kHz
Seven-Band Graphic (Main Output) ±15 dB, center
@ 100 Hz, 250 Hz, 500 Hz,
1 kHz, 2.5 kHz, 5 kHz, 10 kHz
Insert Send Output Level
0 dBM
Insert Return Input Level
0 dBM
Connectors
Ch1-4 Input L (mono)
Ch1-4 Input R (mono)
Mic Input
Mic Insert
Ch1-4 Input L (mono)
Ch1-4 Input R (mono)
Line Output L (mono)
Line Output R (mono)
Aux In Left and Right
External Mixer In
Into Phones Only
Stereo Link Input
Stereo Link Output
Headphone - St. TRS 1/4" phone
Speaker Output
1/4" phone
1/4" phone
XLR
TRS1/4" phone
1/4" phone
1/4" phone
1/4" phone, XLR
1/4" phone, XLR
RCA
TRS 1/4" phone
TRS 1/4" phone
1/4" phone
1/4" phone
1/4" phone
Speaker System Impedance (Ohms)
Low Frequency Drivers
High Frequency Driver
4 Ohms Impedance
15" Special Design 8 ohm, 200 watt Speaker
1" Throat Compression Driver
Weight
Dimensions
74.8 lbs. (34 kg)
Height:18.25" (46.5 cm)
Width:22" (56 cm)
Depth: 21.25" (54.0 cm)
1 kHz, 2,5 kHz, 5 kHz, 10 kHz
Channel 1 Bass ±15 dB @ 100 Hz
Channel 1 Treble ±15 dB @ 10 kHz
grafischer 7-Band-EQ (Main Output) ±15 dB, Center
@ 100 Hz, 250 Hz, 500 Hz,
1 kHz, 2.5 kHz, 5 kHz, 10 kHz
Line Output L (mono)
Line Output R (mono)
High Frequency Driver
4 Ohm
@ 100 Hz, 250 Hz, 500 Hz,
1 kHz, 2.5 kHz, 5 kHz, 10 kHz
Channel 1 Bass ±15 dB @ 100 Hz
Channel 1 Treble ±15 dB @ 10 kHz
@ 100 Hz, 250 Hz, 500 Hz,
1 kHz, 2.5 kHz, 5 kHz, 10 kHz
Livello d'uscita Insert Send
0 dBM
Livello d'ingresso Insert Return
0 dBM
Connettori
Ch1-4 Input L (mono)
Ch1-4 Input R (mono)
Mic Input
Mic Insert
Ch1-4 Input L (mono)
Ch1-4 Input R (mono)
Line Output L (mono)
Line Output R (mono)
Aux In Left e Right
External Mixer In
Into Phones Only
Stereo Link Input
Stereo Link Output
Headphone - St.
Speaker Output
phone jack da 1/4"
phone jack da 1/4"
XLR
phone jack TRS da 1/4"
phone jack da 1/4"
phone jack da 1/4"
phone jack da 1/4", XLR
phone jack da 1/4", XLR
RCA
phone jack TRS da 1/4"
phone jack TRS da 1/4"
phone jack da 1/4"
phone jack da 1/4"
phone jack TRS da 1/4"
phone jack da 1/4"
Impedenza Speaker System (Ohms)


- Safety Instructions/Consignes de sécurité/Sicherheitsvorkehrungen
- WARNING
- CAUTION
- Important Safety Instructions
- ENGLISH
- FRANÇAIS
- KM200 Features
- Guided Tour - KM200 Front Panel
- Guided Tour - KM200 Input and Output Panel
- Guided Tour - KM200 Rear Panel
- Setting Up and Using the KM200
- KM200 Basic Operation
- Using the Line Outputs
- Using the In To Headphones Level
- Using the In To Phone Only
- Using the Stereo Link Connections
- Using the Channel 1Insert
- Using the External Mixer In
- About Equalization
- Introduction
- In To Headphones Level-Regler verwenden
- Nominal Output Level
- Equalizer
- Connectors
- Speaker System Impedance (Ohms)
- Low Frequency Drivers
- High Frequency Driver
- Weight
- Dimensions
- Connettori
- Impedenza Speaker System (Ohms)
Brand : Hartke
Model : KM200
Category : Receiver