PIXMA TS9541C - Printer CANON - Free user manual and instructions
Find the device manual for free PIXMA TS9541C CANON in PDF.

| Product type | Multifunction inkjet printer |
| Brand | Canon |
| Model | PIXMA TS9541C |
| Main functions | Print, copy, scan, direct photo printing from memory card |
| Printing technology | Thermal inkjet |
| Print resolution | Up to 4800 x 1200 dpi |
| Printing speed (A4 document) | Approx. 15 ppm black / 10 ppm color |
| Supported paper sizes | A4, Letter, Photo (10x15 cm, 13x18 cm), envelopes |
| Paper capacity (cassette) | 100 sheets of plain paper (A4/Letter) |
| Paper capacity (rear tray) | 20 sheets of photo paper |
| Connectivity | Wi-Fi, USB 2.0, Wi-Fi Direct (via Canon PRINT app) |
| Touchscreen | Yes, 4.3-inch color LCD screen |
| Number of ink cartridges | 5 (black, cyan, magenta, yellow, gray) |
| Cartridge types | Individual cartridges (PGI/CLI series) |
| Power supply | AC 100-240V, 50/60 Hz |
| Power consumption | Approx. 20 W printing, 0.8 W standby |
| Dimensions (W x D x H) | Approx. 450 x 368 x 180 mm |
| Weight | Approx. 8.2 kg |
| Maintenance | Automatic print head cleaning via software or control panel |
| Safety | Do not block ventilation slots; use only the supplied power cord; do not touch electrical contacts |
| Box contents | Printer, setup ink cartridges, power cord, installation CD-ROM, setup guide |
Frequently Asked Questions - PIXMA TS9541C CANON
User questions about PIXMA TS9541C CANON
0 question about this device. Answer the ones you know or ask your own.
Ask a new question about this device
Download the instructions for your Printer in PDF format for free! Find your manual PIXMA TS9541C - CANON and take your electronic device back in hand. On this page are published all the documents necessary for the use of your device. PIXMA TS9541C by CANON.
USER MANUAL PIXMA TS9541C CANON
Read Safety and Important Information (addendum) first.
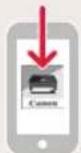
natural_image
Icon showing a printer and a document with an arrow, set against a solid red background (no text or symbols)Installing the Printer......page 1
natural_image
Two white devices on a solid red background: a laptop and a smartphone (no text or symbols)Connecting with Computer and Smartphone/Tablet ...... page 4

Instructional Videos
Instructions vidéo
Anleitungsvideos
Instructievideo's
Video informativi
Setting up the printer

Web Setup
http://ij.start.canon

1. Box Contents
natural_image
Simple line drawing of a USB cable tied with a string (no text or symbols)Power cord

natural_image
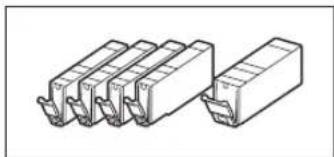
Line drawing of a series of rectangular connectors or connectors with no text or symbols- Ink tanks for setup
natural_image
Simple line drawing of a CD or DVD disc with no text or symbols- Setup CD-ROM

natural_image
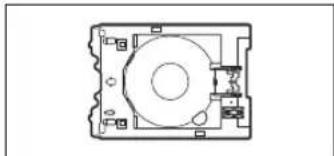
Cross-sectional diagram of a mechanical device with no visible text or symbols- Multi-purpose tray
The multi-purpose tray is attached to the underside surface of the cassette.
● Safety and Important Information
• Getting Started (this manual)
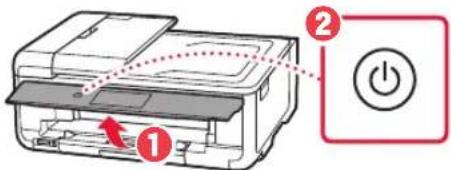
2. Removing Packing Materials

1 Remove and dispose of the packing materials from the device.
- Operating the printer while the orange tape and protective film are still on it causes malfunctions. Be sure to remove them.
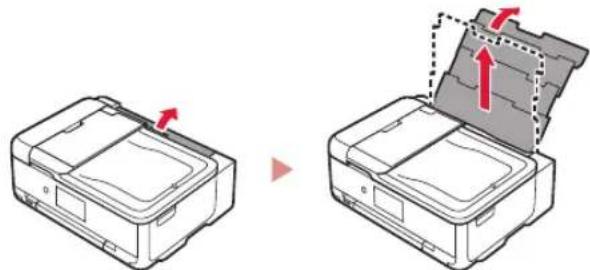
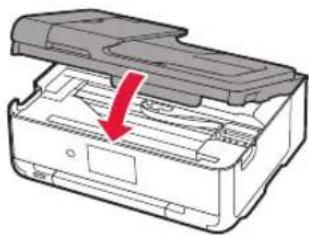
2 Open the scanning unit / cover and remove the orange tape.
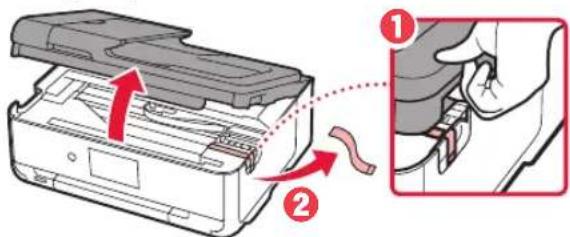
3 Close the scanning unit / cover.

natural_image
Diagram of a printer with a red arrow indicating compression or disassembly (no text or symbols present)
Caution
Watch your fingers.
3. Turning on the Printer

1 Connect the power cord.


Important
At this time, do not connect any other cables.
2 Open the operation panel and press the ON button.
3 Scroll and tap to select your language, and then tap OK.

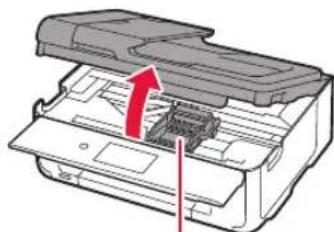
4. Installing the Ink Tanks

1 Open the scanning unit / cover.
natural_image
Diagram of a printer with an open lid and internal structure, showing no text or symbolsCaution
Do not touch the print head holder until it stops moving.
Setting up the printer
2 Remove the tape and film on the ink tanks.
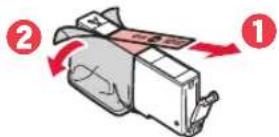
- Check that no tape is left over.
3 Slowly remove the orange cap.
natural_image
Illustration showing two hands holding a small object with red arrows indicating motion (no text or symbols)Important
- Do not push both sides of the ink tank with the Y-shape air hole blocked.
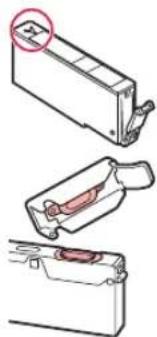
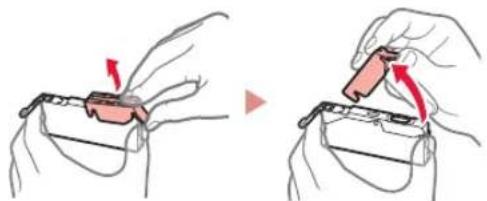
natural_image
Three-step diagram showing a device with a red component inserted into a housing, no text or symbols present.- Do not touch the red areas shown in the figure.
4 Install the ink tanks.
- Insert the ink tank into the print head and press it from above until it clicks.
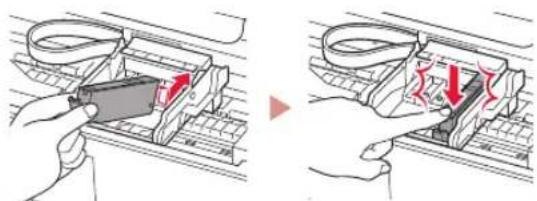
natural_image
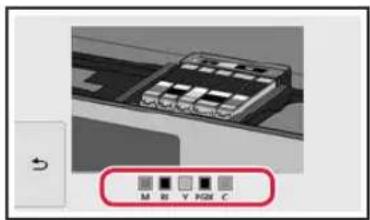
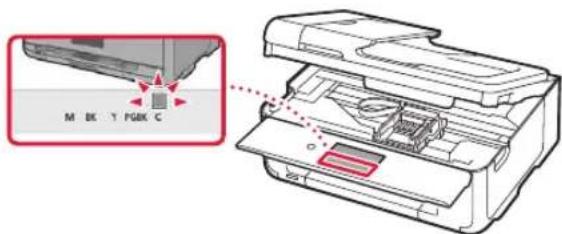
Illustration showing two-step installation of a mechanical component with a tool, no text or symbols present5 Make sure that the color of the ink tank you installed appears on the screen.
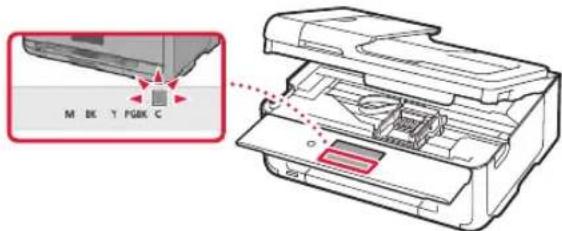
Important
If the color is not displayed on the screen even though you have installed the ink tank, the color of the ink tank may be wrong or you may have installed an ink tank, such as one with a different model number, that is not supported by this printer. Either install an ink tank for the correct color or use the provided ink tank for setup.
6 Repeat steps 2 through 5 to install all the ink tanks.
• Make sure that all the colors appear.
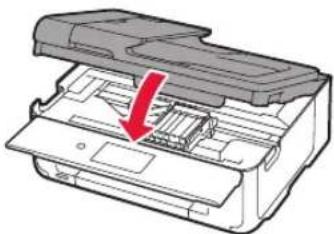
7 Close the scanning unit / cover.
- When you close the scanning unit / cover, the internal operations start.
natural_image
Diagram of an open printer with a red arrow indicating the internal structure (no text or symbols present)Caution Watch your fingers.
5. Loading Paper

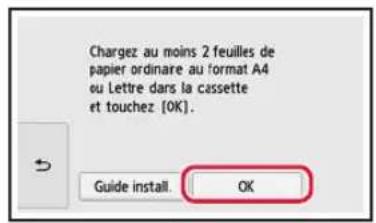
1 Tap OK.
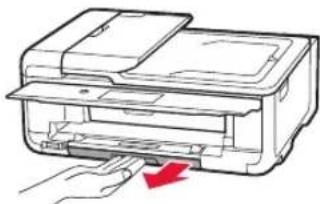
2 Pull the cassette out of the device.

natural_image
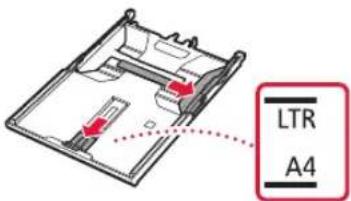
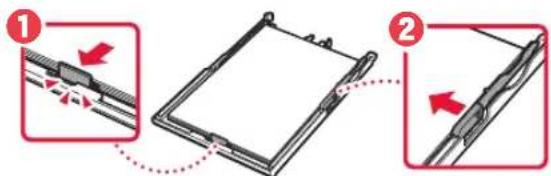
Line drawing of a printer with a hand inserting a paper into the cover (no text or symbols)3 Slide apart the paper guides.
- Slide the right paper guide to the right edge. Align the front paper guide with the LTR or A4 mark.
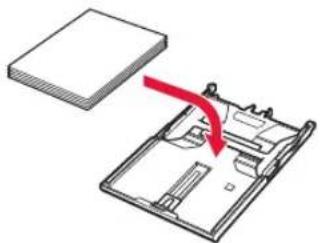
4 Load paper.
- Load plain LTR or A4 size paper with the print side facing down.
natural_image
Diagram showing a device with a red arrow pointing to a component, no text or symbols present- Place the paper against the front paper guide, and align the right paper guide to the width of the paper.
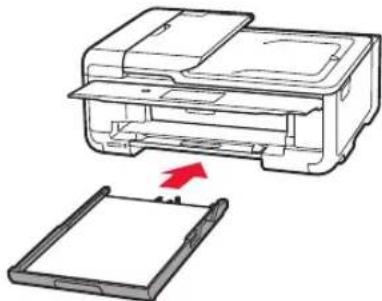
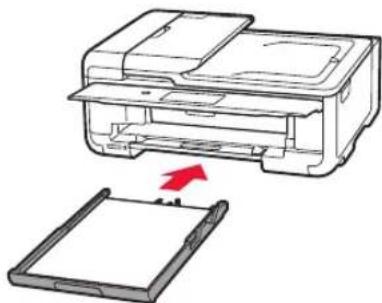
5 Load the cassette.

natural_image
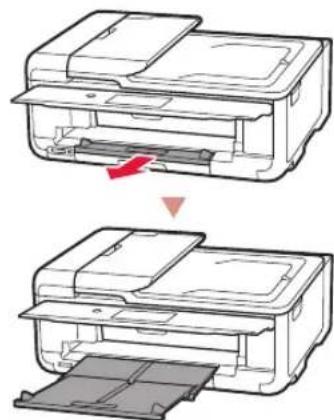
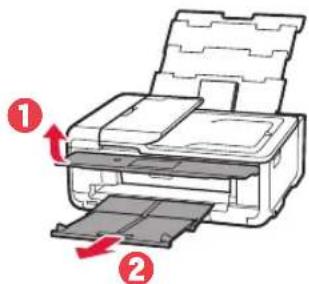
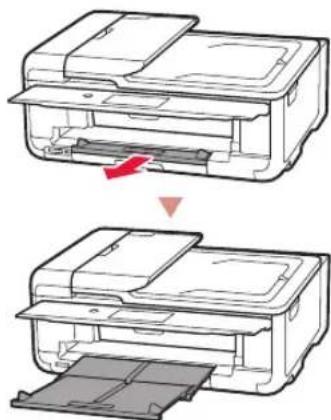
Diagram of a printer with a paper holder and a red arrow indicating compression or disassembly (no text or symbols present)6 Pull out the paper output tray.
natural_image
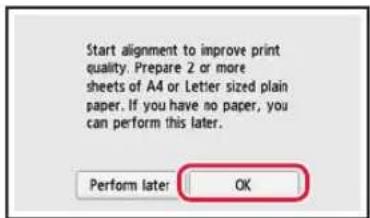
Two line drawings of a printer with a red arrow indicating compression or disassembly (no text or symbols present)7 Tap OK.
![load 2 or more sheets of A4 or letter sized plain paper in the cassette and tap [OK]. How to set OK Alignment request accepted. Please continue with setup. OK](/content/2026/04/680949/images/7edb190dda8cd70ea0bf386a0a88f68f00a17559bf0f7fb4701f9bd2180b015f.jpg)
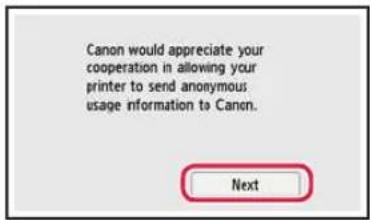
8 Tap Next.
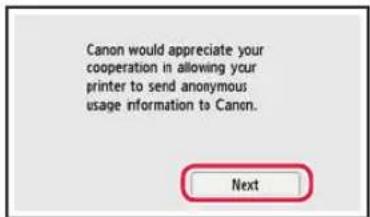
- Next, follow the onscreen instructions to continue operations. During these operations, you will need to make selections related to sending information. Read "Sending Information To Canon" in Safety and Important Information.
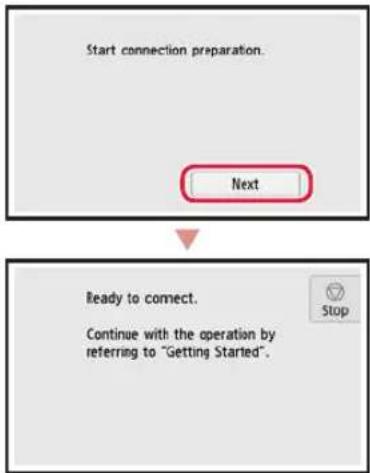
9 Tap Next.
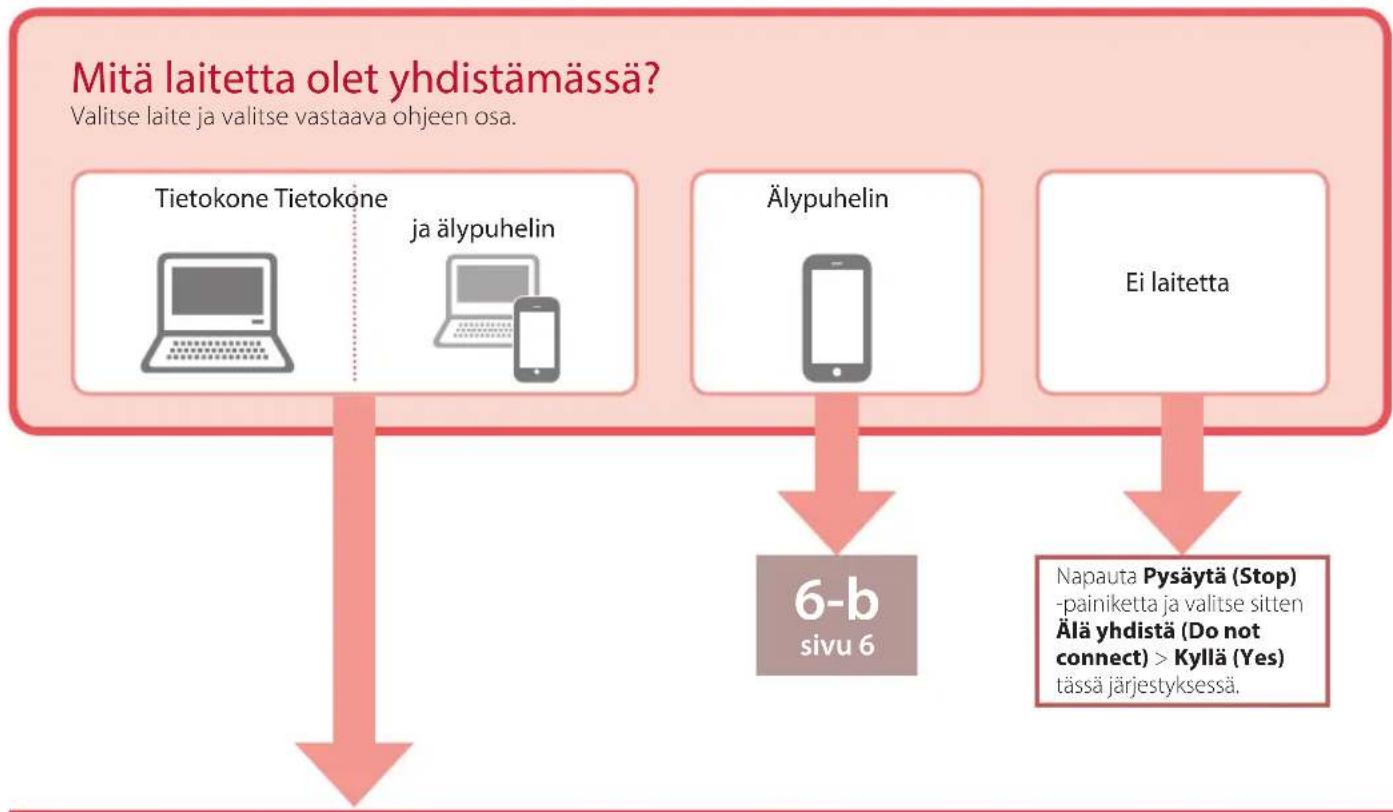
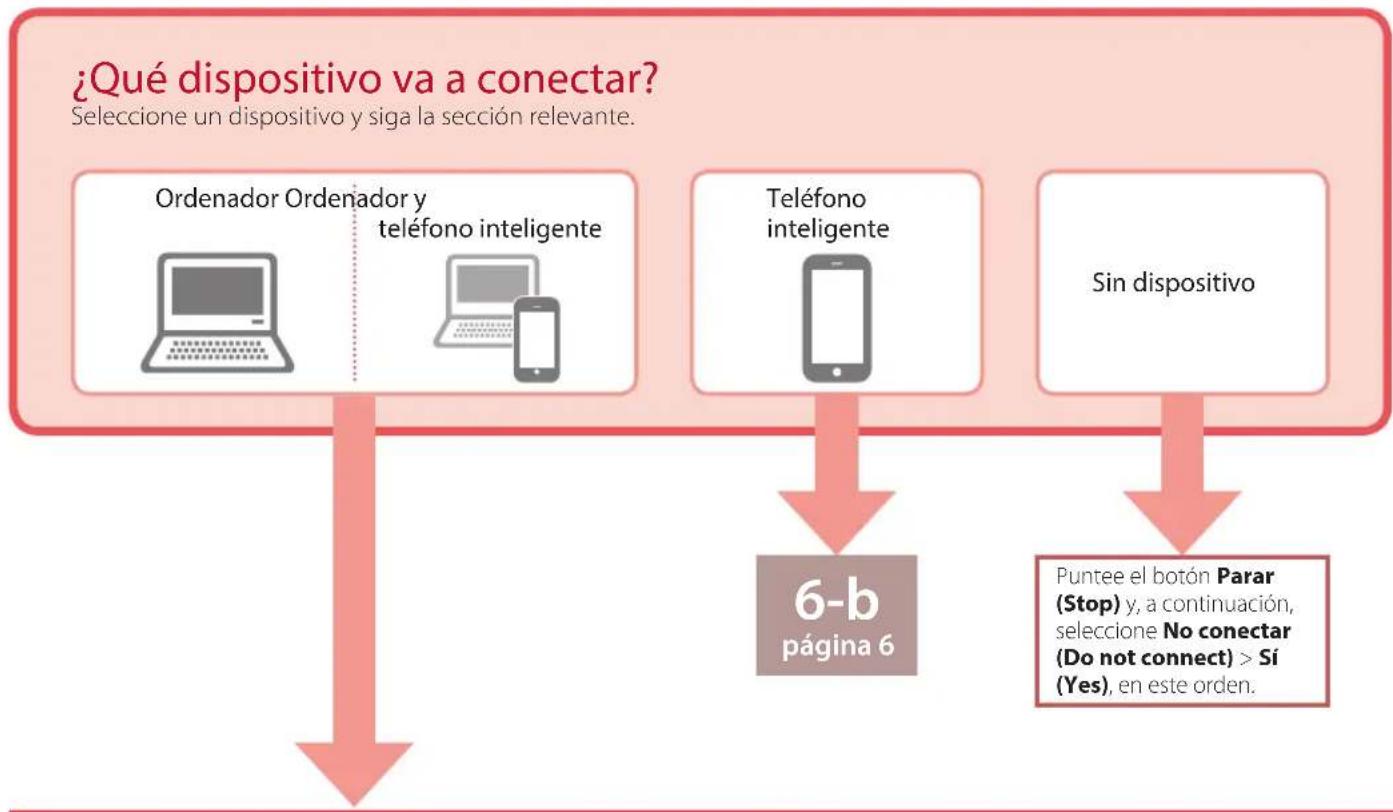
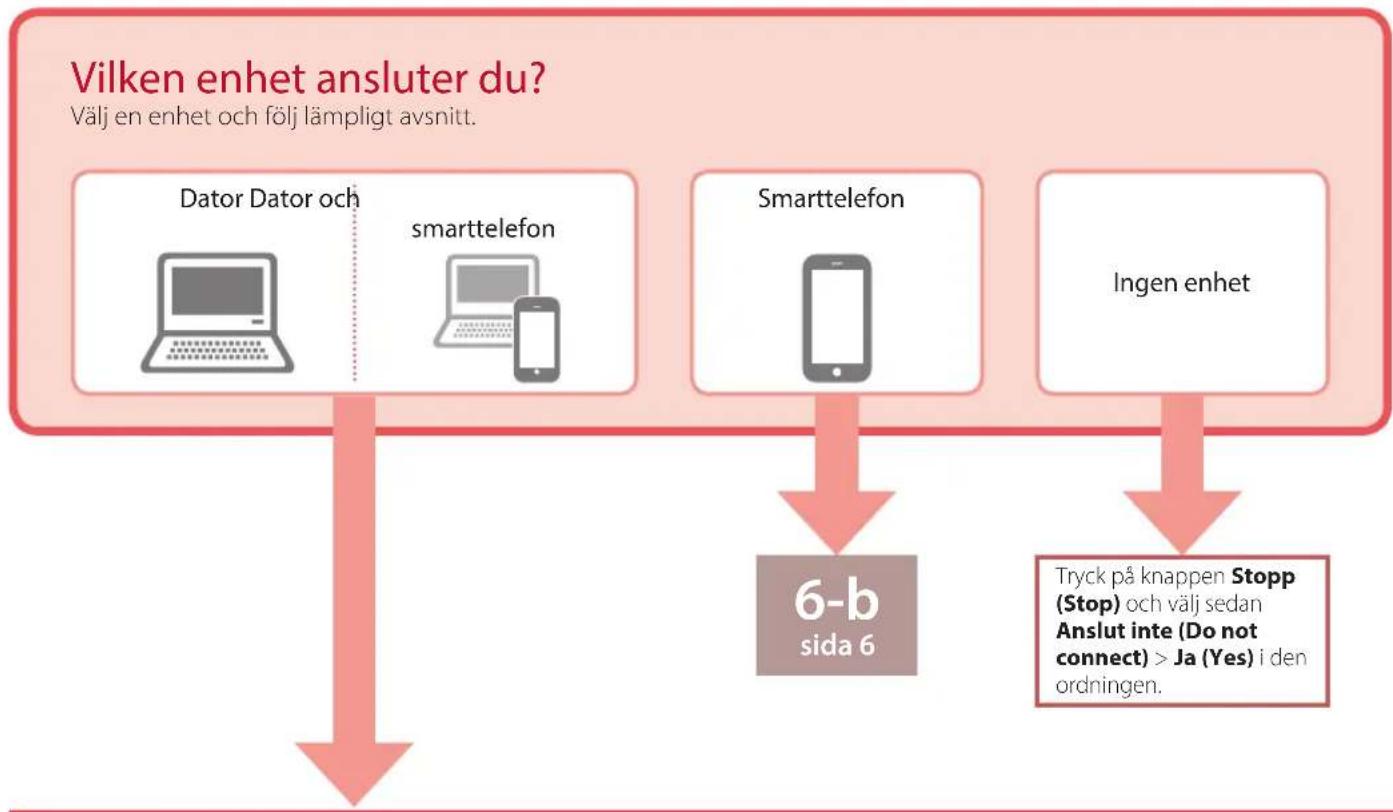
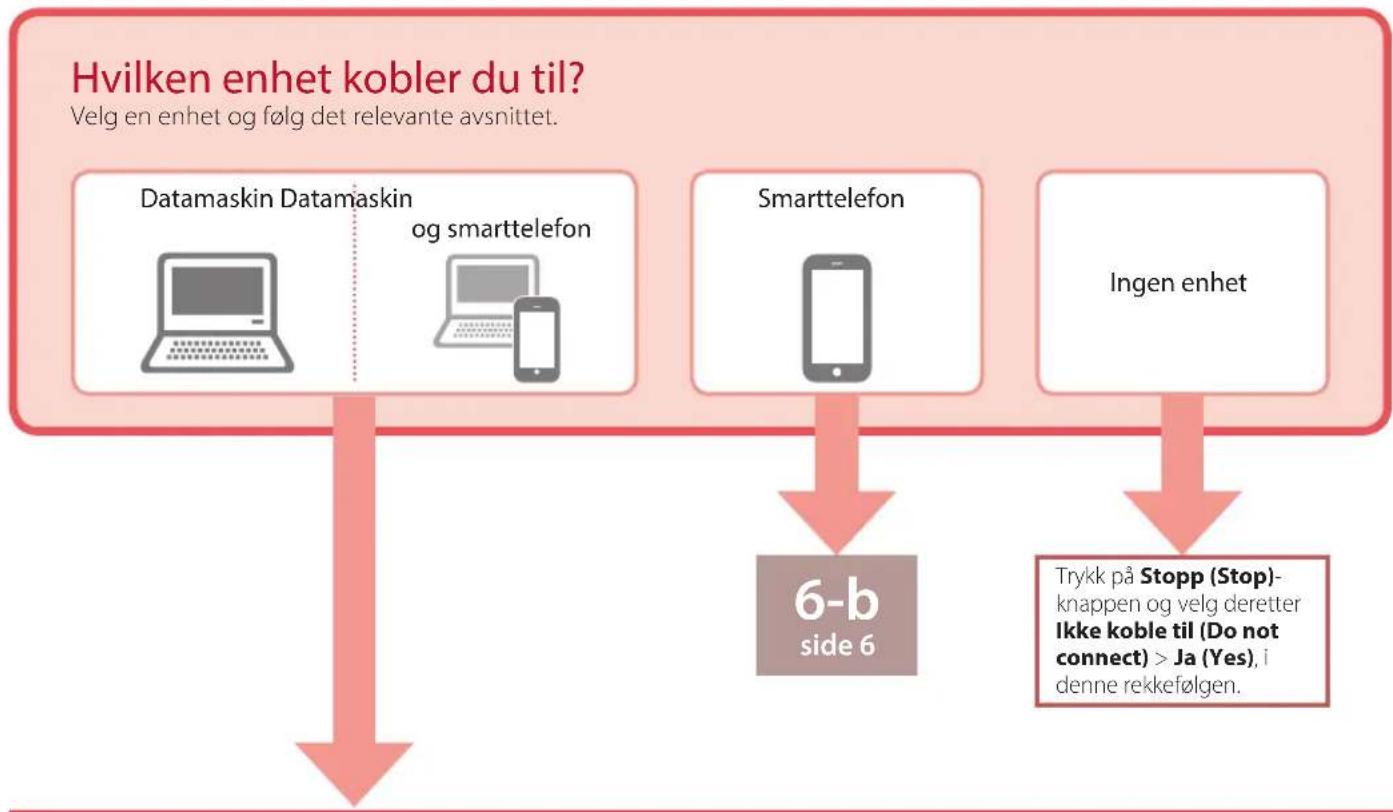
What device are you connecting?
Select a device and follow the relevant section.
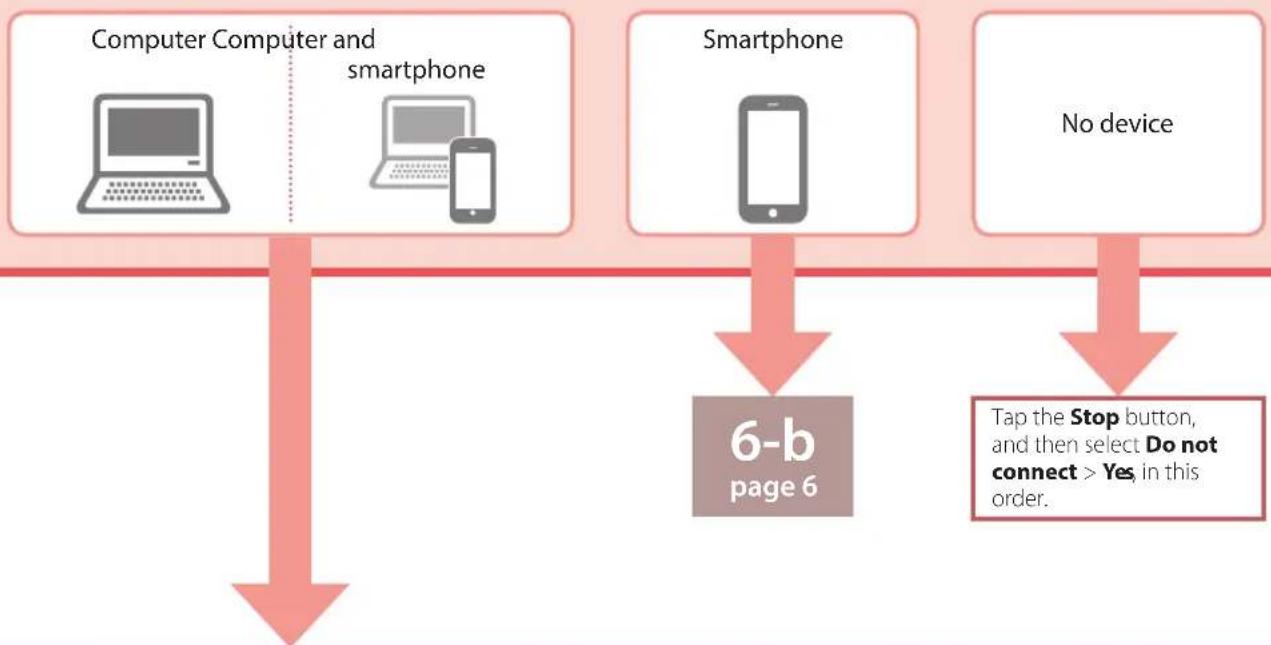
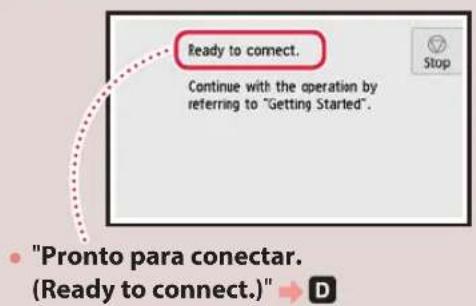
flowchart
graph TD
    A["Computer Computer and smartphone"] --> B["6-b page 6"]
    C["Smartphone"] --> B
    D["No device"] --> E["Tap the Stop button, and then select Do not connect > Yes in this order."]
6-a
Connecting to a Computer
If you are using multiple computers, perform these steps on each computer. There are two methods, "Online Setup" and "Bing the Setup CD-ROM (Windows Only) Provided".


Online Setup
1 Access the Canon website from a computer.

2 Select Set Up.
3 Enter your printer's model name and click Go.
4 Click Start.
5 Click If you have already prepared your printer, go to Connect.

When you are using a computer with Windows (except for Windows 10 S) or macOS, proceed to the next step. When you are using a computer with another OS, continue the setup by following the on-screen instructions.
6 Click Download.
- The setup file is downloaded to your computer.
7 Run the downloaded file.
8 Proceed to step 9 on page 5.

Using the Setup CD-ROM (Windows Only) Provided
1 Insert the Setup CD-ROM into your computer.

2 Follow the instructions for your version of Windows.
Windows 10/Windows 8.1
1 Click on the following message when it appears on the right-hand side of your computer screen.

Note
If the message does not appear (or is no longer visible), click the File Explorer icon in the taskbar. On the left-hand side of the window, click This PC. Double click the CD icon that is displayed on the right-hand side (when the content of the CD is displayed, and then double click Msetup4.exe). Proceed to 3.
② Click Run Msetup4.exe.

3 If the User Account Control dialog box appears, click Yes.
Windows 7
1 Click Run Msetup4.exe.
- When the AutoPlay screen appears, click Run Msetup4.exe.
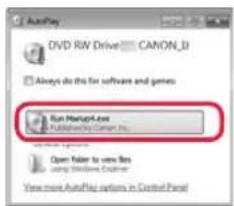
Note
If the AutoPlay screen does not appear, in the Start menu, click Computer. On the right-hand side of the window, double click the CD icon (when the content of the CD is displayed, double click Msetup4.exe).
2 If the User Account Control dialog box appears, click Continue.
3 Proceed to step 9 below.
9 Click Start Setup.
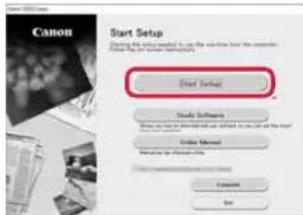
10 Follow the on-screen instructions.
• These operations may take some time.
11 When the following screen appears, click Exit.
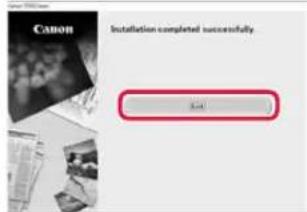
Your printer is now connected to your computer. To connect a smartphone as well, see "6-b. Connecting to a Smartphone" on page 6.
6-b
Connecting to a Smartphone
If you are using multiple smartphones, perform these steps on each smartphone.

Prepare the following before starting.
1 Enable the Wi-Fi setting on your smartphone*.
2 Connect your smartphone to the wireless router* (if you have a wireless router).
* See your smartphone and wireless router manuals regarding these procedures for more details.
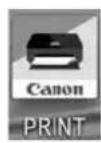
1 Install the "Canon PRINT Inkjet/SELPHY" app on your smartphone.
ios
Search for "Canon PRINT" in the App Store.
Android
Search for "Canon PRINT" in Google Play.

Note
You can also access the Canon website by scanning the QR code shown on the right to download the app.

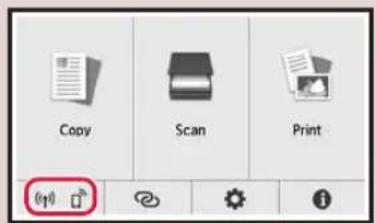
2 Check the printer's screen as you proceed through the steps.

appears,

• If ( ) does not appear,


Note
- The printer's screen turns off when the printer is idle for 10 minutes. Tap the touch screen to turn on the screen.
- If (1) appears, The printer cannot communicate by Wi-Fi connection. For details, see "Frequently Asked Questions" at "http://ij.start.canon".

3 Open the installed app.
4 Follow the on-screen instructions to add your printer.
5 Check that the following screen appears.

Your printer is now connected to your smartphone. To print photos, see "Loading Photo Paper" on page 8.

Procedures vary for iOS and Android. Follow the instructions for your operating system.
iOS
3 Tap Settings on your smartphone's home screen, and tap Canon_ij_XXXX in the Wi-Fi settings.
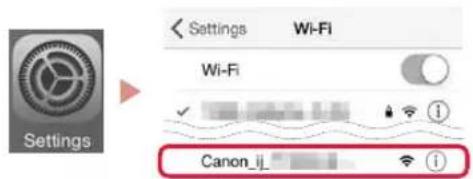
Note
If Canon_ij_XXXX does not appear, follow the procedure in E, and then search for Canon_ij_XXXX again.
4 Open the installed app.
• The printer is registered with the most appropriate connection method for the environment you are using.

5 Check that the following screen appears.

Android
3 Open the installed app.
- The printer is registered with the most appropriate connection method for the environment you are using.
Note
If a message saying "No printer has been added. Perform printer setup?" does not readily appear after starting the application, follow the procedure in E and then return to smartphone operations.
4 Check that the following screen appears.

Your printer is now connected to your smartphone. To print photos, see "Loading Photo Paper" on page 8.
E
3 Tap on the printer's touch screen.
4 Press and hold the on the HOME screen for about 3 seconds.
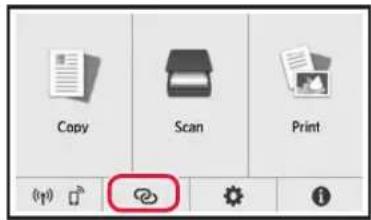
5 When "Follow the instructions on the computer or smartphone, etc. to perform the operation." appears, proceed to D
Loading Photo Paper
Photo paper can only be loaded in the rear tray.
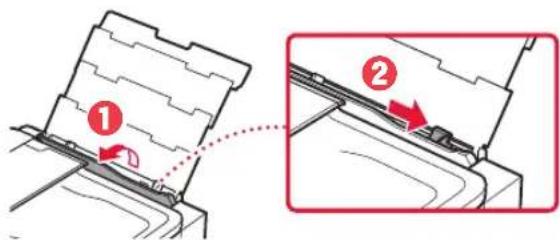
1 Open the rear tray cover and extend the paper support.
natural_image
Diagram showing two views of a printer with arrows indicating process direction (no text or symbols)2 Open the feed slot cover and slide the right-hand side paper guide to the far right.
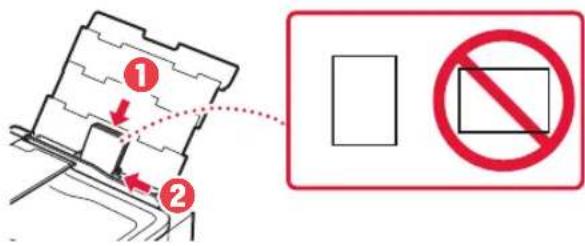
3 Load several sheets of photo paper with the print side facing up and slide the side paper guide against the edge of the paper stack.
4 Close the feed slot cover.
- Follow the on-screen instructions to set information for the loaded paper.
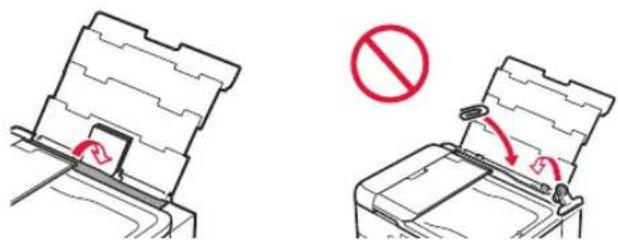
5 Open the operation panel and pull out the paper output tray.

Printing Photos Saved on a Memory Card
1 Turn on the printer.
2 Load several sheets of photo paper.
3 Insert the memory card into the card slot.
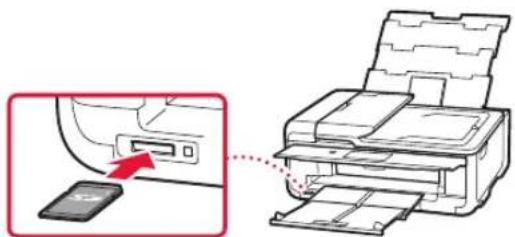
4 Flick right and left through the photos and select one.
5 Tap the Color button to start printing.
Configuration de l'imprimante
Configuration Web
http://ij.start.canon

natural_image
Simple line drawing of a USB cable tied with a strap (no text or symbols)natural_image
Line drawing of a series of rectangular connectors or connectors with no text or symbolsnatural_image
Simple line drawing of a CD or DVD disc with no text or symbolsnatural_image
Technical line drawing of a mechanical component with no visible text or symbolsnatural_image
Diagram of a printer with a red arrow indicating compression or disassembly (no text or symbols present)Attention
natural_image
Diagram of a printer internal structure showing paper feeding into a slot (no text or symbols)Attention
natural_image
Illustration showing two hands performing a task on a device, with red arrows indicating motion direction (no text or symbols present)Important
natural_image
Three-step diagram showing a device with a red component inserted into a housing, no text or symbols present.natural_image
Two-step diagram showing a hand inserting a device into a device, with red arrows indicating the process (no text or symbols present)Important
natural_image
Diagram of an open printer with a red arrow indicating the process (no text or symbols present)▲ Attention
natural_image
Line drawing of a printer with a hand inserting a paper into the cover (no text or symbols)natural_image
Diagram showing a device with a red arrow pointing to a component, no text or symbols present5 Chargez la cassette.

natural_image
Diagram of a printer with a paper holder and a red arrow indicating compression or disassembly (no text or symbols present)natural_image
Diagram showing two views of a printer with a red arrow indicating compression or disassembly (no text or symbols present)7 Touchez OK.
natural_image
Diagram showing two views of a printer with arrows indicating process direction (no text or symbols)natural_image
Simple line drawing of a USB cable tied with a strap (no text or symbols)Netzkabel

natural_image
Line drawing of a series of rectangular connectors or connectors with no text or symbolsnatural_image
Simple line drawing of a CD or DVD disc with no text or symbols• Installations-CD-ROM
natural_image
Cross-sectional diagram of a mechanical device with no visible text or symbolsnatural_image
Diagram of a printer with a red arrow indicating compression or disassembly (no text or symbols present)Vorsicht
natural_image
Diagram of a printer with a red arrow indicating compression or disassembly (no text or symbols present)Vorsicht
natural_image
Illustration of two hands holding a small object with red arrows indicating motion (no text or symbols)Wichtig
natural_image
Three-step diagram showing a mechanical assembly with a highlighted section (no text or symbols)natural_image
Illustration showing two steps of a device being opened, with no visible text or symbolsWichtig
natural_image
Diagram of an open printer with a red arrow indicating the paper cut (no text or symbols present)natural_image
Line drawing of a printer with a hand inserting a paper into the cover (no text or symbols)natural_image
Diagram showing a device with a red arrow indicating a process or transformation, no text or symbols present.natural_image
Diagram showing a printer being placed into a flat sheet with a red arrow indicating compression (no text or symbols present)natural_image
Diagram showing two views of a printer with a paper feed being inserted (no text or symbols present)flowchart
graph TD
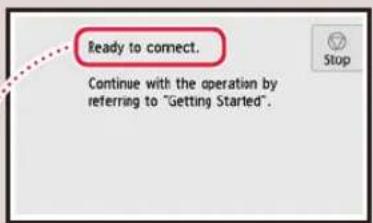
A["Start connection preparation."] --> B["Next"]
B --> C["Ready to connect. Continue with the operation by referring to "Getting Started"."]
C --> D["Stop"]

Hinweis

Hinweis
natural_image
Diagram showing two views of a printer with arrows indicating process direction (no text or symbols)natural_image
Simple line drawing of a USB cable tied with a string (no text or symbols)Netsnoer
natural_image
Line drawing of a series of rectangular connectors or connectors with no text or symbolsnatural_image
Simple line drawing of a CD or DVD disc with no text or symbolsnatural_image
Cross-sectional diagram of a mechanical device with internal components (no text or labels)3 Sluit de scaneenheid / klep.

natural_image
Diagram of a printer with a red arrow indicating compression or disassembly (no text or symbols present)Let op
natural_image
Diagram of a printer internal structure showing paper feeding into a printer with a red arrow indicating the process (no text or symbols present)Let op
natural_image
Illustration showing two hands holding a small object with red arrows indicating motion (no text or symbols)Belangrijk
natural_image
Three-step diagram showing a device with a highlighted circular component, no text or symbols presentnatural_image
Illustration showing two-step cleaning process: hand using tool to clean or adjust a device (no text or symbols visible)Belangrijk
7 Sluit de scaneenheid / klep.
natural_image
Diagram of an open printer with a red arrow indicating the internal structure (no text or symbols present)Let op
natural_image
Line drawing of a printer with a hand inserting a paper into the cover (no text or symbols)natural_image
Diagram showing a device with a red arrow pointing to a component, no text or symbols presentnatural_image
Diagram showing a printer being placed into a flat sheet with a red arrow indicating compression (no text or symbols present)natural_image
Two line drawings of a printer with a red arrow indicating compression or disassembly (no text or symbols present)7 Tik op OK.
![load 2 or more sheets of A4 or letter sized plain paper in the cassette and tap [OK]. How to set OK Alignment request accepted. Please continue with setup. OK](/content/2026/04/680949/images/5cdd9ceeb856031efbe98257c69186f4e6b6ec2f443a09fbbb8f1c99467256d1.jpg)
Opmerking
Opmerking
Zoek "Canon PRINT" in Google Play.

Opmerking
natural_image
Diagram showing two views of a printer with arrows indicating process direction (no text or symbols)natural_image
Simple line drawing of a USB cable tied with a strap (no text or symbols)natural_image
Line drawing of a series of rectangular connectors or connectors with no text or symbolsnatural_image
Simple line drawing of a CD or DVD disc with no text or symbolsnatural_image
Top-down schematic of a mechanical device with no visible text or symbolsnatural_image
Diagram of a printer with a red arrow indicating compression or disassembly (no text or symbols present)Attenzione
natural_image
Diagram of a printer internal structure showing paper feeding into a slot (no text or symbols)
Attenzione
natural_image
Illustration of two hands holding a small object with red arrows indicating motion (no text or symbols)Importante
natural_image
Three-step diagram showing a device with a highlighted section, no text or symbols presentnatural_image
Illustration showing two-step assembly process: one with a tool and cable, the other with a red arrow indicating a cut or repair (no text or symbols present)Importante
natural_image
Diagram of an open printer with a red arrow indicating the process (no text or symbols present)Attenzione
natural_image
Line drawing of a printer with a hand inserting a paper into the cover (no text or symbols)natural_image
Diagram showing a device with a red arrow indicating a process or transformation, no text or symbols present.natural_image
Diagram showing a printer being placed into a flat sheet with a red arrow indicating compression (no text or symbols present)natural_image
Diagram showing two views of a printer with a red arrow indicating the process (no text or symbols present)7 Toccare OK.
![load 2 or more sheets of A4 or letter sized plain paper in the cassette and tap [OK]. How to set OK Alignment request accepted. Please continue with setup. OK](/content/2026/04/680949/images/3d94f52360e95d3b62bad00cb7ff886e01d7aa7c97d229bcd2f7b0567ed94552.jpg)
8 Toccare Avanti (Next).

Nota
Nota
Se appare


Se non appare


Android
natural_image
Diagram showing two views of a printer with arrows indicating process direction (no text or symbols)natural_image
Line drawing of a USB cable with a connector (no text or symbols)- Cabo de alimentação

natural_image
Line drawing of a series of rectangular connectors or connectors with no text or symbolsnatural_image
Simple line drawing of a CD or DVD disc with no text or symbolsnatural_image
Cross-sectional diagram of a mechanical device with internal components (no text or labels)natural_image
Diagram of a printer with a red arrow indicating compression or disassembly (no text or symbols present)Cuidado
natural_image
Diagram of a printer internal structure showing paper feeding into a slot (no text or symbols)Cuidado
natural_image
Illustration of two hands holding a small object with red arrows indicating motion (no text or symbols)Importante
natural_image
Three-step diagram showing a device with a red component inserted into a housing, no text or symbols present.natural_image
Illustration showing two-step installation of a mechanical component with a tool, no text or symbols present5 Verifique se a cor do cartucho de tinta instalado aparece na tela.
Importante
natural_image
Diagram of an open printer with a red arrow indicating the internal structure (no text or symbols present)Cuidado
natural_image
Line drawing of a printer with a hand inserting a paper into the cover (no text or symbols)3 Deslize as guias do papel.
natural_image
Diagram showing a device with a red arrow indicating a process or transformation, no text or symbols present.5 Carregue o cassete.

natural_image
Diagram of a printer with a red arrow indicating compression or disassembly (no text or symbols present)6 Puxe para fora a bandeja de saída do papel.

natural_image
Diagram showing two views of a printer with a red arrow indicating the process (no text or symbols present)7 Toque em OK.
![load 2 or more sheets of A4 or letter sized plain paper in the cassette and tap [OK]. How to set OK Alignment request accepted. Please continue with setup. OK](/content/2026/04/680949/images/b0b6b9a5bb773b69925713ed14784afeeef02d9c0ae89fb0298109bbfdbcd653.jpg)
Nota
① Clique em Executar Msetup4.exe (Run Msetup4.exe).
Nota


Nota
natural_image
Diagram showing two views of a printer with arrows indicating process direction (no text or symbols)5 Abra o painel de controle e puxe a bandeja de saída do papel para fora.
natural_image
Simple line drawing of a USB cable tied with a string (no text or symbols)natural_image
Line drawing of a multi-pin electrical connector (no text or symbols)natural_image
Simple line drawing of a CD or DVD disc with no text or symbolsnatural_image
Cross-sectional diagram of a mechanical device with internal components (no text or labels)natural_image
Diagram of a printer with a red arrow indicating compression or disassembly (no text or symbols present)natural_image
Diagram of a printer internal structure with a red arrow indicating the paper direction (no text or symbols present)Precaución
natural_image
Illustration showing two-step instructions for inserting a device into a clip (no text or symbols present)Importante
natural_image
Three-step diagram showing a mechanical component with a highlighted section (no text or symbols)natural_image
Illustration showing two-step assembly process: one with tool and cable, the other with a red arrow indicating a cut or repair (no text or symbols present)Importante
natural_image
Diagram of an open printer with a red arrow indicating the process (no text or symbols present)Precaución
natural_image
Line drawing of a printer with a hand inserting a paper into the cover (no text or symbols)natural_image
Diagram showing a device with a red arrow indicating a process or transformation, no text or symbols present.natural_image
Diagram showing a printer being placed into a flat sheet with a red arrow indicating compression (no text or symbols present)natural_image
Diagram showing two views of a printer with a red arrow indicating the process (no text or symbols present)7 Puntee OK.
![load 2 or more sheets of A4 or letter sized plain paper in the cassette and tap [OK]. How to set OK Alignment request accepted. Please continue with setup. OK](/content/2026/04/680949/images/d2fcb586e2bab0707d054d06367e6ba7451d4450aeb4deb84419d15973759c5f.jpg)
8 Puntee Siguiente (Next).

Nota

Nota
• Si aparece


• Si no aparece


Nota
natural_image
Diagram showing two views of a printer with arrows indicating process direction (no text or symbols)natural_image
Simple line drawing of a USB cable tied with a strap (no text or symbols)- Καλώδιο τροφοδοσίας

natural_image
Line drawing of a series of rectangular connectors or connectors with no text or symbolsnatural_image
Simple line drawing of a CD or DVD disc with no text or symbolsnatural_image
Technical line drawing of a mechanical component with no visible text or symbolsnatural_image
Diagram of a printer with a red arrow indicating compression or disassembly (no text or symbols present)⚠️ Προσοχή
natural_image
Diagram of a printer internal structure showing paper feeding into a printer with a red arrow indicating the paper's direction (no text or symbols present)⚠️ Προσοχή
natural_image
Illustration of two hands holding a device with red arrows indicating motion (no text or symbols)Σημαντικό
natural_image
Three-step diagram showing a device with a highlighted circular region, no text or symbols presentnatural_image
Illustration showing two steps of a device being opened, with no visible text or symbolsΣημαντικό
natural_image
Diagram of an open printer with a red arrow indicating the process (no text or symbols present)⚠️ Προσοχή
natural_image
Line drawing of a printer with a hand inserting a paper into the cover (no text or symbols)natural_image
Diagram showing a device with a red arrow pointing to a component, no text or symbols presentnatural_image
Diagram showing a printer being placed into a flat case with a red arrow indicating motion (no text or symbols present)natural_image
Two-step diagram showing printer insertion process: top view with arrow indicating compression, bottom view with loose paper (no text or symbols)7 Πατήστε ΟΚ.
![load 2 or more sheets of A4 or letter sized plain paper in the cassette and tap [OK]. How to set OK Alignment request accepted. Please continue with setup. OK](/content/2026/04/680949/images/33b8fe0abc196dc56650562a3506fefcb9cbac19fea4d6a6d0f0935caf8210be.jpg)
Σημείωση
Σημείωση
natural_image
Diagram showing two views of a printer with arrows indicating process direction (no text or symbols)natural_image
Simple line drawing of a USB cable tied with a string (no text or symbols)Strömkabel

natural_image
Line drawing of a series of rectangular connectors or connectors with no text or symbolsnatural_image
Simple line drawing of a CD or DVD disc with no text or symbols• Installations-CD
natural_image
Technical line drawing of a mechanical component with no visible text or symbolsnatural_image
Diagram of a printer with a red arrow indicating compression or disassembly (no text or symbols present)natural_image
Diagram of a printer with an open lid and internal structure, showing no text or symbols⚠ Försiktighet
natural_image
Illustration showing two-step hand manipulation of a device with red arrows indicating rotation (no text or symbols)Viktigt!
natural_image
Three-step diagram showing a device with a red component inserted into a housing, no text or symbols present.natural_image
Illustration showing two-step cleaning process: hand using tool to clean a device (no text or symbols visible)Viktigt!
natural_image
Diagram of an open printer with a red arrow indicating the paper cut (no text or symbols present)2 Dra ut kassetten ur enheten.
natural_image
Line drawing of a printer with a hand inserting a paper into the cover (no text or symbols)natural_image
Diagram showing a device with a red arrow pointing to a component, no text or symbols present5 Ladda kassetten.

natural_image
Diagram showing a printer being placed into a flat case with a red arrow indicating compression (no text or symbols present)natural_image
Two line drawings of a printer with a red arrow indicating compression or disassembly process (no text or symbols)7 Tryck på OK.
![load 2 or more sheets of A4 or letter sized plain paper in the cassette and tap [OK]. How to set OK Alignment request accepted. Please continue with setup. OK](/content/2026/04/680949/images/043eb9e7389add15bdfc89888321f4ac2a39951e9464c65d0dca32263fe29946.jpg)
Obs!
Obs!
- Om (q)ler visa
- Om (inte visas,


Obs!
natural_image
Diagram showing two views of a printer with arrows indicating process direction (no text or symbols)natural_image
Simple line drawing of a USB cable tied with a string (no text or symbols)Strømledning

natural_image
Line drawing of a series of rectangular connectors or connectors with no text or symbolsnatural_image
Simple line drawing of a CD or DVD disc with no text or symbols• Installerings-CD-ROM

natural_image
Technical line drawing of a mechanical component with no visible text or symbols3 Lukk skanneenheten/dekselet.
natural_image
Diagram of a printer with a red arrow indicating compression or disassembly (no text or symbols present)▲ Forsiktig!
Pass på fingrene.
3. Slå på skriveren


natural_image
Diagram of a printer internal structure showing paper feeding into a slot (no text or symbols)▲ Forsiktig!
natural_image
Illustration showing two hands holding a small object with red arrows indicating motion (no text or symbols)Viktig!
natural_image
Three-step diagram showing a device with a red component inserted into a housing, no text or symbols present.natural_image
Illustration showing two steps of a hand inserting a cable into a device, with no visible text or symbols.Viktig!
7 Lukk skanneenheten/dekselet.
natural_image
Diagram of an open printer with a red arrow indicating the internal structure (no text or symbols present)natural_image
Line drawing of a printer with a hand inserting a paper into the cover (no text or symbols)natural_image
Diagram showing a device with a red arrow pointing to a component, no text or symbols present5 Sett inn kassetten.
natural_image
Diagram of a printer with a red arrow indicating compression or disassembly (no text or symbols present)6 Trekk ut papirutmatingsbrettet.
natural_image
Two-step diagram showing printer insertion process, with no text or symbols present7 Trykk på OK.
![load 2 or more sheets of A4 or letter sized plain paper in the cassette and tap [OK]. How to set OK Alignment request accepted. Please continue with setup. OK](/content/2026/04/680949/images/9c3197b5ef2d174ab7e5724e279758c202fc08c2d4b4022b15e8bd676a8eb9f1.jpg)
flowchart
graph TD
    A["Start connection preparation."] --> B["Next"]
    C["Ready to correct."] --> D["Continue with the operation by referring to "Getting Started"."]
    E["Stop"] --> D
Merk
Merk


Merk
natural_image
Two-step diagram showing a printer being inserted into a paper holder, with arrows indicating the process (no text or symbols present)4 Lukk spordekselet for mating.
natural_image
Simple line drawing of a USB cable tied with a string (no text or symbols)Netledning

natural_image
Line drawing of a series of rectangular connectors or connectors with no text or symbolsnatural_image
Simple line drawing of a CD or DVD disc with no text or symbols• Installations-cd-rom

natural_image
Technical line drawing of a mechanical component with no visible text or symbolsnatural_image
Diagram of a printer with a red arrow indicating compression or disassembly (no text or symbols present)▲ Forsigtig
Pas på dine fingre.
3. Tænd printeren


natural_image
Diagram of a printer internal structure showing paper feeding into a slot, with no visible text or symbols.▲ Forsigtig
natural_image
Illustration of two hands holding a device with red arrows indicating motion (no text or symbols)Vigtigt
natural_image
Three-step diagram showing a device with a red circular annotation and a magnified view of the internal structure (no text or symbols)natural_image
Illustration showing a hand inserting a cable into a device with a red arrow indicating the cable's direction (no text or symbols present)Vigtigt
natural_image
Diagram of an open printer with a red arrow indicating the internal structure (no text or symbols present)natural_image
Line drawing of a printer with a hand inserting a paper into the cover (no text or symbols)natural_image
Diagram showing a device with a red arrow pointing to a component, no text or symbols present5 Isæt kassetten.
natural_image
Diagram showing a printer being inserted into a plastic sheet, with a red arrow indicating the process (no text or symbols present)natural_image
Diagram showing two views of a printer with a red arrow indicating compression or disassembly (no text or symbols present)7 Tryk på OK.
![load 2 or more sheets of A4 or letter sized plain paper in the cassette and tap [OK]. How to set OK Alignment request accepted. Please continue with setup. OK](/content/2026/04/680949/images/7da727b488d0a0ef999fc2155584be0fcb0d2ccb3ecb742d6d21e3fa3d2d6da6.jpg)
flowchart
graph TD
    A["Start connection preparation."] --> B["Next"]
    C["Ready to connect."] --> D["Continue with the operation by referring to "Getting Started"."]

Bemærk

Bemærk

Bemærk
natural_image
Diagram showing two views of a printer with arrows indicating process direction (no text or symbols)natural_image
Simple line drawing of a USB cable tied with a string (no text or symbols)• Virtajohto

natural_image
Line drawing of a series of rectangular connectors or connectors with no text or symbolsnatural_image
Simple line drawing of a CD or DVD disc with no text or symbols• Asennus-CD

natural_image
Technical line drawing of a mechanical component with no visible text or symbolsnatural_image
Diagram of a printer with a red arrow indicating compression or disassembly (no text or symbols present)Huomio
Varo sormiasi.
natural_image
Diagram of a printer internal structure showing paper feeding into a slot (no text or symbols)Huomio
natural_image
Illustration showing two-step hand manipulation of a device with red arrows indicating rotation (no text or symbols)Tärkeää
natural_image
Three-step diagram showing a device with a red component inserted into a housing, no text or symbols present.natural_image
Illustration showing a hand inserting a cable into a device with a red arrow indicating the cable's direction (no text or symbols present)Tärkeää
natural_image
Diagram of an open printer with a red arrow indicating the process (no text or symbols present)▲ Huomio Varo sormiasi.
natural_image
Line drawing of a printer with a hand inserting a paper into the cover (no text or symbols)natural_image
Diagram showing a device with a red arrow pointing to a component, no text or symbols present5 Aseta kasetti.

natural_image
Diagram showing a printer being inserted into a flat sheet, with a red arrow indicating the process (no text or symbols present)natural_image
Two line drawings of a printer with a red arrow indicating a process or transformation (no text or symbols present)7 Napauta OK.
![load 2 or more sheets of A4 or letter sized plain paper in the cassette and tap [OK]. How to set OK Alignment request accepted. Please continue with setup. OK](/content/2026/04/680949/images/0822e9f1fedc34897f81173f034d07b6bdd0ce0b76d342761e3f22de2ea9eefa.jpg)
Tulostimen asennus