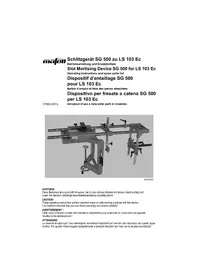
SG 500 - Notching device Mafell - Free user manual and instructions
Find the device manual for free SG 500 Mafell in PDF.


| Product type | Notching device for chain mortiser |
| Brand | Mafell |
| Model | SG 500 |
| Maximum notch depth | 500 mm |
| Notch thickness | 10 - 17 mm |
| Notch width | 50 mm |
| Inclination | Up to 45° on each side |
| Weight | 42 kg |
| Power supply | Mechanical accessory, powered by the LS 103 Ec mortiser |
| Main functions | Wood notching, depth adjustment, inclination, lateral displacement |
| Standard equipment | Notching device, clamping device, service tool, lubrication pump, set of guide parts 3,5,7 mm |
| Maintenance | Regular greasing of the roller bearing with non-acid grease, dipping the chain in an oil bath after sharpening |
| Cleaning | Wipe surfaces; do not use aggressive solvents |
| Safety | Secure the workpiece against slipping; use only compliant tools; follow the instructions of the LS 103 Ec mortiser |
| Spare parts and repairability | Use exclusively original MAFELL parts; revision by an authorized workshop recommended |
| General information | Manufacturer: MAFELL AG, Oberndorf/Neckar, Germany; user manual of 14 pages |
Frequently Asked Questions - SG 500 Mafell
User questions about SG 500 Mafell
0 question about this device. Answer the ones you know or ask your own.
Ask a new question about this device
Download the instructions for your Notching device in PDF format for free! Find your manual SG 500 - Mafell and take your electronic device back in hand. On this page are published all the documents necessary for the use of your device. SG 500 by Mafell.
USER MANUAL SG 500 Mafell
Operating instructions and spare parts list
These operating instructions contain important notes on safe working practices with this device. It is therefore essential that you read these operating instructions carefully!
AVERTISSEMENT!
This device is an optional accessory to be used with the chain mortising machine LS 103 Ec and is intended for cutting operations on wood. Using the machine for other purposes may lead to accidents.
1 Product information
for slot mortising device SG 500 with Art.-No. 201005
1.1 Manufacturer's data
MAFELL AG
P. O. Box 1180, D-78720 Oberndorf / Neckar
Phone +49 7423 812-0, Fax +49 7423 812-218
1.2 Technical data
Cutting depth 500mm (19 3/4 in.)
Cutting width 10 - 17 mm (3/8 - 11/16 in.)
Cutting length 50 mm (1 31/32 in.)
Tiltable up to 45^
Weight 42 kg (93 lbs)
1.3 Delivery specification
1 slot mortising device
1 clamping device
1 operating tool
1 grease gun
1 set of guide pieces 3,5,7 mm (1/8,3/16,9/32 in.)
2 Safety instructions
The safety regulations applicable in the country of use, as well as all other generally accepted rules on safety and occupational medicine, must be observed.
Whenever possible, secure the workpiece against slipping, tipping over and springing up (e.g. with screw clamps).
Only use tools with the technical data stated in this manual.
Only original MAFELL spare parts and accessories must be used. Otherwise the manufacturer does not offer any warranty and does not accept any liability.
Adhere to the safety instructions contained in the operating manual of the chain mortising machine LS 103 Ec.
3 Setting up / Adjusting
3.1 Indication on changing the mortising chain set
A groove in the chain bar of the SG 500 provides additional support and guidance for the mortising chain set.
3.2 Installing the LS 103 Ec on the SG 500
- Loosen clamping lever 1 (Fig. 1) and retract the depth stop pin of the chain mortising machine LS 103 Ec completely.
- Tighten clamping lever in such a way that the lever points in the direction opposite to the direction of mortising. (All clamping levers on the LS 103 Ec and SG 500 are adjustable and can be set to the desired position simply by pulling upwards.)
-
Remove guide plate 2 and install mortising chain set for slot mortising.
-
Pull out completely columns support 3 (Fig. 2) of the slot mortising device from the pivoting plate.
- Slide support bracket 4 forwards until it engages, if necessary release clamping lever 5 and push guide rod 6 downwards.
- Release clamping levers 7 and 8, move guide block 9 downwards as far as it will go by turning handle 10 and retighten clamping levers 7 and 8. Loosen the cylinder head bolt in handle 10 using the hexagonal spanner (SW4) provided with the LS 103 Ec and take off the handle.
- Now put the chain mortising machine LS 103 Ec on guide columns 11 and secure by means of knurled nut 12. Re-fasten handle 10 with the cylinder head bolt.
- To mount the chain bar support unscrew threaded pin 13 after slackening off wing nut 14 so that the mortising chain can be moved between threaded pin 13 and bearing journal 15.
-
Then release clamping lever 5, pull back support bracket 4 and insert bearing journal 15 in the groove of the chain bar.
-
Tighten threaded pin 13 so that support bracket 4 can be moved back- and forwards without play.
- Finally, secure threaded pin 13 with wing nut 14.
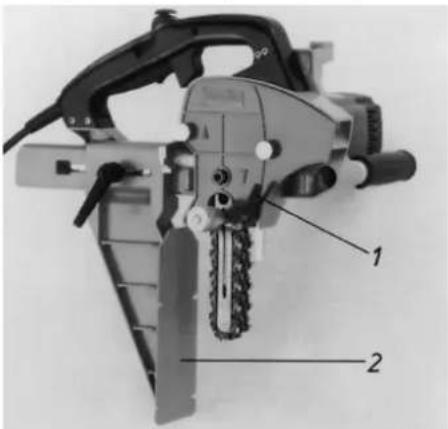
MAF00979
Fig. 1
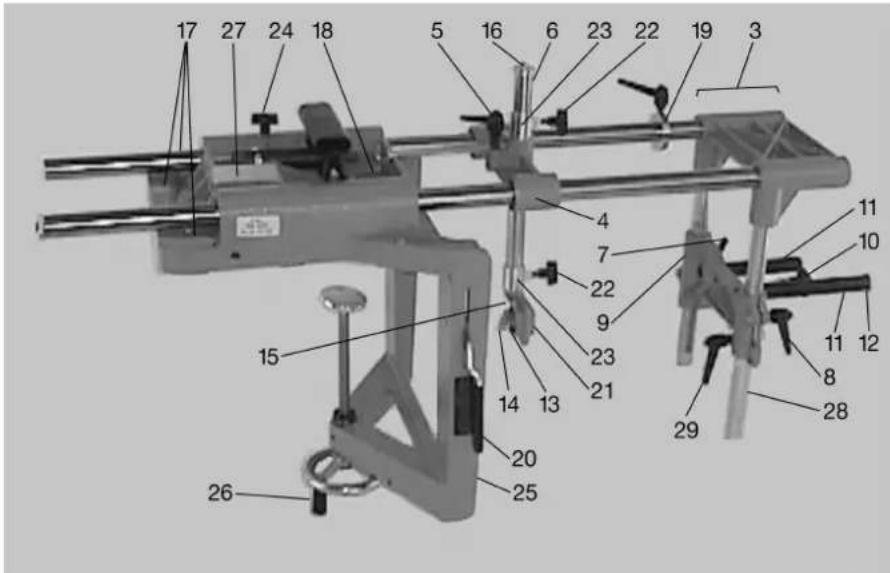
MAF00984
Fig. 2
3.3 Slot mortise distance from top edge of timber
Measuring rod 16 (Fig. 2) has been adjusted in such a way that the upper edge of setting ring 40 corresponds with the upper edge of the slot to be cut.
- Pull back support bracket 4.
- Release clamping levers 5, 7 and 8.
- Set desired distance according to scale 16 by turning handle 10 and then retighten clamping levers 5, 7 and 8.
3.4 Pivoting range
To cut slots at an angle the slot mortising device can be pivoted up to 45^ to either side.
- If necessary, turn frame 21 (Fig. 2) around to the other side.
- Loosen screws 17 and 18 which hold the pivoting plate and tighten them again when the angle required is reached.
3.5 Adjusting the cutting depth
The depth of the slot can be preselected by means of depth stop 19 (Fig. 2).
4 Operation
4.1 Operating instructions
After setting the slot mortise distance, slide support bracket 4 (Fig. 2) forwards as far as it will go to give the chain bar optimum support and engage it.

With slot lengths exceeding 50 mm (1 31/32 in.) begin mortising at the right marking. When the first cut has been completed, pull out the machine, move it sideways to the left and make the second cut.
When making more than one cut it is recommended to use the quick-action clamping device.
- First clamp clamping support 25 tight with hand-wheel 26.
- Eccentric lever 20 allows to loosen and retighten the clamping device quickly.
With the guide pieces stored in magazine 27 it is possible to cut slots of different widths with one chain bar (s. chart on page 19).
Stops 23 and 28 define the upper and lower edge of the slot for fast resetting.
When moving the SG 500 clamp down column support 3 with clamping screw 24.
4.2 Securing the machine against moving sideways
The inside of the clamping support must be in contact with the workpiece. Clamp the entire slot mortising device tight with the handwheel. To move the device sideways for longer slots, release the tension with eccentric lever 20, move the device and then clamp tight again.
5 Maintenance
The roller bearing of the chain bar should be kept well greased. The grease gun is provided for this purpose which should be pressed into the hole at the tip of the bar (only acid-free ball bearing grease of good quality should be used)!
The chain should be immersed in thin oil every time it has been resharpened. When the chain is being used very frequently it should be oiled several times a day!
Before re-tensioning the chain let it cool down.

MAFELL machines are designed to be low in maintenance. After a prolonged period of operation, users are recommended to have the device checked by an authorized MAFELL customer service shop.
Français
- AVERTISSEMENT!
- Product information
- Manufacturer's data
- Technical data
- Delivery specification
- Safety instructions
- Setting up / Adjusting
- Indication on changing the mortising chain set
- Installing the LS 103 Ec on the SG 500
- Slot mortise distance from top edge of timber
- Pivoting range
- Adjusting the cutting depth
- Operation
- Operating instructions
- Securing the machine against moving sideways
- Maintenance
- Français
Brand : Mafell
Model : SG 500
Category : Notching device