
TC 30 - Measuring equipment BENNING - Free user manual and instructions
Find the device manual for free TC 30 BENNING in PDF.


| Product type | Thermal camera |
| Brand | BENNING |
| Model | TC 30 |
| Category | Measuring equipment |
| Temperature measurement range | -20 °C to +400 °C |
| Measurement accuracy | ±2 % of measured value or ±2 °C (at +15 °C to +35 °C ambient, object >0 °C) |
| Detector | Infrared (IR) |
| Display | Color touchscreen |
| Power supply | Integrated Li-ion rechargeable battery, charging via USB-C (charger included) |
| Charging time | Approximately 3 hours |
| Main functions | Thermal images, optical images, video recording, temperature alarm, WLAN, hotspot, screen mirroring |
| Provided software | BENNING TC Analyser (PC), BENNING TC-Image Link app |
| Included accessories | USB-C charger, wrist strap, carrying case, quick start guide |
| Optional accessories | Macro lens (ref. 10237623) |
| Maintenance | Regular cleaning, recharge battery every 6 months, annual calibration |
| Safety instructions | Use only in dry environment, avoid explosive atmospheres, violent shocks, high electromagnetic radiation |
| Spare parts and repairability | No user-replaceable components; contact BENNING customer service |
| Disposal | Recycle in accordance with local regulations |
Frequently Asked Questions - TC 30 BENNING
User questions about TC 30 BENNING
0 question about this device. Answer the ones you know or ask your own.
Ask a new question about this device
Download the instructions for your Measuring equipment in PDF format for free! Find your manual TC 30 - BENNING and take your electronic device back in hand. On this page are published all the documents necessary for the use of your device. TC 30 by BENNING.
USER MANUAL TC 30 BENNING
Quick reference guide Translation of the German original version
Impressum
1.2 Service & Support 5
2 Sicherheit 5
https://tms.benning.de/tc30
1.2 Service & Support
Ensure that the applicable documentation is used for this product. For safe handling, knowledge that is provided in these instructions is required.
The product may only be handled while following this documentation, particularly the safety instructions and warnings it contains. The personnel must be qualified for the respective task and have the capability to recognise risks and prevent possible dangers.
Manufacturer and holder of rights
Commercial register Coesfeld HRA no. 4661
Copyright
All rights reserved.
This document – particularly all of the contents, texts, photographs and graphics that it contains – are protected by copyright.
No part of this documentation or the associated contents may be reproduced or edited, copied or distributed using electronic media in any form (printed, photocopied or using any other method) without express written permission.
Disclaimer
The contents of the documentation has been checked to ensure that it corresponds to the hardware and software described. Nevertheless, deviations cannot be ruled out, so Benning cannot guarantee complete correspondence. The contents of this documentation are checked at regular intervals, and any corrections that are needed are contained in the versions that follow.
General non-discrimination
Benning is aware of the importance of language with regard to the gender equality and endeavors to take this into account at all times. To improve readability, we have refrained from consistently using differentiating formulations.
Table of contents
| 1 | Introduction | 3 |
| 1.1 | General notes | 4 |
| 1.2 | Service & support | 5 |
| 2 | Safety | 5 |
| 2.1 | Warning system | 5 |
| 2.2 | Symbols used | 6 |
| 2.3 | Intended use | 7 |
| 3 | Scope of delivery | 8 |
| 4 | Device structure | 8 |
| 5 | Functions | 9 |
| 6 | Getting started | 10 |
| 6.1 | Charging the battery | 10 |
| 6.2 | Switching the device ON/OFF | 10 |
| 6.3 | Setting the language | 10 |
| 6.4 | Auto power-off (APO) | 10 |
| 7 | Settings | 11 |
| 7.1 | Swipe-down menu | 11 |
| 7.2 | Local settings | 11 |
| 7.3 | Menu – Configuring the camera live view | 13 |
| 8 | Operation | 14 |
| 8.1 | Requirements for measuring | 14 |
| 8.2 | Operating the camera live view | 14 |
| 8.3 | Temperature measurement | 15 |
| 9 | Maintenance | 15 |
| 9.1 | Maintenance schedule | 15 |
10 Disposal and environmental protection.... 15
1 Introduction
The BENNING TC 30 thermal imaging camera described here (in the following only referred to as "device") is intended for making thermal images, optical images and video recordings. The device determines the surface temperature of an object by measuring the IR radiation (infrared radiation) emitted by the object. The integrated infrared detector of the device determines the intensity of the IR radiation and makes it visible to the human eye as a thermal image.
The temperature measuring range of the device is between -20 °C and +400 °C with an accuracy of ±2 % of the measured value or 2 °C at an ambient temperature between +15 °C and +35 °C and an object temperature of more than 0 °C.
Further information
https://tms.benning.de/tc30
On the Internet, you will find the following additional information directly at the specified link or at www.benning.de (product search):
- Operating manual of the device in several languages
• Further information depending on the device (e. g. brochures, technical reports, FAQs)
1.1 General notes
Target group
This operating manual is intended for the following groups of people:
• Professional users, craftspeople and do-it-yourselfers
Required basic knowledge
To understand these operating manual, you will need general knowledge of testing and measuring equipment. Moreover, you will need basic knowledge of the following issues:
- Thermography
Purpose of the operating manual
This operating manual describes the device and provides you information about how to handle it.
Keep this operating manual in a safe place for later use. Read this operating manual before handling the device and follow the instructions.
NOTE
Disclaimer of liability
Please make sure that any person using the device has read and understood the instructions of this operating manual before handling the device and that the instructions are adhered to in all points. Non-observance of this operating manual might result in product damage, property damage and/or personal injury.
Benning assumes no liability for damage and malfunctions resulting from the failure to observe the instructions in this operating manual.
The devices are subject to continuous further development. Benning reserves the right to make changes to the device's design, configuration and technology. The information in this operating manual corresponds to the state of technical knowledge at the time of printing. For this reason, no claims for certain device characteristics can be derived from the contents of this operating manual.
Information in this operating manual can be changed at any time without prior notice. Benning is not obligated to make amendments to this operating manual or to keep it up to date.
Direct any technical questions to Technical Support [▶ page 5].
Trademarks
All trademarks used are the property of their respective owners, even if they are not separately marked as such.
1.2 Service & support
Please contact your specialty retailer or the BENNING Service Center for any repair or service work that might be required.
Technical Support
Please contact our Technical support for technical questions on handling the device.
Easily and conveniently use the BENNING returns portal for a quick and smooth returns processing:
This operating manual contains notes that must be taken into consideration for your personal safety and in order to avoid injuries and damage to property. Warnings about your personal safety and to prevent personal injuries are marked with a warning triangle. Warnings on sole prevention of material damage are shown without a warning triangle. The warnings are shown in descending order depending on the hazard level as follows.

DANGER
Extremely dangerous situation for humans
If you do not pay attention to this warning, irreversible or deadly injuries will occur.

WARNING
Hazard to humans
If you do not pay attention to this warning, irreversible or deadly injuries could occur.

CAUTION
Minor hazard to humans
If you do not pay attention to this warning, minor or moderate injuries could occur.
NOTICE
Danger to property, not to persons
If you do not pay attention to this warning, material damage could occur.
If multiple hazard levels occur, the warning for the highest respective hazard level will be used. In addition, a warning about personal injuries can also include a warning about material damage.
2.2 Symbols used
Symbols on the device
| Symbol Meaning | |
 | Please observe the information provided in this operating manual in order to avoid dangers. |
 | The device complies with EU directives. |
 | The device complies with directives applicable in Great Britain. |
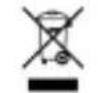 | At the end of product life, dispose of the unserviceable device via appropriate collecting facilities provided in your community. |
 | Please observe the operating manual. |
Table 1: Symbols on the device
Symbols used in the operating manual
| Symbol Meaning | ||
 | General warning | |
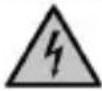 | Warning of electric voltage! | |
Table 2: Symbols used in the operating manual
2.3 Intended use
Only use the device within the framework of the corresponding technical data. Any operating conditions that deviate from this shall be considered as improper use. Solely the user of the device shall be liable for any resulting damage.
Please note the following:
- In case of improper use, the liability and warranty claims become void. Solely the user of the device shall be liable for any damage resulting from improper use. Uses not complying with the intended use include e. g.:
- Use of components, accessories, spare or replacement parts that have not been released and approved for the respective application by Benning
-
Non-observance, manipulation, changes or misuse of the operating manual or the instructions and notes contained therein
– Any form of misuse of the device
– Any use other than or beyond that described in this operating manual -
Warranty and liability claims are generally excluded if the damage is the result of force majeure.
- If any prescribed services are not performed regularly or not on time, according to the manufacturer's specifications during the warranty period, a decision about a warranty claim can only be made once the findings are available.
Direct any questions to Technical Support [▶ page 5].
Using the device
Please observe the following basic obligations when using the device:
- The device may only be used in a technically perfect and safe condition. Always check the device for damages before using it.
- The personnel must be qualified for the respective task.
- Observe relevant regulations on occupational safety and health as well as those on environmental protection.
• The device may only be used in dry environments. - Do not use the device in potentially explosive environments.
- Do not use the device in extremely hot, cold, dusty, corrosive, salty, alkaline or humid environments.
- Do not use the device in the vicinity of high levels of electromagnetic radiation.
- Avoid violent impacts or dropping the device.
Securing the device
If the device is not in a technically perfect and operationally safe condition, safe operation is no longer guaranteed. Make sure that the following measures are taken:
- Switch off the device.
The following characteristics indicate that safe operation is no longer guaranteed:
• The device shows visible damage.
- The device does not work properly in compliance with regulations (e. g. errors during measurements).
- The device shows recognisable consequences of prolonged storage under inadmissible conditions.
• The device shows recognisable consequences of extraordinary stress due to transport.
3 Scope of delivery
The scope of delivery of the device includes the following components:
- 1 x charger with USB-C connecting cable
- 1 x carrying strap
- 1 x transport and storage case
• 1 x quick reference guide
- 1 x BENNING TC 30 thermal imaging camera (item no.: 050530)
Software
• PC software "BENNING TC Analyser"
- App "BENNING TC-Image Link"
Optional accessories
• Macro lens (item no.: 10237623)
4 Device structure
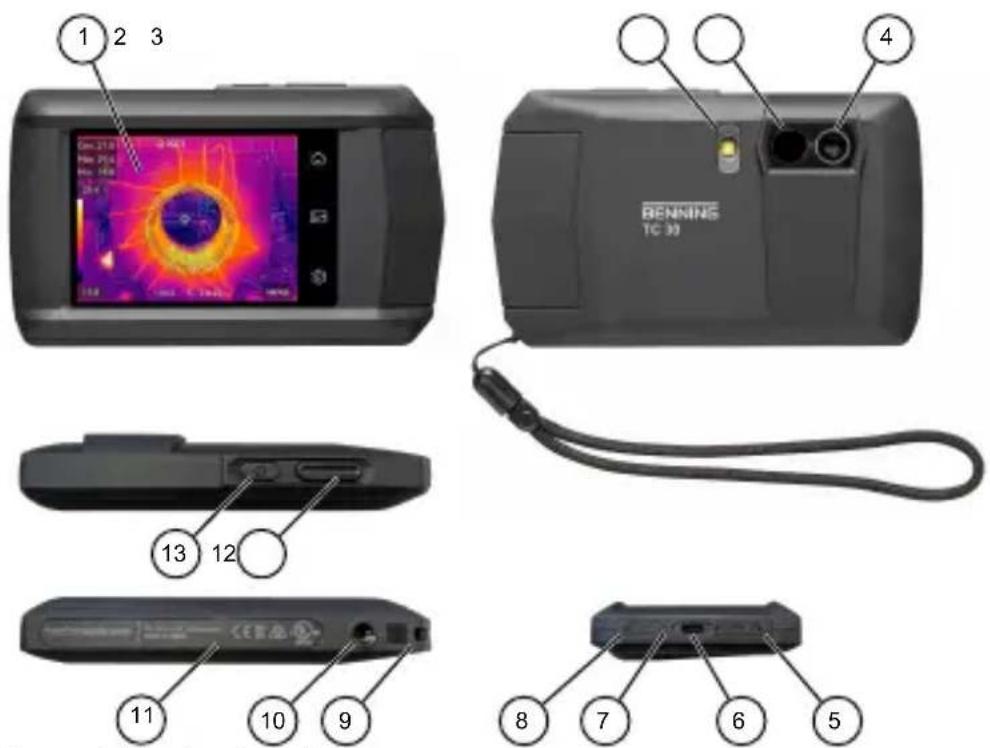
Figure 1: Device description
| 1 Touch display 2 Flashlight (flash) | ||
| 3 Thermal lens 4 Optical lens | ||
| 5 Microphone 6 USB-C port | ||
| 7 State of charge LED 8 Buzzer (sound output) | ||
| 9 Wrist strap attachment point 10 Tripod thread | ||
| 11 Notes and information about the device | 12 Shutter button | |
| 13 ON/OFF key | -- | |
Digital display
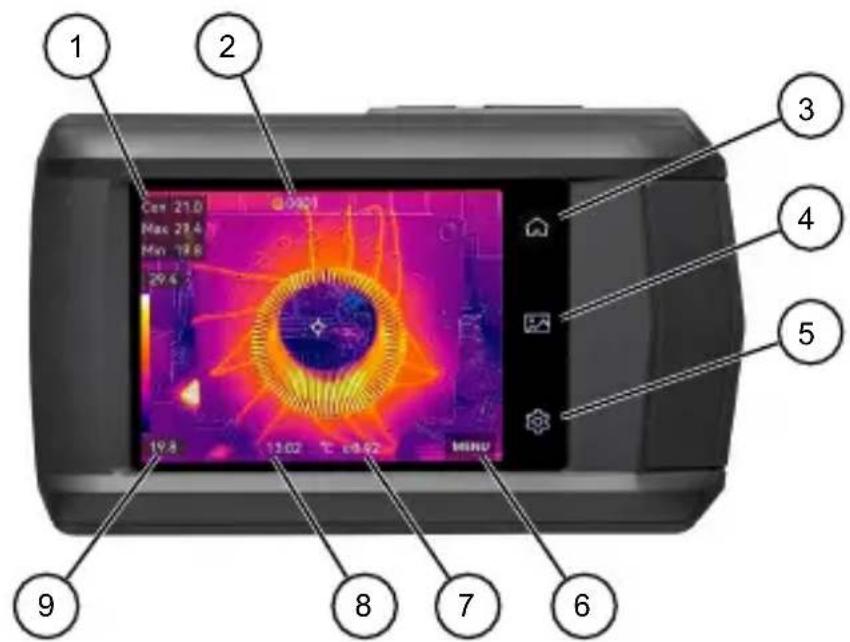
Figure 2: Touch display
| 1 Temperature measuring points 2 No. of images/videos(scheduled and continuous capture) | ||
| 3 Camera live view 4 File management | ||
| 5 Local settings 6 Menu | ||
| 7 Temperature unit and emissivity 8 Time display | ||
| 9 Colour scale from min. to max.measured temperature value | - | |
5 Functions
For more information on the following functions, please refer to the operating manual [▶ page 3].
- Temperature alarm
• Temperature measuring range
• WLAN and WLAN hotspot - Capture mode
- Emissivity
- Self-calibration
• Data transfer and data backup - Macro mode
- Screen cast
• BENNING TC Analyser
• BENNING TC-Image Link
6 Getting started
6.1 Charging the battery
Charge the integrated lithium-ion battery before using the device for the first time. Only use the mains adapter included in the scope of delivery to charge the integrated battery (item no.: 10237620).
Make sure that there is no flammable material within 2 metres of the charger during the charging process.
The charging time is about 3 hours.
States of charge:
• LED lights red: Charging process active
• LED flashing red: Error while charging
• LED lights green: Charging process completed
6.2 Switching the device ON/OFF
To switch the device on or off, press the ON/OFF key for approx. 3 seconds. The device is ready for use after 30 seconds.
6.3 Setting the language
By default, English is selected in the factory settings. You can change the language for the device under the following path:
EN: "Local Settings" > "Device Settings" > "Language"
6.4 Auto power-off (APO)
In the factory settings, the automatic power-off is disabled. You can set the time-dependent, automatic power-off of the device under "Settings" > "Device Settings" > "Auto Power-off".
7 Settings
7.1 Swipe-down menu
The swipe-down menu is intended for quickly enabling/disabling functions and setting the display.
You can open the swipe-down menu by swiping down from the top edge of the display. If a function is highlighted in white, it is active.
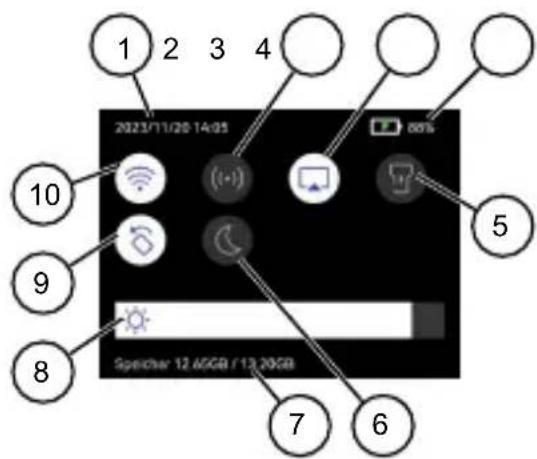
Figure 3: Swipe-down menu
| 1 Date and time 2 Hotspot | ||
| 3 Screen cast 4 Battery status | ||
| 5 Flashlight 6 Light/dark mode of the display | ||
| 7 Memory status 8 Screen brightness | ||
| 9 Auto-rotate 10 WLAN |
7.2 Local settings
7.2.1 Measurement settings
Make the following measurement settings to achieve the best possible measuring result:
| Setting Meaning and operation | |
| Measuring range | Select a corresponding temperature measuring range or the “Auto Switch” mode. |
| Emissivity Select | the emissivity of the target object. You can choose from the given materials (with emissivity) or specify a custom emissivity. |
| Refl. Temp. Set | the ambient temperature.If there are radiating objects with a much higher temperature in the vicinity of the target object (with low emissivity), use the temperature of the radiating object. |
| Humidity Set the | current air humidity of the environment. |
| Setting Meaning and operation | |
| Alarm settings You can enable the temperature alarm. Select a temperature threshold and the alarm linkage. |
Table 3: Measurement settings
7.2.2 Display settings
| Setting Meaning | |
| Time You can enable | the time display to show the set time on the display of the device. |
| Parameters You can enable the parameters to show the emissivity and the temperature unit on the display of the device. | |
Table 4: Display settings
7.2.3 Camera settings
| Setting Meaning and operation | |
| Capture Mode Select the one of the capture modes “Capture One Image”, “Scheduled Capture” or “Continuous Capture”. | |
| Visual Image Resolution | Select the desired visual image resolution (2.5 or 8 MP). |
| Filename Header You can enter the file name (2 to 7 characters) under which the image or video recording is to be saved.The file name will be automatically supplemented with the set date and time of the device.Example: Name20231015112041.jpeg(name/year/month/day/hours/minutes/seconds) | |
| Macro Mode To capture very small objects, set the macro mode and attach the optional macro lens. | |
| Save Visual Image You can enable this function to save a separate visual image in addition to the thermal image. | |
| Edit before Saving You can enable this function if you want to add a comment (information text) before saving the image. | |
Table 5: Camera settings
7.2.4 Device settings
| Setting Meaning and operation | |
| Screen Brightness You | can adjust the screen brightness using the slider. |
| Unit Set the desired unit for temperature (°C / °F / Kelvin) and distance (m / feet). | |
| Language You can select one of the available languages. | |
| Time and Date Set the time and date of the device. | |
| Auto-Rotate You can enable the automatic rotation of the On-Screen Display (OSD). This is also possible via the control menu. | |
| Auto Power-off You can enable the automatic power-off (APO) of the device (OFF, 10 to 60 minutes). | |
| Device Initialization Format Storage: The device formats the internal memory and deletes all existing data.Restore Device: You can reset the device to the factory settings. | |
| Device Information Here, the following information about the device is stored: model, version, module, serial number and IP address. | |
Table 6: Device settings
7.3 Menu – Configuring the camera live view
Configure the camera live view to achieve the best possible measuring result. To do this, open the menu.
For more information on the following functions, please refer to the operating manual [▶ page 3].
| Setting Meaning | |
| Measurement Select the desired temperature measuring points (Max = hot, Min = cold, Cen. = medium). | |
| Image Mode Select the desired camera live view (Thermal, Fusion, PiP (picture in picture), Visual, Blending). | |
| Palettes Select the desired colour palette. | |
| Level & Span Select “Manual” or “Auto”. The level defines the temperature level and the span defines the temperatures within the displayed temperature range. | |
Table 7: Menu
8 Operation
8.1 Requirements for measuring
- Please consider the brightness of the surrounding light conditions:
- The ambient light must not be too bright.
- Avoid measuring in direct sunlight.
• The device battery is fully charged.
- Please consider sources of interference that might be present. Strong sources of interference in the vicinity of the device might involve unstable readings and measuring errors.
8.2 Operating the camera live view
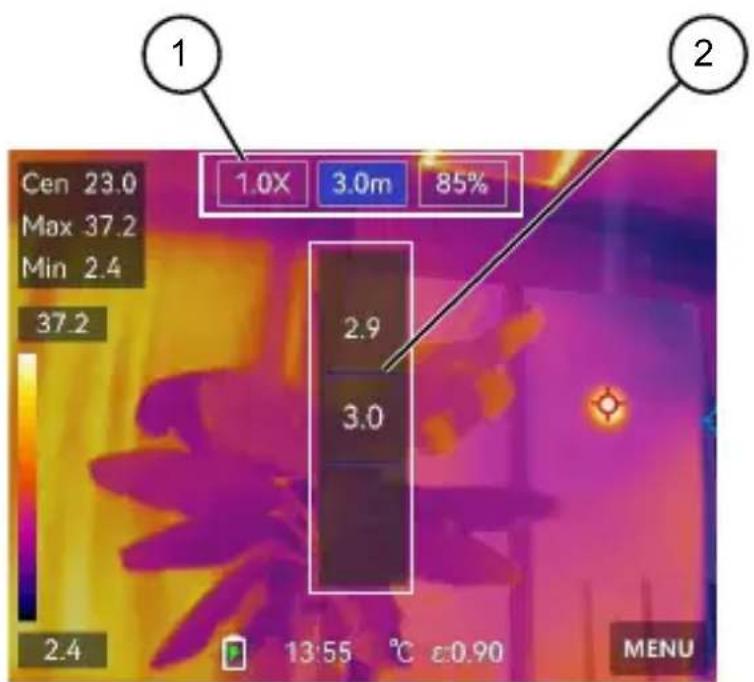
Figure 4: Operating the live view (taking the “Blending” image mode as an example) Depending on which image mode is selected, different setting options (1) are displayed. Tap the respective setting option (zoom [x] / distance to object [m] / optical-thermal ratio [%]). Set these options using the setting dial (2).
8.3 Temperature measurement
Requirements
- Please observe the requirements for measuring.
- You have configured the camera live view via the menu.
- You have made the device settings in the local settings.
• The device is not connected to the PC.
• In the camera live view, the menu is closed.
Procedure – Capturing a thermal image
In the camera live view, focus on the object to be checked and press the shutter button.
Depending on the selected capture mode, one or more thermal images are captured.
If you have selected scheduled or continuous capture mode, press the shutter button again to stop capturing.
The images created are saved in the standard storage album and can be selected and opened via the file manager.
Procedure – Recording a video
In the camera live view, focus on the object to be checked and press and hold the shutter button for a few seconds until the video recording starts and the recording symbol is displayed.
Stop the recording by pressing the shutter button again. The recorded video is saved automatically.
The videos created are saved in the standard storage album and can be selected and played via the file manager.
9 Maintenance
There are no components in the device that you can replace.
9.1 Maintenance schedule
The following table provides an overview of all maintenance and servicing work that you must carry out permanently or at regular intervals.
| Interval Measures | |
| Regularly, as needed • Cleaning the device | |
| As needed / every 6 months • Charging the battery | |
| Every 12 months • Calibrating the device |
Table 8: Maintenance schedule
10 Disposal and environmental protection
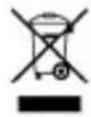 | At the end of product life, dispose of the unserviceable device via appropriate collecting facilities provided in your community. |
Mentions légales
https://tms.benning.de/tc30
Assistance technique
https://tms.benning.de/tc30


- IMPRESSUM
- 1.2 SERVICE & SUPPORT
- MANUFACTURER AND HOLDER OF RIGHTS
- COPYRIGHT
- DISCLAIMER
- GENERAL NON-DISCRIMINATION
- 1 INTRODUCTION
- 1.1 GENERAL NOTES
- TARGET GROUP
- REQUIRED BASIC KNOWLEDGE
- PURPOSE OF THE OPERATING MANUAL
- NOTE
- DISCLAIMER OF LIABILITY
- TRADEMARKS
- TECHNICAL SUPPORT
- DANGER
- EXTREMELY DANGEROUS SITUATION FOR HUMANS
- WARNING
- HAZARD TO HUMANS
- CAUTION
- MINOR HAZARD TO HUMANS
- NOTICE
- DANGER TO PROPERTY, NOT TO PERSONS
- 2.2 SYMBOLS USED
- 2.3 INTENDED USE
- USING THE DEVICE
- SECURING THE DEVICE
- 3 SCOPE OF DELIVERY
- SOFTWARE
- OPTIONAL ACCESSORIES
- 4 DEVICE STRUCTURE
- 5 FUNCTIONS
- 6 GETTING STARTED
- 6.1 CHARGING THE BATTERY
- STATES OF CHARGE
- 6.2 SWITCHING THE DEVICE ON/OFF
- 6.3 SETTING THE LANGUAGE
- 6.4 AUTO POWER-OFF (APO)
- 7 SETTINGS
- 7.1 SWIPE-DOWN MENU
- 7.2 LOCAL SETTINGS
- 7.2.1 MEASUREMENT SETTINGS
- 7.2.4 DEVICE SETTINGS
- 7.3 MENU – CONFIGURING THE CAMERA LIVE VIEW
- 8 OPERATION
- 8.1 REQUIREMENTS FOR MEASURING
- 8.2 OPERATING THE CAMERA LIVE VIEW
- 8.3 TEMPERATURE MEASUREMENT
- REQUIREMENTS
- PROCEDURE – CAPTURING A THERMAL IMAGE
- PROCEDURE – RECORDING A VIDEO
- 9 MAINTENANCE
- 9.1 MAINTENANCE SCHEDULE
- 10 DISPOSAL AND ENVIRONMENTAL PROTECTION
- MENTIONS LÉGALES
- ASSISTANCE TECHNIQUE
Brand : BENNING
Model : TC 30
Category : Measuring equipment