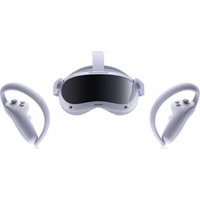
4 - VR glasses Pico - Free user manual and instructions
Find the device manual for free 4 Pico in PDF.


| Product type | Standalone VR headset with 6 degrees of freedom |
| Brand | Pico |
| Model | 4 |
| Box contents | VR headset, 2 controllers, 4 AA 1.5V alkaline batteries, glasses spacer, nose pad, 2 controller straps, USB-C power adapter, USB-C to C 2.0 data cable, quick start guide, user guide, safety and warranty guide |
| Headset power supply | Built-in battery, rechargeable via USB-C (power adapter included) |
| Controller power supply | 2 AA 1.5V alkaline batteries per controller (4 batteries included) |
| Display | Screen with IPD adjustment, eye protection mode certified by TÜV Rheinland |
| Tracking | 6 degrees of freedom (movements and rotations), tracking cameras |
| Connectivity | USB-C interface, integrated left/right speakers |
| Adjustments | Adjustable IPD (system settings), top strap, strap dial, glasses spacer |
| Sensors | Proximity sensor, tracking cameras, accelerometers, gyroscopes |
| Recommended age | 12 years and older (adult supervision for 12-17 years) |
| Required space | Minimum 2 m x 2 m in a clear indoor space |
| Maintenance and cleaning | Clean the lenses with a soft cloth, avoid direct exposure to sunlight |
| Safety | Do not use if discomfort, take breaks every 30 minutes, keep out of reach of children |
| Spare parts and repairability | Replaceable face foam, top strap, nose pad and glasses spacer |
| Warranty | Damage to the screen caused by direct sunlight or strong light is not covered |
Frequently Asked Questions - 4 Pico
User questions about 4 Pico
0 question about this device. Answer the ones you know or ask your own.
Ask a new question about this device
Download the instructions for your VR glasses in PDF format for free! Find your manual 4 - Pico and take your electronic device back in hand. On this page are published all the documents necessary for the use of your device. 4 by Pico.
USER MANUAL 4 Pico
* In The Box Important Health & Safety Notes Quick Guide
02 Product Details 05 02 Operating Instructions 07 03
In The Box:
VR Headset / 2 Controllers / 4 1.5V AA Alkaline Batteries / Glasses Spacer / Nose Pad / 2 Controller Lanyards / USB-C Power Adapter / USB-C to C 2.0 Data Cable / Quick Guide / User Guide / Safety and Warranty Guide
WARNING Important Health & Safety Notes
- This product is designed and intended to be used in an open and safe indoor area, free of any tripping or slipping hazards. To avoid accidents, remain conscious to the potential confines of your physical area and respect the boundary of your virtual area whenever you see it. Be sure to wear the lanyards when using the Controllers. Make sure that there is enough space around your head and body (at least 2 meters by 2 meters) to stretch your arms to avoid damage or injury to yourself, others, and your surroundings.
- This product is not recommended for children aged 12 and under. It is recommended to keep headsets, controllers and accessories out of the reach of children. Teenagers aged 13 and over must use it under adult supervision to avoid accidents.
- This product is designed to accommodate most prescription glasses. Make sure to wear the VR Headset in a manner in which the VR Headset lenses do not rub or impair your prescription lenses.
- Prolonged use may cause dizziness or eye fatigue. It is recommended to take a break every 30 minutes. Try relieving your eyestrain by looking at distant objects. If you feel any discomfort, stop using the product immediately. If the discomfort persists, seek medical advice.
- Do not expose the optical lenses to direct sunlight or other strong light sources. Exposure to direct sunlight may cause permanent yellow spot damage on the screen. Screen damage caused by sunlight exposure or other strong sources of light is not covered by the warranty.
- This product supports interpupillary distance (IPD) adjustment in system settings. When adjusting, please be aware that with the minimum IPD, it may touch the bridge of the nose. You can adjust the IPD according to your actual interpupillary distance in "Settings" ▶ "Display". Please note that using inap-
propriate IPD may increase the risk of discomfort.
- This product has an "Eye Protection Mode", certified by TÜV Rheinland (Germany), which can protect your eyes by reducing blue light in the three color channels using software algorithms. The screen appears yellowish in this mode and you can turn this feature on/off in "Settings" ▶ "Display" ▶ "Color" ▶ "Eye Protection".
- Protect optical lenses during use and storage to prevent damage, such as scratches or exposure to strong light or direct sunlight.
Product and packaging are updated regularly, and the functions and contents of the standalone headset may be upgraded in the future. Therefore, the content, appearance and functionality listed in this manual and product packaging are subject to change and may not reflect the final product. These instructions are for reference only.
* Carefully read this user guide before using the product and share this information with any other users, as it contains important safety information. Keep the user guide as reference for the future.
6 Degrees of Freedom VR
The device can track your translational and rotational movements in all directions (up/down, left/right, forward/backward, pitch, roll, and yaw). Your movements in the real world will be captured and translated to what you see in the virtual world when using the appropriate content.
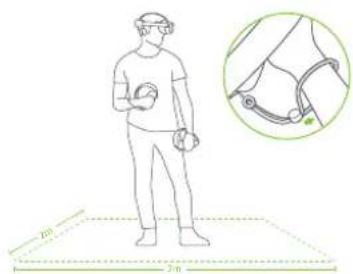
Ensure a safe environment before you start your VR experience.
- Clear a safe indoor area of at least 2 meters by 2 meters. Keep the room bright, avoid spaces with main-
ly single-colored walls, glass, mirrors, moving pictures or other similar objects. - Remove the protective film that covers the headset front cameras. Wear the lanyards connected to the Controllers.
- Set up your environment by following instructions on the VR Headset screen.
WARNING
This product can not guarantee your safety with guardian system, you will need to always pay attention to the surrounding safety.
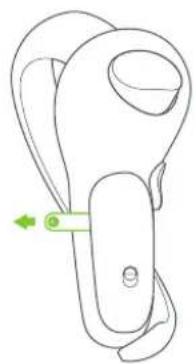
① Install Batteries
Pull the tab to remove the insulating paper.
natural_image
Line drawing of a mechanical clamp or bracket with a green arrow indicating direction (no text or symbols)* Note: 1.5V AA alkaline batteries should be used.
Quick Guide
natural_image
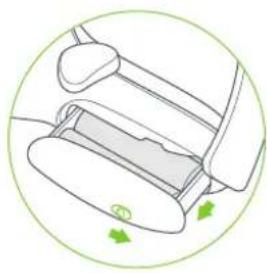
Diagram of a car seatbelt mechanism inside a circular frame, showing no text or symbolsSlide the toggle according to arrow direction to open the battery case.
② Power on the Controller
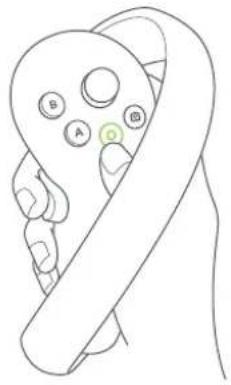
First Start: The Controller will start automatically after removing the insulating paper. Others: Short press the Home button for 1 second until the status indicator flashes blue.
③ Power on the VR Headset
Long press the Power button for 2 seconds until the status indicator turns blue.
④ Wear Your Headset for a Comfortable Fit and View
Adjust the strap dial to turn the strap so that the back of your head rests on the padding. Fine-tune the length and position of the strap to give a clear view.
natural_image
Line drawing of a handheld device with labeled buttons (A, B, C) and a green circular icon on the handle (no text or symbols beyond labels)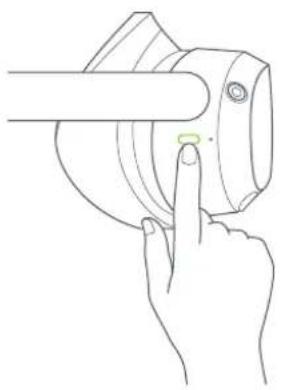
natural_image
Line drawing of a hand pressing a button on a mechanical component (no text or symbols)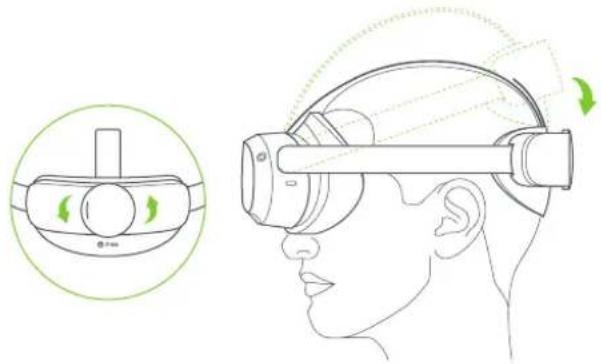
natural_image
Line drawing of a person wearing a VR headset with green directional arrows indicating motion (no text or symbols)* Note: You can use this product with prescription glasses or lenses insert.
⑤ Fine-tune the Top Strap
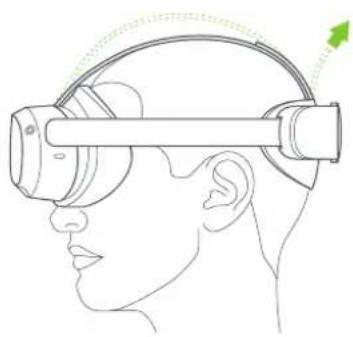
Fine-tune the head strap to reduce pressure on the forehead.
natural_image
Side profile illustration of a person wearing a VR headset (no text or symbols)⑥ Interpupillary Distance (IPD) Adjustment
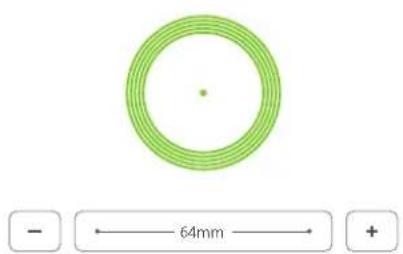
In System Setting, go to "Setting" ▶ "Display" to adjust IPD, tap "+" or "-" button to slightly adjust IPD until the picture is clear.
WARNING
Please note that inappropriate IPD setting may cause ghosting or eyestrain. Accurate IPD setting helps you get a clear imaging and ease eyestrain.
Product Details
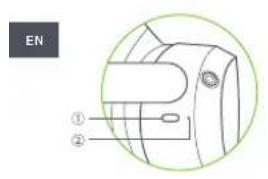
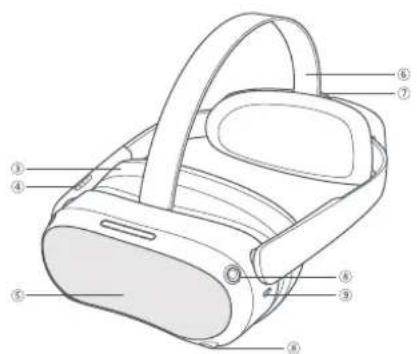
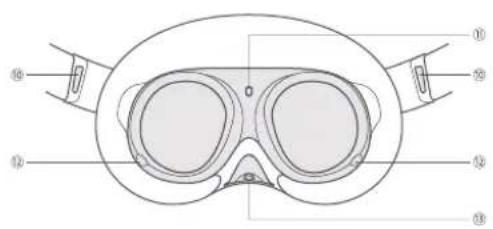
VR Headset Status Indicator Legend
Blue: Powered on with battery over 20%
Yellow: Charging: Battery is less than 98%
Red: Charging: Battery is less than 20%
Green: Charging: Battery is more than 98% or charge complete
Blue flashing: Shutting down
Red flashing: Battery is less than 20%
Off: Sleeping or Powered off
① Power
Power on: Long press for 2 seconds
Power off: Long press for 5 seconds
Hardware reset: Long press for 10 seconds
Short press to enter sleep or wake up
② Status Indicator
③ Face Cushion
④ Volume
⑤ RGB See Through Camera
Do not block during use.
⑥ Top Strap
Removable
① Scrap Blar ② Tracking Canvas
Tracking cameras Do not block during use.
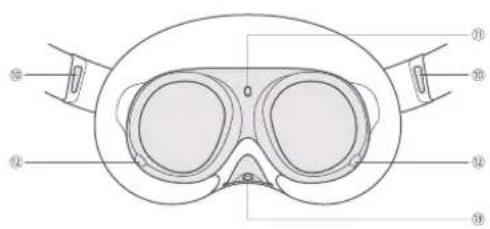
9 USB-C Interface
10 Left/Right Speaker
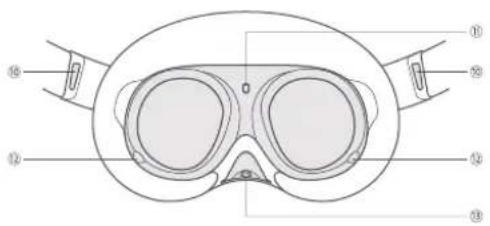
⑪ Proximity Sensor The system wakes up when the VR headset is put on, sleeps when VR headset is taken off.
⑫ Eye Tracking Cameras
Pro version only.
Do not black during use.
⑬ Face Tracking Camera
Pro version only. Do not block duri
natural_image
Line drawing of a handheld electronic device with a green arrow indicating rotation (no text or symbols)Controller Status Indicator Legend
Off: Connected or Powered off
Blue: Firmware updating in progress
Blue flashing: Searching for connection
Red and blue flashing alternately: Pairing in progress
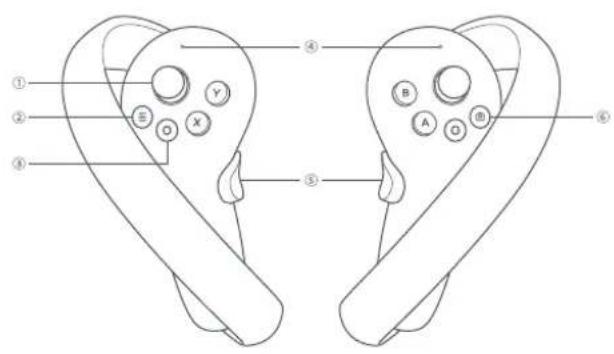
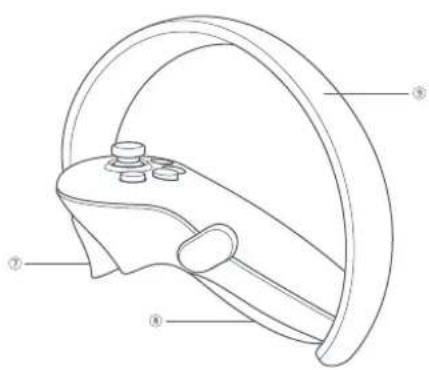
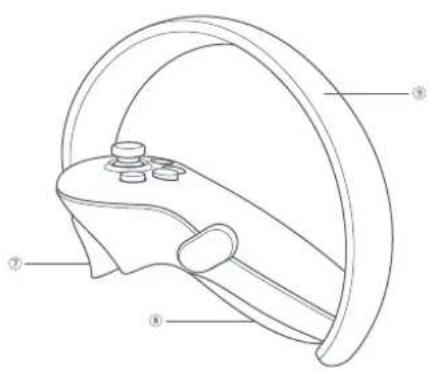
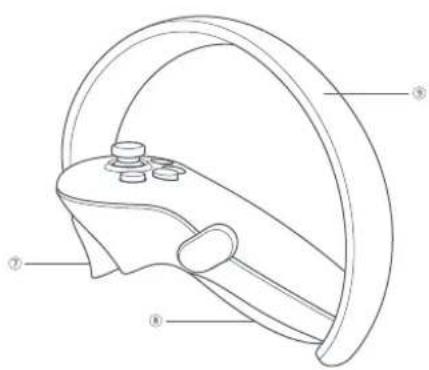
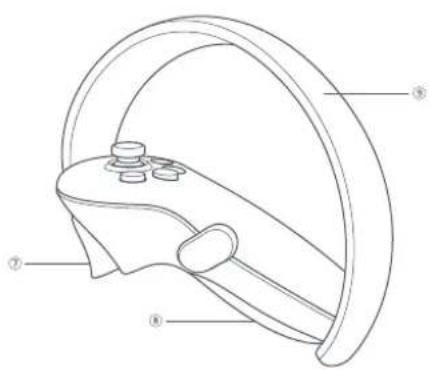
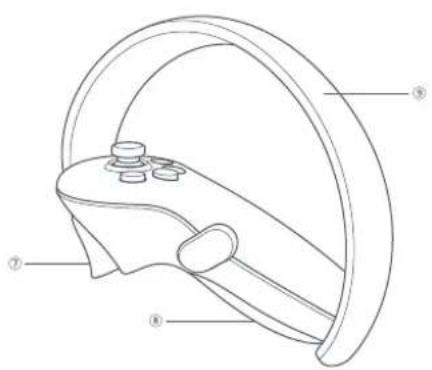
① Joystick ③ Home
② Menu Power on: Short press
Power off: Long press for 6 seconds
Screen recentering: Press for 1 second
④ Status Indicator
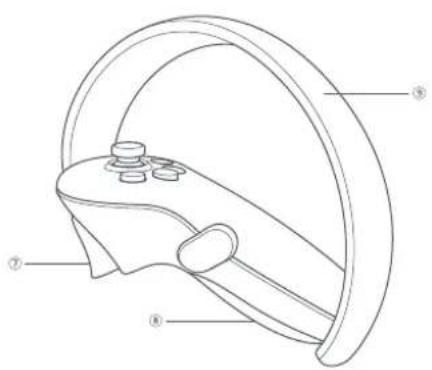
⑤ Grip
⑥ Capture
⑦ Trigger
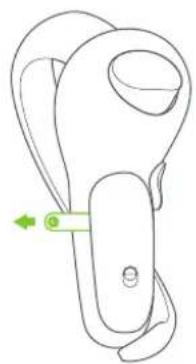
⑧ Battery Case
Open: Slide down the toggle and
pop up the battery case.
Lock: Push the battery case to lock.
Tracking King
Do not block during use.
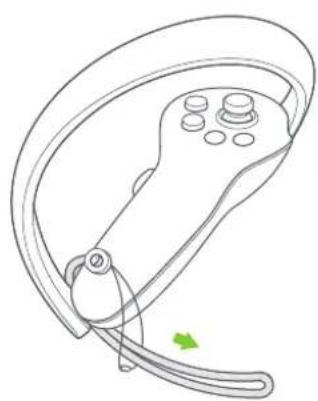
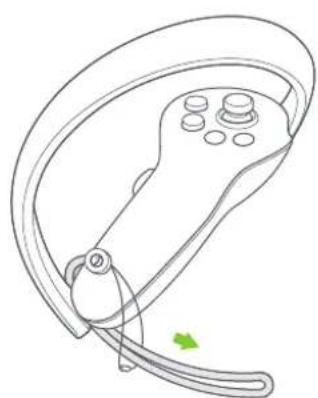
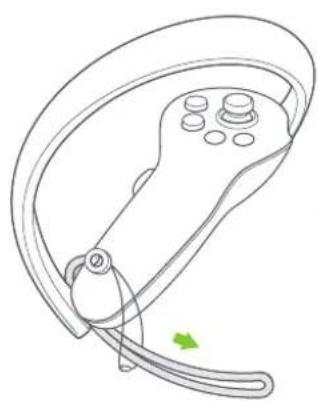
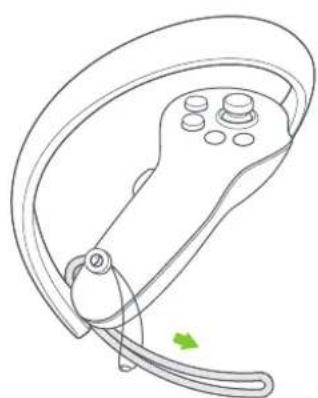
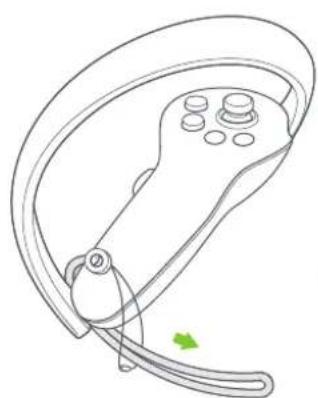
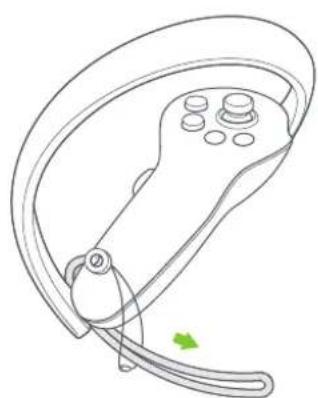
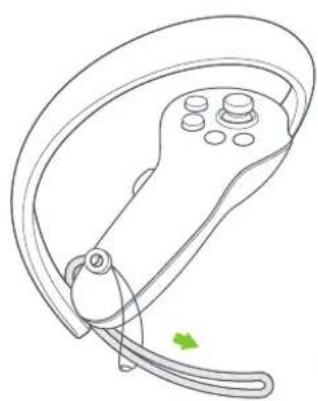
* Note: Pass the Controller Lanyard
through the string as shown and
lock at the end of the Controller
Operating Instructions
Headset Control Mode
If the Controller is not connected, you can interact with the home screen by moving your head to direct the crosshairs over your intended selection and clicking the Volume Up/Down button on the VR Headset.
Switch the pointer of the master Controller
In the home screen, short press the Trigger of the corresponding Controller to switch the pointer of the master Controller.
Screen re-centering
Wear the VR Headset and look straight ahead, press and hold the Home button of the Controller or VR Headset (or the Volume Down button of the VR Headset in head control mode) for more than 1 second to re-center the screen.
Disconnect the Controller
Press and hold the Home button until the status indicator turns red and the Controller vibrates.
Controllers will automatically shut down to save power in the following cases:
- When the VR Headset enters deep sleep (a while after the VR Headset is taken off) - When the Controller is unpaired
- When the VR Headset is powered off
Add a new Controller
If you need to add a new Controller (the VR Headset can only connect one left Controller and one right Controller) or reconnect with an unpaired Controller. Go to "Settings" ▶ "Controller", click on "Pair". Press and hold the Home button and the Trigger of the Controller at the same time until the red and blue lights of the Controller flashing alternately, and then follow the instructions on the VR Headset screen.
Sleep / Wake up
Option 1 (Proximity Sensor) Take off VR Headset for automatic sleeping: wear the VR Headset for automatic waking up.
Option 2 (POWER Button) Press the Power button of the VR Headset for manual sleeping or waking up.
Hardware reset
VR Headset reset
If the visual in the VR Headset freezes, or the VR Headset does not respond after short press the Power button, you can press the Power button of the VR Headset for more than 10 seconds to reboot the VR Headset.
Controller reset
If the virtual Controller, the Home button or any buttons of the Controller doesn't respond, remove and reinstall the battery case to restart the Controller.
The VR Headset Adjustment
This device has no myopia adjustment function. The VR Headset allows wearing most standard glasses with a frame width of less than 150mm.
to install Glasses Spacer to increase the space. You can install or not according to your situation.
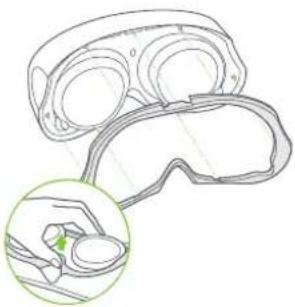
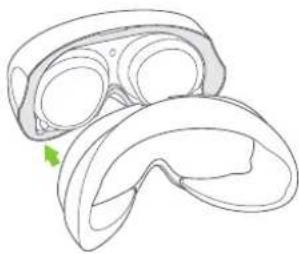
Install Glasses Spacer
If you have glasses collision with headset lens or pressure on the bridge of nose, please follow the picture to install Glasses Spacer to increase the space. You can install or not according to your situation.
① Disassemble the Face Cushion.
② Install the Glasses Spacer on the Headsel.
Install the Face Cushion on the Glasses Spacer.
natural_image
Line drawing of a VR headset with an inset showing a hand holding a coin (no text or symbols)* Note: Disassemble the Glasses Spacer
natural_image
Line drawing of a VR headset with a green arrow pointing to the side (no text or symbols)Install Nose Pad
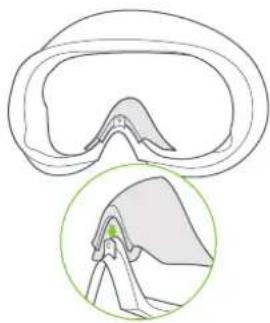
If you feel light leaking from your nose, please follow the picture to install Nose Pad to block the light. You can consider having it installed at your own discretion.
① Disassemble the Face Cushion.
② Install the Nose Pad on the Face Cushion.
Install the Face Cushion on the Headset.
natural_image
Diagram showing a cross-sectional view of an eye with a magnified inset highlighting the anatomical structure (no text or labels)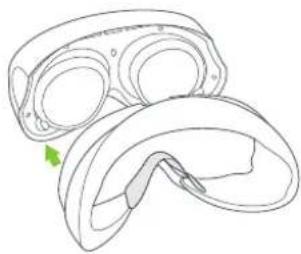
natural_image
Line drawing of a mechanical component with a green arrow indicating a specific part (no text or symbols present)Replace Face Cushion
The Face Cushion will have the following phenomena such as color change, surface fluff, soft texture after long-term use and repeated cleaning. You can replace a new Face Cushion as needed.
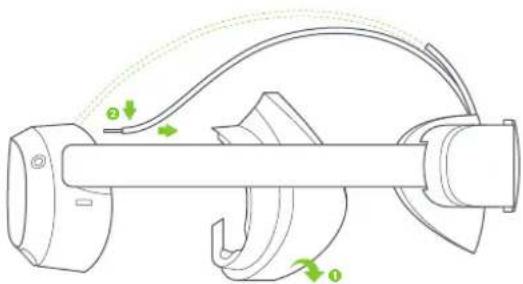
Replace Top Strap
① Disassemble the Face Cushion.
② Pinch the metal buckle of the top strap as shown, press it down and pull it out.
③ Install the Face Cushion on.
natural_image
Mechanical assembly diagram showing a shaft and housing with green directional arrows indicating motion (no text or symbols)
The essential tool for PICO all-in-one VR, helping you manage your headset better
natural_image
Line drawing of a person standing with a helmet and holding an object, alongside a magnified inset showing the same figure (no text or symbols present)WARNING
natural_image
Line drawing of a mechanical clamp or bracket with a green arrow indicating direction (no text or symbols)natural_image
Diagram of a car seatbelt mechanism with directional arrows indicating movement (no text or symbols)natural_image
Line drawing of a stylized object resembling a device with labeled buttons (no text or symbols beyond labels)natural_image
Line drawing of a hand pressing a button on a mechanical component (no text or symbols)natural_image
Line drawing of a person wearing a VR headset with head-mounted sensors, alongside a circular diagram showing the device's internal components (no text or symbols present)natural_image
Line drawing of a person wearing a VR headset with head highlighted (no text or symbols)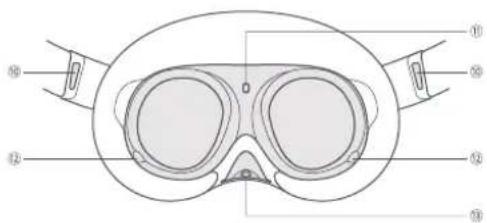
natural_image
Line drawing of a handheld device with a green arrow indicating rotation (no text or symbols)natural_image
Line drawing of a VR headset with an inset close-up showing the interior components (no text or symbols)natural_image
Line drawing of a VR headset with a green arrow pointing to the front portion (no text or symbols)natural_image
Diagram of a bird's head and neck anatomy, showing detailed anatomical structures with no text or labels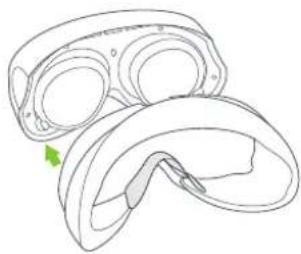
natural_image
Line drawing of a VR headset with a green arrow indicating the component (no text or symbols present)natural_image
Mechanical assembly diagram showing a shaft and housing with green directional arrows indicating motion (no text or symbols)natural_image
Line drawing of a mechanical clamp or bracket with a green arrow indicating direction (no text or symbols)natural_image
Diagram of a car seatbelt mechanism inside a circular frame, showing no text or symbolsnatural_image
Line drawing of a stylized object resembling a device with labeled buttons (no text or symbols)natural_image
Line drawing of a hand pressing a button on a mechanical component (no text or symbols)natural_image
Line drawing of a person wearing a VR headset with green motion arrows indicating rotation (no text or symbols)natural_image
Line drawing of a person wearing a VR headset, head view with motion indicator (no text or symbols)⑥ Ajuste de distancia interpupilar (IPD)
natural_image
Line drawing of a handheld electronic device with a green arrow indicating rotation (no text or symbols)natural_image
Line drawing of a VR headset with an inset close-up showing the interior components (no text or symbols)natural_image
Line drawing of a VR headset with a green arrow pointing to the front portion (no text or symbols)natural_image
Diagram showing a cross-sectional view of an eye with a magnified inset highlighting the anatomical structure (no text or labels)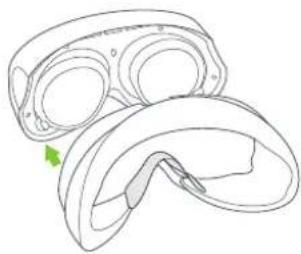
natural_image
Line drawing of a mechanical component with a green arrow indicating a specific part (no text or symbols present)Sustituir la almohadilla facial
natural_image
Mechanical assembly diagram showing a shaft and housing with motion arrows indicating rotational direction (no text or symbols)AVERTISSEMENT
natural_image
Line drawing of a mechanical clamp or bracket with a green arrow indicating direction (no text or symbols)natural_image
Diagram of a car seatbelt mechanism with directional arrows indicating movement (no text or symbols)natural_image
Line drawing of a stylized human figure holding a palette with labeled buttons (no text or symbols beyond labels)natural_image
Line drawing of a hand pressing a button on a mechanical component (no text or symbols)natural_image
Line drawing of a person wearing a VR headset with green motion arrows indicating rotation (no text or symbols)natural_image
Side profile illustration of a person wearing a VR headset with head turned (no text or symbols)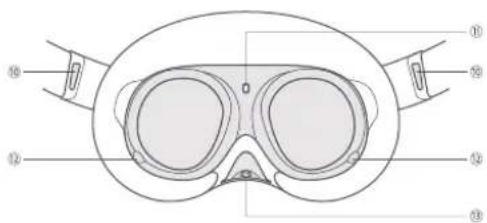
natural_image
Line drawing of a handheld device with a green arrow indicating rotation (no text or symbols)natural_image
Line drawing of a VR headset with an inset close-up showing the front and side views (no text or symbols)natural_image
Line drawing of a VR headset with a green arrow pointing to the front portion (no text or symbols)Installation de la plaquette nasale
natural_image
Diagram showing a cross-sectional view of a bird's head and neck, with a magnified inset highlighting the anatomical structure (no text or labels)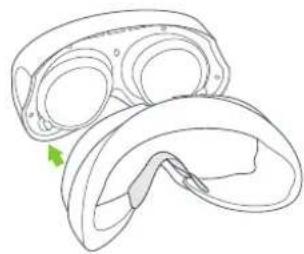
natural_image
Line drawing of a VR headset with a green arrow indicating the component (no text or symbols present)natural_image
Mechanical assembly diagram showing a shaft and housing with green directional arrows indicating motion (no text or symbols)
natural_image
Line drawing of a mechanical device with a green arrow indicating direction (no text or symbols)natural_image
Diagram of a car seatbelt mechanism with directional arrows indicating movement (no text or symbols)natural_image
Line drawing of a handheld device with labeled buttons (A, B, C) and a green circular icon on the handle (no text or symbols beyond labels)natural_image
Line drawing of a hand pressing a button on a mechanical component (no text or symbols)natural_image
Line drawing of a person wearing a VR headset with green motion arrows indicating rotation (no text or symbols)natural_image
Side profile illustration of a person wearing a VR headset with head turned (no text or symbols)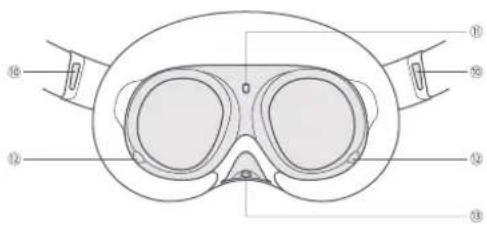
natural_image
Line drawing of a handheld device with control buttons and a green arrow indicating rotation (no text or symbols)Off: connesso o spento
natural_image
Line drawing of a VR headset with an inset close-up showing the interior components (no text or symbols)natural_image
Line drawing of a VR headset with a green arrow indicating the component (no text or symbols present)natural_image
Diagram showing a cross-sectional view of a mechanical component with an inset close-up highlighting a specific area (no text or labels present)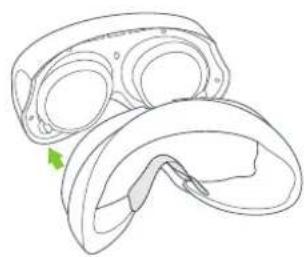
natural_image
Line drawing of a VR headset with a green arrow indicating the component (no text or symbols present)natural_image
Mechanical assembly diagram showing a shaft and housing with green directional arrows indicating motion (no text or symbols)AVISO
① Instale as baterias
Puxe a aba para remover o papel isolante.
Guia rápido
natural_image
Line drawing of a mechanical device with a green arrow indicating direction (no text or symbols)natural_image
Diagram of a car seatbelt mechanism inside a circular frame, showing no text or symbolsnatural_image
Line drawing of a stylized object resembling a device with labeled buttons (no text or symbols)③ Ligue o Headset de RV
natural_image
Line drawing of a hand pressing a button on a mechanical component (no text or symbols)natural_image
Line drawing of a person wearing a VR headset with head-mounted sensors, alongside a circular diagram showing the device's internal components (no text or symbols present)natural_image
Side profile illustration of a person wearing a VR headset (no text or symbols)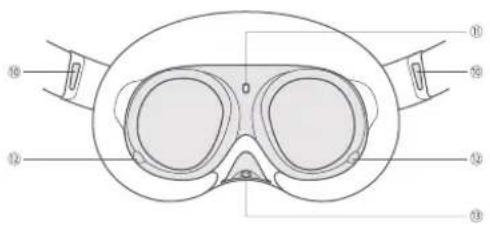
Legenda do indicador de status do Headset de RV
natural_image
Line drawing of a handheld device with a green arrow indicating rotation (no text or symbols)Legenda do indicador de status do Controlador
natural_image
Line drawing of a VR headset with an inset showing a close-up of the interior components (no text or symbols)natural_image
Line drawing of a VR headset with a green arrow indicating the component (no text or symbols present)natural_image
Diagram showing a cross-sectional view of a mechanical component with an inset close-up highlighting a specific area (no text or labels present)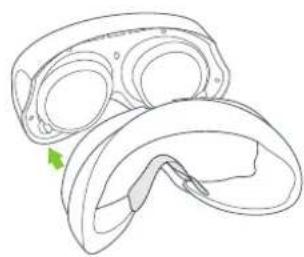
natural_image
Line drawing of a VR headset with a green arrow indicating the component (no text or symbols present)natural_image
Mechanical assembly diagram showing a shaft and housing with green directional arrows indicating motion (no text or symbols)警告
natural_image
Line drawing of a mechanical clamp or bracket with a green arrow indicating direction (no text or symbols)natural_image
Diagram of a car seatbelt mechanism with directional arrows indicating movement (no text or symbols)natural_image
Line drawing of a handheld device with labeled buttons (A, B, C) and a green circular mark on the handle (no text or symbols beyond labels)③ VR ヘッドセットの電源を入れる
natural_image
Line drawing of a hand pressing a button on a mechanical component (no text or symbols)natural_image
Line drawing of a person wearing a VR headset with green motion arrows indicating rotation (no text or symbols)natural_image
Side profile illustration of a person wearing a VR headset (no text or symbols)⑥ 瞳孔間距離 (IPD) 調整
natural_image
Line drawing of a handheld electronic device with a green arrow indicating rotation (no text or symbols)コントローラーのステータス表示の表示例
消灯:接続中または電源オフ状態
青色:ファームウェア更新中
青色点滅:接続を検出中
赤色と青色が交互に点滅:ベアリング中
① ジョイスティック ③ ホーム
②メニューニ
電源オン:見押
電器オブ:6 秒間長伸し
natural_image
Line drawing of a VR headset with an inset close-up showing the interior components (no text or symbols)natural_image
Line drawing of a VR headset with a green arrow indicating the component (no text or symbols present)ノーズパッドの取り付け
natural_image
Diagram showing a cross-sectional view of a mechanical component with an inset close-up highlighting a specific area (no text or labels present)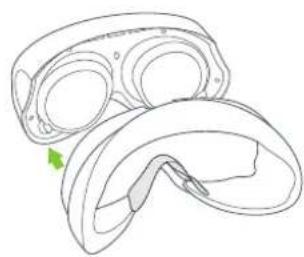
natural_image
Line drawing of a mechanical component with a green arrow indicating a specific part (no text or symbols present)フェイスクッションの交換
natural_image
Mechanical assembly diagram showing a shaft and housing with green directional arrows indicating motion (no text or symbols)
경고
natural_image
Line drawing of a mechanical device with a green arrow indicating direction (no text or symbols)natural_image
Diagram of a car seatbelt mechanism inside a circular frame, showing no text or symbolsnatural_image
Line drawing of a handheld device with labeled buttons (A, B, C) and a green circular mark on the handle (no text or symbols beyond labels)③ VR 헤드셋 전원 켜기
natural_image
Line drawing of a hand pressing a button on a mechanical component (no text or symbols)natural_image
Line drawing of a person wearing a VR headset with head-mounted sensors, alongside a circular diagram showing rotational motion (no text or symbols)
- In The Box:
- WARNING Important Health & Safety Notes
- Degrees of Freedom VR
- WARNING
- ① Install Batteries
- Quick Guide
- ② Power on the Controller
- ③ Power on the VR Headset
- ④ Wear Your Headset for a Comfortable Fit and View
- ⑤ Fine-tune the Top Strap
- ⑥ Interpupillary Distance (IPD) Adjustment
- VR Headset Status Indicator Legend
- Controller Status Indicator Legend
- Operating Instructions
- Headset Control Mode
- Switch the pointer of the master Controller
- Screen re-centering
- Disconnect the Controller
- Controllers will automatically shut down to save power in the following cases:
- Add a new Controller
- Sleep / Wake up
- Hardware reset
- VR Headset reset
- Controller reset
- The VR Headset Adjustment
- Install Glasses Spacer
- Install Nose Pad
- Replace Face Cushion
- Replace Top Strap
- ⑥ Ajuste de distancia interpupilar (IPD)
- Sustituir la almohadilla facial
- AVERTISSEMENT
- Installation de la plaquette nasale
- AVISO
- ① Instale as baterias
- Guia rápido
- ③ Ligue o Headset de RV
- Legenda do indicador de status do Headset de RV
- Legenda do indicador de status do Controlador
- 警告
- ③ VR ヘッドセットの電源を入れる
- ⑥ 瞳孔間距離 (IPD) 調整
- コントローラーのステータス表示の表示例
- ノーズパッドの取り付け
- フェイスクッションの交換
- 경고
- ③ VR 헤드셋 전원 켜기
Brand : Pico
Model : 4
Category : VR glasses