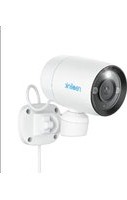
RLC-81PA - Surveillance Camera REOLINK - Free user manual and instructions
Find the device manual for free RLC-81PA REOLINK in PDF.


| Product type | Outdoor surveillance camera |
| Brand | Reolink |
| Model | RLC-81PA |
| Dimensions | 70 x 134 x 140 mm |
| Weight | 603 g |
| Power supply | 12 V DC or PoE (Power over Ethernet) |
| Protection rating | IP66 (weatherproof) |
| Operating temperature | -10 °C to +55 °C (14 °F to 131 °F) |
| Operating humidity | 10 % to 90 % |
| Resolution | Not specified, but probably Full HD surveillance camera |
| Night vision | Yes, with infrared LEDs |
| Viewing angle | Adjustable via manual rotation and remote control |
| Connectivity | Ethernet (RJ45) for data and PoE power |
| Storage | Reolink NVR (not included) |
| App | Reolink App (iOS/Android) and PC client |
| Built-in spotlight | Yes, adjustable via the app |
| Warranty | 2 years limited |
| Box contents | Camera, Ethernet cable, quick start guide, drilling template, screw kit |
Frequently Asked Questions - RLC-81PA REOLINK
User questions about RLC-81PA REOLINK
0 question about this device. Answer the ones you know or ask your own.
Ask a new question about this device
Download the instructions for your Surveillance Camera in PDF format for free! Find your manual RLC-81PA - REOLINK and take your electronic device back in hand. On this page are published all the documents necessary for the use of your device. RLC-81PA by REOLINK.
USER MANUAL RLC-81PA REOLINK
If you need any technical help, please visit our official support site and contact our support team before returning the products: https://support.reolink.com.
Hoferstasse 9B, 71636 Ludwigsburg, Germany
Email: prodsg@libelleconsulting.com
UK REP APEX CE SPECIALISTS LIMITED
Addr.: 89 Princess Street, Manchester, M14HT, UK
Email: info@apex-ce.com
May 2023
QSG1_A
58.03.005.0107

Be Prepared. Be Reulink
EN/DE/FR/IT/ES
Operational Instruction
Apply to: RLC-81PA, B4K1PA
@ReolinkTech https://reolink.com

Contents
What's in the Box....2
Camera Introduction 3
Connection Diagram 4
Set up the Camera 5
Mount the Camera 6
Troubleshooting 9
Specifications 10
Notification of Compliance 10
What's in the Box
Camera Waterproof Lid Surveillance Sign


Ethernet Cable


Quick
Start Guide

Mounting Hole Template

Pack of Screws
Camera Introduction
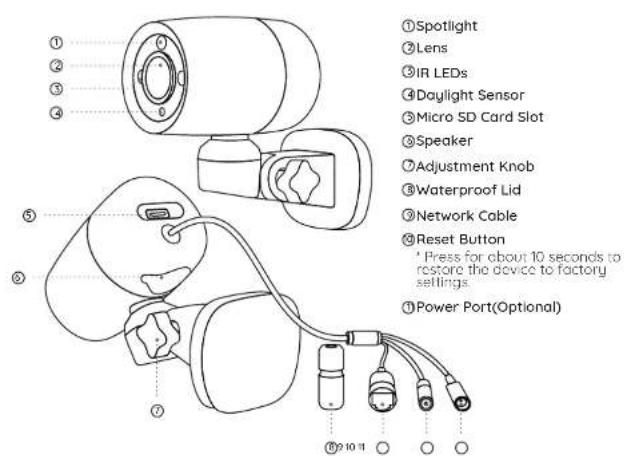
EnglishEnglish3 4
Connection Diagram
Before using the camera, please connect your camera as instructed below to finish initial setup.
-
Connect the camera to a Reolink NVR (not included) with an Ethernet cable.
-
Connect the NVR to your router, and then power on the NVR.
NOTE The camera should be powered with a 12V DC adapter or a PoE powering device such as PoE injector, PoE switch or Reolink NVR (not included in the package).
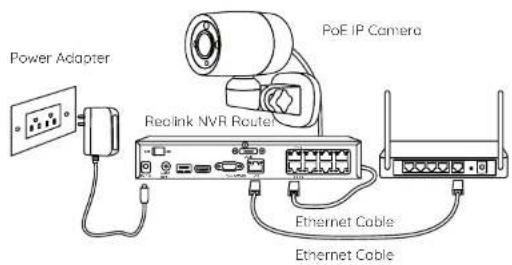
* You may also connect the camera to a PoE switch or PoE injector.
Set up the Camera
Set up the Camera Using a Smartphone
Step 1 Scan to download the Redink App from the App Store or Google Play store.


- On PC
Download path of the Reolink Client: Go to https://reolink.com > Support > App & Client.
NOTE: If you are connecting the camera to a Reolink PoE NVR, please set up the camera via the NVR interface.
EnglishEnglish5 6
Mount the Camera
Installation Tips
- Do not face the camera towards any light sources
- Do not point the camera towards a glass window. Or, it may result in poor image quality because of the window glare by infrared LEDs, ambient lights or status lights.
- Do not place the camera in a shaded area and point it towards a well-it area. Or, it may result in poor image quality. To ensure best image quality, the lighting condition for both the camera and the capture object shall be the same.
• To ensure better image quality, it's recommended to clean the lens with a soft cloth from time to time. - Make sure the power ports are not directly exposed to water or moisture and not blocked by dirt or other elements.
- With IP waterproof ratings, the camera can work properly under conditions like rain and snow. However, it doesn't mean the camera can work underwater.
- Do not install the camera at places where rain and snow can hit the lens directly.
- The camera may work in extreme cold conditions as low as -25°C. Because when it is powered on, the camera will produce heat. You may power on the camera indoors for a few minutes before installing it outdoors.
Install the Camera
natural_image
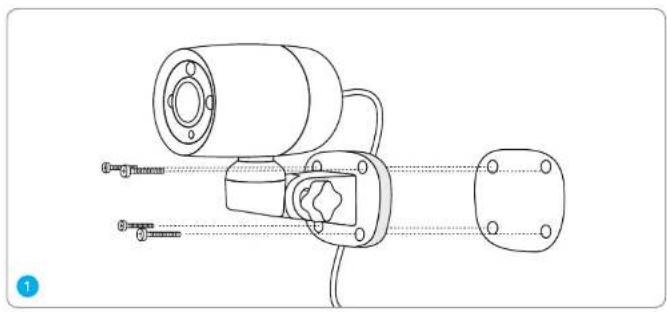
Technical line drawing of a mechanical device with labeled parts (no text or symbols present)Find a desired location and drill holes in accordance with the mounting hole template. Install the mount base with the mounting screws included in the package.
NOTE: Use drywall anchors included in the package if needed.
natural_image
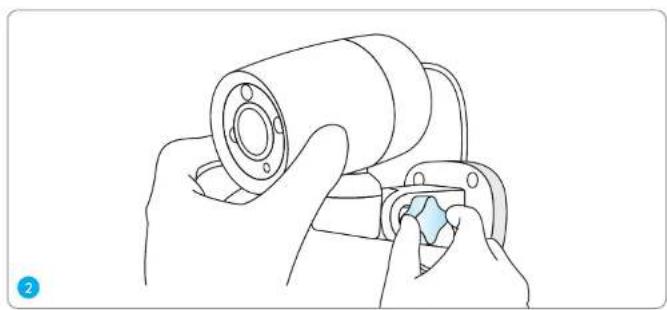
Illustration of hands assembling a cylindrical mechanical component with a blue star-shaped part (no text or symbols)Loosen the adjustment knob on the mount base and rotate the camera until the desired view is set. Tighten the adjustment knob to secure the camera in position;
NOTE: After the installation, you can remotely control your camera from Realink App to spin left and right for the best field of view.
Troubleshooting
Camera is Not Powering On
If your camera is not powering on, please try the following solutions:
- Make sure your camera is powered properly. The PoE camera should be powered by a PoE switch/Injector, the Reolink NVR or a 12V power adapter.
- If the camera is connected to a PoE device as listed above, connect the camera to another PoE port and see if the camera will power on.
- Try again with another Ethernet cable.
If these won't work, contact Reolink Support https://support.reolink.com/.
Picture is not Clear
If the picture from the camera is not clear, please try the following solutions:
- Check the camera lens for dirt, dust or
EnglishEnglish9 10
spiderwebs, please clean the lens with a soft, clean cloth.
- Point the camera to a well-lit area, the lighting condition will affect the picture quality a lot.
- Upgrade the firmware of your camera to the latest version.
- Restore the camera to factory settings and check out again.
If these won't work, contact Reolink Support https://support.reolink.com/.
Spotlight is not On
If the spotlight on your camera is not on, please try the following solutions:
- Ensure the spotlight is enabled under Device Settings page via Realink App/Client.
- Upgrade the firmware of your camera to the latest version.
- Restore the camera to factory settings and check out the spotlight light settings again.
If these won't work, contact Reolink Support https://support.reolink.com/.
Specifications
Size: 70 x 134 x 140mm Weight: 603g
Operating Temperature: -10°C\~+55°C (14°F-131°F)
Operating Humidity: 10%-90% Waterproof Rating: IP66
For more specifications, visit the Realink official website.
Notification of Compliance
CE Declaration of Conformity
Reolink declares that this device is in compliance with the essential requirements and other relevant provisions of EMC Directive 2014/30/EU and LVD 2014/35/EU.
UKCA Declaration of Conformity
Reolink declares that this product is in compliance with Electromagnetic Compatibility Regulations 2016 and Electrical Equipment Safety Regulations 2016.
FCC Compliance Statements
This device complies with Part 15 of the FCC Rules. Operation is subject to the following two conditions: (1) this device may not cause harmful interference, and (2) this device must accept any interference received, including interference that may cause undesired operation.
NOTE: This equipment has been tested and found to comply with the limits for a Class B digital device, pursuant to Part 15 of the FCC Rules. These limits are designed to provide reasonable protection against harmful interference in a residential installation. This equipment generates, uses and can radiate radio frequency energy and, if not installed and used in accordance with the instructions, may cause harmful interference to radio communications. However, there is no guarantee that interference will not occur
in a particular installation. If this equipment does cause harmful interference to radio or television reception, which can be determined by turning the equipment off and on, the user is encouraged to try to correct the interference by one or more of the following measures:
- Reorient or relocate the receiving antenna.
- Increase the separation between the
equipment and receiver. - Connect the equipment into an outlet on a circuit different from that to which the receiver is connected.
- Consult the dealer or an experienced radio/TV technician for help.
Cution: Changes or modifications not expressly approved by the party responsible for compliance could void the user's authority to operate the equipment.
ISED Compliance Statements
This Class B digital apparatus complies with Canadian ICES-003.
Correct Disposal of This Product
This marking indicates that this product should not be disposed with other household wastes throughout the EU. To prevent possible harm to the environment or human health from uncontrolled waste disposal, recycle it responsibly to promote the sustainable reuse of material resources. To return your used device, please use the return and collection systems or contact the retailer where the product was purchased. They can take this product for environmentally safe recycling.
Limited Warranty
This product comes with a 2-year limited warranty that is valid only if purchased from Reolink Official Store or a Reolink authorized reseller. Learn more:
https://reolink.com/warranty-and-return/.
Terms and Privacy
Use of the product is subject to your agreement to the Terms of Service and Privacy Policy at reolink.com. Keep out of reach of children.

Katalog
Lieferumfang 14
Über die Kamera 15
natural_image
Technical line drawing of a mechanical device with labeled parts (no text or symbols present)natural_image
Illustration of hands assembling a cylindrical mechanical component with a blue star-shaped part (no text or symbols)Reolink Support https://support.reolink.com/.
Spezifikationen
natural_image
Technical line drawing of a mechanical device with labeled parts (no text or symbols present)natural_image
Line drawing of hands assembling a mechanical component (no text or symbols)Percorso di download del client Reolink: Accedere a https://reolink.com > Supporto > App & Client.
natural_image
Technical line drawing of a mechanical device with attached components and mounting holes (no text or symbols)natural_image
Line drawing of hands assembling a mechanical component (no text or symbols)natural_image
Technical line drawing of a mechanical device with labeled parts (no text or symbols present)natural_image
Line drawing of hands assembling a mechanical component (no text or symbols)- Operational Instruction
- Contents
- What's in the Box
- Connection Diagram
- Set up the Camera
- Set up the Camera Using a Smartphone
- - On PC
- Mount the Camera
- Installation Tips
- Install the Camera
- Troubleshooting
- Camera is Not Powering On
- Picture is not Clear
- Spotlight is not On
- Specifications
- Notification of Compliance
- CE Declaration of Conformity
- UKCA Declaration of Conformity
- FCC Compliance Statements
- ISED Compliance Statements
- Correct Disposal of This Product
- Limited Warranty
- Terms and Privacy
- Katalog
- Spezifikationen
Brand : REOLINK
Model : RLC-81PA
Category : Surveillance Camera