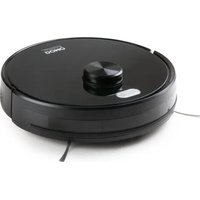
DO7298S - Robot vacuum DOMO - Free user manual and instructions
Find the device manual for free DO7298S DOMO in PDF.


| Product Type | Robot vacuum with mop and auto-empty station |
| Brand | DOMO |
| Model | DO7298S |
| Power Supply | Included charging/emptying station; optional adapter DO7296S-A (not included) |
| Battery | Built-in rechargeable; first charge of 12 hours recommended |
| Runtime | Not specified; automatic return to station when battery low |
| Main Functions | Vacuuming, mopping (water tank), auto-empty, laser mapping, scheduled cleaning, spot cleaning |
| Suction Power | 4 levels (silent, normal, powerful, max) via app; normal and powerful via remote |
| Control | Remote (AAA batteries not included), Smart Life / Tuya Smart app, buttons on device |
| Connectivity | Wi-Fi (2.4 GHz); compatible with voice assistants |
| Sensors | Laser (distance measurement), anti-drop, obstacle detection |
| Dustbin Capacity | Not specified; auto-empty into dust bag in station |
| Dust Bag Capacity (Station) | Not specified; replace when indicator turns red |
| Water Tank for Mop | Yes, with flow control (3 levels via app) |
| Safety | Anti-drop sensors, auto-stop if stuck, fall protection (stairs) |
| Maintenance and Cleaning | Regular cleaning of brushes (main and side), filters (HEPA, pre-filter, sponge), dustbin and water tank |
| Spare Parts and Consumables | Side brushes, main brush, HEPA filters, nylon pre-filter, pre-filter sponge, dust bags, mop cloth, charging/emptying station, optional adapter |
| Warranty | 2 years (accessories and wear parts: 6 months) |
| Customer Service | +32 14 21 71 91 (Mon-Thu 8:30-12pm, 1-5pm; Fri 8:30-12pm, 1-4:30pm) |
| Available Languages | French, English, German, Spanish, Italian, Dutch, Czech, Slovak (downloadable manual) |
Frequently Asked Questions - DO7298S DOMO
User questions about DO7298S DOMO
0 question about this device. Answer the ones you know or ask your own.
Ask a new question about this device
Download the instructions for your Robot vacuum in PDF format for free! Find your manual DO7298S - DOMO and take your electronic device back in hand. On this page are published all the documents necessary for the use of your device. DO7298S by DOMO.
USER MANUAL DO7298S DOMO
natural_image
Black DOME robotic vacuum cleaner with control panel and remote control, displayed alongside a smartphone interface (no visible text or symbols on the device itself)DO7298S
| Handleiding Robotstofzuiger | |
| Mode d'emploi Aspirateur robot | |
| Gebrauchsanleitung Staubsauger-Roboter | |
| Instruction booklet Robot vacuum cleaner | |
| Manual de instrucciones Robot aspirador | |
| Istruzioni per l'uso Aspirapolvere robot | |
| Návod k použití Robotický vysavač | |
| Návod na použitie Robtický vysávač |

natural_image
Two black-and-white icons: a triangular warning symbol with an exclamation mark and a open book (no text or symbols present)Read all instructions carefully. Save this instruction manual for future reference.
⚠PRODUCTSPECIFIEKE WAARSCHUWINGEN
natural_image
Line drawing of a modern kitchen appliance with a rectangular top and side base (no text or symbols)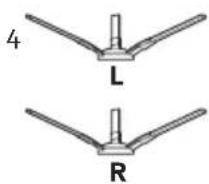
3
8
1
natural_image
Line drawing of a circular vacuum cleaner with labeled 'DOMO' and 'LANTINUMA' (no additional text or symbols)6
natural_image
Technical line drawing of a mechanical component with curved surfaces and mounting holes (no text or symbols)9
natural_image
Simple curved line drawing resembling a simplified leaf or crescent (no text or symbols)ROBOTSTOFZUIGER
Bovenkant:
- Bumper
- Bedieningsknoppen
- WiFi-indicator
- Laserafstandssensor
Onderkant:
WATERRESERVOIR
- Afdichtingsdop van reservoir
- Waterreservoir
- Dweil
LAAD-LEDIGINGSTATION
natural_image
Illustration of various electronic devices including a robot, car, mouse, and battery with a red X symbol (no text or labels)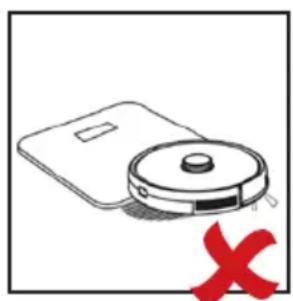
natural_image
Simple line drawing of a vacuum cleaner with a red X mark indicating no text or symbols on the device itself.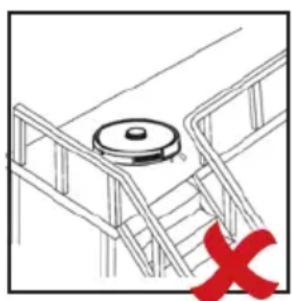
natural_image
Diagram of a staircase with a circular object on top and a red X mark at the bottom (no text or symbols)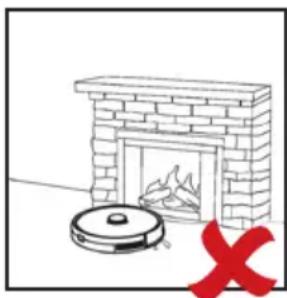
natural_image
Illustration of a brick chimney with a vacuum cleaner and a red X symbol (no text or symbols present)OPMERKING:
natural_image
Simple line drawing of a maze with a circular button at the end (no text or symbols)natural_image
Simple spiral diagram with an arrow indicating direction (no text or symbols)natural_image
Technical line drawings of a robotic vacuum cleaner's internal components (no text or labels)Opgelet:
Manueel
DE ROBOTSTOFZUIGER MET DE APP GEBRUIKEN
Opmerkingen:
natural_image
Technical line drawing of a circular mechanical or electronic component with internal components and no visible text or symbols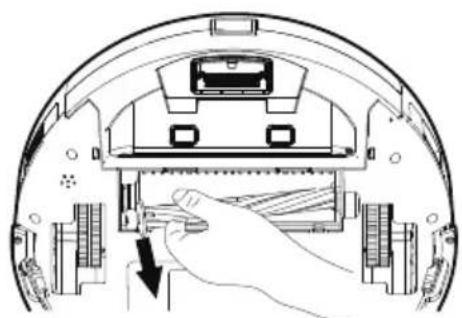
natural_image
Diagram of a robotic device showing internal components and a hand interacting with a tool (no text or symbols visible)natural_image
Technical line drawing of a circular mechanical device with mounting brackets and a central hub (no text or symbols)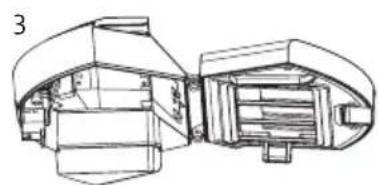
natural_image
Technical line drawing of a mechanical component with no visible text or symbols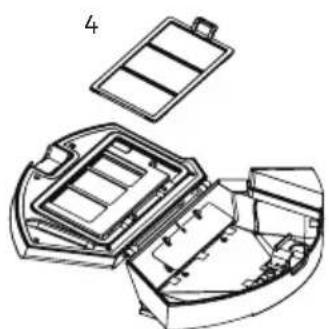
natural_image
Technical line drawing of a mechanical housing or enclosure with internal compartments and mounting brackets (no text or symbols)
natural_image
Simple line drawing of a petri dish containing scattered particles (no text or symbols)natural_image
Technical line drawings of a mechanical device showing open lid, internal compartments, and water tap (no text or symbols)natural_image
Technical line drawings of a mechanical device showing exploded, assembled, and assembled views (no text or symbols)WATERRESERVOIR REINIGEN
PROBLEEM EN OPLOSSING
natural_image
Recycling symbol icon with three chasing arrows forming a triangle (no text or labels)natural_image
Symbol of a trash bin crossed out by two diagonal lines, representing no waste or discharge (no text or labels)⚠ AVERTISSEMENTS SPÉCIFIQUES AU PRODUIT
natural_image
Line drawing of a circular vacuum cleaner with labeled 'DOMO' and control buttons (no additional text or symbols)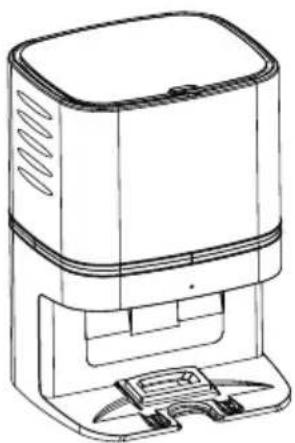
natural_image
Line drawing of a modern kitchen appliance with a rectangular top and side base (no text or symbols)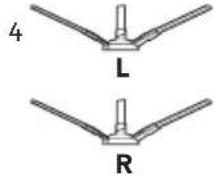
6
natural_image
Technical line drawing of a mechanical component with curved surfaces and mounting holes (no text or symbols)
8
9
natural_image
Simple curved line drawing resembling a simplified leaf or crescent (no text or symbols)ASPIRATEUR-ROBOT
Partie supérieure :
natural_image
Illustration of a robot with connected cables and a car, accompanied by a red X symbol (no text or labels)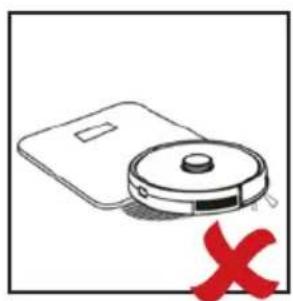
natural_image
Illustration of a vacuum cleaner with a red X mark indicating no text or symbols on the device itself.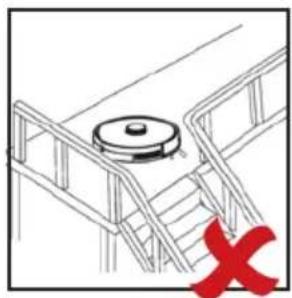
natural_image
Diagram of a staircase with a circular object on top and a red X mark at the bottom (no text or symbols)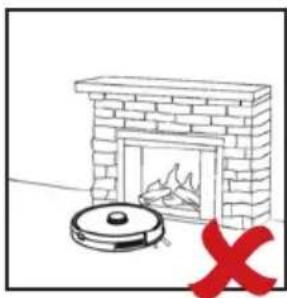
natural_image
Simple line drawing of a brick fireplace with a vacuum cleaner and a red X mark (no text or symbols)REMARQUE :
natural_image
Simple line drawing of a maze with a mouse on the right side (no text or symbols)natural_image
Simple spiral diagram with an arrow indicating direction (no text or symbols)natural_image
Technical line drawings of a robotic vacuum cleaner's internal components (no text or labels)Attention :
Manuellement
UTILISER L'ASPIRATEUR-ROBOT AVEC L'APPLICATION
Remarques :
natural_image
Technical line drawing of a circular mechanical or electronic component with internal components and mounting features (no text or symbols)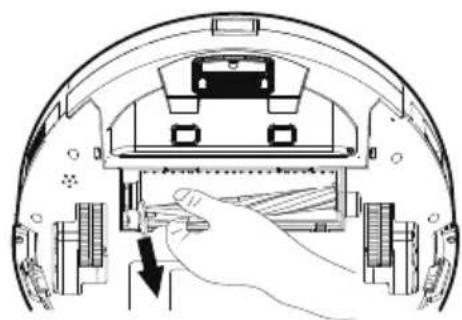
natural_image
Diagram of a robotic device interior showing a hand inserting a component into a housing (no text or symbols visible)natural_image
Technical line drawing of a circular mechanical component with mounting brackets and a central hub (no text or symbols)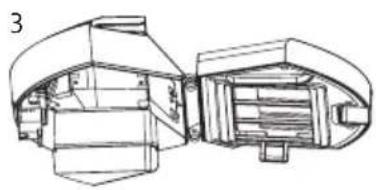
natural_image
Technical line drawing of a mechanical component with no visible text or symbols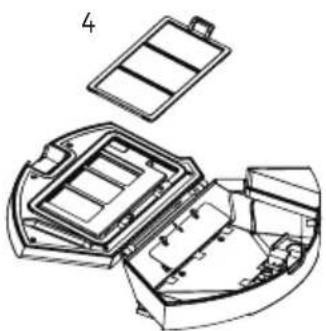
natural_image
Technical line drawing of a mechanical component with internal compartments and housing (no text or symbols)natural_image
Line drawing of a mechanical component with a handle and internal compartments (no text or symbols)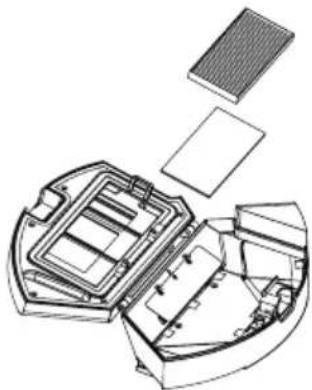
natural_image
Exploded view diagram of a mechanical assembly showing internal components and housing (no text or labels)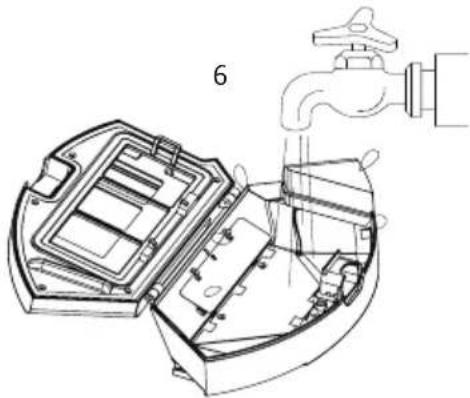
natural_image
Technical line drawing of a device with open lid and water tap, no text or symbols presentnatural_image
Technical line drawings of a mechanical device with exploded and assembled views (no text or symbols)natural_image
Technical line drawing of a robotic vacuum cleaner (no text or symbols)
natural_image
Technical line drawing of a mechanical component with a curved top and internal structure (no text or symbols)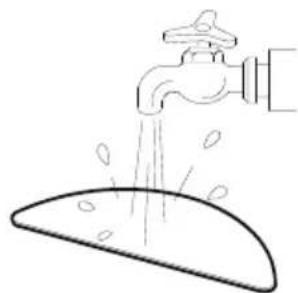
natural_image
Simple line drawing of a faucet spraying water onto a surface (no text or symbols)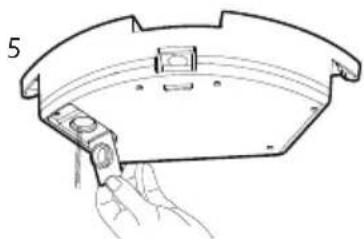
natural_image
Line drawing of a hand holding a tool interacting with a curved mechanical component (no text or symbols)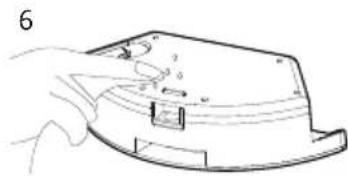
natural_image
Line drawing of a hand holding a small electronic device with a curved panel (no text or symbols)NETTOYAGE DE L'APPAREIL
DÉCLARATION DE CONFORMITÉ
natural_image
Recycling symbol icon with three chasing arrows forming a triangle (no text or labels)natural_image
Symbol of a trash bin crossed with no text or numbers, representing waste sorting or disposal (no text present)BATTERIE AMOVIBLE
natural_image
Top-down line drawing of a circular vacuum cleaner with labeled 'DOMO' and control buttons (no text beyond label)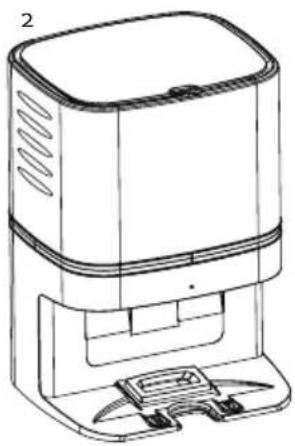
natural_image
Line drawing of a modern kitchen appliance with a rectangular top and side base (no text or symbols)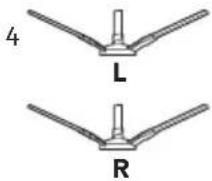
natural_image
Technical line drawing of a mechanical component with curved surfaces and mounting holes (no text or symbols)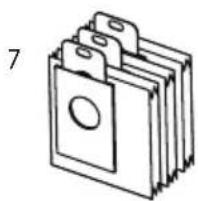
natural_image
Illustration of a stack of three identical rectangular objects with circular cutouts, no text or symbols present.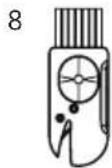
natural_image
Simple curved line drawing with number 9 labeled on the top-left corner (no other text or symbols)STAUBSAUGERROBOTER
Oberseite:
Seite:
natural_image
Illustration of a robotic vacuum cleaner with a red X mark indicating cancellation or error (no text or symbols present)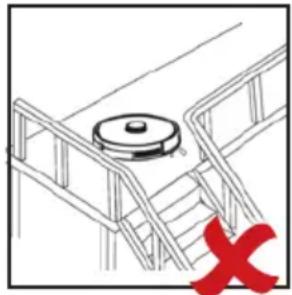
natural_image
Diagram of a staircase with a circular object on top and a red X mark at the bottom (no text or symbols)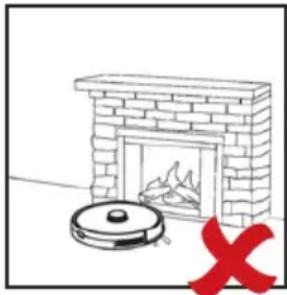
natural_image
Simple line drawing of a brick fireplace with a vacuum cleaner and a red X symbol (no text or labels)ANMERKUNG:
natural_image
Simple line drawing of a zigzag path with a circular element at the end (no text or symbols)natural_image
Simple spiral diagram with an arrow indicating direction (no text or symbols)natural_image
Technical line drawings of a robotic vacuum cleaner with open lid, showing internal components and mounting bracket (no text or symbols)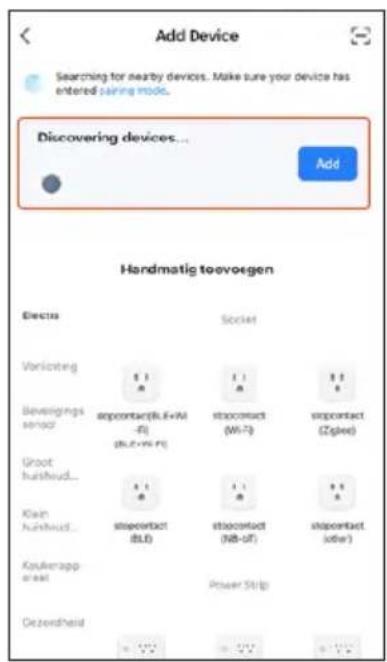
Manuell
VERWENDUNG DES STAUBSAUGERROBOTERS MIT DER APP
Anmerkungen:

natural_image
Technical line drawing of a circular mechanical or electronic component with internal components and mounting holes (no text or symbols)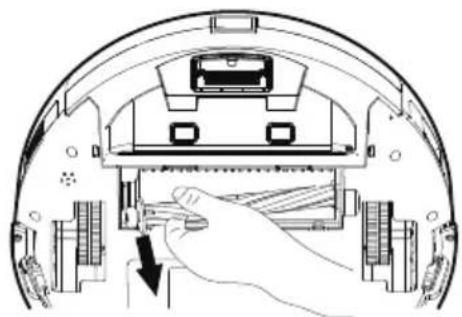
natural_image
Diagram of a robotic device with a hand inserting a component into a housing (no text or symbols visible)natural_image
Technical line drawing of a mechanical assembly with no visible text or symbols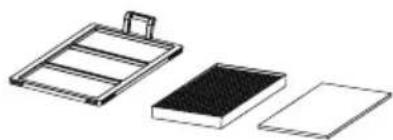
natural_image
Three technical line drawings of a mechanical component or assembly (no text or symbols)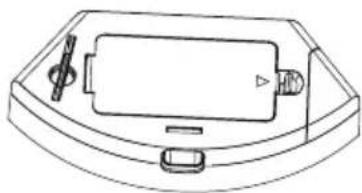
natural_image
Line drawing of a device casing with handle, buttons, and a central component (no text or symbols)WASSERBEHÄLTER REINIGEN
natural_image
Symbol of a trash bin crossed with no text or numbers, enclosed in a rounded square frame (no readable text or labels)natural_image
Recycling symbol icon with three chasing arrows forming a triangle (no text or labels)natural_image
Symbol of a trash bin crossed out by two diagonal lines, representing no waste or discharge (no text or labels)HERAUSNEHMBARE BATTERIE
All of our products are always submitted to a strict quality control before they are sold to you.
Should you nevertheless experience problems with your device, we sincerely regret this.
In that case, we kindly request you to contact our customer service.
Our staff will gladly assist you.

+32 14 21 71 91

info@linea2000.be
Monday – Thursday: 8.30 – 12.00 and 13.00 – 17.00
Friday: 8.30 - 12.00 and 13.00 - 16.30
This appliance has a two year warranty period. During this period the manufacturer is responsible for any failures that are the direct result of construction failure. When these failures occur the appliance will be repaired or replaced if necessary. The warranty will not be valid when the damage to the appliance is caused by wrong use, not following the instructions or repairs executed by a third party. The guarantee is issued with the original till receipt. All parts, which are subject to wear, are excluded from the warranty. If your device breaks down within the 2-year warranty period, you can return the device together with your receipt to the shop where you purchased it.
The guarantee on accessories and components that are liable to wear-and-tear is only 6 months.
The guarantee and responsibility of the supplier and manufacturer lapse automatically in the following cases:
- If the instructions in this manual have not been followed.
· In case of incorrect connection, e.g. electrical voltage that is too high.
· In case of incorrect, rough or abnormal use.
· In case of insufficient or incorrect maintenance.
· In case of repairs or alterations to the device by the consumer or non-authorised third parties. - If the customer used parts or accessories that are not recommended or provided by the supplier / manufacturer.
SAFETY INSTRUCTIONS
When using electrical appliances, basic safety precautions should always be taken, including the following:
- Read all instructions carefully. Keep this manual for future reference.
- Make sure all packaging materials and promotional stickers have been removed before using the appliance for the first time. Make sure children cannot play with the packaging materials.
- This appliance is intended to be used in household and similar applications such as:
- staff kitchen areas in shops, offices and other working environments;
· farm houses; - by clients in hotels, motels and other residential type environments;
-
bed and breakfast type environments.
-
Children should be supervised to ensure that they do not play with the appliance.
- This appliance can be used by children aged from 16 years and above and persons with reduced physical, sensory or mental capabilities or lack of experience and knowledge if they have been given supervision or instruction concerning use of the appliance in a safe way and understand the hazards involved.
· Children shall not play with the appliance. - Cleaning and user maintenance shall not be made by children unless they are older than 16 or supervised.
- Keep the appliance and its cord out of reach of children younger than 16 years.
- All repairs should be carried out by the manufacturer or its aftersales service.
- Any injury or damage caused by failure to comply with these rules are at your own risk. Neither the manufacturer, importer, or the supplier may be held liable.
▲ELECTRICAL WARNINGS
- The appliance must be disconnected from its power source during service and when replacing parts. To disconnect, turn controls to "OFF" or "o" position, then remove the plug from the wall. Never pull the cord or appliance to remove the plug from the socket.
- Before use, check carefully that the electric tension and frequency of the power net at your home match the indications on the rating label of the appliance.
- Do not let the power supply cord hang over the edge of a counter, or touch hot surfaces.
- Keep the power cord away from hot parts and don't cover the appliance.
- Unwrap the cord completely to prevent overheating of the cord. Do not allow the power cord supply to run underneath or around the charging station.
- Do not operate this appliance with a damaged cord or plug or in the event the appliance malfunctions or has been damaged in any manner. Return the appliance to the DOMO Service Department or its service agent for examination, repair, or electrical or mechanical adjustment. Do not try to repair the appliance yourself.
⚠️INSTALLATION
· Do not place near flammable materials, gases or explosives.
· Do not use or store this appliance outdoors.
· Always use the appliance on a steady, dry and level surface.
- Never place this appliance near a gas stove or electrical stove or in a place where it may come into contact with a warm appliance.
⚠ USE
· Do not use this appliance for other than intended use.
- Only use the appliance for domestic use. The manufacturer cannot be held responsible for accidents that result from improper use of the appliance or not following the instructions described in this manual.
· Do not operate the appliance with wet hands.
- The use of accessories that are not recommended or sold by the manufacturer can cause fire, electrical shock or injuries. Only use the utensils delivered with the appliance.
⚠ CLEANING AND MAINTENANCE
- To protect against electrical shock or burns, do not immerse unit, cord, or plug in water or other liquid.
- Failure to maintain this appliance in a clean condition could adversely affect the life of the appliance and possibly result in a hazardous situation.
⚠️PRODUCT-SPECIFIC WARNINGS
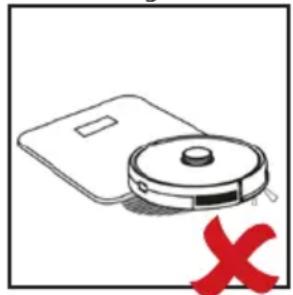
- Do not use the robot vacuum to clean up detergents, flammable/corrosive liquids (such as solvents, flammable and explosive materials such as petrol, alcohol, etc.), and other similar liquids, needles, matches, sharp objects, or flammable items.
- Do not use the robot vacuum cleaner to vacuum up cement, powder and other small particles.
- Avoid vacuuming large objects and items that could become entangled in the brush (long hair, plastic bags, string, etc.). The robot vacuum cleaner could be clogged, the motor could overheat or other damage may occur.
- Make sure that the air intake or the floor suction opening do not become blocked.
- First charge a new battery up completely for 12 hours.
- Pull the plug from the outlet when the vacuum cleaner is fully charged when charging directly with adapter (not included).
- This product contains a rechargeable battery. Batteries must be recycled in accordance with local laws and regulations when they are no longer of use. Do not pierce the battery or expose it to high temperatures; this may cause the battery to explode.
- Under extreme circumstances, there could be leakage of the battery. If the liquid from the battery comes into contact with the skin, wash it off immediately with water and soap or neutralize it with a mild acid such as lemon juice or vinegar. If the liquid comes into contact with the eyes, rinse them liberally with water for at least 10 minutes and contact a doctor.
- Do not place foreign objects in the openings of your machine. Do not use the machine if an opening is blocked. Keep the machine free from dust, dirt, hair or anything that could reduce the air supply.
- Remove large and sharp objects from the floor to prevent damage to the plastic components, the brushes and the motor.
- Keep hair, loose clothing, fingers and other body parts away from openings and moving parts.
- After using the appliance, it is important to clean the water reservoir to prevent the suction power from decreasing and the motor from heating up due to blockage. This could affect the performance and lifetime of the appliance.
- Only use the charging/emptying station or optional adapter DO7296S-A (not included) to charge the appliance. Other chargers may damage the appliance/battery and render the appliance unusable.
· Take care when using the appliance in damp rooms, such as bathrooms, toilets, and storerooms, etc., so that the appliance cannot get wet.
- Never use the robot vacuum without filters and reservoir. This will damage the motor and render it unusable.
SAVE THESE INSTRUCTIONS FOR FUTURE REFERENCE
PARTS
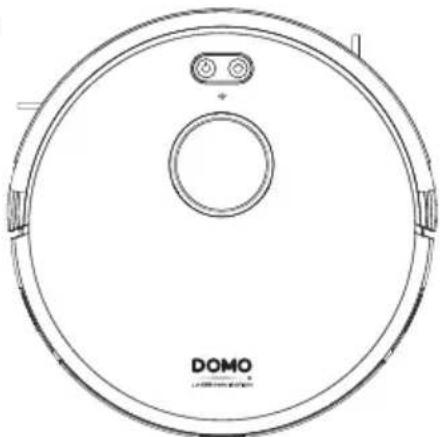
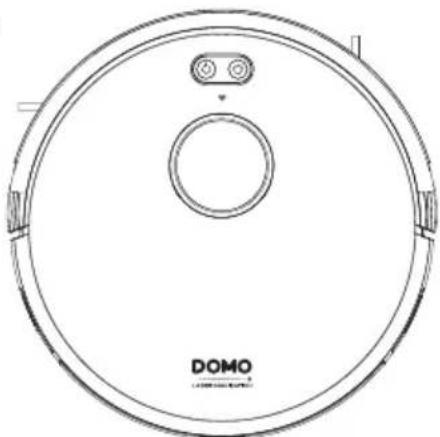
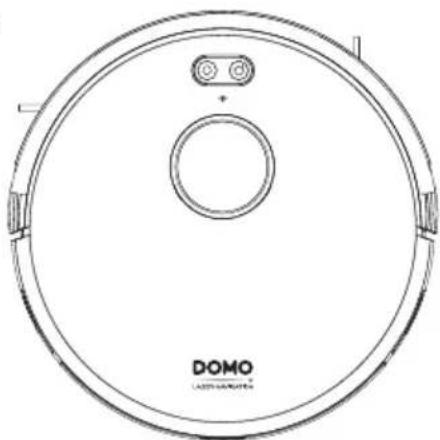
- Robot vacuum cleaner
- Charging/emptying station
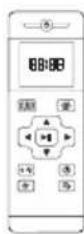
- Remote control
- Left and right side brushes
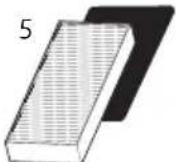
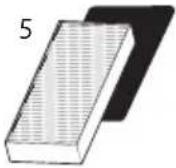
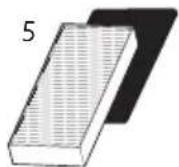
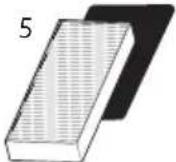
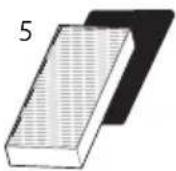
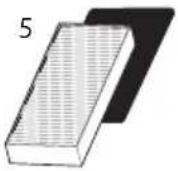
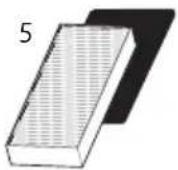
- Extra HEPA filter and pre-filter sponge
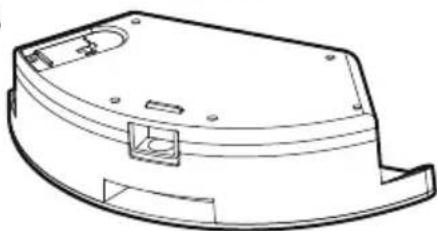
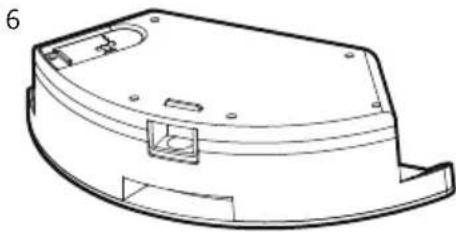
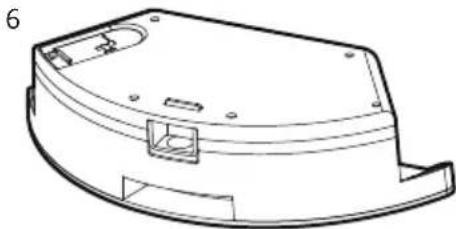
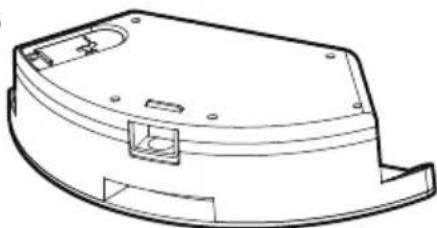
- Water reservoir with mop
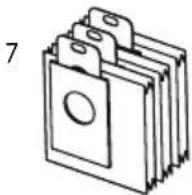
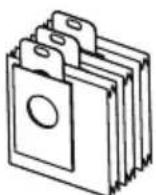
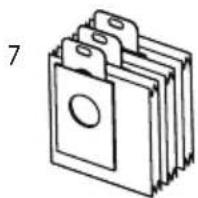
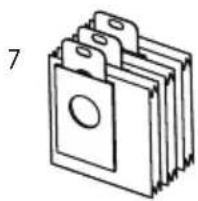
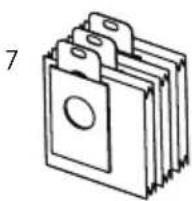
- Extra dust bags
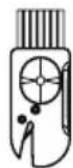
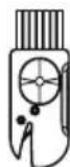
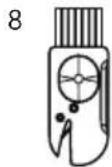
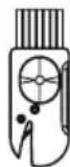
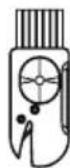
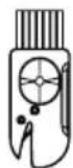
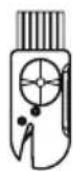
- Cleaning brush with blade
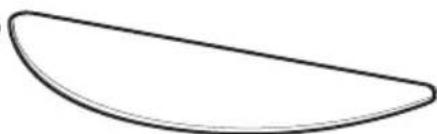
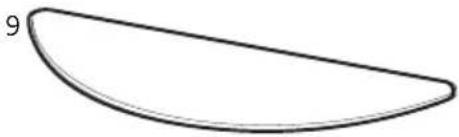
- Extra mop
natural_image
Technical line drawing of a circular vacuum cleaner with labeled 'DOMO' and control buttons (no additional text or symbols)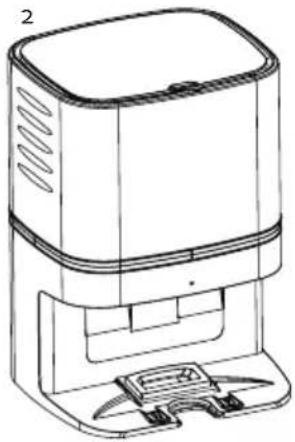
natural_image
Line drawing of a smart air purifier device with control panel and base mount (no text or symbols)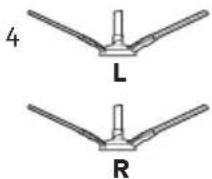
natural_image
Technical line drawing of a curved mechanical component with mounting holes and internal features (no text or symbols)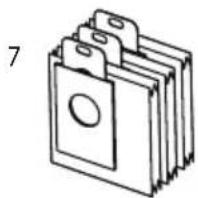
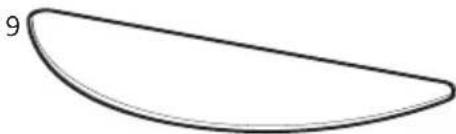
natural_image
Simple curved line drawing with number 9 labeled on the top-left corner (no other text or symbols)ROBOT VACUUM CLEANER
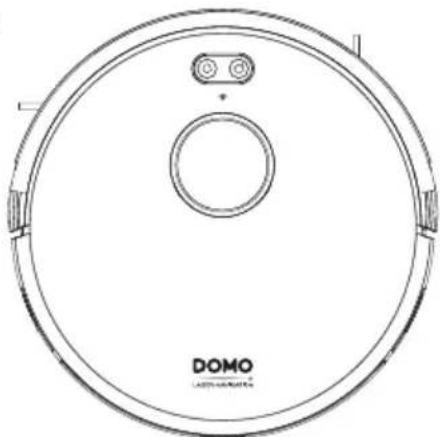
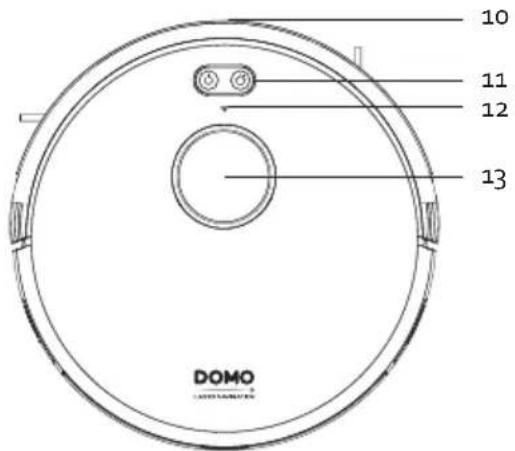
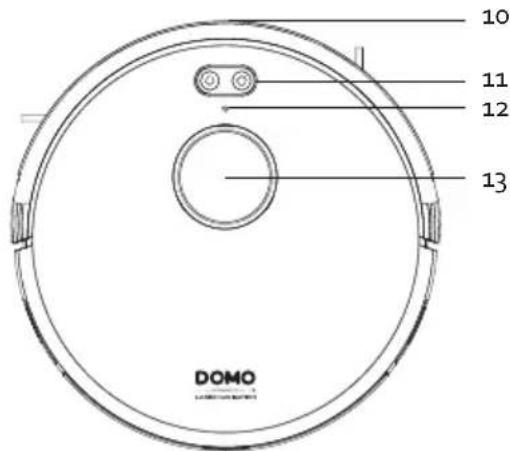
Top:
- Bumper
- Control buttons
- Wi-Fi indicator
- Laser distance sensor
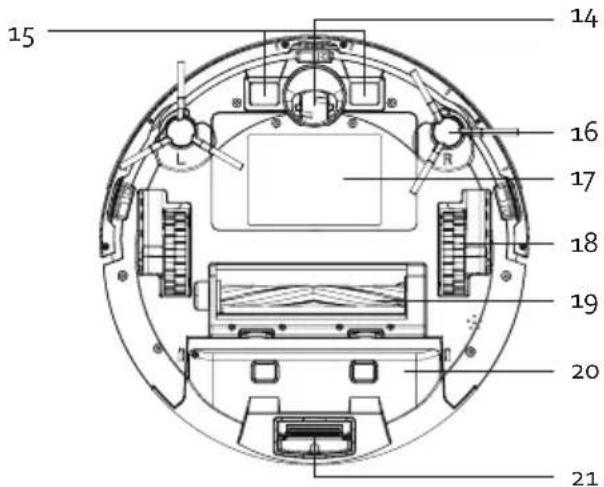
Bottom:
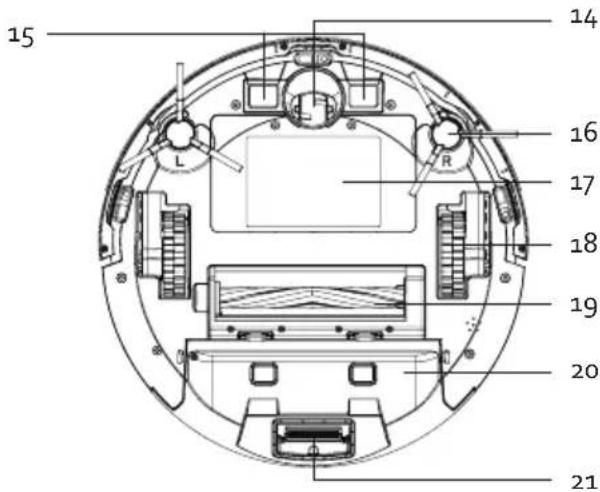
-
Castor wheel
-
Charging contacts
-
Side brushes
-
Battery compartment
-
Side wheel
-
Suction nozzle with rotating brush
-
Dust bin
-
Dust discharge port
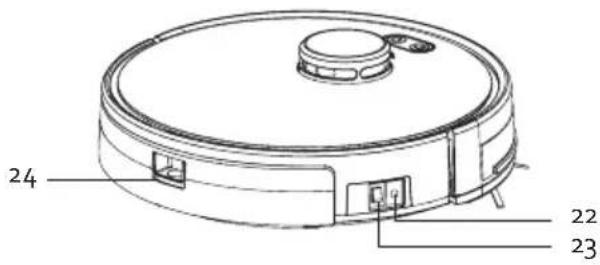
Side:
-
Adapter input
-
On/Off switch
-
Dust collector release
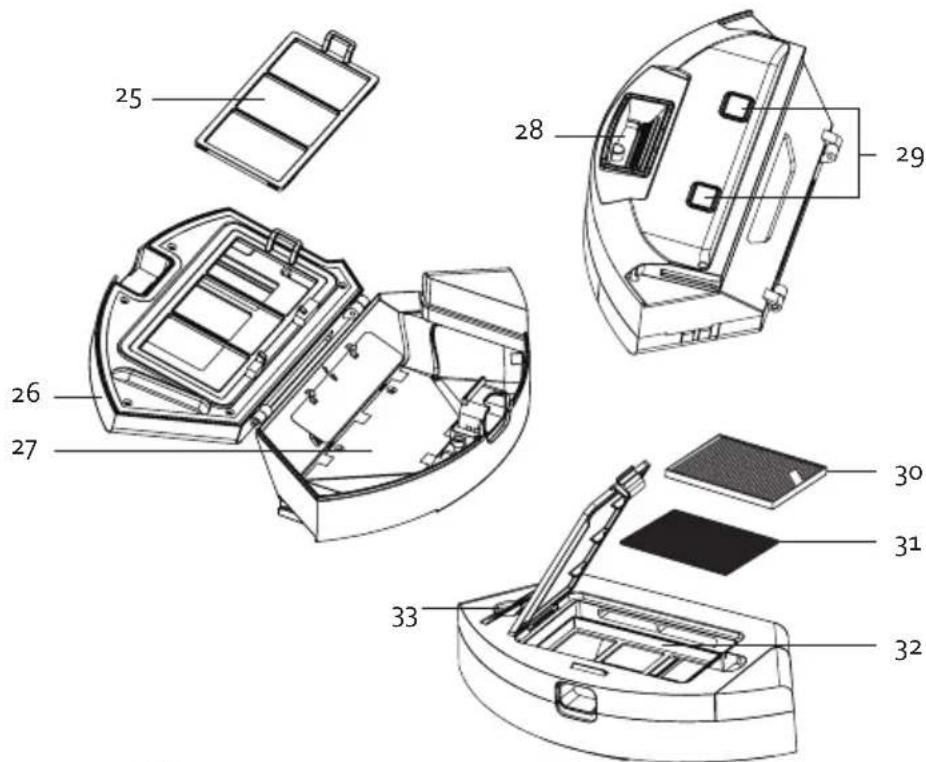
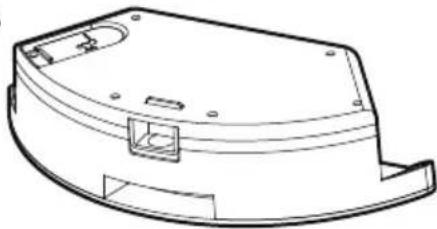
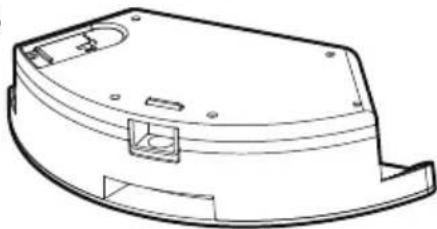
DUST BIN
-
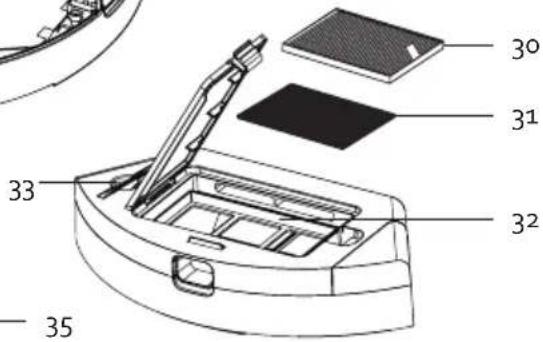
Nylon pre-filter
-
Dust collector lid
-
Dust bin
-
Dust discharge port
-
Emptying contacts
-
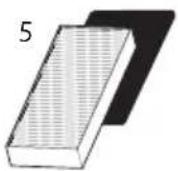
HEPA filter
-
Pre-filter sponge
-
Filter compartment
-
Cleaning brush with blade
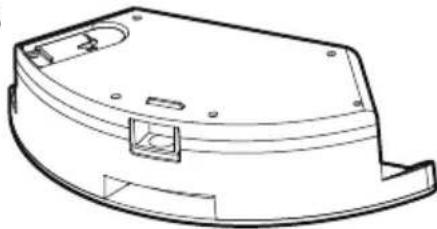
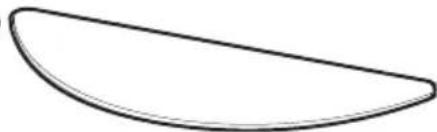
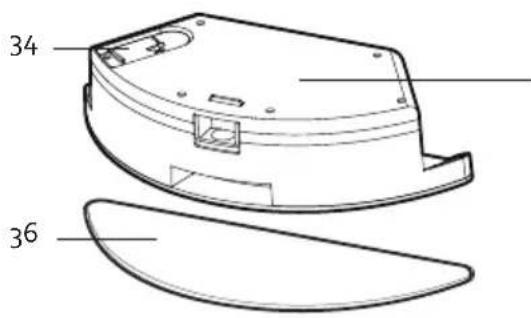
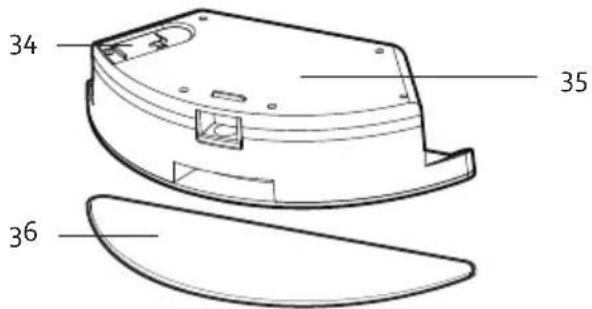
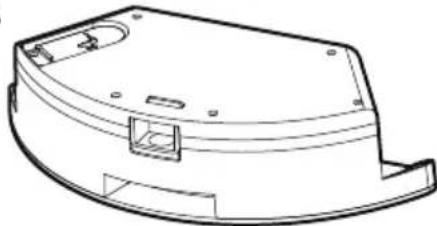
WATER TANK
-
Tank sealing cap
-
Water tank
-
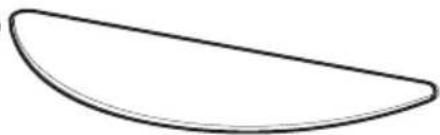
Mop
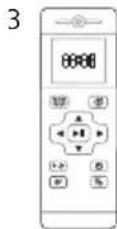
CHARGING/EMPTYING STATION
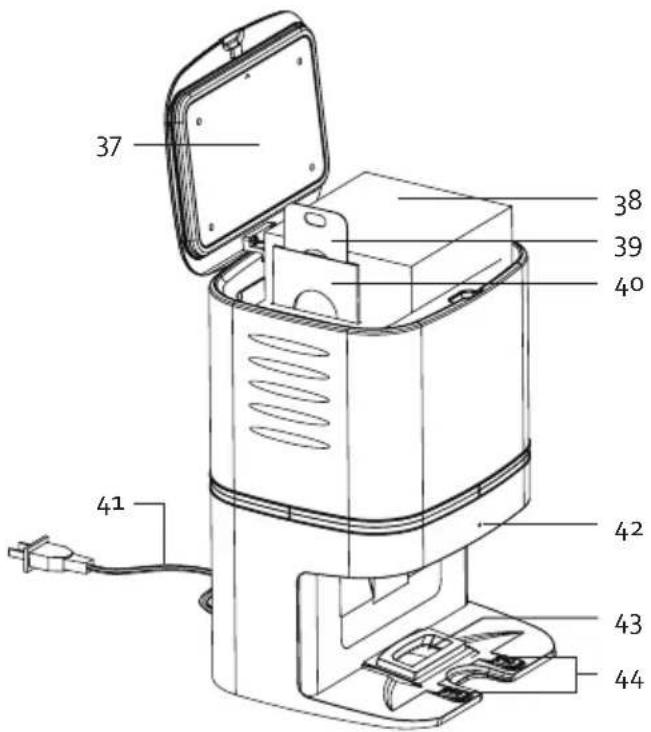
- Lid
- Dust bag
- Dust bag handle
- Dust bag guide plate
- Power supply cable
- Indicator light
- Vacuum port
- Charging contacts
BEFORE THE FIRST USE
- Put two AAA batteries in the remote control.
- Set the time (see "use/use with remote control/ Clock settings").
-
Place the signed brushes on the vacuum cleaner. Press on them until you hear a click. The brushes and the appliance are marked with L (left) and R (right); make sure they match.
· Install the charging/emptying station: -
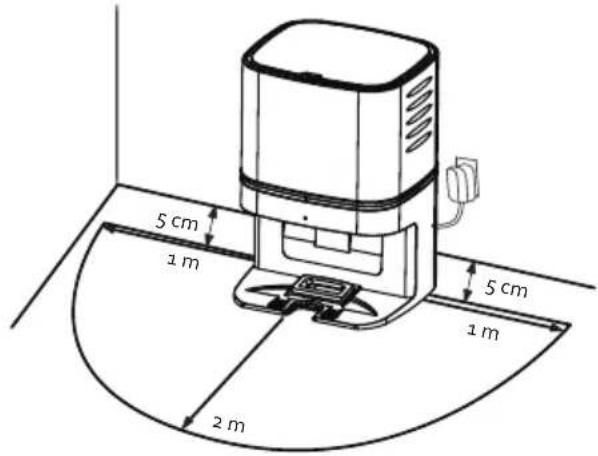
Place the charging/emptying station on a flat, hard surface; allow at least 5 cm free space behind the station and 1 m free space on the left and right-hand sides. In front of the charging station, there must be a free area of 2 m. If this is not the case, the robot vacuum may not be able to find the station for charging or emptying.
-
Install a dust bag in the charging/emptying station (see "Replacing the dust bag").
- Plug the charging/emptying station into the wall socket. Make sure the power cable is not in
front of or next to the station. The charging/emptying station indicator light will flash slowly.
- Allow the robot vacuum to charge fully for 12 hours before first use. See "Charging".
CHARGING
· Switch on the robot vacuum machine using the power switch on the side of the machine.
· Make sure the charging/emptying station is installed correctly (see above).
- Press the home button on the appliance or remote control. The robot will drive to the charging/emptying station and start charging.
- During charging, the indicator light of the control button ⏻ on top of the appliance will flash. When the robot vacuum is fully charged, the light will be lit constantly.
PLEASE NOTE:
- Allow the robot vacuum to charge fully for 12 hours before first use.
- When the battery is low or when the robot has completed its programme, the appliance will automatically return to the charging/emptying station for charging. If no charging/emptying station is installed, the robot vacuum will go into standby mode.
- Ensure the on/off switch on the side of the appliance is on at all times; otherwise, the appliance will not be able to charge.
- Make sure the charging/emptying station is always plugged in; otherwise, the robot vacuum will not be able to find the charging/emptying station.
- You can also choose to charge the appliance earlier by pressing the home button on the appliance or the remote control.
- If the appliance battery is completely empty, you can manually place the robot in the charging/emptying station. Make sure the castor wheel is between the two charging contacts.
- The robot vacuum can also be charged without a charging/emptying station using the adapter port on the side next to the on/off switch. Use adapter DO7296S-A (not included – available in the DOMO webshop) for this purpose.
AUTOMATIC EMPTYING
When the robot has finished vacuuming, it automatically returns to the charging/emptying station. When it gets there, it will empty itself first. To do this, it will move backwards into the charging/emptying station, which will then empty the dust reservoir using suction. This takes 10-15 seconds. The robot will then turn 180^ and move forward into the charging/emptying station to begin charging.
The robot empties itself every time it finishes its programme. This means after cleaning an entire space (when used without the app) or after completing a specified task (when used with the app).
- You can only adjust the emptying frequency or start emptying manually via the app.
USE
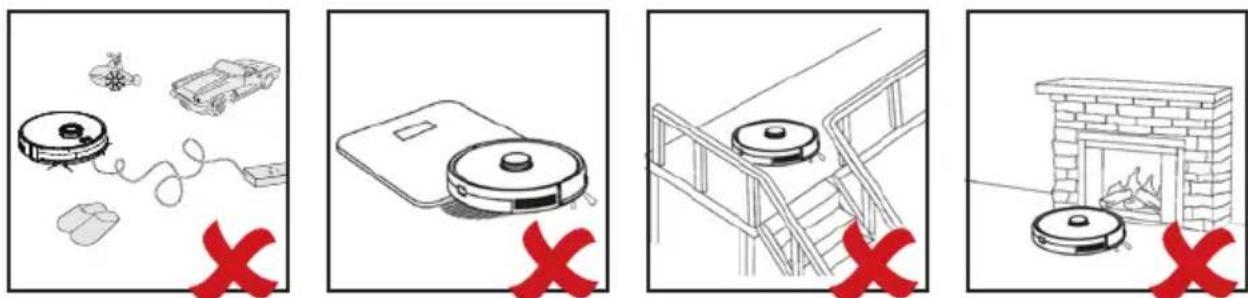
The robot vacuum maps the room using a laser beam and thus cleans the room most efficiently. In addition, its sensors ensure it does not collide with anything. It is advisable to tidy up the room as best as possible and remove as many obstacles as possible.
For optimal performance and the best cleaning results, it is best to follow these tips:
- Remove loose objects, obstacles and small furniture from the ground.
- Place chairs neatly around the table or raise them off the floor.
- Remove objects and cables that could cause the robot to get stuck.
- Remove objects lower than 18 mm.
· Fold the tassels on the edges of the rugs inward to prevent the robot from getting stuck. - Roll up or remove dark-coloured, deep-pile rugs or rugs thicker than 18 mm, as this may cause problems for the robot.
- In most cases, anti-fall sensors will prevent the robot from falling and/or making steep descents. However, these sensors are less effective when they are dirty or when the robot is moving on carpeted, reflective or dark-coloured floors. Therefore, it is advisable to cordon off stairs and holes, set them as a no-go zone, or set up a virtual wall in the app.
It is recommended that fireplaces and certain areas (e.g. ventilation floor grilles) where the robot could be damaged be cordoned off, set as a no-go zone, or set up as a virtual wall in the app.
- Do not walk near the working robot. The robot could recognise you as an obstacle and skip places when vacuuming.
NOTE:
The robot vacuum can also be used with the charging station DO7296S-32 (not included – available in the DOMO webshop), which can be placed in another space or on another floor. As a result, you don't always have to move the charging/emptying station. The robot can charge automatically if necessary.
ON/STANDBY/SLEEP MODE/OFF
On
Switch on the robot vacuum machine using the power switch on the side of the machine.
Start the robot with the control button on the appliance using the remote control (see "Use with remote control" or with the app (see "Use with app").
Standby
The machine is in standby mode when the on switch is on and the machine is in idle state, ready to be used immediately. Both indicator lights ⏻ on the appliance will light up. When the machine is in sleep mode, you must first activate it before you can start the machine.
The robot will go into standby mode when you press the control button on the appliance or the pause button on the remote control or in the app.
Sleep mode
If the appliance is not activated within 10 minutes, it will automatically go into sleep mode. Both indicator lights on the appliance will go out. You can do this by pressing the control button on the appliance, the ON/OFF button on the remote control, or by activating the appliance in the app.
You can put the appliance into sleep mode yourself by pressing the ON/OFF button on the remote control.
Off
You can turn off the machine completely by switching off the on switch on the side of the device while in standby mode.
Should the robot not be planned for use for an extended period, it is advisable to switch it off.
USE WITHOUT REMOTE CONTROL
- Press the control button for automatic cleaning. The vacuum cleaner will plot its own path to vacuum the entire area, taking walls, obstacles and stairs into account.
- When the appliance has finished vacuuming, it automatically returns to the charging/emptying station. When it gets there, it will empty itself first. To do this, it will move backwards into the charging/emptying station, which will then empty the dust reservoir using suction. This takes 10-15 seconds. The robot will then turn 180^ and move forward into the charging/emptying station to begin charging.
- If no charging station is installed, the vacuum cleaner enters standby mode.
- It is also possible to allow the machine itself to stop cleaning. To do this, press the control button ⏻
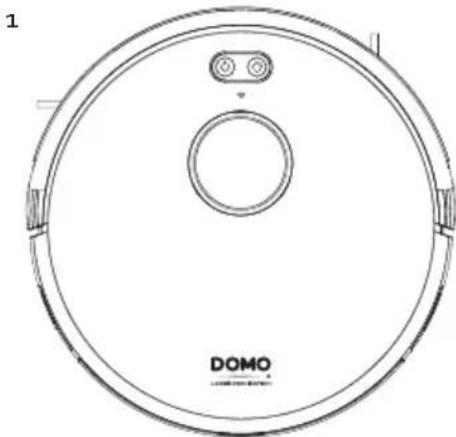
USE WITH REMOTE CONTROL
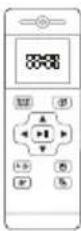
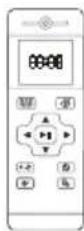
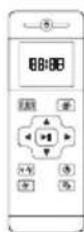
- On-off button
- Display
- Plan cleaning
- Home button
- Arrows
- Start/pause button
- Suction level adjustment
- Clock settings
- Spot cleaning
- Schedule setting
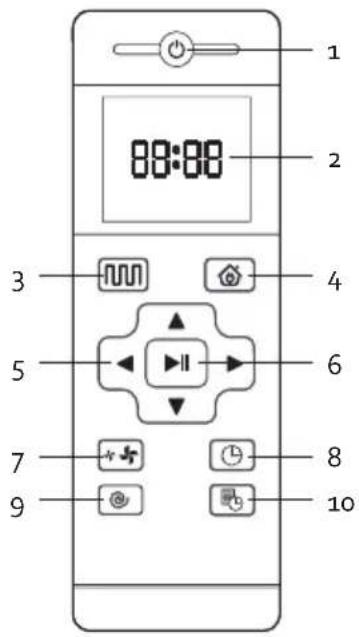
- On-off button ⏻
This button is used to switch the appliance from sleep mode to standby mode and vice versa. This is also the off button to stop the appliance.
- Display
The display shows the time and the settings.
- Plan cleaning (smart cleaning)
Regardless of which mode the robot is in, pressing this button switches the appliance directly to plan cleaning. The vacuum cleaner will move through the room and vacuum in an S-shaped motion.
- Home button: return to the charging station for re-charging

If you wish to charge the vacuum cleaner during use, press the HOME button. The vacuum cleaner will now automatically look for the charging/emptying station.
-
Arrows
-
I standby mode, press this arrow to move the vacuum cleaner forwards. For other settings, this button can be used to increase the value.
- In standby mode, press this arrow to turn the vacuum cleaner 180 degrees. For other settings, this button can be used to decrease the value.
- In standby mode, press and hold this arrow to turn the vacuum cleaner to the left. For other settings, this button can be used to switch from minutes to hours.
- In standby mode, press and hold this arrow to turn the vacuum cleaner to the right. For other settings, this button can be used to switch from hours to minutes.
6. Start/pause button ▶||
This button immediately starts automatic cleaning, both from sleep mode and standby mode. The vacuum cleaner will plot its own path to vacuum the entire room, and will avoid walls, obstacles, and stairs.
This button can also be used to pause the vacuum cleaner. If you press this button again, the appliance will continue to complete its programme.
7. Suction level adjustment ✦
Use this button to set the suction level. A symbol for the selected setting will be shown on the display. You can switch between normal and powerful suction.
The robot always starts with the same suction power that was selected before it went into standby or sleep mode.
8. Clock settings
- Press this button to set the clock.
- The hours on the display will flash. Set the hours by pressing the up or down arrows.
- Then press the right arrow to set the minutes. The minutes on the display begin to flash. Set the minutes by pressing the up or down arrows.
- Confirm the clock setting with the start-pause button ▶ or by pressing the clock setting button 📊 again.
9. Spot Cleaning
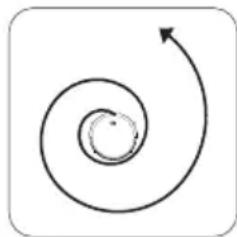
The robot vacuum performs concentrated cleaning with maximum suction power (extra powerful). The robot will take its current position as its centre when you press this button and then create a spiral route around this centre. After reaching a radius of 1.5 metres, it will reduce its radius in a spiral to go back to its starting position. If the robot encounters an obstacle during this operation, it will turn 180^ and continue its spiral route in the opposite direction.
natural_image
Simple spiral diagram with an arrow indicating direction (no text or symbols)You can set the suction power to powerful or normal for this spot cleaning by pressing the suction power adjustment button.
10. Schedule setting
Use this button to programme the robot vacuum cleaner to automatically vacuum at a set time every day.
- Press the schedule settings button.
- Set the clock using the arrow buttons.
- Confirm the setting with the start-pause button ▶ or by pressing the schedule setting button again.
- Choose the preferred suction power.
- The display will show the icon at all times, so that you know this setting is in place.
- The robot will now start vacuuming the room every day at the set time.
- To cancel this setting, press and hold the schedule settings button for 3 seconds until the icon disappears from the display.
PLEASE NOTE:
- When adjusting settings with the remote control, you must aim it at the machine.
- Do not use the remote control near the charging/emptying station as it may interfere with the signal and affect its operation.
· If you will not be using the remote control for a long period of time, remove the batteries.
· Never use spot cleaning mode in the corner of a room. The robot would get stuck.
- Should the robot get stuck (in a corner, under a cupboard, on cables or other obstacles on the floor, in low-hanging curtains, etc.), it will try to break free. If this fails, the robot will switch itself off after 2.5 minutes and will notify you using the robot's voice and send a notification to the app. In that case, place the robot back on a flat surface and restart it. The robot will remember the difficult spot as an obstacle and avoid this spot during the next cleaning.
- If you want to move the robot, do this in standby mode as much as possible using the arrows on the remote control (unless it is stuck).
- If you want to pick up the robot and move it, first put it on standby. As soon as you restart the robot vacuum, it will reposition itself and continue its programme. If the robot does not find the charging/emptying station immediately, it will not complete its cleaning programme; it will start a new cleaning cycle.
The sensors are less effective on reflective or dark-coloured surfaces or if they are dirty. Therefore, it is advisable to cordon off stairs and holes, set them up as a no-go zone, or set up a virtual wall in the app.
- Do not move the charging/emptying station during cleaning. The robot vacuum will not be able to reposition itself and complete its cleaning programme.
USING THE ROBOT VACUUM WITH WATER TANK AND MOP
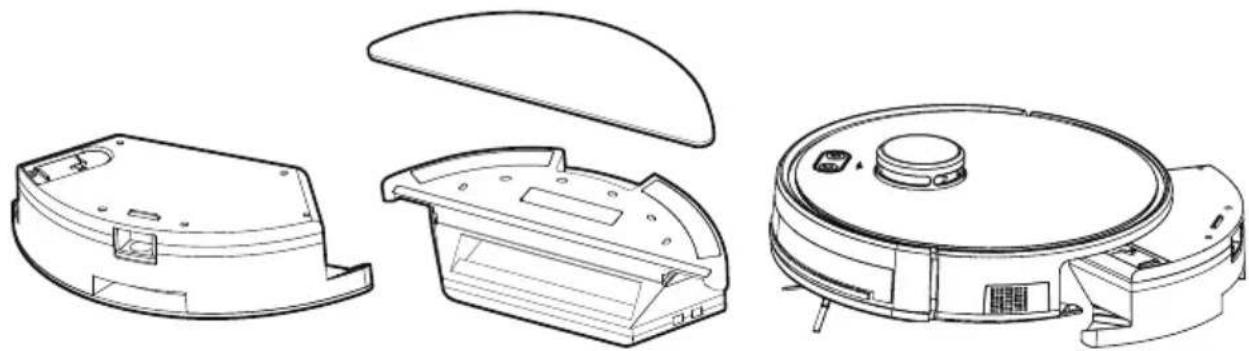
You can also have the robot vacuum cleaner mop the floor after vacuuming, thanks to its water tank with mop. The appliance does NOT vacuum and mop at the same time.
Please note: Remove the water tank during charging to prevent any hazardous situations.
-
Open the tank's sealing cap and fill the tank with water. Use the sealing cap to close the water tank carefully.
-
Attach the mop to the tank.
-
Use the release catch to remove the dust collector and replace it with the water tank. You will hear a click when the tank is correctly positioned.
natural_image
Technical line drawings of a robotic vacuum cleaner with open lid, showing internal components (no text or symbols)- Start the robot as usual. It will follow an S-shaped route with the mop water reservoir instead of the dust reservoir.
Please note:
- Remove the water tank during charging to prevent any hazardous situations.
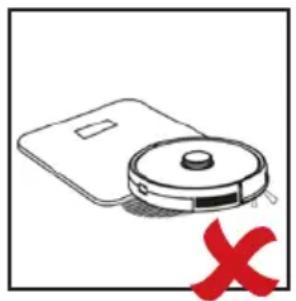
- Do not use the mopping function on a carpet. If there is a carpet in the space where the robot will mop, roll up the edges of the carpet so the robot cannot get onto it (higher than 2 cm).
USE WITH APP
For best performance of the vacuum cleaner, it is best to use the app. Some settings can only be changed in the app.
Please note:
The following explanations and screenshots of the app are subject to possible app updates.
INSTALLING THE APP
- Install the "Smart Life" or "Tuya Smart" app with below QR code or search it in the App Store or Google Play.

- Open the app. If you do not have an account yet, make sure to register and log in.
Attention:
if you want to use the app with several smartphones to control the appliance, make sure to use the same account. The appliance cannot connect to different accounts.
ADDING THE ROBOT VACUUM TO THE APP
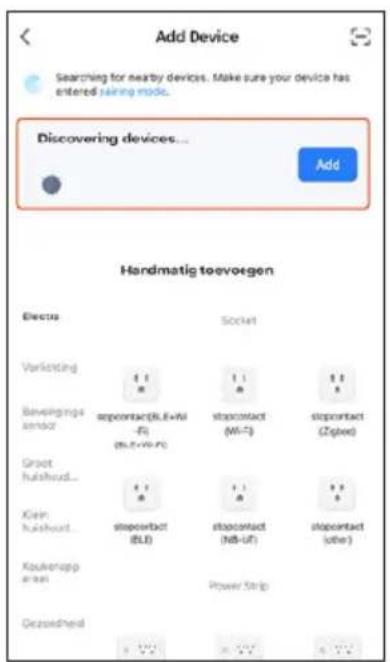
Add the robot vacuum to your account. This can be done automatically or manually:
Automatic
- Place the power switch on the side of the robot to the on position in order to connect the robot vacuum to the app.
- Wait until both indicator lights on the robot come on.
- Press the control button for a few seconds until the robot's voice indicates that the robot is searching for a WiFi connection. The WiFi indicator will flash.
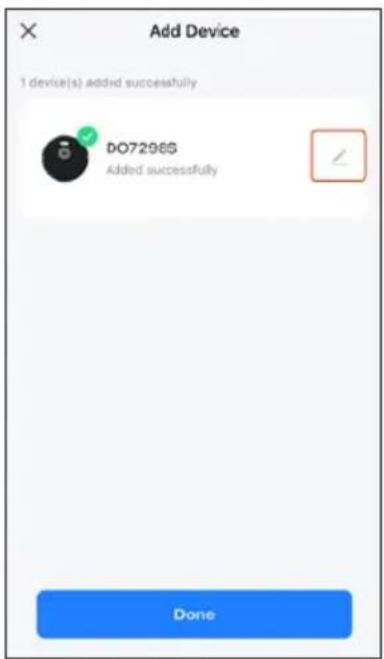
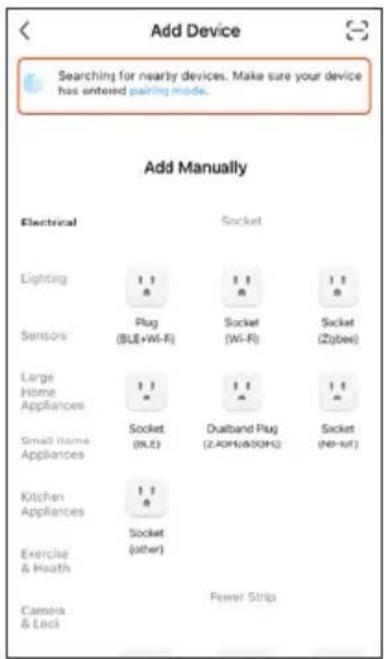
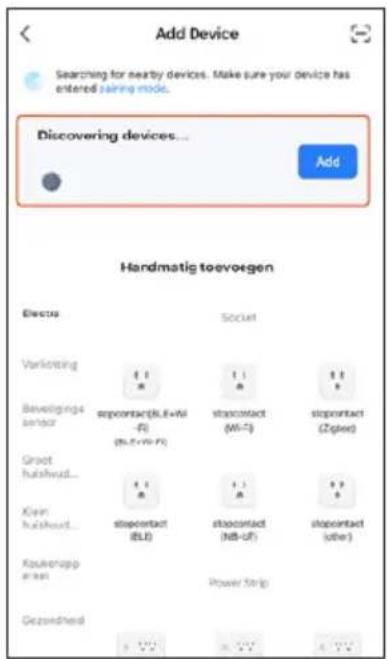
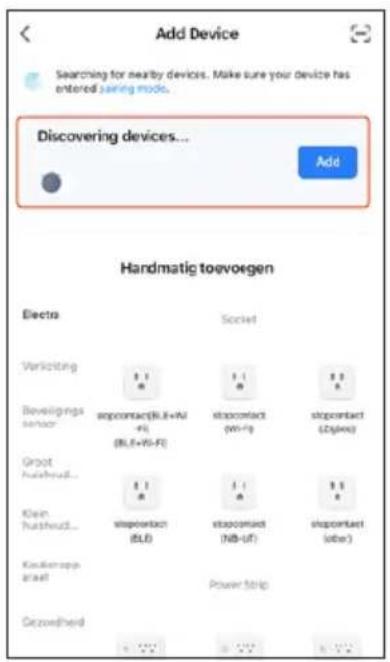
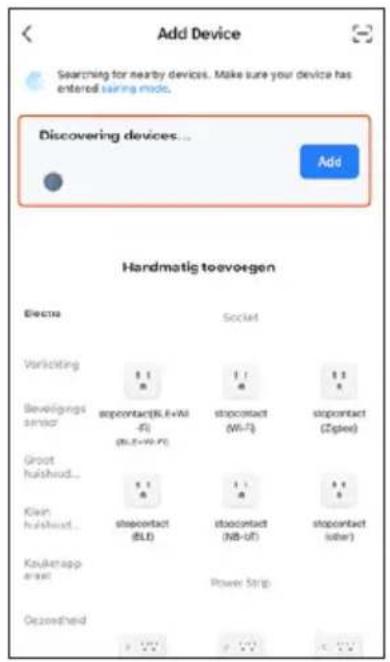
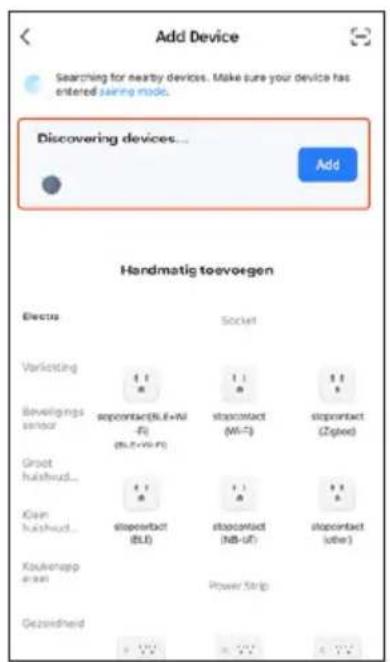
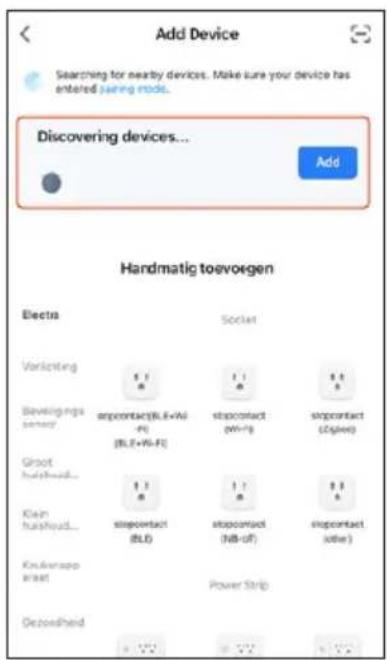
- Click on "Add appliance" in the app or on "+" at the top right of the home screen. The app will search, find and display the robot vacuum. If not, proceed to manual connection on the next page.
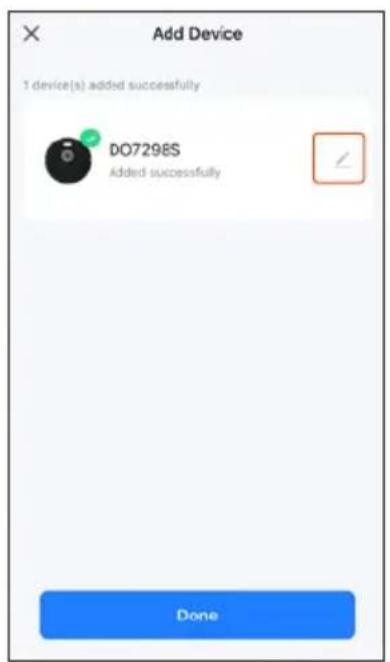
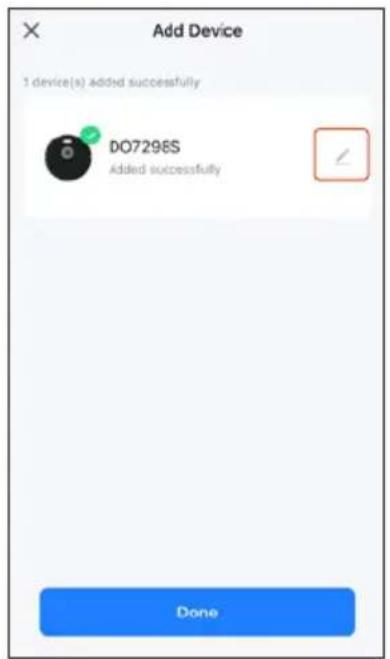
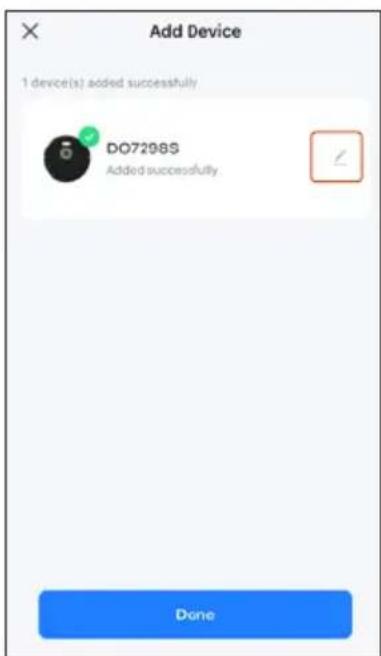
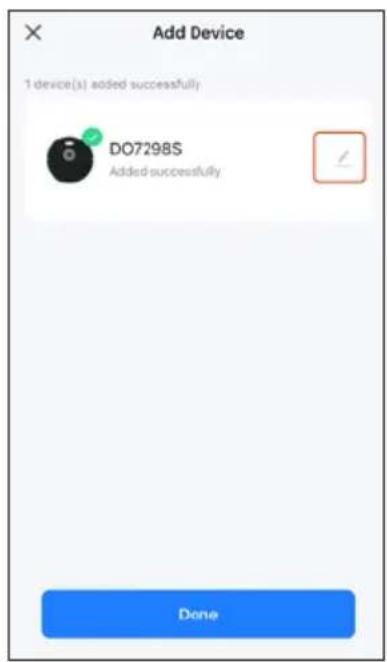
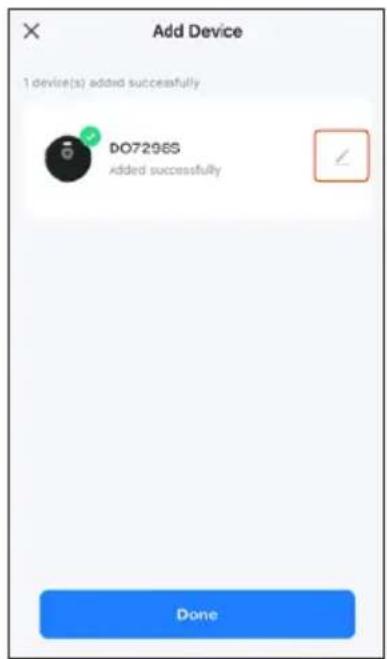
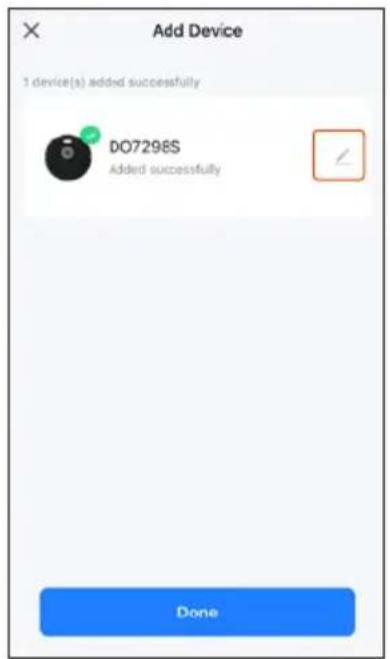
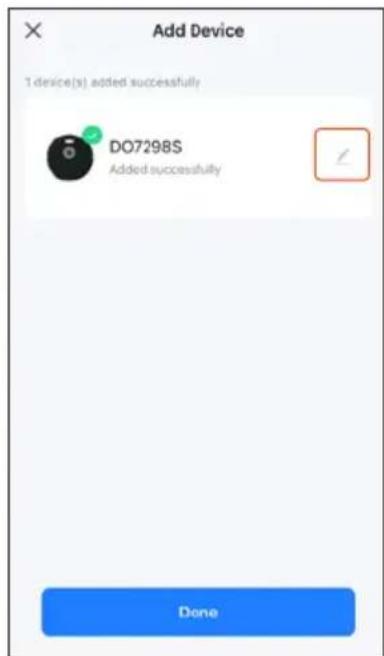
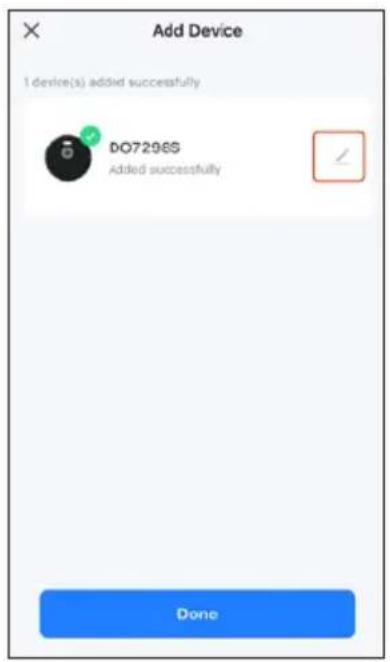
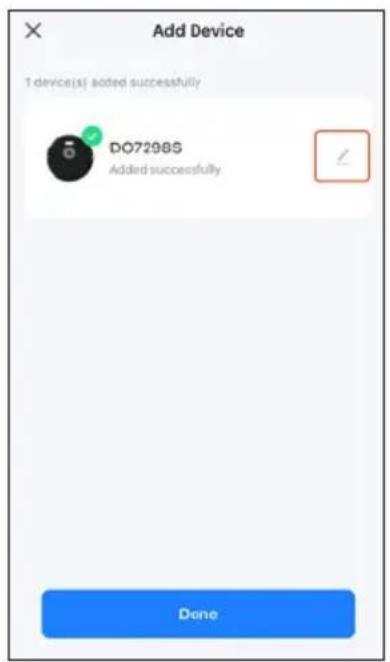
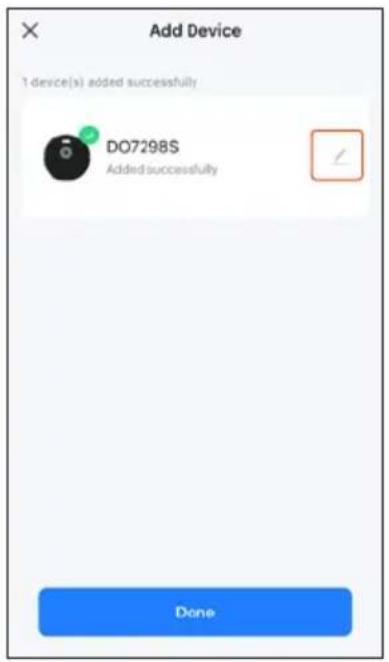
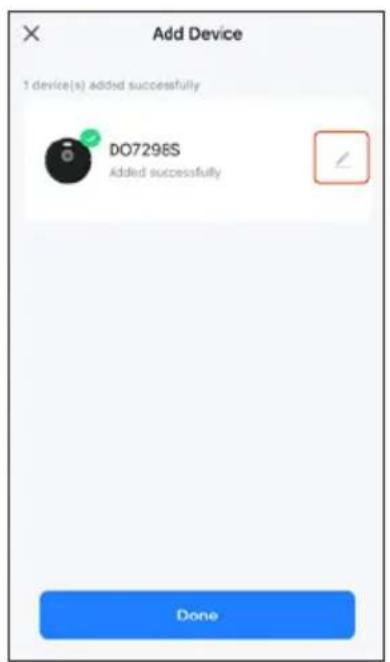
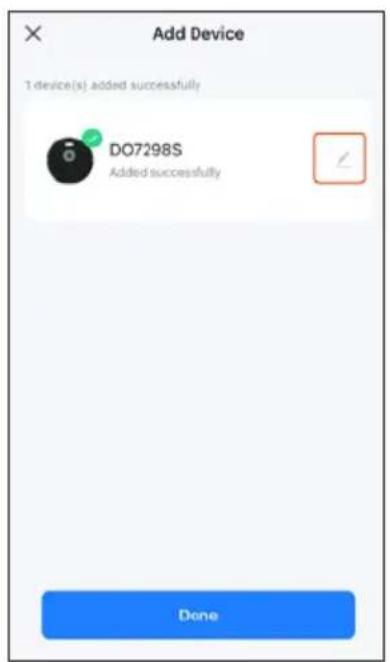
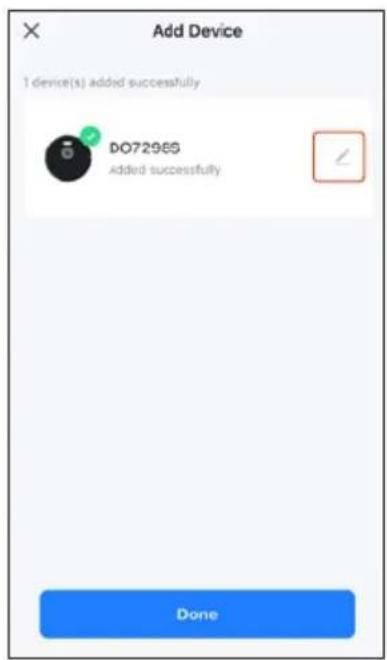
- Click on the appliance found. The app and the robot vacuum are now connected.
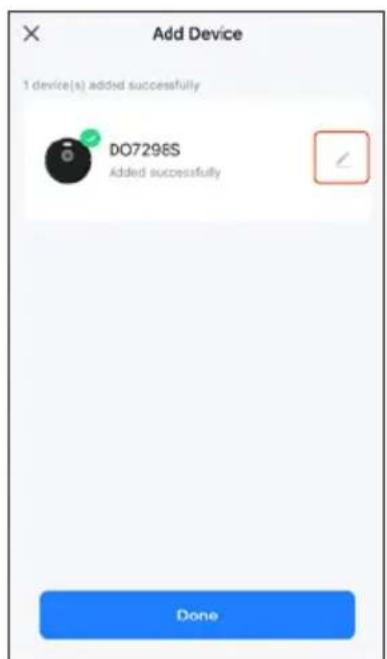
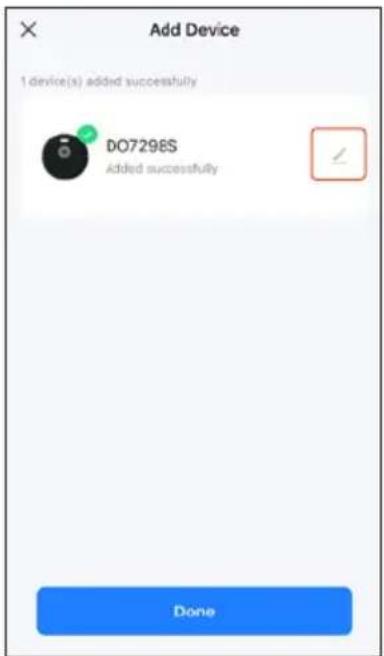
- You can change the name of the appliance if desired. To do this, click on the pen next to the appliance name.
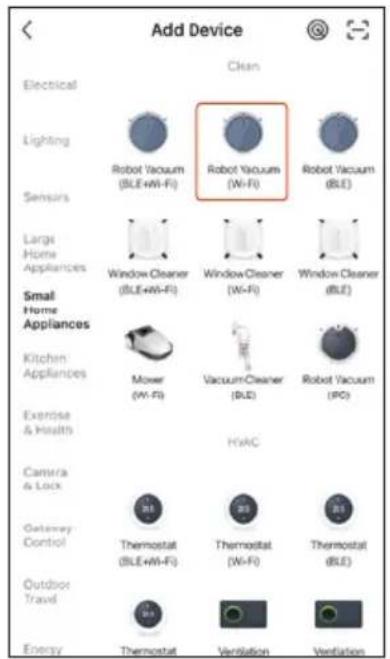
Manual
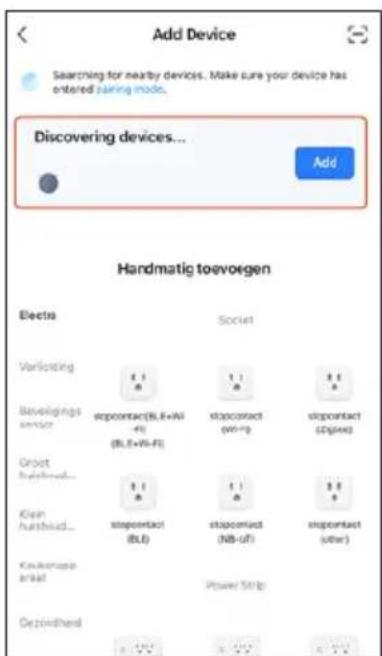
If the app does not automatically find the robot, you can add the appliance manually.
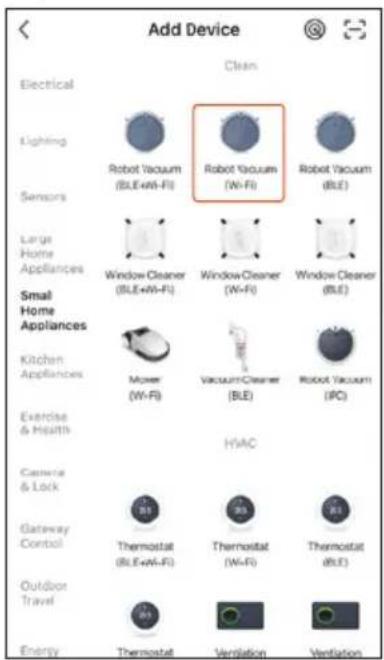
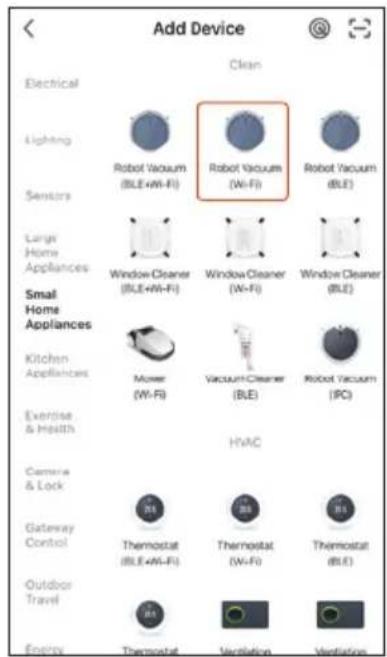
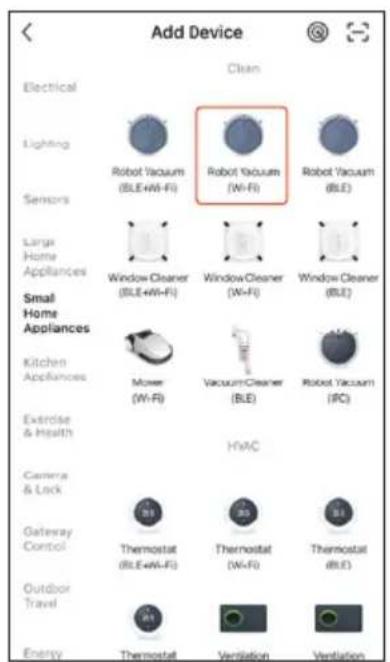
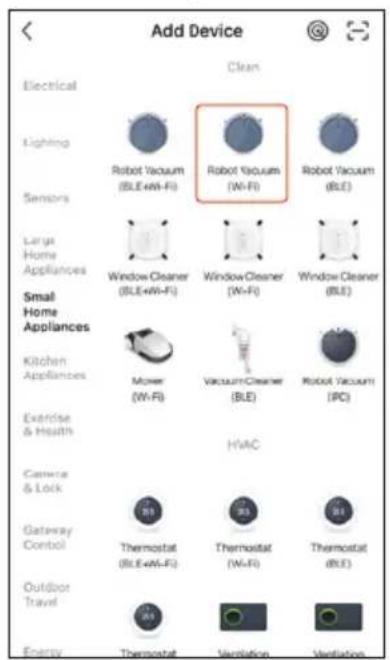
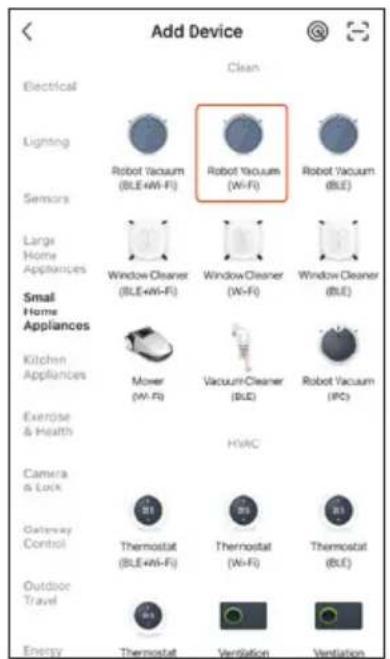
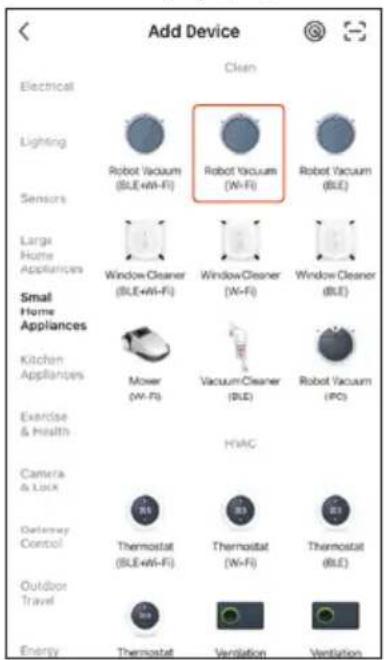
- Under "Add manually", select "Small household appliances" on the left of the categories.
- Then select "Robot vacuum (Wi-Fi)".
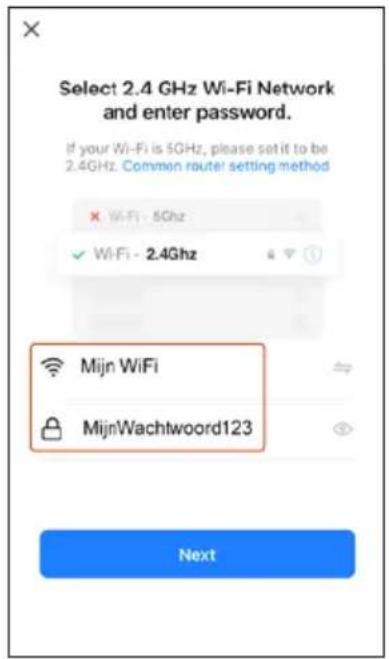
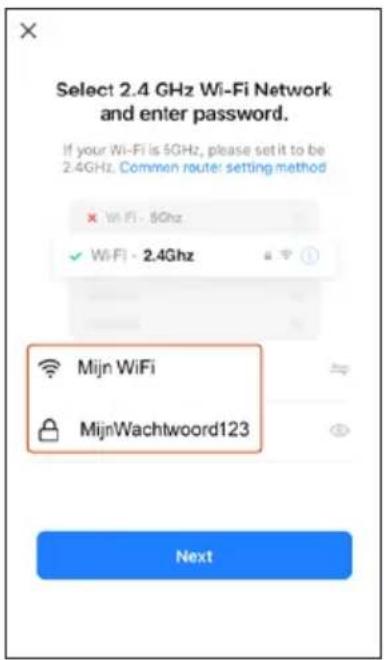
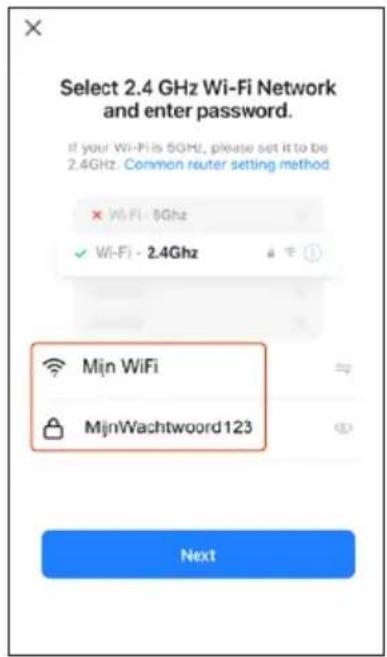
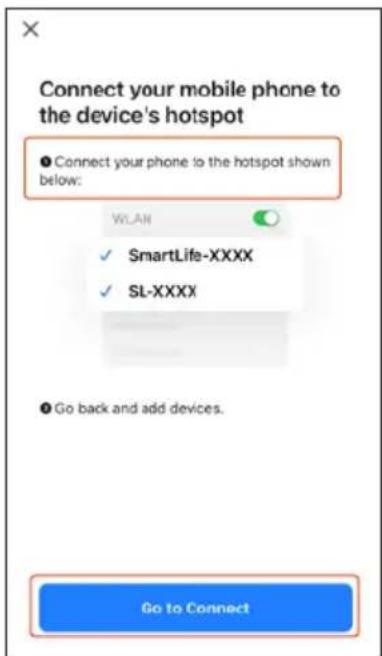
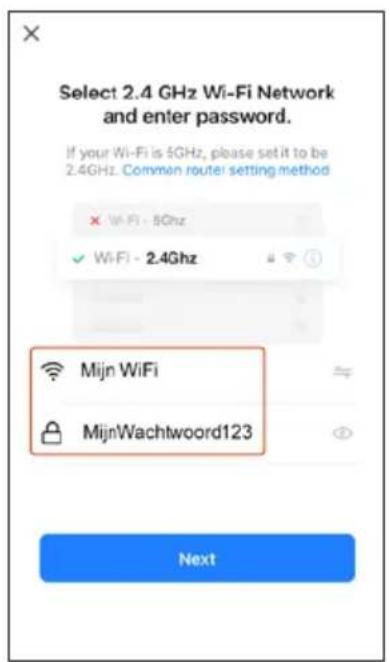
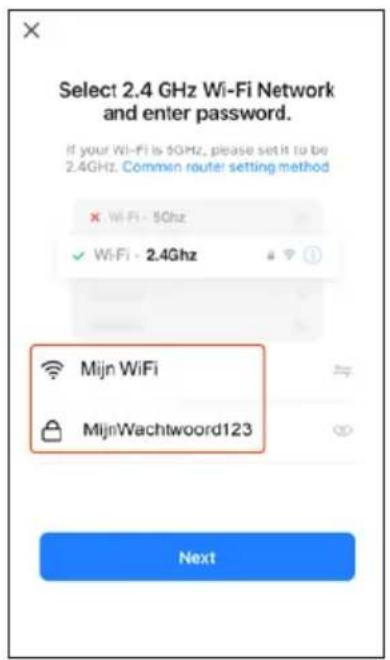
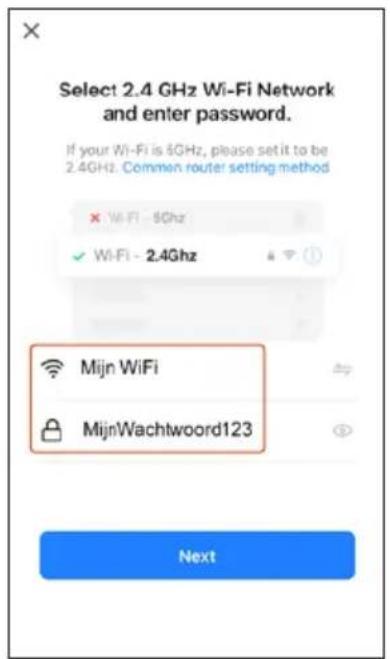
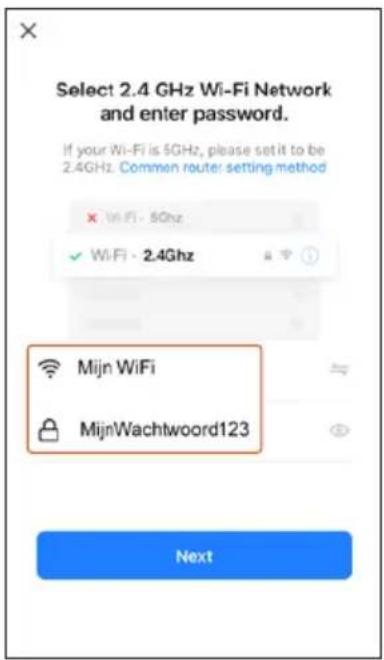
- Enter the WiFi network your phone is connected to and the password.
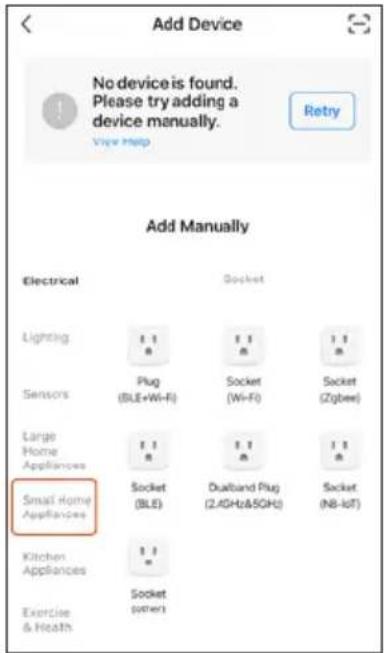
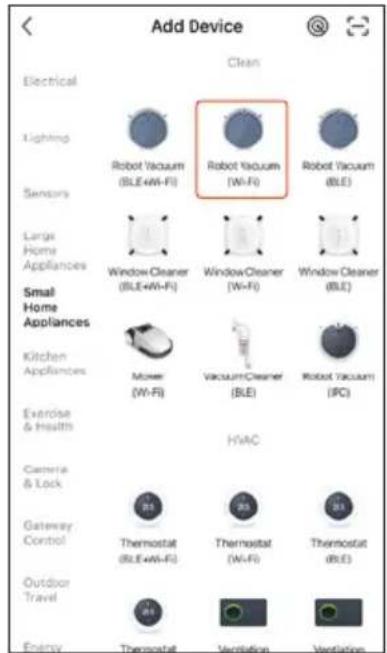
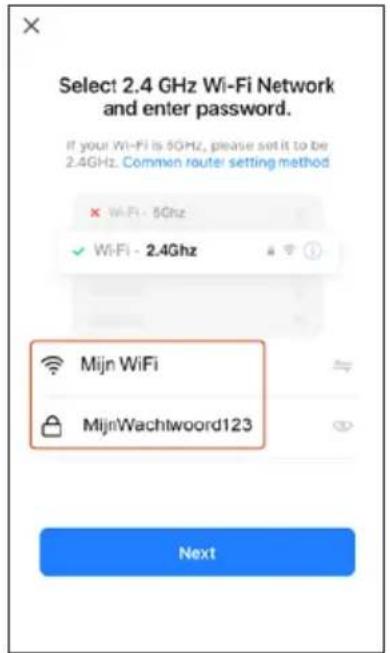
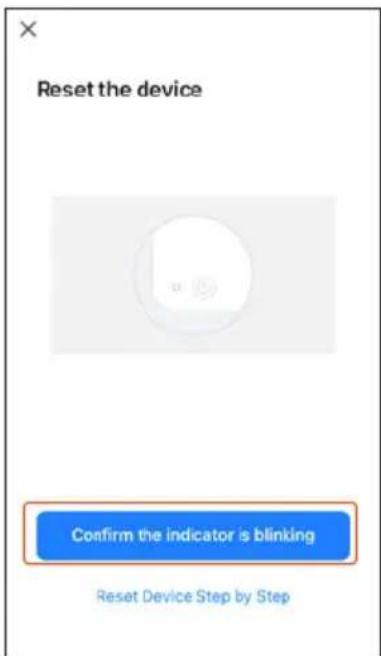
- Confirm that the indicator light on the robot is flashing.
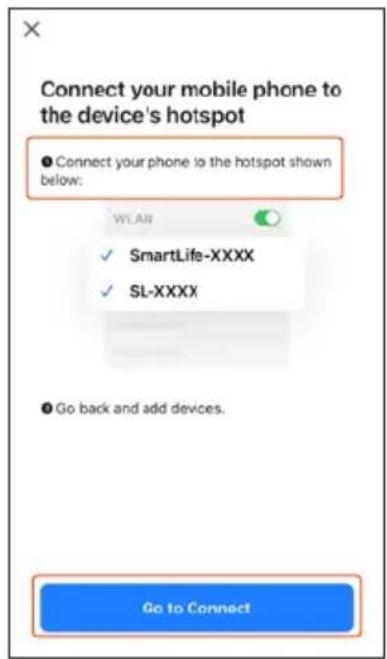
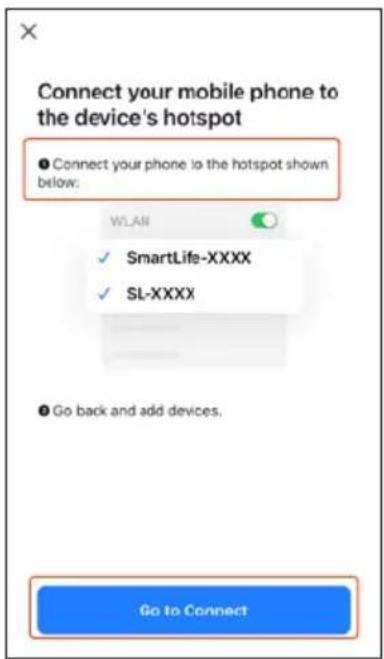
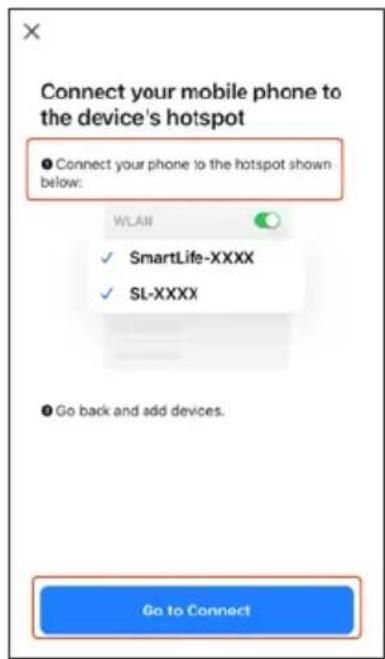
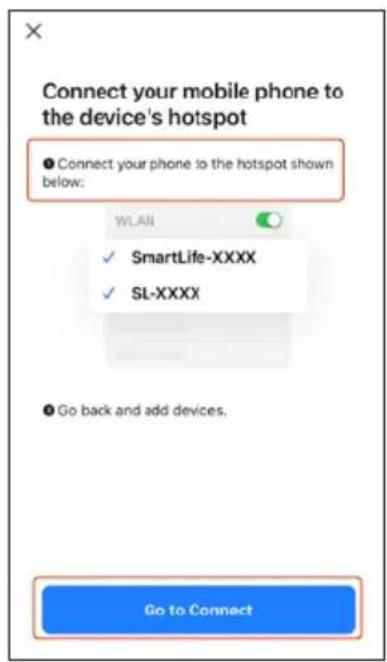
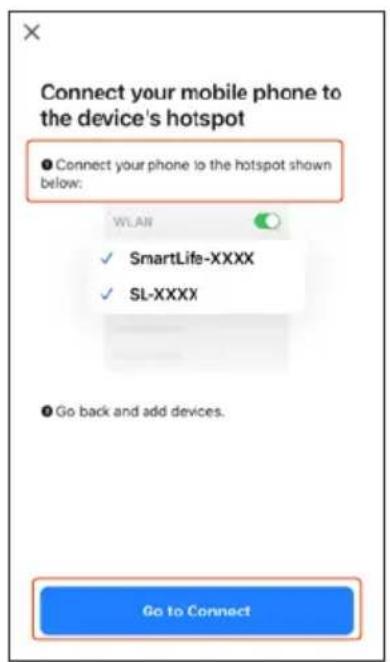
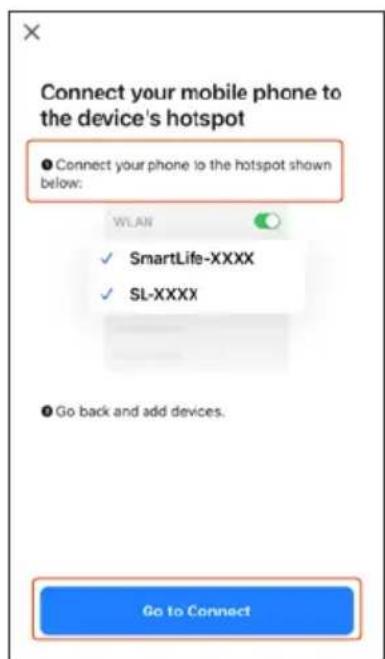
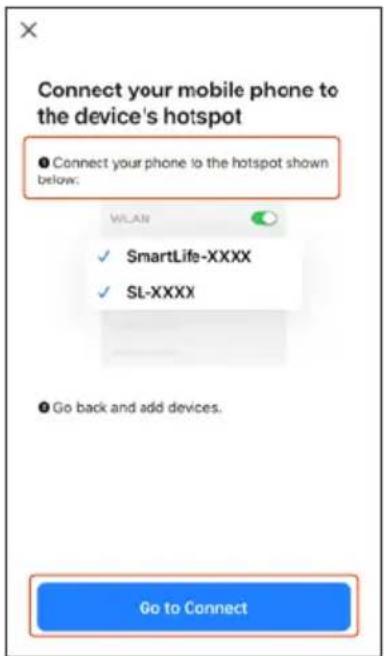
- Now go to your phone's WiFi settings and connect to Smart Life's hotspot.
- Return to the app and click "Connect" at the bottom.
- When the connection is established, the app will display the appliance. You can change the name of the appliance if desired. To do this, click on the pen next to the appliance name.
USING THE ROBOT VACUUM WITH THE APP
Click the appliance to open the app's control interface.
This has an extensive menu of functionalities, such as:
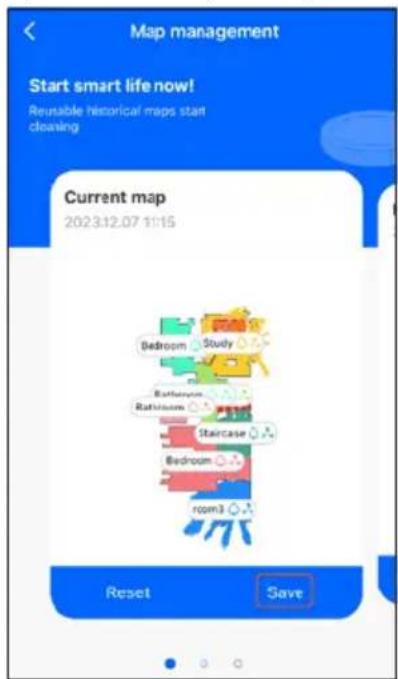
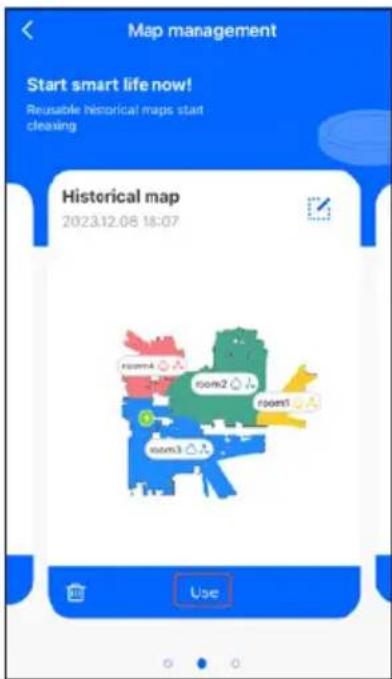
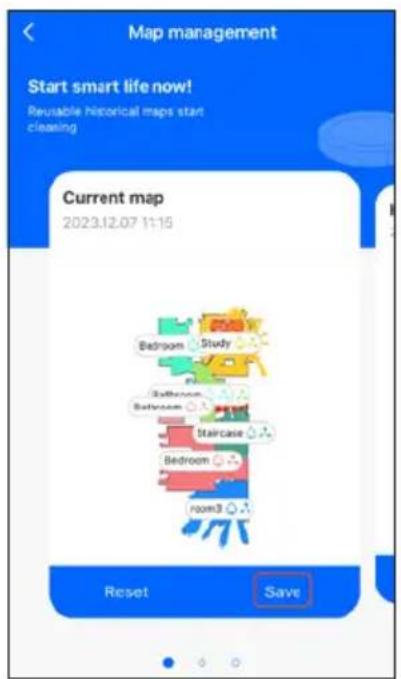
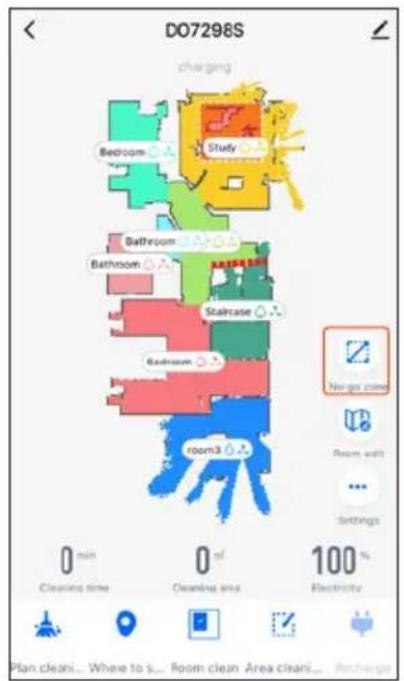
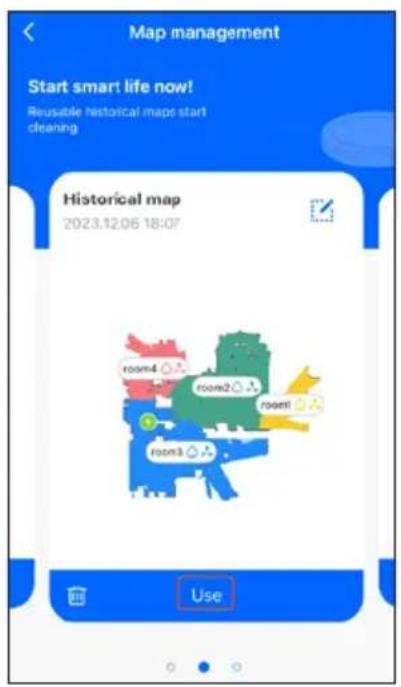
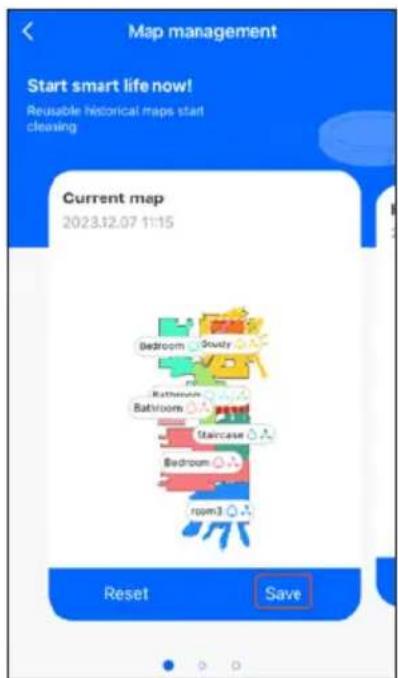
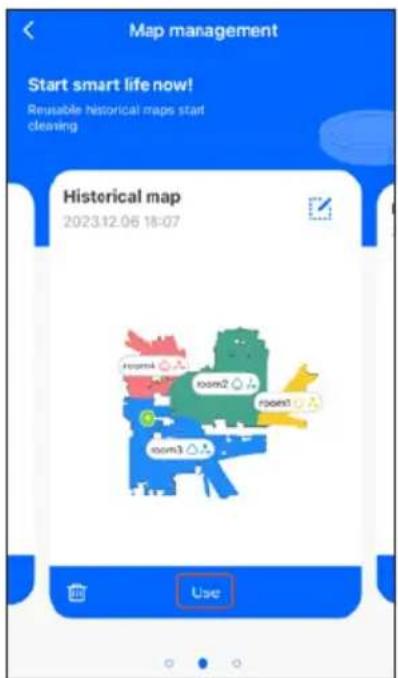
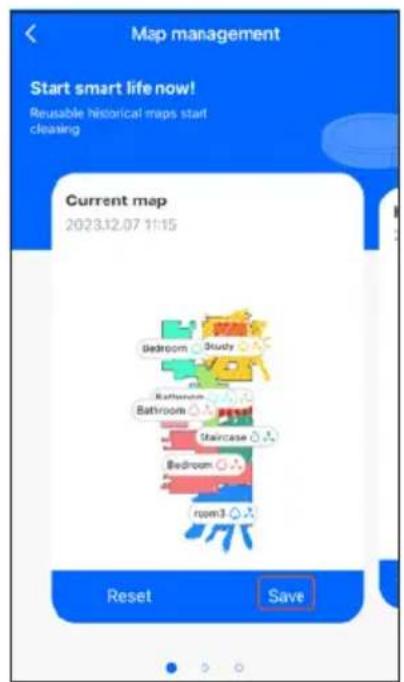
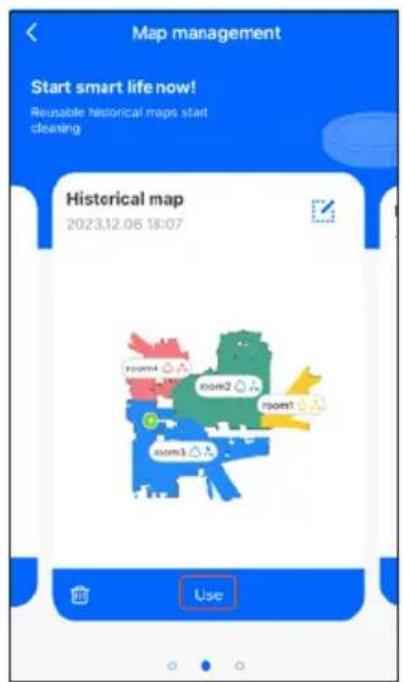
- Mapping a space or room. To do this, let the robot vacuum clean the space for the first time. You will see in the app that the robot immediately starts scanning the space and displaying its results. The space will be completely mapped at the end of the cleaning through a combination of laser scanning and cleaning. The app will automatically divide the mapped space into different rooms.
- Reorganising the mapped space. You can rename, merge, divide the proposed rooms, etc. You can also set up no-go zones and draw virtual walls so the robot will not clean in certain places. The robot will not enter no-go zones or move past a virtual wall.
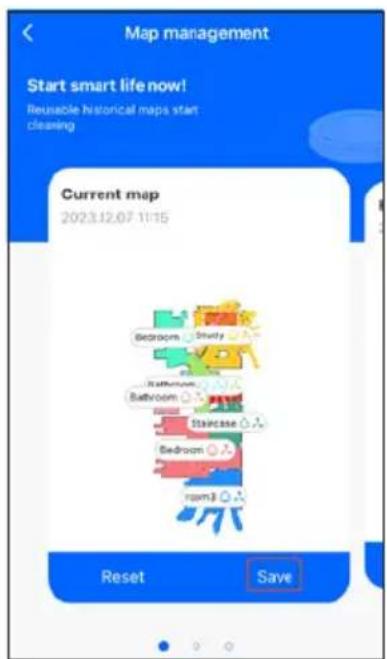
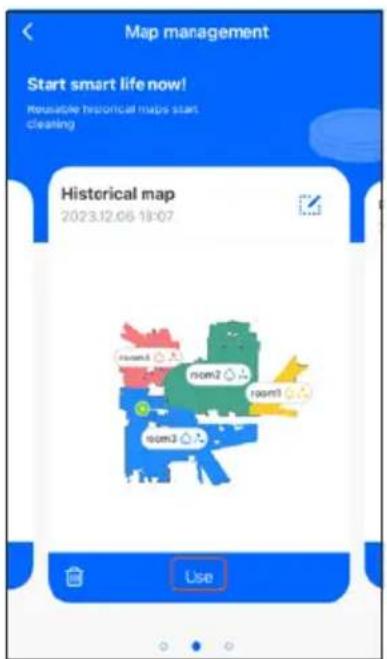
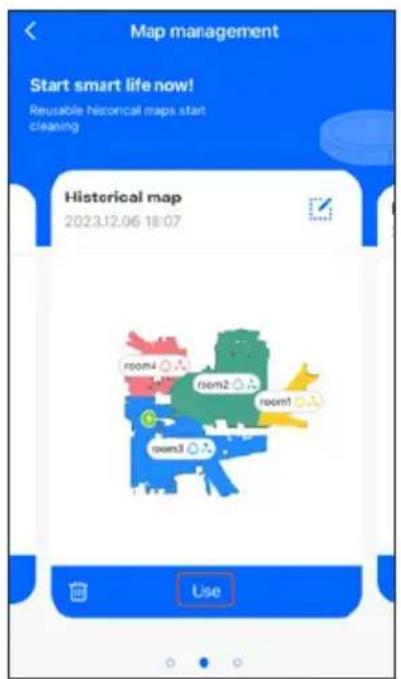
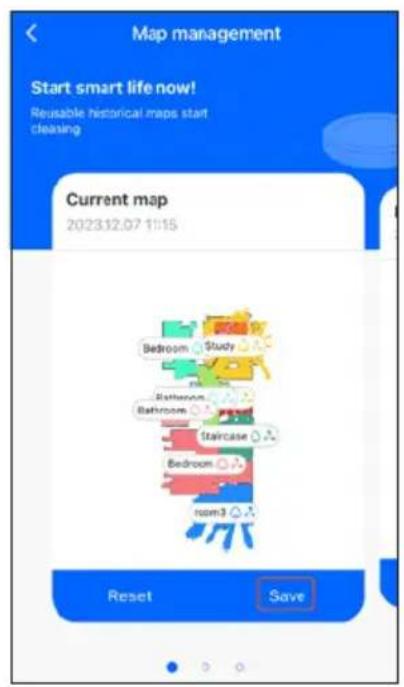
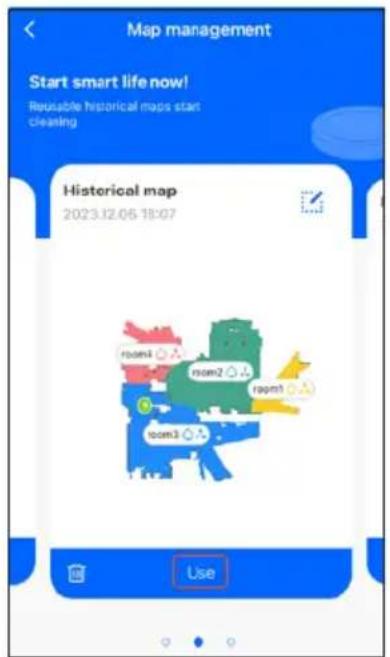
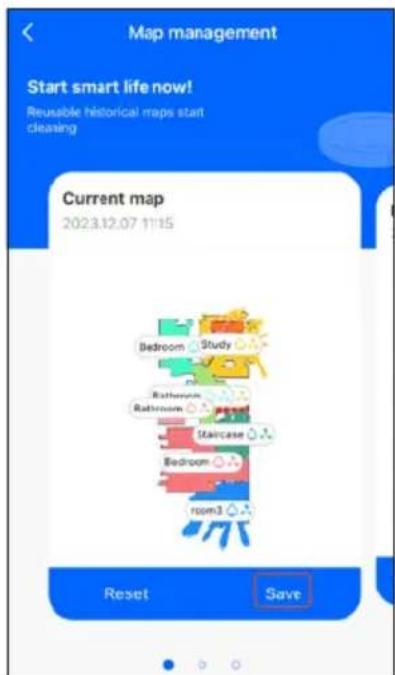
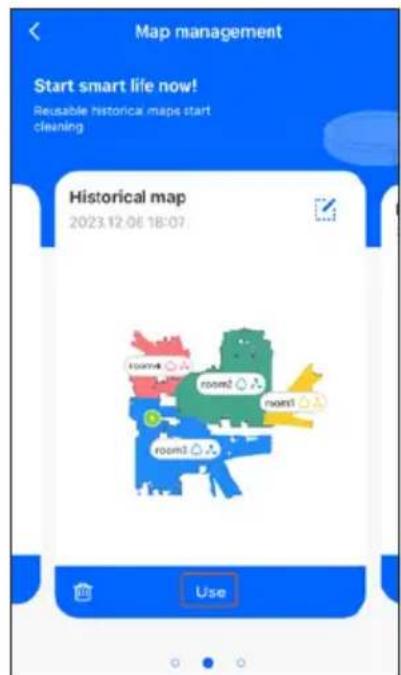
- Mapping out your entire house. You can map different spaces (e.g. ground floor, upper floor). To do this, move the robot with its charging/emptying station to the new space and start with a new room. Always save the map in "Folder Management". The different maps can be found and used here. Make sure you always return the charging/emptying station or the optional charging station (DO7296S-32) to the same place when using a saved map. The location of the charging/emptying station is displayed on the map using a green symbol.
· Scheduling cleaning, one-off or repetitive.
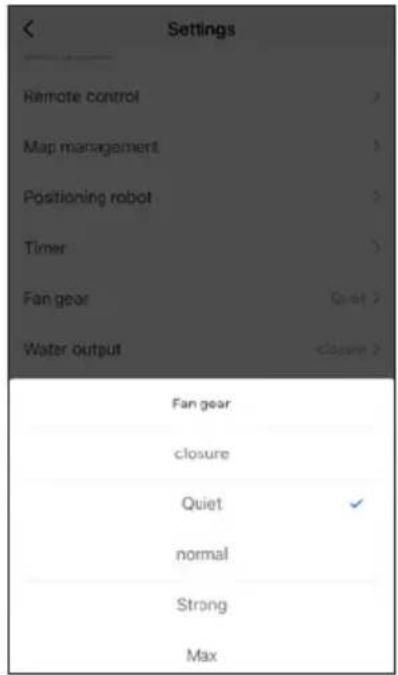
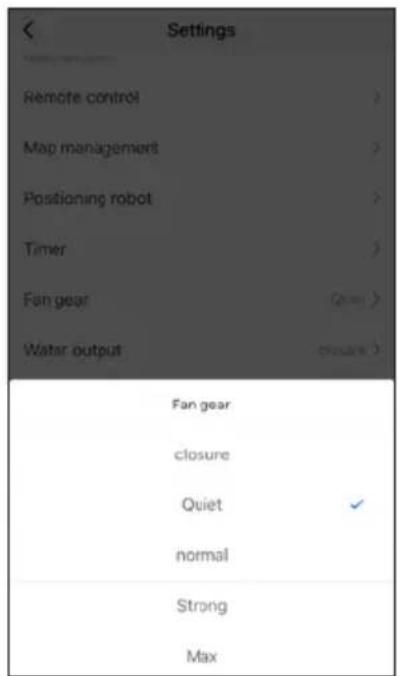
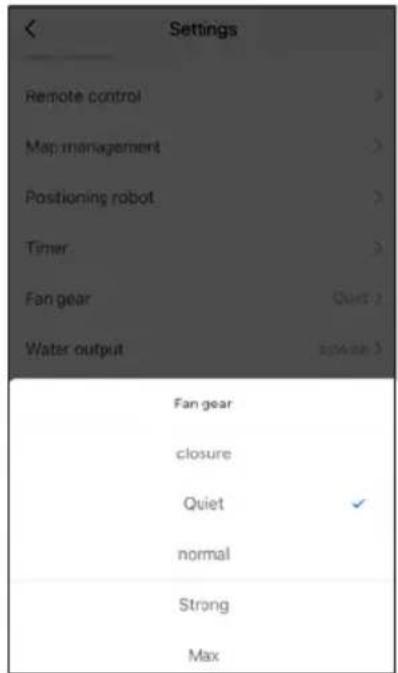
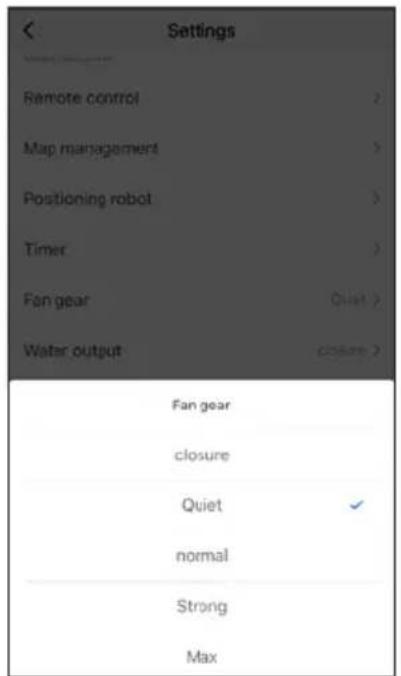
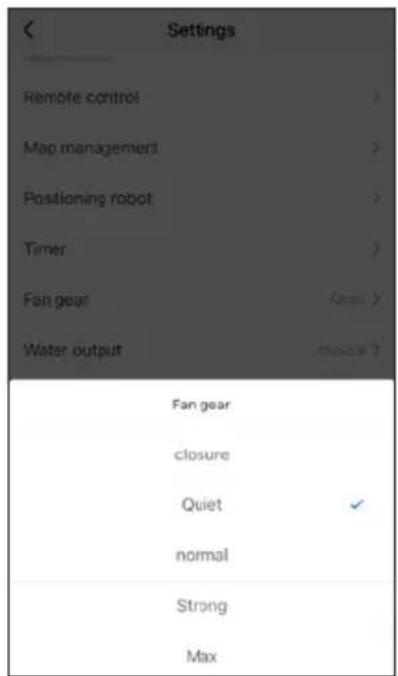
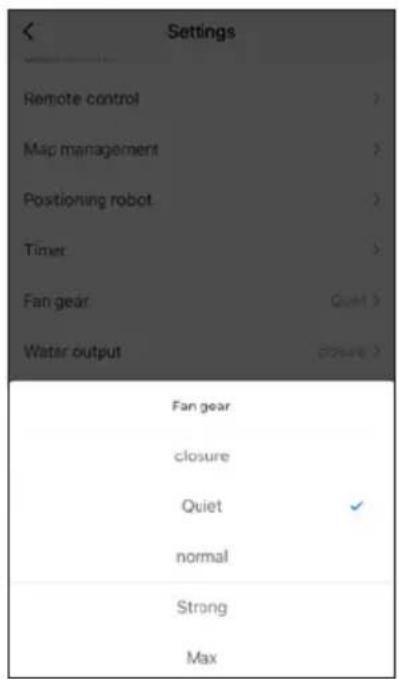
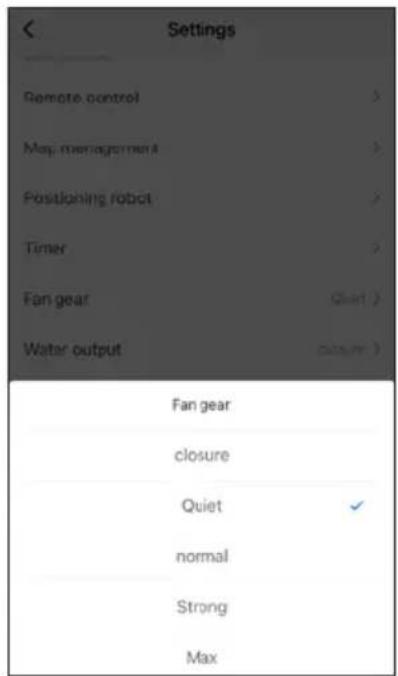
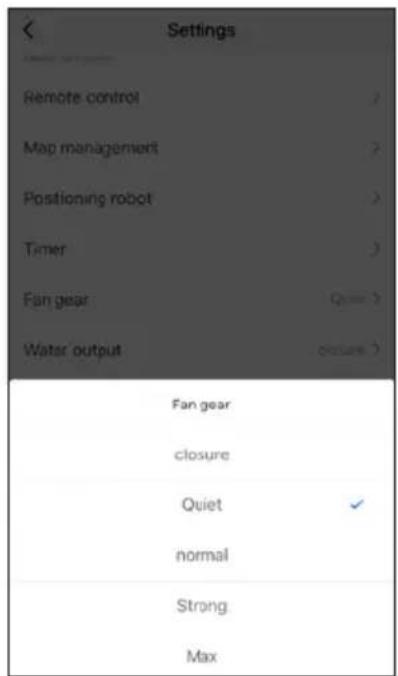
- Selecting the suction power. You can choose between 4 suction power settings on the app: silent, normal, powerful or max (extra powerful).
- Selecting the amount of water to siphon when using the mop. You can choose from 3 levels on the app: low, medium and high.
- Choosing the language and volume of the robot's voice.
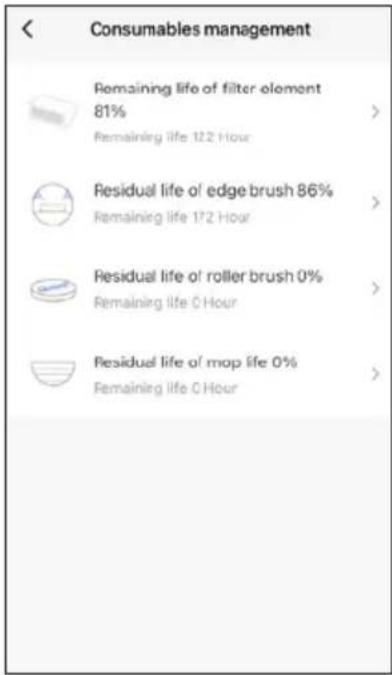
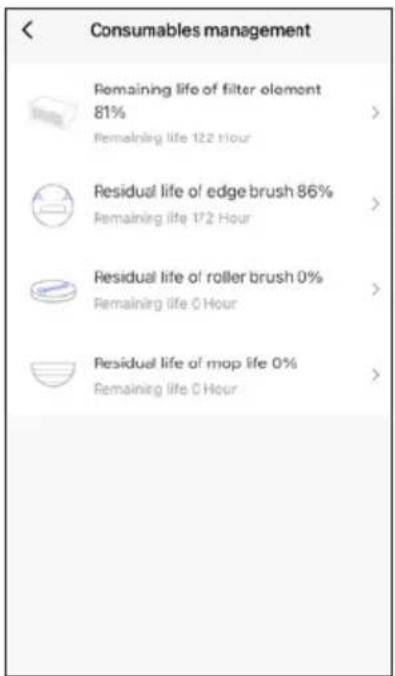
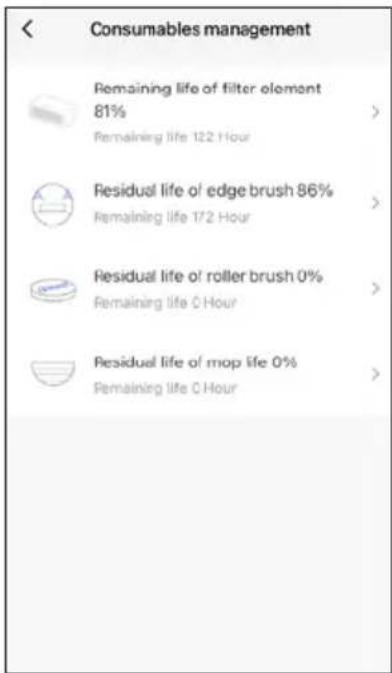
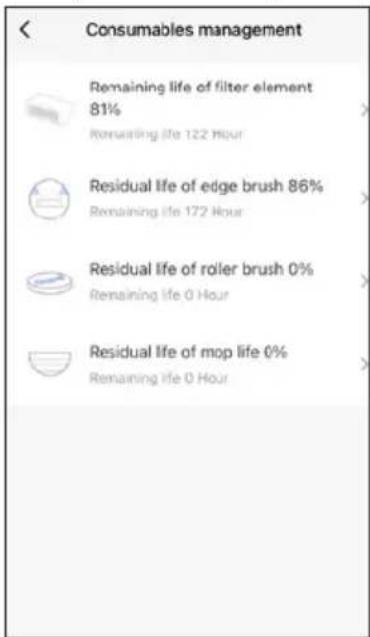
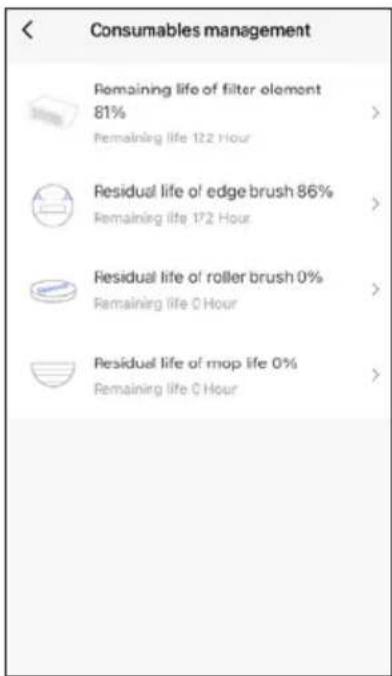
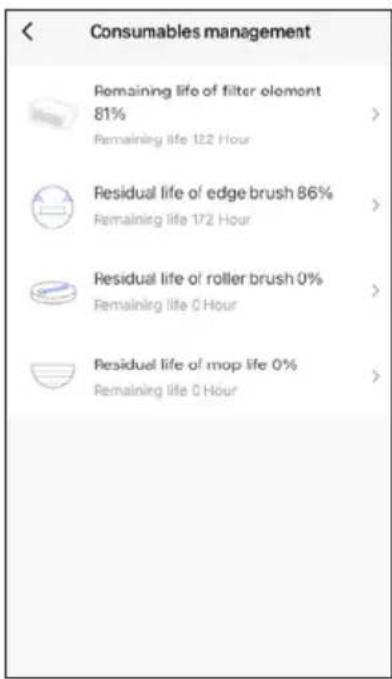
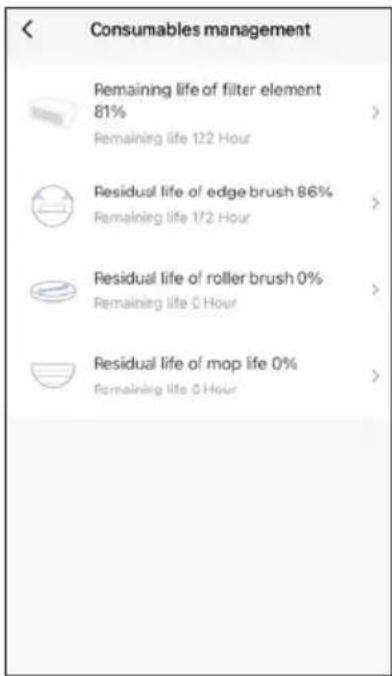
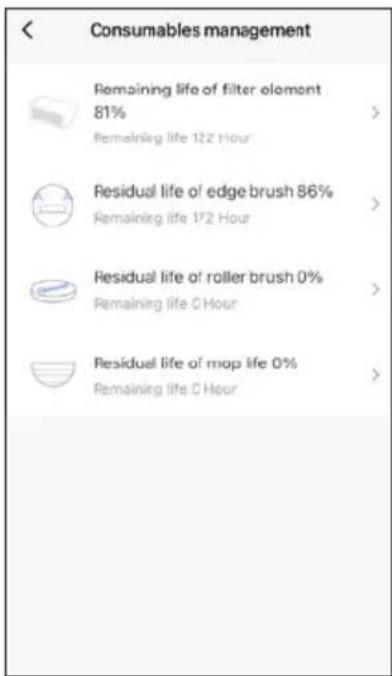
- Checking the service life of the various parts. This will ensure you know exactly when a part needs to be replaced.
- Setting the dust emptying frequency or start emptying manually.


Remarks:
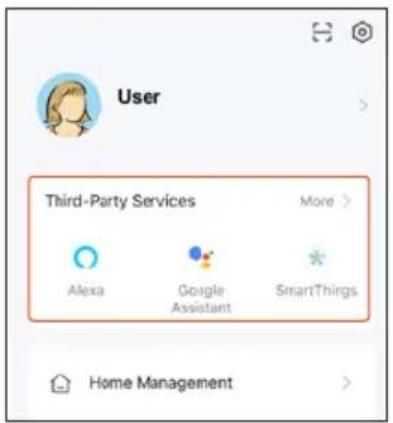
- The app's interface can also be connected and used with a voice-activated assistant.
- The appliance can give error messages via the app. Usually, this is when the robot vacuum is stuck or when an object is blocking the robot vacuum. Remove the object blocking the robot vacuum so that it can continue working. If the voice module is activated, it will also announce these error messages.
CLEANING AND MAINTENANCE
CLEANING BRUSHES AND WHEELS
Check the brushes and wheels after each use.
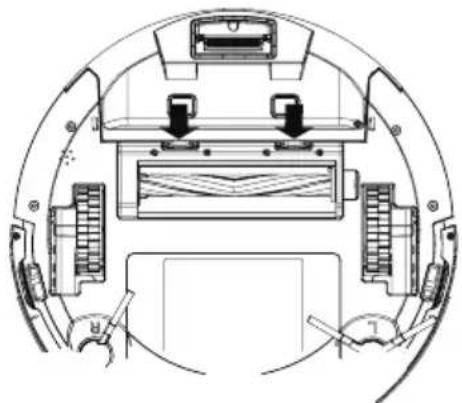
- Remove any dirt and hair stuck in the main and side brushes and the wheels. To do this, use the included cleaning brush with the integrated blade to carefully cut through hairs that are twisted around the brush or wheel.
· Wipe the side brushes and wheels with a soft cloth to clean them.
- Replace the side brushes if they are damaged.
- To clean the main brush, open the cover and remove the rotating floor brush. Wipe the cover clean with a soft cloth. Remove the rotating floor brush. Remove hairs and other dirt that have wrapped around the floor brush. If you do not clean the floor brush regularly, it will become damaged and your machine will become unusable. Rinse the brush under running water. Let it dry before putting it back in place.
natural_image
Technical line drawing of a circular mechanical or electronic component with internal components and mounting holes (no text or symbols)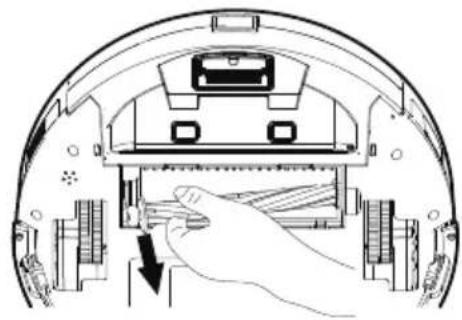
natural_image
Diagram of a robotic device with a hand inserting a cable into the internal components (no text or symbols visible)- If the floor brush is not cleaned regularly, it may become damaged, and the appliance may become unusable.
CLEANING OUT THE CANISTER AND FILTER
Clean the canister and the filter after each use in the following manner:
-
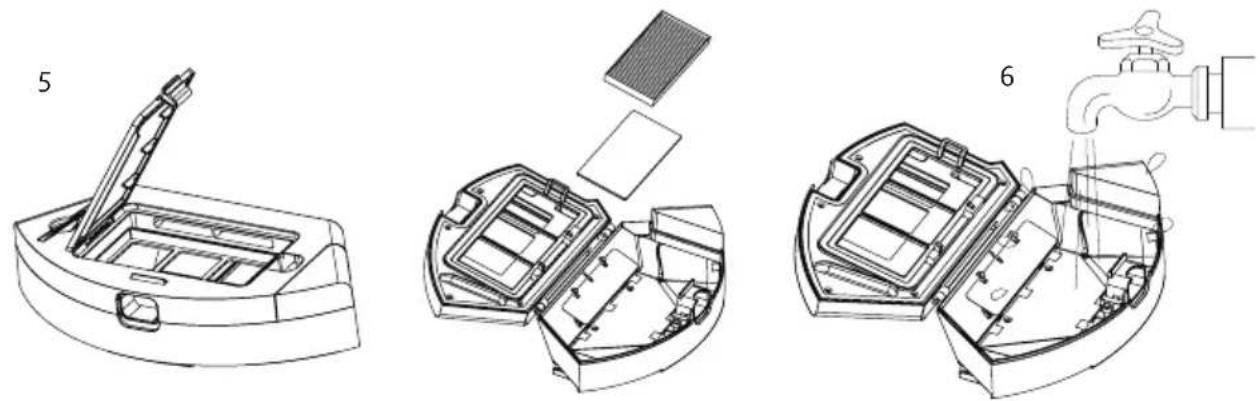
Press the release catch to remove the dust collector. Remove the canister from the vacuum.
-
Open the canister.
-
Empty the canister into the waste bin.
-
Remove the nylon pre-filter.

-
Remove the dust collector lid, the HEPA filter and the pre-filter sponge.
-
Rinse the canister, the filter holder and the nylon pre-filter under running water. Let them dry before putting them back in place.
natural_image
Three technical line drawings of a device's internal components, showing open lid, internal compartments, and a water tap (no text or symbols)- Use the cleaning brush to clean the HEPA filter and pre-filter sponge.
- If the HEPA filter and pre-filter sponge are dirty, after about 30 days of use, you can also clean them under running water. • Allow both to dry fully before putting them back in place.
- The HEPA filter and pre-filter sponge must be replaced after frequent use. The maximum service life of the filter is approximately 6 months.
-
Allow all the parts to dry fully before putting them back in the appliance.
-
Place the HEPA filter and pre-filter sponge back in the dust collector lid. Place the pre-filter back in the dust collector. Close the dust container and place it back in the robot.

natural_image
Technical line drawings of a mechanical device with exploded and assembled views (no text or symbols)CLEANING THE WATER TANK
-
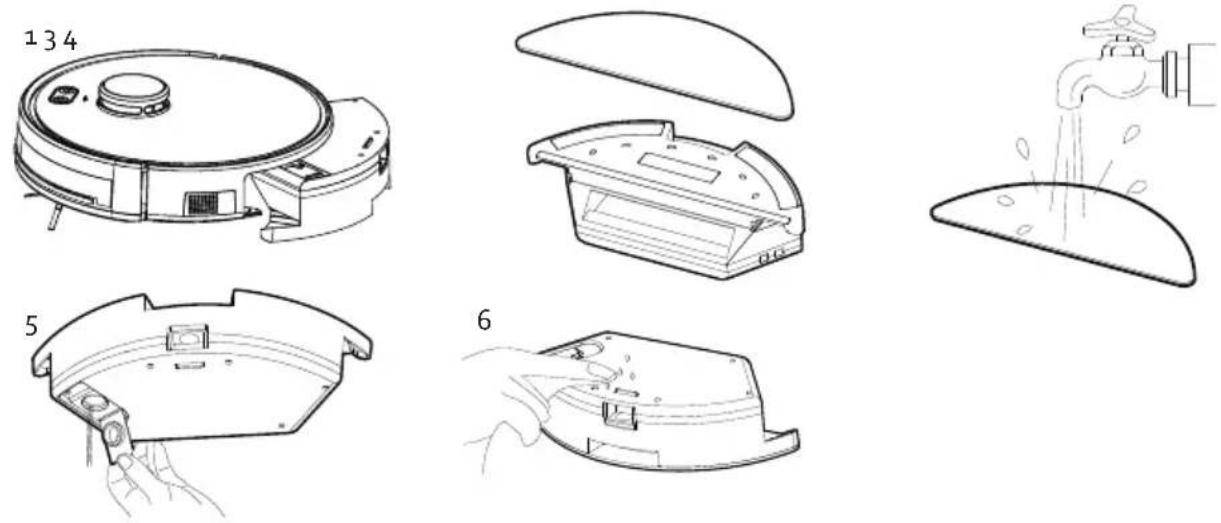
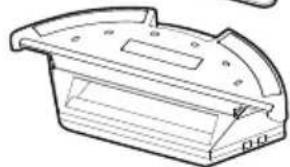
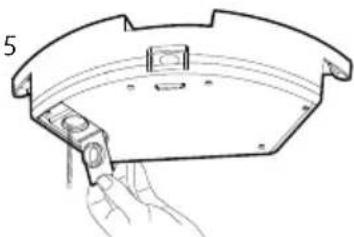
Press the release catch to remove the water tank.
-
Remove all dust from the dust container.
-
Remove the mop from the tank.
-
Wash the mop in warm water with a mild detergent. Allow the mop to dry completely.
-
Rinse the reservoir and dust container with warm water and allow it to dry completely.
-
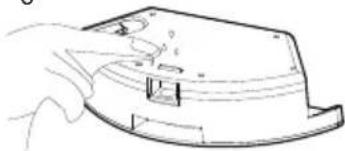
Wipe the outside clean with a soft cloth.
CLEANING THE APPLIANCE
Clean the wheels, sensors, charging contacts and charging/emptying station with a soft cloth after each use.
PLEASE NOTE:
- The lifespan of the brushes, filters and mop can also be found in the app under "Consumables management". When you have replaced one of the parts, you can reset its counter.
· Never submerge the appliance in water!
· The sensors and charging contacts must not get wet.
REPLACING THE DUST BAG
The indicator light on the charging/emptying station shows the status of the dust bag:
- white light, flashing slowly: the charging/emptying station is available. The robot is charging or cleaning.
· white light, constant: the charging/emptying station is busy emptying the dust compartment. -
white light, flashing quickly: the vacuuming of the dust compartment is complete.
-
red light, flashing slowly: the dust bag is full or the suction line is blocked. Check the pipe or replace the dust bag.
- red light, flashing quickly: the dust bag is incorrectly installed or not installed. Install the dust bag correctly into the charging/emptying station.
Replacing the dust bag
When the dust bag is full, the indicator light on the charging/emptying station will turn red. Replacing the dust bag:
- Open the lid of the charging/emptying station.
- Pull the handle of the dust bag so it slides upwards. This closes the dust bag.
- Carefully pull the dust bag out of the slots using the handle.
- Discard the full dust bag and install a new, empty dust bag in the charging/emptying station.
Installing the dust bag
- Unfold the new dust bag.
- Slide the dust bag guide plate into the slots provided for this purpose.
- Push the dust bag handle down.
- Close the lid of the charging/emptying station.
STORAGE
If you do not plan to use the appliance for a long period of time:
- remove the batteries from the remote control;
- fully charge the robot's battery, then set the power switch to the "off" position and store the appliance in a dry place.
If the appliance has not been used for 3 months or more, charge the battery for 12 hours before using.
PROBLEM AND SOLUTION
| PROBLEM SOLUTION | |
| The robot vacuum is not charging. · Make sure there is contact between the charging station and the main housing. Wipe the contacts clean with a soft cloth. · Ensure that the on/off switch on the side of the appliance is on at all times, otherwise the appliance will not be able to charge. · Make sure the plug of the charging/emptying station is plugged in; otherwise, the robot vacuum will not charge. | |
| The robot vacuum has got itself stuck. · Move the robot vacuum so it is no longer stuck. · Make sure there are no loose wires or other loose objects on the floor that the robot vacuum could get stuck on. | |
| The robot vacuum will return to the charging station without completing its cleaning programme. | · The battery of the robot vacuum is almost empty. The robot is going to recharge. When it is sufficiently charged, it will resume the programme. |
| The robot vacuum does not return to the charging/emptying station after completing its cleaning programme. | · Make sure the plug of the charging/emptying station is plugged in; otherwise, the robot vacuum will not charge.· Do not move the charging/emptying station during robot cleaning. |
| The robot vacuum does not empty automatically after completing its cleaning programme. | · Make sure there is a dust bag correctly installed in the emptying station. If this is not the case, the indicator light will not flash white, and the emptying station will not empty automatically.· Make sure the settings under “Collect dust” in the app are not set to “Never”. |
| The robot vacuumis not carrying out its automated cleaning mode as set. | · Turn the appliance on.· Allow the robot vacuum to charge fully first.· Switch the appliance off and thoroughly clean the dust collector as well as the side brushes and the wheels before putting the appliance back to work. |
| The remote control is not working. · Replace the batteries and place them in the remote control correctly.· Ensure the robot vacuum is switched on and sufficiently charged.· Do not use the remote control near the charging station as it may interfere with the signal.· Ensure that there are no obstacles between the vacuum cleaner and the remote control as this may interfere with the signal. | |
| The appliance is not cleaning properly. · Ensure that the room to be cleaned is closed off, do not leave doors open.· Ensure that there are no loose wires or other loose objects on the floor. | |
| The app cannot find the appliance. Press and hold the control button for several seconds until the Wi-Fi indicator flashes rapidly. The appliance is now ready to connect. | |
DECLARATION OF CONFORMITY
This product complies with the EU requirements concerning radio interference. Linea 2000 BV hereby declares that this robot vacuum cleaner with mop and emptying station, product code DO7298S, complies with the provisions of EU Directive 2014/53/EU. The full text of the Declaration of Conformity for the EU is available on the DO7298S product page on the DOMO website: https://www.domo-elektro.be
ENVIRONMENTAL GUIDELINES
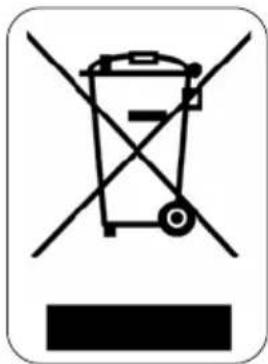
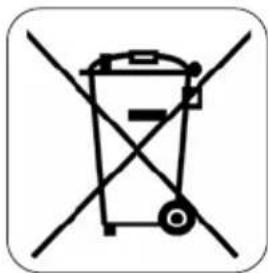
This symbol on the product or on its packaging indicates that this product may not be treated as household waste. Instead it must be brought to the applicable collection point for recycling of electrical and electronic equipment. By ensuring this product is disposed of correctly, you will help prevent potential negative consequences for the environment and human health, which could otherwise be caused by inappropriate waste handling of this product. For more detailed information about recycling of this product, please contact your local city office, your household waste disposal service or the shop where you purchased the product.
natural_image
Recycling symbol icon with three chasing arrows forming a triangle (no text or labels)The packaging is recyclable. Please treat the packaging ecologically.
natural_image
Symbol of a trash bin crossed out by two diagonal lines, representing no waste or discharge (no text or labels)REMOVABLE BATTERY
The appliance is battery-operated, and the battery must not be disposed of with household waste, even after use. You can take the appliance to a collection point for discarded electrical appliances (Recupel) in your neighbourhood (container park, specialist shop, etc.). Batteries contain substances that are dangerous to human health and to the environment.
Remove the battery from the appliance before disposal as described in this
manual. Recycle the battery in accordance with local laws and regulations. Never pierce the battery or expose it to high temperatures; this may cause the battery to explode.
Battery leakage may occur under extreme conditions. If the liquid from the battery comes into contact with the skin, immediately wash it off with soap and water or neutralise it with a mild acid such as lemon juice or vinegar. If the liquid comes into contact with the eyes, rinse them abundantly with water for at least 10 minutes and contact a doctor.
GARANTIA
natural_image
Line drawing of a circular vacuum cleaner with labeled 'DOMO' and control panel (no additional text or symbols)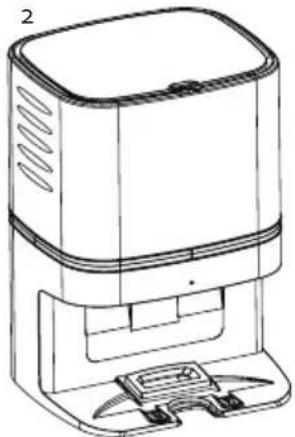
natural_image
Line drawing of a modern kitchen appliance with a rectangular top and side-mounted base (no text or symbols)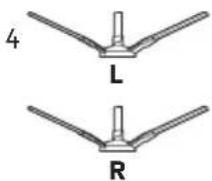
6
natural_image
Technical line drawing of a mechanical component with mounting holes and a central square feature (no text or symbols)7
8
9
natural_image
Simple curved line drawing resembling a simplified banana or leaf (no text or symbols)ROBOT ASPIRADOR
Parte superior:
natural_image
Illustration of various electronic devices including a robot, car, and plug with a red X symbol (no text or labels)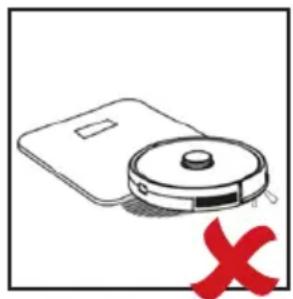
natural_image
Simple line drawing of a vacuum cleaner with a red X mark indicating cancellation or error (no text or symbols present)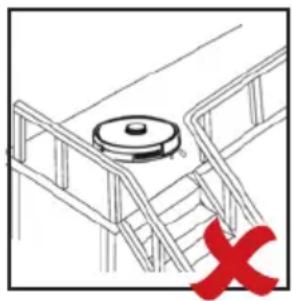
natural_image
Diagram of a staircase with a circular object on top and a red X mark at the bottom (no text or symbols)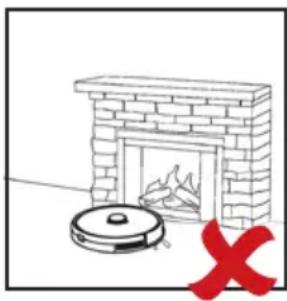
natural_image
Illustration of a brick chimney with a vacuum cleaner and a red X symbol (no text or symbols present)OBSERVACIÓN:
natural_image
Simple line drawing of a maze with a circular button at the end (no text or symbols)natural_image
Simple spiral diagram with an arrow indicating direction (no text or symbols)natural_image
Technical line drawings of a robotic vacuum cleaner's internal components (no text or labels)Atención:
Manualmente
Observaciones:
natural_image
Technical diagram of a vehicle interior showing dashboard, steering wheel, and gear mechanism (no text or labels)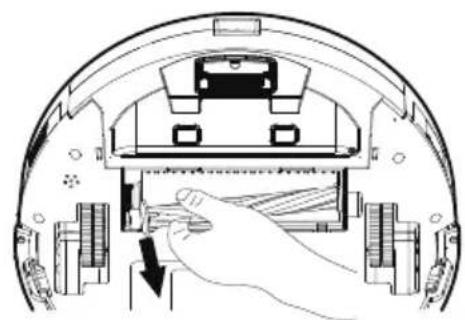
natural_image
Diagram of a robotic device with a hand inserting a cable into the internal components (no text or symbols visible)natural_image
Technical line drawing of a circular robotic vacuum cleaner with mounting bracket (no text or symbols)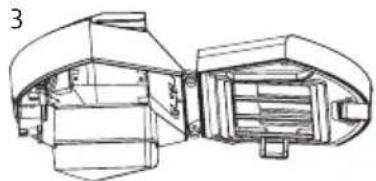
natural_image
Technical line drawing of a mechanical assembly with no visible text or symbols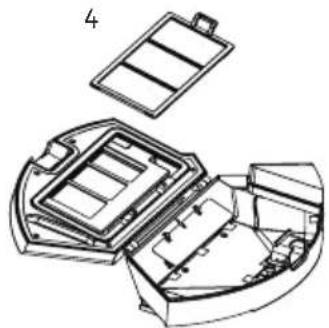
natural_image
Technical line drawing of a mechanical component with open and closed views (no text or symbols)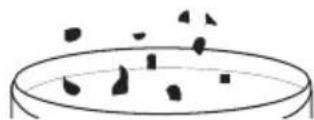
natural_image
Technical line drawing of a mechanical component with a handle and base plate (no text or symbols)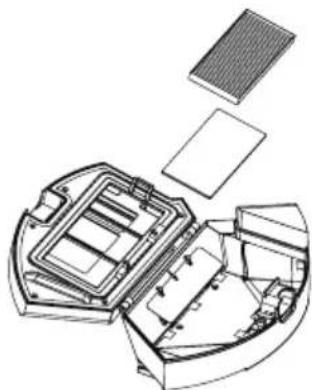
natural_image
Exploded view diagram of a mechanical assembly showing internal components (no text or labels)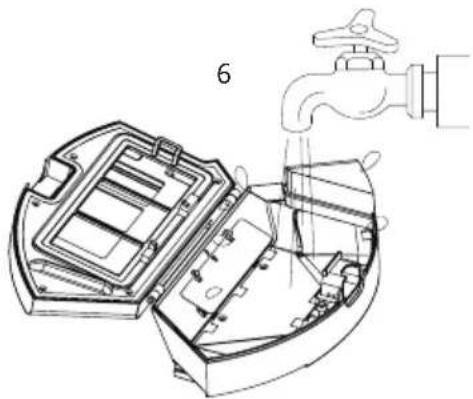
natural_image
Technical line drawing of a mechanical device with a faucet and internal components (no text or symbols)natural_image
Technical line drawings of a device's internal components, including a tray, lid, and base plate (no text or symbols)natural_image
Recycling symbol icon with three chasing arrows forming a triangle (no text or labels)natural_image
Symbol of a trash bin crossed out by two diagonal lines, representing no waste or discharge (no text or labels)BATERÍA EXTRAÍBLE
natural_image
Line drawing of a modern kitchen appliance with a rectangular top and side base (no text or symbols)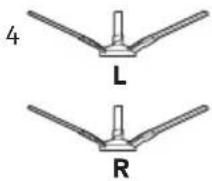
natural_image
Line drawing of a stack of three identical rectangular objects with a circular hole, no text or symbols present.3
8
1
natural_image
Line drawing of a circular vacuum cleaner with labeled 'DOMO' and control buttons (no text beyond label)6
natural_image
Technical line drawing of a mechanical housing or enclosure component (no text or symbols)9
natural_image
Simple curved line drawing resembling a simplified leaf or crescent (no text or symbols)ASPIRAPOLVERE ROBOT
Parte superiore:
SERBATOIO DELL'ACQUA
natural_image
Illustration of a robot, car, and mechanical components with a red X symbol (no text or labels)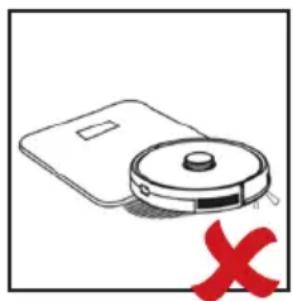
natural_image
Simple line drawing of a vacuum cleaner with a red X mark indicating no text or symbols on the device itself.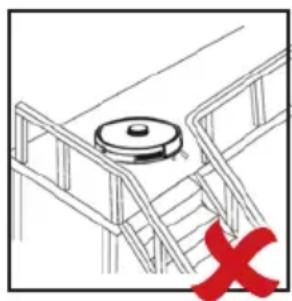
natural_image
Diagram of a staircase with a circular object on top and a red X mark at the bottom (no text or symbols)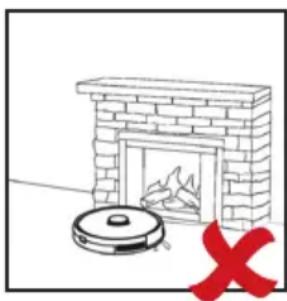
natural_image
Simple line drawing of a brick stove with a vacuum cleaner and a red X mark (no text or symbols)NOTE
natural_image
Simple line drawing of a zigzag path with a circular marker at the end (no text or symbols)natural_image
Simple spiral diagram with an arrow indicating direction (no text or symbols)natural_image
Technical line drawings of a robotic vacuum cleaner with open lid, showing internal components and mounting brackets (no text or labels)Note
Manuale
UTILIZZO DELL'ASPIRAPOLVERE ROBOT TRAMITE APP


Note:

natural_image
Technical line drawing of a car interior showing dashboard, seats, and steering wheel (no text or labels)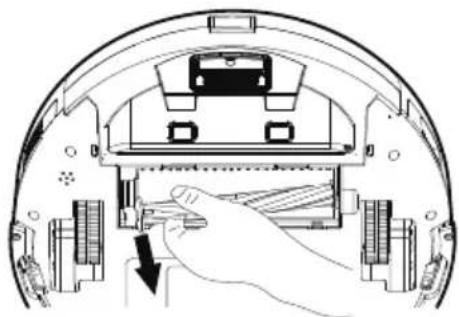
natural_image
Diagram of a robotic device showing internal components and a hand inserting a component (no text or symbols present)natural_image
Technical line drawing of a robotic vacuum cleaner (no text or symbols)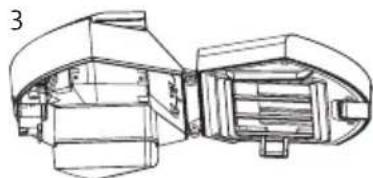
natural_image
Technical line drawing of a mechanical component with no visible text or symbols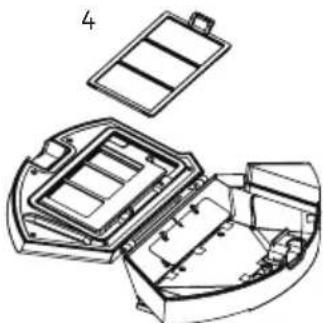
natural_image
Exploded view diagram of a battery pack assembly (no text or labels)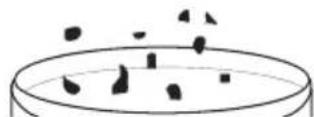
natural_image
Technical line drawings of a mechanical device showing three views: top view with a handle, front view with internal components, and bottom view with a faucet (no text or symbols present)natural_image
Technical line drawings of a mechanical device with exploded and assembled views (no text or symbols)PULIZIA DEL SERBATOIO DELL'ACQUA
natural_image
Recycling symbol icon with three chasing arrows forming a triangle (no text or labels)natural_image
Symbol of a trash bin crossed with no text or numbers, representing waste sorting or disposal (no text present)BATTERIA RIMOVIBILE
natural_image
Line drawing of a modern kitchen appliance with a rectangular top and side base (no text or symbols)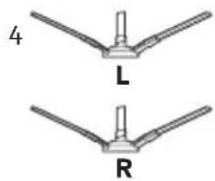
natural_image
Illustration of a stack of five identical rectangular objects with a circular hole, no text or symbols present.3
8
1
natural_image
Line drawing of a circular vacuum cleaner with labeled 'DOMO' and control buttons (no additional text or symbols)6
natural_image
Technical line drawing of a mechanical component with curved surfaces and mounting holes (no text or symbols)9
natural_image
Simple curved line drawing with no text, numbers, or symbolsROBOTICKÝ VYSAVAČ
Horní část/kryt:
NABÍJECÍ STANICE
natural_image
Illustration of a robot, car, and mechanical components with a red X symbol (no text or labels)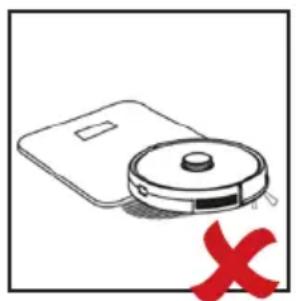
natural_image
Illustration of a vacuum cleaner with a red X mark indicating no text or symbols on the device itself.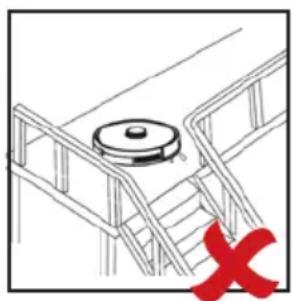
natural_image
Line drawing of a staircase with a circular object on top and a red X mark at the bottom (no text or symbols)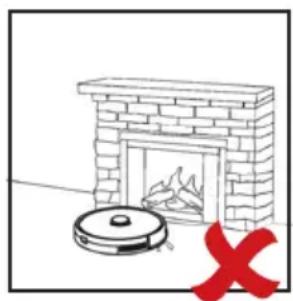
natural_image
Simple line drawing of a brick chimney with a vacuum cleaner and a red X mark (no text or symbols)POZNÁMKA:
natural_image
Simple line drawing of a maze with a circular button at the end (no text or symbols)natural_image
Simple spiral diagram with an arrow indicating direction (no text or symbols)natural_image
Technical line drawings of a robotic vacuum cleaner with open lid, showing internal components and housing (no text or symbols)C
Upozornění:
NAINSTALUJTE APLIKACI
Ručně
POUŽÍVÁNÍ ROBOTICKÉHO VYSAVAČE S APLIKACÍ
Poznámky:

natural_image
Technical line drawing of a mechanical assembly with gears and housing (no text or symbols)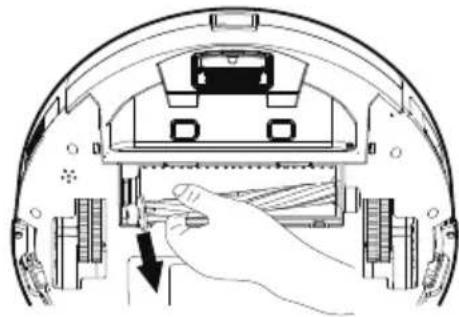
natural_image
Diagram of a robotic device interior showing a hand pressing down on a component (no text or symbols visible)natural_image
Technical line drawing of a circular robotic vacuum cleaner with mounting base (no text or symbols)
natural_image
Technical line drawing of a mechanical assembly with no visible text or symbols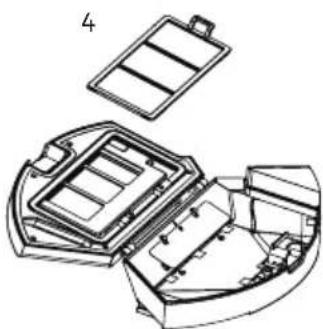
natural_image
Technical line drawing of a mechanical assembly with internal components (no text or symbols)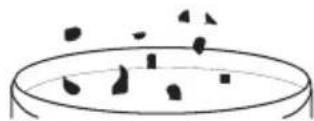
natural_image
Three technical line drawings of a device interior with open lid, showing internal components and a faucet (no text or symbols)natural_image
Technical line drawings of a device's internal components, including a tray, lid, and base plate (no text or symbols)ČIŠTĚNÍ NÁDRŽKY NA VODU
natural_image
Line drawing of a robotic vacuum cleaner with labeled part 134 (no text or symbols on the device itself)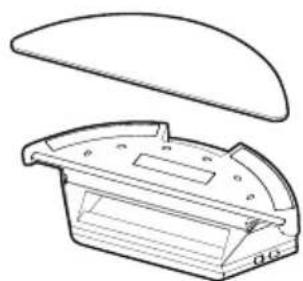
natural_image
Technical line drawing of a mechanical component with a curved top and internal structure (no text or symbols)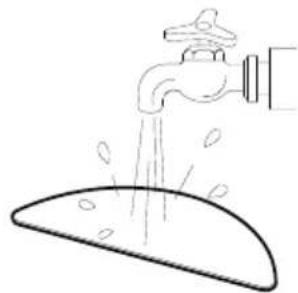
natural_image
Simple line drawing of a faucet spraying water onto a surface (no text or symbols)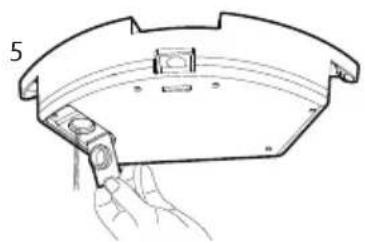
natural_image
Line drawing of a mechanical component with a hand holding a tool, no text or symbols present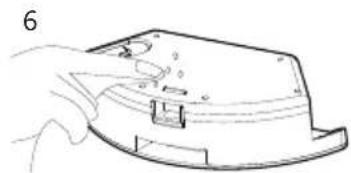
natural_image
Hand holding a small electronic device component (no visible text or symbols)ČIŠTĚNÍ VYSAVAČE
OHLED NA ŽÍVOTNÍ PROSTŘEDÍ
natural_image
Symbol of a trash bin with crossed lines and a blank base, no text or numbers present.natural_image
Recycling symbol icon with three chasing arrows forming a triangle (no text or labels)natural_image
Symbol of a trash bin crossed with no text or numbers, representing waste sorting or disposal (no text present)VYJÍMATELNÉ/VYMĚNITELNÉ BATERIE
natural_image
Line drawing of a smart air purifier device with control panel and ventilation slots (no text or symbols)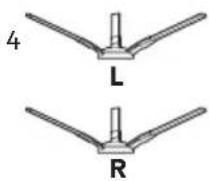
3
8
1
natural_image
Line drawing of a circular vacuum cleaner with a central hub and two side sensors (no text or symbols)6
natural_image
Technical line drawing of a mechanical component with mounting holes and a central square feature (no text or symbols)9
natural_image
Simple curved line drawing resembling a simplified leaf or crescent (no text or symbols)ROBOTICKÝ VYSÁVAČ
Horná čast:
natural_image
Simple line drawing of a vacuum cleaner with a red X mark indicating cancellation (no text or symbols present)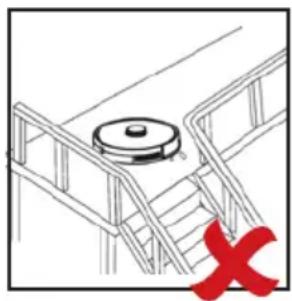
natural_image
Diagram of a staircase with a circular object on top and a red X mark at the bottom (no text or symbols)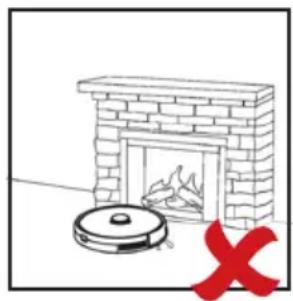
natural_image
Simple line drawing of a brick fireplace with a vacuum cleaner and a red X mark (no text or symbols)natural_image
Simple line drawing of a zigzag path with a circular element at the end (no text or symbols)natural_image
Simple spiral diagram with an arrow indicating direction (no text or symbols)10. Nastavenie rozvrhu upratovania

natural_image
Technical line drawings of a robotic vacuum cleaner with open lid, internal casing, and mounting bracket (no text or symbols)Upozornenie:
NAINŠTALUJTE APLIKÁCIU
Ručne
POUŽÍVÁNÍ ROBOTICKÉHO VYSAVAČE S APLIKACÍ
Poznámky:
natural_image
Technical line drawing of a circular mechanical component with internal components and mounting holes (no text or symbols)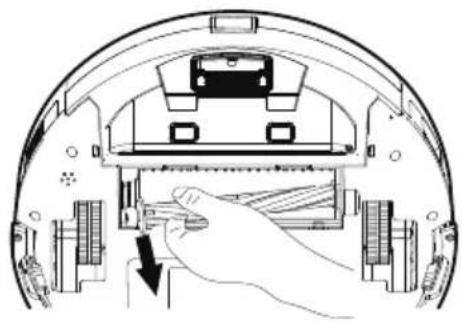
natural_image
Diagram of a device interior showing a hand inserting a cable into a housing (no text or symbols visible)natural_image
Technical line drawing of a circular robotic device with internal components (no text or symbols)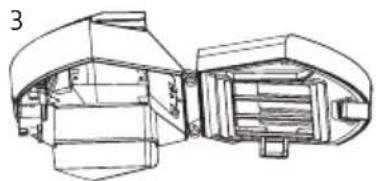
natural_image
Technical line drawing of a mechanical component with no visible text or symbols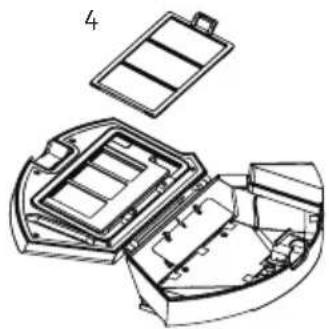
natural_image
Technical line drawing of a mechanical assembly with open and closed views (no text or symbols)
natural_image
Line drawing of a mechanical component with an open lid and internal compartments (no text or symbols)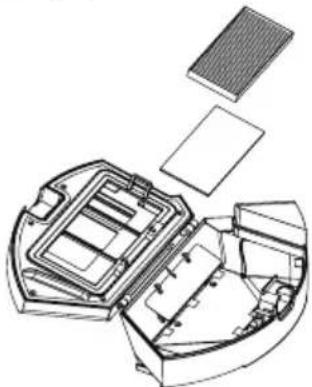
natural_image
Exploded view diagram of a device showing internal components and assembly (no text or labels)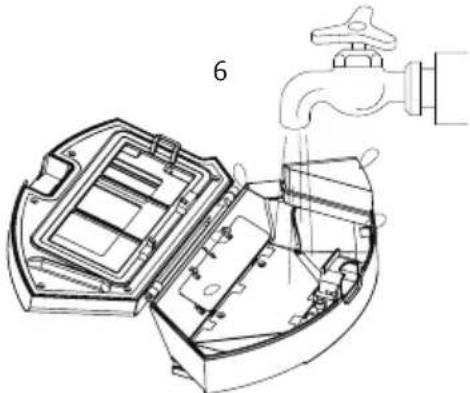
natural_image
Technical line drawing of a mechanical device with a faucet and internal components (no text or symbols)natural_image
Technical line drawing of a mechanical assembly with no visible text or symbols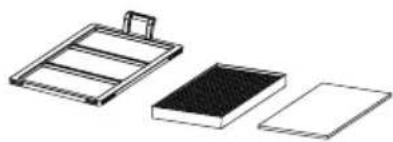
natural_image
Three technical line drawings of a mechanical component or assembly, showing different shapes and surfaces (no text or symbols)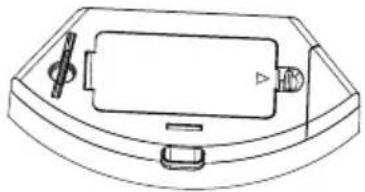
natural_image
Line drawing of a device casing with handle, buttons, and a central component (no text or symbols)ČISTENIE NÁDRŽKY NA VODU
natural_image
Line drawing of a robotic vacuum cleaner with lid and mounting bracket (no text or symbols)
natural_image
Technical line drawing of a mechanical component or housing (no text or symbols)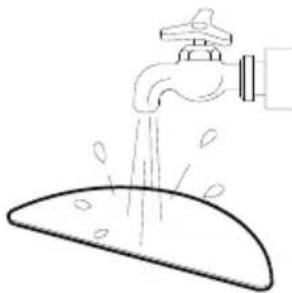
natural_image
Simple line drawing of a faucet pouring liquid into a surface with droplets (no text or symbols)5
natural_image
Technical line drawing of a mechanical component with a hand holding a tool (no text or symbols present)6
natural_image
Hand holding a curved mechanical component with a small inset detail (no text or symbols visible)ČISTENIE VYSÁVAČA
Po každom použití je potrebné očistiť handričkou: kolieska, senzory, nabíjacie kontakty a nabíjaciu stanicu.
POZNÁMKA:
natural_image
Recycling symbol icon with three chasing arrows forming a triangle (no text or labels)natural_image
Symbol of a trash bin crossed out by two diagonal lines, representing no waste or discharge (no text or labels)VYBERATEL'NÉ/VYMENITEL'NÉ BATÉRIE
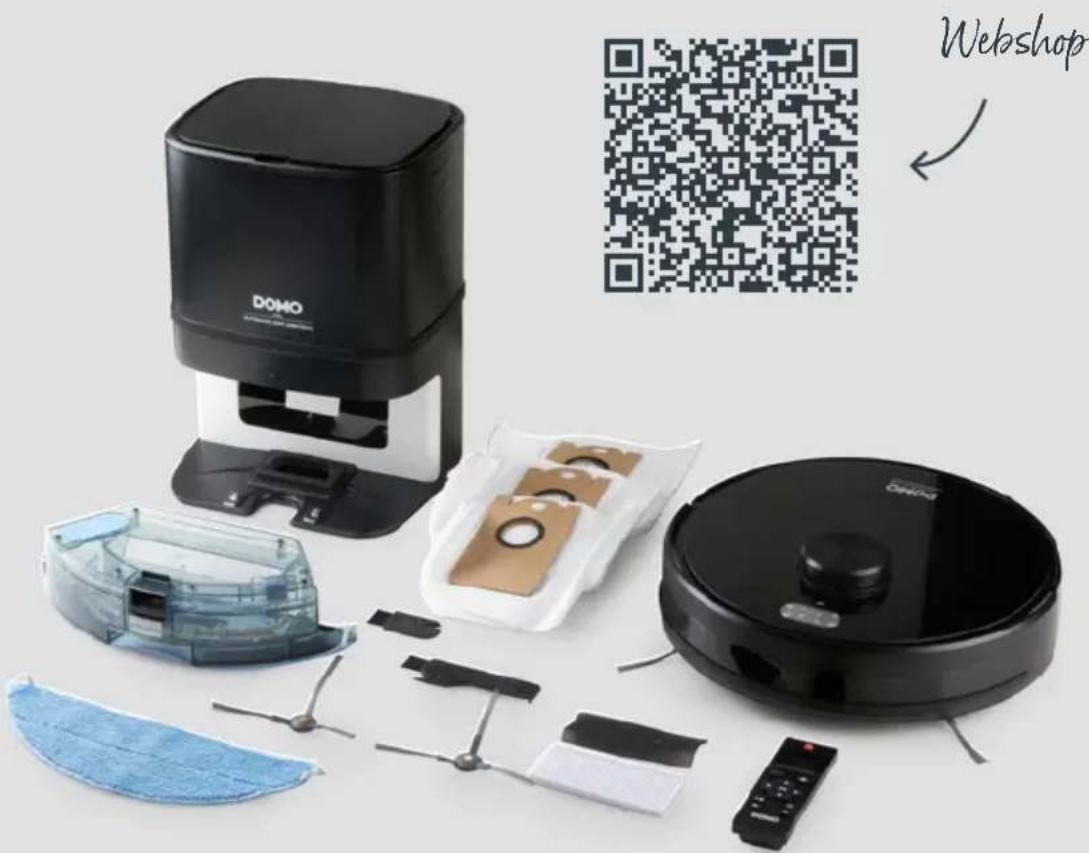
Looking for extra accessories or you have a broken piece?
ORDER the original DOMO accessories and parts on our webshop.
- DO7298S
- ⚠PRODUCTSPECIFIEKE WAARSCHUWINGEN
- ROBOTSTOFZUIGER
- WATERRESERVOIR
- LAAD-LEDIGINGSTATION
- OPMERKING:
- Opgelet:
- Manueel
- DE ROBOTSTOFZUIGER MET DE APP GEBRUIKEN
- Opmerkingen:
- WATERRESERVOIR REINIGEN
- ⚠ AVERTISSEMENTS SPÉCIFIQUES AU PRODUIT
- ASPIRATEUR-ROBOT
- REMARQUE :
- Attention :
- Manuellement
- UTILISER L'ASPIRATEUR-ROBOT AVEC L'APPLICATION
- Remarques :
- NETTOYAGE DE L'APPAREIL
- DÉCLARATION DE CONFORMITÉ
- BATTERIE AMOVIBLE
- STAUBSAUGERROBOTER
- Seite:
- ANMERKUNG:
- Manuell
- VERWENDUNG DES STAUBSAUGERROBOTERS MIT DER APP
- Anmerkungen:
- WASSERBEHÄLTER REINIGEN
- HERAUSNEHMBARE BATTERIE
- SAFETY INSTRUCTIONS
- ▲ELECTRICAL WARNINGS
- ⚠️INSTALLATION
- ⚠ USE
- ⚠ CLEANING AND MAINTENANCE
- ⚠️PRODUCT-SPECIFIC WARNINGS
- SAVE THESE INSTRUCTIONS FOR FUTURE REFERENCE
- PARTS
- ROBOT VACUUM CLEANER
- Bottom:
- Side:
- DUST BIN
- WATER TANK
- CHARGING/EMPTYING STATION
- BEFORE THE FIRST USE
- CHARGING
- PLEASE NOTE:
- AUTOMATIC EMPTYING
- USE
- NOTE:
- ON/STANDBY/SLEEP MODE/OFF
- On
- Standby
- Sleep mode
- Off
- USE WITHOUT REMOTE CONTROL
- USE WITH REMOTE CONTROL
- Start/pause button ▶||
- Suction level adjustment ✦
- Clock settings
- Spot Cleaning
- Schedule setting
- USING THE ROBOT VACUUM WITH WATER TANK AND MOP
- USE WITH APP
- INSTALLING THE APP
- Attention:
- ADDING THE ROBOT VACUUM TO THE APP
- Automatic
- Manual
- USING THE ROBOT VACUUM WITH THE APP
- Remarks:
- CLEANING AND MAINTENANCE
- CLEANING BRUSHES AND WHEELS
- CLEANING OUT THE CANISTER AND FILTER
- CLEANING THE WATER TANK
- CLEANING THE APPLIANCE
- REPLACING THE DUST BAG
- Installing the dust bag
- STORAGE
- DECLARATION OF CONFORMITY
- ENVIRONMENTAL GUIDELINES
- REMOVABLE BATTERY
- GARANTIA
- ROBOT ASPIRADOR
- OBSERVACIÓN:
- Atención:
- Manualmente
- Observaciones:
- BATERÍA EXTRAÍBLE
- ASPIRAPOLVERE ROBOT
- SERBATOIO DELL'ACQUA
- NOTE
- Manuale
- UTILIZZO DELL'ASPIRAPOLVERE ROBOT TRAMITE APP
- PULIZIA DEL SERBATOIO DELL'ACQUA
- BATTERIA RIMOVIBILE
- ROBOTICKÝ VYSAVAČ
- NABÍJECÍ STANICE
- POZNÁMKA:
- Upozornění:
- NAINSTALUJTE APLIKACI
- Ručně
- POUŽÍVÁNÍ ROBOTICKÉHO VYSAVAČE S APLIKACÍ
- Poznámky:
- ČIŠTĚNÍ NÁDRŽKY NA VODU
- ČIŠTĚNÍ VYSAVAČE
- OHLED NA ŽÍVOTNÍ PROSTŘEDÍ
- VYJÍMATELNÉ/VYMĚNITELNÉ BATERIE
- ROBOTICKÝ VYSÁVAČ
- Nastavenie rozvrhu upratovania
- Upozornenie:
- NAINŠTALUJTE APLIKÁCIU
- Ručne
- ČISTENIE NÁDRŽKY NA VODU
- ČISTENIE VYSÁVAČA
- VYBERATEL'NÉ/VYMENITEL'NÉ BATÉRIE
Brand : DOMO
Model : DO7298S
Category : Robot vacuum