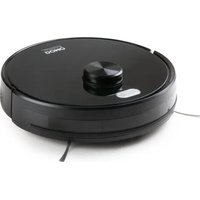
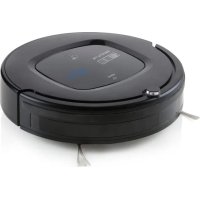
DO7296S - Robot vacuum DOMO - Free user manual and instructions
Find the device manual for free DO7296S DOMO in PDF.
| Product type | Robot vacuum with mopping function |
| Brand | DOMO |
| Model | DO7296S |
| Power supply | 100-240 V, 50/60 Hz, adapter 19 V / 0.6 A |
| Battery | Rechargeable, built-in lithium-ion |
| Charging time | Approximately 5 hours (first charge) |
| Runtime | Approximately 120 minutes (depending on mode and surface) |
| Dust container capacity | 600 ml |
| Water tank capacity | 300 ml |
| Filtration | HEPA filter, pre-filter, and filtration sponge |
| Cleaning modes | Scheduled (S-shaped), zone, along walls, mopping |
| Connectivity | WiFi, Smart Life / Tuya Smart app |
| Remote control | Yes, with 2 AAA batteries |
| Sensors | Anti-drop, mapping laser, obstacle detection |
| Brushes | 2 side brushes (L/R) and 1 rotating floor brush |
| Weight | 4.2 kg |
| Dimensions (L x W x H) | 35 x 35 x 9.8 cm |
| Warranty | 2 years (accessories and wear parts: 6 months) |
| Wear parts | HEPA filter (replace every 6 months), side brushes (replace every 12 months) |
| Cleaning and maintenance | Empty the tank after each use, wash the filter and brush, clean the sensors |
| Safety | Automatic shutdown in case of jamming, anti-drop sensors, overload protection |
Frequently Asked Questions - DO7296S DOMO
User questions about DO7296S DOMO
0 question about this device. Answer the ones you know or ask your own.
Ask a new question about this device
Download the instructions for your Robot vacuum in PDF format for free! Find your manual DO7296S - DOMO and take your electronic device back in hand. On this page are published all the documents necessary for the use of your device. DO7296S by DOMO.
USER MANUAL DO7296S DOMO
natural_image
Black robotic vacuum cleaner with control panel and remote control (no visible text or symbols)DO7296S
| Handleiding Robotstofzuiger | |
| Mode d'emploi Aspirateur robot | |
| Gebrauchsanleitung Staubsauger-Roboter | |
| Instruction booklet Robot vacuum cleaner | |
| Manual de instrucciones Robot aspirador | |
| Istruzioni per l'uso Aspirapolvere robot | |
| Návod k použití Robotický vysavač | |
| Návod na použitie Robtický vysávač |
natural_image
Two simple line icons: a warning triangle with an exclamation mark and an open book with a stack of books (no text or symbols)⚠PRODUCTSPECIFIEKE WAARSCHUWINGEN
natural_image
Illustration of hands connecting a circular device to a power outlet (no text or symbols)OPMERKINGEN
STAND-BY/SLAAPSTAND/UIT
Stand-by
natural_image
Simple line drawing of a maze with a circular button at the end (no text or symbols)natural_image
Simple spiral diagram with an arrow indicating direction (no text or symbols)natural_image
Simple geometric diagram with a square and a circle, no text or symbols present.natural_image
Line drawing of a mechanical component with hands holding a clip (no text or symbols)
natural_image
Technical line drawing of a mechanical component with a curved top and rectangular base (no text or symbols)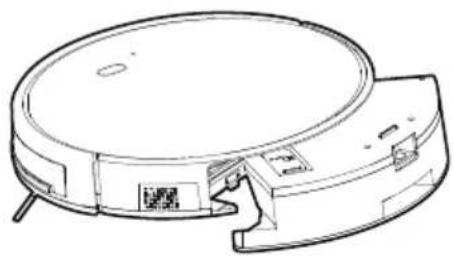
natural_image
Line drawing of a circular robotic vacuum cleaner with visible internal components and mounting bracket (no text or symbols)ANTI-VALSYSTEEM
text_image
QR code with a blue home icon in the center, likely linking to a digital service or application.text_image
Register Log In Try now I agree to Ethnoty Policy1 - EFair Agreement3 EChildren's Privacy Statement3 - EThird Party Information Saving List3
text_image
Register Log In Please enter your account. Password □ 1 Agree Privacy Policy User Agreement Children's Privacy Statement and Third Party Information Sharing List Forgot Passwordtext_image
Add Device Discovering hot water, disaster: While some poly devices have been discovered using devices Discovering devices... Add Handmaging hot watergen Balance Control Watering Watering Watering Watering Watering Watering Watering Watering Watering Watering Watering Watering Watering Watering Watering Watering Watering Watering Watering Watering Watering Watering Watering Watering Watering Watering Watering Watering Watering Watering Watering Watering Watering Wateringtext_image
XXXXXXX-robot Device Information Tap-to-Run and Automation Device Review Device Offline Notification Offline Notification Others Share Device Check Device Network Check Now > Device Update No updates available > Remove DeviceERRORCODES
text_image
Technical diagram of a ship's deck structure with labeled components L and R, showing structural layout and cabin layout.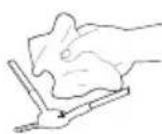
REINIGING ROTERENDE VLOERBORSTEL
natural_image
Diagram showing two views of a device interior with internal components and directional arrows (no text or symbols)OPBERGEN
PROBLEEM EN OPLOSSING
text_image
Prohibition sign depicting a trash bin crossed with no signage, indicating no waste or discharge.natural_image
Recycling symbol icon (three chasing arrows) inside a rounded square frame, no text or labels present.natural_image
Symbol of a trash bin crossed with two diagonal lines, representing no waste or discharge (no text or numbers present)⚠ AVERTISSEMENTS SPÉCIFIQUES AU PRODUIT
natural_image
Line drawings of various household appliances and devices including a circular device, remote control, and electrical plug (no text or symbols present)APPAREIL
Partie supérieure:
natural_image
Hand holding a circular device connected to an electrical outlet (no text or symbols visible)REMARQUES
natural_image
Simple line drawing of a maze with a circular button at the end (no text or symbols)natural_image
Simple spiral diagram with an arrow indicating direction (no text or symbols)natural_image
Simple geometric diagram with a square and a circle, no text or symbols present.natural_image
Line drawing of a hand holding a small mechanical component, no text or symbols present
natural_image
Technical line drawing of a mechanical component with a curved lid and internal structure (no text or symbols)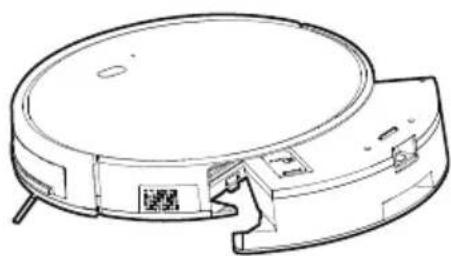
natural_image
Line drawing of a circular robotic vacuum cleaner with visible internal components and a QR code on the cover (no text or symbols)SYSTÈME ANTICHUTE
text_image
QR code with a blue home icon in the center, likely linking to a digital service or application.text_image
Register Log In Try now □ Agree in (Privacy Policy) (User Agreement) (Children's Privacy Statement) (Third Party Information Sharing List) Log In Please enter your account Password □ AgreePrivacy Policy User Agreement Children's Privacy Statement and Third Parts Information Sharing List Forgot Passwordtext_image
Add Device Discovering for safety, security, mobile home body devices that are available using ###. Discovering devices... Add Handmethyl boerogen Add Device XXXXXXE-rolbort Add Devicestext_image
XXXXXXX-robot Device Information Tap-to-Run and Automation Device Review Device Offline Notification Offline Notification Others Share Device Check Device Network Check Now Device Update No updates available Remove DeviceCODES D'ERREUR
natural_image
Line drawings of a robotic vacuum cleaner with water spray, showing internal components and clean air flow (no text or symbols)NETTOYAGE DE L'APPAREIL
natural_image
Diagram showing a vehicle interior with circular components and a hand holding a tool, no text or symbols present.NETTOYAGE DE LA BROSSE POUR SOLS ROTATIVE
natural_image
Diagram showing two views of a device's internal structure, one with internal components and arrows indicating movement (no text or symbols)RANGEMENT
DÉCLARATION DE CONFORMITÉ
text_image
Prohibition sign depicting a trash bin crossed with both diagonal lines, indicating no waste or discharge.natural_image
Recycling symbol icon with three chasing arrows forming a triangle (no text or labels)natural_image
Symbol of a trash bin crossed with two crossed lines, no text or numbers presentBATTERIE AMOVIBLE
natural_image
Line drawings of various household appliances and devices including a vacuum cleaner, remote control, and battery pack (no text or symbols)GERÄT
Oberseite:
natural_image
Hand holding a circular device connected to an electrical outlet (no text or symbols visible)ANMERKUNGEN
natural_image
Simple line drawing of a zigzag path with a circular marker at the end (no text or symbols)natural_image
Simple spiral diagram with an arrow indicating direction (no text or symbols)natural_image
Simple geometric diagram with a square and a circle, no text or symbols present.natural_image
Technical line drawings of a device housing and casing, showing front, side, and top views with no visible text or symbols.ANTI-FALLSYSTEM
text_image
QR code with a blue home icon in the center, likely linking to a digital service or application.text_image
Register Log In Try now Agree Privacy Policy User Agreement Children's Privacy Statement and Third Party Information Sharing List Log In Please enter your account Password AgreePrivacy Policy User Agreement Children's Privacy Statement and Third Party Information Sharing List Forgot Passwordtext_image
XXXXXXX-robot Device Information Tap-to-Run and Automation Device Review Device Offline Notification Offline Notification Others Share Device Check Device Network Check Now Device Update No updates available Remove DeviceFEHLERCODES
natural_image
Diagram of a ship's interior showing two circular views with labeled components (no text or symbols present)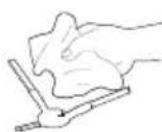
natural_image
Diagram showing two views of a device interior with internal components and directional arrows (no text or symbols)LAGERUNG
text_image
Prohibition sign depicting a trash bin crossed with no signage, indicating no waste or discharge.natural_image
Recycling symbol icon with three chasing arrows forming a triangle (no text or labels)natural_image
Symbol of a trash bin crossed with two diagonal lines, representing no waste or discharge (no text or numbers present)HERAUSNEHMBARE BATTERIE
All of our products are always submitted to a strict quality control before they are sold to you.
Should you nevertheless experience problems with your device, we sincerely regret this.
In that case, we kindly request you to contact our customer service.
Our staff will gladly assist you.

+32 14 21 71 91

info@linea2000.be
Monday – Thursday: 8.30 – 12.00 and 13.00 – 17.00
Friday: 8.30 - 12.00 and 13.00 - 16.30
This appliance has a two year warranty period. During this period the manufacturer is responsible for any failures that are the direct result of construction failure. When these failures occur the appliance will be repaired or replaced if necessary. The warranty will not be valid when the damage to the appliance is caused by wrong use, not following the instructions or repairs executed by a third party. The guarantee is issued with the original till receipt. All parts, which are subject to wear, are excluded from the warranty. If your device breaks down within the 2-year warranty period, you can return the device together with your receipt to the shop where you purchased it.
The guarantee on accessories and components that are liable to wear-and-tear is only 6 months.
The guarantee and responsibility of the supplier and manufacturer lapse automatically in the following cases:
· If the instructions in this manual have not been followed.
· In case of incorrect connection, e.g. electrical voltage that is too high.
· In case of incorrect, rough or abnormal use.
· In case of insufficient or incorrect maintenance.
· In case of repairs or alterations to the device by the consumer or non-authorised third parties.
- If the customer used parts or accessories that are not recommended or provided by the supplier / manufacturer.
SAFETY INSTRUCTIONS
When using electrical appliances, basic safety precautions should always be taken, including the following:
- Read all instructions carefully. Keep this manual for future reference.
- Make sure all packaging materials and promotional stickers have been removed before using the appliance for the first time. Make sure children cannot play with the packaging materials.
- This appliance is intended to be used in household and similar applications such as:
· staff kitchen areas in shops, offices and other working environments;
· farm houses;
- by clients in hotels, motels and other residential type environments;
- bed and breakfast type environments.
- Children should be supervised to ensure that they do not play with the appliance.
- This appliance can be used by children aged from 16 years and above and persons with reduced physical, sensory or mental capabilities or lack of experience and knowledge if they have been given supervision or instruction concerning use of the appliance in a safe way and understand the hazards involved.
· Children shall not play with the appliance.
- Cleaning and user maintenance shall not be made by children unless they are older than 16 or supervised.
- Keep the appliance and its cord out of reach of children younger than 16 years.
- All repairs should be carried out by the manufacturer or its aftersales service.
- Any injury or damage caused by failure to comply with these rules are at your own risk. Neither the manufacturer, importer, or the supplier may be held liable.
▲ELECTRICAL WARNINGS
- The appliance must be disconnected from its power source during service and when replacing parts. To disconnect, turn controls to "OFF" or "o" position, then remove the plug from the wall. Never pull the cord or appliance to remove the plug from the socket.
- Before use, check carefully that the electric tension and frequency of the power net at your home match the indications on the rating label of the appliance.
- The appliance must be plugged into an appropriate outlet that is installed and grounded in accordance with local installation regulations.
- Do not let the power supply cord hang over the edge of a counter, or touch hot surfaces.
- Keep the power cord away from hot parts and don't cover the appliance.
- Unwrap the cord completely to prevent overheating of the cord. Do not allow the power cord supply to run underneath or around the charging station.
- The appliance may not be used with an extension lead or a multiple socket.
- Do not operate this appliance with a damaged cord or plug or in the event the appliance malfunctions or has been damaged in any manner. Return the appliance to the DOMO Service Department or its service agent for examination, repair, or electrical or mechanical adjustment. Do not try to repair the appliance yourself.
⚠️INSTALLATION
· Do not place near flammable materials, gases or explosives.
· Do not use or store this appliance outdoors.
· Always use the appliance on a steady, dry and level surface.
- Never place this appliance near a gas stove or electrical stove or in a place where it may come into contact with a warm appliance.
⚠ USE
· Do not use this appliance for other than intended use.
- Only use the appliance for domestic use. The manufacturer cannot be held responsible for accidents that result from improper use of the appliance or not following the instructions described in this manual.
· Do not operate the appliance with wet hands.
- The use of accessories that are not recommended or sold by the manufacturer can cause fire, electrical shock or injuries. Only use the utensils delivered with the appliance.
⚠ CLEANING AND MAINTENANCE
- To protect against electrical shock or burns, do not immerse unit, cord, or plug in water or other liquid.
- Failure to maintain this appliance in a clean condition could adversely affect the life of the appliance and possibly result in a hazardous situation.
⚠️PRODUCT-SPECIFIC WARNINGS
- Do not use the vacuum to clean up detergents, flammable/corrosive liquids (such as solvents, flammable and explosive materials such as petrol, alcohol, etc.), and other similar liquids, needles, matches, sharp objects, or flammable items.
- Do not use the vacuum cleaner to vacuum up cement, powder and other small particles. Also avoid vacuuming up large objects. The vacuum cleaner could be clogged, the motor could overheat or other damage may occur.
- Make sure that the air intake or the floor suction opening do not become blocked.
- First charge a new battery up completely.
- Pull the plug from the outlet when the vacuum cleaner is fully charged when charging directly.
- This product contains a rechargeable battery. Batteries must be recycled in accordance with local laws and regulations when they are no longer of use. Do not pierce the battery or expose it to high temperatures; this may cause the battery to explode.
· Under extreme circumstances, there could be leakage of the battery. If the liquid from the battery comes into contact with the skin, wash it off immediately with water and soap or neutralize it with a mild acid such as lemon juice or vinegar. If the liquid comes into contact with the eyes, rinse them liberally with water for at least 10 minutes and contact a doctor.
- Do not place foreign objects in the openings of your machine. Do not use the machine if an opening is blocked. Keep the machine free from dust, dirt, hair or anything that could reduce the air supply.
- Remove large and sharp objects from the floor to prevent damage to the plastic components, the brushes and the motor.
- Keep hair, loose clothing, fingers and other body parts away from openings and moving parts.
- After using the appliance, it is important to clean the water reservoir to prevent the suction power from decreasing and the motor from heating up due to blockage. This could affect the performance and lifetime of the appliance.
- Only use the supplied charger to charge the appliance. Other chargers may damage the appliance/battery and render the appliance unusable.
· Take care when using the appliance in damp rooms, such as bathrooms, toilets, and storerooms, etc., so that the appliance cannot get wet.
- Never use the appliance without filters and reservoir. This will damage the motor and render it unusable.
SAVE THESE INSTRUCTIONS FOR FUTURE REFERENCE
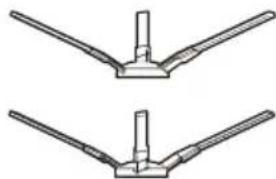
PARTS
- Appliance
- Charging station
- Remote control
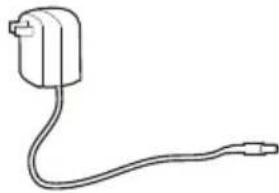
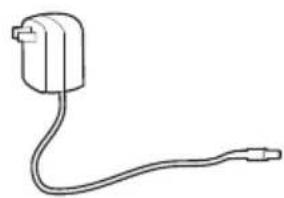
- Adapter
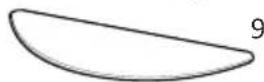
- Cleaning brush
- Water tank
- Side brushes
- HEPA filter
- Mop
text_image
1 2 3 4 D-1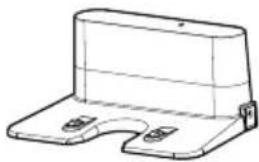
natural_image
Technical line drawing of a mechanical bracket or support structure (no text or symbols)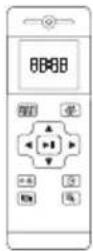
natural_image
Simple line drawing of a plug with a cable, no text or symbols present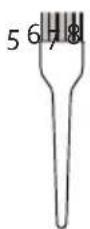

natural_image
Two identical mechanical bracket diagrams with no text or symbols
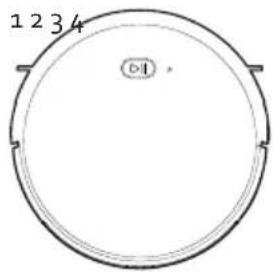
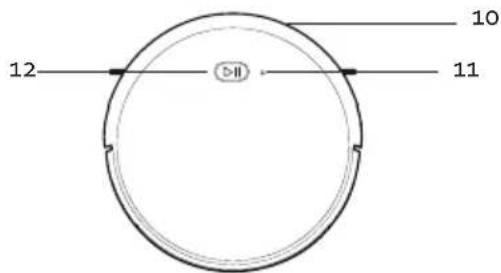
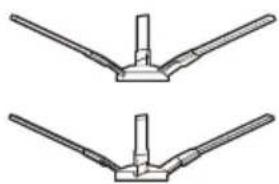
APPLIANCE
Top:
- Bumper
- Wi-Fi indicator
- Control button
Bottom:
- Universal wheel
- Charging contacts
- Side brushes
- Battery compartment
- Side wheel
- Rotating floor brush
- Dust bin
Side:
- Adapter input
- On/Off switch
- Dust collector release
text_image
10 12 II 11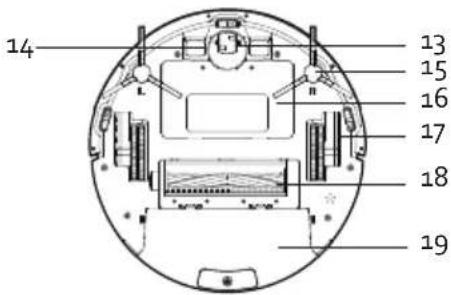
text_image
14 13 15 16 17 18 19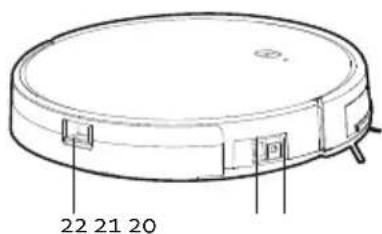
text_image
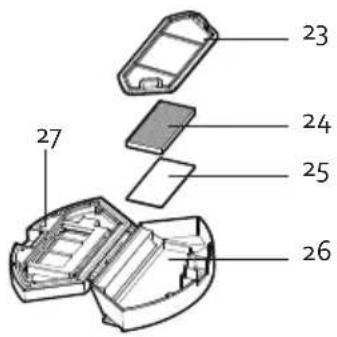
22 21 20DUST BIN
- Pre-filter
- HEPA filter
- Filter sponge
- Dust bin
- Dust collector lid
WATER TANK
- Tank sealing cap
- Water tank
- Mop
CHARGING STATION
- Indicator light
- Adapter input
- Charging contacts
BEFORE THE FIRST USE
- Put two AAA batteries in the remote control.
- Set the time (see "use/use with remote control/ Clock settings").
· Prior to initial use, charge the robot vacuum cleaner for 5 hours (see "charging"). - Place the signed brushes on the vacuum cleaner. Press on them until you hear a click. The brushes and the machine are marked with L (left) and R (right); make sure they match.
INSTALLING THE CHARGING STATION
- Place the charging station on a smooth hard surface, e.g. tiles, parquet, short-haired sturdy carpet, against a wall or cupboard.
- Make sure that there is an area of at least 1 m free on the left and right sides of the charging station. In front of the charging station, there must be a free area of 2 m. If this is not the case, it is possible that the vacuum cleaner cannot find the charger when it must charge.
CHARGING
Turn the appliance on using the on/off switch. The appliance can be charged with or without the charging station.
CHARGING WITH CHARGING STATION
- Ensure the charging station is installed correctly. See "Before first use/Charging station installation".
- Plug the adapter into a socket and insert the adapter output into the charging station.
· IMPORTANT: always make sure that no cables are in front of or next to the charging station; these could get caught between the wheels or brushes of the vacuum cleaner.
text_image
23 24 25 26 27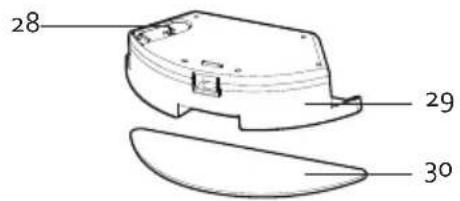
text_image
28 29 30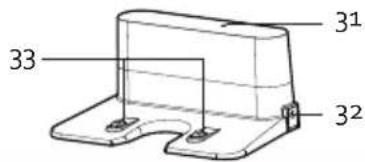
text_image
31 32 33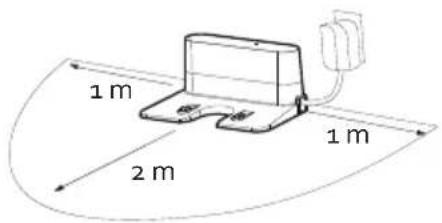
text_image
1 m 2 m 1 m- When the battery is almost empty, or when the appliance has finished its programme, the vacuum cleaner will automatically return to the charging station if one has been installed. If no charging station is installed, the vacuum cleaner will enter standby mode.
- You can also choose to charge the appliance sooner by pressing the HOME button on the remote control.
- When charging, the control button indicator light on the appliance will flash. Once the vacuum cleaner is fully charged, the light will switch off.
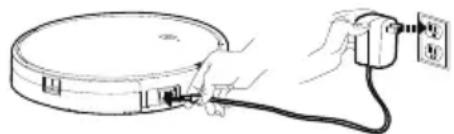
CHARGING WITHOUT CHARGING STATION
- Plug the adapter into a socket and insert the adapter output into the device.
- When charging, the control button indicator light on the appliance will flash. Once the vacuum cleaner is fully charged, the light will switch off.
natural_image
Illustration of hands connecting a circular device to an electrical outlet (no text or symbols present)PLEASE NOTE
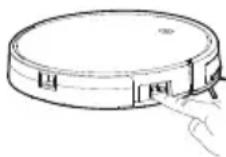
- Ensure that the on/off switch on the side of the appliance is on at all times, otherwise the appliance will not be able to charge.
- Ensure the adapter is plugged into a socket and connected to the charging station, otherwise the vacuum cleaner will not be able to find the charging station.
USE
The robot vacuum maps the room using a laser beam and thus cleans the room most efficiently. In addition, its sensors ensure it does not collide with anything. It is advisable to tidy up the room as best as possible and remove as many obstacles as possible.
For optimal performance and the best cleaning results, it is best to follow these tips:
- Remove loose objects, obstacles and small furniture from the ground.
- Place chairs neatly around the table or raise them off the floor.
- Remove objects and cables that could cause the robot to get stuck.
- Remove objects lower than 18 mm.
· Fold the tassels on the edges of the rugs inward to prevent the robot from getting stuck. - Roll up or remove dark-coloured, deep-pile rugs or rugs thicker than 18 mm, as this may cause problems for the robot.
- In most cases, anti-fall sensors will prevent the robot from falling and/or making steep descents. However, these sensors are less effective when they are dirty or when the robot is moving on carpeted, reflective or dark-coloured floors. Therefore, it is advisable to cordon off stairs and holes, set them as a no-go zone, or set up a virtual wall in the app.
It is recommended that fireplaces and certain areas (e.g. ventilation floor grilles) where the robot could be damaged be cordoned off, set as a no-go zone, or set up as a virtual wall in the app. - Do not walk near the working robot. The robot could recognise you as an obstacle and skip places when vacuuming.
Turn the machine on with the on switch on the side of the appliance prior to use or charging.
STANDBY/SLEEP MODE/OFF
Standby
The machine is in standby mode when the on switch is on and the machine is in idle state, ready to be used immediately.
Sleep mode
The machine automatically goes into sleep mode after being in standby mode for 10 minutes. When the machine is in sleep mode, you must first activate it before you can start the machine. Do this by pressing the control button on the appliance or the ON/OFF button on the remote control.
Off
You can turn off the machine completely by switching off the on switch on the side of the device while in standby mode.
USE WITHOUT REMOTE CONTROL
- Press the control button for automatic cleaning. The vacuum cleaner will plot its own path to vacuum the entire area, taking walls, obstacles and stairs into account.
- When the machine is finished vacuuming, it will automatically return to the charging station. If no charging station is installed, the vacuum cleaner enters standby mode.
- It is also possible to allow the machine itself to stop cleaning. To do this, press the control button. Turn the device off with the on switch on the side of the machine.
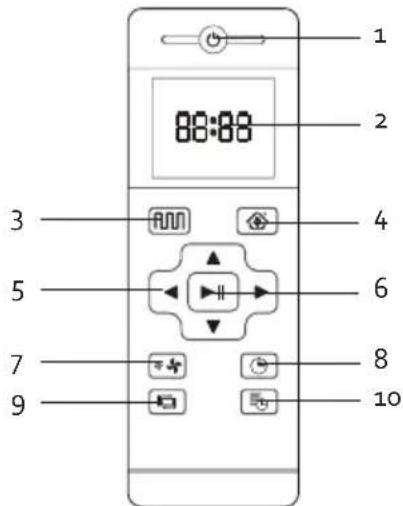
USE WITH REMOTE CONTROL
Important: when adjusting settings with the remote control, you must aim it at the machine.
Do not use the remote control near the charging station as it may interfere with the signal and affect its operation.
If you will not be using the remote control for a long period of time, remove the batteries.
- ON/OFF: on-off button
- Display
- Plan cleaning (smart cleaning)
- HOME: return to the charging station for re-charging
- Arrows
- Confirmation button/pause button
- Suction level adjustment
- Clock settings
- Wall-guided cleaning
-
Schedule setting
-
ON/OFF: on-off button
This button is used to switch the appliance from sleep mode to standby mode and vice versa. This is also the off button to stop the appliance.
- Display
Use the display to view your settings.
text_image
1 2 8:88 3 4 5 6 7 8 9 103. Plan cleaning (smart cleaning)
N
The vacuum cleaner will move through the room and vacuum in an S-shaped motion.
4. HOME: return to the charging station for re-charging

- If you wish to charge the vacuum cleaner during use, press the HOME button. The vacuum cleaner will now automatically look for the charging station.
- PLEASE NOTE: it is possible that the vacuum cleaner cannot find the charging station because there are too many obstacles around the charging station. Make sure that the free area around the charging station is as large as possible.
- When the battery is almost empty, or when the appliance has finished its programme, the vacuum cleaner will automatically return to the charging station if one has been installed. If no charging station is installed, the vacuum cleaner enters standby mode.
5. Arrows
- Standby mode, press this arrow to move the vacuum cleaner forwards.
For other settings, this button can be used to increase the value. - In standby mode, press this arrow to turn the vacuum cleaner 180 degrees.
For other settings, this button can be used to decrease the value. - In standby mode, press and hold this arrow to move the vacuum cleaner to the left.
For other settings, this button can be used to switch from minutes to hours. - In standby mode, press and hold this arrow to move the vacuum cleaner to the right.
For other settings, this button can be used to switch from hours to minutes.
6. Confirmation button/pause button

- This button can be used to start automatic cleaning when the appliance is in standby mode. The vacuum cleaner will plot its own path to vacuum the entire room, and will avoid walls, obstacles, and stairs.
- When the battery is almost empty, or when the appliance has finished its programme, the vacuum cleaner will automatically return to the charging station if one has been installed. If no charging station is installed, the vacuum cleaner will enter standby mode.
- You can also make the appliance stop cleaning. To do this, press the on/off switch. Switch the appliance off using the on/off switch on the side of the appliance.
- Use this button to confirm your settings.
- This button can also be used to pause the vacuum cleaner. If you press this button again, the appliance will continue to complete its programme.
7. Suction level adjustment

Use this button to set the suction level. A symbol for the selected setting will be shown on the display.
8. Clock settings

- Press this button to set the clock.
· The hours on the display will flash. Set the hours by pressing the up or down arrows. - Then press the right arrow to set the minutes. The minutes on the display begin to flash. Set the minutes by pressing the up or down arrows.
- Press the confirmation button to confirm the time.
9. Wall-guided cleaning

Press this button to set a route where the vacuum cleaner cleans along walls and also cleans corners.
- Schedule settings button

Use this button to programme the robot vacuum cleaner to automatically vacuum at a set time every day. For example, if you set the vacuum cleaner for 09:30, it will start to clean at 09:30 every day.
- Press the schedule settings button.
- Set the clock using the arrow buttons.
- Then select the desired suction level.
- Press the confirmation button to confirm the setting.
- The display will show the icon at all times, so that you know this setting is in place.
To cancel this setting, press and hold the schedule settings button for several seconds until the icon disappears from the display.
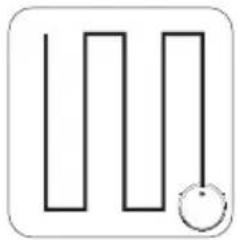
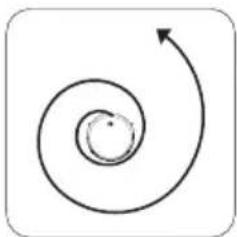
CLEANING MODES
You can choose from 4 cleaning modes:
- Plan cleaning (S-shaped cleaning): The vacuum cleaner will move through the room and vacuum in an S-shaped motion.
natural_image
Simple line drawing of a zigzag path with a circular marker at the end (no text or symbols)- Spot cleaning: the vacuum cleaner will carry out concentrated cleaning on a very dirty spot. This setting can only be selected in the app.
natural_image
Simple spiral diagram with an arrow indicating direction (no text or symbols)- Wall-guided cleaning: the route the vacuum cleaner takes cleans along walls and also cleans corners.

natural_image
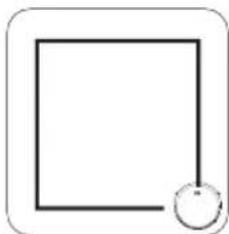
Simple geometric diagram with a square and a circle connected by a line (no text or symbols)- Mop mode: the vacuum cleaner follows an S-shaped route with the water tank and mop instead of the dust collector.
Please note
- Do not move the vacuum cleaner and do not operate it remotely while the appliance is in operation. This will prevent the vacuum cleaner from starting its cleaning routine from the start and repeating the route.
- It is normal that the vacuum cleaner periodically pauses during operation.
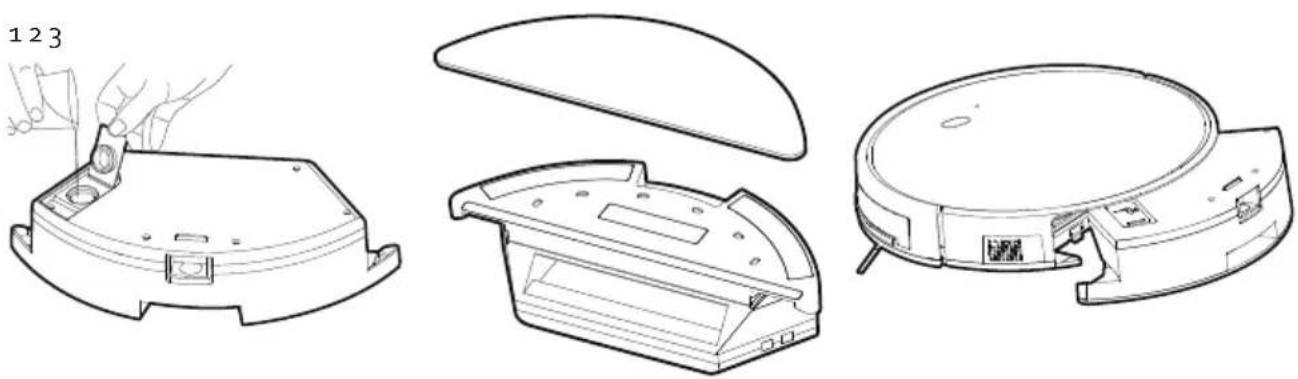
USING THE VACUUM CLEANER WITH WATER TANK AND MOP
You can also have the robot vacuum cleaner mop the floor after vacuuming, thanks to its water tank with mop. The appliance does NOT vacuum and mop at the same time.
Please note: Remove the water tank during charging to prevent any hazardous situations.
- Open the tank's sealing cap and fill the tank with water. Use the sealing cap to close the water tank carefully.
- Attach the mop to the tank.
- Use the release catch to remove the dust collector and replace it with the water tank. You will hear a click when the tank is correctly positioned.
natural_image
Technical line drawings of a device housing and casing, showing front, side, and top views with no visible text or symbols.ANTI-FALL SYSTEM
- The robot vacuum cleaner is equipped with an anti-fall detection. The machine will detect stairs or drops, preventing it from falling.
- Nevertheless, it is recommended that you exercise caution and restricted the vacuum cleaner from the area with stairs.
USE WITH APP
For best performance of the vacuum cleaner, it is best to use the app. Some settings can only be changed in the app, such as voice-activation, water usage in the mop mode, etc. The app is subject to changes.
- Switch on the on/off switch on the appliance to connect the vacuum cleaner to the app.
- Install the "Smart Life" or "Tuya Smart" app with below QR code or search it in the App Store or Google Play. Download and install.

text_image
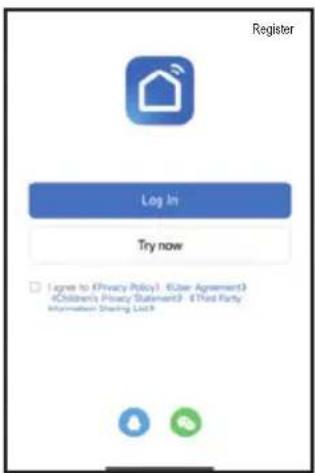
QR code with a blue home icon in the center, likely linking to a digital service or application.- Open the app. If you do not have an account yet, make sure to register and log in. Attention: if you want to use the app with several smartphones to control the appliance, make sure to use the same account. The appliance cannot connect to different accounts.
text_image
Register Log In Try now I agree to Privacy Policy1. ©User Agreement3 ©Children's Privacy Statement3 - ©Post Party Information Sharing List9
text_image
Log In Please enter your account Password I Agree Privacy Policy User Agreement Children's Privacy Statement and Third Party Information Sharing List Forgot Password- You can add the vacuum cleaner manually or search automatically for nearby devices.
- Manual add: after logging in, click the '+' in the top right corner of the start page to add the robot vacuum cleaner. Then on the device options page, select small appliances on the left, and robot vacuum cleaners on the right. Follow the instruction in the app to connect to the appliance.
text_image
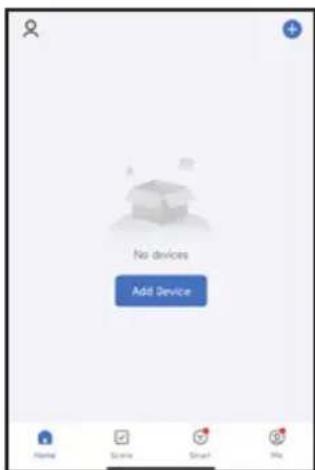
No devices Add Device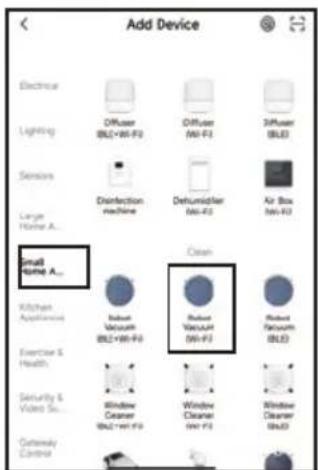
text_image
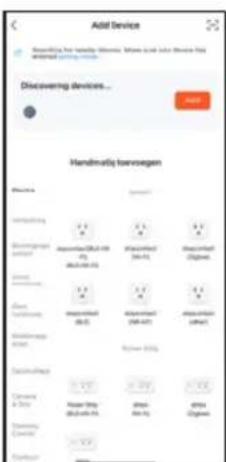
Add Device Electrical Lighting Sensors Large Home A... Small Home A... Kitchen Appliances Exercise & Health Security & Video S... Gateway Control Offuser BLZ+W1-F2 Offuser MI-F1 Diffuser BLZ Distraction machine Defraudier MI-F2 Air Box MI-F2 Clean Robust Vacuum (MI-F1) Robust Vacuum (MI-F2) Robust Vacuum (BLZ)- Automatic search: the appliance searches automatically and connects to the smartphone. The Wi-Fi indicator on the appliance will flash rapidly. After logging in, click the '+' in the top right corner of the start page to add the robot vacuum cleaner. The smartphone will find the robot vacuum cleaner immediately and display it in the app. Click it, so that the appliance and the app are connected.
text_image
Add Device Discovering devices... Handimally toesrogen Device 1 Component 1.0 Description 1.0 Parameter 0.0 (0.0-0.0) Parameter 0.0 (0.0-0.0) Parameter 0.0 (0.0-0.0) Parameter 0.0 (0.0-0.0) Parameter 0.0 (0.0-0.0) Parameter 0.0 (0.0-0.0) Parameter 0.0 (0.0-0.0) Parameter 0.0 (0.0-0.0) Parameter Parameter 1.0 Description 1.0 Parameter 1.0 Parameter 1.0 Parameter 1.0 Parameter 1.0 Parameter 1.0 Parameter 1.0 Parameter 1.0 Parameter 1.0 Parameter 1.0 Parameter 1.0 Parameter 1.0 Parameter 1.0 Parameter 1.0 Parameter 1.0 Parameter 1.0 Parameter 1.0 Parameter 1.5 Parameter 1.5 Parameter 1.5 Parameter 1.5 Parameter 1.5 Parameter 1.5 Parameter 1.5 Parameter 1.5 Parameter 1.5 Parameter 1.5 Parameter 1.5 Parameter 1.5 Parameter 1.5 Parameter 1.5 Parameter 1.5 Parameter 1.5 Parameter 1.5 Parameter 2 Parameter 2 Parameter 2 Parameter 2 Parameter 2 Parameter 2 Parameter 2 Parameter 2 Parameter 2 Parameter 2 Parameter 2 Parameter 2 Parameter 2 Parameter 2 Parameter 2 Parameter 2 Parameter 2 Parameter 2 Parameter 2 Parameter 2 Parameter 2 Parameter 2 Parameter 2 Parameter 2 Parameter 2 Parameter 3 Parameter 3 Parameter 3 Parameter 3 Parameter 3 Parameter 3 Parameter 3 Parameter 3 Parameter 3 Parameter 3 Parameter 3 Parameter 3 Parameter 3 Parameter 3 Parameter 3 Parameter 3 Parameter 3 Parameter 3 Parameter 3 Parameter 3 Parameter 3 Parameter 3 Parameter 3 Parameter 3 Parameter 3 Parameter 4 Parameter 4 Parameter 4 Parameter 4 Parameter 4 Parameter 4 Parameter 4 Parameter 4 Parameter 4 Parameter 4 Parameter 4 Parameter 4 Parameter 4 Parameter 4 Parameter 4 Parameter 4 Parameter 4 Parameter 4 Parameter 4 Parameter 4 Parameter 4 Parameter 4 Parameter 4 Parameter 4 Parameter 4 Parameter 5 Parameter 5 Parameter 5 Parameter 5 Parameter 5 Parameter 5 Parameter 5 Parameter 5 Parameter 5 Parameter 5 Parameter 5 Parameter 5 Parameter 5 Parameter 5 Parameter 5 Parameter 5 Parameter 5 Parameter 5
text_image
Add Device 1 (do not add successfully) XXXXXXD-robot Do not add- If the app displays the page as shown below, it means you can use the app to control the robot vacuum cleaner. Click the appliance to open the app's control interface. In this interface, you can select various cleaning modes or view the cleaning process/status. Click the icon at the top right for more options.
text_image
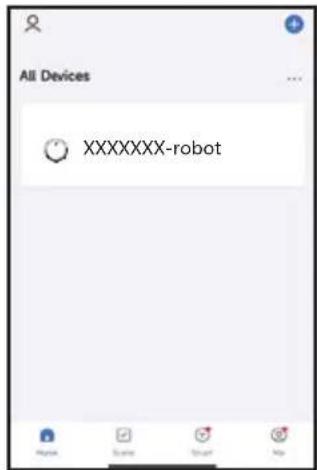
All Devices XXXXXXX-robot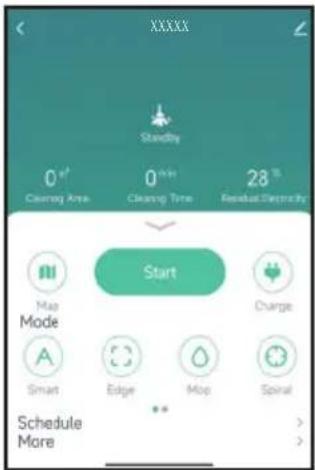
text_image
XXXXX Standby 0° Clearing Area 0° Clearing Time 28% Residual Electricity Start Map Mode Smart Edge Map Spiral Schedule More- This interface can be connected to smart audio systems to perform several operating functions using a single button.
text_image
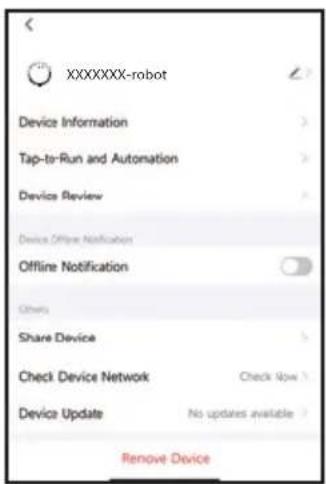
XXXXXXX-robot Device Information Tap-to-Run and Automation Device Review Device Off-line Notification Offline Notification Others Share Device Check Device Network Check Now Device Update No updates available Remove DeviceERROR CODES
The appliance can send error messages via the app, this is usually because the vacuum cleaner is blocked. Remove the object blocking the vacuum cleaner so it can continue to work. If the appliance still does not work, please contact the DOMO after-sales service. If the voice module is activated, it will also announce these error messages.
CLEANING AND MAINTENANCE
CLEANING OUT THE CANISTER AND FILTER
Clean the canister and the filter after each use in the following manner:
-
Press the release catch to remove the dust collector. Remove the canister from the vacuum.
-
Open the canister.
-
Empty the canister into the waste bin.
-
Remove the pre-filter.
-
Remove the dust collector lid, the HEPA filter and the filter sponge.
-
Rinse the canister and filter holder under running water. Let them dry before putting them back in place. Use the dust brush to clean the HEPA filter and the filter sponge.
- If the HEPA filter is dirty, after about 30 days of use, you can also clean it under running water. Let it dry before putting it back in place.
- The HEPA filter must be replaced after frequent use. The maximum service life of the filter is approximately 6 months.
- Place the HEPA filter and filter sponge back in the dust collector lid. Place the pre-filter back in the dust collector. Ensure that all parts are completely dry before placing back into the appliance.
text_image
12-3 4 56CLEANING THE WATER TANK
- Press the release catch to remove the water tank.
- Remove the mop from the tank.
- Wash the mop in warm water with a mild detergent. Allow the mop to dry completely.
- Pour the water from the tank. Rinse the tank using warm water and allow to dry completely.
natural_image
Line drawings of a robotic vacuum cleaner with water spray, showing internal components and a faucet (no text or symbols)CLEANING THE MACHINE
- Clean the side brushes, sensors, charging contacts and the charging station regularly using a soft cloth.
- After numerous uses, the side brushes should be replaced. The maximum duration of the brushes is approximately 12 months. The brushes and the machine are marked with L (left) and R (right); make sure they match.
· Never submerge the machine in water!
· The sensors may not become wet.
natural_image
Technical line drawing of a mechanical assembly with circular components and a hand holding a tool (no text or symbols)CLEAN ROTATING FLOOR BRUSH
Open the cover of the floor brush. Wipe the cover clean with a soft cloth. Remove the rotating floor brush. Remove hairs and other dirt that have wrapped around the floor brush. If you do not clean the floor brush regularly, it will become damaged and your machine will become unusable. Rinse the brush under running water. Let it dry before putting it back in place.
natural_image
Top-down schematic of a mechanical or electronic component with no visible text or symbols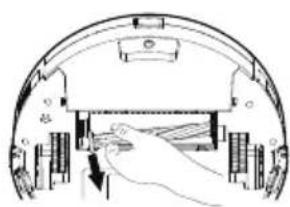
natural_image
Diagram of a mechanical assembly with a hand operating a component, showing internal parts and a downward arrow (no text or symbols)STORAGE
If you do not use the device for a long period of time:
- Remove the batteries from the remote control
· Fully charge the battery, turn off the power switch, and store the device in a dry place
· If the device has not been used for 3 months or more, charge the battery for 5 hours before using.
PROBLEM AND SOLUTION
| PROBLEM SOLUTION | |
| The vacuum cleaner is not charging. · Make sure there is contact between the charging station and the main housing. · Ensure that the on/off switch on the side of the appliance is on at all times, otherwise the appliance will not be able to charge. · Ensure the adapter is plugged into a socket and connected to the charging station, otherwise the vacuum cleaner will not be able to find the charging station. | |
| The vacuum cleaner has got itself stuck. Move the vacuum cleaner so it is no longer stuck. | |
| The vacuum cleaner will return to the charging station without completing its cleaning programme. | The vacuum cleaner's battery is almost empty, allow the appliance to charge. |
| The vacuum cleaner is not carrying out its automated cleaning mode as set. | · Turn the appliance on. · Allow the vacuum cleaner to charge fully first. · Switch the appliance off and thoroughly clean the dust collector as well as the side brushes and the wheels before putting the appliance back to work. |
| PROBLEM SOLUTION | |
| The remote control is not working. · Replace the batteries and place them in the remote control correctly.Ensure the vacuum cleaner is switched on and sufficiently charged.Do not use the remote control near the charging station as it may interfere with the signal.Ensure that there are no obstacles between the vacuum cleaner and the remote control as this may interfere with the signal. | |
| The appliance is not cleaning properly. · Ensure that the room to be cleaned is closed off, do not leave doors open.Ensure that there are no loose wires or other loose objects on the floor. | |
| The app cannot find the appliance. Press and hold the control button for several seconds until the Wi-Fi indicator flashes rapidly.The appliance is now ready to connect. | |
SPECIFICATIONS ADAPTOR
| Published information Value and precision Unit | ||
| Linea 2000 BV-Dompel 9-2200 Herentals-Belgium | - | - |
| Model number DO7296S - | ||
| Supply voltage 100-240 V | ||
| Power frequency 50/60 Hz | ||
| Output voltage | 19 | V |
| Output current | 0,6 | A |
| Output power | 11,4 | W |
| Average active efficiency | > = 85,72 | % |
| Efficiency at low load | - | % |
| Non-loaded energy consumption | < 0,1 | W |
DECLARATION OF CONFORMITY
This product complies with the EU requirements concerning radio interference. Linea 2000 BV hereby declares that this robot vacuum cleaner with mop, product code DO7296S, complies with the provisions of EU Directive 2014/53/EU. The full text of the Declaration of Conformity for the EU is available on the DO7296S product page on the DOMO website: https://www.domo-elektro.be
ENVIRONMENTAL GUIDELINES
text_image
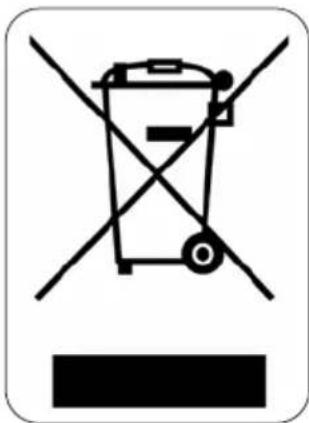
Prohibition sign depicting a trash bin crossed with crossed lines, indicating no waste or discharge.This symbol on the product or on its packaging indicates that this product may not be treated as household waste. Instead it must be brought to the applicable collection point for recycling of electrical and electronic equipment. By ensuring this product is disposed of correctly, you will help prevent potential negative consequences for the environment and human health, which could otherwise be caused by inappropriate waste handling of this product. For more detailed information about recycling of this product, please contact your local city office, your household waste disposal service or the shop where you purchased the product.
natural_image
Recycling symbol icon (three chasing arrows) inside a rounded square frame, no text or labels present.The packaging is recyclable. Please treat the packaging ecologically.
natural_image
Symbol of a trash bin crossed with two diagonal lines, representing no waste or discharge (no text or numbers present)REMOVABLE BATTERY
The appliance is battery-operated, and the battery must not be disposed of with household waste, even after use. You can take the appliance to a collection point for discarded electrical appliances (Recupel) in your neighbourhood (container park, specialist shop, etc.). Batteries contain substances that are dangerous to human health and to the environment. Remove the battery from the appliance before disposal as described in this manual. Recycle the battery in accordance with local laws and regulations. Never pierce the battery or expose it to high temperatures; this may cause the
battery to explode.
Battery leakage may occur under extreme conditions. If the liquid from the battery comes into contact with the skin, immediately wash it off with soap and water or neutralise it with a mild acid such as lemon juice or vinegar. If the liquid comes into contact with the eyes, rinse them abundantly with water for at least 10 minutes and contact a doctor.
GARANTIA
natural_image
Illustration of hands connecting a circular component to an electrical outlet (no text or symbols)OBSERVACIONES
natural_image
Simple line drawing of a maze with a circular button at the end (no text or symbols)natural_image
Simple spiral diagram with an arrow indicating direction (no text or symbols)natural_image
Simple geometric diagram with a square and a circle, no text or symbols present.natural_image
Line drawing of a mechanical component with a hand holding a clip, no text or symbols present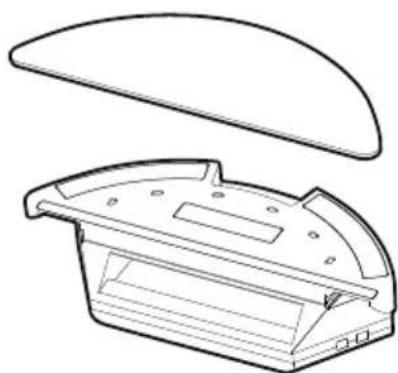
natural_image
Technical line drawing of a mechanical component with a curved top and internal structure (no text or symbols)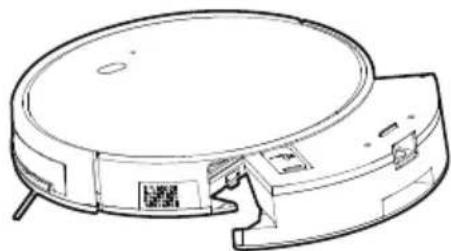
natural_image
Line drawing of a circular robotic vacuum cleaner with visible internal components and a QR code on the cover (no text or symbols)SISTEMA ANTICAÍDA
text_image
QR code with a blue home icon in the center, likely linking to a digital service or application.text_image
Register Log In Try now I agree to Privacy Policy1 - User Agreement3 iChildren's Privacy Statement3 - Third Party Information Sharing List
text_image
Log In Please enter your account Password I AgreePrivacy Policy User Agreement Under the Privacy Statement and Third Party Information Sharing List Forgot Passwordtext_image
No devices Add Device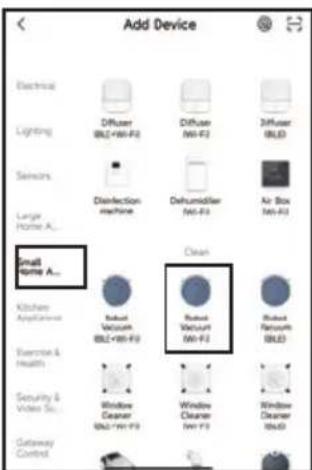
text_image
Add Device Electrical Lighting Diffuser BLZ+8W-F2 Diffuser MW-F2 Diffuser BLCD Sensors Disinfection machine Dehumidifier MW-F3 Air Box 100-50 Large Home A... Small Home A... Kitchen Appliance Robust Vacuum BLZ+8W-F3 Robust Vacuum MW-F2 Robust Vacuum BLCD Exercise & Health Security & Video S... Window Cleaner BLZ+8W-F3 Window Cleaner MW-F3 Window Cleaner BLCD Gateway Controltext_image
XXXXXXX-robot Device Information Tap-to-Run and Automation Device Review Device Offline Notification Offline Notification Others Share Device Check Device Network Check Now ? Device Update No updates available Remove DeviceCÓDIGOS DE ERROR
natural_image
Line drawings of various household appliances including a vacuum cleaner, water dispenser, and kitchen sink (no text or symbols)LIMPIEZA DEL APARATO
text_image
Technical diagram showing a mechanical device with labeled components L and R, alongside a hand holding a tool.LIMPIAR EL CEPILLO GIRATORIO
natural_image
Diagram showing two views of a device interior with internal components and directional arrows (no text or symbols)GUARDAR
text_image
Prohibition sign with a trash bin crossed out by two crossed lines, indicating no waste or discharge.natural_image
Recycling symbol icon with three chasing arrows forming a triangle (no text or labels)natural_image
Symbol of a trash bin crossed with two crossed lines, no text or numbers presentBATERÍA EXTRAÍBLE
natural_image
Illustration of hands connecting a circular device to a power outlet cable (no text or symbols)NOTE
MODALITÀ STANDBY/RIPOSO/OFF
Standby
natural_image
Simple line drawing of a maze-like shape with a circular button at the end (no text or symbols)natural_image
Simple spiral diagram with an arrow indicating direction (no text or symbols)natural_image
Simple geometric diagram with a square and a circle, no text or symbols present.natural_image
Technical line drawings of a device's internal components, including a lid, casing, and base plate (no text or symbols)SISTEMA ANTI-CADUTA
text_image
QR code with a blue home icon in the center, likely linking to a digital service or application.text_image
Register Log In Try now I agree to EPrivacy Policy1. EUser Agreement3 Children's Privacy Statement4. EYoud Party Information During List
text_image
Register Log In Please enter your account. Password 1 Agree Privacy Policy User Agreed Ustatement's Privacy Statement and Third Party Information Sharing List Forgot Passwordtext_image
No devices Add Device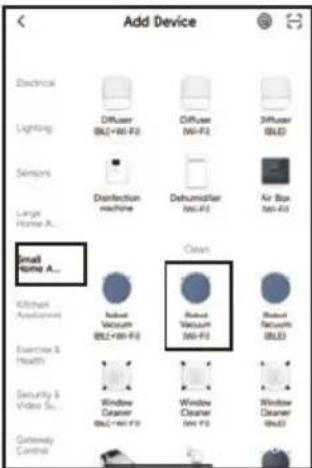
text_image
Add Device Electrical Lighting Diffuser BLZ+Wi-Fi Diffuser Wi-Fi Diffuser BLBD Sensors Disinfection machine Dehumidifier Net-Fi Air Bus Net-43 Large Home A... Small Home A... Kitchen Appliance Robot Vacuum BLZ+Wi-Fi Robot Vacuum Wi-Fi Robot Facuum BLBD Exercise & Health Window Cleaner BLZ+Wi-Fi Window Cleaner Net-Fi Security & Video S... Gateway Controltext_image
Add Device Searching for handcount devices. Table size: your device has added to existing devices. Discovering devices... Add Handcountly robotogen Add Device 1.00000000000000000000000000000000000000000000000000000000000000000000000000000000000 Add Device XXXXXXXEX-robot Add Device 1.000000000000000000 Add Devices Downloadtext_image
XXXXXXX-robot Device Information Tap-to-Run and Automation Device Review Device Offline Notification Offline Notification Others Share Device Check Device Network Check Now > Device Update No updates available > Remove DeviceCODICI DI ERRORE
natural_image
Line drawings of a robotic vacuum cleaner with water spray, showing internal components and part outline (no text or symbols)natural_image
Diagram of a mechanical device with labeled parts and a hand holding a tool, no readable text or symbols present.PULIZIA SPAZZOLA ROTANTE PER PAVIMENTI
natural_image
Diagram showing two views of a device's internal structure with arrows indicating movement or force (no text or symbols present)RIPORRE
text_image
Prohibition sign depicting a trash bin crossed with no signage, indicating no waste or discharge.natural_image
Recycling symbol icon (three chasing arrows) inside a rounded square frame, no text or labels present.natural_image
Symbol of a trash bin crossed with two diagonal lines, representing no waste or discharge (no text or numbers present)BATTERIA RIMOVIBILE
natural_image
Hand holding a circular device connected to a power outlet cable (no text or symbols visible)POZNÁMKA:
natural_image
Simple line drawing of a maze with a circular button at the end (no text or symbols)natural_image
Simple spiral diagram with an arrow indicating direction (no text or symbols)natural_image
Simple geometric diagram with a square and a circle, no text or symbols present.natural_image
Line drawing of a hand inserting a small component into a mechanical housing (no text or symbols)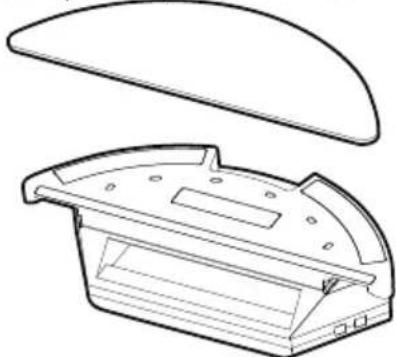
natural_image
Technical line drawing of a mechanical housing or enclosure with top and side views (no text or symbols)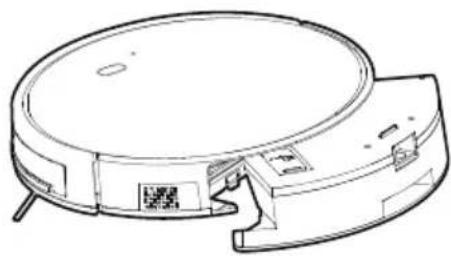
natural_image
Line drawing of a circular robotic device with a QR code and mounting bracket (no text or symbols)SYSTÉM PROTI PŘEPADU
text_image
QR code with a blue home icon in the center, likely linking to a digital service or app.text_image
Register Log In Try now I agree to Privacy Policy1 - Elar Agreement3 iChildren's Privacy Statement3 - EThd Party Information Sharing List3
text_image
Log In Please enter your account. Password □ 1 AgreePrivacy Policy User Agreement Children's Privacy Statement and Third Party Information Sharing List Forgot Passwordtext_image
No devices Add Device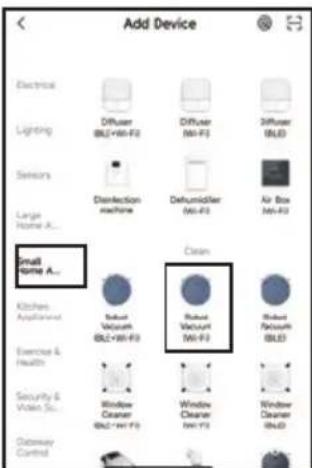
text_image
Add Device Electrical Lighting Sensors Large Home A... Kitchen Appliances Exercise & Health Security & Video Sci. Gateway Control Diffuser BLZ+MI-F3 Diffuser MI-F3 Diffuser BLE Distinction Machine Defhumidifier (MI-F3) Air Box (MI-F3) Close Sub Nut Vacuum BLZ+MI-F3 Robust Vacuum MI-F3 Robust Vacuum BLEtext_image
Add Device Recognizing for newly existing software. Make new plus device that is available using icons. Discovering devices... Add Handmailig boerogen Add Device 1. (without) added bootups XXXXXXDX-robout Change Divisions Change Change Change Change Change Add Devicestext_image
XXXXXXX-robot Device Information Tap-to-Run and Automation Device Review Device Offline Notification Offline Notification Others Share Device Check Device Network Check Now Device Update No updates available Remove DeviceCHYBOVÉ HLÁŠENÍ
natural_image
Line drawings of a robotic vacuum cleaner with water spray, showing internal components and part outline (no text or symbols)ČIŠTĚNÍ VYSAVAČE
natural_image
Technical line drawing of a mechanical assembly with circular components and a hand holding a tool (no text or symbols)ČIŠTĚNÍ ROTAČNÍHO KARTÁČE
natural_image
Diagram showing two views of a device's internal structure, with arrows indicating movement or force (no text or symbols present)USKLADNĚNÍ
OHLED NA ŽÍVOTNÍ PROSTŘEDÍ
natural_image
Symbol of a trash bin crossed with diagonal lines, no text or numbers presentnatural_image
Recycling symbol icon with three chasing arrows forming a triangle (no text or labels)natural_image
Symbol of a trash bin crossed with two diagonal lines, representing no waste or discharge (no text or numbers present)VYJÍMATELNÉ/VYMĚNITELNÉ BATERIE
text_image
1 2 3 4 D-I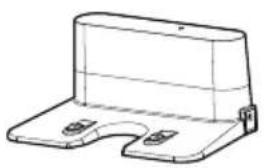
natural_image
Technical line drawing of a mechanical bracket or support structure (no text or symbols)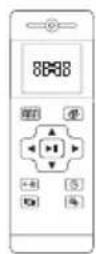
natural_image
Simple line drawing of a connected electrical plug or cable (no text or symbols)

natural_image
Two identical mechanical bracket diagrams with no text or symbols
natural_image
Simple line drawing of a rectangular block with textured top surface (no text or symbols)
ZARIADENIE
Horná časť
natural_image
Line drawing of hands connecting a circular device to a wall-mounted electrical outlet (no text or symbols)POZNÁMKA:
natural_image
Simple line drawing of a maze-like shape with a circular marker at the end (no text or symbols)natural_image
Simple spiral diagram with an arrow indicating direction (no text or symbols)- Režim upratovania pozdlž stien: trasa vysávania bude plánovaná najmä pozdlž stien a do rohov.
natural_image
Simple geometric diagram with a square and a circle, no text or symbols present.natural_image
Technical line drawings of a robotic vacuum cleaner's internal components, showing exploded view and assembled views (no text or symbols)SYSTÉM PROTI PREPADU
text_image
QR code with a blue house icon in the center, likely linking to a digital service or application.text_image
Register Log In Try now I agree to Privacy Policy 1. User Agreement Children's Privacy Statement 2. Third Party Information Sharing List Log In Please enter your account Password I AgreePrivacy.Policy User Agreement Children's Privacy Statement and Third Party Information Sharing List Forgot Passwordtext_image
Add Device Recovery, Get user access, Make sure key device that is added using devices... Discovering devices... Add Handcounting Inverter Hardware 1.0 2.0 3.0 4.0 5.0 6.0 7.0 8.0 9.0 10.0 11.0 12.0 13.0 14.0 15.0 16.0 17.0 18.0 19.0 20.0 21.0 22.0 23.0 24.0 25.0 26.0 27.0 28.0 29.0 30.0 31.0 32.0 33.0 34.0 35.0 36.0 37.0 38.0 39.0 40.0 41.0 42.0 43.0 44.0 45.0 46.0 47.0 48.0 49.0 50.0 51.0 52.0 53.0 54.0 55.0 56.0 57.0 58.0 59.0 60.0 61.0 62.0 63.0 64.0 65.0 66.0 67.0 68.0 69.0 70.0 71.0 72.0 73.0 74.0 75.0 76.0 77.0 78.0 79.0 80.0 81.0 82.0 83.0 84.0 85.0 86.0 87.0 88.0 89.0 90.0 91.0 92.0 93.0 94.0 95.0 96.0 97.0 98.0 99.0 100.0text_image
XXXXXXX-robot Device Information Tap-to-Run and Automation Device Review Device Offline Notification Offline Notification Other Share Device Check Device Network Check Now Device Update No updates available > Remove DeviceCHYBOVÉ HLÁSENIE
natural_image
Line drawings of various household appliances including a vacuum cleaner, water dispenser, and washing machine (no text or symbols)ČISTENIE VYSÁVAČA
text_image
Technical diagram of a mechanical or electrical component with labeled parts L, B, and R, showing internal structure and connections.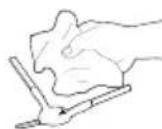
ČISTENIE ROTAČNEJ KEFY
text_image
Diagram of a device rear view with labeled components and directional arrows indicating movement or flow.