HF 9501 DUO BLACK - Deep fryer STEBA - Free user manual and instructions
Find the device manual for free HF 9501 DUO BLACK STEBA in PDF.


User questions about HF 9501 DUO BLACK STEBA
0 question about this device. Answer the ones you know or ask your own.
Ask a new question about this device
Download the instructions for your Deep fryer in PDF format for free! Find your manual HF 9501 DUO BLACK - STEBA and take your electronic device back in hand. On this page are published all the documents necessary for the use of your device. HF 9501 DUO BLACK by STEBA.
USER MANUAL HF 9501 DUO BLACK STEBA
text_image
MATCH 23:00 45:00 SYNC ① Steba®50/60 Hz; 220 - 240 V\~; 2.400 W
Heißluftfritteuse
HF 9501 DUO BLACK
Instructions for use 14
Mode d'emploi 26
text_image
Technical diagram of a multi-compartment container with labeled parts and directional arrows indicating movement or assembly.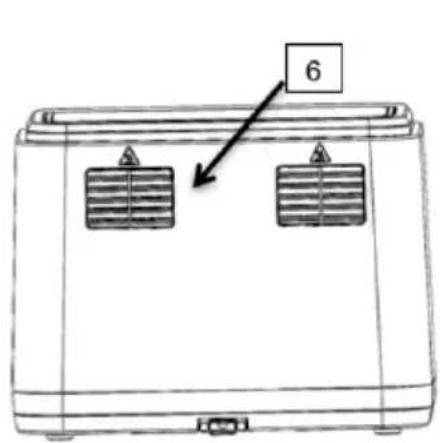
text_image
6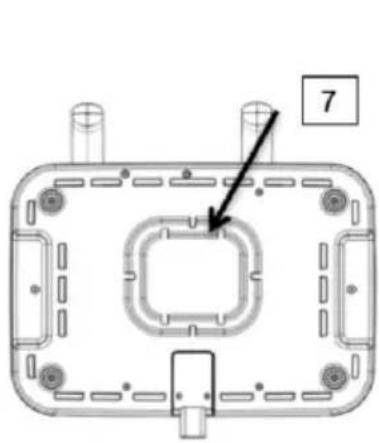
natural_image
Technical diagram of a mechanical component with mounting holes and a central square feature, no text or symbols present.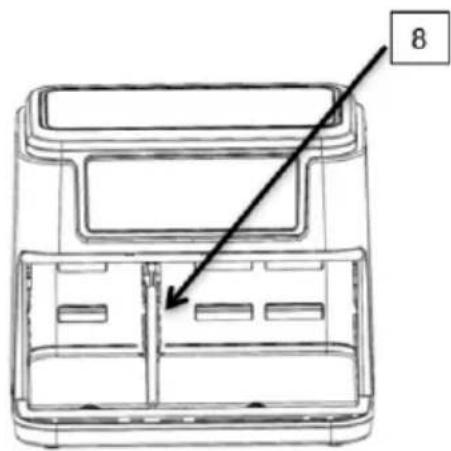
text_image
8This appliance is for private and indoor use only and must not be used commercially. Please read the instruction manual carefully and keep it at a safe place. When the appliance is given to another person the instruction manual should be passed to that person, too. Only use the appliance as described in the instruction manual and pay attention to the safety information. No liability for damages or accidents will be accepted, which are caused by not paying attention to the instruction manual. Remove all packaging and sticker (except the rating label). Wash up all parts carefully (see cleaning).
Safety information

Hot surface! There is danger of burning when touching the surface during operation. Set the back of the device with a distance of 10cm to the kitchen wall.
- Connect and operate the appliance in accordance with the specifications shown on the rating label.
- Do not use if the plug cord is damaged. Verify before every use.
- Do not plug with wet hands.
- Connect the power plug to a properly installed and easily accessible socket only.
- To unplug the power plug, always pull the plug – not the cable.
- Plug off the appliance after each use or in case of failure.
- Do not pull at the cord. Don't pull it over edges and don't bend it too much.
- Keep the cord away from hot parts.
The appliance can be used by children aged 8 and above and persons with limited physical, sensory or mental capabilities or lack of experience/knowledge, provided that are supervised or have been provided with instruction in the safe use of the appliance and have understood the resulting dangers. Children must not use the packaging as a toy. Cleaning and user
maintenance must not be carried out by children unless they are 8 years or older and are supervised.
- Children under the age of 8 must be kept away from the appliance and the connecting cable.
- Children should be supervised to ensure that they do not play with the appliance or packaging material (e.g. Plastic Bags).
- The appliance must not be operated using a timer or a separate remote system!
- Never leave the appliance unattended when in use.
- Do not leave the appliance outdoors or in a damp area.
Never place anything on top of the device and do not cover the ventilation slots.
- Never immerse the unit in water.
- Leave a space of about 10cm around the device.
- Never use the device after a malfunction, e.g. if it felt down or has been damaged in any other manner.
- The manufacturer is not liable for damage which is occurring due to the usage of the appliance in a different way as described or a mistake in the handling has been made.
- To prevent injury, repairs such as replacing a damaged cord, should only be carried out by a customer service. Only original spare parts have to be used.
- The device gets hot, only transport after it cooled down.
• Only use the device as described in this manual.
This appliance is not a normal deep fryer. Do not put any oil or fat into the pot. Danger of burns!
- You must not put any materials such as paper, cardboard, plastic etc. into the appliance.
- This appliance is intended to be used in household and similar applications such as:
o staff kitchen areas in shops, offices and others working environments
o by clients in hotels, motels and other residential type environments
o bed and breakfast type environments.
- Before initial use: clean all parts – except the heating elements - carefully and leave to dry. Heat up the device for about 15 min. to eliminate the smell of newness.
• Attention! Housing and glass get hot. Danger of

burns! Do not place the appliance on a sensitive surface (e.g. painted furniture) and keep a distance of at least 70cm to burnable materials.
- During operation steam emerge. Keep hands and face away. Watch out for steam during cooking and when you pull out the pot. Take appropriate distance to wall cupboards to avoid damage of the veneer.
- If an extension cable is used, it has to have a cross-section of 1,5mm^2 . A cable drum must always be unwound.
- If a GS-tested 16 A multi-pin extension is used, it may not be charged with more than 3680 watts due to fire hazard.
- Make sure that children do not tease the cable or that a trip hazard occurs.
- The device must always be disconnected from the power supply if it is not supervised and before assembling, disassembling or cleaning.
Hot steam may leave the louvers. Never place any wet food into the device, thaw frozen food slightly.
Hygiene: Please always clean the device to avoid bacteria and mould formation.
Cleaning
Attention! Pull the plug before cleaning and allow the device to cool down.
- Never immerse the unit into water.
- The pot and tray can be cleaned in warm water with usual dish-washing detergents. Do not use aggressive or abrasive cleaning agents or steel sponges.
- Clean the interior with water and dishwashing detergent, if necessary, use oven cleaner. If the heating element is soiled, turn the device upside down in order to clean the heating elements with a brush.
- Clean the display and the housing with a damp cloth.
- Place the pot in the device and leave to dry for 5 minutes at 80^ C .
Workplace
Important:
Never place this device on or next to hot surfaces (e.g. hot stoves). Only use it on a even, stable and a heat resisting surface. It is important that no inflammable items are near to the device. Do not place the device on the edge of the table so that it cannot be touched by children or fall down when touched.
Getting started
text_image
1 4 9 1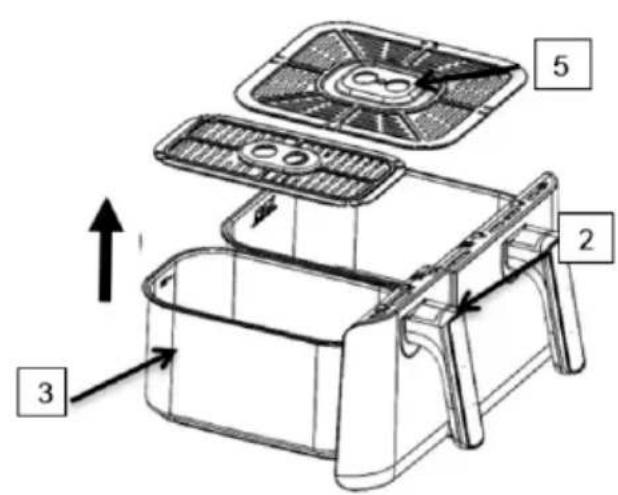
text_image
Technical diagram of a multi-compartment appliance with labeled parts and directional arrows indicating movement or assembly.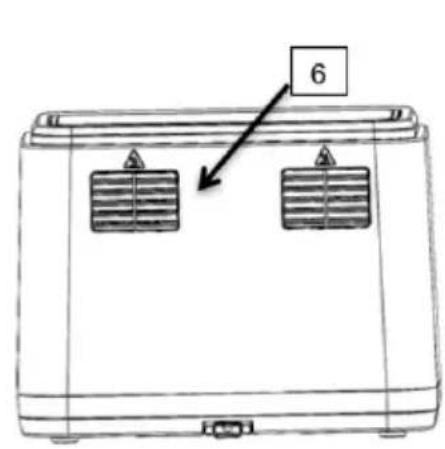
text_image
6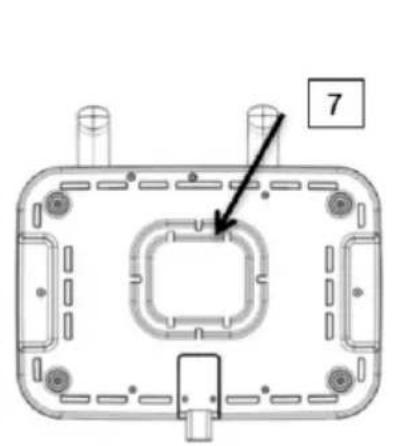
natural_image
Technical diagram of a mechanical component with mounting holes and a central square feature, labeled with number 7 (no text or symbols beyond label)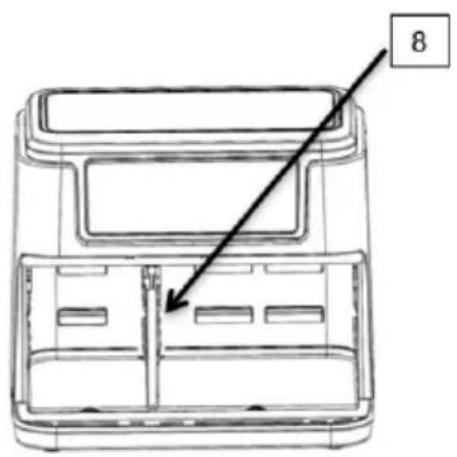
text_image
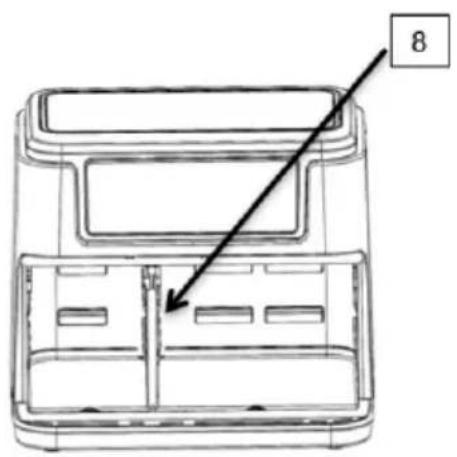
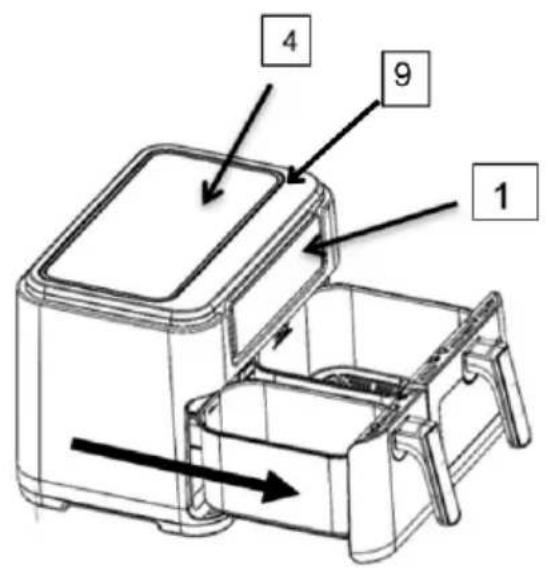
81) Control panel
2) Handles
3) Frying baskets 3.5 l & 6 l
4) Housing
5) Insert trays
6) Air outlet
7) Cable storage
8) Insulating wall
9) Air intake
text_image
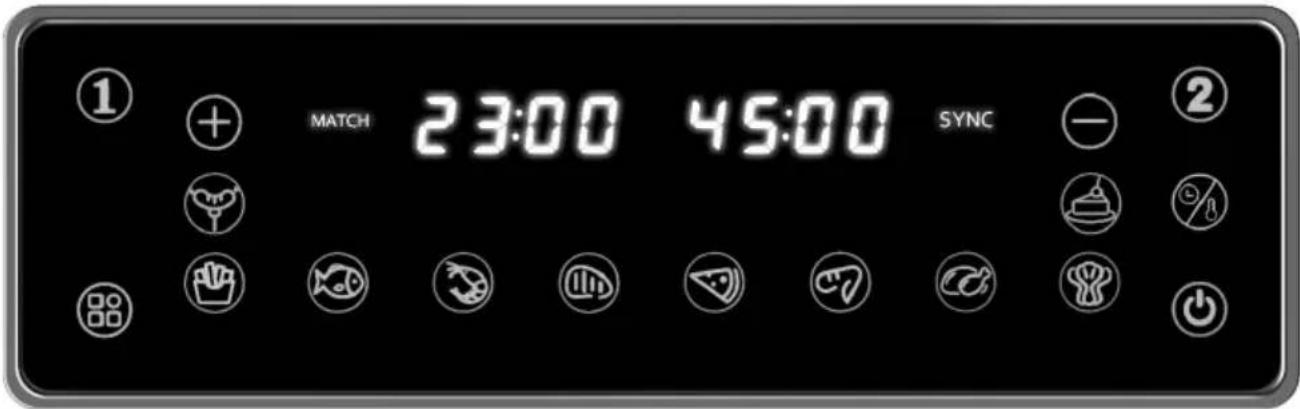
MATCH 23:00 45:00 SYNC ① ②
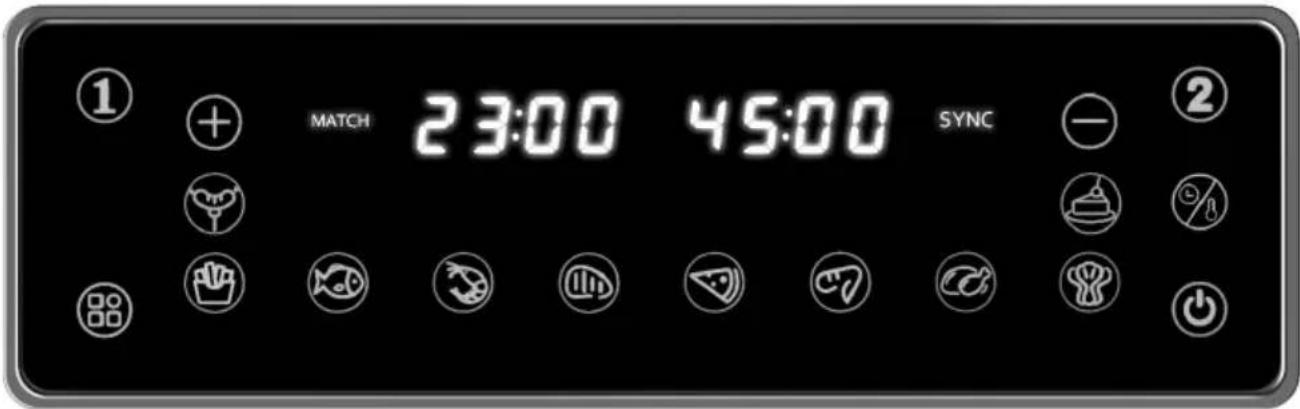
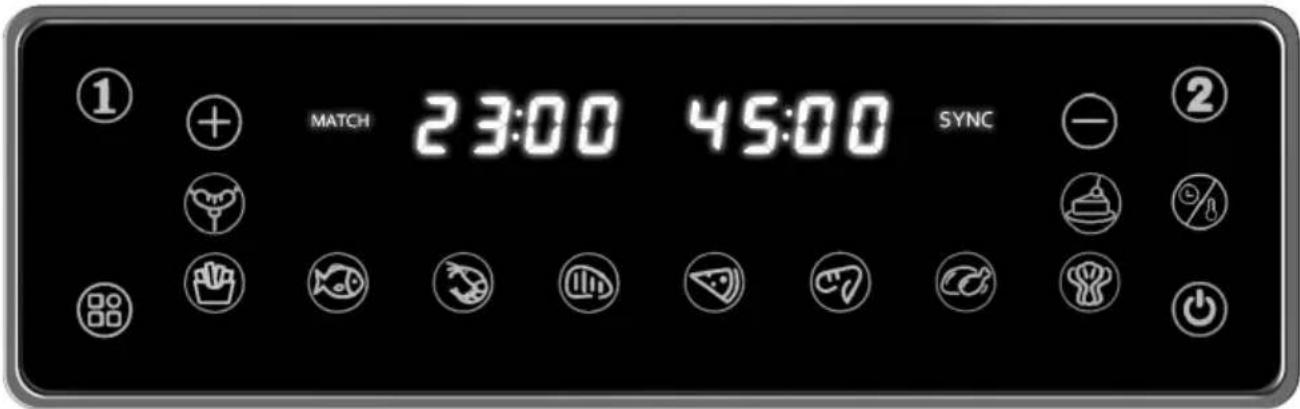
Start/Stop button

Basket 3.5 I left

Basket 6 I right

Program selection

Temperature/time selection
SYNC Synchronization of the end of cooking time of the two baking chambers
MATCH Same function in both baking chambers
Basic programs
| Symbol | Meaning Temperature in °C | Time in Min | Info |
 | French Fries | 180 | 23 Drizzle with a little oil, shaking halfway through |
 | Fish | 200 | 18 Drizzle with a little oil, turning halfway through |
 | Shrimp | 200 | 14 Drizzle with a little oil, shaking halfway through |
 | Steak | 180 | 15 Drizzle with a little oil, turning halfway through |
 | Pizza 200 17 | ||
 | Chicken Nuggets | 180 23 Drizzle with a little oil, shaking halfway through | |
 | Whole Chicken Chicken leg | 200 45 | |
 | Vegetable | 160 | 8 Drizzle with a little oil, turning halfway through |
 | Sausage | 180 | 23 Drizzle with a little oil, turning halfway through |
 | Cake | 170 | 15 |
Preset programs are guidelines and depend on your own taste, quantity, type and quality of food.
- Use the device similarly to an oven for grilling, baking or reheating food.

Never operate the device without the insert trays.
- Connect the device. A signal sounds and all symbols light up in the display. The device is in standby mode.
- Put the food in the basket(s). Make sure that the MAX mark is not exceeded. Leave enough space to turn or shake food. Slide the pots into the device.
- Press the start/stop button, ① and ② light up in the display. Now select the basket in which the food is located, e.g. ②
- ② flashes in the display and the basic values 180^ C and 15:00. You can use the button to select a basic program.
- The symbol - - - - indicates that the other basket is not in use.
- Start the device with the start/stop button, the interior lighting only lights up in the basket ②.
• The display switches between cooking time and temperature.
- If the basket is pulled out briefly during the cooking time, the program is stopped and continues as soon as the basket is pushed back in.
- To cancel a program, press the start/stop button.
- When the program has expired, a signal sounds and OFF lights up in the display. The cooling fan continues to run for approx. 3 minutes.
- Unplug the power cord after each use.
MATCH
- To start both baskets with the same values for temperature and time.
- Press the start/stop button and select the basket ① or ②
- For example,② flashes in the display, the basic values 180°C and 15:00 are shown as well as MATCH.
- If you want to change the basic values, press the button Ⓞ. Now choose the time between 1 – 60 minutes. By pressing the button again, select the temperature between 60 – 200°C.
- OR you press the button to select a basic program 1 to 10. To do this, press the button repeatedly until the desired program flashes.
- Press the buttonMATCH and start the program with the start/stop button.
- The selected program starts in both baskets at the same temperature and the same time.
SYNC
For the simultaneous end of the program for different foods with different cooking times and temperatures.
- Press the start/stop button and select the basket①.
- For example,① flashes in the display, the basic values 180°C and 15:00 are shown as well as MATCH.
- If you want to change the basic values, press the button ⚠️. Now choose the time between 1 – 60 minutes. By pressing the button again, select the temperature between 60 – 200°C.
- OR you press the button to select a basic program 1 to 10. To do this, press the button repeatedly until the desired program flashes.
- Now select the basket.
- For example,② flashes in the display, the basic values 180°C and 15:00 are shown as well as MATCH and SYNC
- If you want to change the basic values, press the button ⚡️. Now choose the time between 1 – 60 minutes. By pressing the button again, select the temperature between 60 – 200°C.
- OR you press the button to select a basic program 1 to 10. To do this, press the button repeatedly until the desired program flashes.
- Press the buttonSYNC and start the device with the start/stop button.
- HOLD lights up in the display for the basket with the shorter cooking time. As soon as the remaining cooking times are identical, both baskets work synchronously. If basket 1 or 2 is pulled out while the program is running, the cooking time will be extended accordingly.
Attention
- Basic programs cannot be changed.
- The running program can be switched off during operation. To do this, hold down the start/stop button for 3 seconds. The set values are then deleted.
Tips
- Ready meals that are prepared in the oven can also be cooked in this device to save energy.
- The device is suitable for roasting whole fresh chickens up to 1200g.
- Smaller quantities generally require shorter cooking times.
• The colder a food, the longer the cooking time.
• After half the cooking time, shake smaller foods vigorously and turn larger ones. - Brush breaded foods or fries with a little oil to make them crispier.
- Do not prepare high-fat foods (e.g. sausages) at temperatures that are too high.
Trouble shooting
| Problem Reason Suggestion | ||
| Device does not work | · It is not connected | · Plug in the device |
| · The timer is not set | · Set the timer to the desired time | |
| The food is not cooked | · Too little temperature· Too little time· Too much food | · Increase temperature and time and use less food |
| The food is cooked uneven | · Turn the food into the basket after half of the time | |
| The snacks are not crispy | · You may used food which is suitable for deep frying | · Use snacks suitable for ovens or put some oil to the food |
| The pot cannot be placed into the device | · Too much food in the basket· The basket is not placed correctly into the pot· The basket is jammed into the pot | · Place the basket correctly into the pot |
| The device smol-ders | · You may used oily food | · Wipe out the pot or dab off the food |
| Fresh fries are not crispy | · The crispness depends on how much water or oil is on the fries | · Dry the fries before adding some oil· Cut the fries a little thinner· Not enough oil |
Correct Disposal of this product
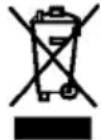
This marking indicates that this product should not be disposed with other household wastes throughout the EU. To prevent possible harm to the environment or human health from uncontrolled waste disposal, recycle it responsibly to promote the sustainable reuse of material resources. To return your used device, please use the return and collection systems or contact the retailer where the product was purchased. They can take this product for environmental safe recycling.
Packaging disposal: Do not throw away the package materials. Please put it in the recycling bin.



Gift box: Paper, should be put to the old paper collection point. Plastic packaging material and foils should be collected in the special collection containers.
Service and Repair:
If the appliance must be repaired, please get in touch with your trader or with the manufacturer:
text_image
Technical diagram of a multi-compartment appliance with labeled parts and directional arrows indicating assembly or movement.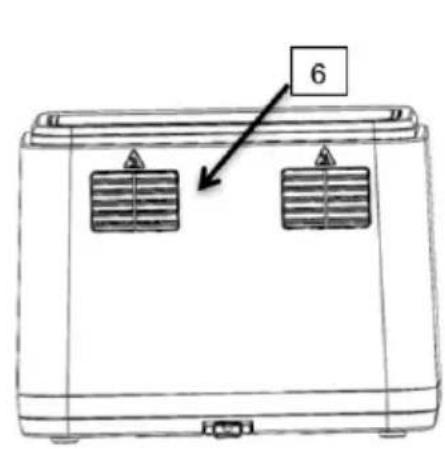
text_image
6
natural_image
Technical diagram of a mechanical component with mounting holes and a central square feature, labeled with number 7 (no text or symbols beyond label)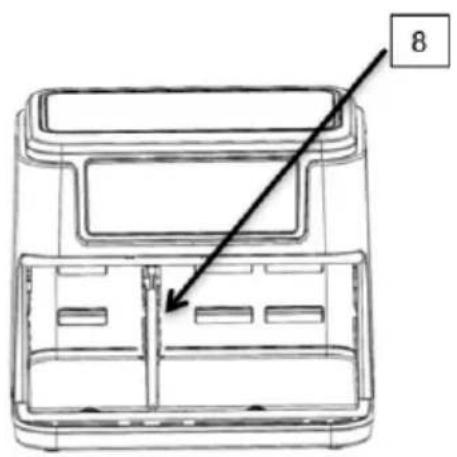
text_image
8text_image
Technical diagram of a multi-compartment container with labeled parts and directional arrows indicating movement or assembly.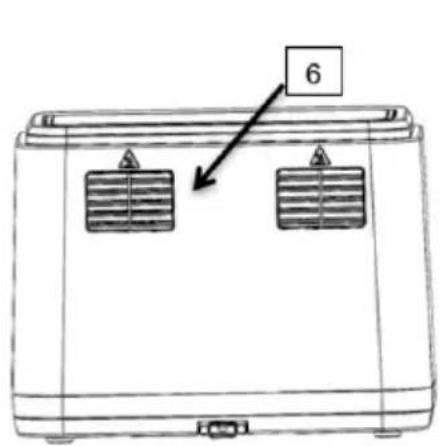
text_image
6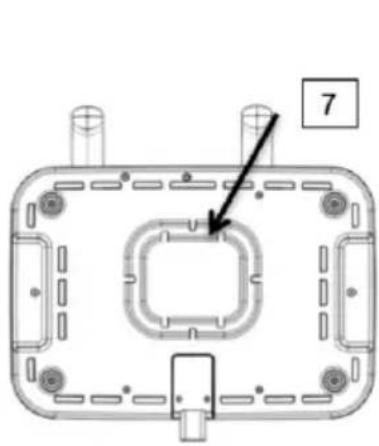
natural_image
Technical diagram of a mechanical component with mounting holes and a central square feature, no text or symbols present.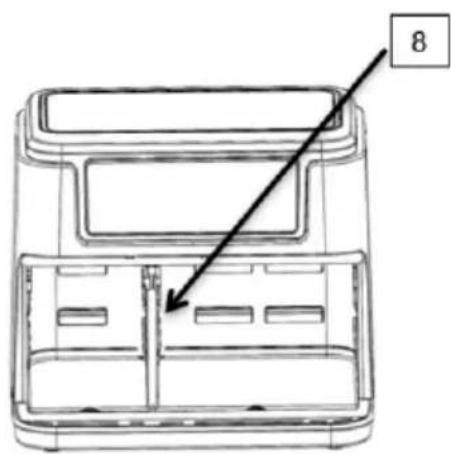
text_image
8text_image
Technical diagram of a multi-compartment container with labeled parts and directional arrows indicating movement or assembly.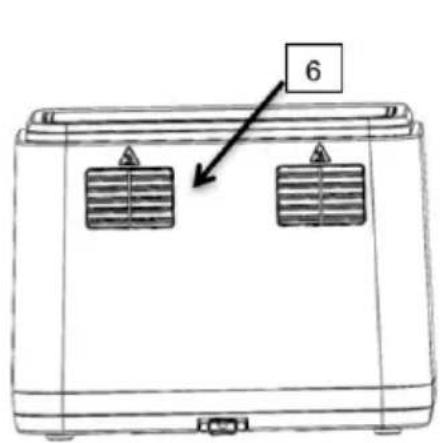
text_image
6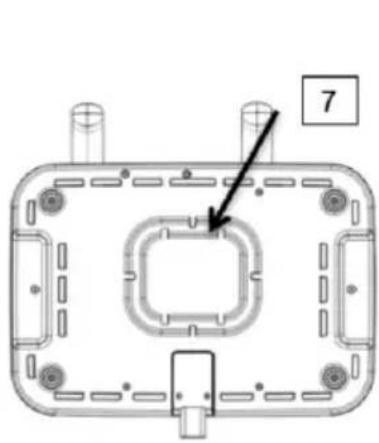
natural_image
Technical diagram of a mechanical component with mounting holes and a central square feature, no text or symbols present.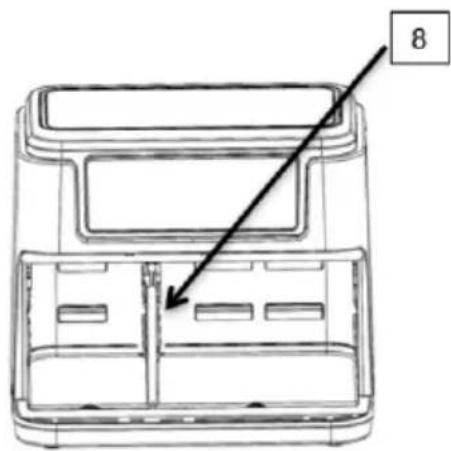
text_image
81) Betjeningspanel
2) Håndtag
3) Kurv 3,51 & 61
4) Apparat
5) Riste
6) Udluftning
7) Kabelopvikling
8) Isolering
9) Luftindtag
text_image
MATCH 23:00 45:00 SYNC ① ②
Start/Stop knap

Kurv 3,5 l venstre

Kurv 6 l højre

Programvælger

Temperatur/timer
text_image
Technical diagram of a multi-compartment container with labeled parts and directional arrows indicating movement or assembly.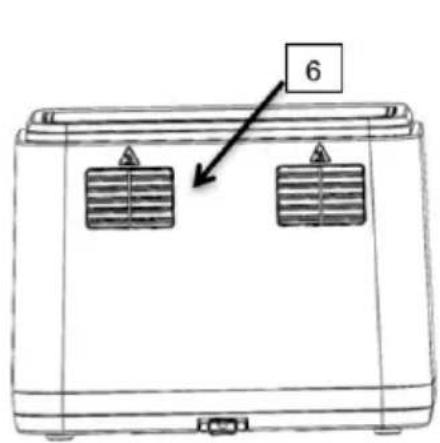
text_image
6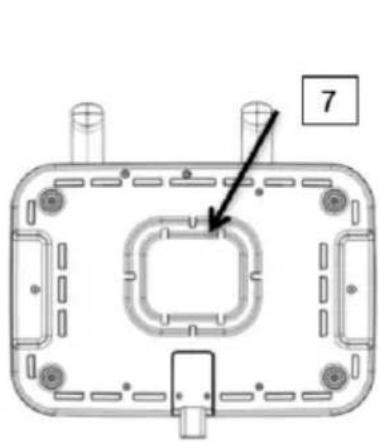
natural_image
Technical diagram of a mechanical component with mounting holes and a central square feature, no text or symbols present.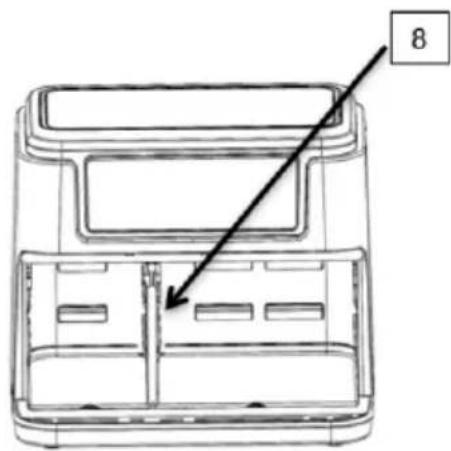
text_image
81) Kontrollpanel
2) Handtag
3) Fritöskorgar 3,5 | & 6 |
4) Varmluftsfritös
5) Avtagbart galler
6) Utblås
7) Sladdförvaring
8) Isolerande innervägg
9) Luftintag
text_image
MATCH 23:00 45:00 SYNC ① ②
ON/OFF knapp

text_image
Technical diagram of a multi-compartment container with labeled parts and directional arrows indicating movement or assembly.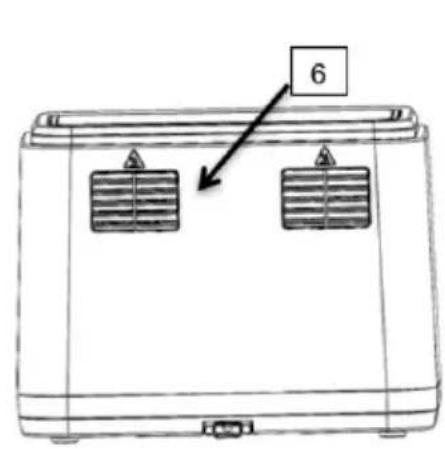
text_image
6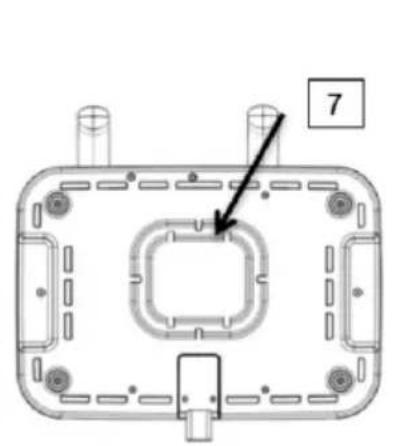
natural_image
Technical diagram of a mechanical component with mounting holes and a central square feature, labeled with number 7 (no text or symbols beyond label)