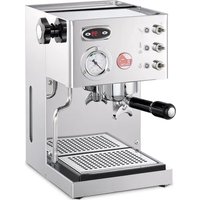
Casa Bar Pid - Coffee machine LA PAVONI - Free user manual and instructions
Find the device manual for free Casa Bar Pid LA PAVONI in PDF.


| Product type | Pump espresso coffee machine |
| Brand | La Pavoni |
| Model | Casa Bar Pid (LPSCSR02) |
| Intended use | Domestic |
| Coffee type | Ground coffee |
| Water tank | Removable, with lid |
| Cup warmer | Passive, located on top |
| Pressure gauge | Yes, indicates boiler pressure |
| Temperature control | Adjustable PID termopid (80°C - 120°C, default 92°C) |
| Portafilter | Two types: standard and Fascino, with 1 and 2 cup filters |
| Tamper | Included, for tamping coffee |
| Dosing scoop | Included, for measuring ground coffee |
| Functions | Espresso, steam, hot water |
| Steam wand | Rotating steam wand for frothing milk |
| Drip tray | Removable for cleaning |
| Safety | Do not immerse, unplug before cleaning, supervise children |
| Cleaning | Soak filters and portafilters, clean steam wand after use |
| Spare parts available | Filters, gaskets, portafilters, shower screen |
| Power supply | Check voltage on nameplate (usually 220-240 V) |
| Recommended ambient temperature | Between 5°C and 35°C |
Frequently Asked Questions - Casa Bar Pid LA PAVONI
User questions about Casa Bar Pid LA PAVONI
0 question about this device. Answer the ones you know or ask your own.
Ask a new question about this device
Download the instructions for your Coffee machine in PDF format for free! Find your manual Casa Bar Pid - LA PAVONI and take your electronic device back in hand. On this page are published all the documents necessary for the use of your device. Casa Bar Pid by LA PAVONI.
USER MANUAL Casa Bar Pid LA PAVONI
natural_image
Exterior view of a modern espresso machine with control panel and gauges (no visible text or symbols)
- nei bed and breakfast.
3. DESCRIZIONE
PROBLEMA CAUSA SOLUZIONE
Instructions for use of models
CASABAR PID
Dear Customer,
Thank you for having purchased one of our products, which has been manufactured using the latest technological innovations. By carefully following some simple instructions regarding the correct use of our product in compliance with the essential safety instructions indicated in this manual, you will be able to obtain the best performance and enjoy the remarkable reliability of this product over the years. In case of faults, please contact one of our Service Centres that are at your disposal from now on.
SYMBOLS USED IN THIS MANUAL
Important information is indicated by these symbols. It is imperative that you comply with these instructions.

Please read the instructions manual carefully before using the appliance.

Caution! Particularly important and / or dangerous operations.

Information (useful for using the appliance).

Advice.

Operations that can be carried out by the user.

Operations that should only be carried out by a qualified technician.
CONTENTS
1. INTRODUCTION TO THE MANUAL 16
1-1. INTRODUCTION 16
2. INSTRUCTIONS
2-1. SAFETY INSTRUCTIONS 16
2-2. INTENDED USE OF THE MACHINE 18
2-3. PRODUCT END-OF-LIFE INSTRUCTIONS 18
3. DESCRIPTION
3-1. PRODUCT DESCRIPTION 19
4. USE
4-1. STARTING THE APPLIANCE 19
4-2. PREPARING ESPRESSO COFFEE 20
4-3. DISPENSING STEAM 21
4-4. HOT WATER 22
4-5. REGULATING THE BOILER TEMPERATURE 22
5. CLEANING
AND
MAINTENANCE
6. TROUBLESHOOTING
24
1. INTRODUCTION TO THE MANUAL
1-1. INTRODUCTION
This instructions manual is an integral part of the machine. It should be read carefully and kept readily available for reference for the entire service life of the machine.
The manual contains information regarding the proper use of the machine, its cleaning and maintenance. It also provides information about operations to be carried out that require particular attention and possible residual risks.
The manual reflects the technological innovations at the time it was drafted. The manufacturer reserves the right to make any necessary technical modifications to its products and to update the manuals with no obligation to revise previous versions.
LA PAVONI S.p.A. declines any liability for damage or injury that may be caused directly or indirectly to people or property due to:
•the failure to comply with all the requirements of current safety regulations
- incorrect installation
•defective power supply
- improper or incorrect use of the machine
- uses other than those specified in this manual
- lack of or incorrect maintenance
•unauthorised modifications or repairs
•the use of non original or non model-specific spare parts
- complete or partial failure to follow the instructions
•exceptional events
2. INSTRUCTIONS

2-1. SAFETY INSTRUCTIONS
•The user must comply with the safety regulations in force in the country where the machine is used, in addition to using common sense and the instructions provided in this manual.
•To ensure that machine works correctly and provides a long service, we recommend that you make sure that the environmental conditions are correct (room temperature should be between 5°C and 35°C). Avoid using the machine in places where jets of water are used or in outdoor environments that are exposed to the weather (sun, rain etc.).
•After removing the machine from its packaging, make sure that it is intact and has not been damaged.
•The packaging should be taken to a proper waste disposal centre. Under no circumstances should it be left unattended where children, animals or unauthorized persons may have access to it.
- Before switching on the machine, make sure that the power supply indicated on the data plate, located under the base of the machine, is the same as the one used in your country.
•The appliance must not be used by persons (including children) with reduced physical, sensory or mental capabilities or with a lack of experience and knowledge, unless appropriately supervised, or instructed on the safe use of the appliance by a person responsible for their safety.
•Children must be supervised at all times to ensure they do not play with the appliance.
- Cleaning and maintenance of the appliance must not be performed by children, unless closely supervised.
- Never submerge the appliance in water.
- This appliance is intended for household use. Moreover, it cannot be used:
- in kitchen areas provided for employees in shops, offices and other work environments
- in farms/farm accommodation
- by guests in hotels, motels and other types of residential accommodation
- in bed and breakfast accommodation.
- If the power cord is damaged, contact technical support to arrange for this to be replaced in order to avoid any possible hazards.
•Only for European markets:
This appliance may be used by children from the age of 8 provided they are supervised or instructed on the safe use of the appliance and they understand the associated risks. - Cleaning and maintenance may be performed by children from the age of 8 as long as they are appropriately supervised.
- Keep the appliance and its cord out of reach of children under the age of 8 years.
- Children must never play with the appliance.
•The appliance may be used by persons with reduced physical, - sensory or mental capabilities or with a lack of experience and knowledge, if they are supervised or instructed on the safe use of the appliance and if they understand the hazards involved.
- Disconnect the appliance from the power socket before
•assembly, disassembly and cleaning. - For this appliance:
Read this user manual carefully before using the appliance. - Switch off the appliance immediately
after use.
- Do not leave the coffee machine unattended during use.
•Always disconnect the coffee machine from the power socket if it is left unattended and before assembly/disassembly of components or cleaning. - Before connecting or disconnecting the machine, make sure that the ON/OFF switch is in the OFF position.
- Unplug the coffee machine before cleaning it and if you notice any fault.
- Let the coffee machine cool down before cleaning.
- Do not use the coffee machine without the tank fitted or if there is no water in the tank.
- Leave at least 3 cm of space between the coffee machine and any walls to the rear or side, and 15 cm clearance above the coffee machine.
- Danger of burns! The coffee machine generates heat and produces hot water and steam during its operation.
- Danger of burns! Do not touch the cup warmer shelf while the appliance is running.
- The surfaces of the appliance remain very hot after use due to residual heat. Do not touch the hot surfaces in order to avoid burns.
- Do not use the coffee machine with parts or accessories of other manufacturers.
- Only use original spare parts. The use of spare parts not approved by the manufacturer could lead to fires, electric shocks or personal injury.
- Only place the coffee machine on level and dry surfaces.
- Avoid getting the coffee machine wet and do not spray liquids onto it. In the event of contact with liquid, immediately switch off the power at
the socket or main breaker and dry the appliance thoroughly: Electric shock hazard!
- Do not use harsh detergents or sharp objects to clean the coffee machine.
- Do not make any modifications to the appliance.
- Never try to put out a fire or flames with water: turn off the appliance and remove the plug from the socket, and smother the flames with a fire blanket or other appropriate cover.
- Prevent the power cord from coming into contact with sharp edges.
- Never position the appliance above or near gas or electric hob burners when they are hot or in use, inside an oven or near other heat sources.
- Do not position the appliance near sinks or taps.
2-2. INTENDED USE OF THE MACHINE
- This machine has been designed for the home preparation of espresso coffee using coffee blends, the production of hot water and/or steam, and the preparation of hot milk.
- In order to use the machine properly, the user must carefully read and understand the instructions provided in this manual.
- Any improper use of the machine will void the warranty and relieve the manufacturer of all liability for damage to property and / or injury to persons.
- Improper use includes:
- any use other than the one specified in the instructions manual
- any intervention carried out on the appliance that does not comply with the instructions given in this manual
- any use following unauthorized modifications to components or safety devices
- use of the appliance outdoors
2-3. PRODUCT END-OF-LIFE INSTRUCTIONS
Electrical appliances must not be disposed of together with household waste. Devices
marked with this symbol are subject to European Directive 2012/19/EU All waste electrical and electronic appliances must be disposed of separately from domestic waste and taken to authorised waste disposal facilities. Disposing of the used appliance correctly, will help to safeguard the environment and human health. For further information regarding the disposal of used appliances, please contact your local authority waste disposal department or the shop where the appliance was purchased.
3. DESCRIPTION
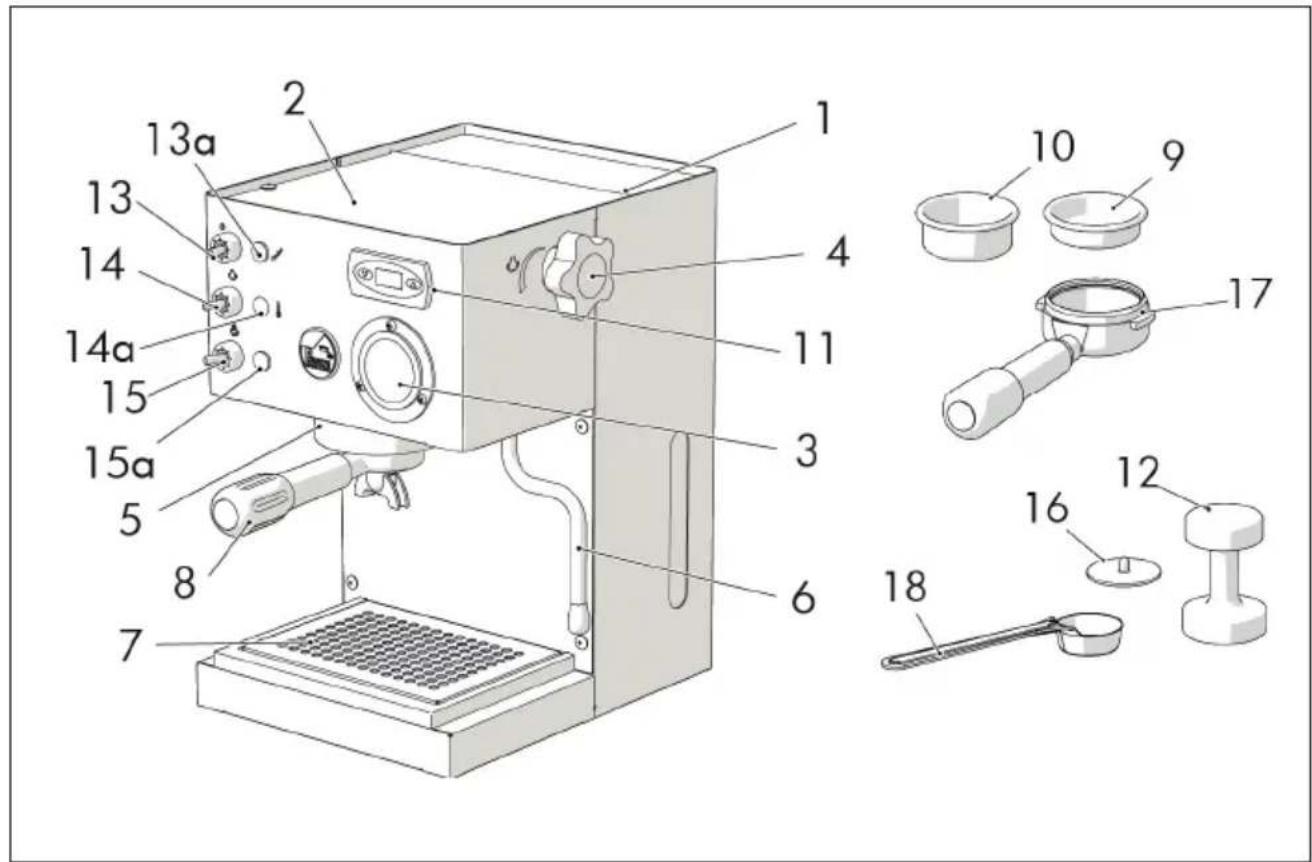
3-1. PRODUCT DESCRIPTION
- Water tank
- Cup warmer
- Pressure gauge
- Hot water / steam knob
- Group head
- Steam / hot water supply nozzle
- Removable drip tray grid
- Filter holder
- Filter - 1 cup
- Filter basket for 2 cups
- PID temperature controller
- Coff ee tamper
- Power on/off switch
13a. Machine on light - Steam switch
14a. Light: machine ready - Coff ee / hot water dispensing switch
15a. Light: coff ee / hot water dispensing switch - Filter sealing membrane
- "Fascino" fi lter holder
- Coff ee scoop
4. USE
4-1. STARTING THE APPLIANCE
- Open the cover and fill the tank (1) with fresh clean water, taking care not to exceed the maximum level of the tank.
- Turn on the machine by placing the on / off switch (13) to position "I". The lamp (13a) lights up to indicate that the machine is powered.
- Insert the filter holder (8 or 17) into the group head (5).
- Open the steam / hot water knob (4).
- Move the coff ee / hot water switch lever (15) to position "I". When water starts to come out of the steam nozzle (6), turn the hot water/coff ee switch lever (15) to position "0" and close the knob (4).
After having done this, rinse the internal circuits:
- Place a container under the coff ee
dispensing spouts and press the coffee / hot water dispensing button (14).
- Repeat this process 5 times.
•After rinsing, wait for the machine to reach operating temperature.
•The machine is ready for use when the PID temperature controller (11) reaches the pre-set temperature of 92°C, the ideal temperature for preparing coffee (if you wish to change the temperature of the PID temperature controller, follow the instructions in section 4.5) and the light (14a) remains on.

To avoid having to repeat this procedure, we recommend that you check the level of water in the tank (1) to prevent emptying the machine's water circuit. If it does happen, repeat the above procedure

The operating temperature light (14a) will continue to switch on and off automatically during heating. After having switched on the machine, wait about 6 minutes for it to heat up before making the first coffee. For subsequent cups, the machine will always be ready.
4-2. PREPARING ESPRESSO COFFEE
-
Make sure that you have carried out all the operations indicated in section 4.1 "starting the machine".
•To obtain a good cup of coffee, it is important that you use a good quality, well roasted and correctly ground coffee. The pump type espresso coffee machine requires finely ground coffee. If the coffee is too coarsely ground, the coffee will be light coloured and weak without froth and if the coffee is too finely ground the espresso will be dark and strong and have little froth. -
We recommend that you grind the coffee beans with a grinder immediately before making the coffee since the coffee quickly loses its aroma after it has been ground.
- Warm cups help maintain the coffee at the right temperature. We therefore recommended that you place the cups on the cup warmer shelf (2) before using them.
PRE-HEATING
- Make sure there is enough water in the tank (1).
- Depending on the number of cups of coffee you wish to make, place a one-cup filter (9) or a two-cup filter (10) into the filter-holder (8 or 17) and insert the filter holder into the group head (5).
- Turn on the main switch (13), the power on light (13a) will come on to indicate that the machine is in operation.
- Wait until machine reaches the operating temperature in order to dispense a coffee, light (14a) lit.
PREPARING ESPRESSO COFFEE
- Remove the filter holder (8 or 17), fill the filter with one or two measures of ground coffee (one measure per cup) then level and press the coffee using the tamper (12).
- Remove any coffee residues from the edge of the filter using the palm of your hand and insert the filter holder (8 or 17) into the group head (5), moving it towards the right to secure it.
- Place one or two pre-warmed cups on the drip tray grid (7) under the filter holder.
- Turn on the coffee / hot water switch (15), the coffee will start to come out from the spouts of the filter holder (8). Once the required amount of coffee
has been dispensed, stop delivery by turning off the switch (15) but do not remove the filter holder.
- Remove the cups and serve immediately.
•After having made the coffee, remove the filter holder, empty the coffee grounds and rinse the filter holder under running water.

•After having switched on the machine, wait about 6 minutes for it to heat up to the operating temperature before dispensing the first coffee
- We recommend that you dispense steam for a maximum of 30 seconds.

- Do not touch the hot surfaces (boiler, group head, filter holder, steam supply nozzle) to avoid burns.
- Do not remove the filter holder while coffee is being dispensed to avoid possible burns.
- Under no circumstances place your hands under the group head or the steam supply nozzle as the liquids or steam delivered are hot and may cause burns.
- Do not remove the filter holder immediately after having dispensed coffee, wait for a few seconds to allow any residual pressure to be released in order to avoid possible burns.
4-3. DISPENSING STEAM
- Steam can be used for frothing the milk for making cappuccinos or to warm up drinks.

Caution! Danger of burns! Spurts of hot water may be ejected when you first start to dispense steam.
The nozzle can become extremely hot. Do not touch it directly with your hands.
•Prepare the espresso coffee in large cups as indicated in the previous sections.
- When the machine is ready to dispense coffee, direct the steam nozzle towards the drip tray (7) and open the "Hot water / steam knob" (4) for a few seconds in order to remove any residual water from the steam nozzle. After a few second only steam will come out.
- When only steam starts to come out, close the steam / hot water knob (4)
- Move the steam lever switch (14) to position "I".
•After about 15-20 seconds and when the machine ready light (14a) comes on, place the container of cold milk under the steam nozzle (6).
- Slowly turn the steam knob (4) anticlockwise so that steam comes out.
- Once the volume of milk has doubled, immerse the frothing nozzle completely and heat the milk to 60-65°C.
- Once the milk has been frothed, turn the steam knob anticlockwise to stop dispensing steam and remove the milk container.
- Move the steam lever switch (14) to position "0".
- Pour the frothed milk into the coffee.

•The more you turn the knob, the greater will be the steam pressure.
- We recommend that you dispense steam for a maximum of 60 seconds.
•To prepare another coffee, fill the
boiler with water and bring the machine to the correct operating temperature. Otherwise, the coffee may have a burnt taste.
- Place an empty cup on the grid. Do not insert the filter holder. Fill the cup with water by moving the lever switch (15) to position "I". Once the cup is full, move the coffee lever switch (15) to position "0". It is now possible to brew more coffee.
4-4. HOT WATER
- Make sure that you have carried out all the operations in section 4.1.
- Place a container under the hot water / steam nozzle
- Open the knob (4) and move the coffee / hot water lever switch (15) to position "I"; water will immediately come out of the steam/hot water nozzle (6).
- Once the required amount of water has been dispensed, move the coffee / hot water lever (15) back to position "0" and close the knob (4).
•After dispensing hot water, make sure that there is still water in the tank (1).
4-5. REGULATING THE BOILER TEMPERATURE
•The LPSCSR02 model is fitted with a PID temperature controller (11).
- PID temperature controllers regulate the boiler temperature.
- The PID temperature controller is factory set to 92^ .
- To adjust the setting proceed as follows:
- press the button ▼; as soon as "PRG" appears on the display, press the button ▲;
- when the temperature of the boiler appears on the display, use the buttons ▼ and to set the temperature, from a minimum of 80°C
to a maximum of 120^ C.
- 3 seconds after having pressed the last button, the value is memorized and the display indicates the temperature.

If the temperature threshold is set too high, the display will start to flash when coffee is dispensed.
5. CLEANING AND MAINTENANCE
- Before carrying out any cleaning or maintenance, unplug the power cable from the power outlet without pulling the cable.
- Do not immerse the coffee machine in water or other liquids.
- Let the coffee machine cool down before cleaning.
CLEANING THE FILTERS AND FILTER HOLDERS
- Regularly check the holes in the filters in order to remove any coffee deposits.
- Place approximately one litre of boiling water and four teaspoons of coffee machine cleaner in a suitable container. Immerse the filters and filter holders in the solution for 20-30 minutes. Then rinse thoroughly under running water.
CLEANING THE STEAM NOZZLE
- To avoid altering the taste of the drinks to be heated and to prevent the hole at the end of the steam nozzle (6) from becoming clogged, after use, turn the steam knob to dispense a small amount of steam and remove any milk from the inside of the nozzle.
- Then clean thoroughly with a damp cloth.
CLEANING THE OUTSIDE OF THE MACHINE
To keep the outer surface of the coffee machine in good condition, it should be cleaned regularly after use. Let the appliance cool down first. Clean with a soft, damp cloth.
6. TROUBLESHOOTING
PROBLEM CAUSE SOLUTION

The machine does not work and the light of the ON/OFF switch does not turn on
- No power
- The machine is not plugged in correctly
-
The power cable is damaged
-
Switch the power back on
- Insert the plug correctly into the power socket
- Contact the SERVICE CENTRE for replacement
The light on the ON/OFF switch is lit and the water does not heat up
- The service thermostats are not working
-
The heating element is broken or burnt out
-
Contact the SERVICE CENTRE
- Contact the SERVICE CENTRE
No coffee is dispensed 1. No water in the tank
- The coffee is too finely ground
- There is too much coffee
- The coffee has been compacted too much.
- Steam switch on
- The circuit has not been filled
-
Shower screen dirty
-
Put water in the tank
- Replace with a coarser coffee blend
- Reduce the amount of coffee in the filter basket
- Tamp the coffee with less force.
- Turn off the steam switch
- See section 4.1
- Clean or replace the shower screen
Loud noise coming from the pump
- No water in the tank
-
The pump is not primed
-
Put water in the tank
- See section 4.1
The coffee is dispensed too quickly
- The coffee is too coarsely ground
- There is not enough coffee
- The coffee has not been compacted enough
-
The coffee is stale or unsuitable
-
The coffee should be ground more finely
- Increase the amount of coffee
- Tamp the coffee more
- Replace the coffee
| The coffee is dispensed in drops | 1. The coffee is too finely ground2. There is too much coffee3. The coffee has been compacted too much | 1. The coffee should be ground more coarsely2. Reduce the amount of coffee3. Tamp the coffee less |
| The coffee leaks between the boiler unit and the filter holder | 1. The filter holder is not inserted correctly2. There is too much coffee in the filter basket3. The edge of the filter holder has not been cleaned4. The group head gasket is worn | 1. Insert it properly2. Reduce the amount of coffee3. Remove coffee residues from the edge of the filter holder and clean the group head gasket4. Contact the SERVICE CENTRE |
| No froth forms on the coffee 1. The coffee blend is not suitable for this type of machine2. The grinding is unsuitable3. There is not enough coffee | 1. Replace the coffee2. Adjust the coffee grind3. Increase the amount of coffee and compact it properly | |
| The coffee is too cold 1. The machine had not reached the correct temperature2. The filter holder had not been pre-heated3. The cups have not been preheated4. The thermostat is not working within the required range5. The PID temperature controller (11) is not working within the required range | 1. Follow the instructions given in section 4.1– 4.22. The filter holder should be heated at the same time as the water, see section 4.13. Heat the cups properly on the cup warmer (2)4. Contact the SERVICE CENTRE.5. Set the value for the PID temperature controller | |
| The coffee is too hot 1. The PID temperature controller (11) is not working within the required range | 1. Set the value for the PID temperature controller | |
| The machine does not dispense steam | 1. The circuit has not been filled2. The hole at the end of the steam nozzle is clogged3. No water in the tank4. The turbo steam nozzle has not been inserted properly | 1. See section 4.3 – dispensing steam2. Clean the hole with a needle3. See section 4.14. Insert the turbo steam nozzle properly |

1. INTRODUCTION AU MANUEL
1-1. INTRODUCTION 28
2. AVERTISSEMENTS
2-1. AVERTISSEMENTS DE SÉCURITÉ 28
2-2. USAGE PRÉVU DE LA MACHINE 30
2-3. INSTRUCTIONS DE TRAITEMENT EN FIN DE VIE 30
3. DESCRIPTION
3-1. DESCRIPTION DU PRODUIT 31
4. UTILISATION
4-1. MISE EN SERVICE DE L'APPAREIL 31
4-2. PRÉPARATION DU CAFÉ EXPRESSO 32
4-3. DISTRIBUTION DE VAPEUR 33
4-4. DISTRIBUTION D'EAU CHAUDE 34
4-5. RÉGLAGE DE LA TEMPÉRATURE DANS LA CHAUDIÈRE 34
5. NETTOYAGE ET ENTRETIEN
6. CAUSES DE DYSFONCTIONNEMENT OU ANOMALIES 36
1. INTRODUCTION AU MANUEL
1-1. INTRODUCTION
3. DESCRIPTION
3-1. DESCRIPTION DU PRODUIT
6. CAUSES DE DYSFONCTIONNEMENT OU ANOMALIES
PROBLÈME CAUSE SOLUTION
- in Bed and Breakfasts.
3. BESCHREIBUNG
2-1. VEILIGHEIDSWAARSCHUWINGEN
- in bed and breakfasts.
3. BESCHRIJVING
3-1. BESCHRIJVING VAN HET PRODUCT
PROBLEEM OORZAAK OPLOSSING
3. DESCRIPCIÓN
3. DESCRIÇÃO
PROBLEMA CAUSA SOLUÇÃO
INNEHÅLLSFÖRTECKNING
1. INTRODUKTION TILL BRUKSANVISNINGEN 88
1-1. INTRODUKTION 88
2. ANVISNINGAR
2-1. SÄKERHETSFÖRESKRIFTER 88
2-2. AVSEDD ANVÄNDNING AV MASKINEN 90
2-3. ANVISNINGAR FÖR HANTERING AV UTTJÄNTA APPARATER 90
3. BESKRIVNING
3-1. BESKRIVNING AV PRODUKTEN 91
4. ANVÄNDNING
4-1. SÄTTA APPARATEN I DRIFT 91
4-2. TILLREDNING AV ESPRESSOKAFFE 92
4-3. MATA UT ÅNGA 93
4-4. MATA UT VARMT VATTEN 94
4-5. REGLERING AV TEMPERATUR I KOKAREN 94
5. RENGÖRING
- ORSAKER TILL FELFUNKTION OCH ANOMALIER 95
1. INTRODUKTION TILL BRUKSANVISNINGEN
1-1. INTRODUKTION
•felaktig installation;
3. BESKRIVNING
3-1. BESKRIVNING AV PRODUKTEN
3. ОПИСАНИЕ
- forkert installation;
3. BESKRIVELSE
3-1. BESKRIVELSE AF PRODUKTET
RENG∅RING AF DAMPDYSE
3. OPIS
3-1. OPIS PRODUKTU
3. KUVAUS
3-1. TUOTTEEN KUVAUS
3. BESKRIVELSE
3-1. BESKRIVELSE AV PRODUKTET
- Vannbeholder
- Passiv koppevarmer
- Manometer
- Bryter for damp/varmt vann
- Uttaksenhet
- Uttak damp/varmt vann
- Avtakbart koppebrett
- Filterholder
- Filter 1 kopp
- Filter 2 kopper
- Termopid
- Kaff etamper
- Strømbryter on/off
13a. Lampe maskin slått på - Dampbryter
14a. Lampe: maskin ved temperatur - Bryter uttak kaff e/varmt vann
15a. Lampe: bryter uttak kaff e/varmt vann - Membran fi Iterpakning
- Fascino fi Iterholder
- Måleenhet kaff e
4. BRUK
4-1. SETTE APPARATET I DRIFT


- DESCRIZIONE
- CASABAR PID
- Dear Customer,
- SYMBOLS USED IN THIS MANUAL
- CONTENTS
- INTRODUCTION TO THE MANUAL 16
- INSTRUCTIONS
- DESCRIPTION
- USE
- CLEANING
- AND
- MAINTENANCE
- TROUBLESHOOTING
- INTRODUCTION TO THE MANUAL
- 1-1. INTRODUCTION
- 2-1. SAFETY INSTRUCTIONS
- 2-2. INTENDED USE OF THE MACHINE
- 2-3. PRODUCT END-OF-LIFE INSTRUCTIONS
- 3-1. PRODUCT DESCRIPTION
- 4-1. STARTING THE APPLIANCE
- 4-2. PREPARING ESPRESSO COFFEE
- PRE-HEATING
- PREPARING ESPRESSO COFFEE
- 4-3. DISPENSING STEAM
- 4-4. HOT WATER
- 4-5. REGULATING THE BOILER TEMPERATURE
- CLEANING AND MAINTENANCE
- CLEANING THE FILTERS AND FILTER HOLDERS
- CLEANING THE STEAM NOZZLE
- CLEANING THE OUTSIDE OF THE MACHINE
- PROBLEM CAUSE SOLUTION
- INTRODUCTION AU MANUEL
- AVERTISSEMENTS
- UTILISATION
- NETTOYAGE ET ENTRETIEN
- CAUSES DE DYSFONCTIONNEMENT OU ANOMALIES 36
- 3-1. DESCRIPTION DU PRODUIT
- CAUSES DE DYSFONCTIONNEMENT OU ANOMALIES
- BESCHREIBUNG
- 2-1. VEILIGHEIDSWAARSCHUWINGEN
- BESCHRIJVING
- 3-1. BESCHRIJVING VAN HET PRODUCT
- DESCRIPCIÓN
- DESCRIÇÃO
- INNEHÅLLSFÖRTECKNING
- INTRODUKTION TILL BRUKSANVISNINGEN 88
- ANVISNINGAR
- BESKRIVNING
- ANVÄNDNING
- RENGÖRING
- INTRODUKTION TILL BRUKSANVISNINGEN
- 1-1. INTRODUKTION
- 3-1. BESKRIVNING AV PRODUKTEN
- ОПИСАНИЕ
- BESKRIVELSE
- 3-1. BESKRIVELSE AF PRODUKTET
- RENG∅RING AF DAMPDYSE
- OPIS
- 3-1. OPIS PRODUKTU
- KUVAUS
- 3-1. TUOTTEEN KUVAUS
- 3-1. BESKRIVELSE AV PRODUKTET
- BRUK
- 4-1. SETTE APPARATET I DRIFT
Brand : LA PAVONI
Model : Casa Bar Pid
Category : Coffee machine