SHXPH550 - Heating SHX - Free user manual and instructions
Find the device manual for free SHXPH550 SHX in PDF.

User questions about SHXPH550 SHX
0 question about this device. Answer the ones you know or ask your own.
Ask a new question about this device
Download the instructions for your Heating in PDF format for free! Find your manual SHXPH550 - SHX and take your electronic device back in hand. On this page are published all the documents necessary for the use of your device. SHXPH550 by SHX.
USER MANUAL SHXPH550 SHX
natural_image
White rectangular electronic device with a small digital display showing '261' and '48' (no visible text or symbols on the device itself)HERZLICHEN GLÜCKWUNSCH!
VIELEN DANK, DASS SIE SICH FÜR DIESES PRODUKT VON SHX ENTSCHIEDEN HABEN.
natural_image
Simple line drawing of a pencil inside a corner, with no text or symbols present.
natural_image
Line drawing of a hand holding a drill bit, no text or symbols present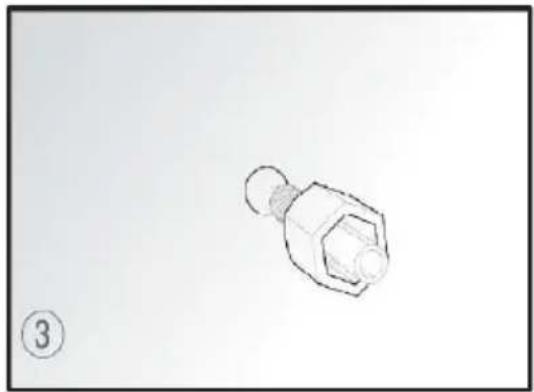
natural_image
Simple line drawing of a mechanical component with a numbered label (3) and no text or symbols on the object itself.
natural_image
Simple line drawing of a door corner with angle θ and number 4 label (no text or symbols beyond basic geometry)Kurzanleitung
natural_image
White rectangular electronic device with a small digital display showing '24h' and '13.5V' (no visible text or symbols on the device itself)FÉLICITATIONS !
MERCI D'AVOIR CHOISI CE PRODUIT DE SHX.
natural_image
Simple line drawing of a pencil inside a corner, with no text or symbols present.
natural_image
Line drawing of a hand holding a drill bit, no text or symbols present
natural_image
Simple line drawing of a mechanical component with a numbered label (3) and no text or symbols on the object itself.
natural_image
Simple line drawing of a door corner with angle θ and number 4 label (no text or symbols beyond basic geometry)Guide rapide
SOLUTION AU PROBLÈME
natural_image
White rectangular electronic device with a small digital display showing '201' and '13.5' (no visible text or symbols on the device itself)CONGRATULAZIONI!
GRAZIE PER AVER SCELTO QUESTO PRODOTTO DI SHX.

natural_image
Simple line drawing of a pencil inside a corner, with no text or symbols present.
natural_image
Line drawing of a hand holding a drill bit, no text or symbols present
natural_image
Simple line drawing of a mechanical component with a numbered label (3) and no text or symbols on the object itself.
natural_image
Simple line drawing of a door corner with angle θ and number 4 label (no text or symbols beyond basic geometry)Guida rapida
natural_image
White rectangular electronic device with a small digital display showing '24h' and '13.5V' (no visible text or symbols on the device itself)GEFELICITEERD!
BEDANKT VOOR HET KIEZEN VAN DIT PRODUCT VAN SHX.

natural_image
Simple line drawing of a pencil inside a rectangular frame, with no text or symbols present.
natural_image
Hand holding a drill bit with a pointed tip, no text or symbols visible
natural_image
Simple line drawing of a mechanical component with a numbered label (3) and no text or symbols on the object itself.
natural_image
Simple line drawing of a door corner with angle θ and number 4, no text or symbols presentSnelle gids
natural_image
White rectangular electronic device with a small display screen showing '201' and '13.5' (no visible text or symbols on the device itself)GRATTIS!
TACK FÖR ATT DU VALDE DENNA PRODUKT FRÅN SHX.

INNEHÅLLSFÖRTECKNING
natural_image
Simple line drawing of a pencil inside a corner, with no text or symbols present.
natural_image
Line drawing of a hand holding a drill bit, no text or symbols present
natural_image
Simple line drawing of a mechanical component with a numbered label (3) and no text or symbols on the object itself.
natural_image
Simple line drawing of a door corner with angle θ and number 4 label (no text or symbols beyond basic geometry)Snabbguide
natural_image
White rectangular electronic device with a small digital display showing '5-25' and '1-3.5' (no visible text or symbols on the device itself)GRATULUJEME!
DĚKUJEME, ŽE JSTE SI VYBRALI TENTO PRODUKT OD SPOLEČNOSTI SHX.
natural_image
Simple line drawing of a pencil inside a corner, with no text or symbols present.
natural_image
Line drawing of a hand holding a drill bit, no text or symbols present
natural_image
Simple line drawing of a mechanical component with a numbered label (3) and no text or symbols on the object itself.
natural_image
Simple line drawing of a door corner with angle θ and number 4 label (no text or symbols beyond basic geometry)Stručný průvodce
natural_image
White rectangular electronic device with a small digital display showing '5-25' and '1-3.5' (no visible text or symbols on the device itself)GRATULUJEME!
ĎAKUJEME, ŽE STE SI VYBRALI TENTO PRODUKT OD SPOLOČNOSTI SHX.
natural_image
Simple line drawing of a pencil inside a corner, with no text or symbols present.
natural_image
Line drawing of a hand holding a drill bit, no text or symbols present
natural_image
Simple line drawing of a mechanical component with a numbered label (3) and no text or symbols on the object itself.
natural_image
Simple line drawing of a door corner with angle θ and number 4 label (no text or symbols beyond basic geometry)Stručný sprievodca
natural_image
White rectangular electronic device with a small digital display showing '201' and '13.5' (no visible text or symbols on the device itself)FELICITĂRI!
VĂ MULTUMIM CĂ AȚI ALES ACEST PRODUS DE LA SHX.

natural_image
Simple line drawing of a pencil inside a corner, with no text or symbols present.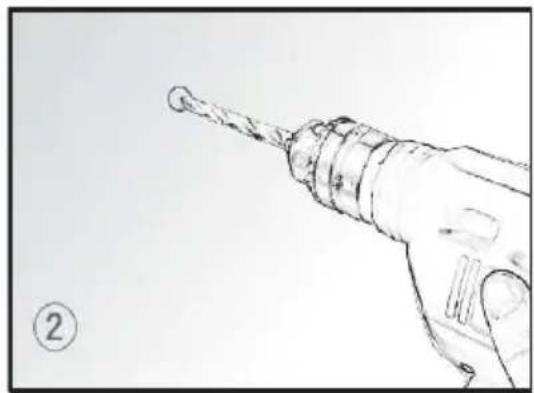
natural_image
Line drawing of a hand holding a drill bit, no text or symbols present
natural_image
Simple line drawing of a mechanical component with a numbered label (3) and no text or symbols on the object itself.
natural_image
Simple line drawing of a door corner with angle θ and number 4 label (no text or symbols beyond basic geometry)Ghid rapid
natural_image
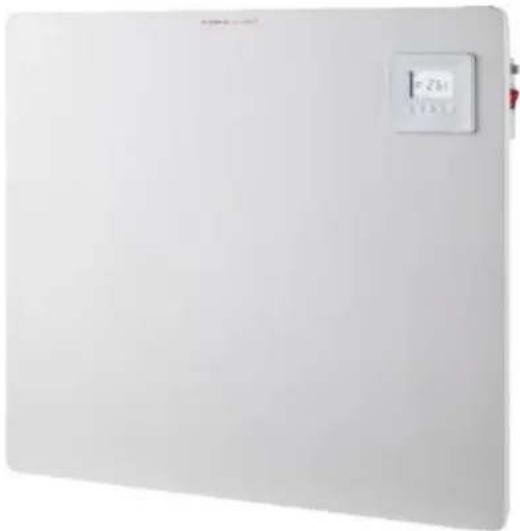
White rectangular electronic device with a small digital display showing '24h' and '13.5V' (no visible text or symbols on the device itself)CONGRATULATIONS!
THANK YOU FOR CHOOSING THIS PRODUCT FROM SHX.

This product is only suitable for well-insulated rooms or for occasional use
TABLE OF CONTENT
| Important information on safety, location and electrical connection |
| Recycling, disposal, declaration of conformity |
| Scope of delivery |
| Safety instructions for assembly |
| Installation instructions |
| Quick guide |
| Commissioning and function |
| Problem solving |
| Technical information |
| Required information on electric single room heaters |
| Warranty |
| Declaration of conformity |
PLEASE READ THE OPERATING INSTRUCTIONSCAREFULLY BEFORE STARTING ASSEMBLY,
INSTALLATION, OPERATION OR MAINTENANCE.
PROTECT YOURSELF AND OTHERS BY FOLLOWING THE SAFETY INSTRUCTIONS. FAILURE TO FOLLOW INSTRUCTIONS COULD RESULT IN PERSONAL INJURY AND/OR PROPERTY DAMAGE AND/OR LOSS OF WARRANTY COVERAGE!
Intended use
This appliance is intended for domestic space heating only and must not be used for any other purpose.
IMPORTANT INFORMATION ON SAFETY, STANDARD
AND ELECTRICAL CONNECTION


- Use this appliance only in accordance with the guidelines in the instruction manual. Any other use not recommended by the manufacturer could result in fire, electric shock or personal injury.
- Do not use this heater if it has previously been dropped.
- Do not use this heater if it shows visible signs of damage.
- Use this heater on a horizontal and stable surface or fixed to a wall if necessary.
-
children younger than 3 years are to be kept away unless they are supervised at all times.
-
Remove the packaging and make sure that the unit is not damaged. If in doubt, do not use the appliance and contact your dealer.
-
Before connecting the appliance to the mains, check that the type of current and mains voltage correspond to the specifications on the appliance type plate.
-
the electrical socket in which you connect the appliance must not be defective or loose and must be suitable for the required current load and, above all, reliably earthed.
-
avoid using an extension cord as it could overheat and cause a fire.
-
the appliance must not be placed directly under a wall socket. If in doubt, have your electrical installation checked by a qualified electrician.
-
it is forbidden to adapt or modify the characteristics of this appliance in any way. Use only spare parts and accessories recommended by the manufacturer (failure to do so may invalidate the warranty).
-
Do not use this heater if it shows visible signs of damage.
-
Do not leave the appliance unattended. If you leave the room, always switch off the appliance.
-
do not use the appliance in small rooms where there are people who are not able to leave the room on their own, unless they are constantly supervised.
-
Children are not allowed to play with the appliance.
-
children under 3 years of age must be kept away from the appliance unless you are supervised at all times.
-
Children 3 years and younger than 8 years of age may only switch the appliance on and off if they are supervised or have been instructed in the safe use of the appliance and understand the resulting dangers, provided that the appliance is placed or installed in its normal position of use. Children aged 3 years and under 8 years shall not plug the appliance into the mains socket, regulate the appliance, clean the appliance and/or carry out user maintenance.
-
This appliance can be used by children aged from 8 years and above and persons with reduced physical, sensory or mental capabilities or lack of experience and knowledge if they have been given supervision or instruction concerning use of the appliance in a safe way and understand the hazards involved. Children must not play with the appliance. Cleaning and user maintenance must not be carried out by children without supervision.
-
If the mains lead of this appliance is damaged, it must be replaced by the manufacturer or its after-sales service or a similarly qualified person in order to avoid hazards.
-
Keep children away from packaging materials.
-
there is a danger of choking if swallowed!
-
the unit is not suitable for continuous and precision operation.
-
do not use this heater if it has been dropped before.
-
This appliance is intended for dry indoor use only.
-
Do not use the unit near water or high humidity, e.g. in a damp basement, next to a swimming pool, bathtub or shower. Make sure that no water can enter the unit.
-
Do not use the appliance in the direct vicinity of petrol, gas, oil, alcohol or other explosive and highly flammable liquids or gases.
-
To reduce the risk of fire, keep a distance of at least one metre from the air outlet of the appliance to all highly flammable materials such as e.g:
a. vessels under pressure (e.g. spray containers)
b. Furniture
c. Textiles of any kind
-
Use this heater on a horizontal and stable surface or fixed to a wall if necessary.
-
Never cover the appliance during operation or when it is cooling down.
-
Make sure that no objects touching the heating surface get between the appliance and the mounting wall.
-
Always switch off the appliance before unplugging it from the mains.
-
caution - Some parts of the product may become very hot and cause burns. Special care should be taken when children and vulnerable persons are present. Always allow the appliance to cool down before cleaning or disassembling it.
-
Unplug the appliance when not in use, before cleaning or when it needs maintenance.
-
Cleaning and user maintenance must not be carried out by children without supervision.
-
do not handle the plug with wet hands to avoid electric shock.
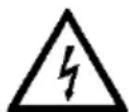
ATTENTION | RISK OF INJURYThe unit becomes hot during operation!Never touch the appliance during operation→ this could cause serious BURNS. |
WARNING | FIRE HAZARDWARNING: To prevent the heater from overheating, do not cover the heater. |
ATTENTION | SAFETY DISTANCEKeep a safe distance of at least 1 metre from easily inflammable objects such as furniture, curtains, paper, etc.!LOCATIONAlways position the appliance so that the air can flow in and out unhindered.RISK OF BURNSThe appliance becomes very hot during use and can cause burns. Special care should be taken when children and vulnerable persons are present.RISK OF OVERHEATINGDo not heat rooms with a volume of less than 4m^3 . |
Symbols on the unit
Symbol:
Meaning:
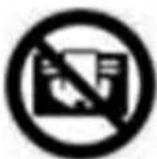
Attention! Do not cover!
The symbol on the unit indicates that it is not permitted to hang objects (e.g. towels, clothes, etc.) above the unit or directly in front of it. The heater must not be covered to avoid overheating and fire hazard!
Symbol:
Meaning:
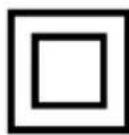
Protection class 2
The symbol indicates that the unit is assigned to protection class 2.
Devices of protection class 2 are not connected to the protective conductor. Instead, they have reinforced or double insulation at the level of the rated insulation voltage between active and touchable parts. Electrically conductive surfaces or conductive touchable parts are thus separated from live parts by reinforced or double insulation.
Recycling, disposal, declaration of conformity
 | RECYCLINGThe packaging materials can be recycled. Therefore, it is recommended to dispose of them in sorted waste. |
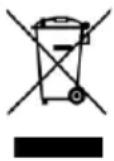 | DISPOSALThe symbol "crossed-out dustbin" requires the separate disposal of waste electrical and electronic equipment (WEEE). Electrical and electronic equipment may contain hazardous and environmentally dangerous substances. Therefore, do not dispose of this in unsorted residual waste, but at a designated collection point for waste electrical and electronic equipment. By doing so, you will help to protect resources and the environment. For more information, please contact your dealer or the local authorities. Directive 2012/19/EU |
 | DECLARATION OF CONFORMITYWe hereby confirm that this article complies with the basic requirements, regulations and directives of the EU. You can view the detailed declaration of conformity at any time under the following link:https://www.schuss-home.at/downloads |
Errors and technical modifications excepted.
Scope of delivery
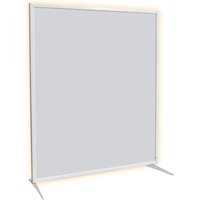
- Heating panel
■ Wall mounting material - Operating instructions
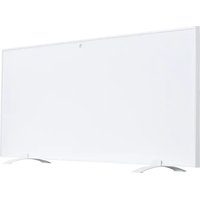
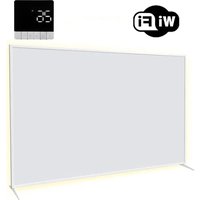
Description of the unit
a) Main switch
b) Control element
c) Radiator
d) Temperature sensor
e) Display
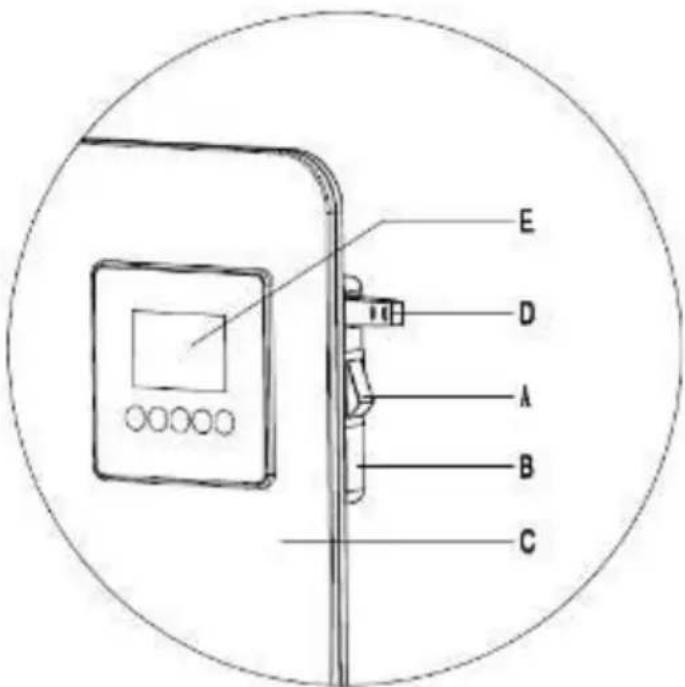
text_image
E D A B CSafety instructions for assembly
The heating panel can be mounted on walls or other vertical surfaces.
Please observe the following instructions when mounting:
-
Make sure that the wall or vertical surface on which you mount the heating panel can support the weight of the appliance.
-
to avoid overloading the circuit, do not connect the panel to a circuit to which other appliances are already connected.
Do not mount the heating panel directly under a wall socket, as the strongest heat is generated above the panel and the socket could be damaged.
The minimum distance of the heating panel to the bottom, top and sides of other objects (window sill, socket, etc.) should be at least 50 cm. The distance to solid objects or combustible materials should be at least 1-2 metres.
-
make sure that there is no material in the immediate vicinity of the heating panel that can deform or discolour at a temperature of over 100^ C.
-
in order not to affect the heating efficiency, do not position any furniture or other objects in front of the heating panel.
-
Do not under any circumstances lay the cable behind the panel.
NOTE
To avoid damaging the heating panel, we recommend that two people carry out the installation.
Before assembly
Open the box and remove the appliance.
Remove the packaging completely from the unit.
Afterwards, check the unit for damage.
Carefully unwind the mains cable and also check for damage.
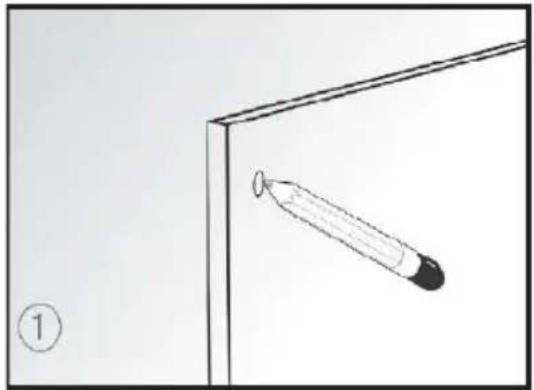
Installation instructions
Unpack your package and find the radiator together with the accessories for wall mounting.
-
Mark the positions of the four holes to be drilled in the wall. (It is recommended to install the radiator at a height of 20 to 100 cm from the floor for best performance).
-
Drill the holes with the drill from the accessory pack.
-
Insert the plastic rails into the holes.
-
Install the panel radiator on the four rails that correspond to the four holes in the radiator.
-
Screw the four fastening bolts into the plastic rails.
-
Place the caps on the fixing bolts. It is recommended to use some normal glue to stick the caps firmly to the bolts.
-
To remove the unit from the wall, simply open the bolt caps, loosen the bolts with a screwdriver and then remove the radiator.
-
Make sure that the distance between the bottom of the radiator and the floor is not less than 20 cm when the radiator is installed.
Note: The kit included in the delivery is intended for vertical mounting on a stable wall. If mounting on other walls, you will need suitable fixings (not included). Please ensure that the heating panel can be mounted securely. We strongly recommend that the panel is installed by a qualified electrician or installer authorised by SHX. The heater must be mounted at least 20 cm away from all objects, walls, etc. The distance to the floor must be at least 20 cm and the distance above the heater must be at least 20 cm.
natural_image
Simple line drawing of a pencil inside a rectangular frame, with no text or symbols present.
natural_image
Hand holding a drill bit with a pointed tip, no text or symbols visible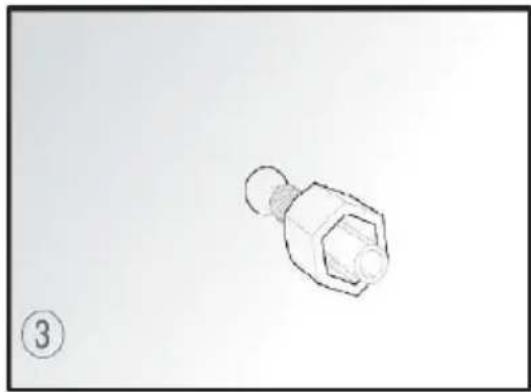
natural_image
Simple line drawing of a mechanical component with a numbered label (3) and no text or symbols on the object itself.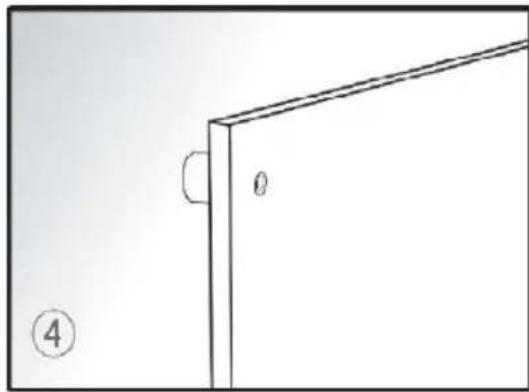
natural_image
Simple line drawing of a door corner with angle θ and number 4 label (no text or symbols beyond basic geometry)Quick guide
To use the heater, please follow these instructions:
- Check that the radiator is not damaged.
- Insert the plug into the socket and switch on the illuminated ON / OFF switch.
- Set the digital display temperature to the desired comfort temperature. The radiator switches off automatically when the set comfort temperature is reached and switches on again when the temperature drops below the set temperature. Note: The comfort temperature number does not necessarily represent the Celsius ambient temperature. If you do not intend to use the radiator for a longer period of time, please disconnect the plug from the socket.
Commissioning and function
To use the heater, please follow these instructions:
- Check the radiator for damage.
-
DATE AND TIME SETTING: Turn on the side switch and make sure that the power supply is activated. Press the button to switch on the radiator. Press the "SET" button for 3 seconds to set the schedule. Once the hour display flashes, press "△" or "▽" to set the hour from 01-23, press "SET" until the minute display flashes, press "△" or "▽" to set the minute from 00-59. Press "SET" until the days of the week flash, press "△" or "▽" to set the week from MO-SO, press "SET" to save or it will automatically save after 10 seconds.
-
POWER SWITCH: Press the button to switch on the radiator. The LCD display shows the room temperature, the schedule (without clock sign) and the weekly status. In normal mode of the radiator, the display shows nothing as soon as the heating panel is switched off.
-
M SWITCH: Press "M" to set normal mode or weekly mode. In normal mode, the radiator has no timer setting.
-
TEMPERATURE SWITCH: Press the button, press "M". In normal mode of the radiator, press "SET". The LCD display shows the room temperature, press "△" or "▽" to set the desired temperature. Press "SET" to save the selected temperature, alternatively the set temperature is automatically saved after 10 seconds. (The temperature you set must be higher than the room temperature).
-
TIMER: Press the button ⏻, press "M", select the weekly programme. The LCD display shows the week (MO-SO) at the top and the time on the left. Press "SET" until the temperature setting flashes, press "△" or "▽" to set the desired temperature, press "SET" to confirm. The screen displays "ON" to start the timer setting. The hour indicator must flash to set the timer start hour. Press "△" or "▽" to select the desired starting hour. The minute code flashes to set the minutes of the timer. Press "SET", the screen displays "OFF" to finish the timer setting. The hour code must flash to set the stopwatch time. Press "△" or "▽" to select the desired stop time. The minute display starts flashing. Set the minutes for the timer stop. The stop time must be later than the start time. If the stop time is before the start time, the timer will not work for that date.
The room temperature control has open window detection. The heater, open doors and windows as well as the room air system are evaluated individually. If the ambient temperature drops by more than 3 °C, the system reduces the heating output to save energy. If you want to continue heating, you must close the doors and windows and switch on the heater to set it to the working state and continue heating.
- Deactivate window opening
The window function is activated ex works. However, if you want to deactivate the window function, press and hold the "▽" button for five seconds. As soon as you have heard the signal tone, release the "▽" key. This extinguishes the window opening symbol " " in the lower right corner of the screen will disappear and the window opening function will be successfully deactivated.
- Restoring the window function
If you want to reactivate the window function, press the "△" key for 5 seconds. After you
have heard the "click", release the "SET" key, the window opening symbol " [ ] " in the lower right corner of the display screen lights up and the window opening function returns to normal.
If you do not intend to use the panel for a longer period of time, you should disconnect the power plug of the heater.
PROBLEM SOLUTION
If your radiator does not work, please follow these instructions:
Make sure your circuit breaker or fuse is working properly.
Make sure that the radiator is plugged in and the socket is working properly.
If the ON / OFF switch does not light up, send it directly to a service centre for repair or contact your dealer.
NOTE: IF YOU HAVE A PROBLEM WITH YOUR HEATER, PLEASE REFER TO THE WARRANTY INFORMATION. DO NOT ATTEMPT TO OPEN OR REPAIR THE HEATER YOURSELF. DOING SO MAY VOID THE WARRANTY AND CAUSE DAMAGE OR PERSONAL INJURY. IF THE PROBLEM PERSISTS, PLEASE CONTACT YOUR DEALER OR OUR SERVICE DEPARTMENT.
Technical information
| Item number: | SHXPH550 |
| Input voltage: | 220-240V |
| Frequency: | 50-60Hz |
| Performance area: | 550 W |
| Heating range: | 9-12 m2 |
| Protection class: | II |
| Weight / Dimensions | 7.75kg600*800*11mm |
| Contact address for further information: | Schuss Home Electronic GmbHScheringgasse 3, A-1140 ViennaService line: +43 (1) 97 0 21www.schuss-home.atFB-No: 236974 t / FB-Court: Vienna |
Required information on electric single room heaters
| Model no: | SHXPH550 | |||
| Article | Symbol | Value | Unit | |
| Heating capacity | ||||
| Nominal heat output | Pnom | 0,55 | kW | |
| Minimum heating capacity (guide value) | PMin | 0 | kW | |
| Maximum continuous heating power | Pmax, c | 0,55 | kW | |
| Auxiliary power consumption | ||||
| At nominal heat output | EImax | N / A | kW | |
| At minimum heating power | EIMin | N / A | kW | |
| In standby mode | Ebb | 0.000960 | kW | |
| Type of heat supply, only for electric storage room heaters (individual selection) | ||||
| Manual heating load control, with integrated thermostat | No | |||
| Manual heating load control with room and/or outdoor temperature feedback | No | |||
| Electronic heating load control with room and/or outdoor temperature feedback | No | |||
| fan assisted heat dissipation | No | |||
| Type of heating output/room temperature control (Single Select) | ||||
| Single-stage heating output and no room temperature control | No | |||
| Two or more manual steps, no room temperature control | No | |||
| with mechanical thermostat room temperature control | No | |||
| with electronic room temperature control | No | |||
| Electronic room temperature control plus daytime timer | No | |||
| Electronic room temperature control plus weekly timer | Yes | |||
| Further control options (multiple selection possible) | ||||
| Room temperature control, with presence detection | No | |||
| Room temperature control, with open-window detection | Yes | |||
| with distance control option | No | |||
| with adaptive start control | No | |||
| with working time limit | Yes | |||
| with black ball sensor | No | |||
| Contact details | Schuss Home Electronic GmbHScheringgasse 3 - 1140 Vienna -AustriaTel.: +43 (0)1/ 970 21 | |||
GUARANTEE
With this quality product from SHX, you have made a decision for innovation, durability and reliability.
For this SHX unit we grant a warranty period of 2 years from the date of purchase valid in Austria and Germany! If, contrary to expectations, service work should nevertheless be necessary on your device during this period, we hereby guarantee to repair the device free of charge (spare parts and labour) or (at the discretion of Schuss) to exchange the product. Should neither repair nor exchange be possible for economic reasons, we reserve the right to issue a credit note for the current value.
In any case, please contact the customer hotline as a first step (see instruction manual - "Contact addresses for further information and service line").
We would like to point out that repair work which has not been carried out by authorised contract workshops immediately terminates the validity of this guarantee.
This warranty does not cover:
- Damage due to non-observance of the operating instructions
- Repair or replacement of parts due to normal wear and tear
• Devices that are used - even only partially - for commercial purposes - Mechanically damaged equipment due to external influence (fall, impact, breakage, improper use, etc.) as well as wear and tear of an aesthetic nature.
• Equipment that has been improperly handled - Units that have not been opened by our authorised service workshop
- Consumer expectations not met
- Damage attributable to force majeure, water, lightning, overvoltage
- Units where the type designation and/or serial number on the unit has been altered, erased, made illegible or removed.
• Defects due to extraordinary pollution - Services outside our authorised workshops, the transport costs to an authorised workshop or to us and back, as well as the associated risks.
We expressly point out that within the warranty period, a lump sum of € 60 (indexed basis CPI 2015, June 2020) will be charged in the event of operating errors or if no error was detected.
By providing a warranty service (repair or replacement of the unit), the absolute<
Warranty period of 2 years from date of purchase not extended.
The 2-year warranty is only valid on presentation of the purchase receipt (name and address of the dealer as well as the complete designation of the unit must be included) and the corresponding warranty certificate, on which the type of unit as well as the serial number (visible on the box and on the back or bottom of the unit) must be noted! Without presentation of the warranty certificate, only the legal warranty applies!
We expressly point out that the statutory warranty rights are not affected by this guarantee and continue undiminished.
Schuss Home Electronic GmbH and its vicarious agents shall only be liable for damages in the event of gross negligence or intent. Liability for loss of profit, expected but not realised savings, consequential damage and damage from third party claims is excluded in any case.
You can find the contact address of the respective service workshop on our homepage www.schuss-home.at.
Congratulations on your choice. We wish you much pleasure with your SHX unit!
ADDRESS
SHX Distribution
Schuss Home Electronic GmbH
A-1140 Vienna, Scheringgasse 3
Tel.: +43 (0)1/ 970 21
Type designation:......
Serial number:......

INSTRUKCJA OBSŁUGI
CERAMICZNA PŁYTA GRZEJNA
SHXPH550
natural_image
White rectangular electronic device with a small digital display showing '201' and '13.5' (no visible text or symbols on the device itself)GRATULACJE!
DZIEKUJEMY ZA WYBÓR TEGO PRODUKTU FIRMY SHX.

natural_image
Simple line drawing of a pencil inside a corner, with no text or symbols present.
natural_image
Line drawing of a hand holding a drill bit, no text or symbols present
natural_image
Simple line drawing of a mechanical component with a numbered label (3) and no text or symbols on the object itself.
natural_image
Simple line drawing of a door corner with angle θ and number 4 label (no text or symbols beyond basic geometry)Szybki przewodnik
natural_image
White rectangular electronic device with a small digital display showing '24h' and '13.5V' (no visible text or symbols on the device itself)ČESTITAMO!
HVALA, KER STE IZBRALI TA IZDELEK IZ SHX.

natural_image
Simple line drawing of a pencil inside a rectangular frame, with no text or symbols present.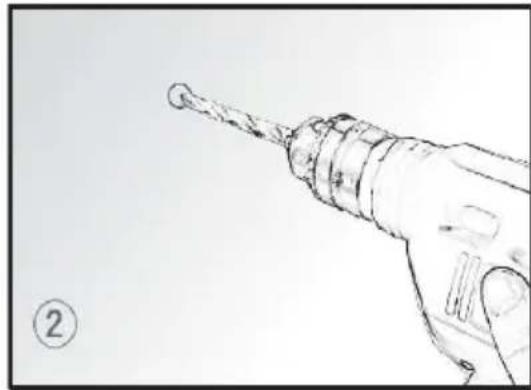
natural_image
Hand holding a drill bit with a pointed tip, no text or symbols visible
natural_image
Simple line drawing of a mechanical component with a numbered label (3) and no text or symbols on the object itself.
natural_image
Simple line drawing of a door corner with angle θ and number 4 label (no text or symbols beyond basic geometry)Kratek vodnik
natural_image
White rectangular electronic device with a small digital display showing '201' and '13.5' (no visible text or symbols on the device itself)ČESTITAMO!
HVALA VAM ŠTO STE ODABRALI OVAJ PROIZVOD IZ SHX-a.

natural_image
Simple line drawing of a pencil inside a corner, with no text or symbols present.
natural_image
Line drawing of a hand holding a drill bit, no text or symbols present
natural_image
Simple line drawing of a mechanical component with a numbered label (3) and no text or symbols on the object itself.
natural_image
Simple line drawing of a door corner with angle θ and number 4 label (no text or symbols beyond basic geometry)Brzi vodič
Za korištenje grijača slijedite ove upute: