SHXBH20R - Heating SHX - Free user manual and instructions
Find the device manual for free SHXBH20R SHX in PDF.

User questions about SHXBH20R SHX
0 question about this device. Answer the ones you know or ask your own.
Ask a new question about this device
Download the instructions for your Heating in PDF format for free! Find your manual SHXBH20R - SHX and take your electronic device back in hand. On this page are published all the documents necessary for the use of your device. SHXBH20R by SHX.
USER MANUAL SHXBH20R SHX
natural_image
Front view of a rectangular electronic device with a circular button and two labeled buttons (no text or symbols on the body)HERZLICHEN GLÜCKWUNSCH!
VIELEN DANK, DASS SIE SICH FÜR DIESES PRODUKT VON SHX ENTSCHIEDEN HABEN.
natural_image
Line drawing of a mechanical fan or electrical enclosure with mounting holes and a power outlet (no text or symbols)text_image
8:00 8:00 © ⓕ Ftext_image
TIME ON EDIT TIME OFFtext_image
08 L © Ⓤ FHINWEIS
text_image
89 @ F 89 @ F 89 @ FHINWEIS
text_image
28°C © L © Ftext_image
8:00 P © FHINWEIS
text_image
23 ℃ © © 23 ℃ P © ©natural_image
Front view of a white rectangular electronic device with a circular indicator showing 23 degrees and three buttons at the bottom (no text or symbols on body)FÉLICITATIONS !
MERCI D'AVOIR CHOISI CE PRODUIT DE SHX.
text_image
SET - OK + OK P SN CR2025 OPEN ↑ PUSHnatural_image
Line drawing of a mechanical fan or vent assembly with mounting holes and a power outlet (no text or symbols)text_image
8:00 8:00 © ⓕ Ftext_image
TIME OK SET +1 - OK + DRY P TIME OK EDIT TIME 2011text_image
88* 80* 88*REMARQUE
text_image
26°C © L © Ftext_image
8:00 P © FREMARQUE
text_image
23 ℃ P © Fnatural_image
Front view of a rectangular electronic device with a circular display showing 23° and two buttons (no text or symbols on the device body)CONGRATULAZIONI!
GRAZIE PER AVER SCELTO QUESTO PRODOTTO DI SHX.

natural_image
Line drawing of a mechanical fan or vent assembly with mounting holes and a power outlet (no text or symbols)text_image
8:00 8:00 © Ⓛ Ftext_image
SET — OK + DRY P TIME ON EDIT TIME OUTtext_image
20°C © L Ftext_image
A 88 P C 88 P D 88 P ENOTA
natural_image
Front view of a rectangular electronic device with a circular display showing 23° and two buttons (no text or symbols on the device body)GEFELICITEERD!
BEDANKT VOOR HET KIEZEN VAN DIT PRODUCT VAN SHX.

natural_image
Line drawing of a mechanical fan or vent assembly with mounting holes and a power outlet (no text or symbols)text_image
8:00 8:00 © Ⓛ Ftext_image
SET — OK + OK DAY P TIME EDIT TIME ON EDITtext_image
A 88 P C 88 P D 88 P EOPMERKING
natural_image
Front view of a rectangular electronic device with a circular display showing '23°' and control buttons (no text or symbols on the device body)¡ENHORABUENA!
GRACIAS POR ELEGIR ESTE PRODUCTO DE SHX.
natural_image
Line drawing of a mechanical fan or vent assembly with mounting holes and a power outlet (no text or symbols)text_image
8:00 8:00 © ⓕ Ftext_image
TIME ON EDIT TIME OUTtext_image
28°C © ℓ ® Ftext_image
A 88 P C B 88 P D 88 P ENOTA
text_image
23 © ℃ © F
text_image
23°C P © Fnatural_image
Front view of a white electronic device with a circular display showing 23° and two buttons (no text or symbols on the device body)GRATULUJEME!
DĚKUJEME, ŽE JSTE SI VYBRALI TENTO PRODUKT OD SPOLEČNOSTI SHX.

text_image
SET — OK + OK P SN CR2025 OPEN ↑ PUSHnatural_image
Line drawing of a mechanical fan or vent assembly with mounting holes and a central fan (no text or symbols)text_image
8:00 8:00 © Ⓛ Ftext_image
SET - OK + DAY P TIME ON EDIT TIME STOPtext_image
88 L F 80 L F 88 L FPOZNÁMKA
text_image
A 88 P © F B 88 P © F C 88 P © F D 88 P © F E 88 P © FPOZNÁMKA
text_image
23 E C P © Fnatural_image
Front view of a white electronic device with a circular display showing 23° and two buttons (no text or symbols on the device body)GRATULUJEME!
ĎAKUJEME, ŽE STE SI VYBRALI TENTO PRODUKT OD SPOLOČNOSTI SHX.
natural_image
Line drawing of a mechanical fan or vent assembly with mounting holes and a central fan (no text or symbols)text_image
8:00 © Ⓛ Ftext_image
SET - OK + DAY P TIME EDIT TIMEtext_image
* 89 * © F * 89 * © F * 89 * © FPOZNÁMKA
text_image
28°C © ℓ ® FPočas prevádzky stlačte "⊖ /⊕ ", na displeji sa štandardne zobrazí "23". Stlačením tlačidla "⊖ /⊕" nastavte požadovanú teplotu (teplotný rozsah 10-49 °C) a stlačením tlačidla "OK" nastavenie potvrd'te.
text_image
A 88 P C 88 P D 88 P EPOZNÁMKA
natural_image
Front view of a rectangular electronic device with a circular display showing 23° and two buttons (no text or symbols on the device body)FELICITĂRI!
VĂ MULȚUMIM CĂ AȚI ALES ACEST PRODUS DE LA SHX.

natural_image
Line drawing of a mechanical fan or vent assembly with mounting holes and a central fan (no text or symbols)text_image
8:00 8:00 © Ⓛ Ftext_image
SET — OK + DAY P TIME EDIT TIMEtext_image
28°C © L © Ftext_image
A 88 P C 88 P D 88 P ENOTĂ
natural_image
Front view of a rectangular electronic device with a circular display showing 23° and two buttons (no text or symbols on the device body)GRATULACJE!
DZIEKUJEMY ZA WYBRANIE TEGO PRODUKTU FIRMY SHX.

natural_image
Line drawing of a mechanical fan or vent assembly with mounting holes and a central fan (no text or symbols)text_image
SET - OK + DATE P TIME ON EDIT TIME OFFtext_image
28°C © ℓ ® Ftext_image
A 88 P B 88 P C 88 P D 88 P EUWAGA
text_image
23 © ℃ © F
text_image
23 ℃ P © Fnatural_image
Front view of a rectangular electronic device with a circular display showing '23°' and control buttons (no text or symbols on the device body)ČESTITAMO!
HVALA, KER STE IZBRALI TA IZDELEK IZ SHX.

natural_image
Line drawing of a mechanical fan or vent assembly with mounting holes and a central fan (no text or symbols)Zagon in delovanje
text_image
88 88 © ⓕ F- Enkrat pritisnite gumb "F", da preklopite v način ventilatorja. Prikaz se prikaže, kot je prikazano na sliki A.
text_image
SET — OK + DAY P TIME ON EDIT TIME ONUpravljanje z daljinskim upravljalnikom:
OPOMBA
text_image
0.8 © F 3.0 © F 8.8 © FOPOMBA
text_image
A 88 P B 88 P C 88 P D 88 P EOPOMBA
natural_image
Front view of a rectangular electronic device with a circular display showing 23° and two buttons (no text or symbols on the device body)ČESTITAMO!
HVALA VAM ŠTO STE ODABRALI OVAJ SHX PROIZVOD.
natural_image
Line drawing of a front-mounted industrial fan or vent with cooling fins and mounting holes (no text or symbols)text_image
8:00 8:00 © Ⓛ F- Pritisnite tipku "F" jednom za prebacivanje u način rada ventilatora. Zaslon se pojavljuje kao što je prikazano na slici A.
Ponovno pritisnite "F" za uključivanje uređaja u načinu rada niske topline. Zaslon se pojavljuje kao što je prikazano na slici B.
Pritisnite "F" treći put za prebacivanje na visoku toplinsku snagu. Zaslon se pojavljuje kao što je prikazano na slici C.
Četvrti put pritisnite "F" za ulazak u stanje pripravnosti (ventilator kraće od 30 sekundi, zatim isključite).
text_image
A B Ctext_image
SET — OK + DAY P TIME EDIT TIME TIME ONtext_image
0.8 ① F 3.0 ① F 8.8 ① FOBAVIJEST
text_image
26°C © L © Ftext_image
88 88 P G FB
text_image
8:0 P G FC
text_image
88 P © FD

text_image
08 P © FE
text_image
8:18 P © FOBAVIJEST
natural_image
Front view of a rectangular electronic device with a circular display showing '23°' and control buttons (no text or symbols on the device body)CONGRATULATIONS!
THANK YOU FOR CHOOSING THIS PRODUCT FROM SHX.
This product is only suitable for well-insulated rooms or for occasional use.
EN
PLEASE READ THE OPERATING INSTRUCTIONSCAREFULLY BEFORE STARTING ASSEMBLY,INSTALLATION, OPERATION OR MAINTENANCE.PROTECT YOURSELF AND OTHERS BY FOLLOWING THESAFETY INSTRUCTIONS. FAILURE TO FOLLOW THEINSTRUCTIONS COULD RESULT IN PERSONAL INJURYAND/OR PROPERTY DAMAGE AND/OR INVALIDATE THEWARRANTY!
Intended use
This appliance is intended exclusively for heating living spaces in households and must not be used for any other purpose. This appliance is only suitable for wall mounting. The lowest point of the appliance must be 180 cm above the floor when installed.
IMPORTANT INFORMATION ON SAFETY, STANDARD AND ELECTRICAL CONNECTION


- Only use this appliance in accordance with the guidelines in the operating instructions. Any other use not recommended by the manufacturer could result in fire, electric shock or personal injury.
- This appliance is intended exclusively for heating living spaces in households and must not be used for any other purpose.
- Remove the packaging and make sure that the appliance is not damaged. If in doubt, do not use the appliance and
contact your dealer.
- Before connecting to the mains, you must check that the type of current and mains voltage match the specifications on the appliance rating plate.
- The electrical socket to which you connect the appliance must not be defective or loose and must be suitable for the required current load and, above all, reliably earthed.
- Avoid using an extension cable, as this could overheat and cause a fire.
- If the power supply cable is damaged, it must be replaced by the manufacturer or an authorised service centre in order to avoid all possible risks. Do not twist or kink the power cable.
- The appliance must not be installed directly under a wall socket. If in doubt, have your electrical installation checked by a qualified electrician.
- It is prohibited to adapt or modify the properties of this appliance in any way whatsoever. Only use replacement parts and accessories recommended by the manufacturer (failure to do so may invalidate the warranty).
- Do not use this heater if it shows visible signs of damage.
- For any repairs to the appliance, the mains plug or the cable, always and only contact customer service centres authorised by the manufacturer
- This appliance may only be used by adults.
- Children aged 3 years and under and younger than 8 years may only switch the appliance on and off if they are supervised or have been instructed in the safe use of the appliance and have understood the resulting dangers, provided that the appliance is placed or installed in its normal position of use. Children aged 3 years and younger than 8 years must not insert the plug into the
socket, regulate the appliance, clean the appliance and/or carry out user maintenance.
-
Do not operate the appliance unattended. If you leave the room, always switch off the appliance.
-
Do not use the appliance in small rooms where people are present who are unable to leave the room independently, unless they are constantly monitored.
-
Children must not play with the appliance.
-
Children under the age of 3 must be kept away from the appliance unless they are constantly supervised.
-
Keep children away from packaging material.
-
Choking hazard if swallowed!
-
This appliance is not equipped with a device for regulating the room temperature.
-
The appliance is not suitable for continuous and precision operation.
-
Do not use this heater if it has been dropped.
-
This appliance is only intended for use in dry indoor areas.
-
Do not use the appliance in the vicinity of water or high humidity, e.g. in a damp cellar, next to a swimming pool, bathtub or shower. Ensure that no water can penetrate the appliance
-
Do not use the appliance in the direct vicinity of petrol, gas, oil, alcohol or other explosive and highly flammable liquids or gases.
-
To reduce the risk of fire, keep the air outlet of the appliance at least one metre away from all highly flammable substances such as
a. pressurised vessels (e.g. spray containers) b. Furniture c. Textiles of any kind
-
Use this heater on a horizontal and stable surface or, if necessary, fixed to a wall.
-
Never cover the appliance during operation and the cool-down phase.

- Make sure that no objects touching the heating surface get between the appliance and the mounting wall.
- Always switch off the appliance before disconnecting the mains plug.
- Caution - Some parts of the product can become very hot and cause burns. Special care must be taken when children and vulnerable persons are present. Always allow the appliance to cool down before cleaning or dismantling it.
- Unplug the appliance when not in use, before cleaning or when maintenance is required. Cleaning and user maintenance must not be carried out by children without supervision.
- Do not touch the plug with wet hands to avoid electric shocks.
ATTENTION | RISK OF INJURYThe appliance becomes hot during operation!Never touch the appliance during operation→ this could lead to serious BURNS. |
ATTENTION | FIRE HAZARDThe appliance must not be covered during operation! |
ATTENTION | SAFETY DISTANCEKeep a safe distance of at least one metre from easily flammable objects such as furniture, curtains, paper, etc.!LOCATIONAlways position the appliance so that the air can flow in and out unhindered.RISK OF BURNSThe appliance becomes very hot during use and can cause burns. Special care must be taken when children and vulnerable persons are present.RISK OF OVERHEATINGDo not heat rooms with a volume of less than 4m3 |
Symbols on the device
Symbol:
Significance:
Caution! Do not cover!
The symbol on the appliance indicates that it is not permitted to hang objects (e.g. towels, clothing, etc.) above the appliance or directly in front of it. The heater must not be covered in order to avoid overheating and the risk of fire!
Symbol:

Significance:
Protection class 2
The symbol indicates that the appliance is assigned to protection class 2.
Protection class 2 devices are not connected to the protective conductor. Instead, they have reinforced or double insulation at the level of the rated insulation voltage between active and touchable parts. Electrically conductive surfaces or conductive touchable parts are thus separated from live parts by reinforced or double insulation.
Recycling, disposal, declaration of conformity
 | RECYCLINGThe packaging materials can be recycled. It is therefore recommended to dispose of them in sorted waste |
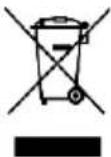 | DISPOSALThe "crossed-out wheelie bin" symbol requires the separate disposal of waste electrical and electronic equipment (WEEE). Electrical and electronic equipment may contain hazardous and environmentally harmful substances. Therefore, do not dispose of them in unsorted residual waste, but at a designated collection point for waste electrical and electronic equipment. This will help to protect resources and the environment. For further information, please contact your dealer or the local authorities. Directive2012/19/EU |
 | BATTERY DISPOSALIn accordance with Legislative Decree 188 of 20 November 2008 implementing Directive 2006/66/EC on batteries, accumulators and related waste, the crossed-out wheeled bin symbol on the battery indicates that it is forbidden to dispose of used batteries in household waste.batteries and accumulators contain highly polluting substances. The user is obliged to dispose of used batteries at the collection points in the municipality or in the appropriate containers. The service is free of charge. In this way, the legal requirements are complied with and the environment is protected.These symbols can be found on batteries:Li = battery contains lithiumAl = battery contains alkaliMn = battery contains manganeseCR 2025 (Li); AA (Al, Mn); AAA (Al, Mn) |
 | DECLARATION OF CONFORMITYWe hereby confirm that this product complies with the essential requirements, regulations and directives of the EU. You can view the detailed declaration of conformity at any time under the following link:https://www.schuss-home.at/downloads |
Errors and technical changes excepted.
Scope of delivery
- Fan heater
■ Wall mounting material - Operating instructions
text_image
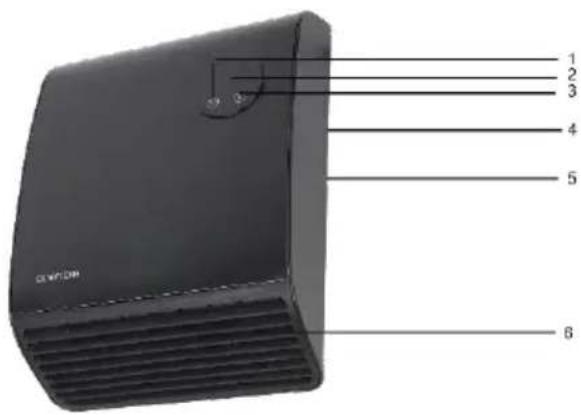
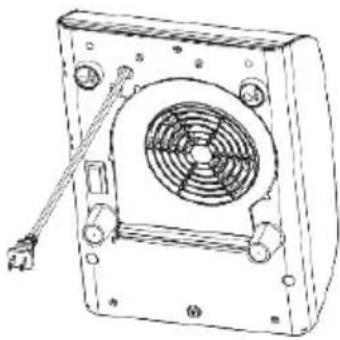
1 2 3 4 5 6Description of the device
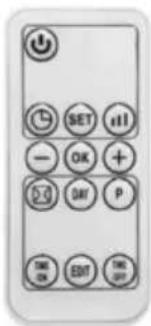
(1) Timer button
(2) Display
(3) Function button (F)
(4) Main switch with indicator light
(5) Air intake grille (rear)
(6) Air outlet grille (front)
Location and connection
- Remove all packaging material and keep it out of the reach of children. After removing the packaging, check the appliance for damage or signs of damage.
• If in doubt, do not use the device, but contact your dealer. - Select a suitable location for the appliance and observe all warnings in these operating instructions.
IMPORTANT
The bathroom fan heater should preferably be permanently installed on an electrical connection, especially when used in damp rooms.
This connection may only be carried out by an authorised electrician and is therefore not described further here.
For safety reasons, these operating instructions therefore assume use with a plug. Passages via the plug do not apply with a fixed connection.
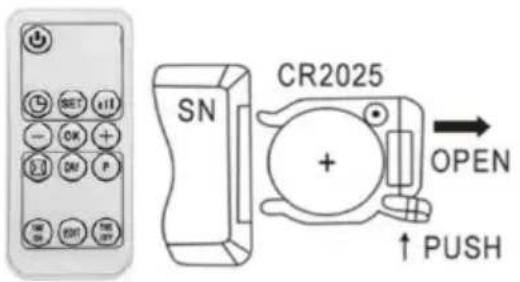
Inserting / replacing the batteries in the remote control
text_image
SN CR2025 OPEN ↑ PUSHOpen the battery cover on the underside of the remote control, press the buckle on the battery cover inwards and pull it out, remove the battery fuse strip. Please pay attention to the correct polarity (+/-).
To replace the battery, please follow the steps below:
- Open the battery cover on the underside of the remote control, press the buckle on the battery cover inwards and pull it out, remove the old battery.
- Please ensure correct polarity (+/-) Only use CR2025 batteries and dispose of the old batteries in an environmentally friendly manner and in accordance with the regulations in your country.
- Slide the battery cover on the underside of the remote control back into the remote control.
Take care not to bend the contacts. Insert the new battery and close the battery compartment cover.
NOTE
If you do not use the remote control for an extended period of time (4 weeks or longer), remove the batteries from the remote control.
Wall mounting
Attention!
The lowest point of the appliance must be 180cm above the floor when installed!
The fan heater must be installed on the wall before it is put into operation. Do not attempt to use it without installation. The installation sequence of the fan heater is as follows:

text_image
≥20 cm ≥20 cm ≥ 200 cm- Fit the mounting bracket to the top of the fan heater with the short side facing the wall. Mark the drill hole on the wall and remove the fan heater again.
- Drill two holes (8 mm) in the wall at the selected and marked point - horizontally and at a distance of 18.7 cm.
- Insert dowels into the holes and screw in the screws (included in the scope of delivery). Leave the screws protruding by approx. 5 mm.
- Hang the fan heater with the fixing brackets on the screws, push it all the way to the left and pull it down.
natural_image
Line drawing of a mechanical fan or vent assembly with mounting holes and a central fan (no text or symbols)Commissioning and function
Operation on the control panel of the appliance:
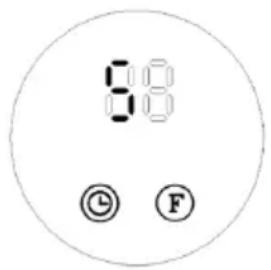
- Insert the plug and switch on the appliance by pressing the main switch 0/I. The fan heater switches to standby mode and the display shows "S".
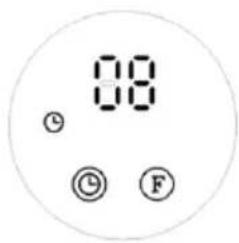
text_image
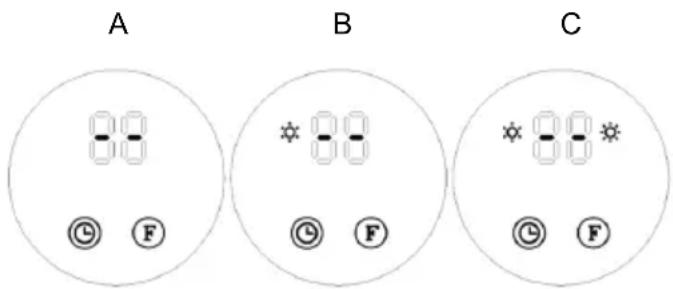
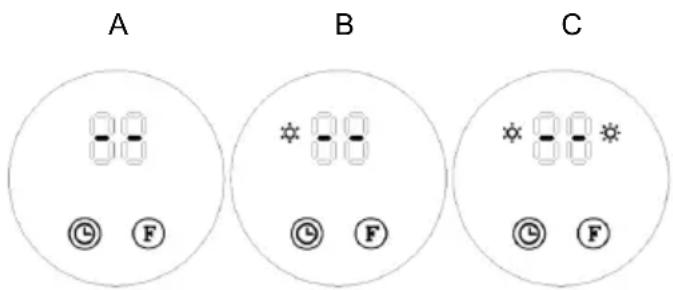
8:00 © Ⓛ F- Press the "F" button once to switch to fan mode. The display appears as shown in figure A.
Press "F" again to switch the appliance on in low heat output mode. The display appears as shown in figure B.
Press "F" for the third time to switch to high heat output. The display appears as shown in figure C.
Press "F" the fourth time to switch to standby mode (fan for less than 30 seconds, then switch off).
text_image
A B C- You can use the timer button Ⓛ to set a suspended start time. Switch the appliance to standby mode ('S') and press the timer button.
- Each time the timer button is pressed, the waiting time until switch-on is increased by one hour. The display shows the set number of hours and how long they have elapsed. The timer indicator light illuminates.
Once the set time has been reached, the appliance starts automatically. The preset temperature is 23^ C. If you work with the appliance buttons, the thermostat cannot be set.
- If no weekly timer is active and no temperature is set with the remote control, the appliance switches itself off after twelve hours of operation.
Pressing the ON/OFF button switches the appliance on. The display appears as shown in Fig. A.
- Press the remote control function button Ⓞ once to heat the appliance at half power. The display appears as shown in Fig. B.
- Press a second time and the appliance heats at full power. The display shows as in Fig. C.
- Press a third time and the appliance returns to standby mode (see Fig. A.).
- The timer button Ⓤ on the remote control works exactly like the one on the appliance.
text_image
SET — OK + DAY P TIME OUT EDIT TIME OUTOperation with the remote control:
NOTE
The remote control only works if the sensor on the remote control is pointed directly at the fan heater. The appliance must be in standby mode (shown on the display!)
Press the "button" button to set the timer (00-12 hours). Press the button once to increase the timer by one hour. After the time has been set, the display shows the current set time for 5 seconds, then returns to the previous display and the "indicator lights up at the same time. The illustration below is an example of setting 8 hours.
text_image
08 ① ② FNOTE
If the temperature and the weekly programme are not set, the appliance switches off automatically after 12 hours of continuous operation and switches to standby mode.
The timer function on the remote control works in the same way as the timer button on the appliance. To set the current time and day (can be set both in standby mode and in working mode):
- Press the "SET" button once and the display will show "12" by default. Use the buttons "+ / -" to set the current hour (24 hours in total).
- Press "SET" again and the display will show "30" for minutes by default. Use the buttons "+ / (-)" to set the current minute (00-59 minutes).
- Press "SET" for the third time and the display will show "d7" for the day by default. Use the buttons "+ /−" to set the current day (Monday-Sunday: d1-d7).
- Press "OK" to confirm the setting. The display shows the previous settings.
For example: Set to Wednesday, 9:30am at 25°C under II heating, please refer to the following photos.

text_image
0.8 © F 3.0 © F 0.8 © FNOTE
The time and day of the week set above are retained as long as the appliance is switched on or in standby mode. If the main power is switched off, a power failure occurs or the appliance is unplugged, the settings must be reset. You can press " " to check the current time and day of the week you have set.
Setting the temperature:
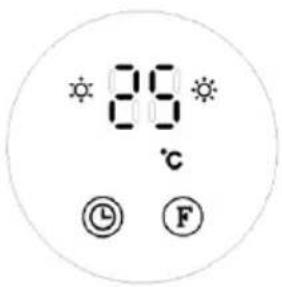
text_image
28°C © FDuring operation, press "⊖ /⊕ ", the display shows "23" by default. Press "⊖ /⊕" to set the desired temperature (temperature range 10-49°C) and press "OK" to confirm the setting.
For example: The current room temperature is 15^ C. If you set the temperature to 25^ C, the display will show as follows.
If you want to cancel the temperature setting, press " 🔊 to select heating level I or II. Meanwhile, the LED will display "--" and the " °C" indicator will go out. After continuous heating for 12 hours, the fan will operate for 30 seconds and then switch to standby mode.
NOTE
An intelligent working method is used to set the temperature:
- Setting temperature - room temperature>2°C: Operation with high output;
- 0^ C < setting temperature - room temperature ≤ 2^ C : Operation with low power;
- Setting temperature - room temperature = 0°C: The fan will operate for 30 seconds to cool the inside of the appliance and protect the components, then it will switch to standby mode.
- After switching to standby mode, when the appliance cools down and the set temperature - room temperature is ≥ 2^ , the appliance will wake up and continue heating.
Set weekly programme (only via remote control):
- Press to set the product to work mode.
- As explained in point 5 above, after you have set the current time/day, follow the instructions for setting the weekly programme.
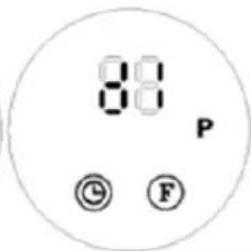
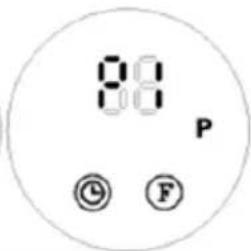
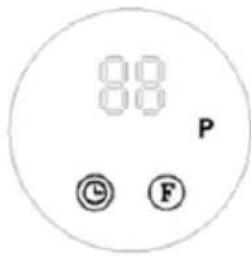
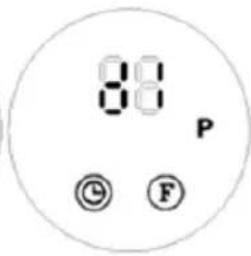
- Press "p", the display shows "P", it enters the weekly programme mode. (Figure A)
- Press "DAY", the display shows d1d7, set the working days as required (Monday to Sunday: d1d7). For example, if you set Monday, the display will show this as in figure B.
NOTE: To distinguish between the setting of the current day and the working time of the day: Current day - Monday to Sunday: d1d7 Working time - Every day: P1P6
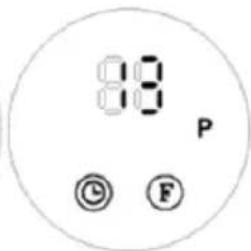
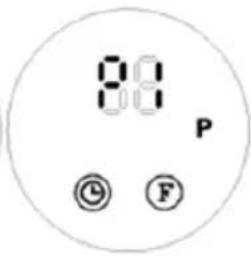
- Press "DIT", the display shows P1\~P6 (a maximum of 6 time periods can be set for each day). For example, setting (Figure C).
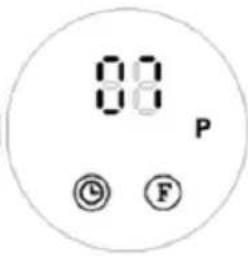
- Press "TIM", the display shows "00" by default. Press "TIME" continuously to set the switch-on time. For example, to set the switch-on time to 7:00 am (as shown in figure D) (Note: The setting time can be selected from 0 to 24).
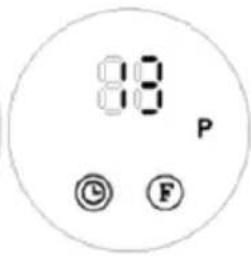
- Press "TIME", the display shows the previously set switch-on time by default. Press "TIME" continuously to set the switch-off time. For example, to set the switch-off time to 13:00 (the display shows this as in figure E), (Note: The switch-off time must be after the switch-on time. If the switch-on time is the same as the switch-off time, the appliance is in standby mode).
- Repeat steps 4-7 above to set the entire weekly programme (each day the work of each segment opens, the time of switching off).
- After the above settings, press "DRY" to select the switch-on day of the week, then press "BIT" to select the switch-on time of the day, then press "- / + " to set the desired temperature (temperature range 10-49°C), press "OK" to confirm the setting.
- To deactivate the weekly function, press the "p" button, the "P" display goes out. The weekly programme is switched off. The appliance will return to the previous operating status.
NOTE
After completing the above settings and when the P programme is active, press Use "DAY" and "EDIT" to check the time set for each day and the time periods.
The switch-on times range from 0 to 24 hours and cannot be set in minutes.
The "TIME/OFF" must not be less than "TIME/ON".
If "TIME/ON" is equal to "TIME/OFF", the time period enters standby mode.
A
text_image
88 P © FB
text_image
88 P © FC
text_image
8:0 P © FD
text_image
00 P © FE
text_image
88 P © FNOTE
If the main power is switched off, a power failure occurs or the appliance is unplugged, the settings must be reset. You can press "SET" to check your set time and day.
Set window opening detection (ONLY via remote control):
- Press "💡" to switch the product to standby mode. Heat for a moment to reach the desired room temperature.
- Press the " ☒ " button on the remote control to activate window detection. The symbols " ☒ / °C " appear on the display.
- The temperature display shows "23" as standard. Use the "⊖ /⊕" buttons to set the target temperature. During window opening detection mode, the product will stop operating within 10 minutes as soon as the room temperature drops by 5-10°C. It will then switch to standby mode within 30 minutes. It will then switch to standby mode within 30 minutes. To switch the device back on, press "⊕".
- To switch off the window opening detection, press " ☐ " again, the " ☐ " display will go out and the appliance will return to the previous operating mode.
- For example: If the current room temperature is below 23^ C , set it to 23^ C and window open detection will be activated. (Figure F)
- If window opening detection and the weekly timer programme are activated at the same time, the appliance will operate according to the set temperature in window opening detection mode when it is switched on during the weekly timer time (Figure G).
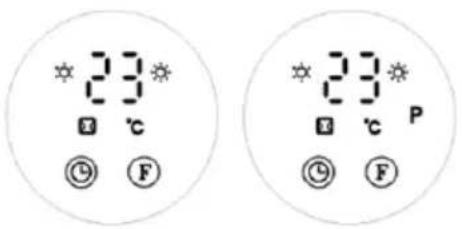
text_image
23 ℃ ⑨ F 23 ℃ P ⑨ FNOTE: To activate the weekly timer function, you must set the switch-on time of the day and the day of the week. Otherwise, the weekly time is set to 00 by default, which means that the appliance is not switched on.
Cleaning and maintenance
Keep the appliance clean. Switch it off for cleaning or maintenance work, remove the plug from the socket and allow the appliance to cool down beforehand.
Clean the outside of the appliance regularly with a dry or very slightly damp cloth. Do not use harsh soaps, sprays, cleaning or scouring agents, wax, polishing agents or other chemical solutions. You can remove dust from the back of the appliance with a feather duster.
To thoroughly clean the rear, unscrew the bathroom fan heater from the wall.
TECHNICAL INFORMATION
| Model: | SHXBH20R |
| Input voltage: | 220-240 V~ |
| Frequency: | 50Hz |
| Performance: | 2000 W |
| Protection class: | IP22 |
| Dimensions | 253 x 347 x 144 mm |
| Weight | 2.3 kg |
| Remote control | Battery: 1x CR2025 3V |
| Contact address for further information: | Schuss Home Electronic GmbHScheringgasse 3, A-1140 ViennaService line: +43 (1) 97 0 21www.schuss-home.at / www.shx.atFB-No.: 236974 t / FB-Court: Vienna |
Required information on electric individual room heaters
| Item number SHXBH20R | ||||||
| Specification | Symbol | Value | Unit | Specification | Unit | |
| Heat output | Only for electric storage single-room heaters:Type of heat supply control | |||||
| Nominal heat output | Pnom | 2,0 | kW | Manual control of the heat supply with integrated thermostat | No | |
| Minimum heat output (guide value) | Pmin | 1,4 | kW | Manual control of the heat supply with feedback of the room and/or outside temperature | No | |
| Maximum continuous heat output | Pmax,c | 2,0 | kW | Electronic control of the heat supply with feedback of the room and/or outside temperature | No | |
| Auxiliary power consumption | Heat output with fan support | No | ||||
| With Nominal heat output | elmax | 0 | kW | Type of heat output/room temperature control | ||
| With Minimum heat output | elmin | 0 | kW | Single-stage heat output, no room temperature control | No | |
| In the Ready state | elsB | 0,000 | kW | Two or more manually adjustable levels, no room temperature control | No | |
| Room temperature control with mechanical thermostat | No | |||||
| With electronic room temperature control | No | |||||
| Electronic room temperature control and time-of-day control | No | |||||
| Electronic room temperature control and weekday control | Yes | |||||
| Other control options | ||||||
| Room temperature control with presence detection | No | |||||
| Room temperature control with open window detection | Yes | |||||
| With remote control option | No | |||||
| With adaptive control of the heating start | No | |||||
| With operating time limit | Yes | |||||
| With black ball sensor | No | |||||
| Contact details: | Schuss Home Electronic GmbHScheringgasse 3 - 1140 Vienna - Austriahttps://www.schuss-home.at/ | |||||
WARRANTY
With this quality product from SHX, you have made a decision in favour of innovation, durability and reliability.
This SHX device is guaranteed for 2 years from the date of purchase in Austria and Germany!
If, contrary to expectations, service work on your device should nevertheless be necessary during this period, we hereby guarantee you a free repair (spare parts and labour) or (at Schuss's discretion) replacement of the product. If neither repair nor replacement is possible for economic reasons, we reserve the right to issue a time value credit note.
In any case, please contact the customer hotline as a first step (see instructions for use - "Contact addresses for further information and service line").
Please note that any repair work carried out by unauthorised workshops will immediately invalidate this warranty.
This guarantee does not cover
• Damage due to non-compliance with the operating instructions
• Repair or replacement of parts due to normal wear and tear
• Devices that are used - even partially - for commercial purposes
• Devices mechanically damaged by external influences (fall, impact, breakage, improper use, etc.) as well as signs of aesthetic wear and tear
• Devices that have been handled improperly
• Devices that have not been opened by our authorised service workshop
• Unfulfilled consumer expectations
• Damage caused by force majeure, water, lightning, overvoltage
- Devices for which the type designation and/or serial number on the device has been changed, deleted, made illegible or removed
• Defects due to extraordinary soiling
- services outside our authorised workshops, the transport costs to an authorised workshop or to us and back and the associated risks
We would like to emphasise that within the warranty period, a lump sum of € 60 (indexed based on CPI 2015, June 2020) will be charged in the event of operating errors or if no error is detected.
The provision of a warranty service (repair or replacement of the device) does not extend the absolute< warranty period of 2 years from the date of purchase.
The 2-year guarantee is only valid on presentation of the proof of purchase (must include the name and address of the dealer as well as the complete appliance designation) and the corresponding guarantee certificate, on which the appliance type and the serial number (visible on the box and on the back or bottom of the appliance) must be noted! Without the warranty certificate, only the statutory warranty applies!
We expressly point out that the statutory warranty rights are not affected by this guarantee and remain unaffected.
Schuss Home Electronic GmbH and its vicarious agents are only liable for damages in the event of gross negligence or wilful intent. Liability for loss of profit, expected but unrealised savings, consequential damage and damage arising from third-party claims is excluded.
You can find the contact address of the relevant service centre on our homepage www.schuss-home.at.
Congratulations on your choice. We hope you enjoy using your SHX device!
ADDRESS
SHX Distribution
Schuss Home Electronic GmbH
A-1140 Vienna, Scheringgasse 3
Tel.: +43 (0)1/ 970 21
Type designation:....
Serial number:......