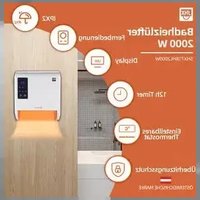
SHX71BHL2000W - Heating SHX - Free user manual and instructions
Find the device manual for free SHX71BHL2000W SHX in PDF.


User questions about SHX71BHL2000W SHX
0 question about this device. Answer the ones you know or ask your own.
Ask a new question about this device
Download the instructions for your Heating in PDF format for free! Find your manual SHX71BHL2000W - SHX and take your electronic device back in hand. On this page are published all the documents necessary for the use of your device. SHX71BHL2000W by SHX.
USER MANUAL SHX71BHL2000W SHX
natural_image
Two white electric heating devices with digital display and control buttons, shown from different angles (no text or symbols visible)HERZLICHEN GLÜCKWUNSCH!
VIELEN DANK, DASS SIE SICH FÜR DIESES PRODUKT VON SHX ENTSCHIEDEN HABEN.

text_image
SET OK OKP TME ON EDIT TME OFF SN CR2025 + OPEN ↑ PUSHtext_image
SET - OK + DAY P TIME ON EDIT TIME OFF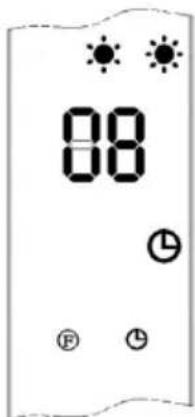
text_image
08 ① ②text_image
D P 88 F ⊕ E P 88 F ⊕ F P 88 F ⊕ G P 88 F ⊕ H P 88 F ⊕natural_image
Two electric heating devices shown from front and side views, one black with digital display and control buttons, the other white with LCD screen (no visible text or symbols)FÉLICITATIONS !
MERCI D'AVOIR OPTÉ EN FAVEUR DE CE PRODUIT DE HORNBACH.

text_image
SET - OK + DAY P TIME ON EDIT TIME OFF SN CR2025 + OPEN ↑ PUSHMontage mural ! Attention !
text_image
SET - OK + DAY P TIME EDIT TIME OFF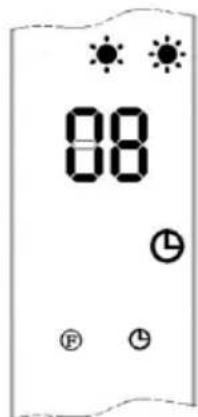
text_image
88 ① ②text_image
D P 88 F ⊕ E P 88 F ⊕ F 88 P 88 F ⊕ G P 88 F ⊕ H P 88 F ⊕natural_image
Two electric heating devices shown from front and side views, one black with digital display and control buttons, the other white with LCD screen (no visible text or symbols)CONGRATULAZIONI!
GRAZIE PER AVER DECISO DI ACQUISTARE QUESTO PRODOTTO DI HORNBACH.

text_image
SET - OK + DAY P TIME ON EDIT TIME OFF SN CR2025 + OPEN ↑ PUSHtext_image
SET - OK + DAY P TIME EDIT TIME OFF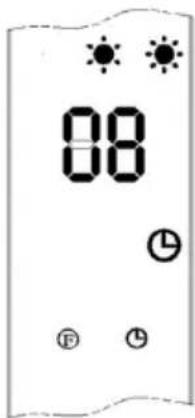
text_image
08 ① ②text_image
D P 88 F ⊕ E P 88 F F ⊕ F G P 88 F ⊕ H P 88 F ⊕natural_image
Two electric heating devices shown from front and side views, one black with digital display and control buttons, the other white with LCD screen (no visible text or symbols)HARTELIJK GEFELICITEERD!
HARTELIJK BEDANKT DAT U VOOR DIT PRODUCT VAN HORNBACH HEBT GEKOZEN.

text_image
SET - OK + DAY P TIME ON EDIT TIME OFF SN CR2025 + OPEN ↑ PUSHtext_image
TIME ON EDIT TIME OFFtext_image
D P 88 F ⊕ E P 88 F F ⊕ F G P 88 F ⊕ H P 88 F ⊕natural_image
Two white electric heating devices with digital display and control buttons, shown from different angles (no text or symbols visible)GRATTIS!
TACK FÖR ATT DU HAR BESTÄMT DIG FÖR DEN HÄR PRODUKTEN FRÅN HORNBACH.

INNEHÅLLSFÖRTECKNING
SE
text_image
SET OK DAY P TIME ON EDIT TIME OFF SN CR2025 + OPEN ↑ PUSHVäggmontering! Varning!
text_image
TIME ON EDIT TIME OUT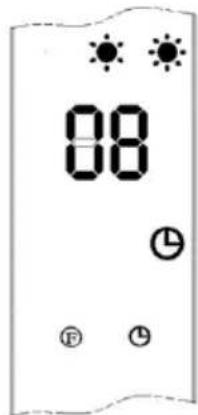
text_image
08L
text_image
D P 88 F ⊕ E P 88 F ⊕ F P 88 F ⊕ G P 88 F ⊕ H P 88 F ⊕natural_image
Two electric heating devices shown from front and side views, one black with digital display and control buttons, the other white with digital display and control buttons (no visible text or symbols)SRDEČNĚ BLAHOPŘEJEME!
DĚKUJEME, ŽE JSTE SE ROZHODLI PRO TENTO PRODUKT SPOLEČNOSTI HORNBACH.

text_image
SET OK OK P SN CR2025 + OPEN ↑ PUSHtext_image
TIME ON SET OK DAY P EDIT TIME OFFtext_image
D P 88 F ⊕ E P 88 F ⊕ F P 88 F ⊕ G P 88 F ⊕ H P 88 F ⊕natural_image
Two electric heating devices shown from front and side views, one black with digital display and control buttons, the other white with LCD screen (no visible text or symbols)SRDEČNE BLAHOŽELÁME!
ĎAKUJEME, ŽE STE SA ROZHODLI PRE TENTO VÝROBOK OD FIRMY HORNBACH.

text_image
SET OK DAY P TIME ON EDIT TIME OFF SN CR2025 + OPEN ↑ PUSHtext_image
TIME ON EDIT TIME OFF DAY P + - OK SETtext_image
D P 88 F ⊕ E P 88 F F ⊕ F G P 88 F ⊕ H P 88 F ⊕natural_image
Two electric heating devices shown from front and side views, one black with digital display and control buttons, the other white with digital display and control buttons (no visible text or symbols)FELICITĂRI!
VĂ MULȚUMIM CĂ AȚI DECIS SĂ ACHIZIȚIONAȚI ACEST PRODUSUL DE LA HORNBACH.

text_image
SET OK OUT P TIME ON EDIT TIME OUT SN CR2025 + OPEN ↑ PUSHtext_image
SET - OK + DAY P TIME ON EDIT TIME OFFtext_image
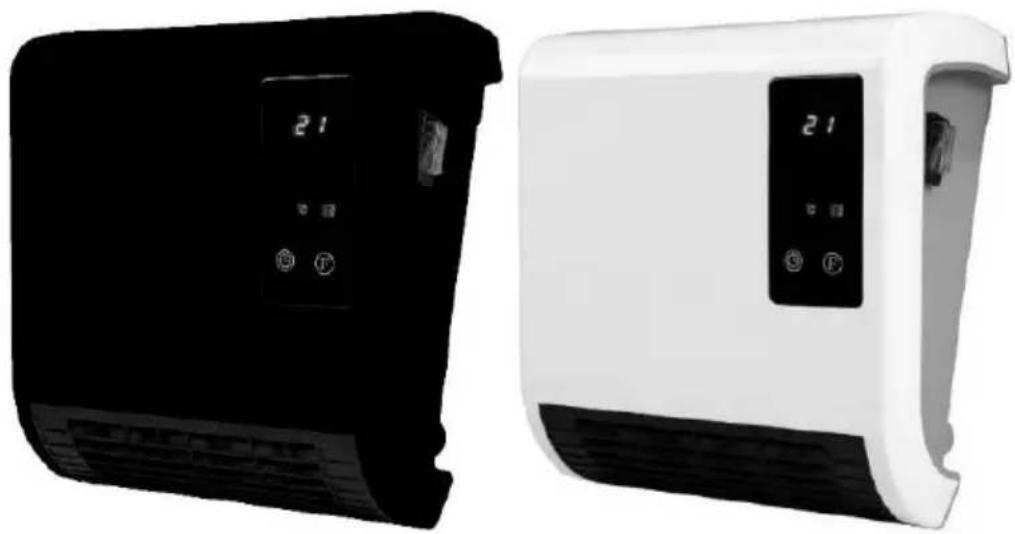
D P 88 F ⊕ E P 88 F ⊕ F P 88 F ⊕ G P 88 F ⊕ H P 88 F ⊕Bathroom Fan Heater 2000 W
SHX71BHL2000SW / SHX71BHL2000W
natural_image
Two electric heating devices shown from front and side views, one black with digital display and control buttons, the other white with a digital display and control buttons (no visible text or symbols)CONGRATULATIONS!
THANK YOU FOR PURCHASING THIS HORNBACH PRODUCT.

This product is intended for use in well-insulated areas and for occasional use only.
TABLE OF CONTENTS
| Important information on safety, place of use and electrical connections |
| Recycling, disposal and Declaration of Conformity |
| Scope of delivery |
| Description of the appliance |
| Place of use and connection to power supply |
| Wall mounting and free standing |
| Starting up and functions |
| Safety features |
| Cleaning and maintenance |
| Technical information |
| Required data for single-room electrical heating devices |
PLEASE READ THE OPERATING MANUAL CAREFULLY BEFORE BEGINNING ASSEMBLY, INSTALLATION, OPERATION OR MAINTENANCE. PROTECT YOURSELF AND OTHERS BY FOLLOWING THE SAFETY INSTRUCTIONS. FAILURE TO COMPLY WITH THESE INSTRUCTIONS MAY RESULT IN PERSONAL INJURY AND/OR PROPERTY DAMAGE AND/OR LOSS OF CLAIMS UNDER WARRANTY.
Intended Use
This appliance is intended exclusively for the heating of domestic living spaces and may not be used for any other purpose. The appliance is suitable for wall-mounting only. It must be installed such that the lowest part of the appliance is 180 cm above the floor.
IMPORTANT INFORMATION ON SAFETY, STANDARDS AND ELECTRICAL CONNECTIONS


-
Use this appliance only in accordance with the guidelines in this operating manual. Any other use not recommended by the manufacturer may result in fire, electrical shock or personal injury.
-
This appliance is intended exclusively for the heating of domestic living spaces and may not be used for any other purpose.
-
Remove the packaging and check that the appliance is not damaged. If you are in doubt, do not use the appliance and contact your dealer.
-
Before connecting to the mains power supply, check that the mains voltage and type matches the information provided on the type plate of the appliance.
-
The electrical socket to which you connect the appliance must not be defective or loose, must be suitable for the current load required, and above all must be reliably earthed.
-
Avoid using an extension cable, because this could overheat and cause a fire.
-
If the power supply cable is damaged, it must be replaced by the manufacturer or an authorised service centre to avoid all possible risks. Do not twist, kink or sharply bend the power supply cable.
-
Do not situate the appliance directly beneath a wall socket. In case of doubt, have your electrical installation checked by a qualified electrician.
-
It is forbidden to adapt or modify the properties of this appliance in any way. Use only replacement parts and accessories recommended by the manufacturer (failure to do so may result in loss of warranty cover).
-
Do not use this heater if it shows visible signs of damage.
-
For any repairs to the appliance, the power plug or the cable, always contact the customer services authorised by the manufacturer.
-
This appliance is for use by adults only.
-
Children over 3 and under 8 years may only switch the appliance on or off under supervision or if they have been instructed in its safe use and understand the resultant
dangers, on the condition that the appliance is positioned or installed in its normal place of use. Children over 3 and under 8 years must not be allowed to insert the plug into the socket, alter the settings, clean the appliance or perform user maintenance on the appliance.
- Do not operate the appliance unattended. Whenever you leave the room, always switch off the appliance.
- Do not use the appliance in small rooms where people are present who are unable to leave the room by themselves, unless they are under constant supervision.
- Do not allow children to play with the appliance.
Keep children under 3 years away from the appliance unless they are under constant supervision.
- Keep the packaging materials away from children.
If swallowed, these pose a risk of suffocation.
- This appliance is not equipped with a thermostat for controlling the room temperature.
- The appliance is not suitable for continuous or high-precision operation.
- Do not use this heater if it has previously been dropped.
- This appliance is for use in dry indoor spaces only.
- Do not use the appliance near water or high humidity, e.g. in damp cellars, or hear swimming pools, baths or
showers. Make sure that water cannot get into the appliance.
-
Do not use the appliance in close proximity to petrol, gas, oil, alcohol or other explosive or flammable liquids or gases.
-
To minimise the risk of fire, ensure a distance of at least one metre between the air outlet of the appliance and any flammable materials such as:
a. Pressurised containers (e.g. spray cans)
b. Furniture
c. Textiles of any kind
-
This heater should be operated on a level, stable surface or attached to a wall if necessary.
-
Never cover the appliance while it is in operation or while cooling down after use.
-
Ensure that no objects come between the appliance and the mounting wall that could touch the heating surface.
-
Always switch the appliance off before unplugging it.
-
Caution: certain parts of this appliance may become very hot and cause burns. Take particular care if children or vulnerable persons are present. Always allow the appliance to cool down before cleaning it or removing it from its mounting.
-
Unplug the appliance when you are not using it and before cleaning it or performing any maintenance. Do not allow children to clean or perform user maintenance on the appliance without supervision.
- To avoid electric shocks, do not touch the plug with wet hands.
ATTENTION | RISK OF INJURYThis appliance becomes hot during use.Never touch the appliance while it is in use → this may result in severe BURNS. |
ATTENTION | RISK OF FIREDo not cover the appliance while it is in use. |
ATTENTION | SAFE DISTANCEMaintain a safe distance of at least one metre from flammable items such as furniture, curtains, paper and similar.PLACE OF USEPosition the appliance in such a way that air can flow in and out without hindrance.RISK OF BURNSThis appliance becomes very hot during use and can cause burns. Take particular care if children or vulnerable persons are present. |
RISK OF OVERHEATING
Do not use the appliance in rooms with a volume less than 4m^3 .
Symbol markings on the appliance
Symbol:
Meaning:

Attention: Do not cover
The symbol on the device indicates that it is not permitted to suspend any item (e.g. towels, clothing etc.) above the appliance or directly in front of it. To prevent overheating and the risk of fire, the heater must not be covered.
Symbol:

Meaning:
Protection class 2
This symbol indicates that the appliance is classified as protection class 2 (double insulated).
Class 2 appliances are not connected to the earth of the electricity supply. Instead, they feature an enhanced or doubled insulation up to the rated insulation voltage between the live parts and the parts that can be touched. Accordingly, electrically conductive surfaces or other parts that can be touched are isolated by an enhanced or doubled insulation from live parts.
Recycling, disposal and Declaration of Conformity

RECYCLING
The packaging materials can be recycled. It is recommended that you dispose of them in separated waste.
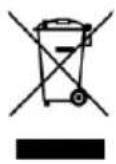 | DISPOSALThe pictogram with the crossed out dustbin indicates that electrical and electronic appliances must be disposed of separately from household waste (WEEE). Electrical and electronic appliances can contain harmful and environmentally hazardous materials. Do not dispose of them in unsorted residual waste, but at a registered collection centre for waste electrical and electronic equipment. By doing so, you will help to conserve resources and protect the environment. For further information please consult your dealer or your local authorities. Directive 2012/19/EU |
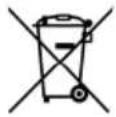 | DISPOSAL OF BATTERIESIn accordance with Legislative Decree no. 188 of 20 November 2008 implementing Directive 2006/66/EC on batteries, accumulators and their associated waste, the symbol of the crossed-out dustbin shown on the battery indicates that it is prohibited to dispose of batteries in household waste. Batteries and accumulators contain environmentally hazardous substances. Users are obliged to dispose of used batteries at municipal collection centres or in collectors set up for the purpose. This service is free of charge. This ensures that the legal requirements are complied with and the environment is preserved.You may find the following symbols on batteries:Li = battery contains lithiumAl = battery contains alkaliMn = battery contains manganeseCR 2025 (Li); AA (Al, Mn); AAA (Al, Mn) |
 | DECLARATION OF CONFORMITYWe hereby confirm that this article complies with the essential requirements, regulations and guidelines of the EU. The detailed declaration of conformity can be viewed at any time via following link:https://www.schuss-home.at/downloads |
Errata and technical changes reserved.
Scope of delivery
- Fan heater
■ Wall mounting accessories - Operating manual
Description of the appliance
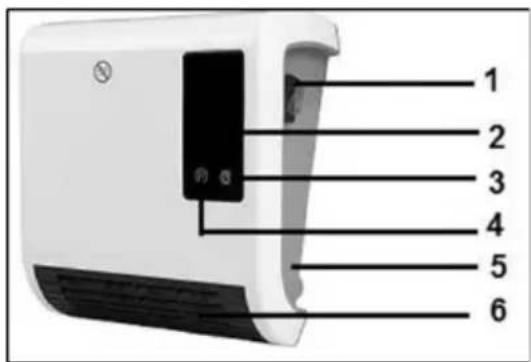
text_image
1 2 3 4 5 6(1) Main switch with indicator lamp
(2) Display
(3) Timer button
(4) Function button (F)
(5) Air inlet grille (rear)
(6) Air outlet grille (front)
Place of use and connection to power supply
- Remove all packaging material and keep this away from the reach of children. After removing the packaging, check for any damage or signs of damage to the appliance.
If in doubt, do not use the appliance and contact your dealer.
- Choose a suitable location for installing the appliance and observe all the warnings in this operating manual.
IMPORTANT
It is preferable to install the bathroom fan heater with a hard-wired power connection (rather than via plug and socket), particularly if it is used in a wet room.
Such a connection can only be made by an authorised electrician and is therefore not further discussed here.
For this reason, it is assumed in this manual for safety reasons that you are carrying out a DIY installation using the plug and socket connection.
Passages in the manual that refer to the plug do not apply in the case of a hard-wired connection.
Insertion/replacement of batteries in the remote control unit
text_image
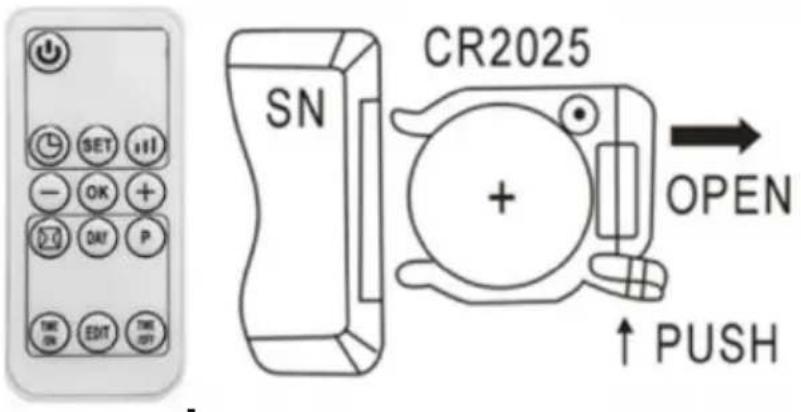
SET OK OKP TME ON EDIT TME OFF SN CR2025 + OPEN ↑ PUSHOpen the battery cover on the bottom of the remote control unit, press the clasp on the battery cover inwards and pull it out. Remove the battery securing strips. Be sure to observe the correct polarity (+/-).
To replace the battery:
- Open the battery cover on the bottom of the remote control unit, press the clasps on the battery cover inwards and pull it out. Remove the old battery.
- Observe the correct polarity (+/-). Use only battery type CR2025. Dispose of old batteries in an environmentally friendly manner and in accordance with your country's regulations.
- Slide the battery cover on the bottom of the remote control unit back into the unit.
Take care not to bend the contacts. Insert the new battery and close the battery compartment cover.
NOTE
If you do not intend to use the remote control for an extended period (4 weeks or more), remove the batteries from the remote control unit.
Obligatory wall mounting. Attention!
The lowest part of the appliance must be at least 180 cm above the floor.
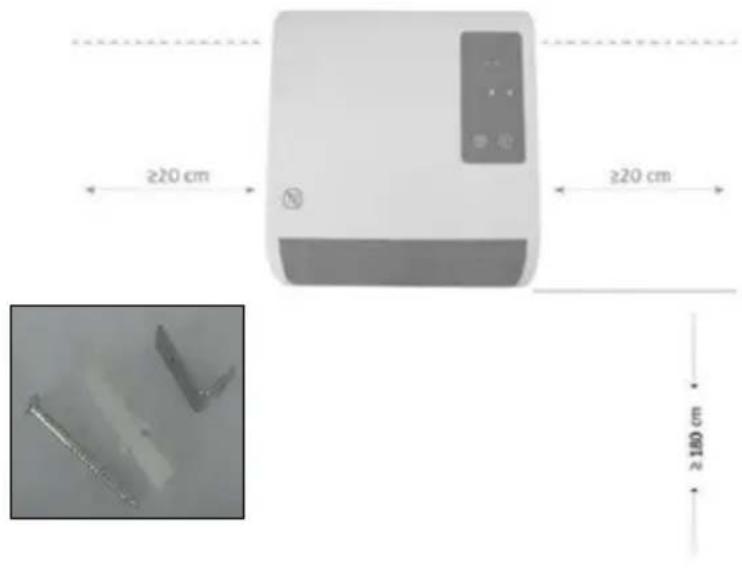
text_image
≥20 cm ≥20 cm ≥150 cm- Fit the mounting brackets to the top of the bathroom fan heater with the short side to the wall. Place against the wall, mark the drilling hole positions on the wall and remove the heater.
- Drill two 8-mm holes in the wall at the places marked, horizontal and with a spacing of 18.7 cm.
- Insert rawl plugs into the holes and insert the screws (supplied). Tighten the screws until they protrude by about 5 mm.
- Mount the fan heater by hooking the mounting brackets over the screws. Slide unit fully to the left and pull it downwards.
Starting up and functions
• The main switch must be in the Off (O) position.
- Unwind the power cable completely and insert the plug into a suitable 220-240 V\~ socket.
- Press the main switch (I). The display shows 'S' (standby mode).
Operation with the control panel:
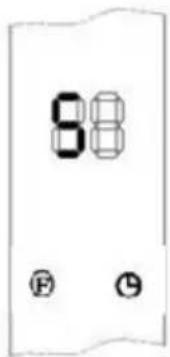
text_image
88 F G- Press the Function button (F) once. The appliance starts to blow cold air and the display appears as in Fig. A.
- Press F a second time and the appliance begins to heat at half power. The display appears as in Fig. B.
- Press F a third time and the appliance heats at full power.
The display appears as in Fig. C.
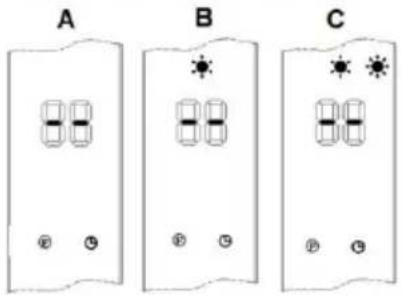
text_image
A B C- Pressing the button a fourth time returns the appliance to standby ('S') mode. The appliance now enters a cooling phase for 3 minutes.
- You can use the timer button (clock symbol) to set a specific start time. To do this, put the appliance into standby ('S') mode and press the Timer button.
Each subsequent press of the Timer button increases the delay time before operation by one hour. The display indicates the number of hours set and the time remaining. The timer indicator lamp illuminates.
Once the set time is reached, the appliance starts automatically. The temperature is preset to 23^ C. The temperature can be adjusted using the remote control but not using the buttons on the appliance itself.
- If no week timer is set and no temperature has been set with the remote control, the appliance switches itself off after twelve hours of operation.
Operation with the remote control:
NOTE
The remote control unit only works when its sensor is aimed directly at the bathroom fan heater.
The appliance must be in standby mode (Check the display)
- Press the ON/OFF button to switch the appliance on. The display appears as in Fig. A.
- Now press the remote control function button once to heat at half power. The display appears as in Fig. B.
- Press a second time and the appliance heats at full power. The display appears as in Fig. C.
- Press a third time and the appliance returns to Standby mode (see Fig. A.).
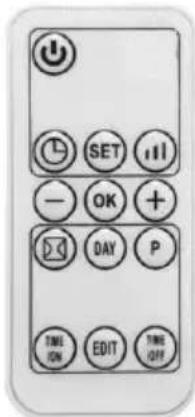
text_image
SET OK DAY P TIME ON EDIT TIME OFF
- The timer button on the remote control functions in exactly the same way as that on the appliance.
Setting the day and time:
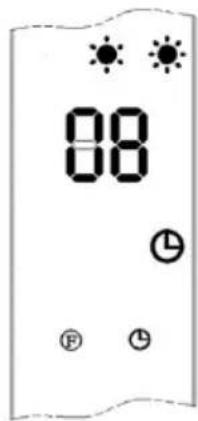
- Press the SET button once: the display shows '12'.
Now use the plus and minus buttons √ to set the hour of the current time (0-23).
Press SET again to display the minutes. The display shows '30' and you can use the plus and minus buttons to set the minutes of the current time (0-59).
text_image
08P
L
Now press SET again. The display shows 'd7' (9); you can now use the plus and minus buttons to set the day of the week as follows: Monday = d1, Tuesday = d2, etc.
Finally, press to confirm your settings. The display now resorts to what it was indicating before you made the settings.
To check the day and time, press SET.
Setting the temperature:
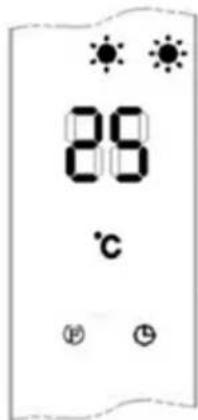
- Press the plus or minus button while the appliance is in operation. The display shows the default value '23'. Next, press the plus or minus button to set the desired temperature (10-35°C). Press OK to confirm your setting. The display now shows the set temperature and the power level.
- Once you have set the temperature, the appliance itself selects the power level required to reach it: if the temperature must be increased by more than 2^ , it selects full power, but if the increase is less than 2^ , it operates at half power. Once the set temperature is reached or exceeded, the heating element is switched off and the fan continues to run for 3 more minutes.
text_image
28 °CThe appliance thus keeps the air moving in the room and can thereby detect whether the room temperature is falling. After 3 minutes the appliance returns to standby mode.
If by now the room temperature has fallen to 2^ C below the set room temperature, the appliance starts up again.
• To override the thermostat, press the function button and select half or full power. The appliance now runs continuously. The temperature disappears from the display, which now changes to that of either Fig. B or Fig. C.
After twelve hours of continuous operation the appliance switches off automatically and returns to standby mode.
Week timer:
To set the week timer, the current date and time must have already been set; see the section 'Setting the day and time' above.
-
Switch the appliance on with the ON/OFF button
-
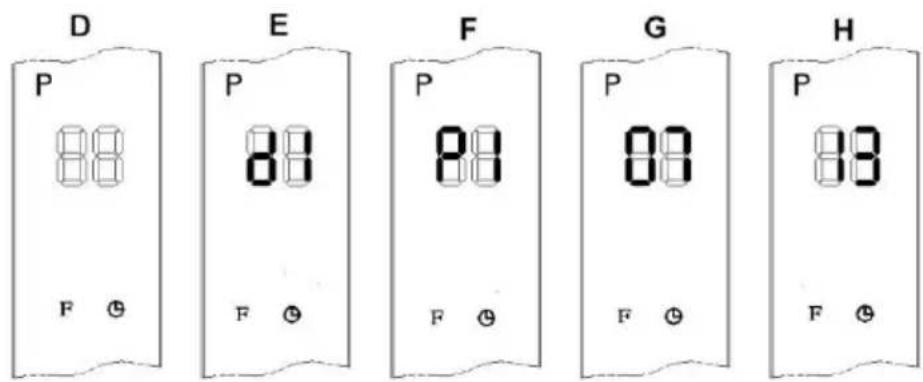
Now press . The display shows 'P' in the top left corner and changes to week timer setting, see Fig. D.
-
Now press . The display shows 'd1'. Cycle through to the day you require by pressing DAY repeatedly: d1 = Monday, d2 = Tuesday etc.
If you are making a setting for Mondays, the display appears (flashing) as in Fig. E.
-
Now press: The display shows 'P1' (Programme 1). You can set up to six time periods, P1 to P6, for each day. Press EDIT again, then go to P2, and so on. Set the first period (P1), and then the display appears (flashing) as in Fig. F.
-
Now press: The display shows the default value '00'. Press TIME/ON repeatedly to set the start time (0-24), e.g. to 07:00, see Fig. G.
-
Now press . By default the display now shows the start time. Press TIME/OFF repeatedly to set the end time (0-24), e.g. to 13:00, see Fig. G.
Note that the end time must always be later than the start time! If the two times are identical, the appliance goes into standby mode.
text_image
D P 88 F ⊕ E P 88 F F ⊕ F G P 88 F ⊕ H P 88 F ⊕-
Use the plus and minus buttons to set the required temperature.
-
While a value is flashing, you can change it or move to the next setting. If you wait too long, the settings mode is cancelled.
-
Finally press OK to confirm your setting.
-
Repeat steps 2-7 to set a complete week-long programme of start and end times, offering seven days with up to six operating periods per day.
-
To change a setting, go through the process described above and overwrite the current values. Confirm with OK.
-
To deactivate the week timer, press the P button again. The 'P' disappears from the display and the week programme is disabled. The appliance returns to its previous function.
NOTE
The week timer works in a continuous cycle, recommencing with day 1 after reaching day 7. If you do not want this, deactivate the week timer using the P button.
Remarks:
- To check your settings, press the following sequence of buttons: DAY, EDIT, TIME/ON and TIME/OFF. The settings appear on the display.
• The timer can be set to whole hours but not to minutes.
• TIME/OFF must always be later than TIME/ON.
- If the appliance is switched off at the main switch, if there is a power failure or if the plug is pulled out, all settings are lost. Press SET to check the set day and time and to set them if necessary.
Switching the Open Window function on and off:
- Check that the appliance is on and is heating.
- Press . The relevant symbol and ^ C appear on the display.
The default setting is 23^ C. You can set your desired temperature using the plus and minus buttons. If open window detection is active, the appliance will switch off and go into standby mode if the temperature in the room falls by 5-10^ C within ten minutes.
You can then switch the appliance back on with the ON/OFF button.
- To deactivate open window detection, press the 📋 button again. The symbol disappears from the display and the appliance resumes the previously set operation.
- If you activate open window detection while the appliance is operating in a preset week programme, the open window detection will only function during the operating times that are set in the programme.
Safety features
Overheating protection switches the appliance off if its interior becomes too hot. This can occur if the appliance cannot fully expel all its heat or if too little fresh air is available for it to draw in.
The usual cause of this is that something is covering or partly covering the appliance or that the air inlet or outlet is blocked or clogged.
If the overheating protection has interrupted operation, the appliance changes to fan only mode to dissipate the heat. The display does not change.
Once the interior of the appliance has cooled, it resumes its set function. It is nevertheless recommended that you switch the appliance off using the remote control and allow it plenty of time to cool down.
Remove the cause of overheating and then start the appliance up normally. If you cannot identify any cause for the overheating and if the problem persists, stop using the appliance and contact your dealer.
Cleaning and maintenance
Keep the appliance clean. Before cleaning or performing maintenance, switch the appliance off, remove the plug from the socket and allow to cool.
Clean the outside of the appliance regularly with a dry or very slightly moistened cloth. Do not use any abrasive soap, spray, detergents or scouring agents, wax, glazing agents or other chemical solutions. Dust can be removed from the rear of the appliance with a duster.
To clean the rear thoroughly, unscrew the bathroom fan heater from the wall.
TECHNICAL INFORMATION
| Article number: | black: SHX71BHL2000SWwhite: SHX71BHL2000W |
| Input voltage: | 220-240 V~ |
| Frequency: | 50 Hz |
| Power range: | 1800 – 2000 W |
| Protection class: | IP22 |
| Weight: | 1.7 kg |
| Dimensions: | 28,5 x 26 x 15,5 cm |
| Remote control | Battery: 1x CR2025 3 V |
| Contact address for further information: | Schuss Home Electronic GmbHScheringgasse 3, A-1140 WienServiceline: +43 (1) 97 0 21www.schuss-home.at / www.shx.atFB-Nr: 236974 t / FB-Gericht: Wien |
Required data for single-room electrical heating devices
| Article number SHX71BHL2000SW, SHX71BHL2000W | ||||||
| Information | Symbol | Value | Unit | Information | Unit | |
| Heat output | Single-room electric storage heaters only:Method of heat transfer control | |||||
| Nominal heat output | P_nom | 2.0 | kW | Manual control of heat transfer with integrated thermostat | No | |
| Minimum heat output (guideline) | P_min | 1.0 | kW | Manual control of heat transfer with feedback of room and/or outside temperature | No | |
| Maximum continuous heat output | P_max,c | 2.0 | kW | Electronic control of heat transfer with feedback of room and/or outside temperature | No | |
| Auxiliary current consumption | Fan-assisted heat outlet | No | ||||
| At Nominal heat output | el_max | 0 | kW | Type of heat output/room temperature control | ||
| At Minimum heat output | el_min | 0 | kW | Single heat output level, no room temperature control | No | |
| In standby mode | el_sB | 0.000 | kW | Two or more manually settable output levels, no room temperature control | No | |
| Room temperature control with mechanical thermostat | No | |||||
| With electronic room temperature control | No | |||||
| Electronic room temperature control and timed control through the day | No | |||||
| Electronic room temperature control and timed control through the week | Yes | |||||
| Other control options | ||||||
| Room temperature control with presence detection | No | |||||
| Room temperature control with detection of open windows | Yes | |||||
| With remote control option | No | |||||
| With adaptive start-up control | No | |||||
| With operating time limiter | Yes | |||||
| With ball-type sensor | No | |||||
| Contact information: | Schuss Home Electronic GmbHScheringgasse 3 - 1140 Wien -Österreichhttps://www.schuss-home.at/ | |||||
WARRANTY
With this quality product from SHX you have made a decision for innovation, durability and reliability.
For this SHX device we grant a warranty period of 2 years from the date of purchase valid in Austria and Germany!
If, contrary to expectations, service work should nevertheless be necessary on your device during this period, we hereby guarantee you a free repair (spare parts and working time) or (at the discretion of Schuss) replacement of the product. If neither repair nor exchange is possible for economic reasons, we reserve the right to issue a current value credit note.
In any case, please contact the customer hotline as a first step (see instruction manual - "Contact addresses for further information and service line").
We would like to point out that repair work which has not been carried out by authorized contract workshops will immediately terminate the validity of this warranty.
This warranty does not cover:
- Damage due to non-observance of the operating instructions
• Repair or replacement of parts due to normal wear and tear
• devices that are used - even only partially - for commercial purposes - devices mechanically damaged by external influence (fall, impact, breakage, improper use, etc.) as well as signs of wear of an aesthetic nature
• devices that have been improperly handled
• devices that have not been opened by our authorized service centre - Failure to meet consumer expectations
- Damage caused by force majeure, water, lightning, overvoltage
- Devices where the type of designation and/or serial number on the device has been altered, erased, made illegible or removed
• Defects due to extraordinary pollution - Services outside our authorized workshops, transport costs to an authorized workshop or to us and back, as well as the associated risks.
We emphatically point out that within the warranty period, in case of operating errors or if no error was detected, a lump sum of € 60.00 (indexed basis CPI 2015, June 2020) will be charged.
The provision of warranty service (repair or replacement of the device) does not extend the absolute< warranty period of 2 years from the date of purchase.
The 2-year warranty is only valid upon presentation of the purchase receipt (must contain the name and address of the dealer as well as the complete device designation) and the associated warranty certificate, on which the device type as well as the serial number (visible on the box and on the back or bottom of the device) must be noted! Without presentation of the warranty certificate, only the legal warranty applies!
We expressly point out that the legal warranty rights are not affected by this warranty and continue undiminished.
Schuss Home Electronic GmbH and its agents are only liable for damages in case of gross negligence or intent. In any case, liability for loss of profit, expected but not realized savings, consequential damages and damages from third party claims is excluded.
The contact address of the respective service workshop can be found on our homepage www.schuss-home.at.
Congratulations on your choice. We wish you much joy with your SHX device!
ADDRESS:
SHX Vertrieb
Schuss Home Electronic GmbH
A-1140 Wien, Scheringgasse 3
Tel.: +43 (0)1/ 970 21
Type reference: ....
Serial number: ....