para llgarg al menu principal.
Dicho de Inicio
Para establisher la direccion de inicio, siga bajo estas instrucciones:
- Pulse
- Utilice <UP> , <DOWN> , <LEFT> o <RIGHT> para seleccionar Start Address o toque la pantalla donde pone Start Address.
- Si utilizes los botones en lugar de la pantalla táctil, pulse .
-
Introduzca la direccion de inicio (000-255) mediante uno de los métodos siguientes:
-
Escribe el número de la direccion realizando el teclado número que aparece en la pantalla táctil.
- Utilice los botones (o los iconos de botones de los laterales de la pantalla):
a. Utilice LEFT> o para seleccionar el digito que deseemodificar.
b. Utilice <UP> o <DOWN> para augmentar o disminuiR el valor numérico de ese digito.
c. Repita hasta haber configurado la direccion deseada.
- Pulse .
Configuración de Red

El universo del protocolo TCP / IP sera el universo de la referencia DMX.
Modo IP
La direccion IP del Maverick MK1 Spot se pueda establisher manualmente, por la red, o a una direccion estática preconfigurada, referencia para cada producto. Para configurar el modo de IP, siga las instrucciones siguientes:
- Pulse
- Utilice , , o para seleccionar Network Setup, o toque la pantalla donte pone Network Setup.
- Si utilizes los botones en lugar de la pantalla táctil, pulse .
- Utilice <UP> o <DOWN> para seleccionar IP Mode, o toque la pantalla donde pone IP Mode.
- Si utilizes los botones en lugar de la pantalla táctil, pulse .
- Utilice , , o para seleccionar entre:
Manual - configurar la direccion IP con el panel de control
DHCP - la red establece la direccion IP
- Static - una direccion estatica preconfigurada, referencia para cada producto, o toque la pantalla sobre se encuentre el modo deseado.
- Press
Universe
El Universo de ser asignado a工程技术 del producto. Para configurar el Universo haga lo suejiente:
- Pulse
- Utilice , , o para seleccionar Network Setup, o toque la pantalla donte pone Network Setup.
- Si utilizes los botones en lugar de la pantalla táctil, pulse .
- Utilice <UP> o <DOWN> para seleccionar Universe, o toque la pantallaonde pone Universe.
-
Si utilizes los botones en lugar de la pantalla táctil, pulse .
-
Introduzca la direccion de inicio (000-255) mediante uno de los métodos siguientes:
-
Escribe el número de la direccion realizando el teclado número que aparece en la pantalla táctil.
Utilice los botones (o los iconos de botones de los laterales de la pantalla):
a. Utilice LEFT> o para seleccionar el digito que deseee modifier.
b. Utilice <UP> o <DOWN> para augmentar o disminuiR el valor numérico de ese digito.
c. Repita hasta haber configurado la direccion deseada.
Dirección IP
Para configurar la direccion IP, haga loCEE:
- Desplácese al menu Configuración de Red
- Utilice , , o para seleccionar Network Setup, o toque la pantalla donte pone Network Setup.
- Si utilizes los botones en lugar de la pantalla táctil, pulse .
- Utilice <UP>0 para seleccionar IP, o toque la pantalla donte pone IP.
- Si utilizes los botones en lugar de la pantalla táctil, pulse .
- Introduzca la direccion IP (de 000.000.000.000 a 255.255.255.255) mediante uno de los métodos seguides:
Mediante la pantalla tactil:
a. Toque la pantalla donde se enquiry el byte (conjunto de tres theys) que necesite!.
cambiar.
b. Utilice el teclado número de la pantalla para introducir el número que desee.
c. Repita hasta haber configurado la direccion IP deseada.
a. Utilice o para seleccionar el byte (conjunto de tres theyeres) que necessite cambiar.
b. Utilice <UP> o <DOWN> para augmentar o disminuiR el valor.
c. Repita hasta haber configurado la direccion IP deseada.
- Pulse .
Mascara de subred
Para configurar la mascar de subred, haga lo suiviente:
- Desplácese al menu Configuración de Red
- Utilice , , o para seleccionar Network Setup, o toque la pantalla donte pone Network Setup.
- Si utilizes los botones en lugar de la pantalla táctil, pulse .
- Utilice <UP> o <DOWN> para seleccionar SubMask, o toque la pantalla donde pone SubMask.
- Si utilizes los botones en lugar de la pantalla táctil, pulse
- Introduzca la direccion IP (de 000.000.000.000 a 255.255.255.255) mediante uno de los métodos tíquentes:
Mediante la pantalla tactil:
a. Toque la pantalla donde se encuesta el byte (conjunto de tres theyeres) que necesite!.
cambiar.
b. Utilice el teclado número de la pantalla para introducir el número que desee.
c. Repita hasta haber configurado la direccion IP deseada.
a. Utilice o para seleccionar el byte (conjunto de tres nombres) que necessite cambiar.
b. Utilice <UP> o <DOWN> para augmentar o disminuiR el valor.
c. Repita hasta haber configurado la direccion IP deseada.
- Pulse .

En el modo DHCP o IP estálico, la configuración del menu de IP y de SubMask no tiene efecto en el producto.
Personalidad
Para establecer que personalidad DMX usar,hawklo siguiente:
- Pulse
- Utilice UP , DOWN , LEFT o RIGHT para seleccionar Personality, o toque la pantalla donde pone Personality.
- Si utilizes los botones en lugar de la pantalla táctil, pulse .
- Utilice , , o para seleccionar DMX 22CH o DMX 29CH, o toque la pantalla sobre se ocundre el ajuste deseado.
- Si utilizes los botones en lugar de la pantalla táctil, pulse .
- Utilice , , o para seleccionar NO (cancelar) o YES (confirmar), o toque la pantalla sobre se encuentre la optacion deseada.
- Pulse
Configuración
Para acceder al menu Settings, siga las instrucciones siguientes:
- Pulse
- Utilice , , o para seleccionar Settings, o toque la pantalla donde pone Settings.
- Si utilizes los botones en lugar de la pantalla táctil, pulse .
Modo control
El Maverick MK1 Spot se pueda configurar para responder a DMX, WDMX, Art-Net™, sACN, Kling-Net o una combinacion de these protocolos. La configuracion del protocolo debe establecerse para que el producto repsonda correctamente a los controladores. Vea el Mapa de Menu para mas informacion. Para configurar el protocolo para el Maverick MK1 Spot, siga estas instrucciones:
- Pulse
- Utilice , , o para seleccionar Settings, o toque la pantalla donde pone Settings.
- Utilice <UP> o <DOWN> para seleccionar Control Mode, o toque la pantallaonde pone Control Mode.
- Si utilizes los botones en lugar de la pantalla táctil, pulse .
- Utilice , , o para seleccionar DMX, WDMX, sACN, ArtNet, o toque la pantalla哪一个 se encuentre la direccion deseada.
- Pulse .

Para el control WMDX, asegúrese de que la antenna está elevada y que no haya obstrucciones entre el controlador y el producto. Ver Restablecer WDMX para información de solución de problemas.
Orientation panoramaica/inclinacion
Para configurar si la orientacion panoramicica o de inclinacion es normal o invertida:
- Desplácese al menu Configuración.
- Utilice o para seleccionar Pan Reverse o Tilt Reverse, o toque la pantalla donte se encontrar el ajuste deseado.
- Si utilizes los botones en lugar de la pantalla táctil, pulse .
- Utilice <UP> , <DOWN> , <LEFT> o <RIGHT> para seleccionar NO (orientacion normal) o YES (orientacion invertida), o toque la pantallaonde se enquiryre la option deseada.
- Pulse .
Orientation de la pantalla
Para configurar hacía sobre apunta la pantalla, haga loisible:
- Desplácese al menu Configuración.
- Utilice <UP> o <DOWN> para seleccionar Screen Reverse, o toque la pantallaonde pone Screen Reverse.
- Si utilizes los botones en lugar de la pantalla táctil, pulse .
- Utilice , , o para seleccionar NO (pantalla normal), YES (pantalla invertida), o AUTO (la pantalla detecta automatamente hacíaonde mira el producto y se orienta OPPUNAMente), o toque la pantalla donte se encuentre la opacion deseada.
- Pulse .
Rango de ángulo de panoramaística/inclínación
Para establecer el rango de movimiento para la panoramaica o inclinacion:
- Desplácese al menu Configuración.
- Utilice <UP> o <DOWN> para seleccionar Pan Angle o Tilt Angle, o toque la pantalla donte se encuentre el ajuste deseado.
- Si utilizes los botones en lugar de la pantalla táctil, pulse .
- Utilice , , o para seleccionar 540 ( 540^ ), 360 ( 360^ ) o 180 ( 180^ ) para panorárica y 270 ( 270^ ), 180 ( 180^ ) o 90 ( 90^ ) para inclinación, o toque la pantalla, donde se ENCuentre la opcción deseada.
- Pulse.
Blackout en movimiento panoramicica/inclinación
Para establercer si el producto irá a blackout durante el movimiento panoramicico o de inclinación, sigasistas instrucciones:
- Desplácese al menu Configuración.
- Utilice <UP> o <DOWN> para seleccionar BL. O. P/T Move, o toque la pantalla donte pone BL. O. P/T Move.
- Si utilizes los botones en lugar de la pantalla táctil, pulse .
- Utilice <UP> , <DOWN> , <LEFT> o <RIGHT> para seleccionar NO (sin blackout) o YES (black durante el movimiento), o toque la pantalla donde se encuentre la referencia deseada.
- Pulse .
Blackout en el movimiento del color
Para establecer si el producto irá a blackout durante el movimiento del color, siga estas instrucciones:
- Desplácese al menu Configuración.
- Utilice <UP> o <DOWN> para seleccionar BL. O. Color Move, o toque la pantalla donde pone BL. O. Color Move.
- Si utilizes los botones en lugar de la pantalla táctil, pulse .
- Utilice <UP> , <DOWN> , <LEFT> o <RIGHT> para seleccionar NO (sin blackout) o YES (black durante el movimiento), o toque la pantalla donde se encuentre la referencia deseada.
- Pulse .
Blackout sobre gobo movimiento
Para establecer si el producto irá a blackout durante el movimiento del gobo, siga estas instrucciones:
- Desplácese al menu Configuración.
- Utilice <UP> o <DOWN> para seleccionar BL. O. Gobo Move, o toque la pantalla donde pone BL. O. Gobo Move.
- Si utilizes los botones en lugar de la pantalla táctil, pulse .
- Utilice <UP> , <DOWN> , <LEFT> o <RIGHT> para seleccionar NO (sin blackout) o YES (black durante el movimiento), o toque la pantalla donde se encuentre la referencia deseada.
- Pulse .
Calibración de la pantalla táctil
Si la pantalla tactil no responde correctamente, es possible que necesse calibrarla. Paraarlo:
- Desplácese al menu Configuración.
- Utilice <UP> o <DOWN> para seleccionar Calibration, o toque la pantalla donte pone Calibration.
- Si utilizes los botones en lugar de la pantalla táctil, pulse
- Utilice <UP> , <DOWN> , <LEFT> o <RIGHT> para seleccionar NO (no calibrar) o YES (calibrar), o toque la pantalla哪一个 se encuentre la optacion deseada.
- Pulse .
- Siga las instrucciones, tocando los+puntos según aparezcan en la pantalla.
Bloqueo de la pantalla táctil
Para bloquear o desbloquear la pantalla táctil para el panel de control, haga lo suiviente:
- Desplácese al menu Configuración.
- Utilice <UP> o <DOWN> para seleccionar Touchscreen Lock, o toque la pantallaonde pone Touchscreen Lock.
- Si utilizes los botones en lugar de la pantalla táctil, pulse .
- Utilice , , o para seleccionar NO (la pantalla respondera a los toques) o YES (la pantalla no respondera a los toques), o toque la pantalla donde se ENCuentra la referencia deseada.
- Pulse .
Pantalla de bloqueo
Para bloquear o desbloquear completeness el panel de control, siga estas instrucciones:
- Desplácese al menu Configuración.
- Utilice o para seleccionar Lock Screen, o toque la pantallaonde pone Lock Screen.
- Si utilizes los botones en lugar de la pantalla táctil, pulse
-
Utilice <UP> , <DOWN> , <LEFT> o <RIGHT> para seleccionar NO (el panel de control no se bloqueará) o YES (se necessitará una restracción para acceder al panel de control), o toque la pantalla sobre se encontrar la option deseada.
-
Pulse .
Para acceder al panel de control cuando se haya bloqueado:
- Pulse
-
Introduzca la contraseña 0920 mediante uno de los métodos siguientes:
-
Con la pantalla táctil: utiliser el teclado número de la pantalla paraSCRIBR 0920.
- Con los botones:
a. Utilice < DOWN> para seleccionar el numero que vaya a cambiar.
b. Utilice < UP> paraacular valor.
c. Repita hasta haber introducido 0920.
- Pulse .
Intercambioar panorárica e inclínación
Para携带 las functions de panoramaática e inclínación de forma que lo que normalmente controla la panoramaática controle la inclínación y lo que normalmente controla la inclínación controle la panoramaática, haga loisible:
- Desplácese al menu Configuración.
- Utilice <UP> o <DOWN> para seleccionar Swap XY, o toque la pantallaonde pone Swap XY.
- Si utilizes los botones en lugar de la pantalla táctil, pulse .
- Utilice <UP> , <DOWN> , <LEFT> o <RIGHT> para seleccionar NO (panorámica e inclinacion normales) or YES (panorámica contra l'inclinacion, inclinacion controla panorámica), o toque la pantalla donte se encontrar la option deseada.
5.Pulse
Velocidad panorárica/inclinación
Para establecer la velocidad maxima de panoramicca e inclinacion:
- Desplácese al menu Configuración.
- Utilice <UP> o para seleccionar XY Mode, o toque la pantalla donde pone XY Mode.
- Si utilizes los botones en lugar de la pantalla táctil, pulse .
- Utilice <UP> , <DOWN> , <LEFT> o <RIGHT> para seleccionar Slow (lento) o Fast (rápido), o toque la pantalla sobre se escañre la optación deseada.
- Pulse .
Restablecer WDMX
Para restablecer la connexion WDMX del Maverick MK1 Spot, haga lo suiviente:
- Desplácese al menu Configuración.
- Utilice <UP> o para seleccionar WDMX Reset, o toque la pantallaonde pone WDMX Reset
- Si utilizes los botones en lugar de la pantalla táctil, pulse .
- Utilice <UP> , <DOWN> , <LEFT> o <RIGHT> para seleccionar NO (no restablecer la conexión) o YES (restablecer la conexión), o toque la pantalla sobre se encuentre la optación deseada.
- Pulse .

Una vez se haya vinculado un receptor WDMX a un transmisor WDMX spécifique, este permanecerá vinculado a este transmisor spécifique hasta que se vincule a otro diferente.
Temporalizador de retroiluminación
Para establecer lacantidad de tiempo de inactividad antes de que se apague la retroiluminacion de la pantalla:
- Desplácese al menu Configuración.
- Utilice o para seleccionar Backlight Timer, o toque la pantallaonde pone Backlight Timer.
- Si utilizes los botones en lugar de la pantalla táctil, pulse .
- Utilice <UP> , <DOWN> , <LEFT> o <RIGHT> para seleccionar 30S (tras 30 segundos de inactividad), 1M (tras 1 minuto de inactividad), 5M (tras 5关键时刻 de inactividad) o ON (no se apaga), o toque la pantalla sobre se encontrar lapellacion deseada.
- Pulse
Pérdida de datos
En caso de perdida deignal de entrada de qualquier tipo, elMaverick MK1 Spot respondera entre dos.
formas posibles: el producto mantendra la ultimaignal recibida o apagar a la emision de luz de todos los LED.
Para configurar el modo en que responde el producto, siga estas instrucciones:
- Desplácese al menu Configuración.
- Utilice <UP> o <DOWN> para seleccionar Loss of Data, o toque la pantalla donde pone Loss of Data.
- Si utilizes los botones en lugar de la pantalla táctil, pulse
- Utilice <UP> , <DOWN> , <LEFT> o <RIGHT> para seleccionar Hold (mantener laULTima senal recibida) o Close (apagar la emision de todos los LED), o toque la pantallaonde se encuentra la)。
opacion deseada.
5.Pulse
Velocidad del ventilador
Paraaabstar la velocidad de los ventiladores,haga lo seguido:
- Desplácese al menu Configuración.
- Utilice <UP> o <DOWN> para seleccionar Fans, o toque la pantalla cuando pone Fans.
- Si utilizes los botones en lugar de la pantalla táctil, pulse .
- Utilice <UP> , <DOWN> , <LEFT> o <RIGHT> para seleccionar Auto (velocidad del ventilador según la temperatura del producto), Full (máxima velocidad) o ECO (modo silencio de ventilador), o toque la pantalla sobre se encuentre la optación deseada.
5.Pulse
Curva de atenuador
Para configurar la velocidad del atenuador, haga lo significiente:
- Desplácese al menu Configuración.
- Utilice o para seleccionar Dimmer Curve, o toque la pantallaonde pone Dimmer Curve.
- Si utilizes los botones en lugar de la pantalla táctil, pulse .
- Utilice , , o para seleccionar Linear, Square, I Squa o SCurve, o toque la pantalla donte se encuentre laOPTION deseada.
- Pulse.
Velocidad del atenuador
Para configurar la velocidad del atenuador, haga lo significiente:
- Desplácese al menú Configuración.
- Utilice <UP> o <DOWN> para seleccionar Dimmer Speed, o toque la pantallaonde pone Dimmer Speed.
- Si utilizes los botones en lugar de la pantalla táctil, pulse .
- Utilice , , o para seleccionar Smooth o Fast, o toque la pantalla donde se enquiryre laOPTION deseada.
5.Pulse
Pulse Width Modulation
Para configurar la Frequencia PWM, siga estas instrucciones:
- Desplácese al menu Configuración.
- Utilice <UP> o <DOWN> para seleccionar PWM Option, o toque la pantallaonde pone PWM Option.
- Si utilizes los botones en lugar de la pantalla táctil, pulse .
- Utilice <UP> , <DOWN> , <LEFT> o <RIGHT> para selecciónar la Frequencia PWM (600Hz, 1200Hz, 2000Hz, 4000Hz, 6000Hz, o 15000Hz), o toque la pantalla donde se ENCuentra laopia de seseada.
- Pulse .
Selección de preconfiguraciones
Esta option guarda 3 configuraciones de options de menu con ajustes preestablecidos. Para configurar los ajustes preestablecidos, siga las instrucciones siguientes:
- Desplacese al menu Configuracion
- Utilice <UP> o <DOWN> para seleccionar Preset Select, o toque la pantallaonde pone Preset Select
- Si utilizes los botones en lugar de la pantalla táctil, pulse .
- Utilice , , o para seleccionar PRESET A, PRESET B o PRESET C, o toque la pantalla哪一个 se encuentre la options deseada.
- Pulse .
- El producto se reinciarda. Cualquier cambio realizado sobre las options de menu se guardará en esta preconfiguration.

- PRESET A es la predeterminada. Si realiza Cambios en PRESET A,這些 ambios se guardarán en PRESET A sin tener que hacer nada.
- Para create un nuevo ajuste preestablishecido, resalte y seleccione PRESET SELECT. Resalte PRESET B o PRESET C y pulse . Cuando realice esta seleccion, el producto se reinciaria automatistically. Vuelva atras y haya losCambios que necesite en el menu. Esto se guardara automatistically en el ajuste preestablishecido en el que se encuentre.
Sincronización de preconfiguraciones
Para synchronize las preconfiguraciones de menu a otros Maverick MK1 Spot, siga estas instrucciones:
- Conecte todos los Maverick MK1 Spot mediante un cable DMX.
- Desplaces al menu Configuracion
- Utilice <UP> o <DOWN> para seleccionar Preset Sync, o toque la pantallaonde pone Preset Sync.
- Si utilizes los botones en lugar de la pantalla táctil, pulse .
- Seleccione YES o toque la pantalla dont se encuentre la option deseada.
- Pulse .

- Para synchronizeothersMaverickMK1Spotes,conecteisospedutos mediateun cableDMX.
- El producto pueda estar en cualquier modo de control excepto WDMX. ArtNet, DMX y sACN son todos acceptables.
- Se transfieren todas las options de menu, incluida la direction DMX. Lo特殊情况 que no se ve afectado en losculos products es la dirección IP.
Funciones de restablecer
Para restablecer la panorámina,la inclinación o todas las functions,como en el arranque:
- Desplácese al menu Configuración
- Utilice <UP> o <DOWN> para seleccionar Reset Function, o toque la pantallaonde pone Reset Function.
- Si utilizes los botones en lugar de la pantalla táctil, pulse .
- Utilice <UP> o <DOWN> para seleccionar la referencia que vaya a restablecer Pan/Tilt, Iris/Prism, Color/CMY+CTO, Gobo/Gobo Rotate, Zoom/Frost/Focus o All, o toque la pantalla donde se encuentre la referencia deseada.
- Si utilizes los botones en lugar de la pantalla táctil, pulse .
- Utilice <UP> , <DOWN> , <LEFT> o <RIGHT> para seleccionar NO (no restablecer) o YES (restablecer), o toque la pantalla donde se encuentre laopiaction deseada.
- Pulse .
Restablecer a valeurs de fabrica
Para restablecer el Maverick MK1 Spot a los values predeterminados de fabrica, haga lo suiviente:
- Desplácese al menu Configuración
- Utilice <UP> o <DOWN> para seleccionar Factory Settings, o toque la pantallaonde pone Factory Settings.
- Si utilizes los botones en lugar de la pantalla táctil, pulse .
- Utilice <UP> , <DOWN> , <LEFT> o <RIGHT> para seleccionar NO (no restablecer) o YES (restablecer a valeurs de fabrica), o toque la pantalla donte se encuentre la option deseada.
- Pulse .
Modo de PrUEba
Prueba automática
Para realizar una prueba automatica de las functions del Maverick MK1 Spot, siga estas instrucciones:
- Pulse
- Utilice , , o para seleccionar Test, o toque la pantalla donte pone Test.
- Si utilizes los botones en lugar de la pantalla táctil, pulse .
- Utilice <UP> o <DOWN> para seleccionar Auto Test, o toque la pantallaonde pone Auto Test.
- Pulse
Prueba manual
Para probar las functions del producto manualmente, haga lo suiviente:
- Pulse
- Utilice , , o para seleccionar Test Mode o toque la pantalla donde pone Test Mode.
- Si utilizes los botones en lugar de la pantalla táctil, pulse .
- Utilice o para seleccionar Manual Test, o toque la pantalla sobre pone Manual Test.
- Si utilizes los botones en lugar de la pantalla táctil, pulse .
- Utilice <UP> o <DOWN> para seleccionar la functiOn que vaya a probar, o toque la pantalla donte se encuentre la functiOn deseada.
- Si utilizes los botones en lugar de la pantalla táctil, pulse .
-
Bombie el valor de la función probada con uno de los métodos siguientes:
-
Escribe el valor deseado utilizing el teclado número que aparece en la pantalla táctil.
Utilice,, o paraacular disminuiir el valor.
-
Pulse .
Toda la informacion sobre el estado actual del Maverick MK1 Spot esta Sys Info menu.
Para ver esta informacion, siga las instrucciones:
- Pulse
- Utilice , , o para seleccionar Information.
- Pulse
- Utilice o para seleccionar Fixture Information (muestra la version de firmware, modo deexecution,direcciónde inicio,etc.),Fan Information (muestra la velocidad del los ventiladores en rpm), Error Information (muestraequaliererroroNoError!) o Channel Information (muestra el valoractualde todoslos canalesde entrada de senal).
- Pulse
- Utilice <UP> o <DOWN> para desplazarse por la información.
Valores DMX
29 Ch
| Canal Función Valor Porcentaje/Configuración |
| 1 | Panorámico | 000 ⇌ 255 | 0-100% |
| 2 | Panorámico fino | 000 ⇌ 255 | Control fino (16-bit) |
| 3 | Inclínacion | 000 ⇌ 255 | 0-100% |
| 4 | Inclínacion fina | 000 ⇌ 255 | Control fino (16-bit) |
| 5 | Velocidad de panorámico/inclínacion | 000 ⇌ 255 0-100% | |
| 6 | Atenuador | 000 ⇌ 255 | 0-100% |
| 7 | Atenuador fino | 000 ⇌ 255 | Control fino (16-bit) |
| 8 | Obturator | 000 ⇌ 003 Apagado | |
| 004 ⇌ 007 Encendido | |
| 008 ⇌ 076 Lento a rápido | |
| 077 ⇌ 145 | Pulso estroboscópico, lento a rápido |
| 146 ⇌ 215 | Estroboscópica aleatoria, lento a rápido |
| 216 ⇌ 255 Encendido | |
| 9 | Estroboscópica virtual | 000 ⇌ 001 Sin funciona | |
| 002 ⇌ 128 | Sacudiendo la luz estroboscópica, lento a rápido |
| 129 ⇌ 255 | Cambio de color, lento a rápido |
| 10 | Cian | 000 ⇌ 255 | 0-100% |
| 11 | Magenta | 000 ⇌ 255 | 0-100% |
| 12 | Amarillo | 000 ⇌ 255 | 0-100% |
| 13 | Rueda de color | 000 ⇌ 006 Encendido | |
| 007 ⇌ 013 Rojo | |
| 014 ⇌ 020 Naranja | |
| 021 ⇌ 027 Verde | |
| 028 ⇌ 034 Azul | |
| 035 ⇌ 041 Magenta | |
| 042 ⇌ 048 UV | |
| 049 ⇌ 059 CTO | |
| 060 ⇌ 187 Colores divididos | |
| 188 ⇌ 219 | Desplazimiento de color en sentido horario, rápido a lento |
| 220 ⇌ 223 Mantener | |
| 224 ⇌ 255 | Color en sentido contrario a las agujas del reloj, lento a rápido |
| 14 | Rueda de gobo | 000 ⇌ 007 | Encendido |
| 008 ⇌ 015 | Gobo 1 (barco de vela) |
| 016 ⇌ 023 | Gobo 2 (barra ondulante) |
| 024 ⇌ 031 | Gobo 3 (engranaje con punto) |
| 032 ⇌ 039 | Gobo 4 (tuercas y tornillos) |
| 040 ⇌ 047 | Gobo 5 (óvalos lineales) |
| 048 ⇌ 055 | Gobo 6 (campo de estrellas) |
| 056 ⇌ 063 | Gobo 7 (mampara de ducha) |
| 064 ⇌ 071 | Gobo 7 temblor |
| 072 ⇌ 079 | Gobo 6 temblor |
| 080 ⇌ 087 | Gobo 5 temblor |
| 088 ⇌ 095 | Gobo 4 temblor |
| 096 ⇌ 103 | Gobo 3 temblor |
| 104 ⇌ 111 | Gobo 2 temblor |
| 112 ⇌ 119 | Gobo 1 temblor |
| 120 ⇌ 127 | Encendido |
| 128 ⇌ 191 | Desplazimiento del gobo en sentido horario, lento a rápido |
| 192 ⇌ 255 | Desplazimiento del gobo en sentido antihorario, lento a rápido |
| Canal | Función | Valor | Porcentaje/Configuración |
| 15 Gobo 1 rotar | 000 ⇌ 063 Indice de gobo rotativo | |
| 064 ⇌ 145 | Rotación en sentido horario, rápido a lento |
| 146 ⇌ 149 Mantener | |
| 150 ⇌ 231 | Rotación en sentido antihorario, lento a rápido |
| 232 ⇌ 255 Efcto rebote | |
| 16 | Gobo rueda 1 indices fino | 000 ⇌ 255 0-100% | |
| 17 | Rueda de gobo 2 | 000 ⇌ 006 Encendido | |
| 007 ⇌ 013 | Gobo 1 (ganchitos de queso) |
| 014 ⇌ 020 Gobo 2 (desgarramiento) | |
| 021 ⇌ 027 Gobo 3 (salpicaduras) | |
| 028 ⇌ 034 Gobo 4 (triángulo) | |
| 035 ⇌ 041 Gobo 5 (circuito) | |
| 042 ⇌ 048 | Gobo 6 (puntos aleatorios) |
| 049 ⇌ 063 | Gobo 7 (bosque de miedo) |
| 064 ⇌ 070 Gobo 7 temblor | |
| 071 ⇌ 077 Gobo 6 temblor | |
| 078 ⇌ 084 Gobo 5 temblor | |
| 085 ⇌ 091 Gobo 4 temblor | |
| 092 ⇌ 098 Gobo 3 temblor | |
| 099 ⇌ 105 Gobo 2 temblor | |
| 106 ⇌ 112 Gobo 1 temblor | |
| 113 ⇌ 127 Encendido | |
| 128 ⇌ 191 | Desplazamente del gobo en sentido horario, lento a rápido |
| 192 ⇌ 255 | Desplazamente del gobo en sentido antihorario, lento a rápido |
| 18 | Enfoque | 000 ⇌ 255 | 0-100% |
| 19 | Enfoque fino | 000 ⇌ 255 | 0-100% |
| 20 | Enfoque automático | 000 ⇌ 010 Sin funciona | |
| 011 ⇌ 030 0-5 m | |
| 031 ⇌ 050 6 m | |
| 051 ⇌ 070 7 m | |
| 071 ⇌ 090 8 m | |
| 091 ⇌ 110 9 m | |
| 111 ⇌ 130 10 m | |
| 131 ⇌ 150 12.5 m | |
| 151 ⇌ 170 15 m | |
| 171 ⇌ 190 17.5 m | |
| 191 ⇌ 210 20-60 m | |
| 211 ⇌ 255 | Distancia de detectión automática |
| 21 | Zoom | 000 ⇌ 255 | Ancho a estrecho |
| 22 | Zoom fino | 000 ⇌ 255 | 0-100% |
| 23 Prisma | 000 ⇌ 004 Sin funciona | |
| 005 ⇌ 255 Efcto prisma | |
| 24 Prisma rotar | 000 ⇌ 127 Posición giratoria | |
| 128 ⇌ 189 | Rotación en sentido horario, lento a rápido |
| 190 ⇌ 193 Mantener | |
| 194 ⇌ 255 | Rotación en sentido antihorario, lento a rápido |
| 25 Iris | 000 ⇌ 063 Grande a(PC) | |
| 064 ⇌ 127 | Cambio automático, lento a rápido |
| 128 ⇌ 191 | Reducción lenta, ampliación(PC) (lenta a(PC) |
| 192 ⇌ 255 | Acercimiento lento, alejamente rápido (lento a(PC) |
| 26 | Escarcha | 000 ⇌ 255 | 0-100% |
| Canal Función Valor Percentaje/Configuración |
| 27 Macro CMY | 000 ⇌ 009 Sin funciona
010 ⇌ 255 Macro CMY | |
| 28 Velocidad de macro CMY | 000 ⇌ 255 100-0% | |
| 29 Control | 000 ⇌ 007 Sin funciona
008 ⇌ 015 Apagón XY
016 ⇌ 023 C apagón
024 ⇌ 031 G apagón
032 ⇌ 039 Apagón XYC
040 ⇌ 047 Apagón XYG
048 ⇌ 055 Apagón XYCG
056 ⇌ 095 Sin funciona
096 ⇌ 103 Reinicio de X
104 ⇌ 111 Reinicio de Y
112 ⇌ 119 Reinicio de color
120 ⇌ 127 Gobo y gobo rotativo
128 ⇌ 135 Sin funciona
136 ⇌ 143 Reinicio de prisma
144 ⇌ 151 Sin funciona
152 ⇌ 159 Todo reinicio
160 ⇌ 167 Reinicio del iris
168 ⇌ 175 Reinicio de escharcha
176 ⇌ 183 Reajuste del zoom
184 ⇌ 191 Reinicio de CMY
192 ⇌ 199 Ventilador, bajo velocidad
200 ⇌ 207 Ventilador a toda velocidad
208 ⇌ 215 Ventilador automatístico
216 ⇌ 220 Sin funciona
221 ⇌ 225 Iris, modo=rápido
226 ⇌ 230 Iris, modo suave
231 ⇌ 235 Cambio de XY encendido
236 ⇌ 240 Cambio de XY apagado
241 ⇌ 255 Sin funciona | |
22 Ch
| Canal Função Valor Percentaje/Configuración |
| 1 | Panorámico | 000 ⇌ 255 0-100% |
| 2 | Panorámicoedo | 000 ⇌ 255 Controledo (16-bit) |
| 3 | Inclinación | 000 ⇌ 255 0-100% |
| 4 | Inclinaciónfina | 000 ⇌ 255 Controledo (16-bit) |
| 5 | Velocidad depanorámicoinclinación | 000 ⇌ 255 0-100% |
| 6 | Atenuador | 000 ⇌ 255 0-100% |
| 7 | Obturador | 000 ⇌ 003 Apagado004 ⇌ 007 Ercendido008 ⇌ 076 Lento a rápido077 ⇌ 145Pulso estroboscópico, lento a rápido146 ⇌ 215Estroboscópica aleatoria, lento a rápido216 ⇌ 255 Ercendido |
| 8 | Estroboscópica virtual | 000 ⇌ 001 Sin funciona002 ⇌ 128Sacudiendo la luz estroboscópica, lento a rápido129 ⇌ 255 Cambio de color, lento a rápido |
| 9 | Cian | 000 ⇌ 255 0-100% |
| 10 | Magenta | 000 ⇌ 255 0-100% |
| 11 | Amarillo | 000 ⇌ 255 0-100% |
| 12 | Rueda de color | 000 ⇌ 006 Ercendido007 ⇌ 013 Rojo014 ⇌ 020 Naranja021 ⇌ 027 Verde028 ⇌ 034 Azul035 ⇌ 041 Magenta042 ⇌ 048 UV049 ⇌ 059 CTO060 ⇌ 187 Colores divididos188 ⇌ 219Desplazamente de color en sentido horario, rápido alento220 ⇌ 223 Mantener224 ⇌ 255 Desplazamente de color en sentido antihorario, lento arápido |
| 13 | Rueda de gobo | 000 ⇌ 007Encendido008 ⇌ 015Gobo 1 (barco de vela)016 ⇌ 023Gobo 2 (barra ondulante)024 ⇌ 031Gobo 3 (engranaje con punto)032 ⇌ 039Gobo 4 (tuercas y tornillos)040 ⇌ 047Gobo 5 (óvalos lineales)048 ⇌ 055Gobo 6 (campo de estrellas)056 ⇌ 063Gobo 7 (mampara de ducha)064 ⇌ 071Gobo 7 temblor072 ⇌ 079Gobo 6 temblor080 ⇌ 087Gobo 5 temblor088 ⇌ 095Gobo 4 temblor096 ⇌ 103Gobo 3 temblor104 ⇌ 111Gobo 2 temblor112 ⇌ 119Gobo 1 temblor120 ⇌ 127Encendido128 ⇌ 191Desplazamente de gobo en sentido horario, rápido alento192 ⇌ 255Desplazamente de gobo en sentido antihorario, lento a rápido |
| Canal Función Valor Percentaje/Configuración |
| 14 Gobo 1 rotar | 000 ⇌ 063 Indice de gobo rotativo064 ⇌ 145Rotación en sentido horario, rápido a lento146 ⇌ 149 Mantener150 ⇌ 231Rotación en sentido antihorario, lento a rápido232 ⇌ 255 Effecto rebote | |
| 15 Rueda gobo 2 | 000 ⇌ 006 Encendido007 ⇌ 013Gobo 1 (ganchitos de queso)014 ⇌ 020 Gobo 2 (desgarramento)021 ⇌ 027 Gobo 3 (salpicaduras)028 ⇌ 034 Gobo 4 (triángulo)035 ⇌ 041 Gobo 5 (circuits)042 ⇌ 048Gobo 6 (puntos aleatorios)049 ⇌ 063Gobo 7 (bosque de miedo)064 ⇌ 070 Gobo 7 temblor071 ⇌ 077 Gobo 6 temblor078 ⇌ 084 Gobo 5 temblor085 ⇌ 091 Gobo 4 temblor092 ⇌ 098 Gobo 3 temblor099 ⇌ 105 Gobo 2 temblor106 ⇌ 112 Gobo 1 temblor113 ⇌ 127 Encendido128 ⇌ 191Desplazamente del gobo en sentido horario, lento a rápido192 ⇌ 255Desplazamente del gobo en sentido antihorario, lento a rápido | |
| 16 Enfoque | 000 ⇌ 2550-100% | |
| 17 Zoom | 000 ⇌ 255Ancho a estrecho | |
| 18 Prisma | 000 ⇌ 004Sin funciona005 ⇌ 255 Effecto prisma | |
| 19 Prisma rotar | 000 ⇌ 127 Posición giratoria128 ⇌ 189Rotación en sentido horario, lento a rápido190 ⇌ 193 Mantener194 ⇌ 255Rotación en sentido antihorario, lento a rápido | |
| 20 Iris | 000 ⇌ 063 Grande alittlecambio automático, lento a rápido064 ⇌ 127Reducción lenta, amplía rápida (lenta a rápida)128 ⇌ 191Acercimiento lento, alejmente rápido (lento a rápido) | |
| 21 Escarcha | 000 ⇌ 2550-100% | |
| Canal | Función | Valor | Porcentaje/Configuración |
| | 000 ⇌ 007 Sin funciona | |
| | 008 ⇌ 015 Apagón XY | |
| | 016 ⇌ 023 C apagón | |
| | 024 ⇌ 031 G apagón | |
| | 032 ⇌ 039 Apagón XYC | |
| | 040 ⇌ 047 Apagón XYG | |
| | 048 ⇌ 055 Apagón XYCG | |
| | 056 ⇌ 095 Sin funciona | |
| | 096 ⇌ 103 Reinicio de X | |
| | 104 ⇌ 111 Reinicio de Y | |
| | 112 ⇌ 119 Reinicio de color | |
| | 120 ⇌ 127 Gobo y gobo rotativo | |
| | 128 ⇌ 135 Sin funciona | |
| | 136 ⇌ 143 Reinicio de prisma | |
| | 144 ⇌ 151 Sin funciona | |
| | 152 ⇌ 159 Todo reinicio | |
| | 160 ⇌ 167 Reinicio del iris | |
| | 168 ⇌ 175 Reinicio de escarcha | |
| | 176 ⇌ 183 Reajuste del zoom | |
| | 184 ⇌ 191 Reinicio de CMY | |
| | 192 ⇌ 199 Ventilador, bajo velocidad | |
| | 200 ⇌ 207 Ventilador a toda velocidad | |
| | 208 ⇌ 215 Ventilador automatístico | |
| | 216 ⇌ 220 Sin funciona | |
| | 221 ⇌ 225 Iris, modo=rápido | |
| | 226 ⇌ 230 Iris, modo suave | |
| | 231 ⇌ 235 Cambio de XY encendido | |
| | 236 ⇌ 240 Cambio de XY apagado | |
| | 241 ⇌ 255 Sin funciona | |
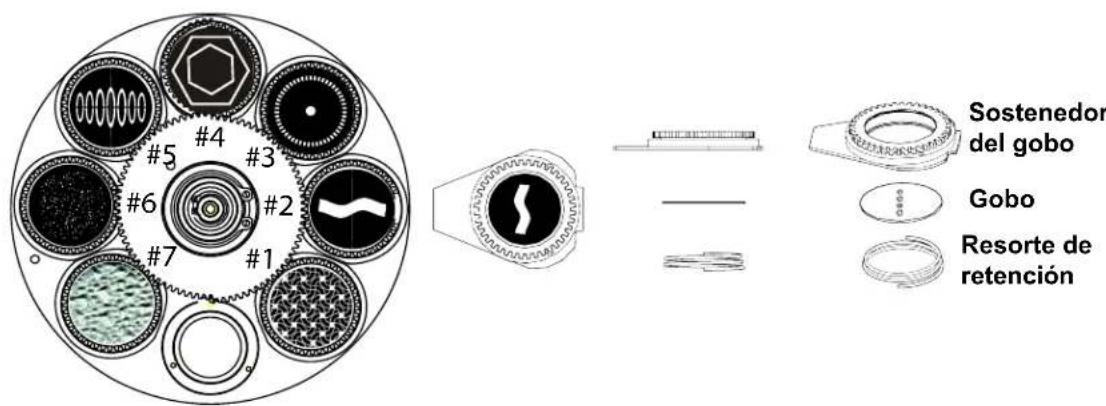
Ruedas de Diseño
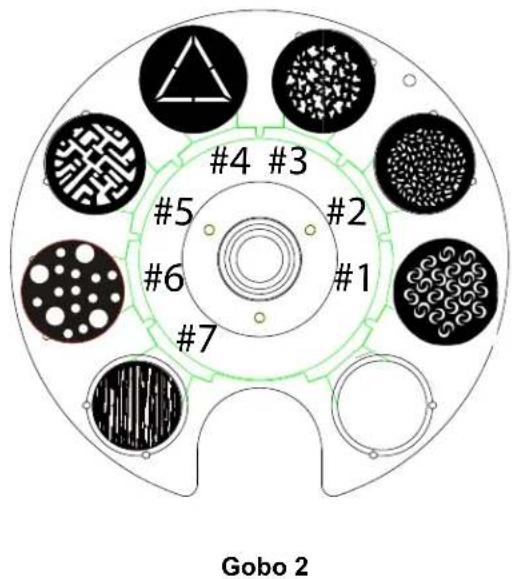
Ruedas de Gobo
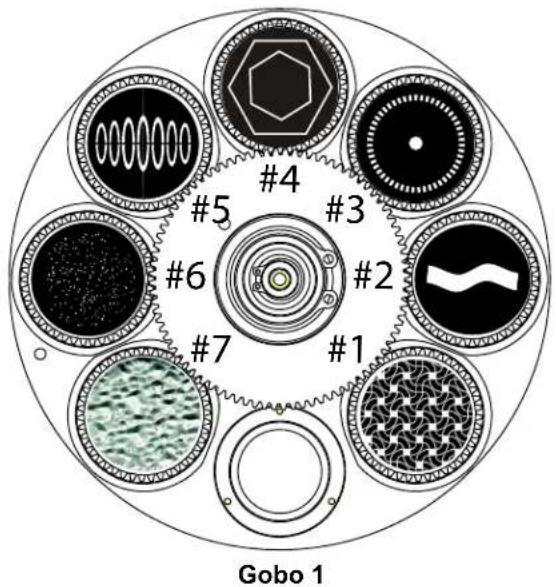
| Rueda de Gobo Número de Gobo Descripción |
| 1 | 1 Barco de vela2 Barra ondulante3 Engranaje con punto4 Tuercas y tornillos5 Óvalos lineales6 Campo de estrellas7 Mampara de ducha |
| 2 | 1 Ganchitos de queso2 Años triangulares3 Salpicaduras4 Triángulo5 Circuits6 Puntos aleatorios7 Desgarramente |
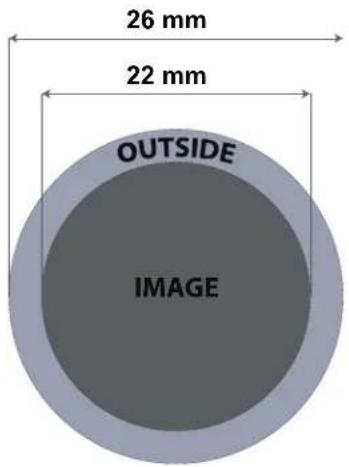
Carta de Dimensiones de Gobo
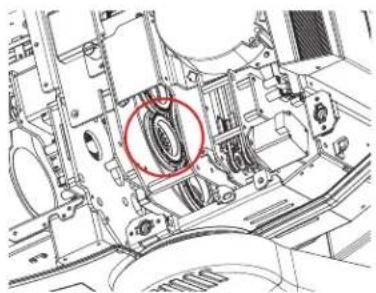
Sustitución del Gobo
Los gobos en la rueda de gobo 1 se pueda extraer de sus soportes. A continuacion possible ver el procedimiento recomendado que debse seguir exactamente para sustituir los gobos de la rueda de gobo 1.

- Asegürese de desconectar el cable de alimentación del producto antes de reemplazar un gobo.
- Sustituya siempre un gobo con除外 de las malmas dimensiones.
- Cuando inserte un gobo de vidrio, asegúrese siempre de que la parte brillante del gobo (la base de vidrio) mira hacer la lámpara. Esto proporción una capa de protección contra la alta temperatura de la lámpara.
Procedimiento
- Aquege el aparato y desconectelo de la toma de alimentacion.
- Abra la tapa superior aflojando 4 tornillos Phillips de 14 de vuelta a los lados de la cubierta superior.
- Separe la plac de gobo de la rueda de gobos empujandola hacia el frente de la cabeza movil (direccion 1 en el diagrama). Tenga cuidado de no sacar el gobo fuera del soporte del gobo.
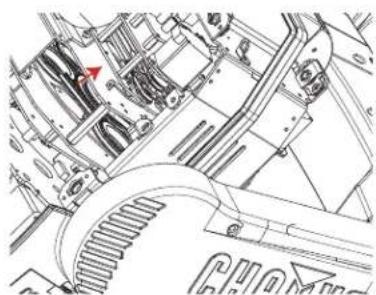
- Extraiga el soporte del gobo tirando hacía afuera (dirección 2 en el diagrama).
- En una superficie plana, quite el anillo de expansión que sujeta el gobo en su situ y quite el gobo de su soporte.
- Inserte un gobo nuevo y colóquelo en su sitio con el anillo de expansión.
- Deslice el extremo del soporte del gobo bajo la plac de presion junto al centro de la rueda de gobos.
- Empujé el soporte del gobo hacía adentro. NO fuercé el soporte del gobo en la ranura de la rueda de gobos. Si está correctamente instalado, el soporte del gobo deberá deslizarse fácilmente en la ranura de la rueda de gobos.
Diagrama
Localizar
Retirar
Remover
Rueda de Color

Número de Color Descripción
1 Valero
2 Barra ondulada
3 Grillos de punto
4 Tuercas y tornillos
5 Ovalos lineales
6 Campo de estrellas
7 Ducha de vidrio
Modo Offset
El modo Offset proportiocría ajustes finos para la posicón inicial de todas las partes mviles del recorro optico y de los movimientos panoramicó y de inclinación. Esto permite que las partes mviles no muesten ningún borde o reducir la emisión de luz cuando está en la posicón inicial. Para acceder a este modo, siga las instrucciones siguientes:
- Empezando en la pantalla de Nivel principal, pulse y mantenga pulsado
- Introduzca la contraseña 2323 con los botones:
a. Utilice DOWN para seleccionar el numero que vaya a cambiar.
b. Utilice < UP> paraacular valor.
c. Repita hasta haber introducido 2323.
- Pulse
- Este leleará a la pantalla de menu Ajuste cero.
PANORÁMICA
- Utilice <UP> o <DOWN> para seleccionar PAN.
- Pulse .
- Utilice <UP> o <DOWN> paraacular disminuiR el valor de inicio, en el rango 000-255.
- Pulse
INCLINACION
- Utilice <UP> o <DOWN> para seleccionar TILT.
- Pulse
- Utilice <UP> o <DOWN> paraacular disminuiR el valor de inicio, en el rango 000-255.
- Pulse .
COLOR
- Utilice <UP> o <DOWN> para seleccionar COLOR.
- Pulse
- Utilice <UP> o <DOWN> paraacular disminuiR el valor de inicio, en el rango 000-255.
- Pulse
GOBO
- Utilice <UP> o <DOWN> para seleccionar GOBO.
- Pulse
- Utilice <UP> o <DOWN> paraacular disminuiR el valor de inicio, en el rango 000-255.
- Pulse
GOBO ROTATE
- Utilice <UP> o <DOWN> para seleccionar GOBO ROTATE.
- Pulse
- Utilice <UP> o <DOWN> paraacular disminuiR el valor de inicio, en el rango 000-255.
- Pulse .
FOCUS1-GOBO2
- Utilice <UP> o <DOWN> para seleccionar FOCUS1-GOBO2.
- Pulse
- Utilice <UP> o <DOWN> para augmentar o disminuiR el valor de inicio, en el rango 000-255.
- Pulse .
FOCUS2
- Utilice <UP> o <DOWN> para seleccionar FOCUS1-GOBO2.
- Pulse
- Utilice <UP> o <DOWN> paraacular disminuiR el valor de inicio, en el rango 000-255.
- Pulse .
FOCUS-GOBO
- Utilice <UP> o <DOWN> para seleccionar FOCUS GOBO.
- Pulse
- Utilice <UP> o <DOWN> paraacular disminuiR el valor de inicio, en el rango 000-255.
- Pulse
ZOOM
- Utilice < UP> o < DOWN> para seleccionar ZOOM.
- Pulse .
- Utilice <UP> o <DOWN> paraacular disminuiR el valor de inicio, en el rango 000-255.
- Pulse .
PRISM
- Utilice <UP> o <DOWN> para seleccionar PRISM.
- Pulse .
- Utilice <UP> o <DOWN> paraacular disminuiR el valor de inicio, en el rango 000-255.
- Pulse
IRIS
- Utilice <UP> <DOWN> para seleccionar IRIS.
- Pulse
- Utilice <UP> o <DOWN> paraacular disminuiR el valor de inicio, en el rango 000-255.
- Pulse
FROST
- Utilice <UP> o <DOWN> para seleccionar FROST.
- Pulse .
- Utilice <UP> o <DOWN> paraacular disminui er valor de inicio, en el rango 000-255.
- Pulse .
CYAN
- Utilice <UP> o <DOWN> para seleccionar CYAN.
- Pulse .
- Utilice <UP> o <DOWN> paraacular disminuiR el valor de inicio, en el rango 000-255.
- Pulse .
MAGENTA
- Utilice <UP> o <DOWN> para seleccionar MAGENTA.
- Pulse .
- Utilice <UP> o <DOWN> paraacular disminuiR el valor de inicio, en el rango 000-255.
- Pulse
YELLOW
- Utilice <UP> o <DOWN> para seleccionar YELLOW.
- Pulse .
- Utilice <UP> o <DOWN> paraacular disminuiR el valor de inicio, en el rango 000-255.
- Pulse .
Dirección MAC
- Utilice <UP> o <DOWN> para seleccionar MAC4, MAC5 o MAC6.
- Pulse .
- Utilice <UP> o <DOWN> paraacular disminuiR el valor de inicio, en el rango 000-255.
- Pulse .
Servidor Web
Al servidor web del Maverick MK1 Spot pueda acceder cualquier ordinador que se encontrar en la misma red que el producto. Permite acceso de red a la informacion y configuracion del systema, (p. ej., ajustes de control, prueba manual de todas las functions,actualizaciones de firmware y la calidad de embarrar la contraseña del servidor web).
- Conecte el producto a la alimentacion y configure el modo Modo IP en Static.
- Conecte el producto a un ordinador Windows con un cable de red.
- En el ordinador, configure la direccion IP de laresha red para que tengalos mismos tres primeros digitos que la direccion IP del producto (ver Direccion IP).
- Introduzca la direccion IP del producto en la barra de direcciones de un navigador web del ordinador.
- Introduzca admin como nombre de usuario y como contraseña para iniciajar sesión.
La párgina de información del servidor web muestra la configuración actual y la información del sistema del Maverick MK1 Spot.
Instalacion
La párgina Instalacion del servidor web proportiencia options de control, similar al menu Setup. Haga click en Save Settings para enviar la nuevo configuracion al producto.
Prueba manual
La párgna Prueba manual del servidor web permite controlar todas las options de salute del producto a工程技术 de la nategador. Para devolver todas las functions a sus valeurs predeterminados, hagablick en Reset.
Actualización de firmware
La párgina Actualización del servidor web permitteactualizar el producto con el firmware másrecente. Visite https://www.chauvetprofessional.com/products/maverick-mk1-spot/ para descargar lasactualizaciones de firmware.
Seguridad
La párgina Seguridad del servidor web posibilita &, a los Productos conectados al servidor web. Introduzca la contraseña (admin de manera predeterminada) y la contraseñanea!. dos vezes, y bajo haga clic en Submit para &,
5. Mantenimiento
Mantenimiento del producto
El polvo acumulado reduce el rendimiento de la calidad de luz y pueda provocar sobrecalentimiento. Esto suece conducir a una reduccion de la vida de la fuente de luz e incrementar el desgaste mecancio Para
mantener un rendimiento optimo y minimizar el desgaste,debte limpiar este producto con fecuencia.
como norma general, limpie este producto al menos dos veces al mes. Sin embargo, el uso y las
condiones ambientales influyen para un aumento de la fecuencia de limpieza.
Para limpar el producto, siga las instrucciones siguientes:
- Desenchufe el producto de la alimentacion.
- Espere a que el producto esté a temperatura ambiente.
- Use an aspirador (o aire seco comprimido) y un cepillo suave para quitar el polvo depositado en orificios de aireacion externos.
- Limpie todas las superficies exteriores con una solución suave de limpiador de cristales sin amoniaco o alcohol isoproplico.
- Aplique la solución directamente sobre un paño suave que no deje pelusa o un pañó de limpian lentes.
- Quite todo el polvo o suciedad de los bordes externos de la superficie de la lente.
- Con cuidado, frote las superficies de la lente hasta que no quede turbidad ni pelugas.

Seque siempre meticulosamente y con cuidado las superficies exteriores después de limparlas.
6. Especillas Técnicas
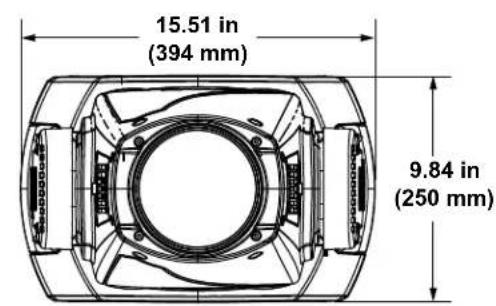
Dimensiones y peso
| Longitud Anchura Altura Peso |
| 394 mm (15,5") 250 mm (9,8") 636 mm (25") 27.2 kg (60 lb) |
| Nota: Las dimensiones en pulgadas estarán redondeadas. |
| Alimentación |
| Tipo de fuente de alimentación Rango Señeción de tensión |
| Conmutación (interna) | 100 a 240 VCA, 50/60 Hz | Detección automática (autorango) |
| Parámetro | 120 V, 60 Hz | 208 V, 60 Hz | 230 V, 50 Hz |
| Consumo | 592 W | 555 W 536 W | |
| Corriente de configuracion | 5.07 A | 2.74 A | 2.47 A |
| Fusible | F 10 A, 250 V | F 10 A, 250 V | F 10 A, 250 V |
| E/S alimentación | EE.UU./Mundial | UK/Europa |
| Conector de entrada de alimentación | Seetronic Powerkon IP65 | Seetronic Powerkon IP65 |
| Enchufe del cable de alimentación | Edison (U.S.) | Enchufe local |
| Fuente de luz |
| Tipo | Color | Cantidad | Alimentación | Intensidad | Duración |
| LED | Blanco frío | 1 | 350 W | 9.6 A | 50,000 horas |
| Fotometría |
| Ángulo de haz | Ángulo de camino | Ángulo de zoom | Illuminancia @ 5 m (7°) | Illuminancia @ 5 m (33°) | Temperatura del color |
| 7°-27° | 7°-33° | 7°-33° | 34,282 lux | 2,097 lux | 7000 K |
| Térmicas |
| Temperatura externa maxima | Sistema de refrigeración |
| 45 °C (113 °F) | Convección asistida por ventilador |
| DMX |
| Connector de E/S | Rango de canal |
| XLR de 3 y 5 pines con clasificación IP | 22 o 29 |
| Art-NetTM/sACN |
| Connector de E/S | Rango de canal |
| Conectores Amphenol XLR Net RJ45 in / out | 22 o 29 |
| Pedidos |
| Nombre de producto | Nombre de articULO | Código de articULO | Código UPC |
| Maverick MK1 Spot | MAVERICKMK1SPOT | 08011311 | 781462216597 |

R
CSA C22.2 No. 166
us
E113093

E
RoHS

Tabla de Fotometría
| Estrecho | Maverick MK1 Spot (Imperial) | Amplio |
| Distancia | 7° Diámetro del Haz | 7° Diámetro del campo | Footcandle | Footcandle | 27° Diámetro del Haz | 33° Diámetro delCampo |
| 15 ft 1. | 83 ft 1.83 ft | 3,089 233 | 7.76 ft 8.89 ft | | | |
| 20 ft 2. | 45 ft 2.45 ft | 2,143 131 | 10.34 ft 11.85 ft | | | |
| 30 ft 3. | 67 ft 3.67 ft | 952 58 | 15.52 ft 17.77 ft | | | |
| 40 ft 4. | 89 ft 4.89 ft | 536 33 | 20.69 ft 23.70 ft | | | |
| 50 ft 6. | 12 ft 6.12 ft | 343 21 | 25.86 ft 29.62 ft | | | |
| 75 ft 9. | 17 ft 9.17 ft | 152 9 38 | 79 ft 44.43 ft | | | |
| 100 ft | 12.23 ft | 12.23 ft | 86 | 5 | 51.72 ft | 59.24 ft |
| 125 ft | 15.29 ft | 15.29 ft | 55 | 3 | 64.65 ft | 74.05 ft |
| 150 ft | 18.35 ft | 18.35 ft | 38 | 2 | 77.59 ft | 88.86 ft |
| Estrecho | Maverick MK1 Spot (Métrico) | Amplio |
| Distancia | 7° Diámetro del Haz | 7° Diámetro del campo | Lux | Lux | 27° Diámetro del Haz | 33° Diámetro delCampo |
| 1 m | 0.12 m | 0.12 m | 857,050 | 52,425 | 0.52 m | 0.59 m |
| 2 m | 0.24 m | 0.24 m | 214,263 | 13,106 | 1.03 m | 1.18 m |
| 5 m | 0.61 m | 0.61 m | 34,282 | 2,097 | 2.59 m | 2.96 m |
| 8 m | 0.98 m | 0.98 m | 13,391 | 819 | 4.14 m | 4.74 m |
| 10 m | 1.22 m | 1.22 m | 8,571 | 524 | 5.17 m | 5.92 m |
| 15 m | 1.83 m | 1.83 m | 3,809 | 233 | 7.76 m | 8.89 m |
| 20 m | 2.45 m | 2.45 m | 2,143 | 131 | 10.34 m | 11.85 m |
| 25 m | 3.06 m | 3.06 m | 1,371 | 84 | 12.93 m | 14.81 m |
| 30 m | 3.67 m | 3.67 m | 952 | 58 | 15.52 m | 17.77 m |
Devolveraciones
En caso de que necesite asistencia o devolver un producto:
Si se enquiryra en EE. UU., pongase en contacto con la Oficina Central de Chauvet.
Si se enquiryra en el Reino Unido o Irlanda,pongase en contacto con Chauvet Europe Ltd.
Si se encuesta en Benelux,pongase en contacto con Chauvet Europe BVBA.
- Si se encuesta en Francia,pongase en contacto con Chauvet France.
Si se encuentra en Alemania,pongase en contacto con Chauvet Germany.
- Si se encuesta en México,pongase en contacto con Chauvet Mexico.
Si se enquiryra en qualquier other pais, NO contacte con Chauvet. Contacte con su distribuidor local. Vea www.chauvetprofessional.com para distribuidores fuera de EE.UU., Reino Unido, Irlanda, Benelux, Francia, Alemania o Mexico.

Si se encuesta fuera de los EE.UU., Reino Unido, Irlanda, Benelux, Francia, Alemania o Mexico,pongase en contacto con su distribuidor de registrar y siga sus instruetiones sobre como devolverle a ellos los productos Chauvet. Visite www.chauvetprofessional.com para detailles de contacto.
Llame a la oficina de Asistencia Técnica Chauvet correspondiente y pida un número de Autorización de Devolución de la mercancía (RMA) antes de enviar el producto. Este preparado para proportesorar el número de modelo, número de série y una breve descripción de la causa de la devolución.
Para enviar una solicitud de service en linea, vea www.chauvetprofessional.com/service-request
Envie la mercancía a portes pagados, en su caja original y con su embalaje y accesorios originales. Chauvet no expeditrá etiquetas de devolución.
Etiquete el paquete claramente con el número de RMA. Chauvet rechazarárialquier producto devuelto sin un número de RMA.

Escriba el número de RMA en una etiqueta conveniently adherida. NO writes el número de RMA directamente sobre la caja.
Antes de enviar el producto,riba claramente la?sigaive informacion en una hoja de papel y colquela.
dontro de la caja:
- Su nombre
- Su direccion
- Su número de téléphone
- Número de RMA
- Una breve descripción del problema
Asegürese de que empaqueteta el producto adecuadamente. Cualquier dano en el transporte que的结果de un empaquetado inadequado sera responsabilidad suya. Se recomienda empaquetado FedEx o de doble caja.

Chauvet se reserva el derecho de usar su propio criterio para reparar o reemplazar productos devueltos.
Oficina Central de Chauvet
Dirección: 5200 NW 108th Ave. Voz: (844) 393-7575
Sunrise, FL 33351 Fax: (954) 756-8015
Voz: (954) 577-4455 Email: chauvetcs@chauvetlighting.com
Fax: (954) 929-5560
Número Gratis: (800) 762-1084 Sitio web: www.chauvetdj.com
Chauvet Europe Ltd
Dirección: Unit 1C Email: UKtech@chauvetlighting.eu
Brookhill Road Industrial Estate
Pinxton, Nottingham, UK Sitio web: www.chauvetdj.eu
NG16 6NT
Voz: +44 (0) 1773 511115
Fax: +44 (0) 1773 511110
Chauvet Europe BVBA
Dirección: Stokstraat 18 Email: BNLtech@chauvetlighting.eu
9770 Kruishoutem
Belgium Sitio web: www.chauvetdj.eu
Voz: +32 9 388 93 97
Chauvet France
Dirección: 3, Rue Ampère
91380 Chilly-Mazarin
France Sitio web: www.chauvetdj.eu
Voz: +33 178 85 33 59
Chauvet Germany
Dirección: Bruno-Bürgel-Str. 11
28759 Bremen
Germany Sitio web: www.chauvetdj.eu
Voz: +49 421 62 60 20
Chauvet Mexico
Dirección: Av. de las Partidas 34-3B
(Entrada por Calle 2)
Zona Industrial Lerma Sitio web: www.chauvetdj.mx
Lerma, Edo. de Mexico, CP 52000
Voz: +52 (728) 690-2010
Email: DEtech@chauvetlighting.de
Email:增值服务@chauvet.com.mx
Visite el situ web correspondiente que aparece arriba para vericar nuestra informacion de contacto e instrucciones para solicitar asistencia. Fuera de los EE. UU., Reino Unido, Irlanda, Benelux, Francia, Alemania o Mexico,pongase en contacto con el distribuidor del registrar.
1. Avant de Commencer
Ce Qui Est Compris
Maverick MK1 Spot
- 2 fixations Omega avec matériel de montage
Cordon d'alimentation Seetronic Powerkon IP65
Instructions Relatives au Déballage
Déballez l'appareil avec précaution et vérifiez le contenu afin de vous assurer que rien ne vous manque et que tout est en bon état.
Réclamations
Si l'emballage ou le contenu (l'appareil et ses accessoires compris) semble avoir ete endommagé pendant le transport, ou s'il presente des signes de manipulation sans precaution, veuillez des reception en notifier immeditatement le transporter et non Chauvet. Ne pas enregisterer voire reclamation aupres du transporter en temps et en heure peut entrainer une non validation de celle-ci. De plus, gardez I'emballage et tous les materiaux d'emballage pour inspection. Pour tout autre probleme comme la non-livraison de pieces ou composants, des dommages non en rapport avec la livraison ou des vices cachés, veuillez deposer voire reclamation aupres de Chauvet dans les 7 jours suivant la livraison.
Conventions manuelles
| Convention Signification |
| 1-512 Une plage de valeurs |
| 50/60 | Un ensemble de valeurs parmi lequel on ne peut en désir qu'une |
| Settings Une option de menu ne pouvant être modifiée |
| <ENTER> | Un bouton sur lequel appuyer sur le panneau de commande de l'appareil |
| ON Une valeur à saisir ou à seLECTIONner |
Symboles
| Symbole Signification |
| Consignes importantes en matière d'installation, de configuration et de fonctionnement.
Le non-respect de ces consignes peut entraîner le non-fonctionnement de l'appareil ou lui cause des dommages. De même, l'utilisateur peut s'en trouver affecté. |
| Consignes importantes en matière d'installation ou de configuration. Le produit peut ne pas fonctionner correctement si ces instructions ne sont pas suivies. |
| Informations utiles. |

Toute référence aux données ou aux connexions d'alimentation dans ce manuel suppose l'utilisation de cables de classe IP Seetronic.

Le terme «DMX» utilisé dans tout ce manuel fait liérefonce au protocole de transmission de données numériques USITT DMX512-A.
Durée de Vie des LED
La luminosité des LED décline au fil du temps, principalement à cause de la chaleur. Les LED agencées en groupes ont des températures de fonctionnement plus élevées que les LED simples. Pour cette raison, le fonctionnement de LED en groupe à leur intensesté maximale réduit leur durée de vie de manière significative. Dans des conditions normales, cette durée de vie est de 40 000 à 50 000 heures. Si vous priorité est de maximiser la durée de vie, il est nécessaire de faire baisser la temperature de fonctionnement en améliorant la ventilation autour de l'appareil, ce qui fait baisser la temperature ambiente. En outre, limiter l'intensité globale de la projection peut prolonger la durée de vie des LED.
Consignes de Sécurité
Veuillez dire les consignes de sécurité qui suivant d'utiliser cet apparil. Ces signes comprennent d'importantes informations en matière d'installation, d'utilisation et de maintenance de l' apparil.

Tous les codes et règlements locaux applicables s'appliquent pour une installation correcte de cet apparéil.

Cet apparéil ne contient aucune piece réparable par l'utilisateur. Toute référence à des réparations dans ce manuel d'utilisation ne s'applique qu'à des techniciens certifiés ayant reçu une formation déquate. Ne pas ouvrir le boîtier ou essayer d'effectuer des réparations.
Sécurité des personnes
- Evitez tout contact visuel direct avec la source lumineuse quand cet apparéil est en marche.
- Toujours débrancher l'appareil de la source d'alimentation avant de le nettoyer ou de remplacer le fusible.
- Toujours connecter l'appareil à un circuit à la terre pour éviter les risques d'électrocution.
- Ne touchez pas le boîtier de l'appareil lorsqu'il est en fonctionnement, celui-ci pouvant être très chaud.
Montage et fixation
N'immergez PAS ce produit (IP65). Ce produit est destiné à une utilisation interieure ou temporaire à l'extérieur.
Lorsque you utilisece ce produit dans un environnement extérieur, utilisez des cables d'alimentation et de données classes IP65 (ou supieur). Securisez les ports d'alimentation et de donnees inutilisés avec les couvercles IP65 attachés.
ATTENTION : Lorsque l'appareil est déplaced d'un environnement à température extréme à un autre (par exemple d'un camion froid vers une salle de spectacle chaude et humide), de la condensation peut se former sur les composants électriques internes. Pour éviter de causeur des dommages, laissez l'appareil s'accimer entière au milieu environnant avant de lemettre sous tension.
- Ne pas installer à l'extérieur en permanence dans des endroits soumis à des conditions environnementales extrêmes. Ceci inclut, mais n'est pas limité à :
- Exposition à un environnement marin / salin (à moins de 3 miles d'un plan d'eau salé).
- Emplacements ou les températures haute ou basses normales dépassent les plages de température indiquées dans ce manuel.
Endroits susceptibles d'être inondés ou enfouis dans la neige.
-
Zones où le produit sera soumis à des radiations extrêmes ou à des substances caustiques.
-
Installlez cet appeareil dans un endroit bien ventilé à au moins 50 cm (20 po) des surfaces adjacentes. Veillez à ce qu'il ne se trouve jamais à proximé d'aucun matériel inflammable lorsqu'il est en fonctionnement.
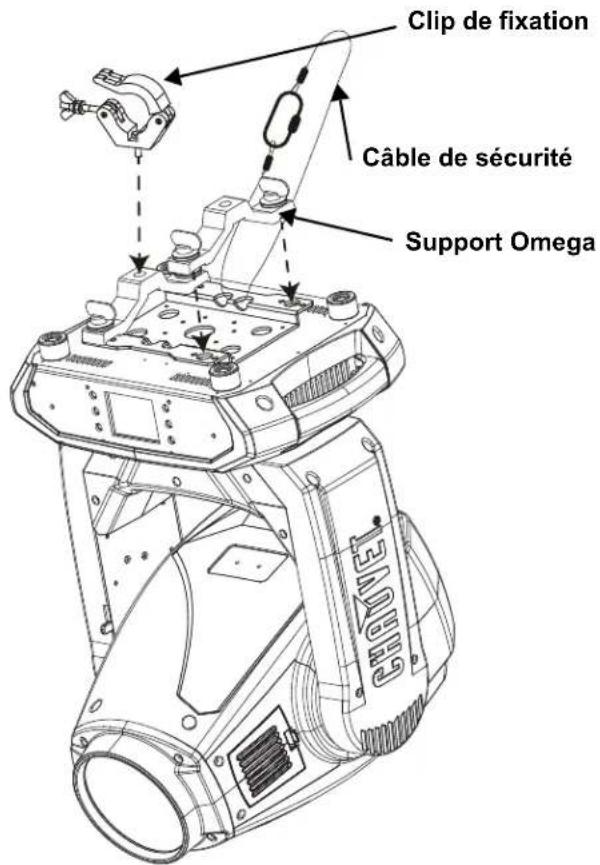
- En cas de suspension de l'appareil, veillez à tousjours le fixer à un dispositif d'attache en utilisant un cable de sécurité.
- Ne transportez jamais l'appareil par son cordon d'alimentation ou toute autre piece mobile.
Alimentation et câblage
Assurez-vous que le cordon d'alimentation n'est pas pince ou endommagé.
- Assurez-vous de plusieurs brancher cet apparéil sur la bonne tension comme indiqué dans les specifications techniques de ce manuel ou sur l'étiquette des specifications de l' apparéil.
Durant les périodes de non-utilisation, pour éviter toute usure inutile et pour prolonger la durée de vie, déconnectez entierement l'appareil en le débranchant de l'alimentation électrique ou en coupant le disjoncteur.
- Ne connectez jamais cet apparéil à un bloc de gradateurs ou à un rhéostat.
- Ne débranchez jamais cet apparéil en tirant sur le cordon d'alimentation.
Utilisation
- Ne pas utiliser cet apparéil si vous constaté que le boîtier, les lentilles ou les cables ont subit des dommages. Faites replacer les pieces endommagées dés que possible par un technicien agréé.
- Ne recouvre pas les fentes de ventilation lors du fonctionnement pour éviter toute surchauffe interne.
- La température ambiente maxime est de 45^ . Ne faites pas fonctionner l'appareil à des températures plus élevées.
- La température de démarrage minimale est de -20 °C. Ne démarrez pas le produit à des températures plus basses.
La température ambiente minimale est de -30^ . Ne pas utiliser le produit à un niveau inférieur.
- En cas de problème de fonctionnement grave, arrêtez l'appareil immédiatement!

Si vous appeareil Chauvet nécessite une réparation, veuillez contacter le support technique de Chauvet.
2. Introduction
Description
LeMaverickMK1 Spot est pret à l'action avec un champ extrémement plat, un melange de couleurs CMJ, un zoom 5:1 et de nombreuses options de contrôle. Propulsé par un moteur LED de 350 W, il dispose d'une roue de gobos statique et d'une roue de gobos rotative, d'une roue de couleurs sur 7 positions + blanc, d'un gel variable et d'un prisme à 3 facettes. Il peut être contrôle par DMX, sACN, Art-Net™ ou WDMX.
\section*{Caracteristiques}
- Projecteur spot tete lyre DEL de 350 W doté de nombreuses fonctions, comprant un mélange de couleurs CMJ, une roue de couleurs, un zoom optique et deux roues de gobos, l'une rotative et l'autre statique.
- Gradation 16 bits du gradateur maître pour un contrôle en douceur des fondus enchânés
- Système de mélange de couleurs CMJ variable permettant d'obtenir une large palette de couleurs
- Support des protocoles DMX, WDMX, sACN et Art-Net™ pour une flexibilité totale de contrôle
- Compatible RDM pour l'adressage et le dépannage à distance
- Conversion TCP/IP vers DMX pour réduire la longueur des cables
Angle de zoom allant de 7^ à 33^ pour des tailles de faisceaux variables
- Equipé d'un iris, d'un prisme à 3 facettes et d'un gel pour le contrôle du faisceau
- Entrée d'alimentation compatible True 1
- Affichage tactile avec batterie de secours équipé d'une rotation automatique pour s'adapter à l'orientation de l'appareil
3 preréglages de menu de configuration et une synchronisation des préréglages pour le chargement simultané sur plusieurs appareils identiques pour une configuration facile
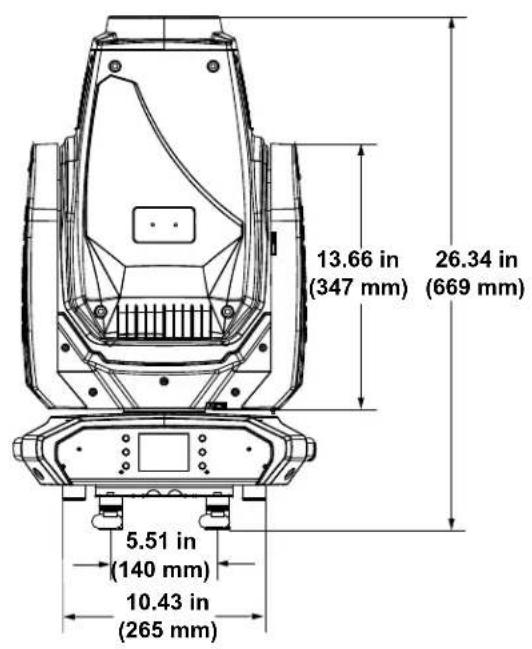
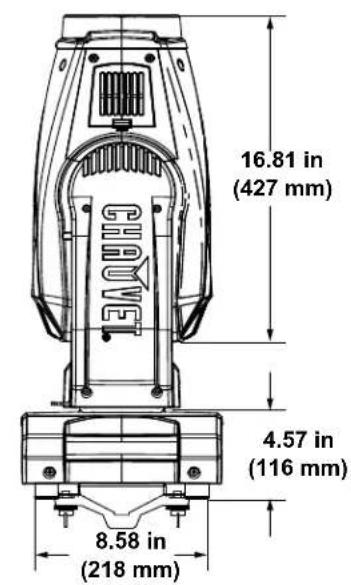
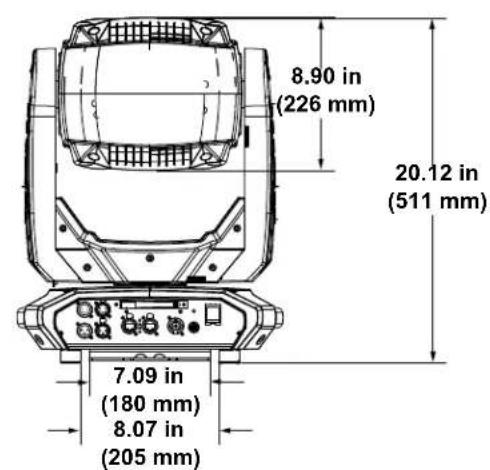
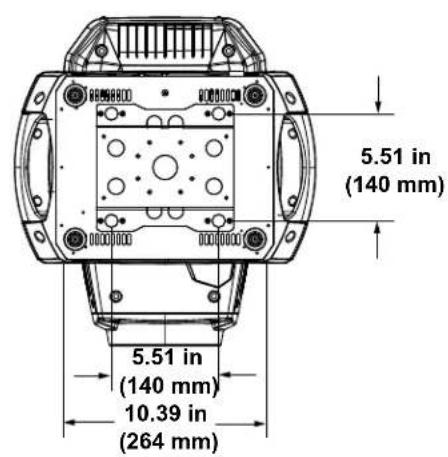
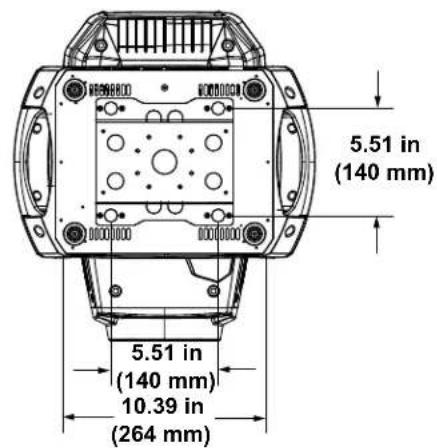
Vue d'ensemble du Produkt
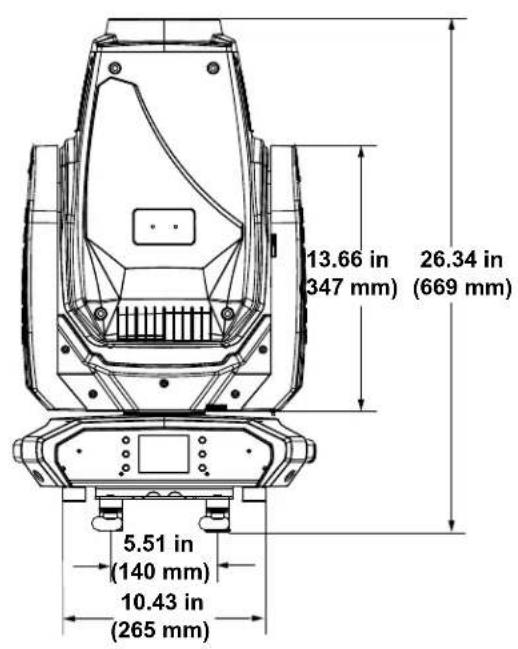
Dimensions du Produkt
3. Configuration
Alimentation CA
LeMaverickMK1Spotestoded'unealimentationuniversellequiprendenchargetoules tensions d'entreescomprisesentre100et240VCA,50/60Hz.Pourconnaîtrelesbesoins enalimentation de chaqueappareilMaverickMK1Spot,veuillezvousréferer àletiquette appossee surl'appareil.Vous pouvezeglementyouréfererau tableau desSpécificitésTechniquesdece manuel.
La capacité nominale affichée indique la consommation maximale de courant pendant le fonctionnement normal. Pour plus d'informations, veuillez telecharger le document Sizing Circuit Breakers (calibrage des disjoncteurs) sur le site Web de Chauvet: www.chauvetprofessional.com

- Toujours connecter l'appareil à un circuit protégé (disjoncteur ou fusible). Assurez-vous que l'appareil soit correctement mis à la terre pour éviter tout risque d'électrocution ou d'incendie.
Durant les périodes de non-utilisation, pour éviter tout usure inutile et pour prolonger la durée de vie, déconnectez-entièrement l'appareil en le débranchant de l'alimentation électrique ou en coupant le disjoncteur.

Ne connectez jamais l'appareil à un rhéostat (résistance variable) ou un circuit gradateur, même si vous n'avez l'intention de vous servir du rhéostat ou du canal d'assombrissement que comme interrupteur 0 à 100% .
Prise CA
LeMaverickMK1 Spot est livre avec un cordon d'alimentation avec un connecteur Seetronic Powerkon a une extrémité et une fiche Edison à l'autre extrémité (marché américain).Si le cordon d'alimentation fourni avec votre produit n'a pas de fiche ou si vous avez besoin de changer la fiche,utilisez le tableau ci-dessous pour cabler la nouvelle fiche.
| Connexion | Câble (États-Unis) | Câble (Europe) | Couleur de la vis |
| Conducteur CA Noir | Marron Jaune/Cuivré | | |
| Neutre CA Blanc | Bleu Argenté | | |
| Terre CA Vert/Jaune | Vert | Vert | |
Remplacement des Fusibles
- Debranche l'appareil de l'alimentation.
- Avec un tournevis plat, dévissez la capuchon du porte-fusible du boitier.
- Enlevez le fusible grillé du porte fusible et remplacez-le par un fusible de même type et de même ampérage (F 20 A, 250 V).
- Remettez en place et vissez le capuchon du porte-fusible, puis rebranchez.

Débranche l'appareil avant de procéder au remplacement du fusible.

Remplacez toujours un fusible obsolete avec un de même type et même ampérage.
Installation
Avant d'installer ce produit, lisez, assimilez et suivez les commandations en matière de sécurité reprises dans la section Consignes de Sécurité.
Orientation
LeMaverickMK1 Spot doitetre montede maniere a garantir l'usage en toute sccurté du laser.Assurez-vous que la ventilation de cet appeareil puisse s'effectuer de maniere adequate.
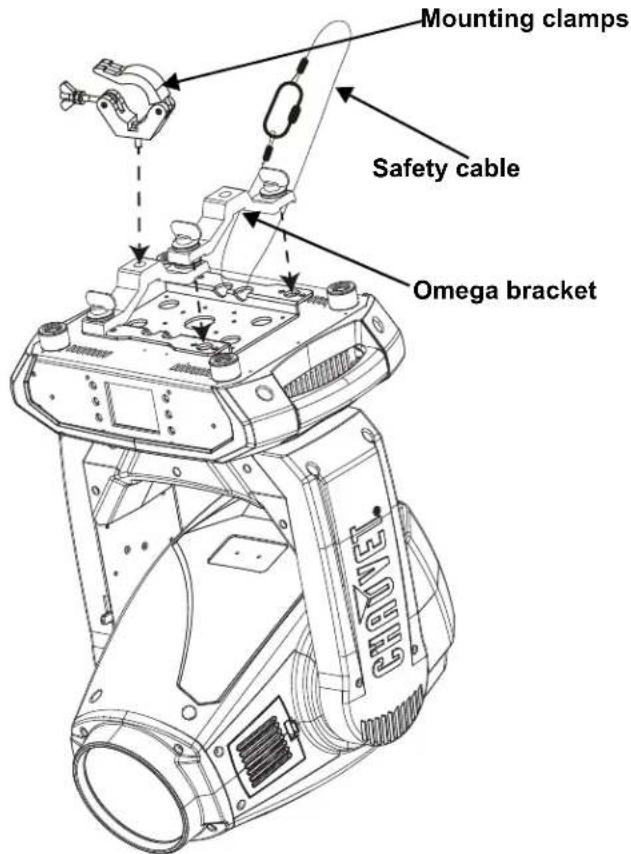
Suspension
- Avant de désir un emplacement pour l'appareil, assurez-vous qu'il soit facile d'y acceder pour toute opération de maintenance et de programmation.
- Ne montez jamais dans des endroits où la pluie, une humidité elevée, des changements de température extrêmes ou une ventilation limitée peuvent affecter le produit.
Assurez-vous que la structure ou la surface sur laquelle vous installez l'appareil peut en supporter le pays (voir les Specificités Techniques)
Lors de la suspension de I'appareil a une structure, vous devriez utiliser un clip de fixation en mesure de supporter la charge nécessaire. Pour la ligne de cables de sécurité CHAUVET Professional, visitez le site http://trusst.com/products/.
Procedure
LeMaverickMK1 Spot est livre avec un étrier à double crochet sur lequel vous pouvez monter des pince de fixation pour suspension ou que vous pouvez simplement utiliser comme support au sol. Les pince de fixation ne sont pas fournies. Assurez-vous que les pince puissant supporter le poids de cet apparéil. Utilisez au moins un point de fixation par apparéil. Pour prendre connaissance de la gamme de pince de montage CHAUVET Professional, veuillez consulter le site internet à l'adresse : http://trusst.com/products/
Scheme de installation
Montage en Hauteur
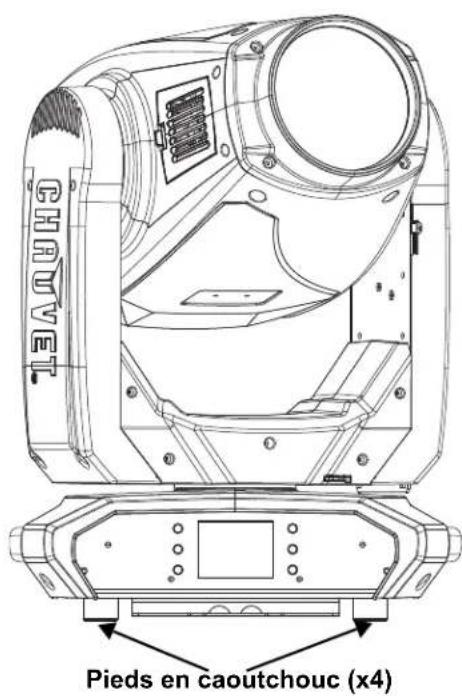
Montage au Sol
Chainage DMX
VoussoupiezrelMerwickMK1SpotauncontroleurDMXenutilisantuneconnexionDMXa3ou5 broches.Siyouusutilized'autresappareilscompatibleSMXaveccetteunité,vousoupzcontrolerchacun d'entreeuxde maniereindividuelleavecunseulcontroleurDMX.
Personnalités DMX
LeMaverickMK1 Spot utilise une connexion de données DMX à 3 et 5 broches pour sespersonnalitésDMX à22 et 29 canaux :
- Reportez-vous à l'Introduction pour une brève description de chaque personnelité DMX.
- Reportez-vous au chapitre Fonctionnement pour apprendre à configurer le Maverick MK1 Spot pour qu'il fonctionne avec ces personnalités.
La section sur les Valeurs DMX fournit des informations détaillées sur les personnalités DMX.
Remote Device Management
Le protocole RDM (gestion des peripheriques à distance) est un standard pour la communication bidirectionnelle des appeareils dotés de fonctions DMX dans un cablage DMX existant. Vérifie le manuel d'utilisation du contrôleur DMX ou demandez au fabricant car tous les contrôleurs DMX ne disposent pas de cette fonctionnalité. Le Maverick MK1 Spot prend en charge le protocole RDM qui permet au signal DMX retard d'apporter des modifications aux options du plan de menu de l'appareil.
Connexions de Signal
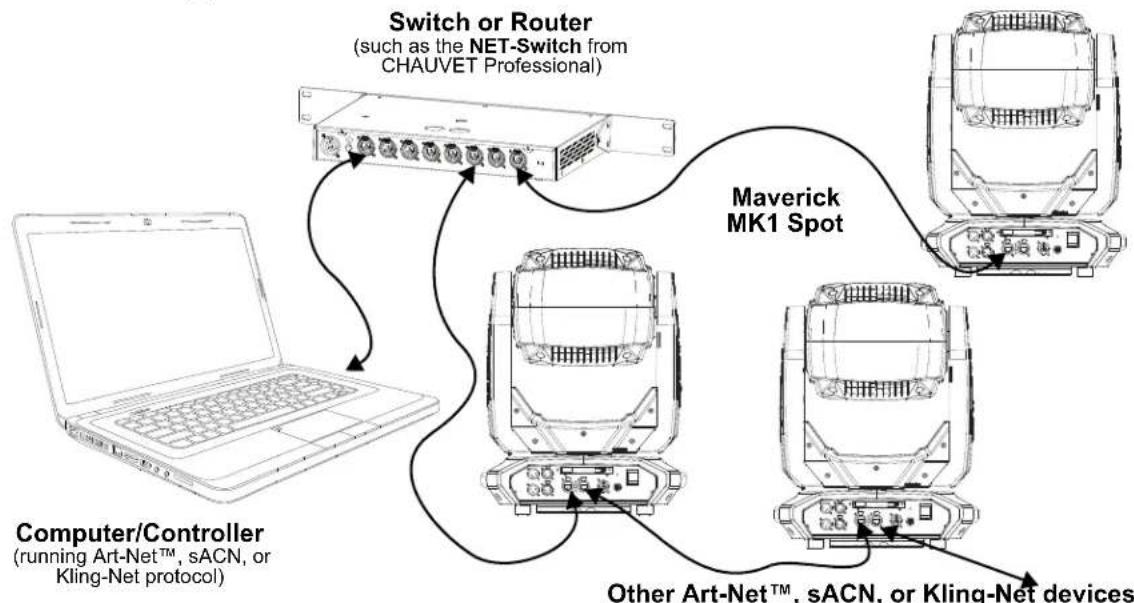
LeMaverickMK1 Spot peut receivevoir le signal DMX,Art-NetTM,sACN ou Kling-Net.LeMaverick MK1 Spot possede deux ports Neutrik etherCON, ainsi que des ports d'entree et de sortie DMX a 3 et 5 broches. Pour plus d'informations sur le DMX, lisez I'amorce DMX a: https://www.chauvetprofessional.com/wp-content/uploads/2016/06/DMX_PRimer.pdf
Connexion Art-NetTM
Art-Net™ est un protocole Ethernet par TCP/IP qui permet de transférer de grandes quantités de données DMX512 à l'aide d'une connexion Neutrik® etherCON® RJ45 sur un grand réseau. Une introduction au protocole Art-Net™ est disponible sur le site internet www.chauvetprofessiona.com. Art-Net™ concu et droit d'auteur par Artistic Licence Holdings Ltd.
Connexion sACN
ACN en continu, également connu sous le nom ANSI E1.31, est un protocole Ethernet qui utilise la mise en couche et le formatage d'Architecture for Control Networks pour transporter des données DMX512 sur IP ou tout autre réseau compatible ACN. L'ACN est maintenu pa la PLASA (Professional Lighting and Sound Association).
Connexion Kling-Net
Kling-Net est un protocole reseau qui permet la configuration automatique des appareils d'affichage en utilisant une connexion Ethernet. Referez-vous au manuel du logiciel ArKaos pour des instructions détaillées sur la programmation de cet apparéil.
Diagramme de connexion
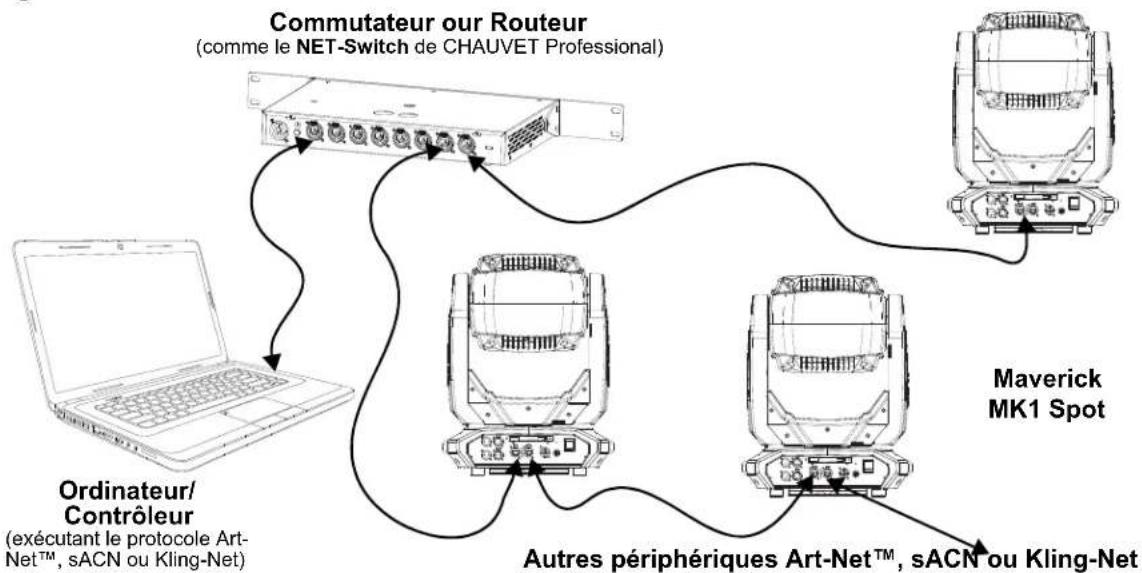

Les trois voyants LED situés entre les ports Ethernet traversant indiquent la connexion au réseau et l'activité sur ce réseau. Ils n'indiquent pas si le Maverick MK1 Spot recoit un signal de la part d'un contrôleur.
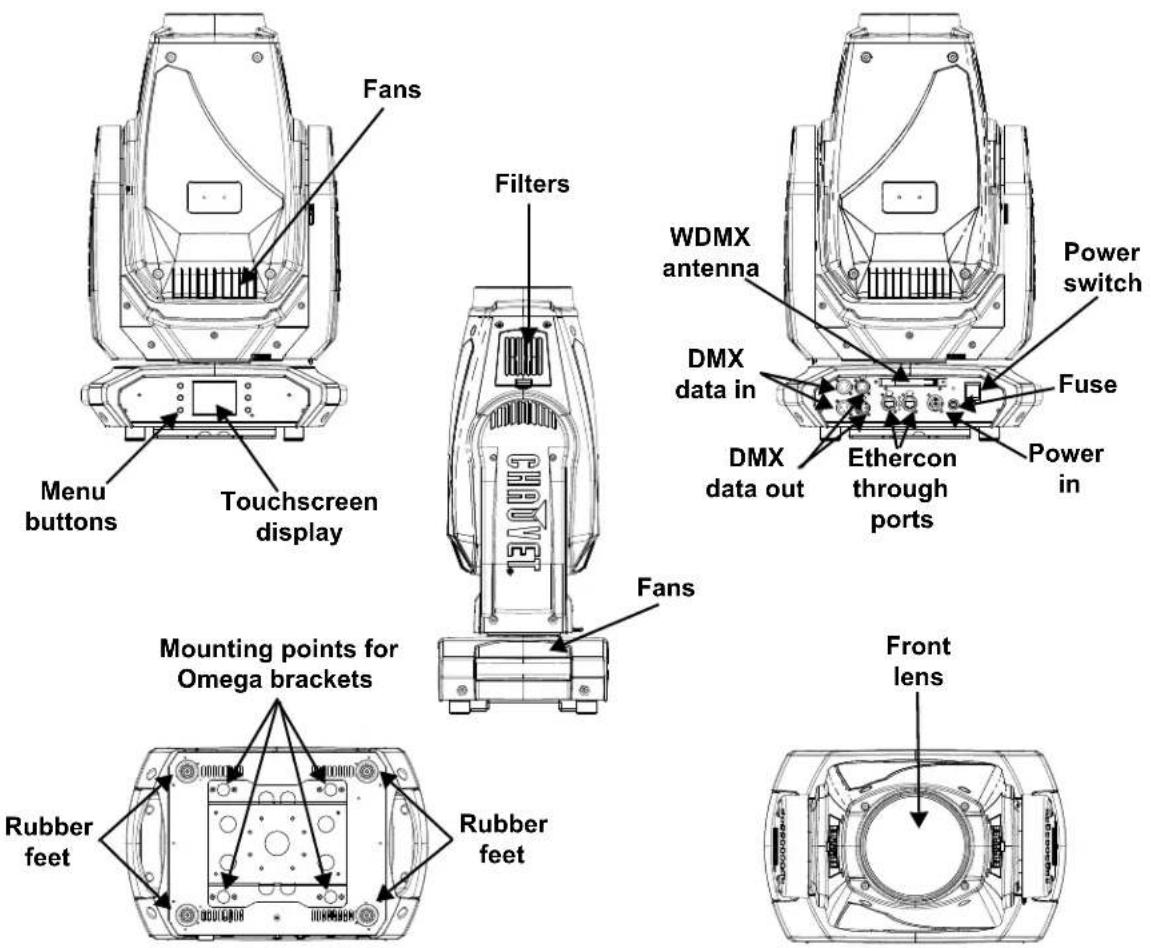
4. Fonctionnement
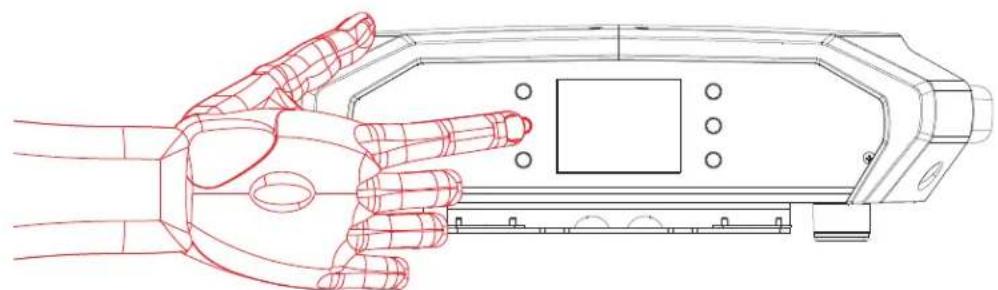
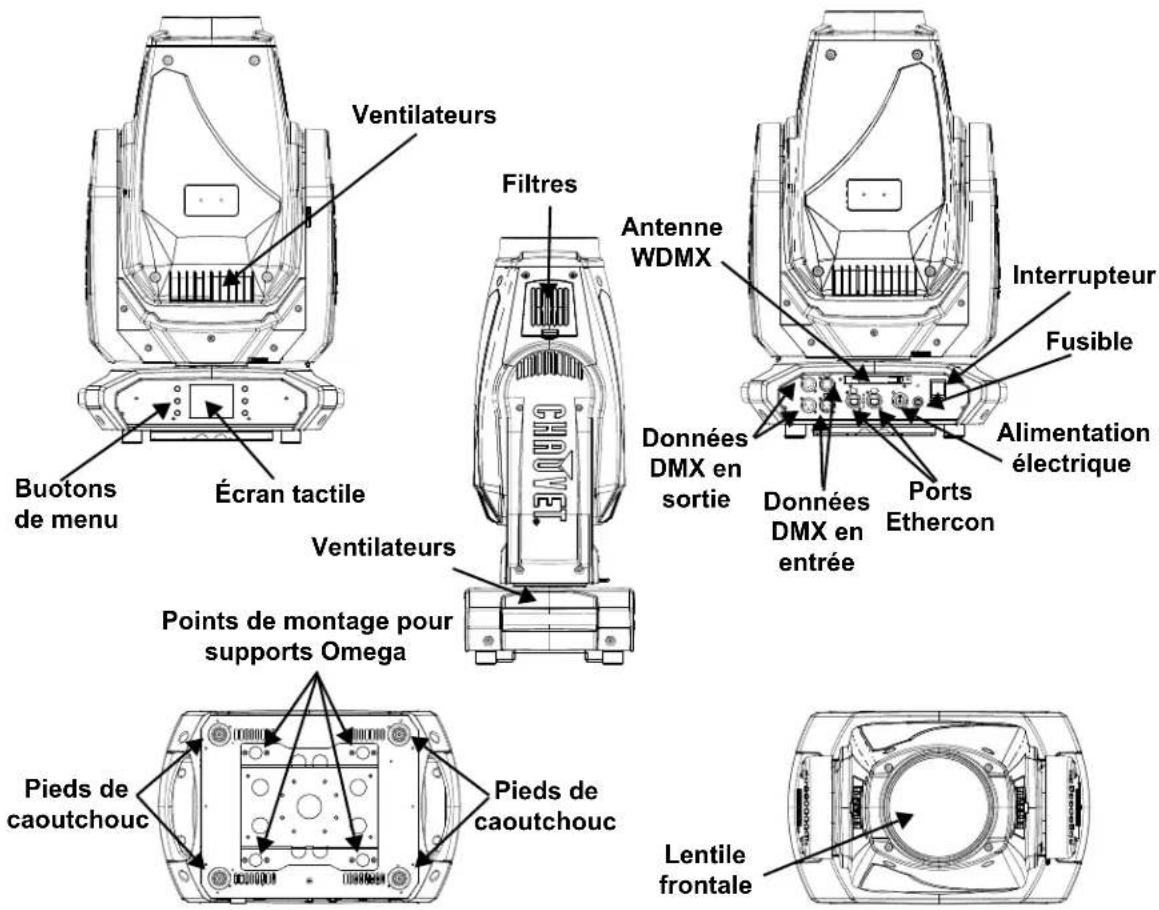
LeMaverickMK1 Spot possede un ecran tactile et six boutons de commande.Naviguez dans la structure du menu en appuyant sur les boutons, en touchant les images des boutons sur les cotes de I'ecran ou en touchant directement l'option de menu souhaitee sur I'ecran. L'ecran tactile peut etre verrouillé et calibre via les options de configuration du menu (voir Calibrage de I'ecran tactile et Verrouillage de I'ecran tactile).
Description du Tableau de Commandes
| Bouton Fonction |
| ↑ | Permet de naviguer vers le haut dans la liste du menu ou d'incrementer une valeur numérique dans une fonction |
| ∥ | Permet de sorting de menu ou de la fonction en cours |
| Permet de naviguer vers le bas dans la liste du menu ou de déprémasterer une valeur numérique dans une fonction |
| Permet de se déplacer vers la gauche dans le menu |
| ← | Active l'entrée de menu actuellément affichée ou confirme la valeur actuallément sélectionnée pour la fonction en cours de Sélection |
| → | Permet de se déplacer vers la droite dans le menu |
Affichage à Piles
Appuyez sur la touche et maintenez-la enforcée jusqu'à ce que l'écran du menu apparaisse (environ 15 secondes).

Carte du Menu
| NiveauPrincipal | Niveau de Programmation Description | |
| Start Address 000-255 Paramètre réseau | |
| Network Setup | IP Mode | Manual | Réglage manuel de l'adresse IP |
| DHCP | L'adresse IP est définie pa le réseau |
| Static | L'adresse IP est définie pa l'appareil |
| Universe 000-255 Définit l'univers | |
| IP 002.243.075.222 | Réglage de l'adresse IP en mode manuel |
| SubMask 255.000.000.000 | Réglage du masque de sous-réseau en mode manuel |
| Personality | DMX 22CH | YES | Choisissez 22 canaux de DMX |
| NO |
| DMX 29CH | YES | Choisissez 29 canaux de DMX |
| NO |
| Settings | Control Mode | DMX Définit la | personnalité DMX |
| WDMX Définit la | personnalité WDMX |
| sACN Définit la | personnalité sACN |
| ArtNet Définit la | personnalité Art-NetTM |
| Pan Reverse | NO | Fonctionnement normal du pan |
| YES Fonctionnement inversé du pan |
| Tilt Reverse | NO | Fonctionnement normal du tilt |
| YES Fonctionnement inversé du tilt |
| Screen Reverse | NO | L'écran s'affiche à normal |
| YES L'écran s'affiche à l'envers |
| AUTO | Orientation automatique de l'écran |
| Pan Angle | 540 | Plage d'angle de pan: 540° |
| 360 | Plage d'angle de pan: 360° |
| 180 | Plage d'angle de pan: 180° |
| Tilt Angle | 270 | Plage d'angle de tilt: 270° |
| 180 | Plage d'angle de tilt: 180° |
| 90 | Plage d'angle de tilt: 90° |
| BL. O. P/T Move | YES | Noir généralpendant le panoramicique/inclinaison |
| NO | Pas de noir généralpendant le panoramicique/inclinaison |
| BL. O. Color Move | YES Activer la | perte de couleur |
| NO | Dé族自治a perte de couleur |
| BL. O. Gobo Move | YES Activer la | blackout des gobos |
| NO | Dé族自治a blackout des gobos |
| Calibration | YES | Calibration de l'écran tactile |
| NO | Conserver le paramètres actuels |
| Touchscreen Lock | YES | L'écran ne réponds pas au toucher |
| NO | L'écran réponds au toucher |
| Lock Screen | YES | Boutons de verrouillage et écran tactile |
| NO | Mot de Passe: 0920 |
| Swap XY | YES | Le panoramicique contrôle le inclinaison et inversement |
| NO | Ne pas permuter le panoramicique/ inclinaison |
| XY Mode | Fast | Le panoramicique/inclinaison rapides |
| Slow | Le panoramicique/inclinaison lents |
| WDMX Reset | YES | Réinitialiser le WDMX |
| NO | Ne pas réinitialiser le WDMX |
| NiveauPrincipal | Niveau de Programmation Description | |
| Settings | Backlight Timer | 30S | L'affichage s'éteint après 30 secondes d'inactivité |
| 1M | L'affichage s'éteint après 1 minute d'inactivité |
| 5M | L'affichage s'éteint après 5 minutes d'inactivité |
| ON | L'affichage reste allumé |
| Loss of Data | Hold | Conservation du dernier signal reçu |
| Close | Extinction de l'unité |
| Fans | Auto | La vitesse du ventilateur s'adapte à la température d'apparil |
| Full | La vitesse du ventilateur est réglée sur la vitesse haute |
| ECO Mode silencieux | |
| Dimmer Curve | Linear | Définir la courbe de gradation |
| Square |
| I Square |
| SCurve |
| Dimmer Speed | Smooth | Modifier la vitesse de gradation |
| Fast |
| PWM Option | 600Hz | Définir le réglage Pulse Width Modulation |
| 1200Hz |
| 2000Hz |
| 4000Hz |
| 6000Hz |
| 25000Hz |
| Preset Select | PRESET A | Options de menu des prérégliages enregistrés |
| PRESET B |
| PRESET C |
| Preset Sync | NO Permet de | transférer les options de menu des prérégliages enregistrés vers d'autres apparueilsMaverick MK1 Spot de la chaine DMX en guirlande |
| YES |
| Reset Function | Pan/Tilt | YES/NO | Réinitialiser chaque fonction de manière individuelle ou toutes les fonctions à partir du démarrage |
| Iris/Prism |
| Color/CMY+CTO |
| Gobo/GoboRotate |
| Zoom/Frost/Focus |
| All |
| Factory Settings | YES | Réinitialisation aux paramètres par défaut d'usine |
| NO |
| NiveauPrincipal | Niveau de Programmation Description |
| Auto Test Auto tester le produit |
| Test | Manual Test | Pan | 000-255 | Affiche toutes les valeurs actuellesdes signaux en entrée, 000 à 255 |
| Pan Fine |
| Tilt |
| Tilt Fine |
| P/T Speed |
| Dimmer |
| Dimmer Fine |
| Shutter |
| Virtual Shaking |
| Cyan |
| Magenta |
| Yellow |
| Color |
| Gobo |
| Gobo RotateFine |
| Gobo Index |
| Gobo 2 |
| Focus |
| Focus Fine |
| Focus Auto |
| Zoom |
| Zoom Fine |
| Prism |
| Prism Rotate |
| Iris |
| Frost |
| CMY Macro |
| CMY MacroSpeed |
| Special Function |
| NiveauPrincipal | Niveau de Programmation | Description |
| Information | FixtureInformation | Ver V_Affiche la version du micrologiciel |
| Running ModeDMX | --- Affiche le mode d'exécution actuel |
| DMX Address | --- Affiche l'adresse de départ actuelle |
| Temperature | --- Affiche la température actuelle de l'appareil en °C |
| Fixture Hours | --- Affiche le nombre d'heure pendant lequel l'appareil est resté allumé |
| IP | --- Affiche l'adresse IP actuelle |
| SubMask | --- Affiche le masque de sous-réseau actuel |
| MAC | --- Affiche l'adresse MAC actuelle |
| Fan Information | Base Fan 1 Speed | --- Affiche la vitesse des ventilateurs de tête en tr/min |
| Base Fan 2 Speed | --- Affiche le nombre des ventilateurs de tête en tr/min |
| Head Fan 1 Speed | --- Affiche l'adresse Mac actuelle |
| Head Fan 2 Speed | --- Affiche le masque de sous-réseau actuel |
| Error Information | No Error!* | Affiche n'importe erreurs ou "No Error!" |
| Channel Information | Frequency Hz | | Affiche toutes les valeurs actuelles des signaux en entrée, 000 à 255 |
| Pan | 000-255 |
| Pan Fine |
| Tilt |
| Tilt Fine |
| P/T Speed |
| Dimmer |
| Information | Channel Information | Dimmer Fine | 000-255 | Affiche toutes les valeurs actuelles des signaux en entrée, 000 à 255 |
| Shutter |
| Virtual Shaking |
| Cyan |
| Magenta |
| Yellow |
| Color |
| Gobo |
| Gobo Rotate |
| Gobo Index |
| Gobo 2 |
| Focus |
| Focus Fine |
| Focus Auto |
| Zoom |
| Zoom Fine |
| Prism |
| Prism Rotate |
| Iris |
| Frost |
| CMY Macro |
| CMY Macro Speed |
| Special Function |
Configuration des Paramètres de Fonctionnement
Écran d'accueil
LeMaverickMK1Spot estequipe d'unecran d'accueil indiquantle mode de protocole,l'adresse IP ou l'accueil,appuyez sur le boutonde maniere repetee jusqu'a ce qu'il s'affiche.Dans I'ecran d'accueil,appuyez sur I'un des boutons de menu pour acceder immediatement a n'importe quelle partie du menu (par exemple,la personnalite,l'adresse de depart ou l'univers)ou appuyez sur le bouton pour acceder au menu principal.
Adresse de départ
Pour définiir l'adresse de départ, suivez les instructions ci-dessous:
- Appuyez plusieurs fois sur
- Utilisez <UP> , <DOWN> , <LEFT> ou <RIGHT> pour sélectionner Start Address, ou touchez l'écran où il est indiqué Start Address.
- Si vous utilisez les boutons à la place de l'écran tactile, appuyez sur la touche .
- Saisissez l'adresse de départ (001-512) avec l'une des méthodes qui suivent:
Saisissez le numero de I'adresse en utilisant le clavier numérique qui s'affiche sur I'ecran tactile.
Utilisez les boutons (ou les boutons en forme dicones sur les bords de I'ecran) :
a. Utilisez les touches ou pour selectionner le chiffre à modifier.
b. Utilisez les touches ou pour augmenter ou diminuer la valeur de ce chiffre.
c. Repetez les étapes jusqu'à ce que l'adresse soit configurée comme souhaitée.
- Appuyez sur la touche.
Paramètres réseau

L'univers du protocole TCP/IP sera l'univers de la fonction DMX.
Mode IP
L'adresse IP du Maverick MK1 Spot peut être définie manuellement, par le réseau ou par une adresse statique spécifique à chaque produit. Pour configurer le mode IP, suivez les instructions ci-dessous :
- Appuyez plusieurs fois sur
- Utilisez , , ou pour sélectionner Network Setup, ou touchez l'écran où il est indiqué Network Setup.
- Si vous utilisez les boutons à la place de l'écran tactile, appuyez sur la touche .
- Utilisez ou pour sélectionner IP Mode, ou touchez l'écran où il est indiqué IP Mode.
- Si vous utilisez les boutons à la place de l'écran tactile, appuyez sur la touche .
-
Utilisez , , ou pour sélection parmi :
-
Manual - définition de l'adresse IP avec le panneau de commande
DHCP - le réseau définit l'adresse IP
Static - une adresse IP prédéfinie spécifique pour chaque apparéil, ou bien touchez l'écran pour désir le mode
-
Appuyez sur la touche .
Universe
L'univers doit etre attribue via le menu du produit. Pour definir l'univers, procedez comme suit :
- Appuyez plusieurs fois sur
- Utilisez , , ou pour sélectionner Network Setup, ou touchez l'écran où il est indiqué Network Setup.
- Si vous utilisez les boutons à la place de l'écran tactile, appuyez sur la touche .
- Utilisez ou pour sélectionner Universe ou touchez l'écran où il est indiqué Universe.
- Si vous utilisez les boutons à la place de l'écran tactile, appuyez sur la touche .
- Enter the universe address (000-255) with one of the following methods:
Saisissez le numero de l'adresse en utilisant le clavier numérique qui s'affiche sur l'écran tactile.
Utilize les boutons (ou les boutons en forme d'icones sur les bords de l'écran) :
a. Utilisez les touches ou pour selectionner le chiffre à modifier.
b. Utilisez les touches ou pour augmenter ou diminuer la valeur de ce chiffre.
c. Repetez cette opération jusqu'à ce que l'univers ou le sous-reseau soit définir comme vous le souhaitez.
Adresse IP
Pour définit r'adresse IP en mode IP manuel, procédez comme suit :
- Appuyez plusieurs fois sur
- Utilisez , , ou pour sélectionner Network Setup, ou touchez l'écran où il est indiqué Network Setup.
- Si vous utilisez les boutons à la place de l'écran tactile, appuyez sur la touche .
- Utilisez <UP> ou <DOWN> pour sélectionner IP ou touchez l'écran où il est indiqué IP.
- Si vous utilisez les boutons à la place de l'écran tactile, appuyez sur la touche .
-
Définissez l'adresse IP (entre 000.000.000.000 et 255.255.255.255) avec l'une des méthodes suivantes:
-
En utilisant l'écran tactile :
a. Touchez l'écran sur l'octet (ensemble de trois chiffres) à modifier.
b. Utilisez le pavé numérique à l'écran pour saisir le nombre désiré.
c. Repetez les étapes jusqu'à ce que l'adresse IP soit configurée comme souhaitée.
Avec les boutons :
a. Utilisez les touches ou pour selectionner l'octet (ensemble de trois chiffres) à modifier.
b. Utilisez les touches <UP> ou <DOWN> pour augmenter ou diminuer la valeur.
c. Repetez les étapes jusqu'à ce que l'adresse IP soit configurée comme souhaitatione.
- Appuyez sur la touche .
Masque de sous-reseau
Pour définitir le masque de sous-reseau en mode IP manuel, procédez comme suit :
- Appuyez plusieurs fois sur
- Utilisez , , ou pour sélectionner Network Setup, ou touchez l'écran où il est indiqué Network Setup.
- Si vous utilisez les boutons à la place de l'écran tactile, appuyez sur la touche .
- Utilizez ou pour sélectionner SubMask ou touchez l'écran où il est indiqué SubMask.
- Si vous utilisez les boutons à la place de l'écran tactile, appuyez sur la touche .
-
Définissez le masque de sous-réseau (entre 000.000.000.000 et 255.255.255.255) avec l'une des méthodes suivantes:
-
En utilisant l'écran tactile :
a. Touchez l'écran sur l'octet (ensemble de trois chiffres) à modifier.
b. Utilisez le pavé numérique à l'écran pour saisir le nombre désiré.
c. Continuez jusqu'à ce que le masque de sous-réseau soit configuré comme souhaité.
Avec les boutons:
a. Utilisez les touches ou pour sélectionner l'octet (ensemble de trois chiffres) à modifier.
b. Utilisez les touches <UP> ou <DOWN> pour augmenter ou diminuer la valeur.
c. Continuez jusqu'à ce que le masque de sous-réseau soit configuré comme souhaïte.
- Appuyez sur la touche .

Personnalité
Pour définit la personnalité DMX à utiliser, procédez comme suit :
- Appuyez plusieurs fois sur
- Utilisé , , ou pour sélectionner Personality, ou touche l'écran où il est indiqué Personality.
- Si vous utilisez les boutons à la place de l'écran tactile, appuyez sur la touche .
- Utilisez , , ou pour sélectionnner DMX 22CH ou DMX 29CH, ou touchez l'écran où il indique l'option souhaïée.
- Si vous utilisez les boutons à la place de l'écran tactile, appuyez sur la touche .
- Utilisez <UP> , <DOWN> , <LEFT> ou <RIGHT> pour sélectionner NO (annuler) ou YES (confirmer), ou touche z'écran où il indique l'option souhaitée.
- Appuyez sur la touche .
Configuration
Pour acceder au menu Configuration, suivez les instructions ci-dessous :
- Appuyez sur la touche
- Sélectionnéz l'élement Setup en touchant l'écran ou en utilisant les touches , , ou .
- Si vous utilisez les boutons à la place de l'écran tactile, appuyez sur la touche .
Mode de contrôle
LeMaverickMK1 Spot peut etre regle pour repondre aDMX,WDMX,Art-NetTM ou sACN.La configuration du protocole doit etre definié pour que le produit reponde correctement au (x) contrôleur (s).Voir la Carte du Menu pour plus d'informations. Pour configurer le protocole du Maverick MK1 Spot, suivez les instructions ci-dessous:
1.Accedez au menu Configuration
2. Utilisez ou pour selectionner Control Mode, ou touchez l'écran où il est indiqué Control Mode.
3. Si vous utilisez les boutons à la place de l'écran tactile, appuyez sur la touche .
4. Utilisez <UP> , <DOWN> , <LEFT> ou <RIGHT> pour sélectionner DMX, WDMX, sACN, ArtNet, ou touchez l'écran où il indique l'option souhaïée.
5. Appuyez sur la touche .

Pour le contrôle par WDMX, assurez-vous que l'antenne soit bien droite et qu'il n'y ait aucun obstacle dans la ligne directe entre le contrôleur et l'appareil. Consultez la section Réinitialisation WDMX pour plus d'informations sur la résolution des problèmes.
Orientation du panoramaique/inclinaison
Pour définit une orientation de panoramicique/inclinaison normale ou inversée :
1.Accedez au menu Configuration
2. Utilisez les touches ou pour selectionner un réglage parmi Pan Reverse (panoramaque inverse) ou Tilt Reverse (inclinaison inverse), ou touche l'écran où il indique l'option souhaïée.
3. Si vous utilisez les boutons à la place de l'écran tactile, appuyez sur la touche .
4. Utilisez les touches , , ou pour sélectionner NO (orientation normale) ou YES (orientation inversée), ou touchez l'écran où il indique l'option souhaïée.
5. Appuyez sur la touche .
Orientation de l'affichage
Pour définit l'orientation de l'écran, procédez comme suit :
1.Accedez au menu Configuration
2. Utilisez les touches ou pour selectionner Screen Reverse, ou touche l'écran où il est indiqué Screen Reverse.
3. Si vous utilisez les boutons à la place de l'écran tactile, appuyez sur la touche .
4. Utilisez les touches UP , DOWN , LEFT ou RIGHT pour selectionner parmi les options NO (écran normal), YES (écran inverse) ou AUTO (l'écran détecte automatique dans quel sens l'appareil est orienté et s'adapte en conséquence) en touchant l'écran ou en utilisant les touches UP , DOWN , LEFT ou RIGHT , ou touchez l'écran où il indique l'options sou Haitée.
5. Appuyez sur la touche .
Amplitude d'angle de panoramicique/inclinaison
Pour définiir l'amplitude de mouvement autorisé pour la panoramaque ou l'inclinaison :
1.Accedez au menu Configuration
2. Utilisez les touches ou pour sélectionner Pan Angle ou Tilt Angle, ou touche l'écran où il est indiqué Pan Angle ou Tilt Angle.
3. Si vous utilisez les boutons à la place de l'écran tactile, appuyez sur la touche .
4. Utilisez , , ou pour sélectionner 540 ( 540^ ), 360 ( 360^ ) ou 180 ( 180^ ) pour la panoramaque, et 270 ( 270^ ), 180 ( 180^ ) ou 90 ( 90^ ) pour l'inclinaison, ou touchez l'écran où il indique l'option souhaitation.
5. Appuyez sur la touche .
Noir général pendant mouvement de panoramicique/inclinaison
Pour définit si l'appareil doit s'éteindre pendant le mouvement de panoramaque ou d'inclinaison, suivez les instructions ci-dessous :
1.Accedez au menu Configuration
2. Utilisez <UP> ou <DOWN> pour sélectionner BL. O. P/T Move, ou touchez l'écran où il est indiqué BL. O. P/T Move.
3. Si vous utilisez les boutons à la place de l'écran tactile, appuyez sur la touche .
4. Utilisez <UP> , <DOWN> , <LEFT> ou <RIGHT> pour sélectionner NO (ne pas s'eteindre) ou YES (extinction pendant le mouvement), ou touchez l'écran où il indique l'option souhaitée.
5. Appuyez sur la touche .
Noir général pendant mouvement de couleur
Pour définiir si l'appareil doit s'éteindre pendant le mouvement de la couleur, suivez les instructions ci-dessous :
- Accedez au menu Configuration.
- Utilisez ou pour sélectionner BL. O. Color Move, ou touchez l'écran où il est indiqué BL. O. Color Move.
- Si vous utilisez les boutons à la place de l'écran tactile, appuyez sur la touche .
- Utilisez <UP> , <DOWN> , <LEFT> ou <RIGHT> pour sélectionner NO (ne pas s'eteindre) ou YES (extinction pendant le mouvement), ou touchez l'écran où il indique l'option souhaitée.
- Appuyez sur la touche .
Noir général pendant mouvement de gobo
Pour définiir si l'appareil doit s'éteindre pendant le mouvement des gobos, suivez les instructions ci-dessous :
- Accedez au menu Configuration.
- Utilisez ou pour sélectionner BL. O. Gobo Move, ou touchez l'écran où il est indiqué BL. O. Gobo Move.
- Si vous utilisez les boutons à la place de l'écran tactile, appuyez sur la touche .
- Utilisez <UP> , <DOWN> , <LEFT> ou <RIGHT> pour sélectionner NO (ne pas s'eteindre) ou YES (extinction pendant le mouvement), ou touchez l'écran où il indique l'option souhaïée.
- Appuyez sur la touche .
Calibrage de I'ecran tactile
Si I'écran tactile ne répond pas correctement, il peut être nécessaire de le calibrer. Faire cela :
- Accedez au menu Configuration
- Utilisez ou pour sélectionnner Calibration, ou touchez l'écran où il est indiqué Calibration.
- Si vous utilisez les boutons à la place de l'écran tactile, appuyez sur la touche .
- Utilisez <UP> , <DOWN> , <LEFT> ou <RIGHT> pour Sélectionner NO (ne pas calibrer) ou YES (calibrer), ou touchez l'écran où il indique l'option souhaitée.
- Appuyez sur la touche .
- Suivez les instructions en touchant les points tels quils apparaisent à l'écran.
Verrouillage de I'ecran tactile
Pour verrouiller ou déverrouiller le panneau de commande de l'écran tactile, procédez comme suit :
- Accedez au menu Configuration
- Utilisez ou pour sélectionner Touchscreen Lock, ou touchez l'écran où il est indiqué Touchscreen Lock.
- Si vous utilisez les boutons à la place de l'écran tactile, appuyez sur la touche .
- Utilisez <UP> , <DOWN> , <LEFT> ou <RIGHT> pour sélectionner NO (l'affichage répondra au toucher) ou YES (l'affichage ne répond pas au toucher), ou touchez l'écran où il indique l'option souhaïée.
- Appuyez sur la touche .
Verrouiller l'ecran
Pour verrouiller ou déverrouiller l'intégrality du panneau de commande, suivez les instructions ci-dessous :
1.Accedez au menu Configuration
2. Utilisez ou pour sélectionner Lock Screen, ou touche l'écran où il est indiqué Lock Screen.
3. Si vous utilisez les boutons à la place de l'écran tactile, appuyez sur la touche
4. Utilisez , , ou pour sélectionner NO (le panneau de commande ne sera pas verrouillé) ou YES (le panneau de commande nécessitera un code d'accès), ou touchez l'écran où il indique l'option souhaïée.
5. Appuyez sur la touche .
Pour acceder au panneau de commande lorsqu'il a ete verrouillé :
- Appuyez n'importe où sur l'écran tactile ou appuyez sur n'importe quel bouton du menu.
- Saisissez le code d'accès (0920) à l'aide de l'écran tactile ou des boutons.
Permutation du panoramaque et de l'inclinaison
Pour permuter les fonctions de panoramicique et d'inclinaison afin que ce qui contrôle normalement le panoramicique contrôle l'inclinaison et ce qui contrôle normalement l'inclinaison contrôle le panoramicique, précédez comme suit :
1.Accédez au menu Configuration
2. Utilisez ou pour sélectionnner Swap XY, ou touchez l'écran où il est indiquéSwap XY.
3. Si vous utilisez les boutons à la place de l'écran tactile, appuyez sur la touche .
4. Utilisez <UP> , <DOWN> , <LEFT> ou <RIGHT> pour sélectionner NO (panoramaque et inclinaison normaux) ou YES (panoramaque contrôle inclinaison, inclinaison contrôle panoramaque), ou touchez l'écran où il indique l'option souhaïée.
5. Appuyez sur la touche .
Vitesse panoramicique/inclinaison
Pour définit la vitesse maximale du panoramaque et de l'inclinaison :
1.Accedez au menu Configuration
2. Utilisez <UP> ou <DOWN> pour sélectionner XY Mode, ou touchez l'écran où il est indiqué XY Mode.
3. Si vous utilisez les boutons à la place de l'écran tactile, appuyez sur la touche .
4. Utilisez <UP> , <DOWN> , <LEFT> ou <RIGHT> pour sélectionner Slow (lente) ou Fast (rapide), ou touchez l'écran où il indique l'option souhaïée.
5. Appuyez sur la touche .
Réinitialisation WDMX
Pour réinitialiser la connexion WDMX du Maverick MK1 Spot, effectuez les actions suivantes :
1.Accedez au menu Configuration
2. Utilisez ou pour sélectionner WDMX Reset, ou touchez l'écran où il est indiqué WDMX Reset.
3. Si vous utilisez les boutons à la place de l'écran tactile, appuyez sur la touche .
4. Utilisez <UP> , <DOWN> , <LEFT> ou <RIGHT> pour sélectionner NO (ne pas réinitialiser la connexion) ou YES (préinitialiser la connexion), ou touche l'écran où il indique l'options souhaïée.
5. Appuyez sur la touche .

Une fois qu'un récepteur WDMX a été connecté à un émetteur WDMX, il reste lié à cet émetteur jusqu'à ce qu'il soit connecté à un émetteur différent.
Délaie de rétro-éclairage
Pour régler la durée d'inactivité avant que le rétroéclairage de l'écran ne s'éteigne :
1.Accedez au menu Configuration
2. Utilisez <UP> ou <DOWN> pour Sélectionner Backlight Timer, ou touchez l'écran où il est indiqué Backlight Timer.
3. Si vous utilisez les boutons à la place de l'écran tactile, appuyez sur la touche .
4. Utilisez <UP> , <DOWN> , <LEFT> ou <RIGHT> pour sélectionner 30S (apres 30 secondes d'inactivité), 1M (apres 1 minute d'inactivité), 5M (apres 5 minutes d'inactivité) ou ON (ne s'éteint pas), ou touchez l'écran où il indique l'option souhaitée.
5. Appuyez sur la touche.
Perte de données
En cas de perte du signal d'entrée, le Maverick MK1 Spot réagira de l'une des deux manières suivantes : le produit conserve le dernier signal reçu ou étéint toutes les sorties LED.
Pour définit la façon dont le produit doit réagir, suivez les instructions ci-dessous :
1.Accedez au menu Configuration
2. Utilisez <UP> ou <DOWN> pour selectionner Loss of Data, ou touchez l'écran où il est indiqué Loss of Data.
3. Si vous utilisez les boutons à la place de l'écran tactile, appuyez sur la touche .
4. Utilisez , , ou pour sélectionner Hold (conserver le dernier signal recu) ou Close (éteindre toutes les sorties LED), ou touchez l'écran où il indique l'option souhaitée.
5. Appuyez sur la touche .
Vitesse du ventilateur
Pour régler la vitesse des ventilateurs, effectuez les actions suivantes :
1.Accédez au menu Configuration
2. Utilizez <UP> ou <DOWN> pour selectionner Fans, ou touchez l'écran où il est indiqué Fans.
3. Si vous utilisez les boutons à la place de l'écran tactile, appuyez sur la touche
4. Utilisez <UP> , <DOWN> , <LEFT> ou <RIGHT> pour sélectionner Auto (vitesse de ventilateur régée en fonction de la température de l'appareil), Full (vitesse maximum) ou ECO (ventilateurs en mode silencieux), ou touchez l'écran où il indique l'option souhaitée.
5. Appuyez sur la touche .
Courbe de gradation
Pour configurer la courbe de gradation, suivez les instructions ci-dessous :
1.Accédez au menu Configuration
2. Utilisez <UP> ou <DOWN> pour sélectionnner Dimmer Curve, ou touchez l'écran où il est indiqué Dimmer Curve.
3. Si vous utilisez les boutons à la place de l'écran tactile, appuyez sur la touche .
4. Utilisez <UP> , <DOWN> , <LEFT> ou <RIGHT> pour sélectionner Linear, Square, I Square ou SCurve, ou touchez l'écran où il indique l'option souhaïée.
5. Appuyez sur la touche .
Vitesse du gradateur
Pour régler la vitesse du gradateur, précédez comme suit :
1.Accédez au menu Configuration
2. Utilisez ou pour sélectionnner Dimmer Speed, ou touchez l'écran où il est indiqué Dimmer Speed.
3. Si vous utilisez les boutons à la place de l'écran tactile, appuyez sur la touche .
4. Utilisez <UP> , <DOWN> , <LEFT> ou <RIGHT> pour sélectionner Smooth (fluide) ou Fast (rapide), ou touchez l'écran où il indique l'option souhaïée.
5. Appuyez sur la touche .
Pulse Width Modulation
Pour définit la fréquence PWM, suivez les instructions ci-dessous:
1.Accédez au menu Configuration
2. Utilisez ou pour selectionner PWM Option, ou touchez l'écran où il est indiqué PWM Option.
3. Si vous utilisez les boutons à la place de l'écran tactile, appuyez sur la touche .
4. Utilisez , , ou pour sélectionner la fréquence PWM, parmi 600Hz, 1200Hz, 2000Hz, 4000Hz, 6000Hz ou 15000Hz, ou touchez l'écran où il indique l'option souhaitée.
5. Appuyez sur la touche .
Sélection de prênéglage
Cette option permet d'enregistrer 3 configurations d'options de menu prédéfinies différentes. Pour enregistrer et définir ces prérégliages, suivez les instructions ci-dessous:
1.Accedez au menu Configuration
2. Utilisez ou pour sélectionner Preset Select, ou touchez l'écran où il est indiqué Preset Select.
3. Si vous utilisez les boutons à la place de l'écran tactile, appuyez sur la touche .
4. Utilisez , , ou pour sélectionner les prêrglages, parmi PRESET A, PRESET B ou PRESET C, ou touchez l'écran où il indique l'option souhaïée.
5. Appuyez sur la touche .
6. L'appareil sera réinitialisé. Toute modification effectue dans les options des menus est sauvégardée dans ce préréglage.

- La valeur par défaut est PRESET A Si vous apportez des modifications à PRESET A, celles-ci sont enregistrées dans PRESET A sans rien faire.
- Pour creer un nouveau préréglage, mettez en surbrillance et selectionnee PRESET SELECT. Sélectionnez PRESET B ou PRESET C et appuyez sur . Lorsque vous effectuez cette selection, le produit sera réinitialisé automatiquement. Revenez en arrêté et effectuez les modifications nécessaires dans le menu. Cela enregistrera automatiquement le préréglage dans lequel vous vous trouvez.
Synchronisation prédéfinie
Pour synchroniser tous les prérégliages de menu sur d'autres Maverick MK1 Spots, suivez les instructions ci-dessous :
- Connectez tous les Maverick MK1 Spots via un cable DMX.
2.Accedez au menu Configuration
- Utilisez ou pour sélectionner Preset Sync, ou touchez l'écran où il est indiqué Preset Sync.
- Si vous utilisez les boutons à la place de l'écran tactile, appuyez sur la touche .
- Sélectionnez YES, ou touche l'écran où il indique l'option souhaitatione.
- Appuyez sur la touche .

Pour synchroniser d'autres Maverick MK1 Spots, connectez-les avec un cable DMX.
- Le produit peut être dans n'importe quels mode de contrôle, à l'exception de WDMX. ArtNet, DMX et sACN sont tous acceptables.
- Toutes les options du menu sont transférées, y compris l'adresse DMX. Seule l'adresse IP n'est pas affectée dans les autres produits.
Fonctions de réinitialisation
Pour réinitialiser le panoramicque, l'inclinaison ou toutes les fonctions à leur état initial :
1.Accedez au menu Configuration
2. Utilisez <UP> ou <DOWN> pour selectionner Reset Function, ou touchez l'écran où il est indiqué Reset Function.
3. Si vous utilisez les boutons à la place de l'écran tactile, appuyez sur la touche .
4. Utilisez , , ou pour sélectionner Pan/Tilt, Iris/Prism, Color/ CMY+CTO, Gobo/Gobo Rotate, Zoom/Frost/Focus ou All, ou touchez l'écran où il indique l'option souhaïée.
5. Si vous utilisez les boutons à la place de l'écran tactile, appuyez sur la touche .
6. Utilisez <UP> , <DOWN> , <LEFT> ou <RIGHT> pour sélectionner NO (ne pas réinitialiser) ou YES (réinitialiser), ou touchez l'écran où il indique l'option souhaitée.
7. Appuyez sur la touche .
Réinitialisation aux réglages d'usine
Pour restaurer les paramètres par défaut du Maverick MK1 Spot, procédez comme suit :
1.Accedez au menu Configuration
2. Utilisez ou pour sélectionnner Factory Settings, ou touchez l'écran où il est indiqué Factory Settings.
3. Si vous utilisez les boutons à la place de l'écran tactile, appuyez sur la touche .
4. Utilisez <UP> , <DOWN> , <LEFT> ou <RIGHT> pour sélectionner NO (ne pas réinitialiser) ou YES (réinitialiser aux régles d'usine), ou touche l'écran où il indique l'option souhaitée.
5. Appuyez sur la touche .
Test mode
Test auto
Pour effectuer un test automatique des fonctions du Maverick MK1 Spot, suivez les instructions ci-dessous :
- Appuyez sur la touche
- Utilisez , , ou pour sélectionner Test, ou touchez l'écran où il est indiqué Test.
- Si vous utilisez les boutons à la place de l'écran tactile, appuyez sur la touche .
- Utilisez ou pour sélectionner Auto test, ou touchez l'écran où il est indiquéAuto test.
- Appuyez sur la touche .
Test manuel
Pour tester les fonctions du produit manuellement, précédez comme suit :
- Appuyez sur la touche
- Utilisez , , ou pour sélectionner Test, ou touchez l'écran où il est indiqué Test
- Si vous utilisez les boutons à la place de l'écran tactile, appuyez sur la touche .
- Utilisez <UP> or <DOWN> pour sélectionner Manual test, ou touchez l'écran où il est indiqué Manual test.
- Si vous utilisez les boutons à la place de l'écran tactile, appuyez sur la touche .
- Utilisez <UP> ou <DOWN> pour selectionner la fonction à tester, ou touchez l'écran où il indique l'option souhaitée.
- Si vous utilisez les boutons à la place de l'écran tactile, appuyez sur la touche .
-
Changez la valeur de la fonction testée avec l'une des méthodes suivantes :
-
Tapez la valeur souhaitation à l'aide du pavé numérique affiché sur l'écran tactile.
Utilisez UP ,DOWN>, ou pour augmenter ou diminuier la valeur.
-
Appuyez sur la touche .
Toutes les informations sur I'etat actuel du Maverick MK1 Spot sont disponibles dans le menu Sys Info du produit. Pour afficher ces informations, suivez les instructions ci-dessous :
- Appuyez sur la touche
- Utilisez , , ou pour sélectionnner Information, ou touche l'écran où il est indiqué Information.
- Si vous utilisez les boutons à la place de l'écran tactile, appuyez sur la touche .
- Utilisez ou pour selectionner Fixture Information (affiche la version du microprogramme, le mode de fonctionnement, l'adresse de départ), Fan Information (indique la vitesse des ventilateurs de la lyre en tr/min), Error Information (saffiche toutes les erreurs ou No Error!) ou Channel Information (affiche la valeur actuelle de tous les canaux d'entrée du signal), ou touchez l'écran où il indique l'options souhaïée.
- Appuyez sur la touche .
- Utilisez les touches ou pour faire défilier les informations.
Valeurs DMX
29 Ch
| Canal Fonction Valeur Pourcentage/Paramétrage |
| 1 | Panoramaique | 000 ⇌ 255 | 0-100% |
| 2 | Panoramaique fin | 000 ⇌ 255 | Contrôle fin (16 bits) |
| 3 | Inclinaison | 000 ⇌ 255 | 0-100% |
| 4 | Inclinaison fin | 000 ⇌ 255 | Contrôle fin (16 bits) |
| 5 | Vitesse panoramicique/inclinaison | 000 ⇌ 255 0- | 100% |
| 6 | Gradateur | 000 ⇌ 255 | 0-100% |
| 7 | Fin gradateur | 000 ⇌ 255 | Contrôle fin (16 bits) |
| 8 | Obturator | 000 ⇌ 003 Fermé | |
| 004 ⇌ 007 Ouvert | |
| 008 ⇌ 076 Lent à rapide | |
| 077 ⇌ 145 | Effet de pouls, lent à rapide |
| 146 ⇌ 215 | Effet aléatoire, lent à rapide |
| 216 ⇌ 255 Ouvert | |
| 9 | Stroboscope virtuel | 000 ⇌ 001 Pas de fonction | |
| 002 ⇌ 128 | Secouant stroboscopique, lent à rapide |
| 129 ⇌ 255 | Ouverture/fermeture en fondu, lent à rapide |
| 10 | Cyan | 000 ⇌ 255 | 0-100% |
| 11 | Magenta | 000 ⇌ 255 | 0-100% |
| 12 | Jaune | 000 ⇌ 255 | 0-100% |
| 13 | PaLETTE de couleurs | 000 ⇌ 006 Ouvert | |
| 007 ⇌ 013 Rouge | |
| 014 ⇌ 020 Orange | |
| 021 ⇌ 027 | Vert |
| 028 ⇌ 034 Bleu | |
| 035 ⇌ 041 | Magenta |
| 042 ⇌ 048 UV | |
| 049 ⇌ 059 CTO | |
| 060 ⇌ 187 Couleurs split | |
| 188 ⇌ 219 | Défilament des couleurs dans le sens des aiguilles d'une montre, rapide à lent |
| 220 ⇌ 223 Arrêt | |
| 224 ⇌ 255 | Défilament des couleurs dans le sens antihoraire, lent à rapide |
| Canal | Fonction | Valeur | Pourcentage/Paramétrage |
| 14 Roue de gobo 1 | | 000 ⇌ 007 | Ouvert |
| 008 ⇌ 015 Gobo 1 (voilier) | |
| 016 ⇌ 023 Gobo 2 (barre ondulée) | |
| 024 ⇌ 031 | Gobo 3 (points grillons) |
| 032 ⇌ 039 | Gobo 4 (écrous et boulons) |
| 040 ⇌ 047 | Gobo 5 (ovales linéaires) |
| 048 ⇌ 055 | Gobo 6 (champ d'étoiles) |
| 056 ⇌ 063 | Gobo 7 (vitre de douche) |
| 064 ⇌ 071 | Gobo 7 tremblante |
| 072 ⇌ 079 | Gobo 6 tremblante |
| 080 ⇌ 087 | Gobo 5 tremblante |
| 088 ⇌ 095 | Gobo 4 tremblante |
| 096 ⇌ 103 | Gobo 3 tremblante |
| 104 ⇌ 111 | Gobo 2 tremblante |
| 112 ⇌ 119 | Gobo 1 tremblante |
| 120 ⇌ 127 | Ouvert |
| 128 ⇌ 191 | Défilament des gobos dans le sens des aiguilles d'une montre, lent à rapide |
| 192 ⇌ 255 | Défilament des gobos dans le sens antihoraire, lent à rapide |
| 15 Gobo 1 tourner | | 000 ⇌ 063 | Index de gobo en rotation |
| 064 ⇌ 145 | Rotation dans le sens des aiguilles d'une montre, rapide à lente |
| 146 ⇌ 149 Arrêt | Rotation dans le sens antihoraire, lent à rapide |
| 150 ⇌ 231 | Rotation de rebond |
| 232 ⇌ 255 Effet de rebond | |
| 16 | Roue de gobo 1 index fin | 000 ⇌ 255 Contrôle fin (16 bits) |
| 17 Roue de gobo 2 | | 000 ⇌ 006 Ouvert | |
| 007 ⇌ 013 | Gobo 1 (choux au fromage) |
| 014 ⇌ 020 | Gobo 2 (rupture serrée) |
| 021 ⇌ 027 | Gobo 3 (feuillage éparpillé) |
| 028 ⇌ 034 Gobo 4 (triangle) | |
| 035 ⇌ 041 Gobo 5 (circuits) | |
| 042 ⇌ 048 | Gobo 6 (points aléatoires) |
| 049 ⇌ 063 | Gobo 7 (forêt effrayante) |
| 064 ⇌ 070 Gobo 7 tremblante | |
| 071 ⇌ 077 Gobo 6 tremblante | |
| 078 ⇌ 084 Gobo 5 tremblante | |
| 085 ⇌ 091 Gobo 4 tremblante | |
| 092 ⇌ 098 Gobo 3 tremblante | |
| 099 ⇌ 105 Gobo 2 tremblante | |
| 106 ⇌ 112 Gobo 1 tremblante | |
| 113 ⇌ 127 Ouvert | |
| 128 ⇌ 191 | Défilament des gobos dans le sens des aiguilles d'une montre, lent à rapide |
| 192 ⇌ 255 | Défilament des gobos dans le sens antihoraire, lent à rapide |
| 18 | Focus | 000 ⇌ 255 | 0-100% |
| 19 | Focus fin | 000 ⇌ 255 | Contrôle fin (16 bits) |
| 20 Focus automatique | 000 ⇌ 010 Aucune fonction | |
| 011 ⇌ 030 0-5 m | |
| 031 ⇌ 050 6 m | |
| 051 ⇌ 070 7 m | |
| 071 ⇌ 090 8 m | |
| 091 ⇌ 110 9 m | |
| 111 ⇌ 130 10 m | |
| 131 ⇌ 150 12.5 m | |
| 151 ⇌ 170 15 m | |
| 171 ⇌ 190 17.5 m | |
| 191 ⇌ 210 20-60 m | |
| 211 ⇌ 255 | Déctector automatiquement la distance |
| 21 | Zoom | 000 ⇌ 255 | Large à étroit |
| 22 | Zoom fin | 000 ⇌ 255 | Contrôle fin (16 bits) |
| 23 Prisme | 000 ⇌ 004 Autcune fonction | |
| 005 ⇌ 255 Effet de prisme | |
| 24 Rotation du prisme | 000 ⇌ 127 Position de rotation | |
| 128 ⇌ 189 | Rotation dans le sens des aiguilles d'une montre, lente à rapide |
| 190 ⇌ 193 Arrêt | |
| 194 ⇌ 255 | Rotation dans le sens antihoraire, lent à rapide |
| 25 Iris | 000 ⇌ 063 Petit à grand | |
| 064 ⇌ 127 | Changement automatique, lent à rapide |
| 128 ⇌ 191 Zoom arrêté lent, zoom rapide (lent à rapide) | |
| 192 ⇌ 255 | Zoom lent, zoom rapide (lent à rapide) |
| 26 | Frost | 000 ⇌ 255 | 0-100% |
| 27 Macro CMY | 000 ⇌ 009 Pas de fonction | |
| 010 ⇌ 255 Macro CMY | |
| 28 | Vitesse macro CMY | 000 ⇌ 255 | 100-0% |
| | 000 ⇌ 007 Aucune fonction | |
| | 008 ⇌ 015 XY blackout | |
| | 016 ⇌ 023 C blackout | |
| | 024 ⇌ 031 G blackout | |
| | 032 ⇌ 039 XYC blackout | |
| | 040 ⇌ 047 XYG blackout | |
| | 048 ⇌ 055 XYCG blackout | |
| | 056 ⇌ 095 Aucune fonction | |
| | 096 ⇌ 103 X réinitialiser | |
| | 104 ⇌ 111 Y réinitialiser | |
| | 112 ⇌ 119 RÉinitialisation de la couleur | |
| | 120 ⇌ 127 Set rotatif gobo et gobo | |
| | 128 ⇌ 135 Aucune fonction | |
| | 136 ⇌ 143 Prisme réinitialiser | |
| 29 Control | | 144 ⇌ 151 Aucune fonction | |
| | 152 ⇌ 159 RÉinitialisation totale | |
| | 160 ⇌ 167 RÉinitialisation iris | |
| | 168 ⇌ 175 RÉinitialisation gel | |
| | 176 ⇌ 183 RÉinitialisation zoom | |
| | 184 ⇌ 191 RÉinitialisation CMY | |
| | 192 ⇌ 199 Ventilateur,asse vitesse | |
| | 200 ⇌ 207 Ventilateur à pleine vitesse | |
| | 208 ⇌ 215 Fan auto | |
| | 216 ⇌ 220 Aucune fonction | |
| | 221 ⇌ 225 Iris,mode rapide | |
| | 226 ⇌ 230 Iris,mode lisse | |
| | 231 ⇌ 235 XY swap on | |
| | 236 ⇌ 240 XY swap off | |
| | 241 ⇌ 255 Aucune fonction | |
22 Ch
| Canal Fonction Valeur Pourcentage/Paramétrage |
| 1 | Panoramaque | 000 ⇌ 255 0-100% |
| 2 | Panoramaque fin | 000 ⇌ 255 Contrôle fin(16 bits) |
| 3 | Inclinaison | 000 ⇌ 255 0-100% |
| 4 | Inclinaison fin | 000 ⇌ 255 Contrôle fin(16 bits) |
| 5 | Vitesse panoramicique/inclinaison | 000 ⇌ 255 0-100% |
| 6 | Gradateur | 000 ⇌ 255 0-100% |
| 7 | Obturator | 000 ⇌ 003 Fermé004 ⇌ 007 Ouvert008 ⇌ 076 Lent à rapide077 ⇌ 145Effet de pouls, lent à rapide146 ⇌ 215Effet aléatoire, lent à rapide216 ⇌ 255 Ouvert |
| 8 | Stroboscope virtuel | 000 ⇌ 001 Pas de fonction002 ⇌ 128129 ⇌ 255Secouant stroboscopique, lent à rapideOuverture/fermeture en fondu, lent à rapide |
| 9 | Cyan | 000 ⇌ 255 0-100% |
| 10 | Magenta | 000 ⇌ 255 0-100% |
| 11 | Jaune | 000 ⇌ 255 0-100% |
| 12 | PaLETTE de couleurs | 000 ⇌ 006 Ouvert007 ⇌ 013 Rouge014 ⇌ 020 Rouge021 ⇌ 027Vert028 ⇌ 034 Bleu035 ⇌ 041 Magenta042 ⇌ 048 UV049 ⇌ 059 CTO060 ⇌ 187 Couleurs split188 ⇌ 219220 ⇌ 223 ArêtDéfillement des couleurs dans le sens des aiguilles d'une montre, rapide à lentD'une montre, rapide à pent |
| 13 | Roue de gobo 1 | 000 ⇌ 007 Ouvert008 ⇌ 015016 ⇌ 023024 ⇌ 031032 ⇌ 039040 ⇌ 047048 ⇌ 055056 ⇌ 063064 ⇌ 071072 ⇌ 079080 ⇌ 087088 ⇌ 095096 ⇌ 103104 ⇌ 111112 ⇌ 119120 ⇌ 127 Ouvert128 ⇌ 191192 ⇌ 255Défillement des gobos dans le sens des aiguilles d'une montre, lent à rapideDéfillement des gobos dans le sens antihoraire, lent à rapide |
| Canal | Fonction | Valeur | Pourcentage/Paramétrage |
| 14 Gobo 1 tourner | | 000 ⇌ 063 | Index de gobo en rotation |
| 064 ⇌ 145 | Rotation dans le sens des aiguilles d'une montre, rapide à lente |
| 146 ⇌ 149 Arrêt | Rotation dans le sens antihoraire, lent à rapide |
| 150 ⇌ 231 | Rotation dans le sens antihoraire, lent à rapide |
| 232 ⇌ 255 Effet de rebond | Effet de rebond |
| 15 Roue de gobo 1 | | 000 ⇌ 007 | Ouvert |
| 008 ⇌ 015 | Gobo 1 (choux au fromage) |
| 016 ⇌ 023 | Gobo 2 (rupture serrée) |
| 024 ⇌ 031 | Gobo 3 (feuillage éparpillé) |
| 032 ⇌ 039 | Gobo 4 (triangle) |
| 040 ⇌ 047 | Gobo 5 (circuits) |
| 048 ⇌ 055 | Gobo 6 (points aléatoires) |
| 056 ⇌ 063 | Gobo 7 (forêt effrayante) |
| 064 ⇌ 071 | Gobo 7 tremblante |
| 072 ⇌ 079 | Gobo 6 tremblante |
| 080 ⇌ 087 | Gobo 5 tremblante |
| 088 ⇌ 095 | Gobo 4 tremblante |
| 096 ⇌ 103 | Gobo 3 tremblante |
| 104 ⇌ 111 | Gobo 2 tremblante |
| 112 ⇌ 119 | Gobo 1 tremblante |
| 120 ⇌ 127 | Ouvert |
| 128 ⇌ 191 | Défilament des gobos dans le sens des aiguilles d'une montre, lent à rapide |
| 192 ⇌ 255 | Défilament des gobos dans le sens antihoraire, lent à rapide |
| 16 | Focus | 000 ⇌ 255 | 0-100% |
| 17 | Zoom | 000 ⇌ 255 | Large à étroit |
| 18 Prisme | | 000 ⇌ 004 Aucune fonction | |
| 005 ⇌ 255 Effet de prisme | |
| 19 Rotation du prisme | | 000 ⇌ 127 Position de rotation | |
| 128 ⇌ 189 | Rotation dans le sens des aiguilles d'une montre, lente à rapide |
| 190 ⇌ 193 Arrêt | Rotation dans le sens antihoraire, lent à rapide |
| 194 ⇌ 255 | Rotation dans le sens antihoraire, lent à rapide |
| 20 Iris | | 000 ⇌ 063 Petit à grand | |
| 064 ⇌ 127 | Changement automatique, lent à rapide |
| 128 ⇌ 191 | Zoom arrêté lent, zoom rapide (lent à rapide) |
| 192 ⇌ 255 | Zoom lent, zoom rapide (lent à rapide) |
| 21 | Frost | 000 ⇌ 255 | 0-100% |
| Channel | Function Value Percent/Setting |
| 000 ⇌ 007 Aucune fonction |
| 008 ⇌ 015 XY blackout |
| 016 ⇌ 023 C blackout |
| 024 ⇌ 031 G blackout |
| 032 ⇌ 039 XYC blackout |
| 040 ⇌ 047 XYG blackout |
| 048 ⇌ 055 XYCG blackout |
| 056 ⇌ 095 Aucune fonction |
| 096 ⇌ 103 X réinitialiser |
| 104 ⇌ 111 Y réinitialiser |
| 112 ⇌ 119 | Réinitialisation de la couleur |
| 120 ⇌ 127 | Set rotatif gobo et gobo |
| 128 ⇌ 135 Aucune fonction |
| 136 ⇌ 143 Prisme réinitialiser |
| 22 Control | 144 ⇌ 151 Aucune fonction |
| 152 ⇌ 159 | Réinitialisation totale |
| 160 ⇌ 167 Réinitialisation iris |
| 168 ⇌ 175 Réinitialisation gel |
| 176 ⇌ 183 Réinitialisation zoom |
| 184 ⇌ 191 Réinitialisation CMY |
| 192 ⇌ 199 | Ventilateur,asse vitesse |
| 200 ⇌ 207 | Ventilateur à pleine vitesse |
| 208 ⇌ 215 Fan auto |
| 216 ⇌ 220 Aucune fonction |
| 221 ⇌ 225 Iris,mode rapide |
| 226 ⇌ 230 Iris,mode lisse |
| 231 ⇌ 235 XY swap on |
| 236 ⇌ 240 XY swap off |
| 241 ⇌ 255 Aucune fonction |
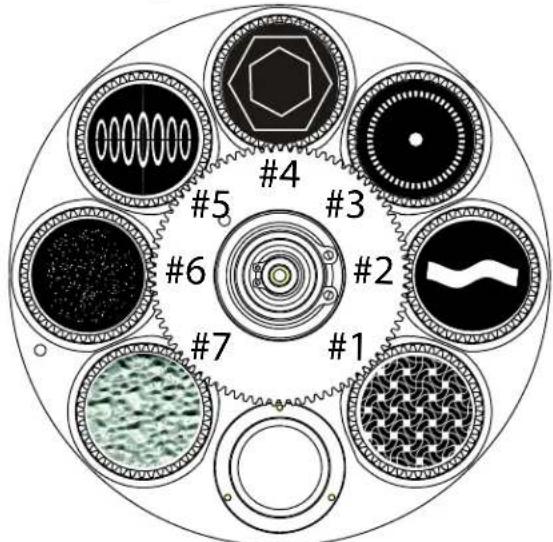
Roues Design
Gobo 1
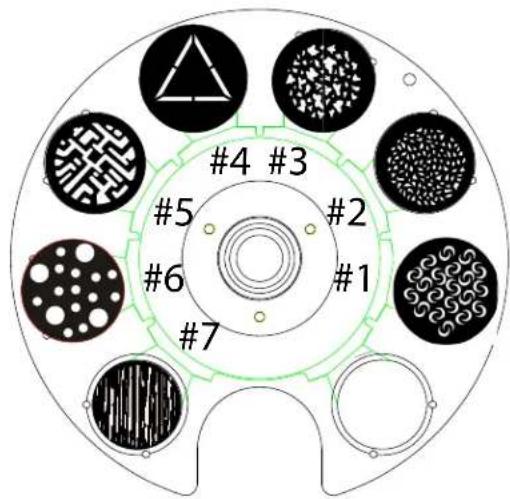
Gobo 2
Roues de gobo
| Gobo wheel Gobo number Description | |
| 1 | 1 Voillier2 Barre ondulée3 Points grillons4 Écrous et boulons5 Ovales linéaires6 Champ d'étoiles7 Vitr de douche | |
| 2 | 1 Choux au fromage2 Rupture de triangle3 Feuillage éparpillé4 Triangle5 Circuits6 Points aléatoires7 | Rupture serrée |
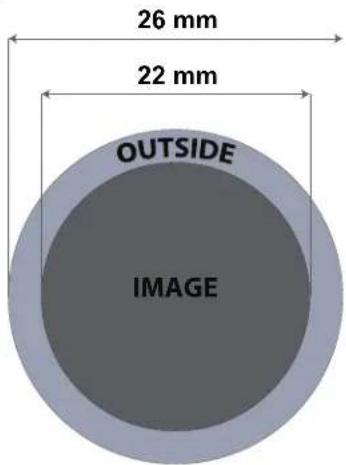
Tableau des dimensions de gobo
Changement de gobo
Les gobos de la roue de gobo 1 peuvent etre enleves de leurs portegobo. La procedure recommandee cidesous doit etre soigneusement suivie pour le remplacement des gobos dans la roue de gobos 1.

Assurez-vous de débrancher le cordon d'alimentation du produit avant de remplacer un gobo.
- Remplacez toujours un gobo par un gobo de la même dimension.
- Lors de l'insertion d'un gobo en verre, assurez-vous toujours que le cote brillant du gobo (base en verre) fait face à la lampe. Cela permet d'assurer une couche de protection contre la température élevée de la lampe.
Procedure
- Mettez l'appareil hors tension et débranchez-le de la prise de courant.
- Ouvrez le couvercle de la tete en desserrant de 14 de tour les 4 vis Phillips situées sur les côtes du couvercle supérieur.
- Enlevez le porte-gobo de la roue de gobos en le poussant vers l'avant de la tete mobile (direction 1 sur le schéma). Veillez à ne pas pousser le gobo en dehors du portegobo.
- Extraire le porte-gobo en le tirant vers l'extérieur (direction 2 sur le schéma).
- Sur une surface plane, retirez la bague d'expansion qui maintain le gobo en place et retirez-le du porte-gobo.
- Insérez un nouveau gobo et maintenez-le en place avec la bague d'expansion.
- Faites glisser la pointe du porte-gobo sous la plaque de pression pres du centre de la roue du gobo.
- Poussez le porte-gobo vers l'intérieur. NE PAS forcer le porte-gobo dans la fente sur la roue. S'il est correctement instalé, le support gobo doit facilement glisser dans la fente de la roue de gobo.
Diagramme
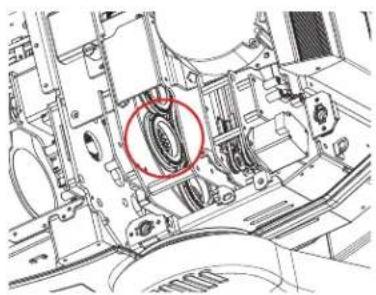
Localisez
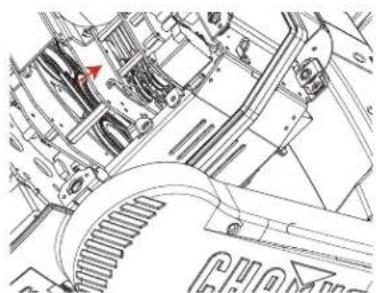
Reculez
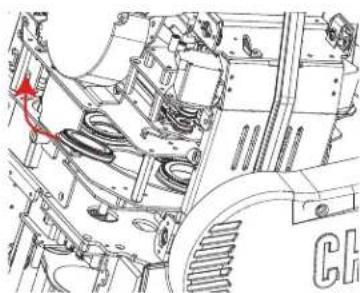
Enlevez

Palette de Couleurs

Numéro de Couleur Description
1 Voilier
2 Barre ondulée
3 Points grillons
4 Ecrous et boulons
5 Ovales linéaires
6 Champ d'etoiles
7Vitre de douche
Mode Decalage
Le mode Offset (décalage) permet d'effectuer des réglages fins pour la position initiale de toutes les pièces mobiles sur le trajet optique et pour les mouvements de panoramaque et d'inclinaison. Ceci permet aux pièces mobiles de ne désenter aucune cordure ou de réduire les sorties lumineuses lorsqu'elles sont dans leur position initiale. Pour acceder à ce mode, procédez comme suit :
- À partir de l'écran principal, maintenez enfoncée la touche
- Saisissez le code d'accès 2323 avec les boutons :
a. Utilisez la touche < DOWN> pour selectionner le numero a modifier.
b. Utilisez la touche < UP> pour augmenter la valeur.
c. Repetez l'opération jusqu'à ce que le code 2323 ait eté saisi.
- Appuyez sur la touche .
- Vous arrivèz alors sur l'écran du menu Zero Adjust (réglage du zéro).
PAN
- Utilisez les touches ou pour selectionner l'objet PAN.
- Appuyez sur la touche.
- Utilisez les touches ou pour augmenter ou diminuer la valeur de démarrage entre 000-255.
- Appuyez sur la touche .
TILT
- Utilisez les touches ou pour selectionner l'élément TILT.
- Appuyez sur la touche.
- Utilisez les touches ou pour augmenter ou diminuer la valeur de démarrage entre 000-255.
- Appuyez sur la touche .
COLOR
- Utilisez les touches ou pour sélectionner l'objet COLOR.
- Appuyez sur la touche .
- Utilisez les touches ou pour augmenter ou diminuer la valeur de démarrage entre 000-255.
- Appuyez sur la touche .
GOBO
- Utilisez les touches ou pour selectionner l'objet GOBO.
- Appuyez sur la touche .
- Utilisez les touches ou pour augmenter ou diminuer la valeur de démarrage entre 000-255.
- Appuyez sur la touche .
GOBO ROTATE
- Utilisez les touches ou pour selectionner l'objet GOBO ROTATE.
- Appuyez sur la touche .
- Utilisez les touches ou pour augmenter ou diminuer la valeur de démarrage entre 000-255.
- Appuyez sur la touche .
FOCUS1-GOBO2
- Utilisez les touches ou pour sélectionner l'objet FOCUS1-GOBO2.
- Appuyez sur la touche .
- Utilisez les touches ou pour augmenter ou diminuer la valeur de démarrage entre 000-255.
- Appuyez sur la touche .
FOCUS2
- Utilisez les touches ou pour selectionner l'élément FOCUS1-GOBO2.
- Appuyez sur la touche .
- Utilisez les touches ou pour augmenter ou diminuer la valeur de démarrage entre 000-255.
- Appuyez sur la touche .
FOCUS-GOBO
- Utilisez les touches ou pour selectionner l'élément FOCUS GOBO.
- Appuyez sur la touche .
- Utilisez les touches ou pour augmenter ou diminuer la valeur de démarrage entre 000-255.
- Appuyez sur la touche .
ZOOM
- Utilisez les touches ou pour sélectionner l'élément ZOOM.
- Appuyez sur la touche .
- Utilisez les touches ou pour augmenter ou diminuer la valeur de démarrage entre 000-255.
- Appuyez sur la touche.
PRISM
- Utilisez les touches ou pour selectionner l'élément PRISM.
- Appuyez sur la touche .
- Utilisez les touches <UP> ou <DOWN> pour augmenter ou diminuer la valeur de démarrage entre 000-255.
- Appuyez sur la touche .
IRIS
- Utilisez les touches ou pour sélectionner l'élément IRIS.
- Appuyez sur la touche .
- Utilisez les touches <UP> ou <DOWN> pour augmenter ou diminuer la valeur de démarrage entre 000-255.
- Appuyez sur la touche .
FROST
- Utilisez les touches ou pour sélectionner l'élément FROST.
- Appuyez sur la touche .
- Utilisez les touches <UP> ou <DOWN> pour augmenter ou diminuer la valeur de démarrage entre 000-255.
- Appuyez sur la touche .
CYAN
- Utilisez les touches ou pour selectionner l'élément CYAN.
- Appuyez sur la touche .
- Utilisez les touches <UP> ou <DOWN> pour augmenter ou diminuer la valeur de démarrage entre 000-255.
- Appuyez sur la touche .
MAGENTA
- Utilisez les touches ou pour sélectionnner l'élement MAGENTA.
- Appuyez sur la touche .
- Utilisez les touches ou pour augmenter ou diminuer la valeur de démarrage entre 000-255.
- Appuyez sur la touche .
YELLOW
- Utilisez les touches <UP> ou <DOWN> pour sélectionner l'élément YELLOW.
- Appuyez sur la touche .
- Utilisez les touches <UP> ou <DOWN> pour augmenter ou diminuer la valeur de démarrage entre 000-255.
- Appuyez sur la touche .
MAC Address
- Utilisez les touches ou pour sélectionner parmi les choix MAC4, MAC5 ou MAC6.
- Appuyez sur la touche .
- Utilisez les touches ou pour augmenter ou diminuer la valeur de démarrage entre 000-255.
- Appuyez sur la touche .
Serveur Web
Le serveur Web du Maverick MK1 Spot est accessible par n'importequel ordinateur se trouvant sur le même réseau que l'appareil. Il permet un accès réseau aux informations systèmes et aux paramétres (par exemple, configuration du contrôle, test manuel de toutes les fonctions, mises à jour du microprogramme et modification du mot de passer du serveur web).
- Branchez l'appareil sur l'alimentation puis reglez le Mode IP sur Static.
- Connectez l'appareil à un ordinateur Windows ® avec un cable réseau
- Sur l'ordinateur, paramétrez l'adresse IP du nouveau réseau afin d'avoir les trois mêmes premiers chiffres que l'adresse IP de l'appareil (voir la section Adresse IP).
- Saisissez l'adresse IP de l'appareil dans la barre d'adresse d'un navigateur Internet sur l'ordinateur.
- Saisissez admin en tant que nom d'utilisateur et mot de passer pour vous identifier.
La page Information du serveur Web affiche les paramétres actuels et les informations système du Maverick MK1 Spot.
Configuration
La page Configuration du serveur Web propose des options de contrôle similaires à celles du menu Setup sur l'appareil. Cliquez Save Settings (enregistrer les paramétres) pour envoyer la nouvelle configuration vers l'appareil.
Test Manuel
La page Test Manuel du serveur Web permet de contrcler toutes les fonctions de sortie de l'appareil via le navigateur. Pour rétablir la valeur par défaut de toutes les fonctions, cliquez sur Reset.
Mise à Jour de Micrologiciel
La page Upgrade (mise à niveau) du serveur Web permet demettre à jour l'appareil avec la derniere version du microprogramme. Rendez-vous sur https://www.chauvetprofessional.com/products/maverick-mk1-spot/ les mises à jour du microprogramme.
Sécurité
La page Security (securite) du serveur Web permit de changer le mot de passer du serveur Web de l'appareil connecte. Saisissez l'ancien mot de passer (admin, par defaut) et le nouveau mot de passer deux fois, puis cliquez sur Submit (soumettre) pour changer le mot de passer.
5. Entretien
Entretien de l'appareil
L'accumulation de poussiè réduit la production de lumière et peut entrainer une surchauffe de l'appareil. Cela peut entrainer une diminution de la durée de vie de la source de lumière et/ou une usure mécanique. Pour conserver des performances optimales et réduire l'usure, nettoyez vos apparéils d'éclairage au moins deux fois par mois. Veuillez cependant bien garder à l'esprit que l'utilisation et les conditions environnementales peuvent contribuer à augmenter la fréquence de nettoyage.
Pour nettoyer l'appareil, suivez les instructions ci-dessous :
- Debranchez l'appareil.
- Attendez que l'appareil soit à la température ambiente.
- Utilisez un aspirateur (ou un compresseur d'air) et unerosse douce pour enlever la poussière accumulée sur les surfaces/évents externes.
- Nettoyez toutes les surfaces transparentes avec une solution douce de nettoyant pour vitres sans ammoniaque ou de l'alcool isopropylique.
- Appliquez la solution directement surun chiffon de coton doux et non pelucheux ou un tissu de nettoyage d'objectif.
- Essuyez soignement toute trace de saleté ou d'encrassement sur la surface transparente.
- Nettoyez en douceur les surfaces transparentes jusqu'à ce que toute peluche ou trace ait disparue.

Assurez-vous de bien secher toutes les surfaces transparentes après les avoir nettoyer.
6. Spécificités Techniques
Dimensions et poids
| Longueur Largeur Hauteur Poids |
| 394 mm (15,5 po) 250 mm (9.8 po) 636 mm (25 po) 27.2 kg (60 lb) |
| Remarque : Les dimensions en pouce sont arrondies. |
| Alimentation |
| Type d'alimentation Plage Sélection de tension |
| Commutation (interne) Entre 100 et 240 VCA, 50/60 Hz Universelle |
| Paramètre | 120 V, 60 Hz | 208 V, 50 Hz | 230 V, 50 Hz |
| Consommation | 592 W | 555 W | 536 W |
| Courant de fonctionnement | 5.07 A | 2.74 A | 2.47 A |
| Fusible | F 10 A, 250 V | F 10 A, 250 V | F 10 A, 250 V |
| E/S alimentation | US/Monde | UK/Europe |
| Connecteur d'entrée d'alimentation | Seetronic Powerkon IP65 | Seetronic Powerkon IP65 |
| Prise du cordon d'alimentation | Edison (US) | Prise locale |
| Source lumineuse |
| Type | Color | Quantity | Power | Current | Lifespan |
| LED | Blanc froid | 1 | 350 W | 9.6 A | 50,000 heures |
| Photométrie |
| Angle de faisceau | Angle de champ Angle de zoom | Lumineux @ 5 m (7°) | Lumineux @ 5 m (33°) | Température de couleur |
| 7°-27° 7°-33° 7°-33° | 34,282 lux 2,097 lux | 7000 K | | | |
| Thermique |
| Température externe maximum | Système de refroidissement |
| 45 °C (113 °F) | Convection assistée par ventilateur |
| DMX |
| Connecteur I/O | Gamme de canaux |
| XLR 3 et 5 broches classé IP | 22 ou 29 |
| Art-NetTM/sACN |
| Connecteur I/O | Gamme de canaux |
| Amphenol XLR Net connecteurs RJ45 in / out | 22 ou 29 |
| Commande |
| Nom de produit | Nom de l'article | Code de l'article | Numéro de CUP |
| Maverick MK1 Spot | MAVERICKMK1SPOT | 08011311 | 781462216597 |

UL 1573
CSA C22.2 No. 166
E113093


RoHS
13/14
Spécificités Techniques
Tableau Photométrique
| Étroit | Maverick MK1 Spot (Impérial) | Grand |
| 7°Diamètredu | 7°Diamètredu Champ Footcandle Footcandle | | | 27°Diamètredu | 33°Diamètredu Champ |
| Distance | Faisceau | du | | Faisceau | du Champ |
| 15 ft | 1.83 ft | 1.83 ft 3,089 | 233 | 7.76 ft 8.89 ft | | |
| 20 ft | 2.45 ft | 2.45 ft 2,143 | 131 | 10.34 ft 11.85 ft | | |
| 30 ft | 3.67 ft | 3.67 ft 952 | 58 | 15.52 ft 17.77 ft | | |
| 40 ft | 4.89 ft | 4.89 ft 536 | 33 | 20.69 ft 23.70 ft | | |
| 50 ft | 6.12 ft | 6.12 ft 343 | 21 | 25.86 ft 29.62 ft | | |
| 75 ft | 9.17 ft | 9.17 ft 152 | 9 | 38.79 ft 44.43 ft | | |
| 100 ft | 12.23 ft | 12.23 ft | 86 | | 5 | 51.72 ft |
| 125 ft | 15.29 ft | 15.29 ft | 55 | | 3 | 64.65 ft |
| 150 ft | 18.35 ft | 18.35 ft | 38 | | 2 | 77.59 ft |
Champ Faisceau Champ
| Étroit | Maverick MK1 Spot (Métrique) | Grand |
| Distance | 7°Diamètre duFaisceau | 7°Diamètre du Champ | Lux | Lux | 27°Diamètre duFaisceau | 33°Diamètre du Champ |
| 1 m | 0.12 m | 0.12 m | 857,050 | 52,425 | 0.52 m | 0.59 m |
| 2 m | 0.24 m | 0.24 m | 214,263 | 13,106 | 1.03 m | 1.18 m |
| 5 m | 0.61 m | 0.61 m | 34,282 | 2,097 | 2.59 m | 2.96 m |
| 8 m | 0.98 m | 0.98 m | 13,391 | 819 | 4.14 m | 4.74 m |
| 10 m | 1.22 m | 1.22 m | 8,571 | 524 | 5.17 m | 5.92 m |
| 15 m | 1.83 m | 1.83 m | 3,809 | 233 | 7.76 m | 8.89 m |
| 20 m | 2.45 m | 2.45 m | 2,143 | 131 | 10.34 m | 11.85 m |
| 25 m | 3.06 m | 3.06 m | 1,371 | 84 | 12.93 m | 14.81 m |
| 30 m | 3.67 m | 3.67 m | 952 | 58 | 15.52 m | 17.77 m |
| Champ Faisceau Champ |
Renvois
Dans le cas où vous avez besoin d'aide ou pour returner un produit :
- Si vous résidiez aux États-Unis, contactez le siège mondial de Chauvet.
- Si vous vivez au Royaume-Uni ou en Irlande, contactez Chauvet Europe Ltd.
- Si vous vivez au Benelux, contactez Chauvet Europe BVBA.
- Si vous vivez au France, contactez Chauvet France.
- Si vous vivez à l'Allemagne, contactez Chauvet Germany.
- Si vous vivez au Mexique, contactez Chauvet Mexico.
- Si vous résidez n'importe ou ailleurs, NE contactez pas Chauvet. Contactez votre revendeur. Rendez-vous sur www.chauvetprofessionnel.com pour découvertir la liste des revendeurs en dehors des États-Unis, du Royaume-Uni, de l'Irlande, du Benelux, de la France, de l'Allemagne ou du Mexique.

Si vous résidiez en dehors des États-Unis, du Royaume-Uni, de l'Irlande, du Benelux, de la France, de l'Allemagne ou du Mexique contactez votre revendeur et suivez leurs instructions quant à la procédure à suivre pour renvoyer votre apparéil. Consultez notre site Web www.chauvetprofessionnel.com pour追寻er leurs coordonnées.
Téléphonez au centre d'assistance technique de Chauvet correspondant et demandez un numero d'autorisation de retard (NAR) avant de nous reexpédier l'appareil. Pour l'obtenir, il vous sera demandé de fournir le numero du modele, le numero de série ainsi qu'une brève description de l'objet du retard.
Pour soumettre une demande de service en ligne, rendez-vous sur www.chauvetprofessional.com/service-request
Vouve ne délivrera pas d'étiquettes de renvoi.
Indiquez lisiblement le NAR sur une etiquette apposoee sur le colis. Chauvet refusera la reception de tout apparéil pour lequel aucun NAR n'a été demandé.

Inscrivez le NAR sur une étiquette convenablement collée. N'écrivez PAS le NAR directement sur le colis.
Avant de nous returner le colis, inscrivez les informations suivantes, de maniere lisible, sur une feuille de papier, que vous placerez à l'intérieur du colis :
- Votre nom
- Voitradresse
- Voitrénero de téléphone
Le numero de NAR
- Une courte description du problème
Veillez à emballer l'appareil de manière ajusté. Vous serez tenu responsable de tout dommage survenant lors de l'expédition de return d'à un emballage inadéquat. Nous vous recommendons d'utiliser un emballage double ou celui de FedEx.

Chauvet se réserve le droit, à sa convenance, de réparer ou remplacer tout apparéil qui lui est returné.
Siège mondial de Chauvet
Adresse:5200 NW 108th Ave. Telephone:(844)393-7575
Sunrise, FL 33351 Télécopie: (954) 756-8015
Telephone: (954) 577-4455 E-mail: chauvetcs@chauvetlighting.com
Télécopie: (954) 929-5560
N°vert:(800)762-1084 Site web:www.chauvetdj.com
Chauvet Europe Ltd
Adresse: Unit 1C E-mail: UKtech@chauvetlighting.eu
Brookhill Road Industrial Estate
Pinxton, Nottingham, UK Site web: www.chauvetdj.eu
NG16 6NT
Telephone: +44 (0) 1773511115
Fax: +44 (0) 1773 511110
Chauvet Europe BVBA
Adresse: Stokstraat 18 E-mail: BNLtech@chauvetlighting.eu
9770 Kruishoutem
Belgium Site web: www.chauvetdj.eu
Telephone: +32 9 388 93 97
Chauvet France
Adresse:3,Rue Ampere
91380 Chilly-Mazarin
France Site web: www.chauvetdj.eu
Telephone:+33178853359
Chauvet Germany
Adresse: Bruno-Burgel-Str. 11
28759 Bremen
Germany Site web: www.chauvetdj.eu
Telephone: +49 421 62 60 20
Chauvet Mexico
Adresse: Av. de las Partidas 34 - 3B
(Entrance by Calle 2)
Zona Industrial Lerma Site web: www.chauvetdj.mx
Lerma, Edo. de Mexico, CP 52000
Telephone: +52 (728) 690-2010
E-mail:增值服务@chauvet.com.mx
www.chauvetdj.mx
Visitez le site Web concenme ci-dessus pour vérifier nos coordonnées et les instructions pour demander de l'assistance. En dehors des États-Unis, du Royaume-Uni, de l'Irlande, du Benelux, de la France, de l'Allemagne ou du Mexique, contactez le revendeur de l'enregistrement.
1. Erste Schritte
Packungsinhalt
Maverick MK1 Spot
2 Omega-Hangebugel mit Befestingungsmaterial
- Seetronic Powekon IP65-Netzkabel
Schnellanleitung
Anweisungen für das Auspacken
Packen Sie das Produktsofarvorsichtig aus und überprüfen Sie,ob Sie alle Teile unbeschadigt erhalten haben.
Schadensmeldung
Wenn die Verpackung oder die in der Verpackung befindlichen Teile (Gerät und Zubehör) beschädigt sind oder Mängel durch nicht einwandfreie Behandlung aufweisen, benachrichtigen Sie umgehend das Transportunternehmen, nicht jedoch Chauvet. Eine nicht zeitnah erfolgte Benachrichtigung kann dazu führen, dass Sie ihren Gewährleistungsanspruch gegenüber dem Transportunternehmen verlieren. Bewahren Sie überdies die Verpackung für eine spätere Überprüfung auf. Bei anderen Problèmes wie etwa fehlende Komponenten oder Teile, Schäden, die nicht durch den Transport entstanden sind, oder nicht offensichtliche Schäden, machen Sie ihren Anspruch gegenüber Chauvet innerhalb von 7 Tagen ab Lieferung der Waren geltend.
Konventionen des Handbuchs
| Kovention Bedeutung |
| 1-512 Eine Bandbreite an Werten |
| 50/60 Ein Wertesatz, aus dem nur ein Wert ausgewählten werden kann |
| Settings Eine Menüoption, die nicht geändert werden kann |
| <ENTER> Eine zu betätigende Taste auf dem Bedienfeld des Geräts |
| ON Ein Wert, der eingegeben oder ausgewählten werden muss |
Symbole
| Symbol Bedeutung |
| ! | Wichtige Informationen zur Installation, Konfiguration und zum Betrieb. Bei Nichtbeachtung dieser Informationen kann es zu Fehlfunktionen oder Beschädigungen des Geräts oder zu Verletzungen des Bedieners kommt. |
| ü | Wichtige Informationen zur Installation oder Konfiguration. Wenn diese Informationen nicht beachvet werden, kann es zu Fehlfunktionenkommen. |
| ü | Nützliche Informationen. |
Voraussichtliche LED-Lebensdauer
LEDs verlieren mit der Zeit an Helligkeit, vor allem aufgrund der Wärme. LEDs, die in Cluster angeordnet sind, haben eine höhere Betriebstempoatur als einzeln LEDs. Aus thisem Grund haben in Cluster angeordnete LEDs bei voller Leistung eine wesentlich kürzere Lebensdauer. Unter normalen Bedingungen beträgt diese 40.000 bis 50.000 Betriebsstunden. Ist es wichtig, diese Lebensdauer zu verlangern, senken Sie durch eine gute Belüfung der Umgebung Produkts die Umgebungs- und damit die Betriebstempoatur. Außen dem kann durch eine Reduzierung der Leuchtintensität auch die Lebensdauer der LED verlangert werden.
Sicherheitshinweise
Lesen Sie sich vor der Inbetriebnahme这点 Geräts alle folgenden Sicherheitshinweise durch. Sie enthalten wichtige Informationen über die Installation, Verwendung und Wartung这点 Geräts.

Die anwendbaren lokalen Vorschriften und Regulierungen sind für eine ordnungsgemäß Installation deses Geräts stets zu beachten.

Die eingebauten Komponenten sind für den Kunden wartungsfrei. In dieser Bedienungsanleitung enthaltene Verweise auf Wartungs-oder Reparaturmaßnahmen sind ausschließlich für ordnungsgemäß geschalte, zertifizierte Techniker bestimmt. Offnen Sie das Gehäuse nicht und versuchen Sie nicht selbst, Reparaturen vorzunehmen.
Persönliche Sicherheit
- Vermeiden Sie eine direkte Augenexposition der Lichtquelle, während das Produkt eingeschaltet ist.
- Trennen Sie das Produkt immer von der Stromquelle, bevor Sie die Sicherung reinigen oder austauschen.
Schlieben Sie das Produkt immer an einen geerdeten Stromkreis an, um Stromschlage zu vermeiden.
Berühren Sie während des Betriebs nicht das Gehäuse des Geräts, da es sehr heißt sein kann.
Befestigung und Aufhängung
- Dieses Gerät darf NICHT in Wasser eingetaucht werden (IP65). Dieses Produkt ist zur Verwendung in Innenräumen oder zur vorübergehenden Verwendung im Freien bestimmt.
- Verwenden Sie für die Verwendung dieser Produkte im Freien Strom- und Datenkabel mit Schutzart IP65 (oder hoher). Sichern Sie nicht verwendete Strom- und Datenports mit angebrachten IP65-Abdeckungen.
VORSICHT: Wenn Sie ein Produkt aus Umgebungen mit extremen Temperatren (z. B. kalter LKW in einen warmen, feuchten Ballsaal) transportieren, kann sich Kondensation auf der internen Elektronik des Produkts bilden. Um zu vermeiden, dass ein Fehler auftritt, setzen Sie das Produkt vollständig an die Umgebung angepasst werden, bevor Sie es an das Stromnetz anschließen.
-
Nicht für die dauerhafte Installation im Freien an Orten mit extremen Umgebungsbedingungen. Dies beinhaltet, ist aber nicht beschränkt auf:
-
Exposition gegenüber einer marinen / salzhaltigen Umgebung (innerhalb von 3 Meilen von einem Salzwasserkörper).
- Orte, an denen die normalen hohen oder niedrigen Temperaturen die in thisem Handbuch angegebenen Temperaturbereiche überschreiben.
- Orte, an denen es zu Überschwemmungen oder Schnee kommt.
-
Bereiche, in denen das Produkt extremer Strahlung oder atzenden Substanzen ausgesetzt ist.
-
Montieren Sie these Product an einem Ort mit ausreichender Beluftung, mindestens 50 cm von benachbarten Oberflächen entfert.
-
Stellen Sie sich, dass sich während des Betriebs keine brennbaren Materialien in der Höhe des Produkts befinden.
- Sichern Sie das Produkt beim Aufhängen immer mit einem Sicherheitskabel an einer Befestigungsvorrichtung.
Tragen Sie das Produkt niemals am Netzkabel oder an einem beweglichen Teil.
Stromversorgung und Verkabelung
- Stellen Sie sicher, dass das Netzkabel nicht gequetscht oder beschädigt ist.
- Stellen Sie immer sicher, dass Sie das Produkt gemäß den Angaben in thisem Handbuch oder auf dem Typenschild des Produkts an die richtige Spannung anschließen.
Umunnotigen Verschleiz zu vermeiden und die Lebensdauer zu verbessern, trennen Sie das Produkt während des Nichtgebrauchs vollständig über einen Trennschalter oder durch Ziehen des Netzsteckers vom Strom.
Schlieben Sie das Produkt niemals an einen Dimmerpack oder einen Rheostat an.
- Trennen Sie diese Produktionsdienstzeiten am Netzkabel.
Operation
- Verwenden Sie theses Produkt nicht, wenn das Gehäuse, die Linsen oder die Kabel beschädigt sind. Lassen Sie die beschädigten Teile sofort von einem autorisierten Techniker austauschen.
- Decken Sie die Lüftungsschlitze während des Betriebs nicht ab, um interne Überhitzung zu vermeiden.
Die maximale Umgebungstemperatur beträgt 45^ . Betreiben Sie das Produkt nicht bei higheren Temperatren.
Die Mindeststarttemperatur beträgt -20 °C. Starten Sie das Produkt nicht bei niedrigeren Temperaturen.
Die minimale Umgebungstemperatur beträgt -30 °C. Betreiben Sie das Produkt nicht bei niedrigeren Temperatren.
- Stellen Sie die Verwendung deses Products bei ernsthaften Betriebs Problemen sofort ein!

Wenn Ihr Chauvet-Produkt gewartet weden muss, wenden Sie sich an den technischen Support von Chauvet.
2. Einleitung
Beschreibung
Der Maverick MK1 Spot istalanders fur den Flachfeld-Einsatz mit CMY-Farbmischungs-Modus, einem VergroBerungsbereich von 5:1 und zahlreichen Steuerungsoptionen gerustet. Mit einem 350 W LED-Leuchtmittel ausgestattet, verfugt er über ein festes und ein rotierendes Goborad, ein 7-Positionen ^+ Wei-B Farbrad, variablen Frost-Effekt und 3-Facetten-Prismen. Er kann uber DMX, sACN, Art-NetTM oder WDMX angesteuert werden.
Funktionen
Voll ausgestatteter, schwenkbarer 350 W LED-Punktscheinwerfer mit CMY-Farbmischung, einem Farbrad, Zoom-Optik und zwei Goborädern, einem rotierenden und einem statischen 16-Bit-Dimmung des Master-Dimmers für eine gleichmäßige Steuerung der Fades
- Variables CMY-Farbmischungssystem zum Entwerfen einer breiten Farbpalette
DMX, WDMX, sACN und Art-Net™ für volle Flexibilität der Steuerungsoptionen
RDM-Aktivierung fur Remote-Adressierung und Fehlerbehebung
- Wandelt zur Einsparung von Kabelverlegungen TCP/IP-Protokolle in eine DMX-Ausgabe um
- Zoombereich von 7^ bis 33^ für unterscheidliche Strahlgroßen
- Iris, 3-Facetten-Prismen und Frost zur Strahlkontrolle
True 1 kompatibler Stromanschluss
- Touchscreen-Anzeige für Akku-Backup mit automatischer Drehung je nach Ausrichtung des Gerätes
Voreinstellungen für drei Setup-Menus und Synchronisation für Cross-Loading
Produktüberblick
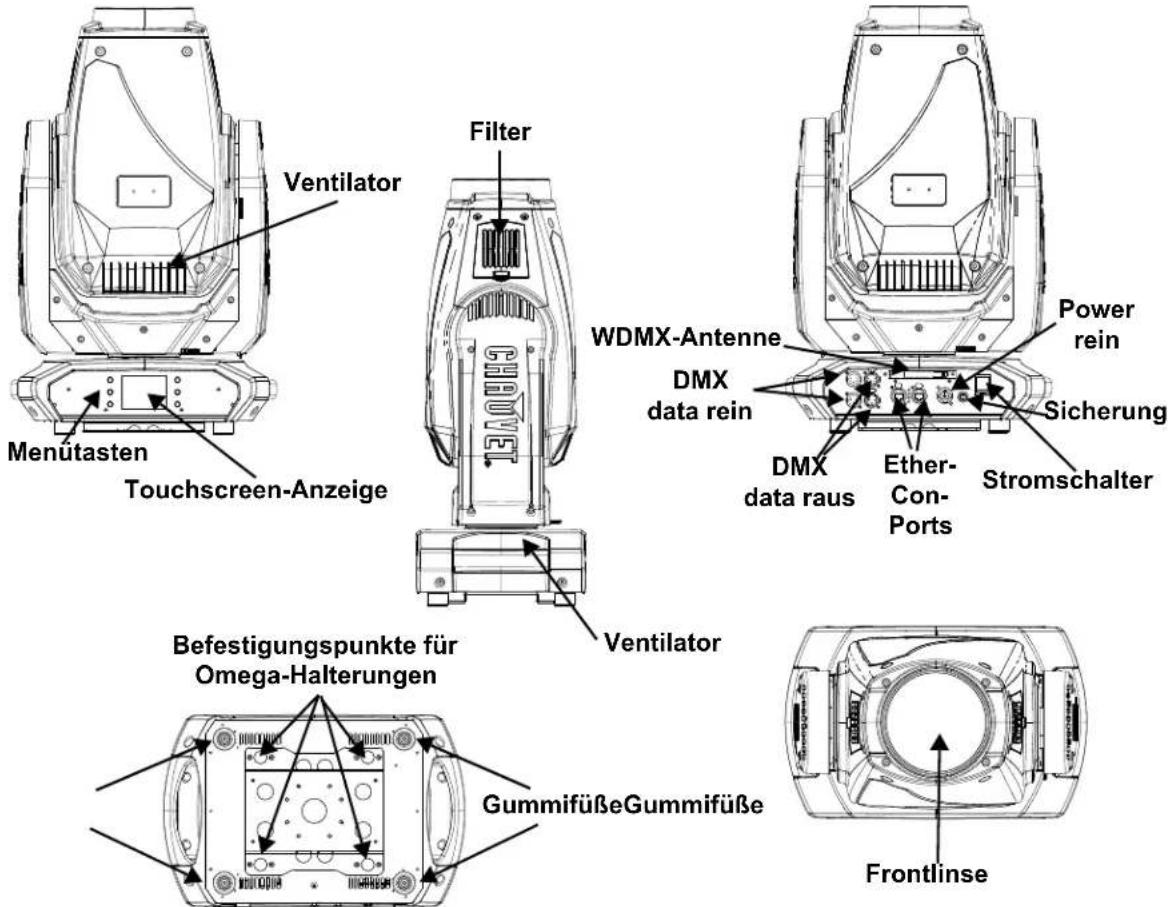
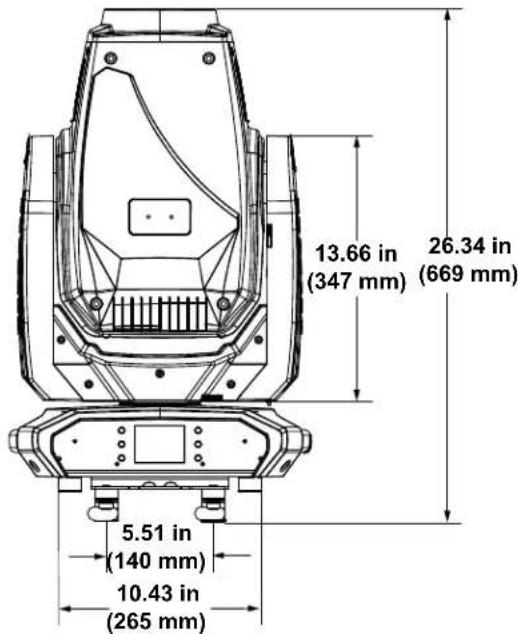
Produktmessungen
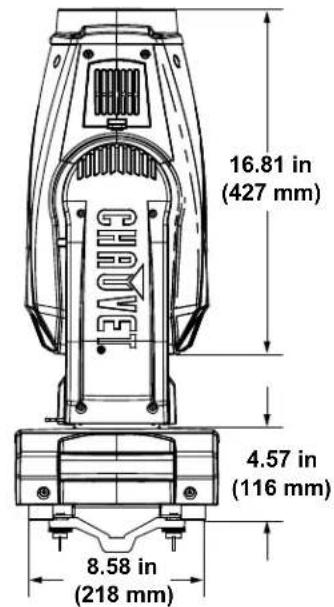
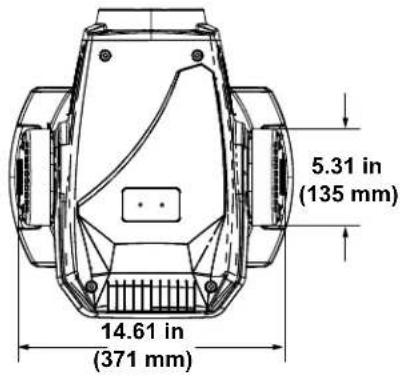

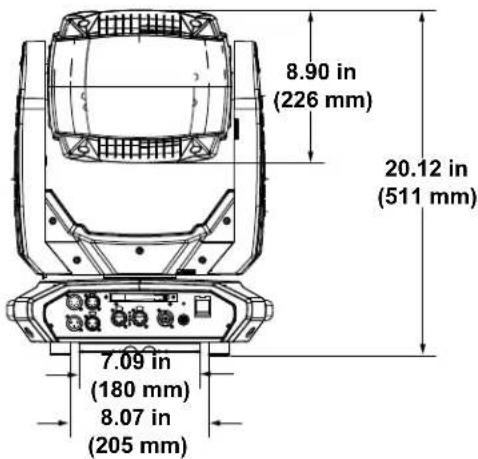
3. Einrichten des Geräts
Wechselstrom
DerMaverickMK1SpotverfugtübereinautomatischumschaltendesNetzeil,dasmiteiner Eingangsspannungvon100bis240VAC,50/60Hzarbeitet.Um dieerforderlichenKennzahlendes Netzanschlusses fur jederMaverickMK1Spot zu ermitteln,beziehenSie sich aufdasHinweisschild am Gerat.OderlesenSiedazudenaAbschnittTechnische DatenindeseraNeitung. Der aufgefhrteNennstromzeigtdiemaximaleStromaufnahmeimNormalbetrieban.Detaillerte InformationenfindenSieunter"BemessungvonLeistungsschaltern"aufderWebsitevonChauvet: www.chauvetprofessional.com.

- Schlieben Sie these Gerät nur an einen abgesicherten Stromkreislauf (Leistungsschalter oder Sicherung) an. Stellen Sie safer, dass das Gerät entsprechend an die Masse angeschlossen ist, um die Gefahr elektrischer Schläge oder eines Brands zu vermeiden.
- Umunnötgigen Verschleib zu vermeiden und die Lebensdauer des Geräts zu verlangern, trennen Sie während längerer Perioden des Nichtgebrauchs das Gerät vom Stromnetz - entweder per Trennschalter oder durch Herausziehen des Steckers aus der Steckdose.

Schlieben Sie这点es Gerät niemals an einen Regelwiderstand oder Dimmer an, auch nicht, wenn der Regelwiderstand oder Dimmer nur als 0 bis 100% Schalter dient.
Wechselstromstecker
Das Stromversorgungskabel des Maverick MK1 Spot ist mit einem Seetronic Powerkon-Steckverbinder an einem Ende und am anderen mit einem Edison-Stecker (US-Markt) abgeschlossen. Verfügt das mit ihrem Gerät mitgelieferte Stromversorgungskabel nicht über einen Stecker, oder müssen Sie diesen austauschen, greifen Sie zum Anschlieben des neuen Steckers auf folgende Tabelle zusck.
| Verbindung | Wire (U.S.) | Wire (Europe) | Schraubenfarbe |
| AC Live Schwarze Braun Gelb/brass | | |
| AC Neutral Weiß Blau Silber | | |
| AC Ground | Grün/gelb | Grün/gelb | Grün |
Ausweiseln der Sicherung
- Trennen Sie das Gerät vom Stromnetz.
- Mit einem Flachkopfschraubendreher offen Sie die Abdeckung des Sicherungshalters vom Gehäuse.
- Entfernen Sie die durchgebrannte Sicherung von der Klemme, und ersetzen Sie diese durch eine Sicherung des gleichen Typs und mit den gleichen Werten (F 20 A, 250 V).
- Schrauben Sie die Abdeckung der Sicherung wieder ein, und schreiben Sie das Gerät wieder an das Stromnetz an.

Trennen Sie das Gerät von der Stromquelle, bevor Sie die Sicherung auswechseln.
Die Sicherungarfurdurchene volkommen gleichwertige ersetzt werden.
Montage
Lesen Sie vor der Montage des Geräts die in den Sicherheitshinweise enthaltenen Sicherheitsempfehlungen durch. Informationen zu unserer CHAUVET-Produktlinie für Befestigungsklemen finden Sie unter: http://trusst.com/products/
Montagerichtung
Stellen Sie sicher, dass这点 Gerät immer in einer geschäften Position mit ausreichendem Raum für Belüftung, Konfiguration und Wartung montiert ist. Der Maverick MK1 Spot kann aufrecht oder kopfüber aufgebaut werden, wobei die zwei beiliegenden Omega-Befestigungsbügel verwendet werden; alternatively kann er aber auch mit seinen Gummifüssen auf einem flachen Untergrund aufgestellt werden.
Hängende Montage
Chauvet empfeht die Beachtung folgender allgemeiner Richtlinien bei der Montage deses Gerats
- Berücksichtigten Sie bei der Auswahl des Installationsorts, dass Sie bequem für den Betrieb, für Programmiereingaben und für routinemäßige Wartungsarbeiten auf these Gerät zugreifen können.
- Stellen Sie sicher, dass das Gerät mit einem Sicherheitsabstand zu entzündlichen Materialien betrieben wird.
- Stellen Sie bei einer hängenden Montage sicher, dass die Konstruktion, auf der Sie das Gerät montieren, dessen Gewicht traben kann. Im Abschnitt Technische Daten sind die Anforderungen an die Trafähigkeit these Geräts aufgeführten.
- Verwenden Sie bei der hängenden Montage dieser Geräts zur Sicherung immer ein ordnungsgemäßes Sicherheitskabel. Informationen zu unserer CHAUVET Professional-Produktlinie für Sicherheitskabel finden Sie unter http://trusst.com/products/.
Verfahren
Der Maverick MK1 Spot verfügbar über einen Doppelhängebügel, an den Sie entweder Befestigungsklammen zum Hängen anbringen oderihn einfach als Bodenaufsteller nutzen. Sie müssen Befestigungsklammen bereithalten. Vergewissern Sie sich, dass die Klemmen das Gewicht these Gerätes tragen können. Verwenden Sie mindestens einen Befestigungspunkt pro Gerät. Die CHAUVET Professional-Produktlinie für Befestigungsklammen, finden Sie unter: http://trusst.com/products/
Montageansicht
DMX-Verbindung
Sie konnen den Maverick MK1 Spot über den 3- oder 5-poligen DMX-Anschluss mit einem DMX Controller verbinden. Falls Sie andere DMX-fähige Geräte mit dieser Gerät verwenden, konnen Sie jeder Einzelne mittels eines individuellen DMX-Controllers ansteuern.
DMX-Eigenschaften
DerMaverickMK1 Spot verwendet eine 3- und 5-polige DMX-Datenverbindung fur die 22- und 29-Kanal-DMX-Modi.
- Beziehen Sie sich auf die "Einleitung" zwecks einer Kurzbeschreibung jeder DMX-Eigenschaft.
- Beziehen Sie sich auf das Kapitel "Betrieb", um sich mit dem Einrichten des Maverick MK1 Spot und dem Arbeitsmen mit diesen Eigenschaften vertraut zu machen.
- Die DMX-Kanalbelegung liefert detailierte Informationen bezüglich der DMX-Eigenschaften.
Remote Device Management
Remote Device Management bzw. RDM ist ein Standard, mit dem DMX-aktivierte Geräte bidirektonal entlang bestehender DMX-KabelCOMMUNIZIEREN konnen. Lesen Sie die Bedienungsanleitung des DMX-Controllers oder wenden Sie sich an den Hersteller, da nicht alle DMX-Controller über diese Funktion verfügt. Der Maverick MK1 Spot unterstützt das RDM-Protekoll, das ein Feedback zur Vornahme von Änderungen der Menüoptionen erlaubt.
Signalanschluss
DerMaverickMK1 Spotkann Signale per DMX,Art-NetTM sACN oder Kling-Net-Signale empfangen.DerMaverick MK1 Spot verfugt uber zwei Neutrik etherCON-Durchgangsports wie 3- und 5-polige DMXEin- und Ausgange.Furweitere Informationen zu DMX lesen Sie "DMX-Eine Einfuhrung" unter: https://www.chauvetprofessional.com/wp-content/uploads/2016/06/DMX_Primer.pdf.
Art-Net-Verbindung
Art-Net™ ist ein Ethernet-Protokoll, das mit TCP/IP eine große Menge an DMX512-Daten mithilfe einer Neutrik® etherCON® RJ45-Verbindung über ein großes Netzwerk überträgt. Das Dokument des Art-Net-Protokolls können Sie unter www.chauvetprofessional.com herunterlagen.
Art-Net™ wurde von Artistic Licence Holdings Ltd entwickelt und ist urheberrechtlich geschützt.
sACN-Verbindung
Das auch als ANSI E1.31 betrachtene Streaming-ACN ist ein Ethernet-Protokoll, das auf das Layering und die Formatierung von Architecture for Control Networks zurückgreift, um DMX512-Daten "over IP" oder ein anderes mit ACN kompatibles Netzwerk übermittelt. ACN wird von der Professional Lighting and Sound Association (PLASA) bereitgestellt.
Kling-Net-Verbindung
Kling-Net ist ein Netzwerkprotokoll, das eine automatische Konfiguration von Anzeigegeräten über eine Ethernet-Verbindung möglich. Detaillierte Anweisungen zur Programmierung dieser Produkte finden Sie im Handbuch der ArKaos-Software.
Connection Diagram

Die drei LED-Kontrollleuchten zwischen den Ethernet-Durchgangs-Anschlüssen zeigen eine Verbindung mit einem Netzwerk sowie Aktivität in thisem Netzwerk an. Sie zeigen nicht an, ob der Maverick MK1 Spot ein Signal von einem Controller erhält oder nicht.
4. Betrieb
Der Maverick MK1 Spot verfügt über ein Touchscreen-Display und sechs Bedientasten. Navigieren Sie durch die Menüstruktur, indem Sie die Tasten drücken, die Bilder der Tasten an den Seiten des Displays berühren oder die gewünschte Menuoption direkt auf dem Display berühren. Der Touchscreen kann über die Setup-Optionen im Menu gespeit und kalibriert werden (siehe Touchscreen-Kalibrierung und Touchscreen-Sperre).
Beschreibung des Bedienfelds
| Taste Funktion |
| Damit navigieren Sie sich durch die Menüpunkte nach oben oder erhöhen den numerischen Wert der entsprechenden Funktion |
| Damit verlassen Sie das aktuelle Menu oder die Funktion |
| Damit navigieren Sie sich durch die Menüpunkte nach unten oder verringern den numerischen Wert der entsprechenden Funktion |
| Damit navigieren Sie nach links durch die Menüpunkte |
| Damit wird das aktuell angezeigte Menu aktiviert oder der aktuellen ausgewählte Wert einer Funktion eingestellt |
| Damit navigieren Sie nach rechts durch die Menüpunkte |
Batteriebetriebene Anzeige
Drücken Sie auf diese Taste und halten Sie sie (für ca. 15 Sekunden) gedrückt, bis der Menu-Bildschirm entscheidet.

Menüplan
| Main Level Programming Levels Description |
| Start Address | 000-255 Netzwerkeinstellung |
| Network Setup | IP Mode | Manual IP-Adresse manuell einstellen |
| DHCP Netzwerk legt die IP-Adresse fest |
| Static Produkt legt die IP-Adresse fest |
| Universe 000-255 Setzt das Universum |
| IP 002.243.075.222 | Legt die IP-Adresse im manuellen Modus fest |
| SubMask 255.000.000.000 | Legt Subnetzmaske im manuellen Modus fest |
| Personality | DMX 22CH | YES Wahlen Sie 22 DMX-Kanäle |
| NO |
| DMX 29CH | YES Wahlen Sie 29 DMX-Kanäle |
| NO |
| Settings | Control Mode | DMX Legt die DMX-Persönlichkeit fest |
| WDMX Legt die WDMX-Persönlichkeit fest |
| sACN Legt die sACN-Persönlichkeit fest |
| ArtNet Legt die Art-Net™-Persönlichkeit fest |
| Pan Reverse | NO Schwenk Normal |
| YES Umgekehrte Schwenkung |
| Tilt Reverse | NO Neigung Normal |
| YES Umgekehrte Neigung |
| Screen Reverse | NO Normale Anzeige |
| YES Umgekehrte Anzeige |
| AUTO Automatische Anzeigerichtigung |
| Pan Angle | 540 Schwenkungsbereich 540° |
| 360 Schwenkungsbereich360° |
| 180 Schwenkungsbereich180° |
| Tilt Angle | 270 Neigungsbereich 270° |
| 180 Neigungsbereich 180° |
| 90 Neigungsbereich 90° |
| BL. O. P/T Move | YES Während Schwenkung/Neigung verdunkeln |
| NO Aktuelle Einstellungen speichern |
| BL. O. Color Move | YES Farbverdunkelung aktivieren |
| NO Deaktivieren Sie die Farbverdunkelung |
| BL. O. Gobo Move | YES Gobo-Blackout aktivieren |
| NO Deaktiviere den Gobo-Blackout |
| Calibration | YES Touchscreen kalibrieren |
| NO Behalten Sie die aktuellen Einstellungen bei |
| Touchscreen Lock | YES Display reagiert nicht auf Berührung |
| NO Display reagiert auf Berührung |
| Lock Screen | YES Sperrt die Tasten und den Touchscreen-Bildschirm Sicherheitscode: 0920 |
| NO |
| Swap XY | YES Schwenkung steuer Neigung, Neigung steuer Schwenkung |
| NO Während Schwenkung und Neigung nicht tauschen |
| XY Mode | Fast Schnelle Schwenkung und Neigung |
| Slow Langsame Schwenkung und Neigung |
| WDMX Reset | YES WDMX zurücksetzen |
| NO WDMX nicht zurücksetzen |
| Backlight Timer | 30S Anzeige schaltet nach 30 Sekunden ab |
| 1M Anzeige schaltet nach 1 Minute ab |
| 5M Anzeige schaltet nach 5 Minuten ab |
| ON Anzeige bleibt an |
| Loss of Data | Hold Hält das zuletzt erhaltene Signal |
| Close Verdunkelt Gerät |
| Main Level Programming Levels Description | |
| Settings | Fans | Auto Lüfter | rehzahl gemäß Gerätepmatur | |
| Full Lüfter | rehzahl auf volle Drehzahl | |
| ECO Lautloser | Modus | |
| Dimmer Curve | Linear | Stellt die Dimmungskurve ein |
| Square |
| I Square |
| SCurve |
| Dimmer Speed | Smooth | Stellt die Dimmungsgeschwindigkeit ein |
| Fast |
| PWM Option | 600Hz | Legt die Frequenz der Puls-Weiten-Modulation fest |
| 1200Hz |
| 2000Hz |
| 4000Hz |
| 6000Hz |
| 25000Hz |
| Preset Select | PRESET A | Aufgezeichnete Voreinstellungen-Menüoptionen PRESET B |
|
| PRESET C |
| Preset Sync | NO Ermöglicht | Aufgezeichnete Voreinstellungen-Menüoptionen an andereMaverick MK1 Spot-Geräte in der DMX-Serienschaltung |
| YES |
| Reset Function | Pan/Tilt | YES/NO | Setzt einzeln oder alle Funktionen ab Startzurück |
| Iris/Prism |
| Color/CMY+CTO |
| Gobo/GoboRotate |
| Zoom/Frost/Focus |
| All |
| Factory Settings | YES | Setzt auf die standardmäßigWerkseinstellungen zurück |
| NO |
| Test | Auto Test Testen Sie das | Produkt automatisch |
| Manual Test | Pan | 000-255 | Zeigt alle aktuellen Werte von Eingangssignalen an, 000-255 |
| Pan Fine |
| Tilt |
| Tilt Fine |
| P/T Speed |
| Dimmer |
| Dimmer Fine |
| Shutter |
| Virtual Shaking |
| Cyan |
| Magenta |
| Yellow |
| Color |
| Gobo |
| Gobo Rotate Fine |
| Gobo Index |
| Gobo 2 |
| Focus |
| Focus Fine |
| Focus Auto |
| Zoom |
| Zoom Fine |
| Prism |
| Prism Rotate Iris |
| Frost |
| CMY Macro |
| CMY Macro Speed |
| Special Function |
| Main Level | Programming Levels | Description |
| Information | Fixture Information | Ver V_Zeigt die Firmware-Version an |
| Running Mode DMX | --- Zeigt den aktuellen Betriebsmodus an |
| DMX Address | --- Zeigt die aktuellen Startadresse an |
| Temperature | --- | Zeigt die aktuellen Temperatur des Geräts in °C an |
| Fixture Hours | --- | Zeigt an, wie lange das Gerät eingeschaltet gewesen ist |
| IP ___. | Zeigt die aktuellen IP-Adresse an |
| SubMask ___. | | Zeigt die aktuellen Subnetzmaske an |
| MAC ___. | | Zeigt die?). Mac-Adresse an |
| Fan Information | Base Fan 1 Speed | --- | Zeigt die Drehzahl der Basis- und Hauptlufter in U/min an |
| Base Fan 2 Speed | --- |
| Head Fan 1 Speed | --- |
| Head Fan 2 Speed | --- |
| Error Information | No Error!* Zeigt a | le Fehler oder "No Error!" |
| Channel Information | Frequency | Hz | Zeigt alle aktuellen Werte von Eingangssignalen an, 000–255 |
| Pan | 000–255 |
| Pan Fine |
| Tilt |
| Tilt Fine |
| P/T Speed |
| Dimmer |
| Main Level Programming Levels Description | |
| Information | Channel Information | Dimmer Fine | 000-255 | Zeigt alle aktuellen Werte von Eingangssignalen an, 000-255 |
| Shutter |
| Virtual Shaking |
| Cyan |
| Magenta |
| Yellow |
| Color |
| Gobo |
| Gobo Rotate Fine |
| Gobo Index |
| Gobo 2 |
| Focus |
| Focus Fine |
| Focus Auto |
| Zoom |
| Zoom Fine |
| Prism |
| Prism Rotate Iris |
| Frost |
| CMY Macro |
| CMY Macro Speed |
| Special Function |
Konfiguration der Betriebseinstellungen
Startbildschirm
DerMaverickMK1 Spot verfugt uber einen Startbildschirm, auf dem die aktuellen Steuerungsprotokolle, Modi, Startadressen, IP-Adressen und Umgebungen angezeigt werden. Um zum Startbildschirm zu gelangen, drucken Sie wiederholt auf