pour accéder au menu principal.
Adresse de Départ
Pour définir l'adresse de départ, définissez le Mode de contrôle, puis suivez les instructions ci-dessous:
- Appuyez plusieurs fois sur
- Utilisez , , ou pour sélectionner Start Address, ou touchez l'écran où il est indiqué Start Address.
- Si vous utilisez les boutons à la place de l'écran tactile, appuyez sur la touche .
-
Saisissez l'adresse de départ (001-512) avec l'une des méthodes qui suiventÿ :
-
Saisissez le numéro de l'adresse en utilisant le clavier numérique qui s'affiche sur l'écran tactile.
• Utilisez les boutons (ou les boutons en forme d'icônes sur les bords de l'écran) :
a. Utilisez les touches ou pour sélectionner le chiffre à modifier.
b. Utilisez les touches ou pour augmenter ou diminuer la valeur de ce chiffre.
c. Répétez les étapes jusqu'à ce que l'adresse soit configurée comme souhaitée.
- Appuyez sur la touche .
Paramètres Réseau

L'univers du protocole TCP / IP sera l'univers de la fonction DMX.
Mode IP
L'adresse IP du Maverick MK2 Profile peut être définie manuellement, par le réseau ou par une adresse statique spécifique à chaque produit. Pour configurer le mode IP, suivez les instructions ci-dessous :
- Appuyez plusieurs fois sur
- Utilisez , , ou pour sélectionner Network Setup, ou touchez l'écran où il est indiqué Network Setup.
- Si vous utilisez les boutons à la place de l'écran tactile, appuyez sur la touche .
- Utilisez ou pour sélectionner IP Mode, ou touchez l'écran où il est indiqué IP Mode.
- Si vous utilisez les boutons à la place de l'écran tactile, appuyez sur la touche .
- Utilisez , , ou pour sélectionner parmi :
- Manual – définition de l'adresse IP avec le panneau de commande
- DHCP – le réseau définit l'adresse IP
-
Static – une adresse IP prédéfinie spécifique pour chaque appareil, ou bien touchez l'écran pour choisir le mode
-
Appuyez sur la touche .
Universe
L'univers doit être attribué via le menu du produit. Pour définir l'univers, procédez comme suit :
- Appuyez plusieurs fois sur
- Utilisez , , ou pour sélectionner Network Setup, ou touchez l'écran où il est indiqué Network Setup.
- Si vous utilisez les boutons à la place de l'écran tactile, appuyez sur la touche .
- Utilisez ou pour sélectionner Universe ou touchez l'écran où il est indiqué Universe.
- Si vous utilisez les boutons à la place de l'écran tactile, appuyez sur la touche .
- Enter the universe address (000–255) with one of the following methods:
- Saisissez le numéro de l'adresse en utilisant le clavier numérique qui s'affiche sur l'écran tactile.
• Utilisez les boutons (ou les boutons en forme d'icônes sur les bords de l'écran) :
a. Utilisez les touches ou pour sélectionner le chiffre à modifier.
b. Utilisez les touches ou pour augmenter ou diminuer la valeur de ce chiffre.
c. Répétez cette opération jusqu'à ce que l'univers ou le sous-réseau soit défini comme vous le souhaitez.
- Appuyez sur la touche .
Adresse IP
Pour définir l'adresse IP en mode IP manuel, procédez comme suit :
- Appuyez plusieurs fois sur
- Utilisez , , ou pour sélectionner Network Setup, ou touchez l'écran où il est indiqué Network Setup.
- Si vous utilisez les boutons à la place de l'écran tactile, appuyez sur la touche .
- Utilisez ou pour sélectionner IP ou touchez l'écran où il est indiqué IP.
- Si vous utilisez les boutons à la place de l'écran tactile, appuyez sur la touche .
- Définissez l'adresse IP (entre 000.000.000.000 et 255.255.255.255) avec l'une des méthodes suivantes :
- En utilisant l'écran tactile :
a. Touchez l'écran sur l'octet (ensemble de trois chiffres) à modifier.
b. Utilisez le pavé numérique à l'écran pour saisir le nombre désiré.
c. Répétez les étapes jusqu'à ce que l'adresse IP soit configurée comme souhaitée.
- Avec les boutons :
a. Utilisez les touches ou pour sélectionner l'octet (ensemble de trois chiffres) à modifier.
b. Utilisez les touches ou pour augmenter ou diminuer la valeur.
c. Répétez les étapes jusqu'à ce que l'adresse IP soit configurée comme souhaitée.
- Appuyez sur la touche .
Masque de sous-réseau
Pour définir le masque de sous-réseau en mode IP manuel, procédez comme suit :
- Appuyez plusieurs fois sur
- Utilisez , , ou pour sélectionner Network Setup, ou touchez l'écran où il est indiqué Network Setup.
- Si vous utilisez les boutons à la place de l'écran tactile, appuyez sur la touche .
- Utilisez ou pour sélectionner SubMask ou touchez l'écran où il est indiqué SubMask.
- Si vous utilisez les boutons à la place de l'écran tactile, appuyez sur la touche .
- Définissez le masque de sous-réseau (entre 000.000.000.000 et 255.255.255.255) avec l'une des méthodes suivantes :
- En utilisant l'écran tactile :
a. Touchez l'écran sur l'octet (ensemble de trois chiffres) à modifier.
b. Utilisez le pavé numérique à l'écran pour saisir le nombre désiré.
c. Continuez jusqu'à ce que le masque de sous-réseau soit configuré comme souhaité.
- Avec les boutons:
a. Utilisez les touches ou pour sélectionner l'octet (ensemble de trois chiffres) à modifier.
b. Utilisez les touches ou pour augmenter ou diminuer la valeur.
c. Continuez jusqu'à ce que le masque de sous-réseau soit configuré comme souhaité.
- Appuyez sur la touche .

En mode DHCP ou IP statique, les paramètres des menu IP et SubMask n'ont aucune incidence sur le fonctionnement de l'appareil.
Personnalité
Pour définir la personnalité DMX à utiliser, procédez comme suit :
- Appuyez plusieurs fois sur
- Utilisez , , ou pour sélectionner Personality, ou touchez l'écran où il est indiqué Personality.
- Si vous utilisez les boutons à la place de l'écran tactile, appuyez sur la touche .
- Utilisez , , ou pour sélectionner DMX 33CH ou DMX 50CH, ou touchez l'écran où il indique l'option souhaitée.
- Si vous utilisez les boutons à la place de l'écran tactile, appuyez sur la touche .
- Utilisez , , ou pour sélectionner NO (annuler) ou YES (confirmer), ou touchez l'écran où il indique l'option souhaitée.
- Appuyez sur la touche .
Configuration
Pour accéder au menu Configuration, suivez les instructions ci-dessous :
- Appuyez sur la touche
- Sélectionnez l'élément Setup en touchant l'écran ou en utilisant les touches , , ou .
- Si vous utilisez les boutons à la place de l'écran tactile, appuyez sur la touche .
Mode de contrôle
Le Maverick MK2 Profile peut être réglé pour répondre à DMX, WDMX, Art-Net™ ou sACN. La configuration du protocole doit être définie pour que le produit réponde correctement au (x) contrôleur (s). Voir la Carte du Menu pour plus d'informations. Pour configurer le protocole du Maverick MK2 Profile, suivez les instructions ci-dessous :
- Accédez au menu Configuration.
- Utilisez ou pour sélectionner Control Mode, ou touchez l'écran où il est indiqué Control Mode.
- Si vous utilisez les boutons à la place de l'écran tactile, appuyez sur la touche .
- Utilisez , , ou pour sélectionner DMX, WDMX, sACN, ArtNet, ou touchez l'écran où il indique l'option souhaitée.
- Appuyez sur la touche .

Pour le contrôle par WDMX, assurez-vous que l'antenne soit bien droite et qu'il n'y ait aucun obstacle dans la ligne directe entre le contrôleur et l'appareil. Consultez la section Réinitialisation WDMX pour plus d'informations sur la résolution des problèmes.
Orientation du panoramique/inclinaison
Pour définir une orientation de panoramique/inclinaison normale ou inversée :
- Accédez au menu Configuration.
- Sélectionnez un réglage parmi Pan Reverse (panoramique inverse) ou Tilt Reverse (inclinaison inverse) en touchant l'écran ou en utilisant les touches ou .
- Si vous utilisez les boutons à la place de l'écran tactile, appuyez sur la touche .
- Sélectionnez l'option NO (orientation normale) ou YES (orientation inversée) en touchant l'écran ou en utilisant les touches , , ou .
- Appuyez sur la touche .
Orientation de l'affichage
Pour définir l'orientation de l'écran, procédez comme suit :
- Accédez au menu Configuration.
- Sélectionnez l'élément Screen Reverse en touchant l'écran ou en utilisant les touches ou .
- Si vous utilisez les boutons à la place de l'écran tactile, appuyez sur la touche .
- Sélectionnez parmi les options NO (écran normal), YES (écran inversé), ou AUTO (l'écran détecte automatiquement dans quel sens l'appareil est orienté et s'adapte en conséquence) en touchant l'écran ou en utilisant les touches , , ou .
- Appuyez sur la touche .
Amplitude d'angle de panoramique/inclinaison
Pour définir l'amplitude de mouvement autorisé pour la panoramique ou l'inclinaison :
- Accédez au menu Configuration.
- Sélectionnez un réglage parmi Pan Angle (angle de panoramique) ou Tilt Angle (angle d'inclinaison) en touchant l'écran ou en utilisant les touches ou .
- Si vous utilisez les boutons à la place de l'écran tactile, appuyez sur la touche .
- Sélectionnez parmi les options 540, 360 ou 180 (540°, 360° ou 180° pour la panoramique) et 270, 180 ou 90 (270°, 180° ou 90° pour l'inclinaison) en touchant l'écran ou en utilisant les touches , , ou .
- Appuyez sur la touche .
Noir général pendant mouvement de panoramique/inclinaison
Pour définir si l'appareil doit s'éteindre pendant le mouvement de panoramique ou d'inclinaison, suivez les instructions ci-dessous :
- Accédez au menu Configuration.
- Sélectionnez l'élément BL. O. P/T Move en touchant l'écran ou en utilisant les touches ou .
- Si vous utilisez les boutons à la place de l'écran tactile, appuyez sur la touche .
- Sélectionnez l'option NO (ne pas s'éteindre) ou YES (extinction pendant le mouvement) en touchant l'écran ou en utilisant les touches , , ou .
- Appuyez sur la touche .
Noir général pendant mouvement de couleur
Pour définir si l'appareil doit s'éteindre pendant le mouvement de la couleur, suivez les instructions ci-dessous :
- Accédez au menu Configuration.
- Utilisez ou pour sélectionner BL. O. Color Move, ou touchez l'écran où il est indiqué BL. O. Color Move.
- Si vous utilisez les boutons à la place de l'écran tactile, appuyez sur la touche .
- Utilisez , , ou pour sélectionner NO (ne pas s'éteindre) ou YES (extinction pendant le mouvement), ou touchez l'écran où il indique l'option souhaitée.
- Appuyez sur la touche .
Noir général pendant mouvement de gobo
Pour définir si l'appareil doit s'éteindre pendant le mouvement des gobos, suivez les instructions ci-dessous :
- Accédez au menu Configuration.
- Utilisez ou pour sélectionner BL. O. Gobo Move, ou touchez l'écran où il est indiqué BL. O. Gobo Move.
- Si vous utilisez les boutons à la place de l'écran tactile, appuyez sur la touche .
- Utilisez , , ou pour sélectionner NO (ne pas s'éteindre) ou YES (extinction pendant le mouvement), ou touchez l'écran où il indique l'option souhaitée.
- Appuyez sur la touche .
Calibrage de l'écran tactile
Si l'écran tactile ne répond pas correctement, il peut être nécessaire de le calibrer. Pour cela :
- Accédez au menu Configuration.
- Sélectionnez l'élement Calibration en touchant l'écran ou en utilisant les touches ou .
- Si vous utilisez les boutons à la place de l'écran tactile, appuyez sur la touche .
- Sélectionnez l'option NO (ne pas calibrer) ou YES (calibrer) en touchant l'écran ou en utilisant les touches , , ou .
- Appuyez sur la touche .
- Suivez les instructions en touchant les points à l'écran au fur et à mesure qu'ils apparaissent.
Verrouillage de l'écran tactile
Pour verrouiller ou déverrouiller l'écran tactile du panneau de commande, procédez comme suit :
- Accédez au menu Configuration.
- Sélectionnez l'élement Touchscreen Lock en touchant l'écran ou en utilisant les touches ou .
- Si vous utilisez les boutons à la place de l'écran tactile, appuyez sur la touche .
- Sélectionnez l'option NO (l'affichage répond au toucher) ou YES (l'écran ne répond pas au toucher) en touchant l'écran ou en utilisant les touches , , ou .
- Appuyez sur la touche .
Verrouillage de l'écran
Pour verrouiller ou déverrouiller l'intégralité du panneau de commande, suivez les instructions ci-dessous :
- Accédez au menu Configuration.
- Sélectionnez l'élement Lock Screen en touchant l'écran ou en utilisant les touches ou .
- Si vous utilisez les boutons à la place de l'écran tactile, appuyez sur la touche .
- Sélectionnez l'option NO (le panneau de commande ne sera pas verrouillé) ou YES (le panneau de commande nécessitera un code d'accès) en touchant l'écran ou en utilisant les touches , , ou .
- Appuyez sur la touche .
Pour accéder au panneau de commande lorsqu'il a été verrouillé :
- Appuyez sur
- Saisissez le code d'accès 0920 avec l'une des méthodes suivantes :
- Avec l'écran tactile : utilisez le pavé numérique sur l'écran pour saisir 0920.
- Avec les boutons:
a. Utilisez la touche pour sélectionner le numéro à modifier.
b. Utilisez la touche pour augmenter la valeur.
c. Répétez l'opération jusqu'à ce que le code 0920 ait été saisi.
- Appuyez sur la touche .
Permutation du panoramique et de l'inclinaison
Pour permuter les fonctions de panoramique et d'inclinaison afin que ce qui contrôle normalement le panoramique contrôle l'inclinaison et ce qui contrôle normalement l'inclinaison contrôle le panoramique, procédez comme suit :
- Accédez au menu Configuration.
- Sélectionnez l'élement Swap XY en touchant l'écran ou en utilisant les touches ou .
- Si vous utilisez les boutons à la place de l'écran tactile, appuyez sur la touche .
- Sélectionnez l'option NO (panoramique et inclinaison normaux) ou YES (panoramique contrôle inclinaison, inclinaison contrôle panoramique) en touchant l'écran ou en utilisant les touches , , ou .
- Appuyez sur la touche .
Vitesse de panoramique/inclinaison
Pour régler la vitesse maximum du panoramique et de l'inclinaison :
- Accédez au menu Configuration.
- Sélectionnez l'élement XY Mode en touchant l'écran ou en utilisant les touches ou .
- Si vous utilisez les boutons à la place de l'écran tactile, appuyez sur la touche .
- Sélectionnez parmi les choix Slow ou Fast en touchant l'écran ou en utilisant les touches , , ou .
- Appuyez sur la touche .
Réinitialisation WDMX
Pour réinitialiser la connexion WDMX du Maverick MK2 Profile, effectuez les actions suivantes :
- Accédez au menu Configuration.
- Sélectionnez l'élement WDMX Reset en touchant l'écran ou en utilisant les touches ou .
- Si vous utilisez les boutons à la place de l'écran tactile, appuyez sur la touche .
- Sélectionnez l'option NO (ne pas réinitialiser la connexion) ou YES (préinitialiser la connexion) en touchant l'écran ou en utilisant les touches , , ou .
- Appuyez sur la touche .

Une fois qu'un récepteur WDMX a été connecté à un émetteur WDMX, il reste lié à cet émetteur jusqu'à ce qu'il soit connecté à un émetteur différent.
Délai de rétro-éclairage
Pour régler la durée d'inactivité avant que le rétroéclairage de l'écran ne s'éteigne :
- Accédez au menu Configuration.
- Sélectionnez l'élement Backlight Timer en touchant l'écran ou en utilisant les touches ou .
- Si vous utilisez les boutons à la place de l'écran tactile, appuyez sur la touche .
- Sélectionnez parmi les options 30S (après 30 secondes d'inactivité), 1M (après 1 minute d'inactivité), 5M (après 5 minutes d'inactivité) ou ON (ne s'éteint pas) en touchant l'écran ou en utilisant les touches , , ou .
- Appuyez sur la touche .
Perte de données
En cas de perte du signal d'entrée, le Maverick MK2 Profile réagira de l'une des deux manières suivantes : le produit conserve le dernier signal reçu ou éteint toutes les sorties LED.
Pour définir la façon dont le produit doit réagir, suivez les instructions ci-dessous :
- Accédez au menu Configuration.
- Sélectionnez l'élement Loss of Data en touchant l'écran ou en utilisant les touches ou .
- Si vous utilisez les boutons à la place de l'écran tactile, appuyez sur la touche .
- Sélectionnez l'option Hold (conserver le dernier signal reçu) ou Close (éteindre toutes les sorties LED) en touchant l'écran ou en utilisant les touches , , ou .
- Appuyez sur la touche .
Vitesse du ventilateur
Pour régler la vitesse des ventilateurs, effectuez les actions suivantes :
- Accédez au menu Configuration.
- Sélectionnez l'élement Fans en touchant l'écran ou en utilisant les touches ou .
- Si vous utilisez les boutons à la place de l'écran tactile, appuyez sur la touche .
- Sélectionnez parmi les choix Auto (vitesse de ventilateur réglée en fonction de la température de l'appareil), Full (vitesse maximum) ou ECO (ventilateurs en mode silencieux) en touchant l'écran ou en utilisant les touches , , ou .
- Appuyez sur la touche .
Courbe de gradation
Pour configurer la courbe de gradation, suivez les instructions ci-dessous :
- Accédez au menu Configuration.
- Sélectionnez l'élement Dimmer Curve en touchant l'écran ou en utilisant les touches ou .
- Si vous utilisez les boutons à la place de l'écran tactile, appuyez sur la touche .
- Sélectionnez parmi les choix Linear (linéaire), Square (rectangulaire), I Squa (rectangulaire inverse) ou SCurve (courbe en S) en touchant l'écran ou en utilisant les touches , , ou .
- Appuyez sur la touche .
Vitesse du gradateur
Pour régler la vitesse du gradateur, procédez comme suit :
- Accédez au menu Configuration.
- Sélectionnez l'élement Dimmer Speed en touchant l'écran ou en utilisant les touches ou .
- Si vous utilisez les boutons à la place de l'écran tactile, appuyez sur la touche .
- Sélectionnez parmi les choix Smooth (fluide) ou Fast (rapide) en touchant l'écran ou en utilisant les touches , , ou .
- Appuyez sur la touche .
Pulse Width Modulation
Pour définir la fréquence PWM, suivez les instructions ci-dessous :
- Accédez au menu Configuration.
- Sélectionnez l'élement Dimmer Speed en touchant l'écran ou en utilisant les touches ou .
- Si vous utilisez les boutons à la place de l'écran tactile, appuyez sur la touche .
- Utilisez , , ou pour sélectionner la fréquence PWM, 600 Hz, 1200 Hz, 2000 Hz, 4000 Hz, 6000 Hz ou 15000 Hz, ou touchez l'écran où il indique l'option souhaitée.
- Appuyez sur la touche .
Zoom intelligent
Pour définir la gamme de zoom sur la mise au point optimale, procédez comme suit :
- Accédez au menu Configuration.
- Sélectionnez l'élement Smart Zoom en touchant l'écran ou en utilisant les touches ou .
- Si vous utilisez les boutons à la place de l'écran tactile, appuyez sur la touche .
- Sélectionnez YES, ou touchez l'écran où il indique l'option souhaitée.
- Appuyez sur la touche .
Correction de faisceau
Pour obtenir un champ plat tout en utilisant les obturateurs, utilisez la fonction de correction du faisceau. Pour ce faire, suivez les instructions ci-dessous :
- Accédez au menu Configuration.
- Sélectionnez l'élement Beam Correction en touchant l'écran ou en utilisant les touches ou .
- Si vous utilisez les boutons à la place de l'écran tactile, appuyez sur la touche .
- Sélectionnez YES, ou touchez l'écran où il indique l'option souhaitée.
- Appuyez sur la touche .

La Roue de Gobo 1 est décalée d'un jeu de valeurs dans la configuration DMX lorsque la Beam Correction est activée.
Sélection de préréglage
Cette option permet d'enregistrer 3 configurations d'options de menu prédéfinies différentes. Pour enregistrer et définir ces préréglages, suivez les instructions ci-dessous :
- Accédez au menu Configuration.
- Sélectionnez l'élement Preset Select en touchant l'écran ou en utilisant les touches ou .
- Si vous utilisez les boutons à la place de l'écran tactile, appuyez sur la touche .
- Sélectionnez un préréglage parmi les choix PRESET A (préréglage A), PRESET B (préréglage B) ou PRESET C (préréglage C) en touchant l'écran ou en utilisant les touches , , ou .
- Appuyez sur la touche .
- L'appareil sera réinitialisé. Toute modification effectuée dans les options des menus est sauvegardée dans ce préréglage.

- La valeur par défaut est PRESET A. Si vous apportez des modifications à PRESET A, elle s'enregistrent dans PRESET A sans que vous ayez à vous en soucier.
- Pour créer un nouveau préréglage, mettez en surbrillance et sélectionnez PRESET SELECT. Mettez en surbrillance PRESET B ou PRESET C puis appuyer sur . Lorsque vous effectuez cette sélection, l'appareil se réinitialise automatiquement. Revenez en arrière et effectuez les modifications nécessaires dans le menu. Ces modifications seront automatiquement enregistrées dans le préréglage actuel.
Synchronisation des préréglages
Pour synchroniser tous les préréglages de menu avec d'autres Maverick MK2 Profile, suivez les instructions ci-dessous :
- Connectez tous les Maverick MK2 Profilees avec un câble DMX.
- Accédez au menu Configuration.
- Sélectionnez l'élement Preset Sync en touchant l'écran ou en utilisant les touches ou .
- Si vous utilisez les boutons à la place de l'écran tactile, appuyez sur la touche .
- Sélectionnez YES ou touchez l'écran sur l'option souhaitée.
- Appuyez sur la touche .

- Pour synchroniser d'autres Maverick MK2 Profile, vous devez connecter ces appareils à l'aide d'un câble DMX.
- L'appareil peut se trouver dans n'importe quel mode de contrôle sauf WDMX. ArtNet, DMX et sACN ne posent pas de problème.
- Toutes les options des menus sont transférées, y compris l'adresse DMX. Seule l'adresse IP n'est pas modifiée dans les autres appareils.
- Connectez les Maverick MK2 Profile seulement.
Fonctions de réinitialisation
Pour réinitialiser le panoramique, l'inclinaison ou toutes les fonctions à leur état initial :
- Accédez au menu Configuration .
- Sélectionnez l'élement Reset Function en touchant l'écran ou en utilisant les touches ou .
- Si vous utilisez les boutons à la place de l'écran tactile, appuyez sur la touche .
- Sélectionnez la fonction à réinitialiser parmi Pan/Tilt, Iris/Prism, Color/CMY+Blade, Gobo/Gobo Rotate, Frost ou All en touchant l'écran ou en utilisant les touches ou .
- Si vous utilisez les boutons à la place de l'écran tactile, appuyez sur la touche .
- Sélectionnez l'option NO (ne pas réinitialiser) ou YES (réinitialiser) en touchant l'écran ou en utilisant les touches , , ou .
- Appuyez sur la touche .
Réinitialisation aux réglages d'usine
Pour réinitialiser le Maverick MK2 Profile au réglages d'usine, effectuez les actions suivantes :
- Accédez au menu Configuration .
- Sélectionnez l'élement Factory Settings en touchant l'écran ou en utilisant les touches ou .
- Si vous utilisez les boutons à la place de l'écran tactile, appuyez sur la touche .
- Sélectionnez l'option NO (ne pas réinitialiser) ou YES (réinitialiser au réglages d'usine) en touchant l'écran ou en utilisant les touches , , ou .
- Appuyez sur la touche .
Test Mode
Test auto
Pour effectuer un test automatique des fonctions du Maverick MK2 Profile, suivez les instructions ci-dessous :
- Appuyez sur la touche
- Utilisez , , ou pour sélectionner Test, ou touchez l'écran où il est indiqué Test.
- Si vous utilisez les boutons à la place de l'écran tactile, appuyez sur la touche .
- Utilisez ou pour sélectionner Auto test, ou touchez l'écran où il est indiqué Auto test.
- Appuyez sur la touche .
Test manuel
Pour tester les fonctions du produit manuellement, procédez comme suit :
- Appuyez sur la touche
- Utilisez , , ou pour sélectionner Test, ou touchez l'écran où il est indiqué Test.
- Si vous utilisez les boutons à la place de l'écran tactile, appuyez sur la touche .
- Utilisez or pour sélectionner Manual test, ou touchez l'écran où il est indiqué Manual test.
- Si vous utilisez les boutons à la place de l'écran tactile, appuyez sur la touche .
- Utilisez ou pour sélectionner la fonction à tester, ou touchez l'écran où il indique l'option souhaitée.
- Si vous utilisez les boutons à la place de l'écran tactile, appuyez sur la touche .
- Changez la valeur de la fonction testée avec l'une des méthodes suivantes :
- Tapez la valeur souhaitée à l'aide du pavé numérique affiché sur l'écran tactile.
• Utilisez , , ou pour augmenter ou diminuer la valeur.
- Appuyez sur la touche .
Toutes les informations sur l'état actuel du Maverick MK2 Profile sont disponibles dans le menu Information du produit. Pour afficher ces informations, suivez les instructions ci-dessous :
- Appuyez sur la touche
- Sélectionnez l'élément Information en touchant l'écran ou en utilisant les touches , , ou .
- Si vous utilisez les boutons à la place de l'écran tactile, appuyez sur la touche .
-
Sélectionnez parmi les options Fixture Information (affiche la version du microprogramme, le mode de fonctionnement, l'adresse de départ), Fan Information (indique la vitesse des ventilateurs de la lyre en tr/min), Error Information (affiche toutes les erreurs ou No Error! (pas d'erreur)) ou Channel Information (affiche la valeur actuelle de tous les canaux d'entrée du signal) en touchant l'écran ou en utilisant les touches ou .
-
Appuyez sur la touche .
-
Utilisez les touches ou pour faire défiler les informations.
Valeurs DMX
50Ch
| Canal Fonction Valeur Pourcentage/Paramétrage |
| 1 | Panoramique | 000 ⇔ 255 | 0–100% |
| 2 | Panoramique fin | 000 ⇔ 255 | Contrôle fin (16 bits) |
| 3 | Inclinaison | 000 ⇔ 255 | 0–100% |
| 4 | Inclinaison fin | 000 ⇔ 255 | Contrôle fin (16 bits) |
| 5 | Vitesse panoramique/inclinaison | 000 ⇔ 255 | 0–100% |
| 6 | Gradateur | 000 ⇔ 255 | 0–100% |
| 7 | Fin gradateur | 000 ⇔ 255 | Contrôle fin (16 bits) |
| 8 Obturateur | 000 ⇔ 003 | Fermé |
| 004 ⇔ 007 | Ouvert |
| 008 ⇔ 076 | Lent à rapide |
| 077 ⇔ 145 | Effet de pouls, lent à rapide |
| 146 ⇔ 215 | Effet aléatoire, lent à rapide |
| 216 ⇔ 255 | Ouvert |
| 9 Stroboscope virtuel | 000 ⇔ 001 | Pas de fonction |
| 002 ⇔ 128 | Secouant stroboscopique, lent à rapide |
| 129 ⇔ 255 | Ouverture/fermeture en fondu, lent à rapide |
| 10 | Cyan | 000 ⇔ 255 | 0–100% |
| 11 | Magenta | 000 ⇔ 255 | 0–100% |
| 12 | Jaune | 000 ⇔ 255 | 0–100% |
| 13 | CTO | 000 ⇔ 255 | 0–100% |
| 14 | Palette de couleurs | 000 ⇔ 006 | Ouvert |
| 007 ⇔ 013 | Rouge |
| 014 ⇔ 020 | Orange |
| 021 ⇔ 027 | Vert |
| 028 ⇔ 034 | Bleu |
| 035 ⇔ 041 | Magenta |
| 042 ⇔ 048 | Jaune |
| 049 ⇔ 059 | UV |
| 060 ⇔ 187 | Couleurs split |
| 188 ⇔ 219 | Défilement des couleurs horaire, rapide à lent |
| 220 ⇔ 223 | Arrêt |
| 224 ⇔ 255 | Défilement des couleurs anti-horaire, lent à rapide |
| 15 | Roue de gobo 1(voir Dessins Gobo) | 000 ⇔ 008 | Ouvert |
| 009 ⇔ 017 | Gobo 1 (cercle d'anneaux) |
| 018 ⇔ 026 | Gobo 2 (vortex de damier) |
| 027 ⇔ 035 | Gobo 3 (triangle) |
| 036 ⇔ 044 | Gobo 4 (champ d'étoile) |
| 045 ⇔ 053 | Gobo 5 (verre lenticulaire) |
| 054 ⇔ 063 | Gobo 6 (correction de faisceau) |
| 064 ⇔ 073 | Gobo 6 tremblement |
| 074 ⇔ 082 | Gobo 5 tremblement |
| 083 ⇔ 091 | Gobo 4 tremblement |
| 092 ⇔ 100 | Gobo 3 tremblement |
| 101 ⇔ 109 | Gobo 2 tremblement |
| 110 ⇔ 118 | Gobo 1 tremblement |
| 119 ⇔ 127 | Ouvert |
| 128 ⇔ 191 | Défilement de gobos horaire, rapide à lent |
| 192 ⇔ 255 | Défilement de gobos anti-horaire, lent à rapide |
| Canal | Fonction | Valeur | Pourcentage/Paramétrage |
| 16 Gobo 1 tourner | 000 ⇔ 063 | Index de gobo en rotation |
| 064 ⇔ 145 | Rotation dans le sens horaire, rapide à lente |
| 146 ⇔ 149 | Arrêt |
| 150 ⇔ 231 | Rotation dans le sens anti-horaire, lent à rapide |
| 232 ⇔ 255 | Effet de rebond |
| 17 | Roue de gobo 1 index fin | 000 ⇔ 255 | Contrôle fin (16 bits) |
| 18 | Roue de gobo 2 (voir Dessins Gobo) | 000 ⇔ 006 | Ouvert |
| 007 ⇔ 013 | Gobo 1 (spirale) |
| 014 ⇔ 020 | Gobo 2 (cercle de points) |
| 021 ⇔ 027 | Gobo 3 (éclaboussures) |
| 028 ⇔ 034 | Gobo 4 (barre ondulée) |
| 035 ⇔ 041 | Gobo 5 (vitre de douche) |
| 042 ⇔ 048 | Gobo 6 (verre lenticulaire) |
| 071 ⇔ 077 | Gobo 6 tremblement |
| 078 ⇔ 084 | Gobo 5 tremblement |
| 085 ⇔ 091 | Gobo 4 tremblement |
| 092 ⇔ 098 | Gobo 3 tremblement |
| 099 ⇔ 105 | Gobo 2 tremblement |
| 106 ⇔ 112 | Gobo 1 tremblement |
| 113 ⇔ 127 | Ouvert |
| 128 ⇔ 191 | Défilement de gobos horaire, rapide à lent |
| 192 ⇔ 255 | Défilement de gobos anti-horaire, lent à rapide |
| 19 Gobo 2 tourner | 000 ⇔ 063 | Index de gobo en rotation |
| 064 ⇔ 145 | Rotation dans le sens horaire, rapide à lente |
| 146 ⇔ 149 | Arrêt |
| 150 ⇔ 231 | Rotation dans le sens antihoraire, lent à rapide |
| 232 ⇔ 255 | Effet de rebond |
| 20 | Roue de gobo 2 index fin | 000 ⇔ 255 | Contrôle fin (16 bits) |
| 21 | Lame 1a | 000 ⇔ 255 | 0–100% |
| 22 | Lame 1a fine | 000 ⇔ 255 | Contrôle fin (16 bits) |
| 23 | Lame 1b | 000 ⇔ 255 | 0–100% |
| 24 | Lame 1b fine | 000 ⇔ 255 | Contrôle fin (16 bits) |
| 25 | Lame 2a | 000 ⇔ 255 | 0–100% |
| 26 | Lame 2a fine | 000 ⇔ 255 | Contrôle fin (16 bits) |
| 27 | Lame 2b | 000 ⇔ 255 | 0–100% |
| 28 | Lame 2b fine | 000 ⇔ 255 | Contrôle fin (16 bits) |
| 29 | Lame 3a | 000 ⇔ 255 | 0–100% |
| 30 | Lame 3a fine | 000 ⇔ 255 | Contrôle fin (16 bits) |
| 31 | Lame 3b | 000 ⇔ 255 | 0–100% |
| 32 | Lame 3b fine | 000 ⇔ 255 | Contrôle fin (16 bits) |
| 33 | Lame 4a | 000 ⇔ 255 | 0–100% |
| 34 | Lame 4a fine | 000 ⇔ 255 | Contrôle fin (16 bits) |
| 35 | Lame 4b | 000 ⇔ 255 | 0–100% |
| 36 | Lame 4b fine | 000 ⇔ 255 | Contrôle fin (16 bits) |
| 37 | Rotation du cadre | 000 ⇔ 255 | 0–100% |
| 38 | Rotation fin du cadre 000 ⇔ | 255 | Contrôle fin (16 bits) |
| 39 | Focus | 000 ⇔ 255 | 0–100% |
| 40 | Fine focus | 000 ⇔ 255 | Contrôle fin (16 bits) |
| 41 Focus automatique | | 000 ⇔ 010 | Aucune fonction |
| 011 ⇔ 030 | 0–5 m |
| 031 ⇔ 050 | 6 m |
| 051 ⇔ 070 | 7 m |
| 071 ⇔ 090 | 8 m |
| 091 ⇔ 110 | 9 m |
| 111 ⇔ 130 | 10 m |
| 131 ⇔ 150 | 12.5 m |
| 151 ⇔ 170 | 15 m |
| 171 ⇔ 190 | 17.5 m |
| 191 ⇔ 210 | 20–60 m |
| 211 ⇔ 255 | Détecter automatiquement la distance |
| 42 | Zoom | 000 ⇔ 255 | Large à étroit |
| 43 | Zoom fin | 000 ⇔ 255 | Contrôle fin (16 bits) |
| 44 Prisme | | 000 ⇔ 004 | Aucune fonction |
| 005 ⇔ 255 | Effet de prisme |
| 45 Rotation du prisme | | 000 ⇔ 127 | Position de rotation |
| 128 ⇔ 189 | Rotation dans le sens horaire, rapide à lent |
| 190 ⇔ 193 | Arrêt |
| 194 ⇔ 255 | Rotation dans le sens anti-horaire, lent à rapide |
| 46 Iris | | 000 ⇔ 063 | Petit à grand |
| 064 ⇔ 127 | Changement automatique, lent à rapide |
| 128 ⇔ 191 | Zoom arrière lent, zoom rapide (lent à rapide) |
| 192 ⇔ 255 | Zoom lent, zoom rapide (lent à rapide) |
| 47 | Frost | 000 ⇔ 255 | 0–100% |
| 48 Macro CMY | | 000 ⇔ 009 | Pas de fonction |
| 010 ⇔ 255 | Macro CMY |
| 49 | Vitesse macro CMY | 000 ⇔ 255 | 100–0% |
| 50 Control | | 000 ⇔ 007 | Aucune fonction |
| 008 ⇔ 015 | Noir général XY |
| 016 ⇔ 023 | Noir général C |
| 024 ⇔ 031 | Noir général G |
| 032 ⇔ 039 | Noir général XYC |
| 040 ⇔ 047 | Noir général XYG |
| 048 ⇔ 055 | Noir général XYCG |
| 056 ⇔ 095 | Aucune fonction |
| 096 ⇔ 103 | X réinitialiser |
| 104 ⇔ 111 | Y réinitialiser |
| 112 ⇔ 119 | Réinitialisation de la couleur |
| 120 ⇔ 127 | Set rotatif gobo et gobo |
| 128 ⇔ 135 | Aucune fonction |
| 136 ⇔ 143 | Prisme réinitialiser |
| 144 ⇔ 151 | Cadrage réinitialisé |
| 152 ⇔ 159 | Réinitialisation totale |
| 160 ⇔ 167 | Réinitialisation iris |
| 168 ⇔ 175 | Réinitialisation gel |
| 176 ⇔ 183 | Réinitialisation zoom |
| 184 ⇔ 191 | Réinitialisation CMY |
| 192 ⇔ 199 | Ventilateur, basse vitesse |
| 200 ⇔ 207 | Ventilateur à pleine vitesse |
| 208 ⇔ 215 | Ventilateur automatique |
| 216 ⇔ 220 | Correction du faisceau désactivée |
| 221 ⇔ 225 | Iris, mode rapide |
| 226 ⇔ 230 | Iris, mode lisse |
| 231 ⇔ 235 | Permutation XY activée |
| 236 ⇔ 240 | Permutation XY désactivée |
| 241 ⇔ 245 | Correction du faisceau activé(compensera les gobos 1 position dans la roue n° 1) |
| 246 ⇔ 250 | Mode lisse XY |
| 251 ⇔ 255 | Mode rapide XY |
33Ch
| Canal Fonction Valeur Pourcentage/Paramétrage |
| 1 | Panoramique | 000 ⇔ 255 | 0–100% |
| 2 | Panoramique fin | 000 ⇔ 255 | Contrôle fin (16 bits) |
| 3 | Inclinaison | 000 ⇔ 255 | 0–100% |
| 4 | Inclinaison fin | 000 ⇔ 255 | Contrôle fin (16 bits) |
| 5 | Vitesse panoramique/inclinaison | 000 ⇔ 255 | 0–100% |
| 6 | Gradateur | 000 ⇔ 255 | 0–100% |
| 7 Obturateur | 000 ⇔ 003 | Fermé |
| 004 ⇔ 007 | Ouvert |
| 008 ⇔ 076 | Lent à rapide |
| 077 ⇔ 145 | Effet de pouls, lent à rapide |
| 146 ⇔ 215 | Effet aléatoire, lent à rapide |
| 216 ⇔ 255 | Ouvert |
| 8 Stroboscope virtuel | 000 ⇔ 001 | Pas de fonction |
| 002 ⇔ 128 | Secouant stroboscopique, lent à rapide |
| 129 ⇔ 255 | Ouverture/fermeture en fondu, lent à rapide |
| 9 | Cyan | 000 ⇔ 255 | 0–100% |
| 10 | Magenta | 000 ⇔ 255 | 0–100% |
| 11 | Jaune | 000 ⇔ 255 | 0–100% |
| 12 | CTO | 000 ⇔ 255 | 0–100% |
| 13 | Palette de couleurs | 000 ⇔ 006 | Ouvert |
| 007 ⇔ 013 | Rouge |
| 014 ⇔ 020 | Orange |
| 021 ⇔ 027 | Vert |
| 028 ⇔ 034 | Bleu |
| 035 ⇔ 041 | Magenta |
| 042 ⇔ 048 | Jaune |
| 049 ⇔ 059 | UV |
| 060 ⇔ 187 | Couleurs split |
| 188 ⇔ 219 | Défilement des couleurs horaire, rapide à lent |
| 220 ⇔ 223 | Arrêt |
| 224 ⇔ 255 | Défilement des couleurs anti-horaire, lent à rapide |
| 14 | Roue de gobo 1(voir Dessins Gobo) | 000 ⇔ 008 | Ouvert |
| 009 ⇔ 017 | Gobo 1 (cercle d'anneaux) |
| 018 ⇔ 026 | Gobo 2 (vortex de damier) |
| 027 ⇔ 035 | Gobo 3 (triangle) |
| 036 ⇔ 044 | Gobo 4 (champ d'étoile) |
| 045 ⇔ 053 | Gobo 5 (verre lenticulaire) |
| 054 ⇔ 063 | Gobo 6 (correction de faisceau) |
| 064 ⇔ 073 | Gobo 6 tremblement |
| 074 ⇔ 082 | Gobo 5 tremblement |
| 083 ⇔ 091 | Gobo 4 tremblement |
| 092 ⇔ 100 | Gobo 3 tremblement |
| 101 ⇔ 109 | Gobo 2 tremblement |
| 110 ⇔ 118 | Gobo 1 tremblement |
| 119 ⇔ 127 | Ouvert |
| 128 ⇔ 191 | Défilement de gobos horaire, rapide à lent |
| 192 ⇔ 255 | Défilement de gobos anti-horaire, lent à rapide |
| Canal | Fonction | Valeur | Pourcentage/Paramétrage |
| 15 Gobo 1 tourner | 000 ⇔ 063 | Index de gobo en rotation |
| 064 ⇔ 145 | Rotation dans le sens horaire, rapide à lente |
| 146 ⇔ 149 | Arrêt |
| 150 ⇔ 231 | Rotation dans le sens antihoraire, lent à rapide |
| 232 ⇔ 255 | Effet de rebond |
| 16 | Roue de gobo 2(voirDessins Gobo) | 000 ⇔ 006 | Ouvert |
| 007 ⇔ 013 | Gobo 1 (spirale) |
| 014 ⇔ 020 | Gobo 2 (cercle de points) |
| 021 ⇔ 027 | Gobo 3 (éclaboussures) |
| 028 ⇔ 034 | Gobo 4 (barre ondulée) |
| 035 ⇔ 041 | Gobo 5 (vitre de douche) |
| 042 ⇔ 048 | Gobo 6 (verre lenticulaire) |
| 071 ⇔ 077 | Gobo 6 tremblement |
| 078 ⇔ 084 | Gobo 5 tremblement |
| 085 ⇔ 091 | Gobo 4 tremblement |
| 092 ⇔ 098 | Gobo 3 tremblement |
| 099 ⇔ 105 | Gobo 2 tremblement |
| 106 ⇔ 112 | Gobo 1 tremblement |
| 113 ⇔ 127 | Ouvert |
| 128 ⇔ 191 | Défilement des gobos horaire, rapide à lent |
| 192 ⇔ 255 | Défilement des gobos antihoraire, lent à rapide |
| 17 Gobo 2 tourner | 000 ⇔ 063 | Index de gobo en rotation |
| 064 ⇔ 145 | Rotation dans le sens horaire, rapide à lente |
| 146 ⇔ 149 | Arrêt |
| 150 ⇔ 231 | Rotation dans le sens antihoraire, lent à rapide |
| 232 ⇄ 255 | Effet de rebond |
| 18 | Lame 1a | 000 ⇔ 255 | 0–100% |
| 19 | Lame 1b | 000 ⇔ 255 | 0–100% |
| 20 | Lame 2a | 000 ⇔ 255 | 0–100% |
| 21 | Lame 2b | 000 ⇔ 255 | 0–100% |
| 22 | Lame 3a | 000 ⇔ 255 | 0–100% |
| 23 | Lame 3b | 000 ⇔ 255 | 0–100% |
| 24 | Lame 4a | 000 ⇔ 255 | 0–100% |
| 25 | Lame 4b | 000 ⇔ 255 | 0–100% |
| 26 | Rotation du cadre | 000 ⇔ 255 | 0–100% |
| 27 | Focus | 000 ⇔ 255 | 0–100% |
| 28 | Zoom | 000 ⇔ 255 | Large à étroit |
| 29 Prisme | 000 ⇔ 004 | Aucune fonction |
| 005 ⇔ 255 | Effet de prisme |
| 30 Rotation du prisme | 000 ⇔ 127 | Position de rotation |
| 128 ⇔ 189 | Rotation dans le sens horaire, rapide à lent |
| 190 ⇔ 193 | Arrêt |
| 194 ⇔ 255 | Rotation dans le sens antihoraire, lent à rapide |
| 31 Iris | 000 ⇔ 063 | Petit à grand |
| 064 ⇔ 127 | Changement automatique, lent à rapide |
| 128 ⇔ 191 | Zoom arrière lent, zoom rapide (lent à rapide) |
| 192 ⇔ 255 | Zoom lent, zoom rapide (lent à rapide) |
| 32 Frost 000 | ⇔ 255 | 0–100% |
| 33 Control | | 000 ⇔ 007 | Aucune fonction |
| 008 ⇔ 015 | Noir général XY |
| 016 ⇔ 023 | Noir général C |
| 024 ⇔ 031 | Noir général G |
| 032 ⇔ 039 | Noir général XYC |
| 040 ⇔ 047 | Noir général XYG |
| 048 ⇔ 055 | Noir général XYCG |
| 056 ⇔ 095 | Aucune fonction |
| 096 ⇔ 103 | X réinitialiser |
| 104 ⇔ 111 | Y réinitialiser |
| 112 ⇔ 119 | Réinitialisation de la couleur |
| 120 ⇔ 127 | Set rotatif gobo et gobo |
| 128 ⇔ 135 | Aucune fonction |
| 136 ⇔ 143 | Prisme réinitialiser |
| 144 ⇔ 151 | Cadrage réinitialisé |
| 152 ⇔ 159 | Réinitialisation totale |
| 160 ⇔ 167 | Réinitialisation iris |
| 168 ⇔ 175 | Réinitialisation gel |
| 176 ⇔ 183 | Réinitialisation zoom |
| 184 ⇔ 191 | Réinitialisation CMY |
| 192 ⇔ 199 | Ventilateur, basse vitesse |
| 200 ⇔ 207 | Ventilateur à pleine vitesse |
| 208 ⇔ 215 | Ventilateur automatique |
| 216 ⇔ 220 | Correction du faisceau désactivée |
| 221 ⇔ 225 | Iris, mode rapide |
| 226 ⇔ 230 | Iris, mode lisse |
| 231 ⇔ 235 | Permutation XY activée |
| 236 ⇔ 240 | Permutation XY désactivée |
| 241 ⇔ 245 | Correction du faisceau activé(compensera les gobos 1 position dans la roue n° 1) |
| 246 ⇔ 250 | Mode lisse XY |
| 251 ⇔ 255 | Mode rapide XY |
Palette de Couleurs
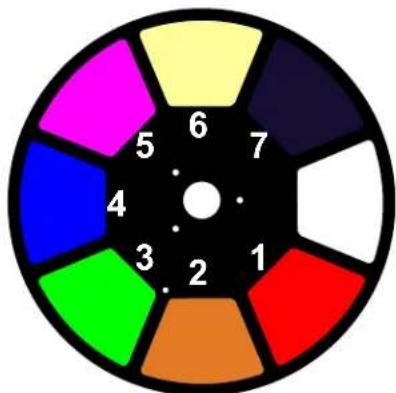
pie
| Segment | Value |
|---|---|
| 1 | 6 |
| 2 | 7 |
| 3 | 4 |
| 4 | 5 |
| 5 | 6 |
| 6 | 7 |
| 7 | 6 |
Couleurs disponibles::
- Rouge
- Orange
- Vert
- Bleu
- Magenta
- CTO
- UV
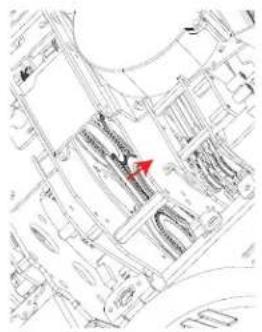
Dessins Gobo
Roue de Gobo 1\*
- Cercle d'anneaux
- Vortex de damier
- Triangle
- Champ d'étoiles
- Verre lenticulaire
- Correction de faisceau
Roue de Gobo 2
- Spirale
- Cercle de points
- Éclaboussures
- Barre ondulée
- Vitre de douche
- Verre lenticulaire
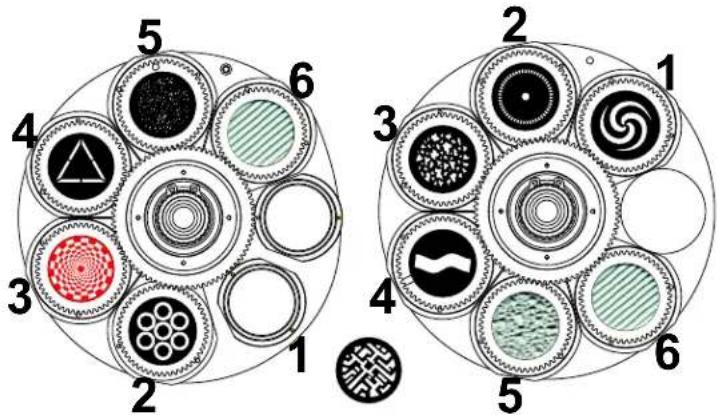
Tableau des Dimensions de Gobo
Changement de gobo
Les gobos de la roue de gobo 1 peuvent être enlevés de leurs porte-gobo. La procédure recommandée ci-dessous doit être soigneusement suivie pour le remplacement des gobos dans la roue de gobos 1.

- Assurez-vous de débrancher le cordon d'alimentation du produit avant de remplacer un gobo.
- Remplacez toujours un gobo par un gobo de la même dimension.
- Lors de l'insertion d'un gobo en verre, assurez-vous toujours que le côté brillant du gobo (base en verre) fait face à la lampe. Cela permet d'assurer une couche de protection contre la température élevée de la lampe.
Procédure
- Mettez l'appareil hors tension et débranchez-le de la prise de courant.
- Ouvrez le couvercle de la tête en desserrant de ¼ de tour les 4 vis Phillips situées sur les côtés du couvercle supérieur.
-
Enlevez le porte-gobo de la roue de gobos en le poussant vers l'avant de la tête mobile. Veillez à ne pas pousser le gobo en dehors du porte-gobo.
-
Extraire le porte-gobo en le tirant vers l'extérieur.
-
Sur une surface plane, retirez la bague d'expansion qui maintient le gobo en place et retirez-le du porte-gobo.
-
Insérez un nouveau gobo et maintenez-le en place avec la bague d'expansion.
-
Faites glisser la pointe du porte-gobo sous la plaque de pression près du centre de la roue du gobo.
-
Poussez le porte-gobo vers l'intérieur. NE PAS forcer le porte-gobo dans la fente sur la roue. S'il est correctement installé, le support gobo doit facilement glisser dans la fente de la roue de gobo.
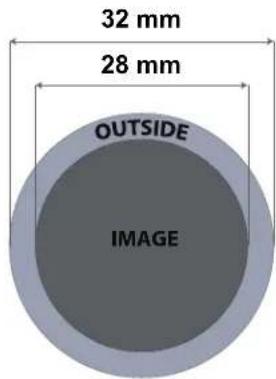
Diagramme
natural_image
Architectural floor plan sketch with a red circle highlighting a specific area (no text or labels visible)
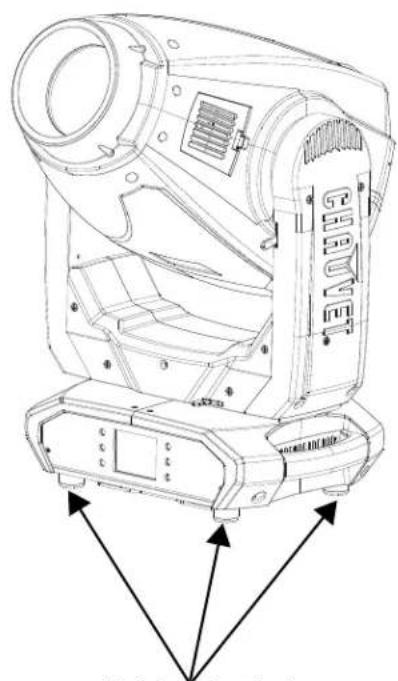
Localisez
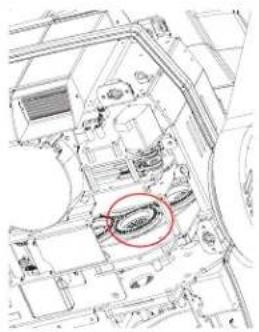
natural_image
Architectural site plan showing building layouts and a red arrow indicating a location (no text or labels)
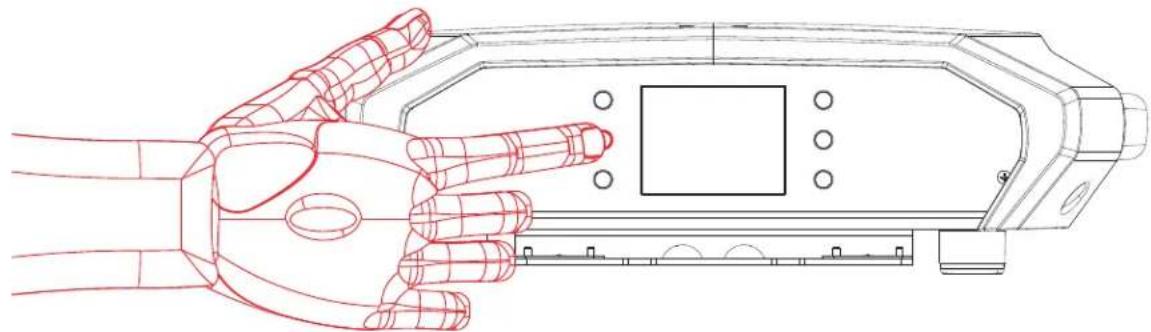
Reculez Enlevez
natural_image
Technical line drawing of a mechanical assembly with no visible text or symbols
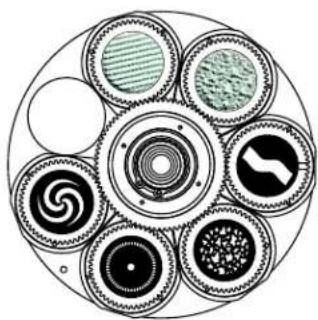
natural_image
Circular diagram showing eight types of mechanical components with concentric rings and circular elements (no text or symbols)

Mode Décalage
Le mode Offset (décalage) permet d'effectuer des réglages fins pour la position initiale de toutes les pièces mobiles sur le trajet optique et pour les mouvements de panoramique et d'inclinaison. Ceci permet aux pièces mobiles de ne présenter aucune bordure ou de réduire les sorties lumineuses lorsqu'elles sont dans leur position initiale. Pour accéder à ce mode, procédez comme suit :
- À partir de l'écran principal, maintenez enfoncée la touche
- Saisissez le code d'accès 2323 avec l'une des méthodes suivantes :
- Avec l'écran tactile : utilisez le pavé numérique sur l'écran pour saisir 2323.
- Avec les boutons :
a. Utilisez la touche pour sélectionner le numéro à modifier.
b. Utilisez la touche pour augmenter la valeur.
c. Répétez l'opération jusqu'à ce que le code 2323 ait été saisi.
-
Appuyez sur la touche .
-
Vous arrivez alors sur l'écran du menu Zero Adjust (réglage du zéro).
PANORAMIQUE
Pour régler le point de départ du moteur panoramique, suivez les instructions ci-dessous :
- Utilisez les touches ou pour sélectionner l'élément PAN.
- Appuyez sur la touche .
- Utilisez les touches ou pour augmenter ou diminuer la valeur de démarrage entre 000–255.
- Appuyez sur la touche .
INCLINAISON
Pour régler le point de départ du moteur d'inclinaison, suivez les instructions ci-dessous :
- Utilisez les touches ou pour sélectionner l'élément TILT.
- Appuyez sur la touche .
- Utilisez les touches ou pour augmenter ou diminuer la valeur de démarrage entre 000–255.
- Appuyez sur la touche .
COULEUR
Pour régler le point de départ du moteur de zoom, suivez les instructions ci-dessous :
- Utilisez les touches ou pour sélectionner l'élément COLOR.
- Appuyez sur la touche .
- Utilisez les touches ou pour augmenter ou diminuer la valeur de démarrage entre 000–255.
- Appuyez sur la touche .
GOBO
Pour régler le point de départ du moteur de zoom, suivez les instructions ci-dessous :
- Utilisez les touches ou pour sélectionner l'élément GOBO.
- Appuyez sur la touche .
- Utilisez les touches ou pour augmenter ou diminuer la valeur de démarrage entre 000–255.
- Appuyez sur la touche .
ROTATION DE GOBO
Pour régler le point de départ du moteur de zoom, suivez les instructions ci-dessous :
- Utilisez les touches ou pour sélectionner l'élément GOBO ROTATE.
- Appuyez sur la touche .
- Utilisez les touches ou pour augmenter ou diminuer la valeur de démarrage entre 000–255.
- Appuyez sur la touche .
GOBO 2
Pour régler le point de départ du moteur de zoom, suivez les instructions ci-dessous :
- Utilisez les touches ou pour sélectionner l'élément GOBO 2.
- Appuyez sur la touche .
- Utilisez les touches ou pour augmenter ou diminuer la valeur de démarrage entre 000–255.
- Appuyez sur la touche .
ROTATION DE GOBO 2
Pour régler le point de départ du moteur de zoom, suivez les instructions ci-dessous :
- Utilisez les touches ou pour sélectionner l'élément GOBO 2 ROTATE.
- Appuyez sur la touche .
- Utilisez les touches ou pour augmenter ou diminuer la valeur de démarrage entre 000–255.
- Appuyez sur la touche .
FOCUS 1
Pour régler le point de départ du moteur de zoom, suivez les instructions ci-dessous :
- Utilisez les touches ou pour sélectionner l'élément FOCUS 1.
- Appuyez sur la touche .
- Utilisez les touches ou pour augmenter ou diminuer la valeur de démarrage entre 000–255.
- Appuyez sur la touche .
FOCUS 2
Pour régler le point de départ du moteur de zoom, suivez les instructions ci-dessous :
- Utilisez les touches ou pour sélectionner l'élément FOCUS 2.
- Appuyez sur la touche .
- Utilisez les touches ou pour augmenter ou diminuer la valeur de démarrage entre 000–255.
- Appuyez sur la touche .
FOCUS GOBO 2
Pour régler le point de départ du moteur de zoom, suivez les instructions ci-dessous :
- Utilisez les touches ou pour sélectionner l'élément FOCUS GOBO 2.
- Appuyez sur la touche .
- Utilisez les touches ou pour augmenter ou diminuer la valeur de démarrage entre 000–255.
- Appuyez sur la touche .
ZOOM
Pour régler le point de départ du moteur de zoom, suivez les instructions ci-dessous :
- Utilisez les touches ou pour sélectionner l'élément ZOOM.
- Appuyez sur la touche .
- Utilisez les touches ou pour augmenter ou diminuer la valeur de démarrage entre 000–255.
- Appuyez sur la touche .
PRISM
Pour régler le point de départ du moteur de zoom, suivez les instructions ci-dessous :
- Utilisez les touches ou pour sélectionner l'élément PRISM.
- Appuyez sur la touche .
- Utilisez les touches ou pour augmenter ou diminuer la valeur de démarrage entre 000–255.
- Appuyez sur la touche .
IRIS
Pour régler le point de départ du moteur de zoom, suivez les instructions ci-dessous :
- Utilisez les touches ou pour sélectionner l'élément IRIS.
- Appuyez sur la touche .
- Utilisez les touches ou pour augmenter ou diminuer la valeur de démarrage entre 000–255.
- Appuyez sur la touche .
FROST
Pour régler le point de départ du moteur de zoom, suivez les instructions ci-dessous :
- Utilisez les touches ou pour sélectionner l'élément FROST.
- Appuyez sur la touche .
- Utilisez les touches ou pour augmenter ou diminuer la valeur de démarrage entre 000–255.
- Appuyez sur la touche .
CYAN
Pour régler le point de départ du moteur de zoom, suivez les instructions ci-dessous :
- Utilisez les touches ou pour sélectionner l'élément CYAN.
- Appuyez sur la touche .
- Utilisez les touches ou pour augmenter ou diminuer la valeur de démarrage entre 000–255.
- Appuyez sur la touche .
MAGENTA
Pour régler le point de départ du moteur de zoom, suivez les instructions ci-dessous :
- Utilisez les touches ou pour sélectionner l'élément MAGENTA.
- Appuyez sur la touche .
- Utilisez les touches ou pour augmenter ou diminuer la valeur de démarrage entre 000–255.
- Appuyez sur la touche .
YELLOW
Pour régler le point de départ du moteur de zoom, suivez les instructions ci-dessous :
- Utilisez les touches ou pour sélectionner l'élément YELLOW.
- Appuyez sur la touche .
- Utilisez les touches ou pour augmenter ou diminuer la valeur de démarrage entre 000–255.
- Appuyez sur la touche .
CTO
Pour régler le point de départ du moteur de zoom, suivez les instructions ci-dessous :
- Utilisez les touches ou pour sélectionner l'élément CTO.
- Appuyez sur la touche .
- Utilisez les touches ou pour augmenter ou diminuer la valeur de démarrage entre 000–255.
- Appuyez sur la touche .
LAME 1-1
Pour régler le point de départ du moteur de zoom, suivez les instructions ci-dessous :
- Utilisez les touches ou pour sélectionner l'élément BLADE 1-1.
- Appuyez sur la touche .
- Utilisez les touches ou pour augmenter ou diminuer la valeur de démarrage entre 000–255.
- Appuyez sur la touche .
LAME 1-2
Pour régler le point de départ du moteur de zoom, suivez les instructions ci-dessous :
- Utilisez les touches ou pour sélectionner l'élément BLADE 1-2.
- Appuyez sur la touche .
- Utilisez les touches ou pour augmenter ou diminuer la valeur de démarrage entre 000–255.
- Appuyez sur la touche .
LAME 2-1
Pour régler le point de départ du moteur de zoom, suivez les instructions ci-dessous :
- Utilisez les touches ou pour sélectionner l'élément BLADE 2-1.
- Appuyez sur la touche .
- Utilisez les touches ou pour augmenter ou diminuer la valeur de démarrage entre 000–255.
- Appuyez sur la touche .
LAME 2-2
Pour régler le point de départ du moteur de zoom, suivez les instructions ci-dessous :
- Utilisez les touches ou pour sélectionner l'élément BLADE 2-2.
- Appuyez sur la touche .
- Utilisez les touches ou pour augmenter ou diminuer la valeur de démarrage entre 000–255.
- Appuyez sur la touche .
LAME 3-1
Pour régler le point de départ du moteur de zoom, suivez les instructions ci-dessous :
- Utilisez les touches ou pour sélectionner l'élément BLADE 3-1.
- Appuyez sur la touche .
- Utilisez les touches ou pour augmenter ou diminuer la valeur de démarrage entre 000–255.
- Appuyez sur la touche .
LAME 3-2
Pour régler le point de départ du moteur de zoom, suivez les instructions ci-dessous :
- Utilisez les touches ou pour sélectionner l'élément BLADE 3-2.
- Appuyez sur la touche .
- Utilisez les touches ou pour augmenter ou diminuer la valeur de démarrage entre 000–255.
- Appuyez sur la touche .
LAME 4-1
Pour régler le point de départ du moteur de zoom, suivez les instructions ci-dessous :
- Utilisez les touches ou pour sélectionner l'élément BLADE 4-1.
- Appuyez sur la touche .
- Utilisez les touches ou pour augmenter ou diminuer la valeur de démarrage entre 000–255.
- Appuyez sur la touche .
LAME 4-2
Pour régler le point de départ du moteur de zoom, suivez les instructions ci-dessous :
- Utilisez les touches ou pour sélectionner l'élément BLADE 4-2.
- Appuyez sur la touche .
- Utilisez les touches ou pour augmenter ou diminuer la valeur de démarrage entre 000–255.
- Appuyez sur la touche .
ROTATION DE LA LAME
Pour régler le point de départ du moteur de zoom, suivez les instructions ci-dessous :
- Utilisez les touches ou pour sélectionner l'élément BLADE ROTATE.
- Appuyez sur la touche .
- Utilisez les touches ou pour augmenter ou diminuer la valeur de démarrage entre 000–255.
- Appuyez sur la touche .
GRADATEUR 1
Pour régler le point de départ du moteur de zoom, suivez les instructions ci-dessous :
- Utilisez les touches ou pour sélectionner l'élément DIMMER 1.
- Appuyez sur la touche .
- Utilisez les touches ou pour augmenter ou diminuer la valeur de démarrage entre 000–255.
- Appuyez sur la touche .
GRADATEUR 2
Pour régler le point de départ du moteur de zoom, suivez les instructions ci-dessous :
- Utilisez les touches ou pour sélectionner l'élément DIMMER 2.
- Appuyez sur la touche .
- Utilisez les touches ou pour augmenter ou diminuer la valeur de démarrage entre 000–255.
- Appuyez sur la touche .
Adresse MAC
Pour régler les quatrième, cinquième ou sixième chiffres de l'adresse MAC, procédez comme suit :
- Utilisez les touches ou pour sélectionner parmi les choix MAC4, MAC5 ou MAC6.
- Appuyez sur la touche .
- Utilisez les touches ou pour augmenter ou diminuer la valeur de démarrage entre 000–255.
- Appuyez sur la touche .
Serveur Web
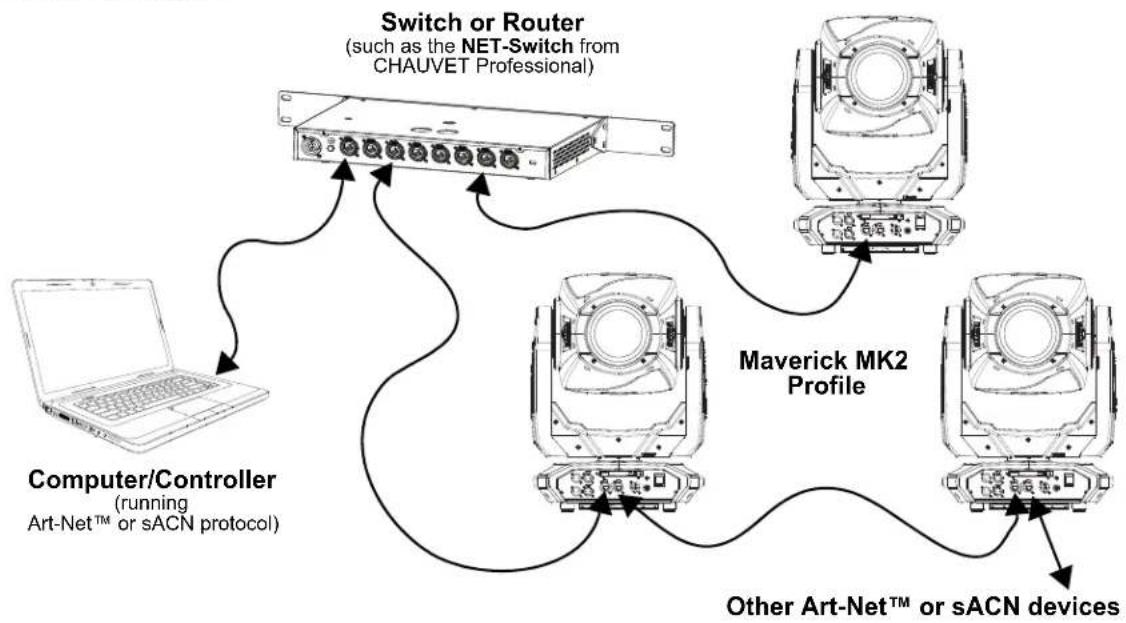
Le serveur Web du Maverick MK2 Profile est accessible par n'importe quel ordinateur se trouvant sur le même réseau que l'appareil. Il permet un accès réseau aux informations systèmes et aux paramètres (par exemple, configuration du contrôle, test manuel de toutes les fonctions, mises à jour du microprogramme et modification du mot de passe du serveur web).
- Branchez l'appareil sur l'alimentation puis réglez le Mode IP sur Static.
- Connectez l'appareil à un ordinateur Windows ^ avec un câble réseau
- Sur l'ordinateur, paramétrez l'adresse IP du nouveau réseau afin d'avoir les trois mêmes premiers chiffres que l'adresse IP de l'appareil (voir la section Adresse IP).
- Saisissez l'adresse IP de l'appareil dans la barre d'adresse d'un navigateur Internet sur l'ordinateur.
- Saisissez admin en tant que nom d'utilisateur et mot de passe pour vous identifier.
La page Information du serveur Web affiche les paramètres actuels et les informations système du Maverick MK2 Profile.
Configuration
La page Configuration du serveur Web propose des options de contrôle similaires à celles du menu Setup sur l'appareil. Cliquez Save Settings (enregistrer les paramètres) pour envoyer la nouvelle configuration vers l'appareil.
Test Manuel
La page Test Manuel du serveur Web permet de contrôler toutes les fonctions de sortie de l'appareil via le navigateur. Pour rétablir la valeur par défaut de toutes les fonctions, cliquez sur Reset.
Mise à Jour de Micrologiciel
La page Upgrade (mise à niveau) du serveur Web permet de mettre à jour l'appareil avec la dernière version du microprogramme. Rendez-vous sur
https://www.chauvetprofessional.com/products/maverick-mk2-profile les mises à jour du microprogramme.
Sécurité
La page Security (sécurité) du serveur Web permet de changer le mot de passe du serveur Web de l'appareil connecte. Saisissez l'ancien mot de passe (admin, par défaut) et le nouveau mot de passe deux fois, puis cliquez sur Save Settings (enregistrer les paramètres) pour changer le mot de passe.
5. Entretien
Entretien de l'appareil
L'accumulation de poussière réduit la production de lumière et peut entraîner une surchauffe de l'appareil. Cela peut entrainer une diminution de la durée de vie de la source de lumière et/ou une usure mécanique. Pour conserver des performances optimales et réduire l'usure, nettoyez vos appareils d'éclairage au moins deux fois par mois. Veuillez cependant bien garder à l'esprit que l'utilisation et les conditions environnementales peuvent contribuer à augmenter la fréquence de nettoyage.
Pour nettoyer l'appareil, suivez les instructions ci-dessous :
- Débranchez l'appareil.
- Attendez que l'appareil soit à la température ambiante.
- Utilisez un aspirateur (ou un compresseur d'air) et une brosse douce pour enlever la poussière accumulée sur les surfaces/évents externes.
- Nettoyez toutes les surfaces transparentes avec une solution douce de nettoyant pour vitres sans ammoniaque ou de l'alcool isopropylique.
- Appliquez la solution directement sur un chiffon de coton doux et non pelucheux ou un tissu de nettoyage d'objectif.
- Essuyez soigneusement toute trace de saleté ou d'encrassement sur la surface transparente.
- Nettoyez en douceur les surfaces transparentes jusqu'à ce que toute peluche ou trace ait disparue.

Assurez-vous de bien sécher toutes les surfaces transparentes après les avoir nettoyer.
6. Spécificités Techniques
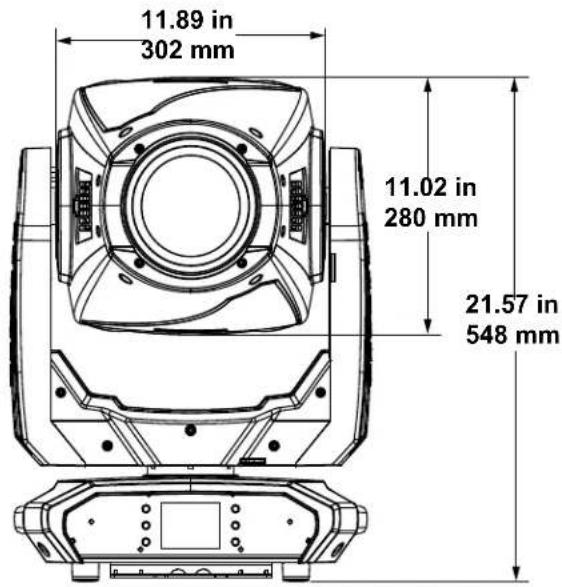
Dimensions et poids
| Longueur Largeur Hauteur Poids |
| 394 mm (15,5 po) | 279 mm (10,9 po) | 679 mm (26,7 po) | 31,7 kg (69,8 lb) |
| Remarque : Les dimensions en pouce sont arrondies. |
Alimentation
| Type d'alimentation Plage Sélection de tension |
| Commutation (interne) Entre 100 et 240 VCA, 50/60 Hz Universelle |
| Paramètre | 120 V, 60 Hz | 208 V, 50 Hz | 230 V, 50 Hz |
| Consommation 750 W | 732 W | 734 W | |
| Courant de fonctionnement | 6,32 A | 3,5 A | 3,1 A |
| Fusible | F 12 A, 250 V | F 12 A, 250 V | F 12 A, 250 V |
| E/S alimentation | US/Monde | UK/Europe |
| Connecteur d'entrée d'alimentation | Seetronic Powerkon IP65 | Seetronic Powerkon IP65 |
| Connecteur de sortie d'alimentation | Seetronic Powerkon IP65 | Seetronic Powerkon IP65 |
| Prise du cordon d'alimentation | Edison (US) | Prise locale |
Source lumineuse
| Type | Couleur | Quantité | Alimentation | Courant | Durée de vie |
| LED | Blanc froid | 1 | 440 W | 6,5 A | 50.000 heures |
| Photométrie |
| Angle de faisceau | Angle de champ | Angle de zoom | Lumineux @ 5 m (12°) | Lumineux @ 5 m (37°) | Température de couleur |
| 12°–35° | 13°–37° | 13°–37° | 14.981 lux | 2.098 lux | 5.883 K |
DMX/ Art-Net™/ sACN
| Connecteurs E/S | Plage de canaux |
| XLR 3 et 5 broches,Connecteurs Amphenol XLR Net RJ45 entrée/sortie | 33 et 50 canaux |
Thermique
| Température externe maximum | Système de refroidissement | |
| 45 °C (113 °F) | Convection | |
| Commande |
| No du produit | Code de l'article | Code UPC |
| Maverick MK2 Profile | 08011312 | 781462216603 |
Tableau Photométrique
| Étroit | Maverick MK2 Profile (Impérial) | Grand |
| Distance | 12°Diamètre du Faisceau | 13°Diamètre du Champ | Footcandle | Footcandle | 35°Diamètre du Faisceau | 37°Diamètre du Champ |
| 15 ft 3. | 15 ft 3.42 ft | 1,665 238 ft | 9.46 ft | 10.04 ft | | |
| 20 ft 4. | 20 ft 4.56 ft | 936 131 ft | 12.61 ft | 13.38 ft | | |
| 30 ft 6. | 31 ft 6.84 ft | 416 58 ft | 18.92 ft | 20.08 ft | | |
| 40 ft 8. | 41 ft 9.11 ft | 234 33 ft | 25.22 ft | 26.77 ft | | |
| 50 ft | 10.51 ft | 11.39 ft | 150 ft | 21 ft | 31.53 ft | 33.46 ft |
| 75 ft | 15.77 ft | 17.09 ft | 67 ft | 9 ft | 47.29 ft | 50.19 ft |
| 100 ft | 21.02 ft | 22.79 ft | 37 ft | 5 ft | 63.06 ft | 66.92 ft |
| 125 ft | 26.28 ft | 28.48 ft | 24 ft | 3 ft | 78.82 ft | 83.65 ft |
| 150 ft | 31.53 ft | 34.18 ft | 17 ft | 2 ft | 94.59 ft | 100.38 ft |
Champ Faisceau Champ
| Étroit | Maverick MK2 Profile (Métrique) | Grand |
| Distance | 12°Diamètre du Faisceau | 13°Diamètre du Champ | Lux | Lux | 35°Diamètre du Faisceau | 37°Diamètre du Champ |
| 1 m | 0.21 m | 0.23 m | 374,525 | 52,450 | 0.63 m | 0.67 m |
| 2 m | 0.42 m | 0.46 m | 93,631 | 13,113 | 1.26 m | 1.34 m |
| 5 m | 1.05 m | 1.14 m | 14,981 | 2,098 | 3.15 m | 3.35 m |
| 8 m | 1.68 m | 1.82 m | 5,852 | 820 | 5.04 m | 5.35 m |
| 10 m | 2.10 m | 2.28 m | 3,745 | 525 | 6.31 m | 6.69 m |
| 15 m | 3.15 m | 3.42 m | 1,665 | 233 | 9.46 m | 10.04 m |
| 20 m | 4.20 m | 4.56 m | 936 | 131 | 12.61 m | 13.38 m |
| 25 m | 5.26 m | 5.70 m | 599 | 84 | 15.76 m | 16.73 m |
| 30 m | 6.31 m | 6.84 m | 416 | 58 | 18.92 m | 20.08 m |
Champ Faisceau Champ
Renvois
Dans le cas où vous avez besoin d'aide ou pour retourner un produit :
- Si vous résidez aux États-Unis, contactez le siège mondial de Chauvet.
• Si vous vivez au Royaume-Uni ou en Irlande, contactez Chauvet Europe Ltd.
- Si vous vivez au Benelux, contactez Chauvet Europe BVBA.
- Si vous vivez au France, contactez Chauvet France.
- Si vous vivez à l'Allemagne, contactez Chauvet Germany.
- Si vous vivez au Mexique, contactez Chauvet Mexico
- Si vous résidez n'importe où ailleurs, NE contactez pas Chauvet. Contactez votre revendeur. Rendez-vous sur www.chauvetprofessional.com pour découvrir la liste des revendeurs en dehors des États-Unis, du Royaume-Uni, de l'Irlande, du Benelux, de la France, de l'Allemagne ou du Mexique.

Si vous résidez en dehors des États-Unis, du Royaume-Uni, de l'Irlande, du Benelux, de la France, de l'Allemagne ou du Mexique contactez votre revendeur et suivez leurs instructions quant à la procédure à suivre pour renvoyer votre appareil. Consultez notre site Web www.chauvetprofessional.com pour trouver leurs coordonnées.
Téléphonez au centre d'assistance technique de Chauvet correspondant et demandez un numéro d'autorisation de retour (NAR) avant de nous réexpédier l'appareil. Pour l'obtenir, il vous sera demandé de fournir le numéro du modèle, le numéro de série ainsi qu'une brève description de l'objet du retour.
Pour soumettre une demande de service en ligne, rendez-vous sur www.chauvetprofessional.com/service-request.
Vous devez nous retournez la marchandise en port prépayé, dans ses boîte et emballage d'origine et avec tous ses accessoires. Chauvet ne délivrera pas d'étiquettes de renvoi.
Indiquez lisiblement le NAR sur une étiquette apposée sur le colis. Chauvet refusera la réception de tout appareil pour lequel aucun NAR n'a été demandé.

Inscrivez le NAR sur une étiquette convenablement collée. N'écrivez PAS le NAR directement sur le colis.
Avant de nous retourner le colis, inscrivez les informations suivantes, de manière lisible, sur une feuille de papier, que vous placerez à l'intérieur du colis :
- Votre nom
- Votre adresse
- Votre numéro de téléphone
• Le numéro de NAR
- Une courte description du problème
Veillez à emballer l'appareil de manière adéquate. Vous serez tenu responsable de tout dommage survenant lors de l'expédition de retour dû à un emballage inadéquat. Nous vous recommandons d'utiliser un emballage double ou celui de FedEx.

Chauvet se réserve le droit, à sa convenance, de réparer ou remplacer tout appareil qui lui est retourné.
Siège mondial de Chauvet
Adresse : 5200 NW 108th Ave. Téléphone : (844) 393-7575
Sunrise, FL 33351 Télécopie : (954) 756-8015
Téléphone : (954) 577-4455 E-mail : chauvetcs@chauvetlighting.com
Télécopie : (954) 929-5560
N° vert : (800) 762-1084 Site web : www.chauvetprofessional.com
Chauvet Europe Ltd
Adresse : Unit 1C E-mail : UKtech@chauvetlighting.eu
Brookhill Road Industrial Estate
Pinxton, Nottingham, UK Site web : www.chauvetprofessional.eu
NG16 6NT
Téléphone : +44 (0) 1773 511115
Fax: +44 (0) 1773 511110
Chauvet Europe BVBA
Adresse : Stokstraat 18 E-mail : BNLtech@chauvetlighting.eu
9770 Kruishoutem
Belgium Site web : www.chauvetprofessional.eu
Téléphone : +32 9 388 93 97
Chauvet France
Adresse : 3, Rue Ampère
91380 Chilly-Mazarin
E-mail : FRtech@chauvetlighting.fr
France Site web : www.chauvetprofessional.eu
Téléphone : +33 1 78 85 33 59
Chauvet Germany
Adresse : Bruno-Bürgel-Str. 11
28759 Bremen
E-mail : DEtech@chauvetlighting.de
Germany Site web : www.chauvetprofessional.eu
Téléphone : +49 421 62 60 20
Chauvet Mexico
Adresse : Av. de las Partidas 34 - 3B
(Entrance by Calle 2)
E-mail : servicio@chauvet.com.mx
Zona Industrial Lerma Site web: www.chauvetprofessional.mx
Lerma, Edo. de México, CP 52000
Téléphone : +52 (728) 690-2010
Visitez le site Web concerné ci-dessus pour vérifier nos coordonnées et les instructions pour demander de l'assistance. En dehors des États-Unis, du Royaume-Uni, de l'Irlande, du Benelux, de la France, de l'Allemagne ou du Mexique, contactez le revendeur de l'enregistrement.
1. Erste Schritte
Packungsinhalt
- Maverick MK2 Profile
• 2 Omega-Halterungen mit Befestingungsmaterial
• Seetronic Powekon IP65 Netzkabel
• Bedienungsanleitung
Anweisungen für das Auspacken
Packen Sie das Produkt sofort vorsichtig aus und überprüfen Sie, ob Sie alle Teile unbeschädigt erhalten haben.
Schadensmeldung
Wenn die Verpackung oder die in der Verpackung befindlichen Teile (Gerät und Zubehör) beschädigt sind oder Mängel durch nicht einwandfreie Behandlung aufweisen, benachrichtigen Sie umgehend das Transportunternehmen, nicht jedoch Chauvet. Eine nicht zeitnah erfolgte Benachrichtigung kann dazu führen, dass Sie Ihren Gewährleistungsanspruch gegenüber dem Transportunternehmen verlieren. Bewahren Sie überdies die Verpackung für eine spätere Überprüfung auf.
Bei anderen Problemen wie etwa fehlende Komponenten oder Teile, Schäden, die nicht durch den Transport entstanden sind, oder nicht offensichtliche Schäden, machen Sie Ihren Anspruch gegenüber Chauvet innerhalb von 7 Tagen ab Lieferung der Waren geltend.
Konventionen des Handbuchs
Konvention Bedeutung
| 1–512 Eine Bandbreite an Werten |
| 50/60 Ein Wertesatz, aus dem nur ein Wert ausgewählt werden kann |
| Settings Eine Menüoption, die nicht geändert werden kann |
|
| Eine zu betätigende Taste auf dem Bedienfeld des Geräts |
| ON Ein Wert, der eingegeben oder ausgewählt werden muss |
Symbole
| Symbol Bedeutung |
 | Wichtige Informationen zur Installation, Konfiguration und zum Betrieb. Bei Nichtbeachtung dieser Informationen kann es zu Fehlfunktionen oder Beschädigungen des Geräts oder zu Verletzungen des Bedieners kommen. |
 | Wichtige Informationen zur Installation oder Konfiguration. Wenn diese Informationen nicht beachtet werden, kann es zu Fehlfunktionen kommen. |
 | Nützliche Informationen. |
Voraussichtliche LED-Lebensdauer
LEDs verlieren mit der Zeit an Helligkeit, vor allem aufgrund der Wärme. LEDs, die in Cluster angeordnet sind, haben eine höhere Betriebstemperatur als einzelne LEDs. Aus diesem Grund haben in Cluster angeordnete LEDs bei voller Leistung eine wesentlich kürzere Lebensdauer. Unter normalen Bedingungen beträgt diese 40.000 bis 50.000 Betriebsstunden. Ist es wichtig, diese Lebensdauer zu verlängern, senken Sie durch eine gute Belüftung der Umgebung Produkts die Umgebungs- und damit die Betriebstemperatur. Außerdem kann durch eine Reduzierung der Leuchtintensität auch die Lebensdauer der LED verlängert werden.

- Alle Verweise auf Daten- oder Stromanschlüsse in diesem Handbuch setzen die Verwendung von Seetronic-Kabeln mit Schutzart IP voraus.
- Die eingebauten Komponenten sind für den Kunden wartungsfrei. In dieser Bedienungsanleitung enthaltene Verweise auf Wartungs-oder Reparaturmaßnahmen sind ausschließlich für ordnungsgemäß geschulte, zertifizierte Techniker bestimmt. Öffnen Sie das Gehäuse nicht und versuchen Sie nicht selbst, Reparaturen vorzunehmen.

- Der in diesem Handbuch verwendete Begriff „DMX“ bezieht sich auf das digitale Datenübertragungsprotokoll USITT DMX512-Ä.
• Die anwendbaren lokalen Vorschriften und Regulierungen sind für eine ordnungsgemäße Installation dieses Geräts stets zu beachten.
Sicherheitshinweise
Lesen Sie sich vor der Inbetriebnahme dieses Geräts alle folgenden Sicherheitshinweise durch. Sie enthalten wichtige Informationen über die Installation, Verwendung und Wartung dieses Geräts.
Persönliche Sicherheit
• Vermeiden Sie eine direkte Augenexposition der Lichtquelle, während das Produkt eingeschaltet ist.
- Trennen Sie das Produkt immer von der Stromquelle, bevor Sie die Sicherung reinigen oder austauschen.
- Schließen Sie das Produkt immer an einen geerdeten Stromkreis an, um Stromschläge zu vermeiden.
- Berühren Sie während des Betriebs nicht das Gehäuse des Geräts, da es sehr heiß sein kann.
Befestigung und Aufhängung
- Dieses Produkt ist nicht für eine dauerhafte Installation vorgesehen.
- Dieses Produkt ist nur für den Innenbereich geeignet! Setzen Sie dieses Produkt nicht Regen oder Feuchtigkeit aus, um die Gefahr eines Brandes oder eines Schlags zu vermeiden (IP20).
- VORSICHT: Wenn Sie ein Produkt aus Umgebungen mit extremen Temperaturen (z. B. kalter LKW in einen warmen, feuchten Ballsaal) transportieren, kann sich Kondensation auf der internen Elektronik des Produkts bilden. Um zu vermeiden, dass ein Fehler auftritt, lassen Sie das Produkt vollständig an die Umgebung angepasst werden, bevor Sie es an das Stromnetz anschließen.
- Montieren Sie dieses Produkt an einem Ort mit ausreichender Belüftung, mindestens 50 cm von benachbarten Oberflächen entfernt.
- Stellen Sie sicher, dass sich während des Betriebs keine brennbaren Materialien in der Nähe des Produkts befinden.
- Sichern Sie das Produkt beim Aufhängen immer mit einem Sicherheitskabel an einer Befestigungsvorrichtung.
- Tragen Sie das Produkt niemals am Netzkabel oder an einem beweglichen Teil.
Stromversorgung und Verkabelung
- Stellen Sie sicher, dass das Netzkabel nicht gequetscht oder beschädigt ist.
- Stellen Sie immer sicher, dass Sie das Produkt gemäß den Angaben in diesem Handbuch oder auf dem Typenschild des Produkts an die richtige Spannung anschließen.
- Um unnötigen Verschleiß zu vermeiden und die Lebensdauer zu verbessern, trennen Sie das Produkt während des Nichtgebrauchs vollständig über einen Trennschalter oder durch Ziehen des Netzsteckers vom Strom.
- Schließen Sie das Produkt niemals an einen Dimmerpack oder einen Rheostat an.
- Stellen Sie sicher, dass Sie die Sicherung durch eine andere mit dem gleichen Typ und der gleichen Nennleistung ersetzen.
- Trennen Sie dieses Produkt niemals durch Ziehen am Netzkabel.
Operation
- Verwenden Sie dieses Produkt nicht, wenn das Gehäuse, die Linsen oder die Kabel beschädigt sind. Lassen Sie die beschädigten Teile sofort von einem autorisierten Techniker austauschen.
- Decken Sie die Lüftungsschlitze während des Betriebs nicht ab, um interne Überhitzung zu vermeiden.
• Die maximale Umgebungstemperatur beträgt 45 °C. Betreiben Sie das Produkt nicht bei höheren Temperaturen.
- Stellen Sie die Verwendung dieses Produkts bei ernsthaften Betriebs Problemen sofort ein!

Wenn Ihr Chauvet-Produkt gewartet weden muss, wenden Sie sich an den technischen Support von Chauvet.
2. Einleitung
Beschreibung
Der Maverick MK2 Profile liefert eine äußerst künstlerische Präzision durch sein technisch anspruchsvolles rotierendes Four-Blade Bildeinstellungssystem mit Zweifach-Position, einem äußerst hell strahlenden 440 W LED-Leuchtmittel, zwei rotierenden Goborädern mit 6-Positionen und Slot-und-Lock-Funktion, einem CMY + CTO Farbmischungssystem, einem Farbrad mit 7-Positionen + Weiß, variablem Frost-Effekt, 3-Facetten-Prismen und einem Zoombereich von 13° bis 37°. Die Steuerung erfolgt per DMX, sACN, Art-Net™ oder WDMX und die Testfunktion mit RDM. Als zusätzliche Funktion, kann dieser überragende Moving Head TCP/IP empfangen und DMX In-und-Out senden, was die Kabelführung vereinfacht.
Eigenschaften
• Voll ausgestatteter 440 W LED- Punktstrahler mit Befestigungsbügel, CMY + CTO Farbmischung, einem rotierenden Four-Blade Bildeinstellungssystem mittels Blenden, einem Farbrad, einem 3:1 Vergrößerungsbereich und zwei rotierenden Gobo Rädern
• 16-Bit-Dimmung des Master-Dimmers für eine gleichmäßige Steuerung der Fades
• Variables CMY + CTO Farbmischungssystem zum Entwerfen einer breiten Farbpalette
• Zwei rotierende, indexierende und austauschbare Gobo Räder mit Slot-and-Lock-Funktion
- DMX, WDMX, sACN und Art-Net™ für volle Flexibilität der Steuerungsoptionen
• RDM-Steuerung über DMX für Geräterückmeldung
- Zoombereich von 13° bis 37° für unterschiedliche Strahlgrößen
- Blende, 3-Facetten-Prismen und Frost-Effekt zur Strahlsteuerung
• True 1 kompatibler Stromanschluss
• Anzeige für Akku-Backup mit automatischer Rotation abhängig von der Geräteausrichtung
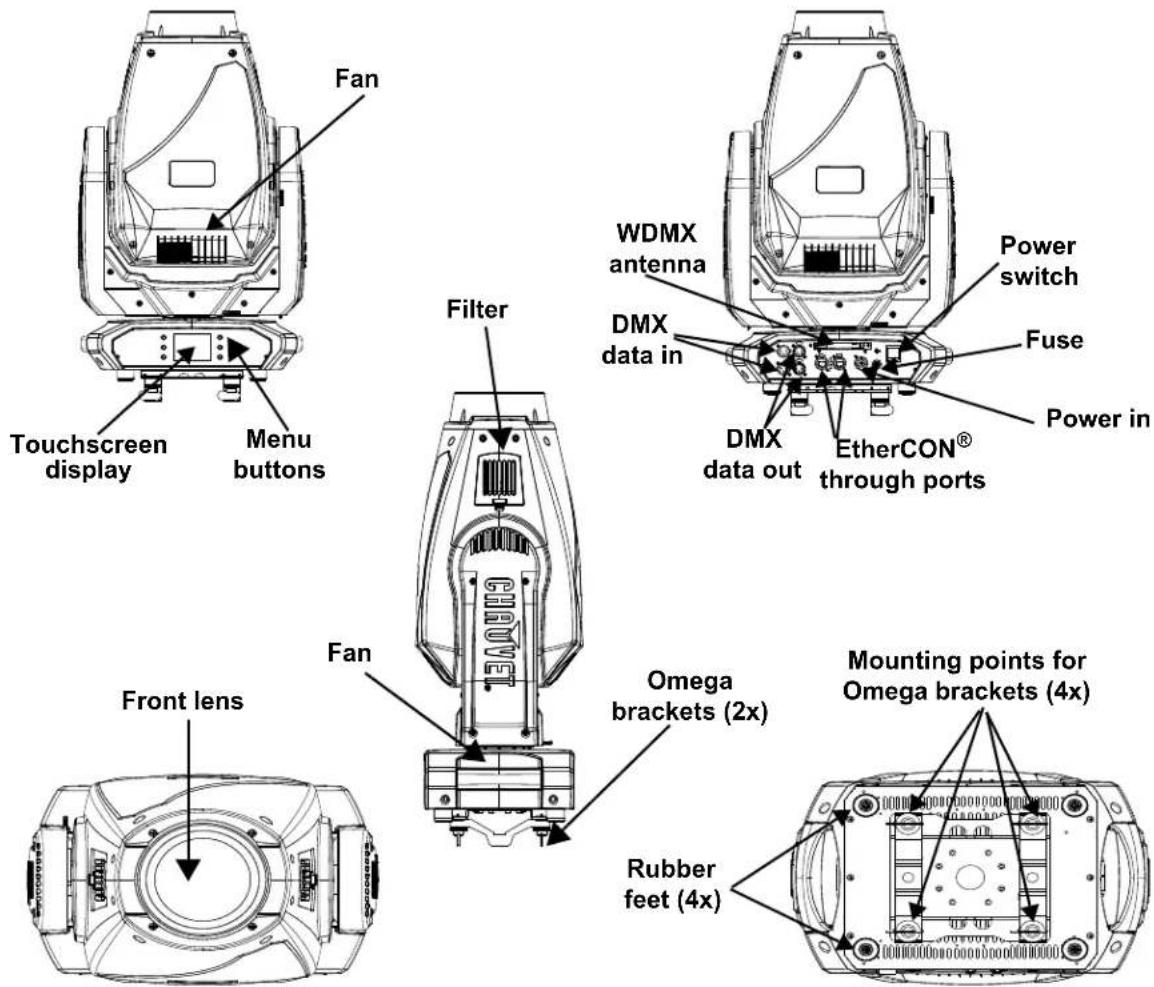
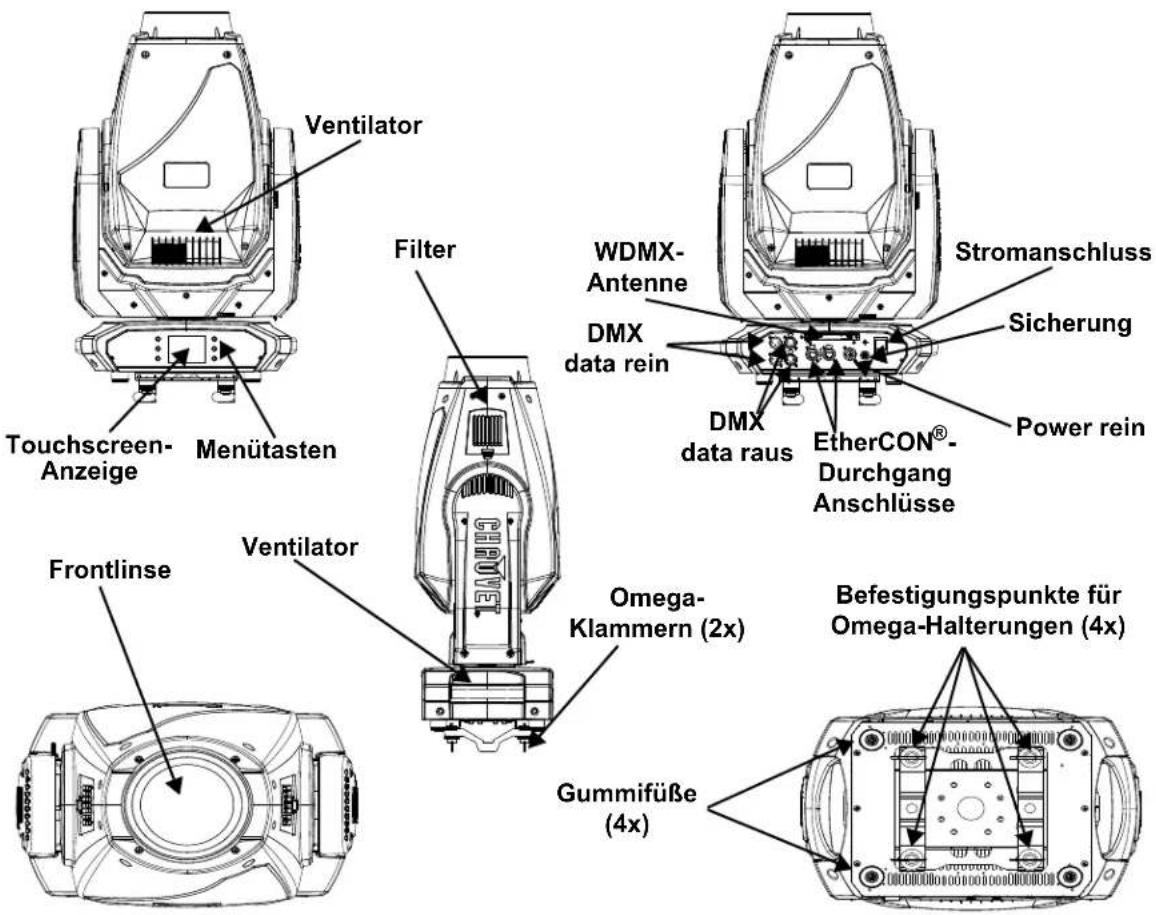
Produktüberblick
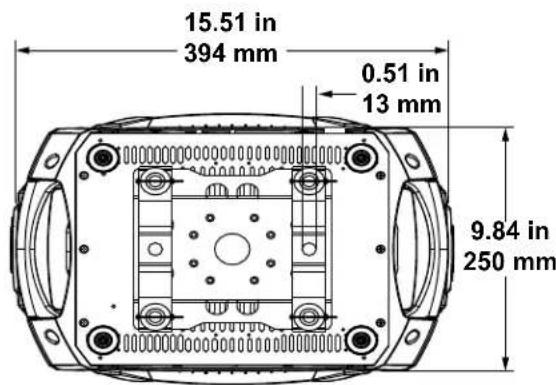
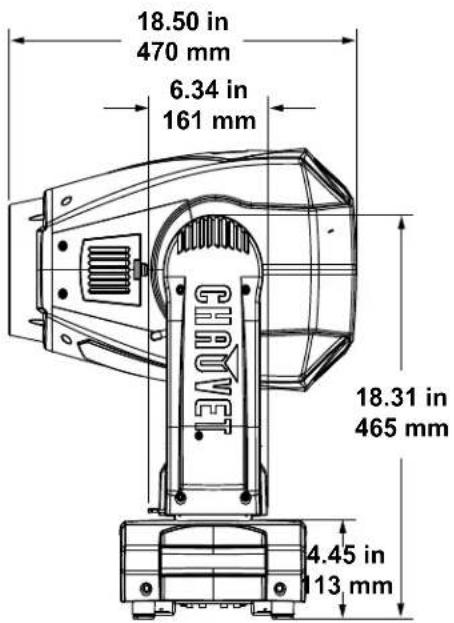
Produktabmessungen


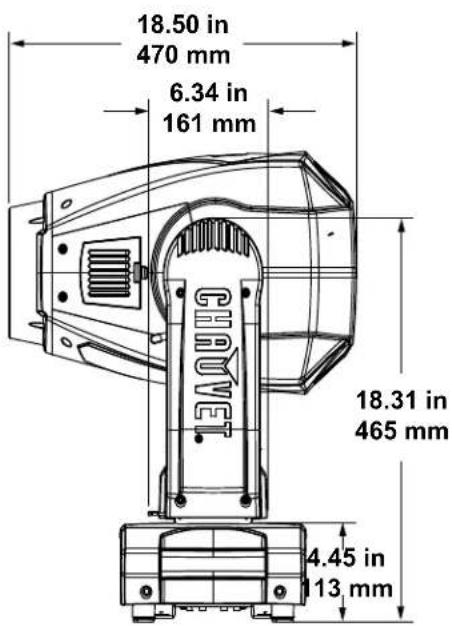
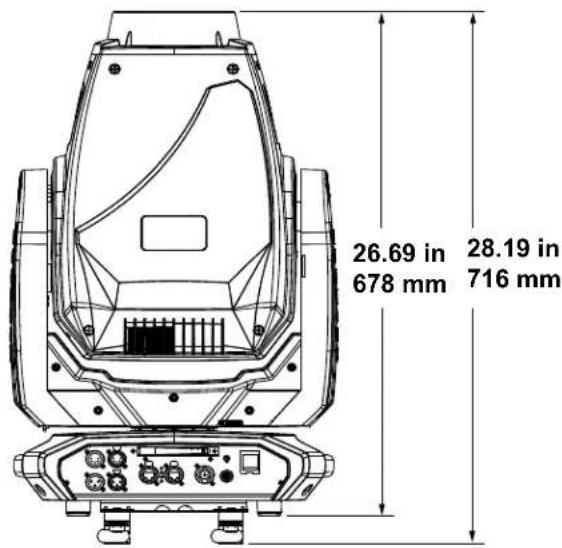
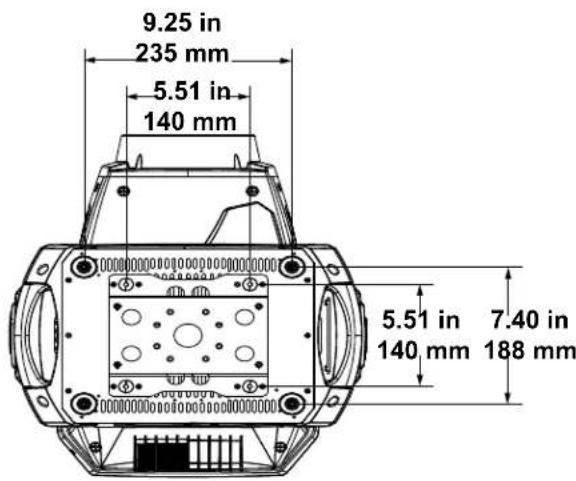
3. Einrichten des Geräts
Jeder Maverick MK2 Profile verfügt über ein Vorschaltgerät, das automatisch die anliegende Spannung erkennt, sobald der Netzstecker in die Schukosteckdose gesteckt wird, und kann mit einer Eingangsspannung von 100\~240 V AC, 50/60 Hz arbeiten. Um die erforderlichen Kennzahlen des Netzanschlusses für jeden Maverick MK2 Profile zu ermitteln, verwenden Sie den aktuellen Wert, der sich auf dem Hinweisschild am Gerät befindet. Oder lesen Sie dazu den Abschnitt Technische Daten in dieser Anleitung.
Der aufgeführte Nennstrom entspricht dem maximalen Stromverbrauch des Geräts unter normalen Betriebsbedingungen. Detaillierte Informationen finden Sie unter "Bemessung von Leistungsschaltern" auf der Website von Chauvet: www.chauvetprofessional.com

- Schließen Sie dieses Gerät nur an einen abgesicherten Stromkreislauf (Leistungsschalter oder Sicherung) an. Stellen Sie sicher, dass das Gerät entsprechend an die Masse angeschlossen ist, um die Gefahr elektrischer Schläge oder eines Brands zu vermeiden.
- Um unnötigen Verschleiß zu vermeiden und die Lebensdauer des Geräts zu verlängern, trennen Sie während längerer Perioden des Nichtgebrauchs das Gerät vom Stromnetz – entweder per Trennschalter oder durch Herausziehen des Steckers aus der Steckdose.
- Schließen Sie dieses Gerät niemals an einen Regelwiderstand oder Dimmer an, auch nicht, wenn der Regelwiderstand oder Dimmer nur als 0 bis 100% Schalter dient.
Wechselstromstecker
Das Stromversorgungskabel des Maverick MK2 Profile ist mit einem Seetronic Powerkon-Steckverbinder an einem Ende und am anderen mit einem Edison-Stecker (US-Markt) abgeschlossen. Verfügt das mit Ihrem Gerät mitgelieferte Stromversorgungskabel nicht über einen Stecker, oder müssen Sie diesen austauschen, greifen Sie zum Anschließen des neuen Steckers auf folgende Tabelle zurück.
| Verbindung | Wire (U.S.) | Wire (Europe) | Schraubenfarbe |
| AC Live Schwarze | Braun Gelb/brass | | |
| AC Neutral Weiß Blau Silber | | | |
| AC Ground Grün/gelb | Grün/gelb | Grün | |
Auswechseln der Sicherung
- Trennen Sie das Gerät vom Stromnetz.
- Mit einem Flachkopfschraubendreher lösen Sie die Abdeckung des Sicherungshalters vom Gehäuse.
- Entfernen Sie die durchgebrannte Sicherung von der Klemme, und ersetzen Sie diese durch eine Sicherung des gleichen Typs und mit den gleichen Werten (F 12 A, 250 V).
- Schrauben Sie die Abdeckung der Sicherung wieder ein, und schließen Sie das Gerät wieder an das Stromnetz an.

Trennen Sie das Gerät von der Stromquelle, bevor Sie die Sicherung auswechseln. Die Sicherung darf nur durch eine vollkommen gleichwertige ersetzt werden.
Montage
Lesen Sie vor der Montage des Geräts die in den Sicherheitshinweisen enthaltenen Sicherheitsempfehlungen durch. Informationen zu unserer CHAUVET-Produktlinie für Befestigungsklemmen finden Sie unter: http://trusst.com/products/
Montagerichtung
Stellen Sie sicher, dass dieses Gerät immer in einer gesicherten Position mit ausreichendem Raum für Belüftung, Konfiguration und Wartung montiert ist. Der Maverick MK2 Profile kann aufrecht oder kopfüber aufgebaut werden, wobei die zwei beiliegenden Omega-Befestigungsbügel verwendet werden; alternativ kann er aber auch mit seinen Gummifüßen auf einem flachen Untergrund aufgestellt werden.
Hängende Montage
Chauvet empfiehlt die Beachtung folgender allgemeiner Richtlinien bei der Montage dieses Geräts
- Berücksichtigen Sie bei der Auswahl des Installationsorts, dass Sie bequem für den Betrieb, für Programmiereingaben und für routinemäßige Wartungsarbeiten auf dieses Gerät zugreifen können.
- Dieses Produkt eignet sich nicht für eine permanente Installation.
- Stellen Sie sicher, dass das Gerät mit einem Sicherheitsabstand zu entzündlichen Materialien betrieben wird.
- Bauen Sie dieses Gerät nie an Orten auf, an denen dieses Regen, hoher Luftfeuchte, extremen Temperaturen oder einer eingeschränkten Belüftung ausgesetzt ist.
- Stellen Sie bei einer hängenden Montage sicher, dass die Konstruktion, auf der Sie das Gerät montieren, dessen Gewicht tragen kann. Im Abschnitt Technische Daten sind die Anforderungen an die Tragfähigkeit dieses Geräts aufgeführt.
- Verwenden Sie bei der hängenden Montage dieses Geräts zur Sicherung immer ein ordnungsgemäßes Sicherheitskabel. Informationen zu unserer CHAUVET Professional-Produktlinie für Sicherheitskabel finden Sie unter http://trusst.com/products/.
- Bei einer Positionierung des Geräts auf einen ebenen Untergrund müssen das Gerät und die Kabel mit einem Abstand zu Personen und Fahrzeugen aufgestellt bzw. verlegt werden.
- Platzieren Sie den Maverick MK2 Profile so, dass er sich frei bewegen kann, ohne in der Nähe befindliche Gegenstände oder Personen zu treffen.
• Verlegen Sie die Kabel so, dass sie nicht gespannt sind und keine Kräfte an den Steckern auftreten.
Montageansicht
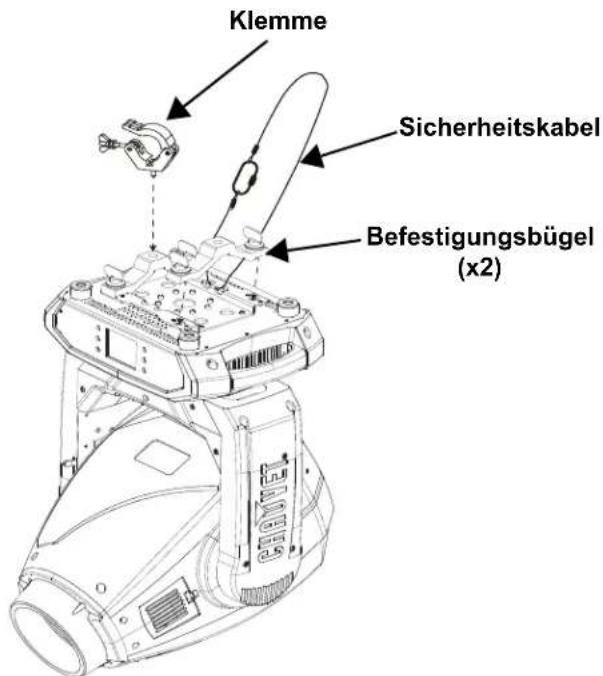
Überkopfmontage
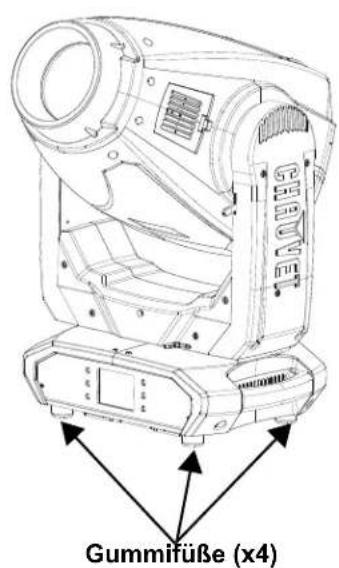
Bodenmontage
DMX Linking
Sie können den Maverick MK2 Profile über den 3- oder 5-poligen DMX-Anschluss mit einem DMX Controller verbinden. Falls Sie andere DMX-fähige Geräte mit diesem Gerät verwenden, können Sie jedes Einzelne mittels eines individuellen DMX-Controllers ansteuern.
DMX Personalities
Der Maverick MK2 Profile verwendet eine 3- und 5-polige DMX-Datenverbindung für die 33- und 50-Kanal-DMX-Modi.
- Beziehen Sie sich auf die Einleitung zwecks einer Kurzbeschreibung jeder DMX-Eigenschaft.
- Beziehen Sie sich auf das Kapitel Betrieb um sich mit dem Einrichten des Maverick MK2 Profile und dem Arbeiten mit diesen Eigenschaften vertraut zu machen.
- Die DMX-Werte liefert detaillierte Informationen bezüglich der DMX-Eigenschaften.
Remote Device Management (RDM)
Remote Device Management bzw. RDM ist ein Standard, mit dem DMX-aktivierte Geräte bidirektional entlang bestehender DMX-Kabel kommunizieren können. Lesen Sie die Bedienungsanleitung des DMX-Controllers oder wenden Sie sich an den Hersteller, da nicht alle DMX-Controller über diese Funktion verfügt. Der Maverick MK2 Profile unterstützt das RDM-Protokoll, das ein Feedback zur Vornahme von Änderungen der Menüoptionen erlaubt.
Signalanschlüsse
Der Maverick MK2 Profile kann Signale per DMX, WDMX, Art-Net™ oder sACN empfangen. Der Maverick MK2 Profile verfügt über 2 Amphenol XLRnet Durchgangs-Anschlüsse sowie 3- und 5-polige DMX-Anschlüsse. Für weitere Informationen zu DMX lesen Sie "DMX - Eine Einführung" unter: https://www.chauvetprofessional.com/wp-content/uploads/2016/06/DMX_Primer.pdf.
Art-Net-Verbindung
Art-Net™ ist ein Ethernet-Protokoll, das mit TCP/IP eine große Menge an DMX512-Daten über ein großes Netzwerk an eine Amphenol XLRnet RJ45-Verbindung überträgt. Das Dokument des Art-Net-Protokolls können Sie unter www.chauvetprofessional.com herunterladen.
Art-Net™ wurde von Artistic Licence Holdings Ltd entwickelt und ist urheberrechtlich geschützt.
sACN-Verbindung
Das auch als ANSI E1.31 bekannte Streaming-ACN ist ein Ethernet-Protokoll, das auf das Layering und die Formatierung von Architecture for Control Networks zurückgreift, um DMX512-Daten "over IP" oder ein anderes mit ACN kompatibles Netzwerk übermittelt. ACN wird von der Professional Lighting and Sound Association (PLASA) bereitgestellt.
Schaltplan
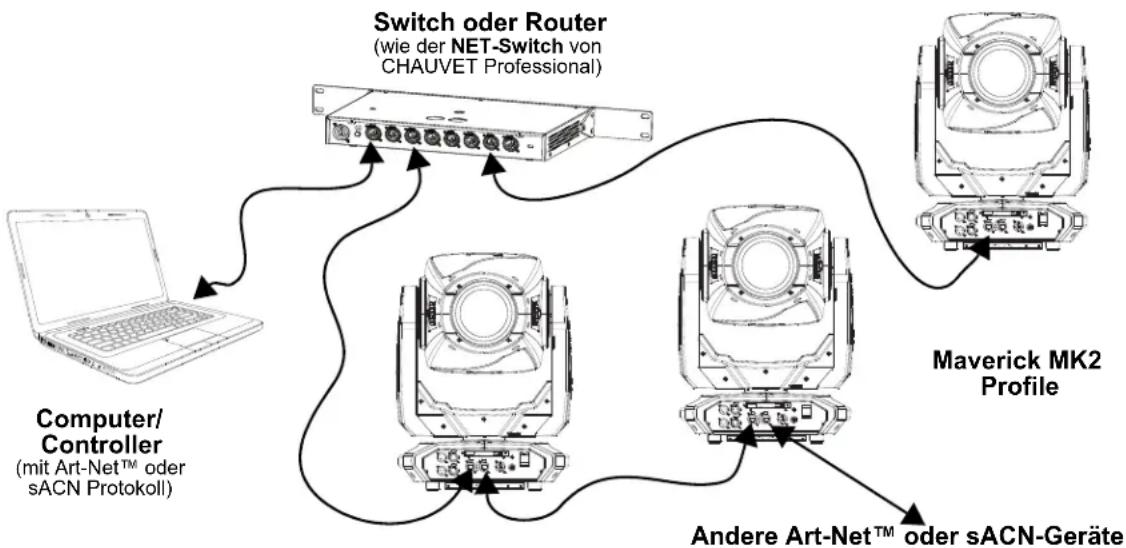
flowchart
graph TD
    A["Laptop"] --> B["Computer/Controller (mit Art-Net™ oder sACN Protokoll)"]
    B --> C["Switch oder Router (wie der NET-Switch von CHAUVET Professional)"]
    C --> D["Maverick MK2 Profile"]
    D --> E["Andere Art-Net™ oder sACN-Geräte"]
    E --> C

Die drei LED-Kontrollleuchten zwischen den Ethernet-Durchgangs-Anschlüssen zeigen eine Verbindung mit einem Netzwerk sowie Aktivität in diesem Netzwerk an. Sie zeigen nicht an, ob der Maverick MK2 Profile ein Signal von einem Controller erhält oder nicht.
4. Betrieb
Berührungsempfindliches Bedienfeld
Der Maverick MK2 Profile verfügt über ein Touchscreen-Display sowie 6 Steuerungstasten. Navigieren Sie zur Menüstruktur, indem Sie auf die Tasten drücken, die Bilder der Tasten an den Seiten des Displays berühren oder direkt auf die gewünschte Menüoption auf dem Display tippen. Der Touchscreen kann über die Settings (Einstellungsoptionen) im Menü gesperrt und kalibriert werden (siehe Touchscreen-Kalibrierung und Touchscreen-Sperre).
Beschreibung des Bedienfelds
| Taste Funktion |
| Damit navigieren Sie sich durch die Menüpunkte nach oben oder erhöhen den numerischen Wert der entsprechenden Funktion |
| Damit verlassen Sie das aktuelle Menü oder die Funktion |
| Damit navigieren Sie sich durch die Menüpunkte nach unten oder verringern den numerischen Wert der entsprechenden Funktion |
| Damit navigieren Sie nach links durch die Menüpunkte |
| Damit wird das aktuell angezeigte Menü aktiviert oder der aktuell ausgewählte Wert einer Funktion eingestellt |
| Damit navigieren Sie nach rechts durch die Menüpunkte |
Batteriebetriebene Anzeige
Drücken Sie auf diese Taste und halten Sie sie (für ca. 15 Sekunden) gedrückt, bis der Menü-Bildschirm erscheint.
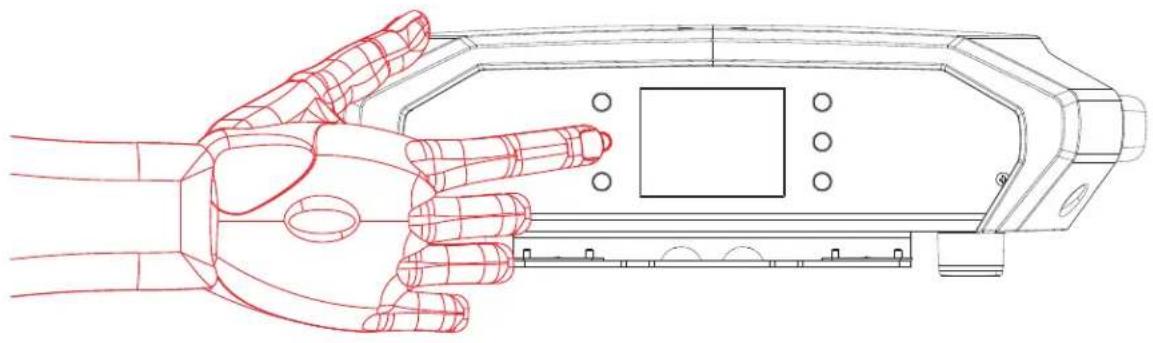
natural_image
Line drawing of a robotic hand holding a device with a control panel (no text or symbols)
Menüplan
| Hauptlevel Programmierebenen Beschreibung | |
| Start Address | 000-512 Netzwerkeinstellung | |
| Network Setup | IP Mode | Manual IP-Adresse manuell einstellen |
| DHCP Netzwerk legt die IP-Adresse fest |
| Static Produkt legt die IP-Adresse fest |
| Universe 000-255 Setzt das Universum | |
| IP 002.xxx.xxx.xxx | Legt die IP-Adresse im manuellen Modus fest |
| SubMask 255.xxx.xxx.xxx | Legt Subnetzmaske im manuellen Modus fest |
| Personality | DMX 33CH | YES | Wählen Sie 33 DMX-Kanäle |
| NO |
| DMX 50CH | YES | Wählen Sie 50 DMX-Kanäle |
| NO |
| Settings | Control Mode | DMX Legt die DMX-Persönlichkeit fest |
| WDMX Legt die WDMX-Persönlichkeit fest |
| sACN Legt die sACN-Persönlichkeit fest |
| ArtNet Legt die Art-NetTM-Persönlichkeit fest |
| Pan Reverse | YES Schwenk Normal |
| NO | Umgekehrte Schwenkung |
| Tilt Reverse | YES Neigung Normal |
| NO | Umgekehrte Neigung |
| Screen Reverse | YES Normale Anzeige |
| NO | Umgekehrte Anzeige |
| AUTO Automatische Anzeigerichtung |
| Pan Angle | 540 | Schwenkungsbereich 540° |
| 360 | Schwenkungsbereich360° |
| 180 | Schwenkungsbereich180° |
| Tilt Angle | 270 | Neigungsbereich 270° |
| 180 | Neigungsbereich 180° |
| 90 | Neigungsbereich 90° |
| BL. O. P/T Move | YES | Während Schwenkung/Neigung verdunkeln |
| NO | Aktuelle Einstellungen speichern |
| BL. O. Color Move | YES Farbverdunkelung aktivieren |
| NO | Deaktivieren Sie die Farbverdunkelung |
| BL. O. Gobo Move | YES Gobo-Blackout aktivieren |
| NO | Deaktiviere den Gobo-Blackout |
| Calibration | YES Touchscreen kalibrieren |
| NO | Behalten Sie die aktuellen Einstellungen bei |
| Touchscreen Lock | YES Display reagiert nicht auf Berührung |
| NO | Display reagiert auf Berührung |
| Lock Screen | YES | Sperrt die Tasten und den Touchscreen-Bildschirm Sicherheitscode: 0920 |
| NO |
| Swap XY | YES | Schwenkung steuert Neigung, Neigung steuert Schwenkung |
| NO | Während Schwenkung und Neigung nicht tauschen |
| XY Mode | Fast | Schnelle Schwenkung und Neigung |
| Slow | Langsame Schwenkung und Neigung |
| WDMX Reset | YES | WDMX zurücksetzen |
| NO | WDMX nicht zurücksetzen |
| Hauptlevel Programmierebenen Beschreibung | |
| Settings | Backlight Timer | 30S | Anzeige schaltet nach 30 Sekunden ab |
| 1M | Anzeige schaltet nach 1 Minute ab |
| 5M | Anzeige schaltet nach 5 Minuten ab |
| ON | Anzeige bleibt an |
| Loss of Data | Hold | Hält das zuletzt erhaltene Signal |
| Close | Verdunkelt Gerät |
| Fans | Auto | Lüfterdrehzahl gemäßGerätetemperatur |
| Full Lüfterdrehzahl auf volle Drehzahl |
| ECO Lautloser Modus |
| Theatrical Dimming | YES Dimming wird aktualisiert |
| NO | Vorhandene Dimming stimmt mit den älterer Maverick MK2 Profile-Geräte übereinstimmt |
| Dimmer Curve | Linear | Stellt die Dimmungskurve ein |
| Square |
| I Square |
| SCurve |
| Dimmer Speed | Smooth | Stellt die Dimmungsgeschwindigkeit ein |
| Fast |
| PWM Option | 600 | Auswahl der Pulse Width Modulation (PWM) |
| 1200 |
| 2000 |
| 4000 |
| 6000 |
| 15000 |
| Smart Zoom | OFF | Begrenzt den Zoombereich auf eine optimale Bildschärfe |
| ON |
| Beam Correction | OFF Ermöglichte eine Flachfeld-Projektion unter Einsatz von Blenden. Damit gleichen Sie auch die Gobos über die Position 1 im Rad #1 aus |
| ON | |
| Preset Select | PRESET A | Aufgezeichnete Voreinstellungs-Menüoptionen |
| PRESET B |
| PRESET C |
| Preset Sync | NO Ermöglicht die Übermittlung aufgezeichneter Voreinstellungs-Menüoptionen an andere Maverick MK2 Spot-Geräte in der DMX-Serienschaltung |
| YES | |
| Reset Function | Pan/Tilt | YES/NO | Setzt einzelne oder alle Funktionen ab Start zurück |
| Iris/Prism |
| Color/CMY+Blade |
| Gobo/GoboRotate |
| Frost |
| All |
| Factory Settings | YES | Setzt auf die standardmäßigen Werkseinstellungen zurück |
| NO |
| Test | Manual Test | Pan | 000-255 | Testen Sie jede Funktion / jeden Kanal einzeln |
| Pan Fine |
| Tilt |
| Tilt Fine |
| P/T Speed |
| Dimmer |
| Dimmer Fine |
| Shutter |
| Virtual Shaking |
| Cyan |
| Magenta |
| Yellow |
| CTO |
| Color |
| Gobo |
| Gobo Rotate |
| Gobo Index |
| Gobo 2 |
| Gobo 2 Rotate |
| Gobo 2 Index |
| Blade 1-1 |
| Blade 1-1 Fine |
| Blade 1-2 |
| Blade 1-2 Fine |
| Blade 2-1 |
| Blade 2-1 Fine |
| Blade 2-2 |
| Blade 2-2 Fine |
| Blade 3-1 |
| Blade 3-1 Fine |
| Blade 3-2 |
| Blade 3-2 Fine |
| Blade 4-1 |
| Blade 4-1 Fine |
| Blade 4-2 |
| Blade 4-2 Fine |
| Blade Rotate |
| Blade Rotate Fine |
| Focus |
| Focus Fine |
| Focus Auto |
| Zoom |
| Zoom Fine |
| Prism |
| Prism Rotate |
| Iris |
| Frost |
| CMY Macro |
| CMY Macro Speed |
| Special Function |
| Hauptlevel | Programmierebenen | Beschreibung |
| Information | Fixture Information | Ver V_Zeigt | die Firmware-Version an |
| Running Mode | ____Zeigt den aktuellen Betriebsmodus an |
| Address ____ | Zeigt die aktuelle Startadresse an |
| Temperature ____ | Zeigt die aktuelle Temperatur des Geräts in °C an |
| Fixture Hours ____ | Zeigt an, wie lange das Gerät eingeschaltet gewesen ist |
| IP ____. | Zeigt die aktuelle IP-Adresse an |
| SubMask ____. | Zeigt die aktuelle Subnetzmaske an |
| MAC ____. | Zeigt die aktuelle MAC-Adresse an |
| Fan Information | Base Fan 1 Speed | ____ | Zeigt die Drehzahl der Basis- und Hauptlüfter in U/min an |
| Base Fan 2 Speed | ____ |
| Head Fan 1 Speed | ____ |
| Head Fan 2 Speed | ____ |
| Error Information | No Error!* Zeigt alle Fehler oder “No Error!” |
| Channel Information | Frequency | Hz | Zeigt alle aktuellen Werte von Eingangssignalen an, 000–255 |
| Pan | 000–255 |
| Pan Fine |
| Tilt |
| Tilt Fine |
| P/T Speed |
| Dimmer |
| Dimmer Fine |
| Shutter |
| Virtual Shaking |
| Cyan |
| Magenta |
| Yellow |
| CTO |
| Color |
| Gobo |
| Gobo Rotate |
| Gobo Index |
| Gobo 2 |
| Gobo 2 Rotate |
| Gobo 2 Index |
| Hauptlevel Programmierebenen Beschreibung | |
| Information | Channel Information | Blade 1-1 | 000–255 | Zeigt alle aktuellen Werte von Eingangssignalen an, 000–255 |
| Blade 1-1 Fine |
| Blade 1-2 |
| Blade 1-2 Fine |
| Blade 2-1 |
| Blade 2-1 Fine |
| Blade 2-2 |
| Blade 2-2 Fine |
| Blade 3-1 |
| Blade 3-1 Fine |
| Blade 3-2 |
| Blade 3-2 Fine |
| Blade 4-1 |
| Blade 4-1 Fine |
| Blade 4-2 |
| Blade 4-2 Fine |
| Blade Rotate |
| Blade Rotate Fine |
| Blade Macro |
| Focus |
| Focus Fine |
| Focus Auto |
| Zoom |
| Zoom Fine |
| Prism |
| Prism Rotate |
| Iris |
| Frost |
| CMY Macro |
| CMY Macro Speed |
| Special Function |
Konfiguration der Betriebseinstellungen
Startbildschirm
Der Maverick MK2 Profile verfügt über einen Startbildschirm, auf dem die aktuellen Steuerungsprotokolle, Modi, Startadressen, IP-Adressen und Umgebungen angezeigt werden. Um zum Startbildschirm zu gelangen, drücken Sie wiederholt auf