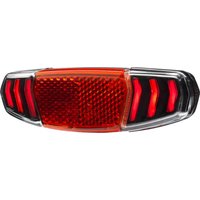
BRIXXI - Lighting Busch + Müller - Free user manual and instructions
Find the device manual for free BRIXXI Busch + Müller in PDF.


| Brand | Busch + Müller |
| Model | BRIXXI (No. 385) |
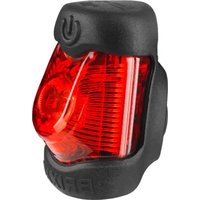
| Product type | Rechargeable battery rear light with brake sensor |
| Certification | StVZO (Germany), for e-bikes up to 25 km/h |
| Technology | BREX: deceleration sensor, brake light and emergency brake light |
| Power supply | Integrated rechargeable battery, charge via USB-C (max. 1000 mA, 5 V DC) |
| Charging time | Approx. 1.5 hours |
| Battery life | Approx. 24 hours (depending on usage) |
| Operating modes | Senso (automatic light depending on brightness), Permanent, Safe-Way-Home (30 min at reduced brightness) |
| Charge indicator | 5 blue LEDs + 1 orange LED (from 100% to <5%) |
| Mounting | On seat post (diameter 25-32 mm) via rotating lock mount and tension strap |
| Attachment | Rotating mount with audible click; removal by anti-release rotation |
| Required orientation | Emission surface perpendicular to the road (18° angle from vertical) |
| Dirt protection | Protective cap for the mount and cover for the USB-C port |
| Weather resistance | Splash-proof (except during charging); remove in heavy rain or when using high-pressure washers |
| Safety functions | Braking (5x brighter), emergency braking (pulsating light), standby mode after 5 min of standstill |
| Package contents | Rear light, mounting bracket, tension strap, USB-A to USB-C cable, assembly instructions |
| Maintenance | Clean with a soft cloth; do not use aggressive cleaning agents; store in a dry place |
| Spare parts | Available at www.bumm-shop.de (mount, strap, caps, etc.) |
| Dimensions (approx.) | Approx. 70 x 30 x 30 mm (estimation) |
| Weight (approx.) | Approx. 50 g (estimation) |
Frequently Asked Questions - BRIXXI Busch + Müller
User questions about BRIXXI Busch + Müller
0 question about this device. Answer the ones you know or ask your own.
Ask a new question about this device
Download the instructions for your Lighting in PDF format for free! Find your manual BRIXXI - Busch + Müller and take your electronic device back in hand. On this page are published all the documents necessary for the use of your device. BRIXXI by Busch + Müller.
USER MANUAL BRIXXI Busch + Müller
Instruction manual for the re-chargeable battery rear light Brixxi with sensor-Brake light and emergency brake mode warning light. Approved for 25kmh E-Bikes. Not approved for 45kmh speed pedelecs
text_image
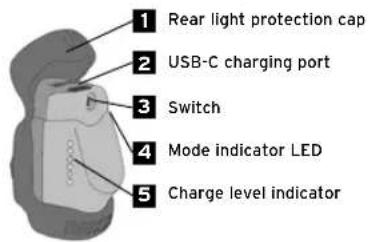
1 Rear light protection cap 2 USB-C charging port 3 Switch 4 Mode indicator LED 5 Charge level indicator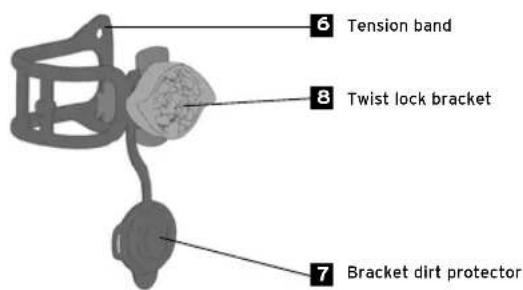
text_image
6 Tension band 8 Twist lock bracket 7 Bracket dirt protector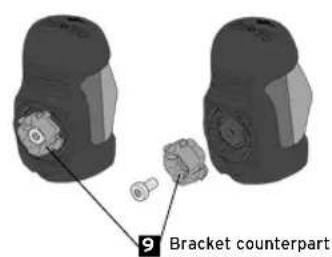
text_image
9 Bracket counterpartBREX-TECHNOLOGY - Sensor brake and emergency brake light function according to StVZO
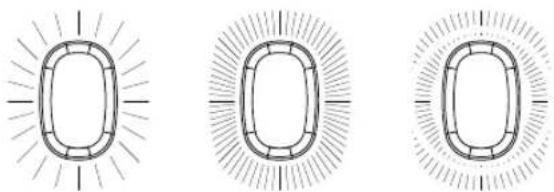
Running light (normal operation), braking or emergency braking. Thanks to the integrated deceleration sensor, and unlike previous brake tail lights, no wiring to the brake lever is required.
natural_image
Three abstract geometric diagrams with radiating lines and concentric circles, no text or symbols present.In normal use, the rear lights with BREX technology offer cyclists the best visibility from behind. The integrated sensor system is active at all times and reacts as soon as braking or emergency braking.
BRAKING
When the braking process is detected by the integrated sensor system, the rear light illuminates very brightly and clearly to signal following road users to slow down. This is more than five times as bright as in normal operation and thus many times brighter than previous tail lights with so-called deceleration light.
EMERGENCY BRAKING
In the event of abrupt braking, the brake light switches up another level to the brightly pulsating emergency brake light function. In this mode, BREX conveys the dangerous situation with an unprecedented signalling effect and prevents accidents.
1. Instruction manual for the re-chargeable battery rear light Brixxl with sensor-Brake light and emergency brake mode warning light. Approved for 25kmh E-Bikes, pedal assisted.
BRIXXI Model No. 385
These instructions are directed at persons with knowledge and experience in the assembly of bicycle components. Specialist tools may be required. Should you not have such experience or the required tools please enlist the service of a cycle specialist to ensure that this assembly is carried out correctly. Improper assembly may result in a fall or crash resulting in serious injury. Please read these instructions thoroughly and retain them for future reference.
- Safety Information
These instruction implement signal words to highlight potential dangers or important information. The meaning of these signal words are as follows:
WARNING Describes a danger situation that could lead to serious injury or even death. NOTE Concerns Information that, while important, does not refer to a personal danger (e.g. information of potential material damage).
The ⚠ concerns other useful information about your new light component.
- Intended use
Busch + Müller produce an extensive product range of bicycle light components. Not every light component is suitable for every ground surface type. Should you be unsure about which type of light component you require for your intended use, you may either contact our service-hotline under +49 2354 915 7111, or by E-mail to service@bumin.de or request advice from a specialist retailer.
NOTE Light components from Busch + Müller are suited to riding conditions on a firm riding surface. Avoid use under extreme circumstances and never ride down steps. Do not use B+M light components while performing jumps, stunts, tricks, hops or fast descents on uneven terrain.
- Legal requirements
Before you operate your vehicle in public traffic you are obliged to ensure that your vehicle complies with national and local laws and regulations, and you as a traffic participant must abide by the traffic regulations that apply. These can be found in the highway code or national equivalent, and depending on the country, also at other sources.
Bicycle lights should never be partially or fully covered or blocked. Always ensure that they are properly positioned and directed.
The prescribed assembly height in Germany is between 25 and 120 cm. More information can be found in the traffic regulations (StVZO) or consult your local specialist retailer.
5. Package contents
Brixxi rear light | Bracket for Seat post assembly | USB-A to USB-C cable | Assembly instructions
6. Assembly
Assemble the bracket and tension band to the seat-post (25-32mm diameter) so that it will not move out of position. Tension band 6 should be wrapped around the Seatpost and stretched over the bracket hooks. Then press the rear light into the twist-lock bracket 8, so that this fixes with an audible click. When removing the rear light from the bracket, turn the twist-lock rotator slightly counter-clockwise. To Protect the twist-lock bracket 8 from dirt when unused, please use the protection cap 7. Just push the protective cover 1 into the twist-lock fixation point.
NOTE If the rear light does not attach in the 8 twist lock bracket, or remains loose, this may result from an over-stretched or displaced rear light protection cap.
This can be corrected in a few simple steps:
-
loosen screw at back of the rear light. (TX 8)
-
loosen 9 counter-part bracket
-
Adjust the soft material part to fit back into the intended seating position
-
Press 9 counter-part bracket back on to the rear light
-
Re-tighten screw so that it remains in place
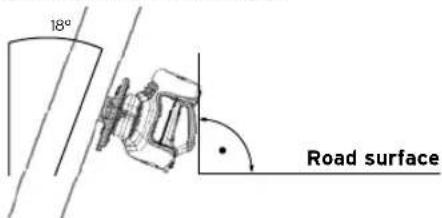
■ Position the rear light so that the light emitting surface is perpendicular to the roadway (see image on page 26). This is imperative for the correct operation of the light. The light is only intended for assembly on the seat post.
WARNING Never assemble on the fork or the seat stay!
To prevent falls, accidents and serious injury, use only the intended mounting bracket from Busch and Müller. If unsuitable or ill-placed brackets are used for the assembly of lights, these can lead to loosened or detaching parts that may trap in wheels or spokes and cause serious injury.
Please always check the secure assembly of your rear light mounting before riding.
Upside down assembly Incorrect: any assembly of the rear light in an inverted upside-down position is incorrect and the light will not function correctly.
text_image
18° Road surfaceIf the rear light is mounted upside-down, the charge indicator LED's will flash repeatedly once the light is turned on. Only assemble as pictured.
Important: Lighting equipment must not be covered at any time.
7. Charging
The rear light has a 350mAh cache battery that can be charged via the 2 USB-C charging port. The 2 USB-C port is located on the upper end of the light under the 1 light protection cap. To charge, use the USB cable with a standard USB charger block (max 1000mAh, 5V DC) or a computer USB port. During charging, the 5 charge level indicator will alight, showing the charge level of the cache battery. The 5 charge level indicator LED's will switch off when the charging process is finished.
WARNING As a measure of precaution, do not leave the rear light unattended while charging, and always place on a fire resistant surface.
NOTE During charging there is no splash or rain water resistance. Damage resulting from water or humidity entering the light while charging is specifically excluded from warranty.
1 Replace the 1 light protection cap after the charging process is completed to close the 2 USB-C charging port. The rear light cannot attach to the 9 counter-part bracket while the 1 light protection cap is open.
NOTE Open the 1 light protection cap only sufficiently to allow access to the 2 USB-C charging port. Overstretching the 1 light protection cap can lead to a displacement under the 9 counter-part bracket. To correct this, refer to point 6. Assembly.
7.1. Charge level indication
5 blue LEDs = 100 · 80 % | 4 blue LEDs = 80 · 60 % | 3 blue LEDs = 60 · 40 % |
2 blue LEDs = 40 - 20 % | 1 blue LED = 20 - 10 % | 1 blue & 1 orange LED = 10 - 5 % |
1 orange LED = < 5 %
The 5 charge level indicator will be activated by switching, or when the rear light is switched off, then by a short press of the "on" button. When the rear light needs charging (under charge level 10%, or when the rear light is in "safe way home" mode) the 5 charge level indicator LED's will remain on continuously.
Once the orange LED allights together with the blue LED, then the charge level is under 10% and the Brake function and emergency brake function will be de-activated. Please re-charge immediately.
Should the charge level sink below 5%, only the orange LED will alight, and the rear light will automatically go into "safe way home" mode.
7.2. Charging times
Charging with a standard USB charger block or a computer USB port takes appr. 1.5 hrs. While charging, the 5 charge level indicator will alight, showing the current charge level. Once the charging process is finished, the indicator LED's will go out, with a fully charged battery, the run-time is appr. 24 hrs. This will depend on ride style, temperature and traffic situation.
8. Operation / Modes
The rear light is switched on and off with a long press of the 3 switch. A short press of the 3 switch will toggle between senso-and-permanent modes.
Senso-Mode
The 4 mode Indicator LED on the right side of the rear light is continuously yellow. With fading ambient light, the rear light will automatically switch on (e.g. dark tunnel or dusk). With bright ambient light (e.g. Daytime - Sun), the standard ride light will switch off after appr. 5 mins. Brake and emergency brake functions remain active.
Permanent Mode
The 4 mode indicator LED on the right side of the rear light is not alight. Standard ride light remains on continuously. Brake and emergency brake functions are active.
Safe-Way-Home-Mode
The rear light will remain alight for at least 30 minutes with reduced brightness. Brake-and-emergency-
brake functions will be deactivated, as will the senso-mode also. The rear light is now continuously on.
The 5 charge level indicator will show only the orange LED (refer to 7.1 Charge level indication)
| Charge level >10 % 10 - 5 % < 5 % | ||||||
| Senso Permanent | Senso Permanent | Senso Permanent | ||||
| Ride light | S | yes | S | yes | no | no |
| Brake function yes | yes | yes no no no no | ||||
| Emergency brake | yes | yes | no | no | no | no |
| Safe-Way-Home no no no no | yes ^ | yes ^ | ||||
S = Automatic switch-on due to brightness and motion sensor
yes ^* = lights up permanently at reduced brightness until the battery is empty
Standby-Mode
In order to extend battery run-time and alleviate the user of on / off switching, the rear light will switch itself off into standby mode when it recognises an extended period of inactivity (motionless). When motion recommences, the rear light will automatically then switch back on again into the previously selected mode. Once the standby mode is finished, the light must be reactivated by pressing the 3 switch. An active standby mode is shown through regular flashes of the 4 mode
indicator LED
| Standby-Mode | ||
| Senso | Permanent | |
| Active after x minutes motionlessness | 5 | 5 |
| Standby-Mode is active | ≤ 24 hrs. | ≤ 1 hr |
| Mode is shown by short pulse of the mode indicator LED | once every two seconds | twice every two seconds |
9. Further Comment
Should the bicycle be sprayed with water, left out in rain or transported on a vehicle in rain, then the rear light should be removed. This is to prevent loss and / or water ingress.
Disposal: Electronic rear lights are not household waste. They are to be disposed of at the intended collection depots.
10. Liability
Damage caused by improper use (e.g. dropped, crash, unsecure assembly and consequences, immersion in water or other liquid) is explicitly excluded from the warranty. The warranty is invalid if the rear light has been opened.
We wish you enjoyment and satisfaction with your new rear light, and always a safe ride.
Spare parts can be found at www.bumm-shop.de
Subject to modifications without notice.
Busch + Müller KG • 58540 Meinerzhagen, Germany • Tel. +49 2354 915-7111 • service@bumm.de • www.bumm.de
natural_image
Diagram of a mechanical or biological structure with no visible text or symbolsnatural_image
Three abstract geometric diagrams with radiating lines and concentric circles, no text or symbols present.FONCTIONNEMENT NORMAL FREINAGE FREINAGE D'URGENCE
FONCTIONNEMENT NORMAL
1 orange LED = < 5 %
natural_image
Three abstract geometric diagrams with radiating lines and concentric circles, no text or symbols present.FUNZIONAMENTO NORMALE FRENATA FRENATA DI EMERGENZA