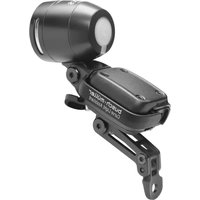
LEVAL - Lighting Busch + Müller - Free user manual and instructions
Find the device manual for free LEVAL Busch + Müller in PDF.


| Product type | Cornering light assistant for bicycle or E-Bike headlight |
| Brand | Busch + Müller |
| Model | LEVAL (no. 365) |
| Operating voltage | 5 - 15 V DC |
| Continuous power | 0.5 W (when activated) |
| Maximum power | 3 W (short-term) |
| Standby consumption | 0.2 W |
| Power supply type | DC voltage source (E-Bike battery, power bank, etc.) |
| Operating modes | Activated (ON) / Deactivated (OFF with return to center position) |
| Main function | Automatic headlight orientation in corners to illuminate the path |
| Auto-calibration | Yes, automatic at standstill and while moving |
| Mounting positions | 4 positions: vertical short/long, suspended short/long |
| Recommended tilt | Approximately 45° relative to the road surface |
| Headlight compatibility | All wired Busch + Müller headlights (except IQ-XL type 169) |
| Minimum cable length | 200 mm between headlight and LEVAL |
| Supplied items | LEVAL, positioning adapter, closing plate, cable plug, T20/T10 key, manual |
| Maintenance | Clean with a dry cloth; do not immerse in water |
| Safety | Do not look directly into the light; lock the screws after adjustment; cut off power before intervention |
| Warranty | Legal warranty; warranty reduced to 6 months for moving parts |
| Repairability | Spare parts available (adapter, plate, screws); do not loosen the silver screws |
| Country of origin | Germany |
Frequently Asked Questions - LEVAL Busch + Müller
User questions about LEVAL Busch + Müller
0 question about this device. Answer the ones you know or ask your own.
Ask a new question about this device
Download the instructions for your Lighting in PDF format for free! Find your manual LEVAL - Busch + Müller and take your electronic device back in hand. On this page are published all the documents necessary for the use of your device. LEVAL by Busch + Müller.
USER MANUAL LEVAL Busch + Müller
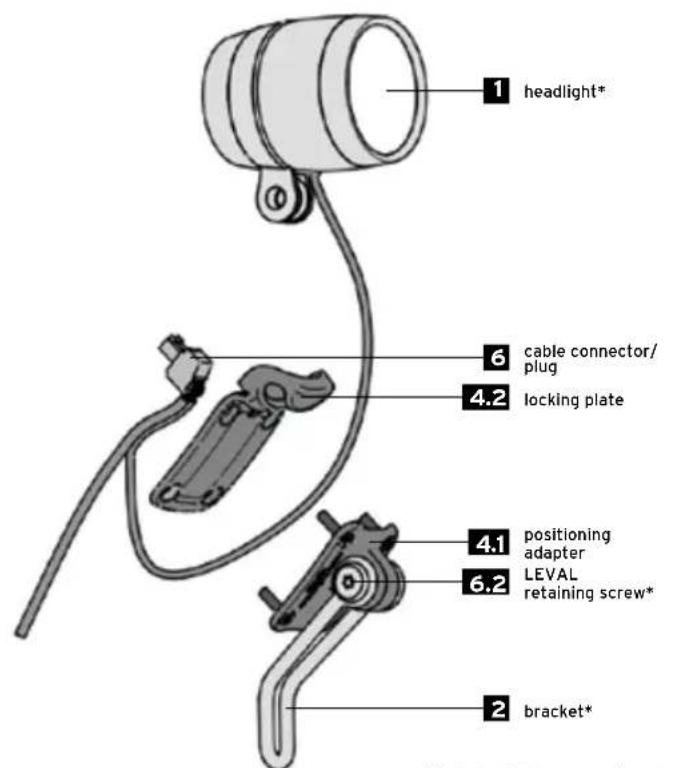
*not included in the scope of supply
Table of content:
-
Busch + Müller LEVAL Curve Light Assistant Page 22
-
Packaging content Page 22
-
Safety information Page 22
-
LEVAL - Legal regulations Page 22
-
LEVAL - Technical specification Page 23
-
Power supply / LEVAL connection Page 23
6.1. Electrical connection of the LEVAL and the headlight to the e-bike's light output Page 24-25
6.2. Electrical connection of the LEVAL to a separate power source Page 26-27
- LEVAL Assembly Page 27
7.1. General assembly Page 27-28
7.2. Initial headlight alignment Page 28-29
7.3. Practical test before initial startup of the LEVAL Page 29
7.4. LEVAL calibration and restart Page 30
7.5. Adjustment of (headlight) position Page 30-31
7.6. Additional product/assembly information Page 31
-
Operation Page 32
-
Additional information Page 32
-
Liability Page 33
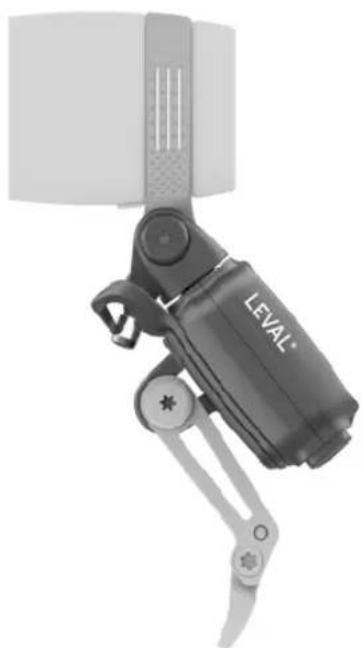
1. Busch + Müller LEVAL Curve Light Assistant
Accessories for bicycles, and bicycles with pedal assistance (e-bikes),
operated via the e-bike system or a separate power source (e.g. power bank)
LEVAL Type No. 365
This Instruction Manual is intended for users with knowledge and experience in assembling and installing bicycle components. Special tools are required. If you do not know how to assemble or install bicycle components or do not have all the necessary tools for the job, please contact a bicycle specialist to have the installation done properly. Otherwise, the cyclist may fall off and suffer serious injuries as a result of improper assembly or installation of the light components. Read this Instruction Manual carefully, follow all the steps described and keep it in a safe place.
2. Packaging content
LEVAL curve light assistant | Fastening fixtures | Positioning adapter | Locking plate | cable connector | Assembly wrench T20/T10 | Instruction manual
3. Safety information
This Instruction Manual uses signal words to alert you to potential hazards or important information. The meaning of the signal words is listed below:
WARNING Describes a hazardous situation which, if not avoided, could result in a fatal accident or serious injury.
NOTICE Indicates information considered important, but not hazard-related (e.g. information related to property damage).
The symbol is used to provide other useful information about your new bicycle lights.
NOTICE Bicycle lights made by Busch + Müller are suitable for use on bicycles cycling on a firm surface. Avoid any extreme use, and never ride down stairs or perform jumps, stunts, tricks, bunny hops or vertical descents on rough terrain.
4. LEVAL - Legal regulations
Before cycling on public roads, you must learn and observe at any time the applicable national laws and statutes as well as local regulations. For information, either consult the Road Traffic Regulations or - depending on your respective place of residence - other sources for information. The LEVAL optimises the light distribution of your headlight when cycling along curves in a way to ensure that the light shines where you need it without dazzling other traffic. However, it is always essential to comply with the basic regulations for headlights and their alignment.
When attaching the LEVAL, make sure that the headlight is not covered under any circumstances. If the LEVAL is switched off, the spotlight must be properly aligned.
In general, the prescribed mounting height ranges between about 400 and 1,200 mm. For details consult your national Road Traffic Regulations or contact a local bicycle specialist retailer.
5. LEVAL - Technical specification
Operating voltage: 5-15 V DC (direct current)
Continuous output: 0.5 W (when activated, switch [3] "ON")
Maximum output: up to 3 W for a short time
Standby mode (switch [3] "OFF"): 0.2 W
Max. load: sufficient for all cable-connected Busch + Müller headlights (except for headlamp IQ-XL, type 169 - can lead to an unsteady light pattern under certain circumstances)
6. Power supply / LEVAL connection
The LEVAL is only suitable for connection to a DC voltage source, not for connection to an AC voltage source such as a dynamo.
The LEVAL can either be connected to the light output of the e-bike system together with the headlight, separately to another switched output of the e-bike system or to a separate power source, e.g. a power bank. The data mentioned under „5. LEVAL - Technical Specification“ must be observed. Additional detailed information is provided in the following sections.
Sufficient power must be available for the operation of the lighting system and the LEVAL curve light assistant!
This must be ensured before putting the LEVAL into operation for the first time. The available power of the power source for the LEVAL (lighting output on the e-bike system or other DC power source) must be higher than the maximum power of all consumers connected to this power source. The consumers always include the LEVAL; other consumers can be: the headlight, rear light, power bank etc. Check this before initial startup!
WARNING If the power provided by the system is not sufficient, there is always the risk that the complete lighting system cannot be switched on at all, or switches off while cycling. This is likely to cause accidents or the cyclist falling off the bike.

Model calculation:
| Parallel connection with the headlight | Connection to a separate power source, e.g. a power bank | ||
| Power provided by the system | 18 W 12 W 5 W | ||
| minus max. head-light demand | -7,5 W -7,5 W n/a | ||
| minus. max. rear light demand | -1,8 W -1,8 W n/a | ||
| minus max. Leval demand | -3,0 W -3,0 W -3 W | ||
| Total 5,7 W -0,3 W | 2 W | ||
| Result: sufficient power insufficient power | sufficient power | ||
| → The LEVAL can be mounted | → The LEVAL should not be mounted | → The LEVAL can be mounted | |
6.1. Electrical connection of the LEVAL and the headlight to the e-bike's light output
If the LEVAL is connected to the light output of an e-bike drive in parallel to the headlight, it is always supplied with power when the lighting system is switched on.
If the maximum power provided is not sufficient, the power output of the drive system can probably be increased. Discuss this with your local retailer.
In order to additionally test whether the available power is sufficient, we recommend carrying out the practical test for this connection variant as described under „7.3. Practical test before initial startup".
The recommended cable length between the headlight [1] and the LEVAL should not be shorter than 200 mm.
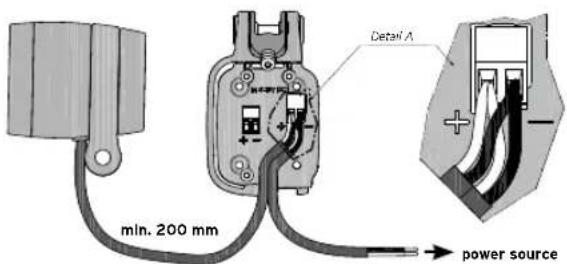
Fig.: Headlight and LEVAL connected to one power source
The power supply connection is positioned under the LEVAL locking plate 4.2 Please proceed as follows:
Connect the cable with the cable connector 6. First prepare both connecting cables (headlight and power source) to be able to insert them into the LEVAL using the cable connector for connection.
Remove 20 mm of the cable sheath from the end of both connecting cables; then strip off 5 mm of the insulation on each exposed cable strand (2x power and 2x earth).
To open the cable connector, loosen the respective screw.
Then insert both the power wire of the headlight and the power source into the correct opening (+) of the cable connector (ensure correct polarity!), and repeat the same with the ground wires (-). Now close the cable connector again with the screw.
After that, open the locking plate 4.2 by loosening the four black screws that hold the locking plate 4.2 on the LEVAL. Then plug in the cable connector € as shown on the housing (detail A). Finally, close the LEVAL again with the locking plate 4.2. To protect the LEVAL from penetrating dirt and moisture, carefully tighten the screws in a way to ensure they cannot come loose all by themselves.
NOTICE When shortening cables, always make sure that the remaining cable lengths are sufficient to make sure the LEVAL can move freely and is not restricted in its freedom of movement by the cables.
6.2. Electrical connection of the LEVAL to a separate power source
(e.g. for connection to bicycles where the lighting system is operated via a dynamo, to another power outlet on the e-bike drive, or to a power bank).
If the LEVAL is connected via a separate power source which is switched on, it can also be active when the lighting system is switched off. The specifications mentioned under „5. LEVAL - Technical specification" must be met by the power source. This must be ensured before putting the LEVAL into operation.
Since the LEVAL is not connected together with the headlight but is powered separately, the headlight cable is not plugged into the LEVAL but connected directly to the power source.
For the power supply of the LEVAL, only the connecting cable of the power source has to be connected to the LEVAL.
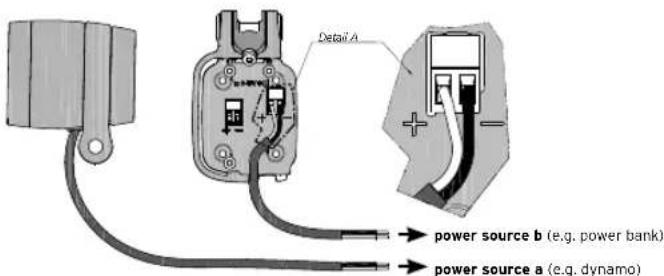
Fig.: Headlight and the LEVAL connected to two separate power sources (a & b)
The connection is under the locking plate 4.2 and is realised by means of the cable connector included in the scope of supply. Proceed as follows: Connect the cable with the cable connector 6.
First prepare the connecting cable of the power source to be able to insert it into the LEVAL using the cable connector/plug for connection. Remove the last 2 cm of the cable sheath from the connecting cable. Now strip off 5 mm of insulation from each of the exposed cable strands (1x power and 1x earth). To open the cable connector/plug, loosen the respective screw.
Then insert both the power wire of the headlight and the power source into the correct opening of the cable plug/connector (ensure correct polarity!), and repeat the same with the ground. Now close the cable connector again with the screw.
After that, open the locking plate 4.2 by loosening the four black screws that hold the locking plate 4.2 to the LEVAL. Then plug in the cable connector 6 as shown on the housing (detail A). Finally, close the LEVAL again with the locking plate 4.2 to protect the LEVAL from penetrating dirt and moisture, carefully tighten the screws in a way to ensure they cannot come loose all by themselves.
NOTICE When shortening cables, always make sure that the remaining cable lengths are sufficient to make sure the LEVAL can move freely and is not restricted in its freedom of movement by the cables.
7. LEVAL assembly
Before assembly, make sure to check there is sufficient power available to operate the LEVAL (see „6. Power Supply / LEVAL connection“).
7.1. General assembly
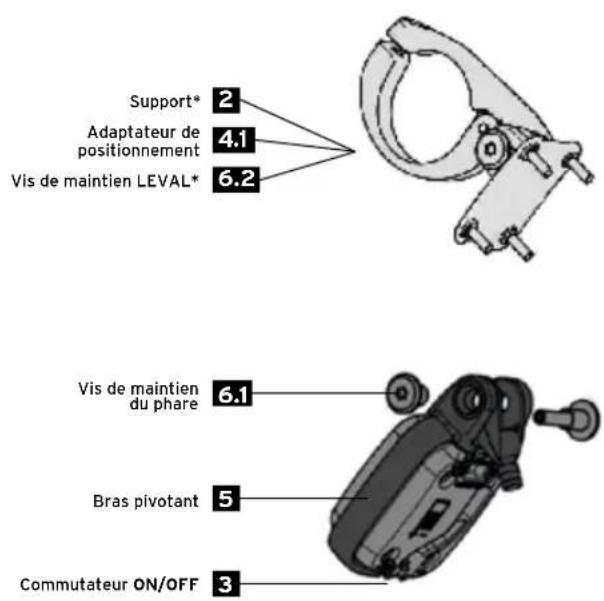
Securely attach the LEVAL to the bicycle between the headlight 1 and the bracket 2 so that the headlight cannot adjust itself or change its position on the bicycle when the LEVAL is switched off (switch 3 to "OFF").
Using the positioning adapter 4.1, the LEVAL can be mounted in four different positions to ensure it is located as compact as possible and at an optimal angle of approx. 45° between the headlight 1 and the bracket 2 (see drawing).
Select the optimum mounting position for your bicycle
The locking plate 4.2 of the LEVAL must always remain on the underside of the LEVAL, while the positioning adapter 4.1 can be attached on the top or underside of the LEVAL (see drawing), depending on the mounting option. For the suspended mounting options (LEVAL mounted underneath the bracket), the LEVAL must therefore be converted as follows: Remove the positioning adapter 4.1 from the locking plate 4.2 by loosening the black screws in the LEVAL housing and attach the positioning adapter on top of the LEVAL housing using the black screws. Tighten the screws in a way to ensure they cannot come loose all by themselves.
NOTICE The swivel arm 5 must always be on the r.h. side in the cycling direction.
upright - short suspended - shortupright - long suspended - long
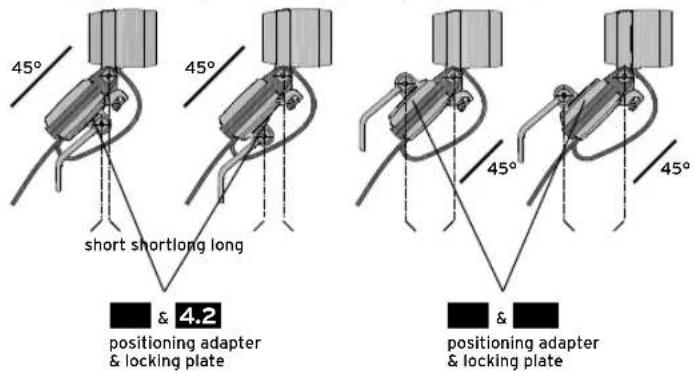
Fig.: Four mounting options for LEVAL
upright - short | upright - long | suspended - short | suspended - long
During assembly, make sure the LEVAL can move freely in all directions and sufficient space for all movements is available. For this purpose, the power cables must also be able to move freely and must not be under tension.
1 When mounting, make sure that the complete assembly (consisting of bracket 2, LEVAL and headlight 1) is as short as possible. A long assembly may cause vibrations at the headlamp due to the extended lever, which could cause an unsteady light pattern. A more stable hold 2 can help in this case.
NOTICE In many cases, a front reflector attached to the headlight can restrict or even hinder the flexibility of the LEVAL. If so, mount a reflector elsewhere according to the legal requirements (in Germany at a height between 400 and 1,200 mm).
7.2. Initial headlight alignment
First align the headlight 1 correctly with the LEVAL deactivated (switch 3 to „OFF“) so that oncoming road traffic is not blinded. On a completely flat road, the horizontal light edge (cut-off line) must always be visible on the road. For this purpose, loosen the headlight retaining screw 6.1 and tighten it again after correctly adjusting the headlamp 1 so that it cannot come loose all by itself.
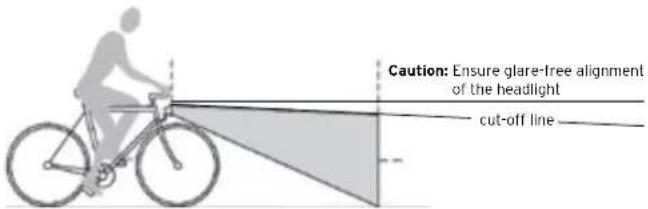
Fig.: Example of headlight alignment
WARNING If unsuitable or Improperly positioned brackets are used to mount a bicycle light, the LEVAL or the headlight may probably come loose, slide down and, in the worst case, get caught in the wheel spokes. Under certain circumstances, this can lead to falls, accidents and serious injuries. Therefore, always make sure the LEVAL is mounted properly.
WARNING Never look directly into the light of the bicycle headlight when switched on.
7.3. Practical test before Initial startup of the LEVAL
- only required in case of parallel connection with the headlight (see 6.1)
After successful installation and initial alignment of the headlight, you can carry out the following practical test before initial startup to determine whether the power provided is sufficient for operation of the lighting system and the LEVAL curve light assistant.
-
Switch on the lighting system. Set the LEVAL switch 3 of the LEVAL to „ON“ so that the LEVAL is also activated.
-
Set the light intensity of the headlight 1 to the highest level. If a rear light with a range of modes is connected, set this to the highest level as well.
-
Tilt the bicycle to the side so that the cut-off line is no longer horizontal.
-
Use your hand to carefully exert a slight pressure on the swivel arm of the LEVAL in the direction of the centre position. As soon as an overload is detected, the LEVAL switches off, yields to the hand force and can simply be turned away.
Results
If the headlight keeps on shining in this test, the energy currently available is sufficient. Briefly switch the LEVAL to „OFF“ via the switch 3, then back to „ON“. The LEVAL is now ready for use. If the headlight 1 no longer lights up or has lost lighting power, the energy currently provided is not sufficient for the maximum load.
7.4. LEVAL calibration and restart
The headlight must be correctly aligned for initial startup (see „7.2. Initial headlight alignment“). Everything else works automatically as the LEVAL uses various sensors for support when cycling along curves and automatically calibrates itself within a few moments when stationary.
As soon as the calibration is complete, the LEVAL starts to adjust the fixture for optimal alignment. If the LEVAL is started in motion, calibration may take a little longer.
If it is impossible to reach the optimum LEVAL position, e.g. because LEVAL is blocked, two attempts are made to move to the optimum position. The LEVAL then stops the attempts, moves back to the centre position and indicates something is wrong by swivelling back and forth briefly and quickly three times.
After that, the LEVAL remains in the centre position to protect the technique.
If the centre position is blocked as well, the LEVAL will attempt to move to this position twice anyway. Since this is impossible, the LEVAL will position itself as close as possible to the centre position. In this case, however, the LEVAL cannot indicate the error by swivelling back and forth briefly and quickly.
As soon as the interfering factor has been eliminated, the LEVAL can be restarted using the switch 3 i.e. first set to „OFF“ and then back to „ON“.
NOTICE If the LEVAL no longer aligns the headlight properly, this may indicate that the power supply is no longer sufficient. Check the power source and, as a precaution, switch the LEVAL to „OFF“ via switch 3 so that it is fixed in the centre position.
CAUTION: In rare cases, external influences such as electromagnetic interference fields may prevent the LEVAL from detecting the correct position and aligning the light field accordingly. Should such a disturbance occur, stop cycling immediately to avoid accidents and recalibrate LEVAL via the switch 3 by setting the LEVAL briefly to „OFF, then back to „ON”.
n Electromagnetic interference fields are rare incidents and mostly confined to small areas.
If malfunctions persist even after several calibration attempts and, if necessary, a change of location, please contact your specialist dealer. As a precaution, deactivate the LEVAL by setting the switch 3 to „OFF”.
7.5. Adjustment of (headlight) position
If the cut-off line of the headlight 1 is too high or too low when cycling along curves (see drawing), the LEVAL must be adjusted in its inclination.
The ideal starting position is a 45° angle of inclination to the road.
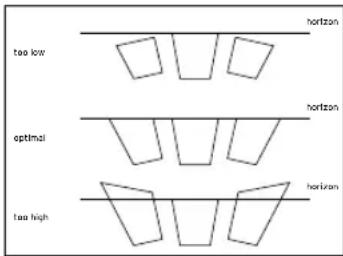
If the cut-off line is too low when cycling along curves, the illuminated area becomes smaller and the LEVAL must be tilted slightly downwards.
If the cut-off line is too high when cycling along curves so that other road users might be dazzled, the LEVAL must be slightly raised.
For this purpose, loosen the LEVAL retaining screw 6.2, adjust the LEVAL inclination and fasten the retaining screw 6.2 again to ensure the LEVAL cannot come off or shift all by itself.
Once the LEVAL has been readjusted, also check the setting of the headlight 1 and align accordingly, if necessary, as described in "7.2. Initial headlight alignment".
WARNING Never adjust the LEVAL setting or the headlight range while cycling! This may cause severe falls and injuries.
Do not use the bicycle if the light beam of your headlight is misaligned or attachment components are too loose. Blinding oncoming traffic can lead to accidents. To align the bicycle headlight or the LEVAL, loosen the headlight retaining screws 6.1 and the LEVAL retaining screw 6.2. Make sure to retighten all screws so that neither the screws nor the headlight or the LEVAL can come loose or move all by themselves.
7.6. Additional product/assembly information
All screws required for assembly are black. These can be loosened and screwed on again without hesitation.
CAUTION: Loosening silver screws renders the warranty null and void (as this would jeopardise proper function).
Silver screws are additionally coated with sealing wax. A damaged sealing wax automatically leads to the loss of our warranty.
8. Operation
To be ready for operation, the LEVAL must be supplied with electric power. If the LEVAL is connected in parallel together with the lighting system (see „6.1. Electrical connection of the LEVAL and the headlight to the e-bike's light output”), this works by switching on the lighting system on the bicycle display.
If the LEVAL is supplied by a separate power source (see „6.2. Electrical connection of the LEVAL to a separate power source”), this power source must be activated.
While the LEVAL switch activates ("ON") or deactivates ("OFF") the LEVAL functions, it does not turn it off completely. LEVAL remains in the standby mode.
Even in the standby mode, the sensors are still active and consume a small amount of power to keep the LEVAL active in the centre position. When restarted, the LEVAL is immediately ready for use.
To turn off the LEVAL completely, you must disconnect the power supply (either switch off the lighting system or the power source, depending on the connection). If the LEVAL is disconnected from the power supply, it maintains the current position. Only when the switch 3 is set to „OFF" the LEVAL mechanism moves it to the centre for its final position.
Setting and fixing the LEVAL in the centre position is possible at any time, mechanically without power, by setting the switch 3 to „OFF“.
When not in use, switch the LEVAL to „OFF“ (= standby mode) using the switch 3 to save power and prevent unnecessary wear and tear. The LEVAL then aligns itself centrally and is fixed like a standard holder without further functions. This function still allows safe cycling even when the LEVAL is not switched on.
WARNING While cycling, operate the LEVAL exclusively via the bicycle display or the control of the lighting system, but never on the LEVAL itself or via other components (power bank, etc.). Always interrupt your ride to prevent accidents and falls.
9. Additional information
Disposal: Electronic components must not be handled as household waste but are to be disposed of as hazardous waste.
10. Liability
In addition to the above-mentioned exclusions of warranty, we do not assume liability for any and all other damage caused by improper handling (e.g. dropping the system, inadequate safety of assembly and its consequences, submersion in water or other liquids etc.). Neither do we assume any liability if silver screws are loosened. Ball bearings and moving parts are subject to a reduced warranty of six months.
Have fun and enjoy safe cycling with your LEVAL!
Technical modifications reserved.
Busch + Müller KG • 58540 Melnerzhagen, Germany • Tel. +49 2354 915-6000 • Info@bumm.de • www.bumm.de
Keep manual chapter 5 in mind: LEVAL works only with 5 - 15 V voltage. NEVER connect to higher voltage, or the electronic will be damaged.
An overview of all headlights approved for use with LEVAL can be found at www.bumm.de/leval
The following things differ from the manual. Please take note!
LEVAL may only be mounted on bicycle parts involved in steering, like e.g. handlebar or fork. The optimum positioning of LEVAL is at a 55° angle to the road. (Correction chapter 7.1. „General assembly“ and 7.5. „Adjustment of (headlight) position“.)
tLEVAL (bete bewertetin toing-bike (pedelec) battery. Connection to a separate power source is not permitted in Germany. (Addition to chapter 6 „Power supply/ LEVAL connection“ and 6.2. „Electrical connection of the tLEVA to a separate power source“.)
890142|0822
Keep manual chapter 5 in mind: LEVAL works only with 5 - 15 V voltage. NEVER connect to higher voltage, or the electronic will be damaged.
An overview of all headlights approved for use with LEVAL can be found at www.bumm.de/leval
The following things differ from the manual. Please take note!
LEVAL may only be mounted on bicycle parts involved in steering, like e.g. handlebar or fork. The optimum positioning of LEVAL is at a 55° angle to the road. (Correction chapter 7.1. „General assembly“ and 7.5. „Adjustment of (headlight) position“.)
LEVAL is to be connected to an e-bike (pedelec) battery. Connection to a separate power source is not permitted in Germany. (Addition to chapter 6 „Power supply/ LEVAL connection“ and 6.2. „Electrical connection of the LEVAL to a separate power source“.)
890142|0822

- TABLE OF CONTENT
- BUSCH + MÜLLER LEVAL CURVE LIGHT ASSISTANT
- ACCESSORIES FOR BICYCLES, AND BICYCLES WITH PEDAL ASSISTANCE (E-BIKES)
- PACKAGING CONTENT
- SAFETY INFORMATION
- LEVAL - LEGAL REGULATIONS
- LEVAL - TECHNICAL SPECIFICATION
- POWER SUPPLY / LEVAL CONNECTION
- SUFFICIENT POWER MUST BE AVAILABLE FOR THE OPERATION OF THE LIGHTING SYSTEM AND THE LEVAL CURVE LIGHT ASSISTANT
- ELECTRICAL CONNECTION OF THE LEVAL AND THE HEADLIGHT TO THE E-BIKE'S LIGHT OUTPUT
- ELECTRICAL CONNECTION OF THE LEVAL TO A SEPARATE POWER SOURCE
- LEVAL ASSEMBLY
- GENERAL ASSEMBLY
- INITIAL HEADLIGHT ALIGNMENT
- PRACTICAL TEST BEFORE INITIAL STARTUP OF THE LEVAL
- RESULTS
- LEVAL CALIBRATION AND RESTART
- ADJUSTMENT OF (HEADLIGHT) POSITION
- ADDITIONAL PRODUCT/ASSEMBLY INFORMATION
- OPERATION
- ADDITIONAL INFORMATION
- LIABILITY
Brand : Busch + Müller
Model : LEVAL
Category : Lighting