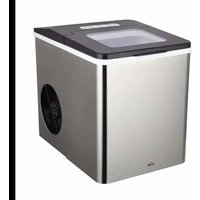
WCICM150S - Ice Maker Witt - Free user manual and instructions
Find the device manual for free WCICM150S Witt in PDF.


| Product Type | Ice Maker |
| Brand | Witt |
| Model | WCICM150S |
| Dimensions (W x D x H) | 330 x 227 x 282 mm |
| Net Weight | 7.7 kg |
| Power Supply | 220-240 V ~ 50/60 Hz |
| Power | 150 W |
| Refrigerant | R600a (24 g) |
| Exterior Material | ABS |
| Production Capacity | Up to 12 kg of ice cubes per 24 h |
| Water Tank Capacity | Up to MAX level |
| Ice Basket Capacity | Approx. 0.6 kg |
| Duration of a Production Cycle | 6 to 15 minutes depending on temperature |
| Selectable Ice Cube Sizes | Small (S) or Large (L) |
| Automatic Shut-off Function | When basket is full or water is low |
| Automatic Cleaning Function | Yes, 60-65 s cycle repeated 5 times |
| Indicator Lights | POWER, ADD WATER, ICE FULL, SMALL, LARGE, CLEAN |
| Recommended Maintenance | Weekly cleaning with water and white vinegar |
| Warranty | 2 years on manufacturing defects |
| After-sales Service | Contact the store or witt.dk |
Frequently Asked Questions - WCICM150S Witt
User questions about WCICM150S Witt
0 question about this device. Answer the ones you know or ask your own.
Ask a new question about this device
Download the instructions for your Ice Maker in PDF format for free! Find your manual WCICM150S - Witt and take your electronic device back in hand. On this page are published all the documents necessary for the use of your device. WCICM150S by Witt.
USER MANUAL WCICM150S Witt
natural_image
Exterior view of a modern stainless steel water heater with a circular vent and lid (no visible text or symbols)Brugsanvisning DK: 2-11
User guide EN: 12-21
Bruksanvisning NO: 22-31
SAFETY INSTRUCTIONS....13
KNOW YOUR ICE MAKER....15
BEFORE FIRST USE 17
USING YOUR ICE MAKER....17
CLEANING AND MAINTENANCE.... 18
TROUBLESHOOTING 19
WARRANTY AND SERVICE 21
Safety instructions
To reduce the risk of fire, explosio, electric shock, or injury when using your ice maker, follow these important safety instructions:
- Before using check that the voltage power corresponds to the one shown on the appliance nameplate.
- Do not remove any safety, warning, or product information labels from your ice maker.
- Plug the ice maker into an exclusive grounded power outlet. No other appliance should be plugged into the same outlet. Be sure that the plug is fully inserted into the receptacle.
- This appliance must be grounded. It is equipped with a power cord having a grounding plug. The plug must be plugged into an outlet that is properly installed and grounded.
- Avoid the use of an extension cord because it may overheat and cause a risk of fire. However, if it is necessary to use an extension cord:
a) Use only extension cord with grounding plug.
b) The marked rating of an extension cord must be equal to or greater than the rating of this appliance.
c) It should be positioned such that it does not drape over the counter or tabletop where it can be pulled on by children intentionally. - Do not operate any appliance with a damage cord or plug or after the appliance malfunction or has been damaged in any manner. Return the appliance to the nearest authorized service facility for examination, repair or adjustment.
- Do not let cord hang over edge of table or counter.
- Do not place on or near a hot gas or electric burner, or in a heated oven.
- Place power cord in such a way it cannot be pulled on by children or cause a tripping hazard.
- Place power cord in such a way that it is not in contact with hot surfaces.
- The use of attachment not recommended or sold by manufacturer may cause fire, electric shock or injury.
- Do not touch the evaporator when using the ice maker or making ice to avoid being suffer from frostbite.
- Do not immerse any part of the product in water.
- To disconnect, turn any control to "OFF", then remove plug from wall outlet.
- Do not plug or unplug product with wet hands.
- Unplug the product before cleaning, maintaining and when not in use.
- Do not use with water that is microbiologically unsafe or of unknown quality.
- Do not clean your ice maker with any flammable fluids. The fumes may create a fire hazard or explosion.
- Do not overturn the ice maker. If the ice maker is overturned accidentally, make it stand steadily for 2 hours before power it on again.
-
If the ice maker is brought in from outside in wintertime, do not use for a few hours, allowing the unit to warm up to the room temperature before operating.
-
Never put flammable, explosive and corrosive articles into the ice maker.
-
Never use the ice maker when there is flammable gas leakage.
-
Never store or use gas and other flammable articles near the ice maker to avoid any fire.
-
Unplug the ice maker before moving it to avoid damaging the refrigerating system.
-
Do not attempt to disassemble, repair, modify, or replace any part of your product.
-
The appliance is not to be used by persons (including children) with reduced physical, sensory or mental capabilities, or lack of experience and knowledge, unless they have been given supervision or instruction.
-
Children should be supervised that they can not play with the appliance.
-
Cleaning and user maintenance shall not be made by children without supervision.
-
Close supervision is necessary when any appliance is used by or near children.
-
Do not leave the appliance unattended while in use.
-
Do not use outdoors.
-
Do not use the appliance for other than intended use.
-
Please abandon the ice maker according to the local regulations as it uses flammable blowing gas and refrigerant.
SAVE THESE INSTRUCTIONS HOUSEHOLD USE ONLY
Know your ice maker
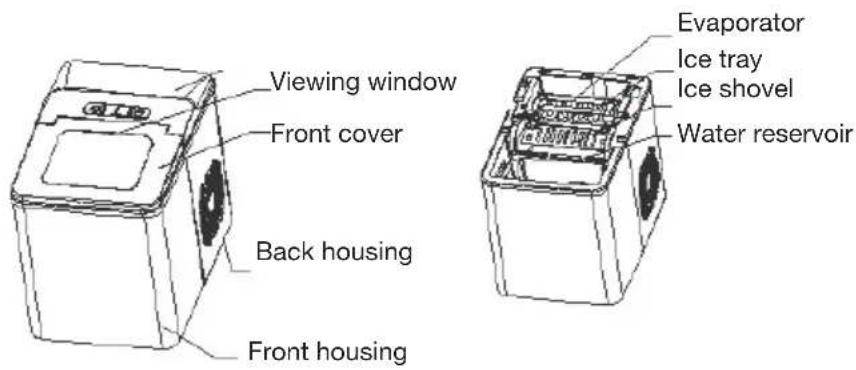
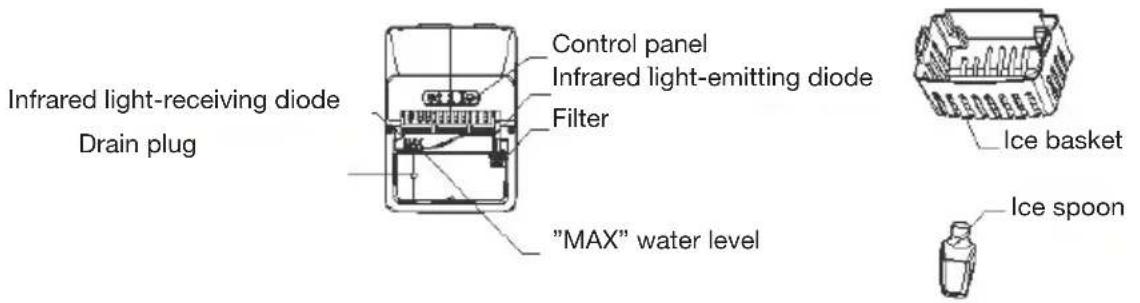
Control panel
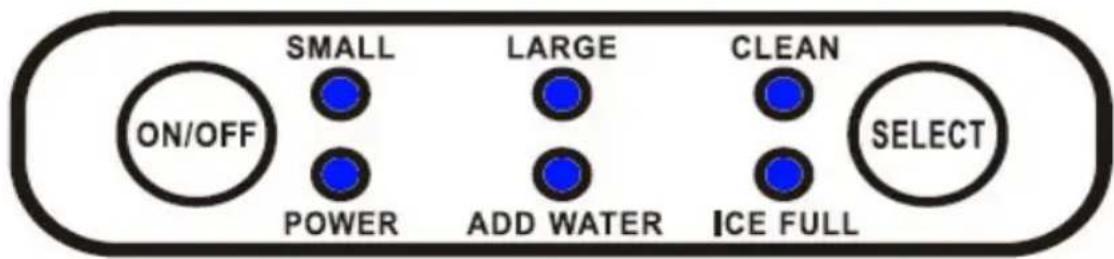
| Key (with indicator) Function | |
| ON/OFF Start or stop the appliance | |
| POWER Standby mode: "POWER" indicator blinks;Working condition: "POWER" indicator lights solidly. | |
| ICE FULL "ICE FULL" indicator lights up when the ice basket is full. | |
| ADD WATER "ADD WATER" indicator lights up when the water reservoir is low on water and needs to be filled. | |
| SMALL The indicator lights up when small ice is selected. | |
| LARGE The indicator lights up when large ice is selected. | |
| CLEAN "CLEAN" indicator lights up when the appliance needs to be cleaned. | |
| SELECT Can select "S", "L" or "CLEAN" under standby mode, after power on, can select "S" or "L". | |
BEFORE FIRST USE
- Unpack the appliance, then check and make sure that all the accessories including ice basket and ice scoop etc. are complete. Please contact with the client service department if some accessories are missed.
- Please ensure the ice maker is level and on a stable table or platform to avoid malfunction.
- The incline angle of the ice maker cabinet should not exceed 45^ during transportation or use. Do not turn the ice maker upside down. Doing so could cause the compressor or refrigerating system to operate incorrectly. Please allow time for the fluids in the compressor to settle after the ice maker is moved or transported. Before using the ice maker for the first time, please wait for 2 hours after the unit has been leveled and positioned in the proper place.
- The appliance must be placed on a dry and level surface with sufficient ventilation, far from heat sources such as ovens, heaters and corrosive gases. Leave about a 6-inch (15cm) clearance on all sides of the ice maker for proper ventilation.
- Do not fill the water reservoir with hot water. This may damage the ice maker. It is best to fill the water reservoir with water of room temperature or lower.
- Do not use the appliance at a very cold environment (lower than 5 °C).
- Clean the appliance by following the operation of “CLEANING AND MAINTENANCE” before operate.
Using your ice maker
- Plug the ice maker into the wall outlet, the "POWER" indicator blinks.
NOTE: Please make the ice maker be rested for 30 minutes before plug if it has been moved. - Open the top lid and remove the ice basket.
-
Fill the water reservoir with drinking water.
NOTE: Do not fill above the MAX water level mark. -
Replace the ice basket and close the top lid.
-
Press "ON/OFF" key, and the "POWER" indicator lights solidly. At that time, press "SELECT" key to select the ice size. If need to clean the appliance, press "SELECT" key to select "CLEAN" function under standby mode.
-
The ice-making cycle will last approximately 6-15 minutes, depending on the ambient temperature and water temperature.
-
The ice-making cycle starts with water being pumped into the ice tray situated below the evaporator. Over the next 6-15 minutes ice forms on the evaporator. Once this has completed, the ice tray will tilt backwards and the remaining water in the ice tray is drained back into the water reservoir. The ice cubes are then dropped from the evaporator and pushed forward into the ice basket by the ice shovel. The ice tray will automatically move back into position under the evaporator and start the next cycle.
-
The “ICE FULL” indicator will light up when the ice basket is full and then the ice maker will stop the ice-making cycle automatically. Gently remove the ice from the ice basket with the ice scoop. About 5 seconds later, the ice maker will restart its ice making function automatically.
-
The “ADD WATER” indicator will light up when the water reservoir is lack of water and the ice-making cycle will stop automatically. At that time, remove the ice basket and add water to the water reservoir, and then press “ON/OFF” key again to restart the ice-making cycle. The appliance will start working automatically after about 30 minutes if the operator forgets to restart the appliance after refill.
- When you have got your desired amount of ice, stop the ice making cycle by pressing the "ON/OFF" key and unplug the unit from the wall outlet.
- Open the top lid and transfer the ice to a freezer.
- Allow the ice maker to reach room temperature.
- Suggest replacing the water every a week. Please empty the water reservoir if the ice maker is not used for a long time.
Cleaning and maintenance
- Stop the ice-making cycle by pressing the "ON/OFF" key, unplug the ice maker from the wall outlet and allow it to warm up to room temperature.
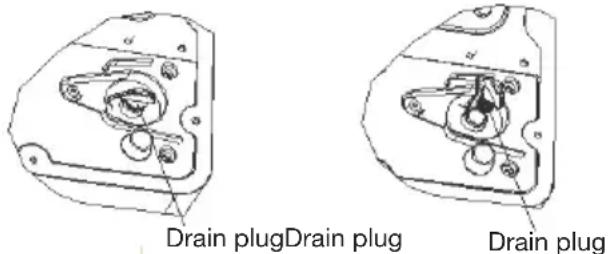
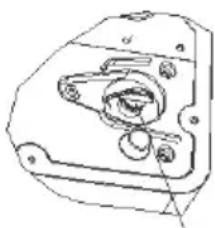
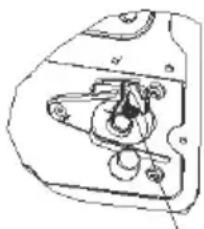
- Tilt the whole unit for about 30^ and move it forward to the place where the drain plug is about 60mm away from the countertop. Open the drain plug and drain the excess water (see Fig.1).
- Remove the ice basket.
- Clean the ice maker interior with a soft cloth soaked with warm water and vinegar, then rinse with clean water and then drain all the water.
- Replace the drain plug well in position. Wash the ice basket and ice scoop in warm soapy water. Rinse and dry.
- Clean the exterior of the ice maker with a soft damp cloth. Use a mild dishwashing soap, if necessary.
NOTE: Do not use organic solvent, boiled water, detergent, strong acid and strong alkali etc. for cleaning.
- Please empty the water reservoir and dry it for storage if the ice maker is not used for a long time.
- Deep cleaning
Fill the ice cube maker with lukewarm water to the MAX line and add a teaspoon of distilled white vinegar. Select 'CLEAN' and then press the 'ON/OFF' button to start the cleaning programme.
We recommend that you deep clean the Ice Cube Maker once per week if using it on a daily basis.
When the programme starts, the ‘CLEAN’ display will show constantly and it will start blinking once the cleaning programme has been completed.
A cleaning process takes around 60-65 seconds and the cycle will progress automatically (5 cycles).
When the cleaning programme is completed, empty the water with the vinegar and then fill the beholder up to the MAX line with clean water.
Run the ‘CLEAN’ programme again to flush out the device.
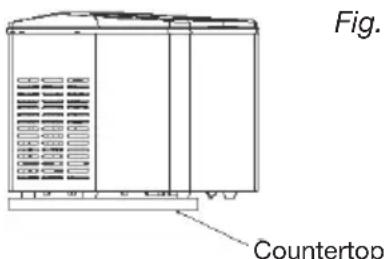
Fig. 1
To disinfect the machine, you can use disinfectants made for ice cube makers as long as they are PH neutral (level 6-7). Follow the instructions on the bottle.
| Problem Cause Solution | ||
| “ADD WATER” indicator turns on | 1. Low water level or lack of water.2. The water screen at the bottom of water reservoir is blocked.3. Pump malfunction. | 1. Stop making ice, refill water and then press “ON/OFF” key to restart ice-making cycle.2. Do cleaning3. Send it to the authorized department for repair. |
| “ICE FULL” indicator lights up | 1. Ice basket is full and the infrared light is blocked by the ice.2. Infrared light-emitting diode & light-receiving diode do not work. | 1. Remove the ice from ice basket.2a. Wipe up the foreign objects on the infrared light-emitting diode & light-receiving diode and restart the ice maker.2b. Call Customer Service if the infrared light-emitting diode & light-receiving diode still can not work after wiping up the foreign objects on them and restarting the ice maker. |
| “ADD WATER” and “ICE FULL” indicators turn on simultaneously | 1. The ice tray is not in the right position.2. The “ICE FULL” condition can not be detected as the infrared light module is interfered by the sunlight. | 1. Unplug the appliance and check if the ice tray is blocked by something.2. Unplug the appliance and move it to a place which is not exposed to the sunlight, then plug the appliance and activate it again. |
| The ice collects together. | Making ice takes too much time. | Stop making ice and restart the ice-making cycle after the ice melts. |
| The water in the water reservoir is of too low temperature. | Fill the water reservoir with water ranges between 8 °C and 25 °C. | |
| The ice-making cycle seems normal but no ice is produced. | The ambient temperature or water temperature is too high. | Start the ice-making cycle at a environment with an ambient temperature less than 32 °C and fill the water reservoir with some cold water. |
| Refrigerating system leaks. | Call customer service | |
| Refrigerating system blocks. | Call customer service | |
| Poor ice-making result 1. Poor | heat dissipation.The water temperature is too high.The ambient temperature is too high. | Leave a 15-cm clearance on all sides of the ice maker for proper ventilation.Fill the water reservoir with water ranges between 8 °C and 25 °C.Operate the ice maker at an ambient temperature between 10 °C and 32 °C. |
TECHNICAL PARAMETERS
Model: WCICM150S
Applicable climate: ST/SN/N/T
Power source: 220-240V/50-60Hz
Rated power: 150W
Refrigerant/Refrigerant amount: R600a / 24g
Net weight: 7.7 kg
Housing: ABS
Unit size: 330x227x282 mm
Capacity: Produces approx. 12 kg ice in 24 hours, depending on room temperature and water temperature.

Disposal/recycling information
According to the Waste Electrical and Electronic Equipment Directive, do not dispose this product with your normal domestic waste at the end of its life span. Therefore, please deliver it at no charge to your appropriately licensed local collecting facilities (e.g. recycling yard) concerned with the recycling of electrical and electronic equipment.
Please approach your local authorities for how to dispose the product.
WARRANTY AND SERVICE
There is a 2-year warranty period if your new product stops working due to manufacturing or material faults which begins from the documented date of purchase. The warranty covers materials and the cost of labour. When inquiring about service, please state the product name and serial number. You can find this information on the type plate. You can write down the information here in these instructions so that you have them at hand. This makes it easier for the service technician to find the correct spare parts.
The warranty does not cover:
- Faults and damage that are not due to manufacturing or material issues
- Damage caused by failure to properly maintain the device - including failing to clean it
- Fire and/or water damage or moisture damage on the product
- Damage caused during transport if the product was transported without proper packaging
- Damage caused by the use of unoriginal spare parts
- Damage resulting from failing to follow the instructions on how to use the device
- If the device has not been set up/assembled as specified in the instructions
- If non-professionals have installed or repaired the product
- Batteries or any other parts subject to normal wear and tear
Damage during transport
If the product is damaged during transport and this is discovered when the retailer delivers the product to the customer, this is exclusively a matter between the customer and the retailer. In cases where customers have handled the transport of the product themselves, the supplier shall not be liable for any potential damage during transport. Any damage caused during transport must be reported immediately and no later than 24 hours after the product has been delivered. If not, the customer's claim will be rejected.
Unnecessary service
If the product is sent in to be serviced and it turns out that the fault could have been fixed independently by following the product's instruction manual, the customer will need to pay the service fee.
Commercial purchases
Commercial purchases are all purchases of devices that are not intended to be used in private households but instead intended to be used for commercial purposes (in restaurants, cafés, canteens, etc.) or intended to be rented out or otherwise used by multiple users in turn.
There is no warranty offered for commercial purchases, as this product is only intended for regular household use.
Service
For service and spare parts in England and Ireland please call below-mentioned number and you will be directed accordingly or send us an email.
Witt UK & Ireland Ltd.
(44) 148 351 6633 / info@witt.dk
We accept no liability for printing errors.
The manufacturer/distributor cannot be held liable for damage to products or individuals if the safety instructions were not followed. The warranty shall not cover cases where the instructions have not been followed.
Innholdsfortegnelse
SIKKERHETSANVISNINGER....23
OVERSIKT OVER APPARATET 25
F∅R F∅RSTE GANGS BRUK....27
BETJENING AV APPARATET....27
RENGJ∅RING OG VEDLIKEHOLD 28
FEILS∅KING....29
REKLAMASJONSRETT OG SERVICE....31
FOUTEN OPSPOREN....39
RECHT OP RECLAMATIE EN SERVICE 41
natural_image
Technical line drawing of a mechanical component with no visible text or symbolsBottenplugg
natural_image
Mechanical component diagram showing internal parts and mounting holes (no text or labels)Bottenplugg
PUHDISTUS JA HUOLTO....69
natural_image
Line drawing of a server rack unit with multiple drive bays (no text or labels)Kuva 1
Pöytälevy
natural_image
Technical line drawing of a mechanical component with no visible text or symbolsIPohjaventtiili
natural_image
Technical line drawing of a mechanical component with no visible text or symbolsPohjaventtiili
- Safety instructions
- SAVE THESE INSTRUCTIONS HOUSEHOLD USE ONLY
- Know your ice maker
- Control panel
- BEFORE FIRST USE
- Using your ice maker
- Cleaning and maintenance
- NOTE: Do not use organic solvent, boiled water, detergent, strong acid and strong alkali etc. for cleaning.
- TECHNICAL PARAMETERS
- Disposal/recycling information
- WARRANTY AND SERVICE
- The warranty does not cover:
- Damage during transport
- Unnecessary service
- Commercial purchases
- Service
- Innholdsfortegnelse
Brand : Witt
Model : WCICM150S
Category : Ice Maker