
HRN 536C VK - Lawn mower Honda - Free user manual and instructions
Find the device manual for free HRN 536C VK Honda in PDF.

| Product Type | Walk-behind lawn mower |
| Brand and model | Honda HRN 536C VK (types VKEA and VYEA) |
| Dimensions (L × W × H) | 1550 × 575 × 1035 mm |
| Weight | 36.0 kg (VKEA) / 39.9 kg (VYEA) |
| Cutting width | 530 mm |
| Cutting height adjustments | 7 positions: 27, 39, 51, 64, 76, 88, 100 mm |
| Grass bag capacity | 70 L |
| Engine | GCV170, 4-stroke, single cylinder, 166 cm³ |
| Nominal power | 3.2 kW |
| Fuel | Unleaded petrol (octane rating ≥ 91), capacity 0.91 L |
| Recommended engine oil | SAE 10W-30, API SN or later, capacity 0.35-0.40 L |
| Sound level (at operator's ear) | 85 dB(A) |
| Guaranteed sound power level | 98 dB(A) |
| Transmitted vibrations | 5.0 m/s² (VKEA) / 5.4 m/s² (VYEA) |
| Drive system | SMART Drive variable speed (0 to 1.75 m/s) |
| Clip Director | Adjustable: bagging or mulching |
| Spark plug | NGK BPR5ES (gap 0.7-0.8 mm) |
| Protection and safety | Cutting blade control lever, Roto-Stop (VYEA), discharge guard |
| Maintenance | Oil change, air filter cleaning, blade sharpening |
Frequently Asked Questions - HRN 536C VK Honda
User questions about HRN 536C VK Honda
0 question about this device. Answer the ones you know or ask your own.
Ask a new question about this device
Download the instructions for your Lawn mower in PDF format for free! Find your manual HRN 536C VK - Honda and take your electronic device back in hand. On this page are published all the documents necessary for the use of your device. HRN 536C VK by Honda.
USER MANUAL HRN 536C VK Honda
Thank you for purchasing a Honda lawnmower!
This manual covers the operation and maintenance of the Honda HRN536CVKEA and HRN536CVYEA lawnmowers.
We want to help you get the best results from your new mower and to operate it safely. This manual contains the information on how to do that; please read it carefully.
This manual should be considered a permanent part of the lawnmower and should remain with it if it is resold.
If you have a problem or questions concerning the mower, contact your supplying dealer.
We recommend that you read the warranty policy to fully understand its coverage and your responsibilities of ownership.
American Honda Motor Co., Inc. reserves the right to make changes at any time without notice and without incurring any obligation.
No part of this publication may be reproduced without written permission.
SAFETY MESSAGES
Pay special attention to statements preceded by the following words:
DANGER
You WILL be KILLED or SERIOUSLY HURT if you don't follow instructions.
WARNING
You CAN be KILLED or SERIOUSLY HURT if you don't follow instructions.
CAUTION
You CAN be HURT if you don't follow instructions.
Each message tells you what the hazard is, what can happen, and what you can do to avoid or reduce injury.
DAMAGE PREVENTION MESSAGES
You will also see other important messages that are preceded by the following word:
NOTICE
Your lawnmower, other property, or the environment can be damaged if you don't follow instructions.
The purpose of these messages is to help prevent damage to your lawnmower, other property, or the environment.

00X3RVR8 6000
HONDA
OWNER'S MANUAL
(Original instructions)
HRN536CVKEA • HRN536CVYEA
PEDESTRIAN CONTROLLED
LAWNMOWER
natural_image
Two Honda lawn mower machines shown from front and back angles, no visible text or symbols on the motors themselves.CONTENTS
INTRODUCTION....1
SAFETY MESSAGES ..... 1
SAFETY INSTRUCTIONS ..... 2
Safety Label Location ..... 3
Product Identification Plate ... 3
COMPONENT IDENTIFICATION3
SETUP 4
CONTROLS 5
Fuel Valve 5
Cutting-mean Control System . 5
Smart Drive Control ..... 5
Throttle Lever. 5
Cutting Height Adjustment
Levers 5
Clip Director Lever. . . . . . . . . 6
PRE-OPERATION CHECKS ... 6
Cutting Means 6
Engine Oil Level.....7
Fuel 7
Grass Catcher 8
Cutting Height 8
Clip Direction 8
OPERATION 9
Mowing Precautions ..... 9
Starting The Engine....9
Stopping The Engine.....9
Safe Mowing Practices ..... 10
Mowing Tips 10
MAINTENANCE....11
Maintenance Safety..... 11
Maintenance Schedule ..... 12
Engine Maintenance ..... 12
Cutting Means Removal And
Installation 14
Grass Catcher Cleaning And
Replacement 14
Operation Check Of The
Cutting-means Control ..... 15
TRANSPORTING.... 15
STORAGE 15
TROUBLESHOOTING.....16
SPECIFICATIONS ..... 17
Honda Warranty Conditions,
EC Declaration of Conformity,
Honda Distributor Locations
...Last pages
© 2021 American Honda Motor Co., Inc.— All Rights Reserved
HPE.2021.06
PRINTED IN U.S.A.
SAFETY INSTRUCTIONS
WARNING
To ensure safe operation –
- Honda lawnmowers are designed to give safe and dependable service if operated according to instructions. Read and understand the Owner's Manual before operating the mower. Failure to do so could result in personal injury or equipment damage.
Tampering and Altering
Never attempt to tamper with or alter the emission control system. Among those acts that constitute tampering are:
- Removal or alteration of any part of the intake, fuel, or exhaust systems.
-
Altering or defeating the governor linkage or speed-adjusting mechanism to cause the engine to operate outside its design parameters.
-
Read instructions carefully, and become familiar with controls and proper use of equipment.
- Use the lawnmower for the purpose it is intended for, that is mowing and collecting grass. Any other use could be dangerous or damage the equipment.
- Never allow children or people unfamiliar with these instructions to use the lawnmower. Local regulations may restrict the age of the operator.
- Never mow when:
- People, especially children, or pets are nearby.
- User is under medication or has swallowed substance known to affect judgment or reactions.
- There is a risk of adverse weather such as lightning or a storm.
- Keep in mind that the operator or user is responsible for injuries or hazards occurring to other people or their property.
- While mowing, always wear substantial footwear and long trousers. Do not operate the equipment when barefoot or wearing sandals.
- Thoroughly inspect the area where the equipment is to be used, and remove all objects which may be thrown by the machine (stones, branches, wires, toys, bones, etc...).
- WARNING - Petrol is highly flammable:
- Store fuel in containers specifically designed for this purpose.
- Refuel outdoors only, before starting the engine, and do not smoke while refueling or handling fuel.
- Never remove the cap of the fuel tank or add petrol while the engine is running or when the engine is hot.
- If petrol is spilled, do not attempt to start the engine, but move the machine away from the area of spillage, and avoid creating any source of ignition until the petrol vapors have dissipated.
- Install fuel caps securely.
- Before tipping the lawnmower to maintain the cutting means or drain oil, remove fuel from the tank.
- Replace faulty mufflers.
- Before using, always visually inspect to see that the cutting means, cutting-means bolts, and cutting-means enclosure are not worn or damaged. Replace worn or damaged cutting means and cutting-means bolts in sets to preserve balance.
- Do not operate the engine in a confined space where dangerous carbon monoxide fumes can collect.
- Mow only in daylight or good artificial light. Do not mow if visibility is impaired.
- If there is a risk of adverse weather such as lightning or a storm, stop operation.
- Avoid operating the equipment in wet grass, where possible.
- While mowing, always keep the safety distance to the cutting means, which is provided by the handle length.
- Walk, never run. Do not let yourself be pulled by the lawnmower.
• Always be sure of your footing on slopes. Mow across the face of slopes, never up and down.
• Exercise extreme caution when changing direction on slopes.
- Do not mow slopes of more than 20^ .
- Use extreme caution when pulling the lawnmower toward you.
- Stop the cutting means if the lawnmower has to be tilted for transporting, when crossing surfaces other than grass, and when transporting the lawnmower to and from the area to be mowed.
- Do not attempt to tamper with or disable safety systems.
- Never operate the lawnmower with defective guards or shields, or without safety devices such as discharge guard and/or grass catcher.
- Do not change the engine governor setting or over-speed the engine.
- Disengage the cutting-means control and drive clutch control before starting the machine.
- Start the engine carefully according to the instructions and with feet well away from the cutting means.
- Do not tilt the lawnmower when starting the engine.
Start the lawnmower on a level surface, free of high grass or obstacles. - Keep hands and feet away from rotating parts.
Do not start the engine when standing in front of the discharge opening. - Never pick up or carry a lawnmower while the engine is running.
- Stop the engine and disconnect the spark plug cap:
– Before any operation under the cutting-means enclosure or the discharge chute.
– Before checking, cleaning, or working on the lawnmower. - After striking a foreign object. Inspect the lawnmower for damage and make repairs before restarting and operating the lawnmower.
- If lawnmower starts to vibrate abnormally, Check immediately the cause of the vibration and perform the necessary repair.
- Stop the engine in the following cases:
- Whenever you leave the lawnmower.
– Before refueling the lawnmower.
- Stop the cutting means in the following cases:
- When installing or removing the grass catcher.
– Before adjusting the cutting height.
- Reduce the throttle setting (if applicable) during engine shut-down, and turn the fuel valve off at the conclusion of mowing.
- Using any attachments other than those recommended in this manual may cause damage to your lawnmower and such damage will not be covered by your guarantee.
- Keep all nuts, bolts, and screws tight to be sure the equipment is in safe working condition. Regular maintenance is an essential aid to user's safety and retaining a high level of performance.
- Never store the equipment with petrol in the tank inside a building where fumes may reach an open flame, spark or high temperature source.
- Allow the engine to cool before storing in any enclosure.
- To reduce the fire hazard, keep the lawnmower, especially the engine and silencer, the petrol storage area, and battery compartment (if applicable) free of grass, leaves, or excessive grease.
Do not leave container of grass cuttings in or near a building.
- If the fuel tank has to be drained, this should be done outdoors with a cold engine.
- Check the grass catcher frequently for wear or deterioration.
- Do not use the machine with worn or damaged parts.
Part must be replaced, not repaired. Replace worn or damaged parts with Honda genuine parts.
Cutting means must always bear the mark Honda and the reference number. Non equivalent quality parts may damage the machine and be prejudicial to your safety.
- Wear thick gloves when removing or installing the cutting means or when cleaning the cutting-means enclosure. When tightening or loosening the cutting-means bolts, use a wooden block to prevent the cutting means from rotating.
• Always make sure the cutting means is correctly balanced when sharpening.
- Wear eye protection.
- Never use the machine in cases of fatigue or illness of the user, or after consumption of medications, drugs, alcohol or dangerous substances which might interfere with his ability regarding reflexes and concentration.
- When using the machine, always wear safety shoes that are strong and non-slip and long trousers. Do not use the machine with bare feet or wearing open shoes. Avoid wearing chains, bracelets or baggy clothes with loose parts or with lacing or neck ties. Long hair must be tied back. Always wear an anti-noise helmet.
- Please remember that the operator or user is responsible for any accidents or unexpected events that may occur to other persons or their property. The user is responsible for checking on possible risks due to the ground to be worked on, and for taking all precautions necessary for ensuring his own safety and that of others, in particular on sloping ground, rough, slippery or unstable terrain, or near holes, ditches or banks.
- CAUTION – The levels for noise and vibration indicated in this information sheet are the maximum values for using the machine. The use of an unbalanced cutting device, an excessive speed of movement and a lack of maintenance have a significant effect on sound emissions and vibration. It is therefore necessary to take preventive measures to eliminate all possible damage due to high noise levels, and stresses due to vibrations; please ensure that the machine is well maintained, wear an anti-noise helmet. Take breaks during the work.
Disposal
To protect the environment, do not dispose of this product, battery, engine oil, etc. carelessly by leaving them in the waste. Observe the local laws and regulations or consult your authorized Honda dealer for disposal.
This label warns you of potential hazards that can cause serious injury. Carefully read meaning. If label comes off or becomes hard to read, contact your dealer for a replacement.
Letter Meaning
| A | 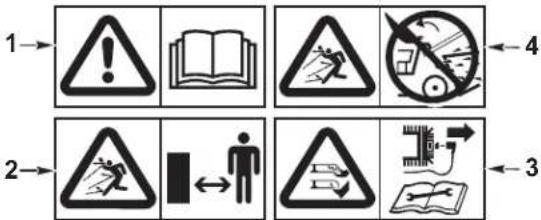 |
| 1. Read the owner's manual before using the mower.2. Risk of projections: Keep third persons away from the area during use.3. Risk of cuts. Rotating cutting means: Do not put hands or feet inside the cutting-means enclosure. Disconnect the spark plug cap before performing any operation of maintenance or repairs.4. Do not operate without either cutting-means enclosure or grass catcher in place. |
| B |  |
| 5. Read the owner's manual before using the mower.6. The engine emits toxic carbon monoxide. Do not run in an enclosed area.7. Petrol is highly flammable. Stop the engine before refueling. |
PRODUCT IDENTIFICATION PLATE
Letter Meaning
| C |  |
| 1. Guaranteed sound power level according to Directive 2000/14/EC2. Conformity mark, according to the EC-Directive3. Optional conformity mark4. Conformity mark for United Kingdom5. Nominal power in kilowatts6. Maximum engine speed7. Production date8. Weight in kilograms9. Serial number10. Model11. Authorized representative name and address12. Manufacturer's name and address | |
| Name and address of manufacturer and authorized representatives are written in the "EC Declaration of Conformity" and "UK Declaration of Conformity" in this Owner's Manual. |
COMPONENT IDENTIFICATION
VKEA Type
![VKEA Type [11] [1] [2] [18] [3] [15] [14] [10] A (LABEL) B (LABEL) C (LABEL) [6] [4] [5] [17] [8] [7] [9] [8] SONDA](/content/2026/04/668918/images/886cef35506a3d4c3464f32dfd7ee31a62a4ab900ce242c27abefde8ca3070f1.jpg)
![VYEA Type [11] [1] [2] [18] [3] [15] [14] [13] [9] [8] [7] [10] [16] A (LABEL) C (LABEL) B (LABEL) BONDA HONDA [6] [4] [5] [17] [8] [19]](/content/2026/04/668918/images/a0c5f537319b76f5590c99dea11c8332b7541127686cdc9269dedb4ebb7bcc9b.jpg)
| 1 | Cutting-means control lever (Starts and stops the cutting means) |
| 2 | Handlebar 12 Handlebar adjust knob (2 |
| 3 | Fuel tank cap 13 Fuel valve |
| 4 | Cutting-means enclosure 14 Engine se |
| 5 | Muffler 15 Air cleaner |
| 6 | Oil filler cap |
| 7 | Clip Director knob |
| 8 | Cutting height adjustment lever (2) |
| 9 | Grass catcher |
| 10 | Recoil starter |
| 11 Smart Drive control |
| al number |
| 16 Carburetor |
| 17 Spark plug cap |
| 18 Discharge guard |
| 19 Throttle Lever (VYEA) |
| 20 Roto-Stop Button (VYEA) |
SETUP
UNPACKING
Remove all the cardboard from around the handlebar.
HANDLEBAR SETUP
Turn the handlebar adjust knobs into the unlocked position, and then carefully raise the handlebar into the mowing position ①. The VKEA type requires the cutting-means control lever ② to be pulled against the handlebar.

Align the adjust knobs with one of the two holes on each handle stay. Setting the adjust knobs in the lowest holes raises the handlebar to its highest position.
Turn the handlebar adjust knobs 90 degrees into the locked position, making sure both sides are positioned at the same height.
NOTICE
Do not allow the control cables to become caught, pinched, or kinked while unfolding the handlebar. The cables or engine control system may be damaged.
GRASS CATCHER ASSEMBLY
- Install the assembled frame [1] into the fabric grass catcher [2], keeping the grass catcher handle [3] exposed.
- Secure the seven plastic clips [4] to attach the fabric catcher to the frame.
![[2] HONDA [3] [4] (7) [1] HONDA](/content/2026/04/668918/images/cdf4defe0f5379c21f34b1f76f626f3e446d6eead3b745e1419a6bdd1c60501c.jpg)
Lift the discharge guard [1] and install the grass catcher [2].
![[1] [2] HONDA](/content/2026/04/668918/images/3bd7877f1fd85971dff4945eeb5169c961dd16fff0841a7058c6589804f6ee07.jpg)
ENGINE OIL
The mower is shipped WITHOUT OIL in the engine.
Add enough SAE 10W-30 API service category SN or later oil to bring the oil level between the upper limit [2] and lower limit [3] marks on the dipstick [1] as shown.
Do not overfill the engine with oil. If the engine is overfilled, the excess oil may get transferred to the air cleaner housing and air filter.
natural_image
Close-up of a red and black lawn mower being adjusted with a tool, no visible text or symbols![HOTDA [1] [2] [3]](/content/2026/04/668918/images/b848a8c10ce96e7ca928f827f6a88bccc592b185a69b8aa94248faa70d5637b2.jpg)
FUEL
Refer to page 7.
BEFORE USING YOUR LAWNMOWER
Before using the lawnmower, all mower operators must read the following chapters:
• SAFETY INSTRUCTIONS (page 2)
• CONTROLS (page 5)
- PRE-OPERATION CHECKS (page 6)
• OPERATION (page 9)
• MAINTENANCE SCHEDULE (page 12)
CONTROLS
FUEL VALVE
The fuel valve [1] opens and closes the connection between the fuel tank and the carburetor.
OPEN CLOSED
natural_image
Close-up of a mechanical component with directional arrows indicating motion (no visible text or symbols)
natural_image
Close-up of a mechanical component with a white cylindrical part inserted, showing motion arrows (no text or symbols visible)CUTTING-MEAN CONTROL SYSTEM
VKEA Type
The cutting-means control lever [1] must be pulled back against the handlebar to start and run the engine. The cutting means start to rotate when the lever is pulled back against the handlebar and the recoil starter grip is pulled.
natural_image
Close-up of a curved mechanical component with a labeled arrow pointing to a feature (no text or symbols present)Continue to hold the cutting-means lever fully against the handlebar. This will keep the engine and cutting means rotating smoothly and prevent premature wear to the cutting-means control system.
Release the cutting-means control lever to stop the engine and stop cutting means rotation whenever you need to leave the mower.
VYEA Type
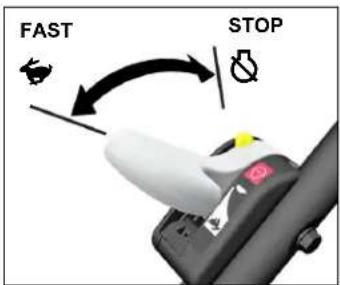
To start cutting-means rotation, make sure the engine is running and the throttle lever [1] is in the FAST position.
- Push down and hold the Roto-Stop® button [2].
- Pull the cutting-means control lever [3] quickly against the handlebar allowing the engine to bring the cutting means up to full speed. Then release the Roto-Stop button.
Continue to hold the cutting-means lever fully against the handlebar to maintain cutting means rotation. The cutting-means control lever must always be fully engaged or fully released. Do not partially engage the lever.
Release the cutting-means control lever to stop cutting means rotation. Always release the cutting-means control lever before starting the engine to prevent the cutting means from rotating.
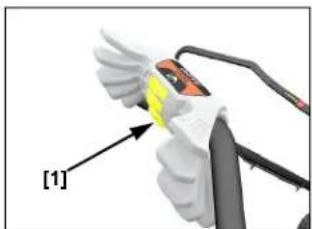
SMART DRIVE CONTROL
With the engine running and the cutting means rotating, slowly push the Smart Drive control to propel the mower forward.
Ground speed will increase as more pressure is applied to the Smart Drive control.
![[2] [3] [1]](/content/2026/04/668918/images/3fc4380f43968cab3008035a8b5e6d01cda9f805c68418e489777e8b17530854.jpg)

applying additional pressure will not further increase ground speed. Apply only enough pressure to achieve the desired speed.
Release the Smart Drive control to disengage the drive when mowing around trees and other obstacles. Push the mower around obstacles for better directional control.
Ground speed varies with terrain, grass height, slope, and grass catcher weight. Moving the Smart Drive control allows you to maintain the desired ground speed under constantly changing mowing conditions.
Release the Smart Drive control to disengage (stop) the rear wheels.
Adjusting the Smart Drive Control
The Smart Drive control can be adjusted up or down into any one of five positions for operator comfort.
Do not attempt to adjust the position of the Smart Drive control while the mower is in motion.
Slide the multi-position adjuster [1] to the left to unlock the control, move
the Smart Drive control up or down into the most comfortable position, and then release the multi-position adjuster and allow it to engage.
natural_image
Close-up of a gloved hand holding a yellow object, with a numbered arrow pointing to it (no text or symbols on the object itself)THROTTLE LEVER
VYEA Type
For best cut quality, always mow with the throttle lever in the FAST position. When the cutting means rotate at the preset fast speed, they create a strong fan action that lifts and cuts grass more efficiently.
Do not try to increase the preset
FAST engine speed; the cutting means could fracture and come apart.
CUTTING HEIGHT ADJUSTMENT LEVERS
There are two cutting height adjustment levers found on the left-hand side of the lawn mower. The lever [1] on the left front wheel adjusts the height of both front wheels, and the lever [2] on the left rear wheel adjusts the height for both rear wheels. Both levers can be adjusted to one of seven settings. The actual height of cut grass will vary with lawn and soil conditions.
Be sure the engine is not running when adjusting the cutting height.
Move the front and rear adjustment levers to the same position, forward for tall grass and rearward for short grass.
To adjust the cutting height, move the rear cutting height adjustment lever first. Grasp the handlebar and lift the mower up slightly, and then pull the adjustment lever toward the wheel and move it into the desired height. Adjust the front cutting height adjustment lever to match the rear height setting.
If you are not sure what cutting height to select, start with a high setting and check the appearance of the lawn after mowing a small area. Then readjust the cutting height if necessary.
![27 mm 39 mm 51 mm 64 mm 76 mm 88 mm 100 mm [1] [2]](/content/2026/04/668918/images/d1ac56637a3cab638ae670dcd4ff92ea34da90714c392eaf135f3f2f3e320c23.jpg)
CLIP DIRECTOR LEVER
The Clip Director can be adjusted to either the CATCH or MULCH position to achieve the desired mowing results.
Adjust the Clip Director lever to either the catch (shutter door fully open) or mulch (shutter door fully closed) (page 8).
To adjust the Clip Director, release the lock by pulling it away from the mower toward the end of the lever, and then move the lever to the desired position. Release the lock and allow it to snap into the groove.
Some grass accumulation in the discharge opening is normal when the Clip Director is in the
MULCH position. To remove this grass, close the discharge guard, set the Clip Director to the CATCH position, engage the cutting means control lever, and start the engine.
If the Clip Director is difficult to move or the lever will not lock fully:
- With the engine OFF, lift the discharge guard and remove the grass clippings from around the shutter door.
- With a garden hose and nozzle, spray around and under the Clip Director lever and cover assembly to remove the grass clippings.
For your safety and for the safety of others, always inspect the area before mowing.
Objects
Anything that can be picked up by the cutting means and thrown is a potential hazard to you and others. Look for things like stones, sticks, bones, toys, and wire. Remove them from the mowing area.
People and Pets
People and animals near the mowing area can move into your path or into a position where they could be struck by thrown objects. Clear the area of people, especially children, and pets. Their safety is your responsibility.
Lawn
Check the length and condition of the grass, so that you will know what cutting height and mowing speed to use.
Avoid mowing wet grass. Not only will wet grass clog your mower deck and collect in clumps on the lawn, it also gives poor traction, increasing your risk of losing your footing.
CHECK YOUR MOWER
Cutting Means
- Move the fuel valve to the OFF position (page 5) and disconnect the spark plug cap from the spark plug (page 13).
- Tilt the mower to the right so the fuel cap is up. This will help prevent fuel leakage, motor oil seeping into the air filter, and hard starting.
- Inspect the cutting means [1] and cutting-means bolts [2] for damage, cracks, and excessive wear, rust, or corrosion.
![[1] [2]](/content/2026/04/668918/images/34f83733c7e3477b9db90fe601743c43eca538a60d8ed9c66fa0e1b4d5fd53bb.jpg)
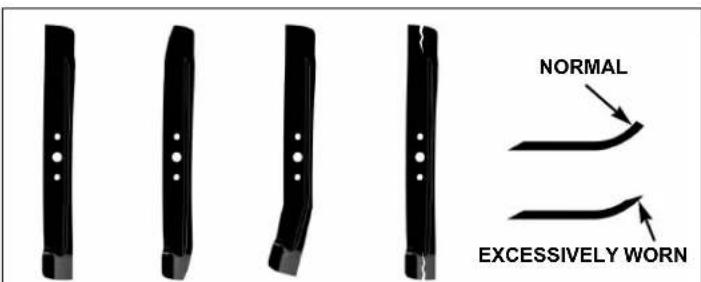
NORMAL WORN BENT CRACKED
WARNING
A worn, cracked, or damaged cutting means can break, and pieces of the damaged cutting means can become dangerous projectiles.
Thrown objects can cause serious injury. Inspect the cutting means regularly, and do not operate the mower with a worn or damaged cutting means.
A dull cutting means can be sharpened, but a cutting means that is worn out, bent, cracked, or otherwise damaged must be replaced. A worn or damaged cutting means can break, causing cutting means pieces to be thrown from the mower.
When a cutting means needs sharpening or replacement, take the lawnmower to an authorized Honda dealer. Or, if you have a torque wrench, you can remove and install the cutting means yourself.
Check that the cutting means bolts are tight (page 14).
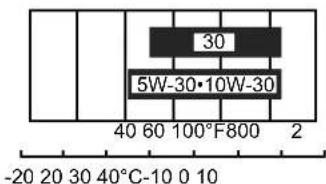
Engine Oil Level
Check the engine oil level with the engine stopped and the mower on a level surface.
Use 4-stroke motor oil that meets or exceeds the requirements for API service category SN or later. Always check the API SERVICE label on the oil container to be sure it includes the letters SN or later.
SAE 10W-30 is recommended for general use. Other viscosities shown in the chart may be used when the average temperature in your area is within the indicated range.
We recommend the use of Honda genuine oil to maintain the performance of the emission control system.
AMBIENT TEMPERATURE
NOTICE
- Running the engine with a low oil level can cause engine damage.
-
Using nondetergent oil can shorten the engine's service life, and using 2-stroke oil can damage the engine.
-
Remove the oil filler cap/dipstick [1], and wipe the dipstick clean.
- Insert the dipstick into the filler neck. Do not screw it down. Remove the dipstick and check the oil level.
- If the oil level is near the low level mark [3], add the recommended oil to bring the level up to the high limit mark [2]. Do not overfill.
- Install and tighten the filler cap/dipstick [1] securely.
![NDA [1] [2] [3]](/content/2026/04/668918/images/c3d5d2d95a1c23821d950be71142b27e9afe15b36f19e5f8ea4927eec641028f.jpg)
Fuel
This engine is certified to operate on unleaded petrol with a research octane rating of 91 or higher.
We recommend refueling after each use to minimize the air present in the fuel tank.
Refuel in a well-ventilated area before starting the engine. If the engine has been running, allow it to cool. Never refuel the mower inside a building where petrol fumes may reach flames or sparks.
You may use regular unleaded petrol containing no more than 10% ethanol (E10) or 5% methanol by volume. In addition, methanol must contain cosolvents and corrosion inhibitors. Use of fuels with content of ethanol or methanol greater than shown above may cause starting and/or performance problems. It may also damage metal, rubber, and plastic parts of the fuel system. In addition, ethanol is hygroscopic, which means it attracts and retains water in the fuel system. Engine damage or performance problems that result from using a fuel with percentages of ethanol or methanol greater than shown above are not covered by warranty. Using the fuel indicated above is necessary to maintain the performance of the emission control system.
If your equipment will be used on an infrequent or intermittent basis, (more than 4 weeks before next use) please refer to the Fuel section of the STORAGE chapter (page 15) for additional information regarding fuel deterioration.
WARNING
Petrol is highly flammable and explosive.
You can be burned or seriously injured when handling fuel.
- Stop the engine and allow to cool.
- Handle fuel only outdoors.
- Wipe up spills immediately.
- Keep heat, sparks, and flame away.
Never use stale or contaminated petrol or an oil/petrol mixture. Avoid getting dirt or water in the fuel tank.
NOTICE
Fuel can damage paint and plastic. Be careful not to spill fuel when filling your fuel tank. Damage caused by spilled fuel is not covered under warranty.
Remove the tank cap and check the fuel level. Refill the tank up to the upper limit [1] if the fuel level is low. Refuel carefully to avoid spilling fuel. Do not overfill; there should be no fuel in the filler neck.
![53 mm [1] GCV 120 HONDA](/content/2026/04/668918/images/9c08e7bf754be245a5e2e6f6233c5322415cb169fcac918f0f8bc51270cb70b3.jpg)
After refueling, tighten the fuel tank cap securely.
Move the mower at least 3 meters away from the fueling source and site before starting the engine.
Fuel Storage Container
Store your petrol in a clean, plastic, sealed container approved for fuel storage. Close the vent (if equipped) when not in use, and store the container away from direct sunlight. If it will take more than 3 months to use the fuel in the container, we suggest adding a fuel stabilizer to the fuel when you fill the container.
Air Cleaner Inspection
Remove the cover [1]. Make sure the filter [2] is clean and in good condition. A dirty air filter will restrict air flow to the carburetor, reducing engine performance. Refer to page 13 for air cleaner service.
![[1] [2]](/content/2026/04/668918/images/c5c386eb7ae799f5135ec7862d93579210402fc5068e7cf79111686eaa45874d.jpg)
Rear Shield
During normal use the rear shield is subject to deterioration and wear. Remove the grass catcher and raise the discharge guard [1] to check the rear shield [2] for cracks or tears. If the rear shield is excessively worn, have it replaced by your authorized Honda servicing dealer.
![[1] [2]](/content/2026/04/668918/images/f9a0aa663387c938cc793b2cfce935e3da45d662bcac279e6b0edb19b173d6c1.jpg)
Handlebar Height Adjustment
Adjust handlebar height to a comfortable operating position (page 4).
Grass Catcher
A lawnmower works like a vacuum cleaner; it blows air through the catcher, which traps the grass clippings. Always empty the grass catcher before it becomes filled to the limit of its capacity. Grass catcher performance will diminish after the catcher becomes about 90% filled. Also, the catcher is easier to empty when it is not packed full.
Inspection
During normal use, the grass catcher material is subject to deterioration and wear.
NOTICE
Frequently inspect the grass catcher for tears, holes, and excessive wear. Check for necessary replacement. Make sure the new catcher meets the original specifications.
If the grass catcher needs replacement, you can remove and install a catcher yourself (page 14).
Installation
-
Raise the discharge guard [1], and use the grass catcher handle [2] to hook the grass catcher [3] onto the cutting-means enclosure as shown.
-
Release the discharge guard to secure the grass catcher.
Removal
-
Raise the discharge guard, grasp the grass catcher handle, and remove the grass catcher.
-
Release the discharge guard.
![[1] [2] [3] HONDA](/content/2026/04/668918/images/b8a1ccf2e662adac7958ad7ac7a44ebac9d98cc155201b101be4b8bb678c03f2.jpg)
- When the grass catcher is clear of the discharge guard, you can lift it through the handlebar opening, or you can remove it to the rear of the lawnmower below the handlebar.
Cutting Height
Check the mower deck cutting height settings, and be sure that both adjustment levers [1] are set to the same cutting height position.
natural_image
Diagram of a red and black lawn mower with labeled parts, showing mechanical components and motion arrows (no text or symbols beyond labels)Clip Direction
Clip Director Adjustment
The Clip Director can be adjusted to either the CATCH or MULCH position to achieve the desired mowing results.
Adjust the Clip Director lever to either the catch (shutter door fully open) or mulch (shutter door fully closed).
To adjust the Clip Director, release the lock by pulling it away from the mower toward the end of the lever, and then move the lever to the desired position. Release the lock and allow it to snap into the groove.

IMPORTANT SAFETY PRECAUTION
Always turn the engine off and disconnect the spark plug cap before lifting the discharge guard to view or clean around the sliding door. This will prevent contact with the rotating cutting means and prevent objects from being thrown into the discharge chute.
Some grass accumulation in the discharge opening is normal when the Clip Director is fully closed. To remove this grass, close the discharge guard, fully open the Clip Director, and start the engine.
If a high resistance is noticed when moving the Clip Director lever from side-to-side, excessive grass may have built up on top of the sliding door.
Mulching
Release the lock ① and then move the Clip Director lever into the MULCH position ②.
Catching or Rear Discharge
Release the lock ① and then move the Clip Director lever into the CATCH position ②.

To discharge clippings to the rear, remove the grass catcher and leave the Clip Director lever in the CATCH position.

natural_image
Lhouette of a red and black lawn mower on a grassy field (no text or symbols visible)Are You Ready to Mow?
Be sure to wear protective clothing. Long pants and eye protection can lower your risk of injury from thrown objects. Wear footwear that protects your feet and won't let you slip if you mow on slopes or uneven ground.
OPERATION
MOWING PRECAUTIONS
Before operating the mower for the first time, please review SAFETY INSTRUCTIONS (page 2) and PRE-OPERATION CHECKS (page 6).
Even if you have operated other mowers, take the time to become familiar with how this mower works, and practice in a safe area until you build up your skills.
For your safety, avoid starting or operating the engine in an enclosed area such as a garage. Your mower's exhaust contains poisonous carbon monoxide gas that can collect rapidly in an enclosed area and cause illness or death.
FREQUENCY OF USE
If your equipment will be used on an infrequent or intermittent basis, (more than 4 weeks before next use) please refer to the Fuel section of the STORAGE chapter (page 15) for additional information regarding fuel deterioration.
At high altitude, the standard carburetor air-fuel mixture will be too rich. Performance will decrease, and fuel consumption will increase. A very rich mixture will also foul the spark plug and cause hard starting.
High altitude performance can be improved by specific modifications to the carburetor. If you always operate your mower at altitudes above 610 meters, have a Honda dealer perform this carburetor modification.
Even with carburetor modification, engine power will decrease about 3.5% for each 300 meter increase in altitude. The effect of altitude on power will be greater than this if no carburetor modification is made.
When the carburetor has been modified for high altitude operation, the air-fuel mixture will be too lean for low altitude use. Operation at altitudes below 610 meters with a modified carburetor may cause the engine to overheat and result in serious engine damage. For use at low altitudes, have your authorized Honda dealer return the carburetor to original factory specifications.
STARTING THE ENGINE
- Turn the fuel valve to the ON (open) position (page 5).
2. VKEA Type:
Pull back on the cutting-means control lever [1] and hold it against the handlebar.
The lever must be against the handlebar to start the engine. The cutting means start to rotate when the lever is against
![[1]](/content/2026/04/668918/images/d134a61f6237d04899309fa1407ce7b2074de7c3c7b3f8cf71e88cc6f2c70f40.jpg)
the handlebar and the recoil starter grip is pulled.
VYEA Type:
Move the throttle lever to FAST position.
- Pull the starter grip lightly until you feel resistance, then pull briskly. Return the starter grip gently.
VKEA Type: Continue to hold the cutting-means control lever against the handlebar; the
engine stops when the cutting-means control lever is released.
To ensure easy restarting and maximum performance from the Auto Choke System, start mowing as soon as the engine starts and allow the engine to run for at least three minutes before stopping the engine.
STOPPING THE ENGINE
- VKEA Type: Release the cutting-means control lever to stop the engine and cutting means rotation.
VYEA Type: Release the cutting-means control lever to stop the cutting means rotation, and then move the throttle lever to the STOP position.
-
When the mower is not in use, turn the fuel valve [1] to the OFF position.
-
If your equipment will not be used for 3 to 4 weeks, we recommend running the engine's carburetor out of fuel. You can do this by leaving the fuel valve OFF, restarting the engine and running it out of fuel. See "STORAGE" on page 15 for periods of inactivity that exceed 4 weeks.
![OFF [1]](/content/2026/04/668918/images/11e9a240773f81410c27dc34ce403ff3f839b5c203267b2c0b4bfd5604c2bc93.jpg)
SAFE MOWING PRACTICES
For your safety, keep all four wheels on the ground, and be careful to avoid losing your footing and your control of the mower. Keep a firm grip on the handlebar, and walk, never run, with the mower. Be very careful when mowing uneven or rough ground.
If stuck, do not kick or shove the mower with your foot. Use the handlebar to control the mower.
DANGER
The cutting means are sharp and spin at high speed.
If you come in contact with a spinning cutting means, it will cut you severely and can amputate fingers and toes.
- Wear protective footwear.
- Keep your hands and feet away from the mower deck while the engine is running.
- Stop the engine before performing any adjustment, inspection, or maintenance.
Slopes
Mow across slopes, not up and down. Avoid steep slopes (more than 20^ ), and be careful when changing direction. Mowing on a slope when the grass is damp or wet could cause you to slip, fall, and lose control of the mower.
Obstacles
Use the side of the mower to cut close to large obstacles, such as fences or walls.
Release the Smart Drive control to disengage the drive when mowing around trees and other obstacles. Push the mower around obstacles for better directional control. Be careful when mowing over obstacles embedded in the lawn, such as sprinkler heads, paving, edging, etc. Avoid anything that sticks up above the surface of the lawn.
If the cutting means hits something, or if the mower starts to vibrate, stop the engine immediately and check for damage. Striking objects may damage the cutting means, bend the crankshaft, and/or break the mower deck or other components. Vibration usually indicates serious trouble.
natural_image
Red and gray lawn mower on a grassy field under a blue sky (no text or symbols visible)WARNING
A worn, cracked, or damaged cutting means can break, and pieces of the damaged cutting means can become dangerous projectiles.
Thrown objects can cause serious injury.
Inspect the cutting means regularly, and do not operate the mower with a worn or damaged cutting means.
The warranty does not cover parts damaged by collision.
Gravel and Loose Objects
Gravel, loose stones, and landscaping material can be picked up by the mower and thrown away with enough force to cause serious personal injury and/or property damage. The best way to prevent potential injury from thrown objects is to release the cutting means control lever to stop the cutting means before reaching areas with gravel, loose stones, or landscaping material.
MOWING TIPS
When to Mow
Most grasses should be mowed when they have grown 12 \~ 25 mm above their recommended height.
More frequent mowing is required for mulching than for catching. For best results, you may need to mow the lawn twice a week during the growing season.
Cutting Height
Consult a local nursery or lawn and garden center for cutting height recommendations and advice about specific types of grasses and growing conditions in your area.

If you look closely, you'll see that most grass has stems and leaves. If you cut off the leaves, you'll scalp the lawn. Let the grass recover between mowings. Your mower will work better, and your lawn will look better.

If your grass gets too tall, cut it once at the highest cutting height setting, and then mow again in 2 or 3 days. Don't take off more than one third of total grass height in any one mowing, or brown patches may develop.
Cutting height adjustment levers are explained in the CONTROLS chapter (page 5).
Cutting Width
For an even lawn finish, overlap each mowing swath by a few centimeters. If the grass is very tall or thick, use more overlap and a narrower mowing swath.
Cutting Means Speed
The cutting means must spin very fast to cut properly.
If engine speed drops, it could mean the engine is being overloaded by the cutting means trying to cut too much grass. Mow a narrower swath, move the mower slower, or raise the cutting height.
Cutting Means Sharpness
A sharp cutting means cuts cleanly. A dull cutting means tears the grass, leaving shredded ends that turn brown. When your cutting means doesn't cut cleanly anymore, have it sharpened or replaced.
Dry Grass
If the ground is too dry, mowing will stir up a lot of dust. Besides being unpleasant to work in, too much dust will clog the carburetor air filter.
If dust is a problem, water your lawn the day before mowing. Mow when the grass is dry to your touch, but the soil is still moist.
Wet Grass
Wet grass is slippery and can make you lose your footing. Also, wet grass clippings will clog the mower deck and collect in clumps on the lawn. Always wait for wet grass to dry before mowing.
Fallen Leaves
When equipped with the grass catcher, your mower can be used to pick up fallen leaves for disposal. If using the mower to collect large amounts of fallen leaves, and not for mowing, adjust the front cutting height adjustment lever so the front of the mower deck is one or two settings higher than the rear.
If you want to mulch fallen leaves into your lawn, don't let the leaf cover get too deep before you begin. For best results, start mulching while grass still shows through the leaf cover. In places where fallen leaves completely cover the grass, remove the leaves by raking, or install the grass catcher, so your mower can pick them up for disposal.
Clogged Cutting-means Enclosure
Before clearing a clogged cutting-means enclosure, stop the engine and turn the fuel valve to the OFF position. With the spark plug cap disconnected, tilt the mower so the air cleaner side is up.
Clear a clogged enclosure with a stick, not your hands.
Mowing Patterns
Your Honda mower will work most efficiently if you use the following mowing patterns as much as possible. Mower deck and equipment design, and the direction in which the cutting means rotate, cause these mowing patterns to give the best results.
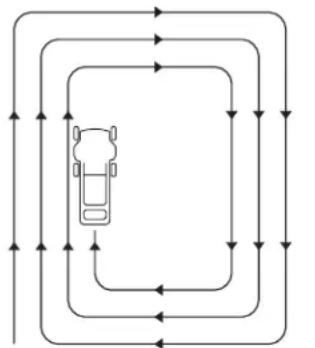
Mulching
Use a counterclockwise mowing pattern when the Clip Director lever is in the MULCH position. If the lawn has an irregular shape, or many obstacles, divide it into sections where you can use counterclockwise mowing patterns.
flowchart
graph TD
    A["Car"] --> B["Top-Left"]
    A --> C["Top-Right"]
    A --> D["Bottom-Left"]
    A --> E["Bottom-Right"]
    B --> F["Top-Left"]
    C --> G["Top-Right"]
    D --> H["Bottom-Left"]
    E --> I["Bottom-Right"]
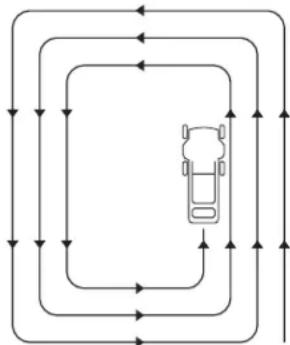
MULCHING PATTERN
Catching
Use a clockwise mowing pattern. This will give the best Clip Director and catching performance, leaving the least amount of clippings on the lawn.
Rear Discharge Mowing
Remove the grass catcher and close the discharge guard. Move the Clip Director lever to the CATCH setting and begin mowing in a clockwise mowing pattern. If the lawn has an irregular shape, or many obstacles, divide it into sections.
flowchart
graph TD
    A["Top Left Arrow"] --> B["Top Right Arrow"]
    B --> C["Bottom Left Arrow"]
    C --> D["Bottom Right Arrow"]
    D --> E["Bottom Left Arrow"]
    E --> F["Bottom Right Arrow"]
    F --> G["Bottom Left Arrow"]
    G --> H["Bottom Right Arrow"]
    H --> I["Bottom Left Arrow"]
    I --> J["Bottom Right Arrow"]
    J --> K["Bottom Left Arrow"]
    K --> L["Bottom Right Arrow"]
    L --> M["Bottom Left Arrow"]
    M --> N["Bottom Right Arrow"]
    N --> O["Bottom Left Arrow"]
    O --> P["Bottom Right Arrow"]
    P --> Q["Bottom Left Arrow"]
    Q --> R["Bottom Right Arrow"]
    R --> S["Bottom Left Arrow"]
    S --> T["Bottom Right Arrow"]
    T --> U["Bottom Left Arrow"]
    U --> V["Bottom Right Arrow"]
    V --> W["Bottom Left Arrow"]
CATCHING & REAR-DISCHARGE PATTERN
MAINTENANCE
Good maintenance is essential for safe, economical, and trouble-free operation. It will also help reduce air pollution and ensure the emissions performance of the engine continues to be met.
To help you properly care for your mower, the following pages include a maintenance schedule, routine inspection procedures, and simple maintenance procedures using basic hand tools. Other service tasks that are more difficult, or require special tools, are best handled by professionals and are normally performed by a Honda technician or other qualified mechanic.
The maintenance schedule applies to normal operating conditions. If you operate your mower under unusual conditions, consult an authorized Honda dealer for recommendations applicable to your individual needs and use.
Remember that your Honda dealer knows your mower best and is fully equipped to maintain and repair it.
To ensure the best quality and reliability, use only new, Honda Genuine parts or their equivalents for repair and replacement.
WARNING
Improper maintenance, or failure to correct a problem before operation, can cause a malfunction in which you can be seriously hurt or killed.
Always follow the inspection and maintenance recommendations and schedules in this owner's manual.
MAINTENANCE SAFETY
Some of the most important safety precautions follow. However, we cannot warn you of every conceivable hazard that can arise in performing maintenance. Only you can decide whether or not you should perform a given task.
WARNING
Failure to properly follow maintenance instructions and precautions can cause you to be seriously hurt or killed.
Always follow the procedures and precautions in this owner's manual.
SAFETY PRECAUTIONS
- Make sure the engine is off before you begin any maintenance or repairs. This will eliminate several potential hazards:
- Carbon monoxide poisoning from engine exhaust.
Be sure there is adequate ventilation whenever you operate the engine.
– Burns from hot parts.
Let the engine and exhaust system cool before touching.
– Injury from moving parts.
Do not run the engine unless instructed to do so.
- Read the instructions before you begin, and make sure you have the tools and skills required.
- To reduce the possibility of fire or explosion, be careful when working around petrol. Use only a nonflammable solvent, not petrol, to clean parts. Keep cigarettes, sparks, and flames away from all fuel-related parts.
MAINTENANCE SCHEDULE
Perform at every indicated month/year or operating hour interval, whichever comes first.
| Regular Service Period | Item | Page |
| Before each use | Check: Grass catcherCheck: Cutting meansCheck: Operation of the cutting means-controlCheck: Engine oil levelCheck: Air filterCheck: Rear shieldCheck: Cutting-means bolts | page 14page 6page 5page 7page 7page 8page 14 |
| First month or 5 hours | Change: Engine oil page 12 | |
| First 25 hours Clean | 1\ Air filter Adjust: Smart Drive cable ^2 Adjust: Roto-Stop cable (VYEA) ^2 Adjust: Throttle cable (VYEA) ^2 | page 13 |
| Every 6 months or 50 hours | Change: Engine oil ^1 Clean: Air filter ^1 Adjust: Smart Drive cable ^2 | page 12page 13 |
| Every year or 100 hours | 6 month items above plus:Check-adjust: Spark plugClean: Spark arrester ^3 (if equipped)Check: Operation of the cutting-means controlGrease: Pinion gears ^2 Adjust: Valve clearance ^2 Adjust: Roto-Stop cable (VYEA) ^2 Adjust: Throttle cable (VYEA) ^2 Clean: Fuel tank ^2 | page 13page 13page 5 |
| Every 2 years or 150 hours | Yearly items above plus:Replace: Air filterReplace: Spark plugAdjust: Smart Drive cable ^2 Check: Transmission axle bearings ^2 | page 13page 13 |
| Every 2 years Check | Fuel lines replace if necessary ^2 |
- Service more frequently when used in dusty areas.
- These items should be serviced by an authorized Honda servicing dealer, unless you have the proper tools and are mechanically proficient. Refer to the Honda shop manual for service procedures.
- In Europe and other countries where machinery directive 2006/42/EC is enforced, this cleaning should be done by your servicing dealer.
Failure to follow this maintenance schedule could result in non-warrantable failures or reduction in performance and emissions noncompliance.
ENGINE MAINTENANCE
Engine Oil Change
Drain the oil while the engine is warm. Warm oil drains quickly and completely.
- Turn the fuel valve OFF. This will reduce the possibility of fuel leakage (page 5).
- Wipe the oil filler area clean, and then remove the oil filler cap/dipstick.
- Place a suitable container next to the mower to catch the used oil, and then tilt the mower on its right side. The used oil will drain through the filler neck. Allow the oil to drain completely.
Please dispose of used motor oil and the containers in a manner that is compatible with the environment. We suggest
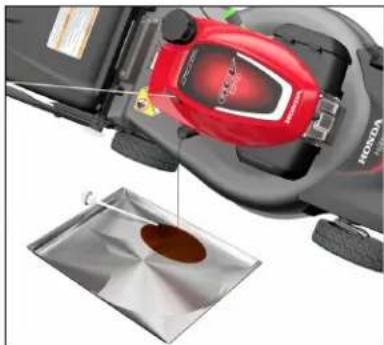
natural_image
Top-down view of a red and black KONSA lawn mower with a small tray containing brown material (no text or symbols visible)you take it in a sealed container to your local recycling center or service station for reclamation. Do not throw it in the trash, pour it on the ground or pour it down a drain.
- Fill with the recommended oil (page 7). Do not overfill. Measure the oil level as shown below.
Refill Amount: 0.35\~0.40 L
- After changing the engine oil and before starting the engine, check the oil level with the mower on a level surface:
natural_image
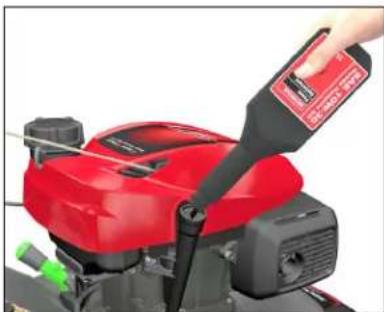
Close-up of a red agricultural machine being adjusted with a tool, no visible text or symbolsa. Remove the filler cap/dipstick [1].
b. Wipe the dipstick clean.
c. Insert and remove the dipstick without screwing it into the filler neck. Check the oil level shown on the dipstick.
d. If the oil level is below the low level mark [3], add oil to reach the high limit mark [2] on the dipstick. Do not overfill. If the engine is overfilled, the excess oil may get transferred to the air cleaner housing and air cleaner filter.
![WDAT [1] [2] [3]](/content/2026/04/668918/images/fe12bb91cb2ed05a9016c162b87e3ff1301017177dabc131a16b144bf3255605.jpg)
NOTICE
Running the engine with a low oil level can cause engine damage.
e. Screw in the filler cap/dipstick securely.
Air Cleaner Service
A properly maintained air filter will help prevent dirt from entering your engine. Dirt entering the carburetor can be drawn into small passages in the carburetor and cause premature engine wear. These small passages can become blocked, causing starting or running problems. It is recommended to always use a genuine Honda air filter specified for your engine to ensure it seals and performs as designed. You will need to clean the filter more frequently if you operate the engine in very dusty conditions.
NOTICE
Operating the engine without an air filter, or with a damaged filter, will allow dirt to enter the engine, causing rapid engine wear. This type of damage is not covered by the warranty.
- Press down on the air cleaner cover [1] tabs, and then remove the cover [2].
- Remove the filter [3] from the air cleaner housing [4].
- Inspect the filter; replace if damaged.
- Clean the filter by tapping the filter several times on a hard surface to remove dirt, or blow compressed air (not exceeding 2 bar/29 psi) through the filter from the inside. Never try to brush off dirt; brushing will force dirt into the fibers.
-
Wipe dirt from the inside of the air cleaner housing and cover, using a moist rag. Be careful to prevent dirt from entering the air duct that leads to the carburetor.
-
Reinstall the filter and cover.
![[4] [1] [3] [2]](/content/2026/04/668918/images/c6b07663639d7c178c4e3cc85819fe6b0e46f4f07676e7c18d7cc22935453beb.jpg)
Spark Plug Service
Required spark plugs: NGK - BPR5ES
NOTICE
Incorrect spark plugs can cause engine damage.
For good performance, the spark plug [1] must be properly gapped and free of deposits.
-
Disconnect the spark plug cap [2], and remove any dirt from around the spark plug area.
-
Remove the spark plug with a spark plug wrench.
![[1] [2] HONDA](/content/2026/04/668918/images/794c4d261e26150d39a01e656776f9fcccd791a86b613006b2ebbd3e77539fe9.jpg)
- Inspect the spark plug. Replace it if the electrodes are worn or if the insulator is cracked or chipped.
- Measure the spark plug electrode gap with a suitable gauge. The gap should be 0.7 \~ 0.8 mm. Correct the gap, if necessary, by carefully bending the side electrode.
- Install the spark plug carefully, by hand, to avoid cross-threading.
- After the spark plug seats, tighten with a spark plug wrench to compress the washer.
If reinstalling the old spark plug, tighten 1/8 to 1/4 turn after the spark plug seats.
If installing a new spark plug, tighten 1/2 turn after the spark plug seats to compress the washer [3].
TORQUE: 20 N·m
NOTICE
A loose spark plug can overheat and damage the engine.
Overtightening the spark plug can damage the threads in the cylinder head.
- Install the spark plug cap on the spark plug.
Spark Arrester Service
In Europe and other countries where machinery directive 2006/42/EC is enforced, this cleaning should be done by your servicing dealer.
The spark arrester must be serviced every 100 hours to keep it functioning as designed.
- Allow the engine to cool.
- Unclip the two red top cover tabs [6] on the muffler side of the engine, and then slightly lift the red top cover up to expose the upper muffler shield bolt.
- Remove the three bolts [1] from the muffler shield [2] using a 10 mm socket wrench.
- Remove the muffler shield [2].
- Remove the set screw [4].
- Remove the spark arrester [3] from the muffler [5].
- Check for carbon deposits on the spark arrester and the exhaust port. Brush carbon deposits away. Be careful to avoid damaging the spark arrester screen.
- Install the spark arrester into the muffler.
- Install the muffler shield on the engine, tighten the three bolts securely, and then reattach the red top cover.
![[1] [2] [3] [4] [5] [6] (red cover shown removed)](/content/2026/04/668918/images/0cb4f6d93b95be484eecad1a24fa79e01c998d5f25cc8d07a24ce7d7a7e035fe.jpg)
Cutting Means Removal And Installation
If you remove the cutting means for sharpening or replacement, you will need a torque wrench for installation. Wear heavy gloves to protect your hands.
Cutting means SHARPENING: To avoid weakening the cutting means, or causing imbalance or poor cutting, the cutting means should be sharpened by trained staff at an authorized Honda dealer.
Cutting means REPLACEMENT: Use Honda Genuine replacement cutting means or their equivalent.
Removal
- Turn the fuel valve OFF and disconnect the spark plug cap.
- Tilt the mower to the right so the fuel cap is up. This will help to prevent fuel leakage, motor oil seeping into the air filter, and hard starting.
- Remove the cutting-means bolts [1] and special washers [2] with a 14 mm (6 point) socket wrench. Wear thick leather gloves and hold the cutting means [3] with your hand to prevent the them from turning when removing the bolts. Remove the cutting means.
- Inspect the cutting-means holder (VKEA) or Roto-Stop assembly (VYEA) [4] and cutting means mounting surface for damage. If damage is found or the cutting means have impacted a hard object, replace the damaged parts..
![[3] [4] [2] (2) [1] (2)](/content/2026/04/668918/images/305e04b980608b9715ea1438c5c6ad0ee6c589b4dea1ae1181723ba93554e952.jpg)
Installation
- Clean dirt and grass from around the cutting means mounting area.
- Install both cutting means [3] using the two cutting means bolts [1] and special washers [2] as shown. Be sure to install the special washers with the concave side toward the cutting means and the convex side toward the head of the bolt.
WARNING
Operating this mower with only one cutting means will result in an improperly seated cutting means that can be thrown from the mower and seriously hurt or kill someone.
Always install both cutting means as a set.
WARNING
If the cutting-means bolts are not torqued properly, the cutting means could loosen and be thrown from the mower.
Cutting means thrown from the mower could seriously hurt or kill someone.
Ensure the cutting-means bolts are torqued properly.
The cutting-means bolts and washers are specially designed for this application. When replacing the bolts and washers, use only Honda Genuine replacement parts.
![[3] [2] (2) [1] (2) [2] DIRECTION](/content/2026/04/668918/images/123790d4bf75e8aa5d43ca0f00bb1b80d6b22ddc3f7f27d7e80b081272582894.jpg)
- Tighten the cutting-means bolts with a torque wrench [7]. Wear thick leather gloves [8] and hold the cutting means with your hand to prevent them from turning when tightening the bolts
![[8] [7] TORQUE: 54 N•m](/content/2026/04/668918/images/f682d9c978c4175304d2ba5d471fb2e9cd1b8cdca582ae18ad22c71e4e48cc7a.jpg)
Cutting-means bolt torque: 54 N·m
If you do not have a torque wrench, have an authorized Honda dealer tighten the cutting-means bolts before you use the mower. If the cutting-means bolts are overtightened, they could break. If the cutting-means bolts are not tightened enough, they could loosen or come out. In either case, it would be possible for the cutting means to fly off while you are operating the mower.
Cutting-means Mounting Bolt Inspection
Inspect the cutting-means bolts for any signs of damage or looseness. If they are damaged, they must be replaced.
If they appear loose, a torque wrench must be used to accurately tighten the cutting-means bolts to the required torque. If you do not have a torque wrench, take your lawnmower to an authorized dealer to have the bolts replaced or tightened.

Use only Honda Genuine cutting-means bolts and special washers, since they are specifically designed for this purpose. Replacement part numbers are on page 16.
GRASS CATCHER CLEANING AND REPLACEMENT
Cleaning
Wash the grass catcher with a garden hose, and allow it to dry completely before use; a wet grass catcher will clog quickly.
Replacement
Replace a worn or damaged grass catcher with a Honda replacement part or its equivalent.
OPERATION CHECK OF THE CUTTING-MEANS CONTROL
VKEA Type only:
Start the engine outdoors. Release the cutting-means control lever; the engine should stop quickly. If the engine does not stop quickly, take the mower to an authorized Honda servicing dealer for repair.
TRANSPORTING
BEFORE LOADING
If the engine has been running, allow it to cool for at least 15 minutes before loading the mower on the transport vehicle. A hot engine and exhaust system can burn you and can ignite some materials.
Turn the fuel valve [1] to the OFF position (page 5). This will prevent carburetor flooding and reduce the possibility of fuel leakage.
LOADING AND UNLOADING
Position the mower so all four wheels are on the bed of the transport vehicle. Tie the mower down with rope or straps, and block the wheels. Keep the tie-down rope or straps away from the controls, adjustment levers, cables, and the carburetor.
NOTICE
To prevent losing control of or damaging the mower, do not use the drive system when going up or down a loading ramp.
- Turn the fuel valve to the OFF position.
- Use a suitable loading ramp. Adjust the loading ramp so that it is inclined at an angle of less than 15^ . If a loading ramp is not available, two people should lift the mower on and off the transport vehicle while keeping the mower level.
STORAGE
Proper storage is essential for keeping your lawnmower troublefree and looking good. The following steps will help protect the mower from rust and corrosion, and make the engine easier to start when you use the lawnmower again.
CLEANING
Engine
Wash the engine by hand, and be careful to prevent water from entering the air cleaner.
NOTICE
Using a garden hose or pressure washing equipment can force water into the air cleaner. Water in the air cleaner will soak the paper filter and can enter the carburetor or engine cylinder, causing damage. Water contacting a hot engine can cause damage. If the engine has been running, allow it to cool for at least half an hour before washing.
Mower Deck
Before washing the underside of the mower deck, allow the engine to cool and be sure the fuel valve is in the OFF position. Disconnect the spark plug cap. Rest the mower on its right side so the fuel filler cap is up. This will help prevent fuel leakage and hard starting due to carburetor flooding. Wear heavy gloves to protect your hands from the cutting means.
Wash the lawnmower, including the underside of the mower deck.
If using a garden hose or pressure washing equipment to clean the mower deck, be careful to avoid getting water into controls and cables, or anywhere near the engine air cleaner or muffler opening.
Grass catcher
Remove the catcher from the mower, and wash it with a garden hose or pressure washing equipment. Allow the catcher to dry completely before storage.
Drying
- After washing the lawnmower, wipe dry all accessible surfaces.
- With the mower in an upright position, move the Clip Director lever to the catcher position, start the engine outdoors, and let it run until it reaches normal operating temperature to evaporate any water remaining on the engine.
- Stop the engine and allow it to cool.
- After the lawnmower is clean and dry, touch up any damaged paint and coat other areas that may rust with a light film of oil.
FUEL
NOTICE
Depending on the region where you operate your equipment, fuel formulations may deteriorate and oxidize rapidly. Fuel deterioration and oxidation can occur in as little as 30 days and may cause damage to the carburetor and/or fuel system. Please check with your servicing dealer for local storage recommendations.
Petrol will oxidize and deteriorate in storage. Old petrol will cause hard starting, and it leaves gum deposits that can clog the small passages in the fuel system. If the petrol in your mower deteriorates during storage, you may need to have the carburetor and other fuel system components, serviced or replaced.
The length of time that petrol can be left in your fuel tank and carburetor without causing functional problems will vary with such factors as petrol blend, your storage temperatures, and whether the fuel tank is partially or completely filled. The air in a partially filled fuel tank promotes fuel deterioration. Very warm storage temperatures accelerate fuel deterioration. Fuel deterioration problems may occur within a few months, or even less if the petrol was not fresh when you filled the fuel tank.
If you keep a container of petrol for refueling, be sure that it contains only fresh petrol.
If it will take more than 3 months to use the fuel in your storage container, we suggest adding a fuel stabilizer to the fuel when you fill the container.
Short Term Storage (30-90 days)
If your lawnmower will not be used for 30 to 90 days, we recommend the following to prevent fuel-related problems:
- Add fuel stabilizer following the manufacturer's instructions.
When adding a fuel stabilizer, fill the fuel tank with fresh petrol. If only partially filled, air in the tank will promote fuel deterioration during storage.
Note:
– All stabilizers have a shelf life and their performance will deteriorate over time.
– Fuel stabilizers will not reconstitute stale fuel.
- After adding a fuel stabilizer, run the engine outdoors for 10 minutes to be sure that treated petrol has replaced the untreated petrol in the carburetor.
- Stop the engine and turn the fuel valve to the OFF position.
- Start the engine and continue to run the engine until it stops from the lack of fuel in the carburetor fuel bowl. Running time should be less than 3 minutes.
Long Term or Seasonal Storage (greater than 90 days)
Start the engine and allow it to run long enough to empty all the petrol from the entire fuel system (including the fuel tank). Do not allow petrol to remain in your engine for more than 90 days of inactivity.
The WARRANTY does not cover fuel system damage or engine performance problems resulting from neglected storage preparation.
ENGINE OIL
Change the engine oil (page 12).
ENGINE CYLINDER
If the mower is to be stored for more than 3 months, remove the spark plug (page 13). Pour 5 \~ 10 cc of clean engine oil into the cylinder [1]. Pull the starter rope several times to distribute the oil in the cylinder. Reinstall the spark plug.
![[1] HONDA OIL](/content/2026/04/668918/images/6f87a7e16eeb8815f9d40b7b30d3d84202e852a15ff495002e4778aa2d029e6c.jpg)
Pull the starter rope slowly until
resistance is felt, then return the starter grip gently. This will close the valves so moisture cannot enter the engine cylinder.
PLACING IN STORAGE
Since your mower will be stored with petrol in the fuel tank and carburetor, it is important to reduce the hazard of petrol vapor ignition. Select a well-ventilated storage area away from any appliance that operates with a flame, such as a furnace, water heater, or clothes dryer. Also avoid any area with a spark-producing electric motor, or where power tools are operated.
If possible, avoid storage areas with high humidity, because that promotes rust and corrosion.
Place the mower with its wheels on a level surface. Tilting can cause fuel or oil leakage. The handlebar can be folded for compact storage, shown below.
With the engine and exhaust system cool, cover the mower to keep out dust. A hot engine and exhaust system can ignite or melt some materials. Do not use sheet plastic as a dust cover. A nonporous cover will trap moisture around the mower, promoting rust and corrosion.
Handlebar Folding
-
Remove the grass catcher. You can place it on top of the engine, with the catcher opening to the front.
-
Support and hold the handlebar.
-
Unlock the handlebar adjust knobs ① and fold the handlebar forward ② into the storage position.
NOTICE
Do not allow the control cables ③ to become caught, pinched, or kinked while folding the handlebar down into the storage position. The cables or engine control system may be damaged causing the lawnmower to not function properly.
REMOVING FROM STORAGE
Check your mower as described in PRE-OPERATION CHECKS (page 6).
If the cylinder was coated with oil during storage preparation, the engine will smoke briefly at startup. This is normal.
FRAME AND ENGINE SERIAL NUMBER
Record the frame and engine serial numbers (page 3) in the space below. You will need these numbers when ordering parts and when making technical or warranty inquires.
Frame serial number:
Engine serial number:
Date of purchase: ____ / ____ / ____
PARTS
| Item Part Number Notes | ||
| Air Cleaner | 17211-Z8B-901 Paper | |
| Spark Plug | 98079-55846 NGK (brand) BPR5ES | |
| Cutting Means:LowerUpper | 72511-VR8-M0072531-VR8-M00 | Always use an upper and lower cutting means as a set. |
| Cutting-means Bolt (2) | 90105-960-710 2 required, 10 x 20 mm | |
| Bolt Washer (2) 90502-VG3-000 2 required | ||
| Wheel/tire 44710-VR8-N00 Front | ||
TROUBLESHOOTING
ENGINE WILL NOT START
| Possible Cause Correction | |
| Fuel valve OFF Turn the fuel valve | ON (page 5). |
| Out of fuel | Refuel (page 7). |
| Throttle in wrong position (VYEA only) | Move throttle lever to FAST position (page 5). |
| Bad fuel; mower stored without treating the petrol, or refueled with bad petrol | Refuel with fresh petrol (page 7). |
| Spark plug faulty, fouled, or improperly gapped | Gap or replace the spark plug (page 13). |
| Spark plug wet with fuel (flooded engine) | Dry and reinstall the spark plug. |
| Fuel filter clogged, carburetor malfunction, ignition malfunction, valves stuck, etc. | Take the mower to an authorized Honda servicing dealer or refer to the shop manual for repair. |
LOSS OF POWER
| Possible Cause | Correction |
| Grass is too tall to cut Raise the cutting height (page 8), cut a narrower swath, use a slower ground speed, or cut more frequently. | |
| Throttle not set to FAST (VYEA only) | Move the throttle lever to FAST (page 5). |
| Cutting-means enclosure is clogged | Clean out the cutting-means enclosure (page 11). |
| Air cleaner is clogged | Clean or replace the air cleaner |
| Bad fuel; mower stored without treating the petrol, or refueled with bad petrol | Refuel with fresh petrol (page 7). |
| Fuel filter clogged, carburetor malfunction, ignition malfunction, valves stuck, etc. | Take the mower to an authorized Honda servicing dealer or refer to the shop manual for repair. |
VIBRATION
| Possible Cause Correction | |
| Grass and debris lodged under the cutting-means enclosure | Clean out the cutting-means enclosure (page 11). |
| Cutting means loose, bent, damaged, or unbalanced by improper sharpening | Tighten loose cutting-means bolts (page 14). If cutting means are found to be bent or damaged, take the lawnmower to an authorized Honda servicing dealer for inspection. |
| Mechanical damage, such as a bent crankshaft | Take the mower to an authorized Honda servicing dealer or refer to the shop manual for repair. |
MOWING AND CATCHING PROBLEMS
| Possible Cause Correction | |
| Mower is moving too fast for lawn conditions | Apply less pressure to the Smart Drive control or push slower. |
| Cutting height adjustment levers set at different positions | Set both levers at the same cutting height position (page 8). |
| Grass catcher overfilled or clogged | Empty the grass catcher. Wash the grass catcher if it is clogged with dirt (page 14). |
| Cutting-means enclosure is clogged | Clean out the cutting-means enclosure (page 11). |
| Cutting means dull, worn, or damaged | Sharpen or replace the cutting means if necessary (page 14). |
SPECIFICATIONS
| MODEL HRN536C | ||
| TYPE VKEA VYEA | ||
| DESCRIPTION CODE MANA | ||
GENERAL
| Length | 1,550 mm | |
| Handlebar height | 1,035 mm | |
| Mass (ISO5395) | 36.0 kg 39.9 kg | |
| Width | 575 mm | |
| Cutting width | 530 mm | |
| Cutting height adjustments | 27 mm, 39 mm, 51mm, 64 mm, 76 mm, 88 mm, 100 mm | |
| Grass catcher capacity | 70 L | |
| Sound pressure level at operator's ears (According to EN ISO 5395-1:2013) | 85 dB(A) | |
| Uncertainty | 1 dB(A) | |
| Sound power level measured (According to 2000/14/EC directive) | 96 dB(A) | |
| Uncertainty | 1 dB(A) | |
| Sound power level guaranteed (According to 2000/14/EC directive) | 98 dB(A) | |
| Vibration transmitted (According to EN ISO 5395-1:2013) | 5.0 m/s^2 | 5.4 m/s^2 |
| Uncertainty | 0.5 m/s^2 | |
ENGINE
| Model | GCV170 |
| Type | 4-stroke, single cylinder, vertical shaft |
| Displacement | 166 cm^3 |
| Bore and stroke | 60 x 59 mm |
| Cooling | Forced air |
| Lubrication | Splash and spray |
| Compression ratio | 8.0:1 |
| Maximum speed | 2,950_-100^+0 min^-1 |
| Nominal power | 3.2 kW |
| Ignition system | Transistorized magneto |
| Spark plug | NGK: BPR5ES |
| Spark plug gap | 0.7 ~ 0.8 mm |
| Air cleaner | Dry element type |
| Recommended fuel | Unleaded petrol with a research octane rating of 91 or higher |
| Fuel tank capacity | 0.91 L |
| Recommended oil | SAE 10W-30, API SN or later |
| Engine oil capacity | 0.40 L* Refill amount: 0.35 ~ 0.40 L |
| Carbon dioxide (CO2) emissions ** | Please refer to the CO2 values of the Honda engine at www.honda-engines-eu.com/co2 |
* Actual amount will vary due to residual oil in the engine. Always use the dipstick to confirm the actual level (see page 7).
** This CO2 measurement results from testing over a fixed test cycle under laboratory conditions of a(n) (parent) engine representative of the engine type (engine family) and shall not imply or express any guarantee of the performance of a particular engine.
DRIVE
| Type | Variable speed Smart Drive |
| Engine to transmission | V-belt |
| Main clutch | Slipping belt type |
| Mower speed | 0 ~ 1.75 m/s |
INTRODUCTION
natural_image
Two Honda lawn mower machines shown from top and side views, no visible text or symbols on the motors themselves.TABLE DES MATIÈRES
INTRODUCTION....1
MESSAGES DE SÉCURITÉ ... 1
CONSIGNES DE SÉCURITÉ...2
Commande SMART Drive .... 5
HUILE MOTEUR
natural_image
Close-up of a red lawn mower being adjusted with a tool, no visible text or symbols![NDA [1] [2] [3]](/content/2026/04/668918/images/2b2fa582c617844a1c7f1540af9430a2ec091feed6fb7992685f0485055ae1cf.jpg)
CARBURANT
natural_image
Close-up of a mechanical component with directional arrows indicating motion (no visible text or symbols)
natural_image
Close-up of a mechanical component with directional arrows indicating motion (no visible text or symbols)SYSTÈME DE COMMANDE DE L'OUTIL DE COUPE
Type VKEA
natural_image
Close-up of a curved mechanical component with a labeled arrow pointing to a section (no text or symbols present)
natural_image
Close-up of a gloved hand holding a yellow object with a sensor or probe, labeled [1] (no text or symbols on the object itself)MANETTE
D'ACCÉLÉRATEUR
Type VYEA
natural_image
Top-down view of a red and black lawn mower on a grassy surface, with arrows indicating motion direction (no text or symbols)Clip Director
Réglage du Clip Director
natural_image
Mowing machine on a green grass field, no visible text or symbolsPrêt à tondre ?
PRATIQUES D'UTILISATION SÛRES DE LA TONDEUSE
natural_image
Close-up of a red Honda lawn mower with a transparent cover and a small tray containing brown liquid (no text or symbols visible)natural_image
Close-up of a red agricultural machine being adjusted with a tool, no visible text or symbolsAVIS
Entretien des bougies
natural_image
Close-up of a metallic bolt head with a hexagonal nut, no visible text or markingsNETTOYAGE ET REMPLACEMENT DU BAC DE RAMASSAGE Nettoyage
SORTIE D'ENTREPOSAGE
natural_image
Two Honda lawn mower machines shown in black and red, no visible text or symbols on the motors themselves.INHALTSVERZEICHNIS
EINFÜHRUNG ..... 1
MOTORÖL
natural_image
Close-up of a red and black lawn mower being adjusted using a tool, no visible text or symbols![HOMA [1] [2] [3]](/content/2026/04/668918/images/ee0d1e296f9891ac9317e43122c89b6ebc0fa4edd33b6904b9946b9f37de7222.jpg)
KRAFTSTOFF
Siehe Seite 7.
natural_image
Close-up of a mechanical component with directional arrows indicating motion (no text or symbols)
natural_image
Close-up of a mechanical component with a white cylindrical part and directional arrows indicating motion (no text or symbols)
natural_image
Close-up of a gloved hand holding a yellow object with a red handle, labeled [1] (no text or symbols on the object itself)Gashebel
Typ VYEA
Schnitthöhe
natural_image
Labeled diagram of a red and black lawn mower with green sensor points, shown in 3D perspective (no text or symbols on the diagram itself)natural_image
Mowing machine in a green field with grass blades, no visible text or symbolsnatural_image
Red and black lawn mower on a grassy field under a blue sky (no text or symbols visible)WARNING
natural_image
Close-up of a red Honda lawn mower with a transparent cover and a small tray containing brown contents (no visible text or symbols)natural_image
Close-up of a red agricultural machine being adjusted with a tool, no visible text or symbols![HOTDA [1] [2] [3]](/content/2026/04/668918/images/1df102c27161c2760230a96af692b4e7878fae968f20b3e5622b35e489fff011.jpg)
HINWEIS
natural_image
Close-up of a metallic bolt head with hexagonal nut (no text or symbols visible)REINIGEN UND ERSETZEN DES GRASFANGKORBS
Reinigen
natural_image
Two Honda lawn mower machines shown in black and red, no visible text or symbols on the motors themselves.INHOUDSOPGAVE
INLEIDING....1
VEILIGHEIDSMEDDELINGEN 1
EC Declaration of Conformity,
Honda Dealer Locaties
MOTOROLIE
natural_image
Close-up of a red and black lawn mower being adjusted with a tool, no visible text or symbols![HDA [1] [2] [3]](/content/2026/04/668918/images/64dacf727cd68fa489aecb8148a30dd11c5b154aa934009d4368d5e021ff5ccb.jpg)
BRANDSTOF
Raadpleeg pagina 7.
VOORDAT U UW GRASMAAIER GEBRUIKT
natural_image
Close-up of a mechanical component with directional arrows indicating motion (no visible text or symbols)
natural_image
Close-up of a mechanical component with a white cylindrical part inserted, showing motion arrows (no text or symbols visible)BESTURINGSSYSTEEM VAN DE SNIJBLADEN
VKEA Type
natural_image
Close-up of a mechanical component with curved lines and a labeled section [1] (no text or symbols beyond label)VYEA Type
natural_image
Close-up of hands adjusting a mechanical component labeled 'METHIANT DRIVE' (no visible text or symbols beyond label)natural_image
Close-up of gloved hands holding a yellow object with a black handle, no visible text or symbols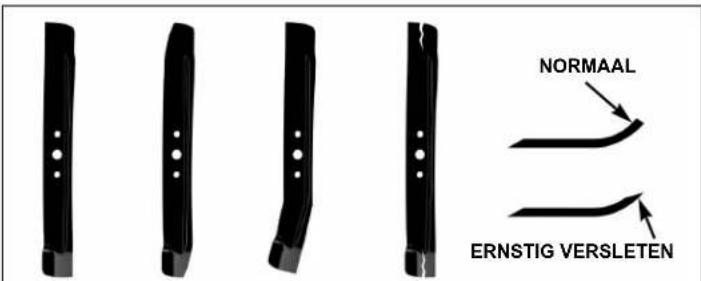
NORMAAL VERSLETEN VERBOGEN GEBARSTEN
⚠ WAARSCHUWING
natural_image
Top-down view of a red and black lawn mower on a grassy vehicle, with arrows indicating components (no text or symbols)Cliprichting
Instelling Clip Director
natural_image
Lhouette of a red and black lawn mower on a green grass field, no visible text or symbolsBent u klaar om te maaien?
VEILIGE MAAIPRAKTIJKEN
natural_image
Red and gray lawn mower on a grassy field under a blue sky (no text or symbols visible)⚠ WAARSCHUWING
natural_image
Close-up of a red Honda lawn mower with a glossy finish, being poured into a metal tray (no visible text or symbols)natural_image
Close-up of a red agricultural machine being adjusted with a tool, no visible text or symbolsLET OP
Bougie onderhoud
UIT DE OPSLAG HALEN
natural_image
Two Honda lawn mower machines shown from different angles, one black and one red with visible branding (no text or symbols on the motors themselves)INDICE
INTRODUZIONE ..... 1
MESSAGGI RELATIVI ALLA
SICUREZZA....1
ISTRUZIONI DI SICUREZZA ... 2
OLIO MOTORE
natural_image
Close-up of a red and black lawn mower being adjusted with a tool, no visible text or symbols![[1] [2] [3]](/content/2026/04/668918/images/efcf30c30d0896f4fddba9eaa70f0f7a49bd527820e35278c3f5f852a23f2b20.jpg)
CARBURANTE
Vedere a pagina 7.
PRIMA DI UTILIZZARE IL TOSAERBA
natural_image
Close-up of a mechanical component with directional arrows indicating motion (no visible text or symbols)
natural_image
Close-up of a mechanical component with directional arrows indicating motion (no visible text or symbols)SISTEMA DI COMANDO DELLE LAME
Tipo VKEA
natural_image
Close-up of a mechanical component with a curved handle and a labeled section [1] (no text or symbols on the main subject)natural_image
Close-up of a gloved hand holding a yellow object with a black handle, next to a curved cable or wire (no text or symbols visible)natural_image
Top-down view of a red and black lawn mower with visible components and directional arrows (no text or symbols)natural_image
Mowing machine in a grassy field, no visible text or symbolsnatural_image
Red and black lawn mower on a grassy field under a blue sky (no text or symbols visible)natural_image
Close-up of a Honda lawn mower with red head and silver tray, no visible text or symbolsnatural_image
Close-up of a red tractor being adjusted with a tool, no visible text or symbolsAVVISO
natural_image
Close-up of a metallic bolt head with a hexagonal nut (no text or symbols visible)RIMESSA IN SERVIZIO
natural_image
Two Honda lawn mower machines, one black and one red, displayed against a white background (no text or symbols visible)INNEHÅLL
INLEDNING....1
SÄKERHETSMEDDELANDEN . 1
SÄKERHETSFÖRESKRIFTER.2
MOTOROLJA
Gräsklipparen levereras UTAN OLJA i motorn.
natural_image
Close-up of a red and black robotic arm with a tool applying material to the top (no visible text or symbols)![HOTDA [1] [2] [3]](/content/2026/04/668918/images/9aa774b1502ae44a9debe4646821ef2b2d2ef6453991b233ac8aad84c5400f7c.jpg)
BRÄNSLE
Se sida 7.
INNAN DU ANVÄNDER GRÄSKLIPPAREN
natural_image
Close-up of a mechanical component with directional arrows indicating motion (no visible text or symbols)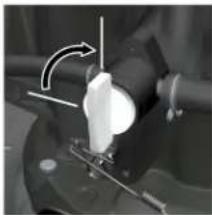
natural_image
Close-up of a mechanical component with a white cylindrical part and directional arrows indicating motion (no text or symbols visible)KNIVARNAS KONTROLLSPAK
VKEA-typ
natural_image
Close-up of a curved mechanical component with a labeled arrow pointing to a small component (no text or symbols present)VYEA-typ
SMART KÖRKONTROLL
natural_image
Close-up of gloved hands holding a yellow object with a black handle, labeled [1] (no text or symbols on the object itself)JUSTERINGSSPAKAR FÖR KLIPPHÖJD
Bränsle
natural_image
Top-down view of a red and black lawn mower with visible wheels and mounting bracket (no text or symbols)Val av klippning
natural_image
Mowing machine in a green field with grass blades, no visible text or symbolsnatural_image
Red and gray lawn mower on a grassy field under a blue sky (no text or symbols visible)WARNING
natural_image
Close-up of a red Honda lawn mower with a glossy finish, partially covered by a metallic tray (no visible text or symbols)natural_image
Close-up of a red agricultural machine being adjusted by a tool, no visible text or symbolsOBS!
ANVÄNDNING EFTER FÖRVARING
natural_image
Two Honda lawn mower machines shown in black and red, no visible text or symbols on the motors themselves.OBSAH
ÚVOD....1 PREVÁDZKA....9
BEZPEČNOSTNÉ Opatrenia pri kosení ..... 9
UPOZORNENIA....1 Štartovanie motora....9
BEZPEČNOSTNÉ POKYNY ... 2 Zastavenie motora. ..... 9
MOTOROVÝ OLEJ
Kosačka je dodávaná BEZ OLEJA v motore.
natural_image
Close-up of a red and black motorcycle engine being adjusted with a tool (no visible text or symbols)![NDA [1] [2] [3]](/content/2026/04/668918/images/620e17ea043d845aa6158d7470f678e9df141c8398b68ee14f8fc246062e9086.jpg)
PALIVO
Pozri stranu 7.
PRED POUŽITÍM KOSAČKY
natural_image
Close-up of a mechanical component with directional arrows indicating motion (no visible text or symbols)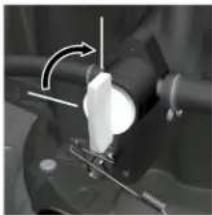
natural_image
Close-up of a mechanical component with directional arrows indicating motion (no visible text or symbols)SYSTÉM OVLÁDANIA ŽACIEHO NOŽA
Typ VKEA
natural_image
Close-up of a mechanical component with a curved handle and a small rectangular component, labeled [1] (no text or symbols on the object itself)OVLÁDANIE SMART DRIVE
natural_image
Close-up of gloved hands holding a yellow object with a black handle, labeled [1] (no text or symbols on the object itself)Palivo
natural_image
Top-down view of a red and black lawn mower with visible wheels and a green sensor, labeled [1] (no text or symbols on the diagram itself)Vol'ba režimu vyhadzovania
Nastavenie páky vol'by režimu vyhadzovania Clip Director
ZOSTAVA PÁKY VOLBY REŽIMU VYHADZOVANIA CLIP DIRECTOR A KRYTU
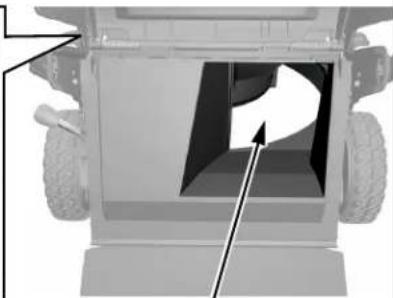
natural_image
3D rendering of a vehicle's rear view showing a rectangular opening with visible wheels and a directional arrow indicating motion (no text or symbols)UZATVÁRACIE DVIERKA (plne otvorené)
Pre vyhadzovanie odrezkov trávy zozadu odstráňte zberný kôš na trávu a páku vol'by režimu vyhadzovania Clip Director prepnite do polohy ZBERNÉHO KOŠA.
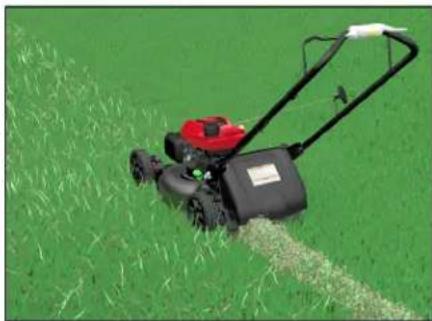
natural_image
Lhouette of a red and black lawn mower on a green grass field, no visible text or symbolsnatural_image
Red and black lawn mower on a grassy field under a blue sky (no text or symbols visible)TIPY NA KOSENIE
Kedy kosit'
natural_image
Close-up of a red Honda lawn mower with a glossy finish, partially covered by a metallic tray (no visible text or symbols)natural_image
Close-up of a red tractor being adjusted using a tool, no visible text or symbolsUPOZORNENIE
natural_image
Close-up of a metallic bolt head with a hexagonal nut (no text or symbols visible)VYBRATIE PO USKLADNENÍ
Skontrolujte kosačku tak, ako popisuje kapitola KONTROLA PRED POUŽITÍM (stranu 6).
EC Declaration of Conformity
1. The undersigned, Peter Neckebroeck, on behalf of the authorized representative, herewith declares that the machinery described below fulfils all the relevant provisions of:
• Directive 2006/42/EC on machinery
- Directive 2014/30/EU on electromagnetic compatibility
- Directive 2000/14/EC – 2005/88/EC on outdoor noise
Directive 2011/65/EU - (EU) 2015/863 on the restriction of the use of certain hazardous substances in electrical and electronic equipment
2. Description of the machinery
Lawnmower
cutting of grass
d) Type
MANA
1000000 - 9999999
MANA
(1)本公司及董事会全体成员保证信息披露的内容真实、准确和完整,没有虚假记载、误导性陈述或重大遗漏。
3. Manufacturer
Honda Power Equipment Mfg., LLC
PO Box 37
Honda Drive, NC Hwy 119
Sweepsonville, NC 27359 USA
4. Authorized representative and able to compile the technical documentation
Honda Motor Europe Ltd - Aalst Office
Wijngaardveld 1 (Noord V), 9300 Aalst - BELGIUM
5. References to applied standards
EN ISO 14982:2009
EN ISO 5395-1:2013+A1:2018
EN ISO 5395-2:2013+A1:2016+A2:2017
6. Outdoor Noise Directive
a) Measured sound power dB(A): 96
b) Guaranteed sound power dB(A): 98
c) Noise parameter (L, min ^-1 ): 53 cm, 2950 min
d) Conformity assessment procedure: Annex VI
e) Notified body: Vinçotte nv
Jan Olieslagerslaan 35
1800 Vilvoorde – Belgium
Aalst, BELGIUM
1 June 2021
Peter Neckebroeck
Head of Certification
Honda Motor Europe Ltd – Aalst Office
7. Done at:
8. Date:
| Français. (French)Déclaration CE de Conformité1. Le sous signé, Peter Neckebroeck, de la part du représentant autorisé, déclaro que la machine décrit ci-dessous répond à toutes les dispositions applicables de:• Directive Machine 2006/42/CE• Directive 2014/30/EU sur la compatibilité électromagnétique• Directive 2000/14/CE-2005/88/CE des émissions sonores dans l'environnement des matériels destinés à être utilisé à l'extérieur des batiments• Directive 2011/55/EU - (UE) 2015/863 relative à la limitation de l'utilisation de certaines substances dangereuses dans les équipements électriques et électroniques2. Description de la machinea) Produit : Tondeuse à guzonb) Fonction : couper de l'herbe (tondre)c) Modèle d) Type e) Numéro de série 3. Constructeur4. Représentant autorisé et en charge des éditions de documentation techniques5. Référence aux normes appliquées6. Directive des émissions sonores dans environnement des matériels destinés à être utilisé à l'extérieur des batimentsa) Puissance accoustique mesuréeb) Puissance accoustique garantec) Paramètre du brutd) Procedure d'évaluation de conformitée) Organisme notifié7. Fait à8. Date | Italiano (Italian)Dichiarazione CE di Conformità1. Il sottoscrito, Peter Neckebroeck, in qualità di rappresentante autorizzato, dichara qui di seguito che la macchina sotto descritta soddisfa tutte le disposizioni pertinenti delle:* Diretiva macchine 2006/42/CE• Diretiva sulla compatibilità elettronmagnetica 2014/30/UE• Diretiva sulla emissione acustica delle macchine e attrezzature destinate a funzionare all'aperto 2000/14/CE 2005/88/CE• Diretiva 2011/65/EU - (UE) 2015/863 sulla restrizione dell'uso di distinguirate sostanze pericolose nelle apparecchiature eletriche ed elektroniche2. Descrizione della macchina) a) Prodotto : Tosserba b) Funzione : Taglio e erba c) Modello d) Tipo e) Numero di serie 3. Costruttora4. Rappresentante autorizzato e competente per la compolazione della documentazione tecnica5. Riferimento alle norme applicate6. Direttiva sulla emissione acustica dello macchine e attrezzature destinate a funzionare all'aperto a) Livello di potenza sonora misurato b) Livello di potenza sonora garantito c) Parametri emissione acustica d) Procedura di valutazione della conformitàe) Organismo notificado7. Fatto a8. Data | Deutsch (German)EG-Konformitätsenklärung1. Der Unterzeichnter, Peter Neckebroeck erklärt hiermit im Namen der Bevollmächtigten, dass das hierunter genannte Maschine allen einschlägigen Bestimmungen der *entspricht:* Maschinenrichtlinie 2006/42/EG• Richtlinie der Elektromagnetischen Kompaltilität 2014/30/EU* Geräuschrichtime im Freien 2000/14/EG-2005/88/EG* Richtlinie 2011/65/EU - (EU) 2015/863 zur Beschränkung der Verwendung bestimmler gefährlicher Stoffe In Elektro und Elektronikergärten2. Beschreibung der Maschinea) Produkt : Rasenmäherb) Funktion : Gras schneigenc) Modell d) Typ e) Seriennummer 3. Hersteller4. Bevollmächtigter und in der Position, die technische Dokumentation zu erstellen5. Verweis auf aufvendbare Standards6. Gerauschrichtime im Freiena) gemessene Lausstärkeb) Schalleistungspegelc) Gerauschworgabe d) Konformitätabewertlungs Ablaufe) Benannte Stelle7. Ort 8. Datum |
| Nederlands (Dutch)EQ-verklaring van overeenstemming1. Ondergetekende, Peter Neckebroeck, In naam van de gemachtigde van de fabrikant, verkaat hiermee dat het hieronder beschreven machine voldoet aan alle loepasselijke bepalingen van :• Richtlin 2006/42/EG betreffende machines• Richtlin 2014/30/EU betreffende electromagnetische overeenstemming• Richtlin 2000/14/EG-2005/88/EG betreffende geluidsemisatie (opentucent)• Richtlin 2011/65/EU - (EU) 2015/863 betreffende beperking van het gebruik van bepaalde gevaarlijke stoffen in elektrische en elektronische apparatur2. Beschrijving van de machinea) Product : Gras maaierb) Functie : gras maaienc) Model d) Type e) Serienummer 3. Fabrikant4. Gemachtigde van de fabrikant en in staat om de technische documentatie samen te stellen5. Referente voor toegepaste normen6. Geluidsemisesserichtlijn (openlicht)a) Gemeten geluidsvermögensniveau b) Gewaarborgd getuidsvermögensniveau c) Geluidparamelerd) Conformittelssbeordelingsproceduree) Aangemelde instantje7. Plats 8. Datum | Dansk (Danish)EF OVERENSTEMMELSEERKLERING1. UNDERTEGNDE, PETER NECKEBROECK, PÅ VEGNE AF DEN AUTORIZEREDERREPRESENTANT, ERKLERER HERMED AT MASKINEN. SOM ER BESKREVET NEDENFOR, OPFYLDER ALLE RELEVANTE BESTEMMELSERIFOLGE:* MASKINDIREKTIV 2006/42/EF* EMC-DIREKTIV 2014/30/EU* DIRECTIV OM STÖJEMISSION 2000/14/EF-2005/88/EF* DIRECTV 2011/65/EU - (EU) 2015/863 om begrænsning af anvendolsen af visse farlige stoffer i elektrisk og elektronisk ud tyr2. BESKRIVELSE AF PRODUKTETa) Produkt : Planeklipperb) ANVENDELSE - Graesklippingc) Model d) TYPE e) SERIENUMMER3. PRODUCENT4. AUTORISERET REPRESENTANT OG I STANDTIL AT UDARBEJE DEN TEKNISKE DOKUMENTATION5. Henvising till anvendte standarder6. DIRECTIV OM STÖJEMISSION FRA MASKINERTIL UDENOZIRS BRUGa) MÄLT LYDEFFEKTNIEVAUB) GARANTERET LYDEFFEKTNIEVAUC) STÖJARAMETERd) PROCEDURE FOR OVERENSTEMMELSESVURDERINGe) BEMYNDIGET ORGAN7. STED 8. DATO | Ελληνικά (Greek)ΕΚ-Φύλωση συμμόφωσης1. Ο κοτώδι υταγκραγμένος, Peter Neckebroeck, κε μέρους του εξουποδειτημένου αντρροσιτου μα το παρων δηλινικα ότο το περακτύν περιγραμφένον όχημα πλαρού δικε τις χρεχτικες προδιγραφές το:* Οόνηγία 2006/42/ΕΚ-2005/88/ΕΚ για το επιτεῖοθορύβου σε εξωτερικούς χώρους.* Οόνηγία 2011/65/EU - (EE) 2015/863 για τον περοσιτομο της χρήσης ορισμένων επικήνωνων συμπον σε ηελετρικο και έλεκτρικο κεξατλαρμύ2. Παργωρημή υμανονήματοςa) προϊόν : Χλοκοσττικόc) Λατορυγρία : για κόψυο γροχοιδιούC) Μοντέλο d) τύτοςe) Αριάψως εσερά παραγωνήςC) Κοτακεωεστής4. Εξυμοδοστημένος αντρροσιτοικος και είναι σε θέση να καταρτίσα τον τεχνικό φοκελο5. Παρεστομήτη στα χριχωντα πρόστυτα6. Οόνηγία επιτεῖοδο βορύβου εξωτερικών χώρουνα Ματρηλέσεια χητηκή ένταση7. Ευγμμένην χητηκή έντασηC) Ηυχητική παραγωριοςd) Διακλοία κατοποίησηςe) Ορονγομικήστοιοποίηση7. Η δοκυή τγνε 8. Нуреоμηνία |
| Svenska (Swedish)EG-förskiran om överensstämmelse1. Undertecknad, Peter Neckebroeck, på updrag av auktoriserad representant, doklarerar håmed aft maskinen beskriven neden funñöljer alla relevanta bestälmelder onil• Direktiv 2006/42/EG gällande maskinerDirektiv 2014/30/EU gällande elektronemagnetikompatibilitet• Direktiv 2000/14/EG-2005/88/EG gällandebull utomhus• direktiv 2011/65/EU - (EU) 2015/863 om begränsning av användning av vissa farliga ännnen i elektrisk och elektronisk utrusting2. Maskinbeaskrivninga) Produkt : Gräksklippareb) Funktion : gräksklippingc) Modell d) Type) Seriennummer3. Tillverkare4. Auktoriserad representant och ska kunna sammanstälä teknisk dokumentationen.5. Referens för tillämpad standard6. Direktiv för buller utomhusa) Ucpmäll tjudnivä) Garanterad ljudniväc) Buller parameterd) Förfarande för bedömninge) Anmälde organ7. Uftarcast vid 8. Datum | Españel (Spanish)Declaración de Conformidad CE1. El abajo timante: Peter Neckebroeck, en representación del representante autorizado, adjunto declata que la máquina abajo descrita, cumple las dúculus relevantes de:• Directiva 2006/42/CE de maquinaria• Directiva 2014/30/EU de competitiod electromagnética• Directiva 2000/14/CE-2005/88/CE de ruido exterior• Directiva 2011/65/EU - (UE) 2015/863 sobre restricciones a la utilización de determinadas sustancias peligrosas en aparatos eléctricos y electrónicos2. Descripción de la máquinaa) Producto : Cortadora de céspedb) Función : Cortar el céspedc) Modelo d) Type) Número de serie3. Fabricante4. Representante autorizado que puede compilar el expediente técnico5. Referencia a normas aplicadas6. Directiva sobre ruido exteriora) Polencia sonora Modida b) Polencia sonora Garantizadac) Parametros ruido d) Procedimen to evaluación conformidade) Organismo notificado7. Realizado en8. Fecha | Româná (Romanian)CE.-Declaratie de Conformitate1. Subseminatul Peter Neckebroeck, in numele reprezentantului autorizat, declar prin prezenta faptuli ca echipimentul descris mai jos indeplineste toate conditiile necessare din:* Directiva 2006/42/CE privind echipimentul* Directiva 2014/30/EU privind compatibilitatea electromagnética* Directiva 2000/14/CE-2005/88/CE privind poluarea fonica in spatu descha* Directiva 2011/65/EU - (UE) 2015/863 privind restricilié de utilizare a anumitor substante periculoase in echipamentele electrici si electronice2. Desorierea echipamentuluia) Produsul : Masina de tuns larbab) Domeniu de utilizare : tunderea lercolii) Codel d) Tip e) Serie produs3. Producator4. Reprezentant autorizat și abilitat să realizeze documentație tecnica5. Referințiă la standardele aplicale6. Directiva privind poluarea fonica in spatiu inchisa) Pulerea acustica masuratab) Putere acustica maxim garantilac) Indice poluare fonicad) Procedura de evaluare a conformitài e) Notificari7. Emsisa 8. Data |
| Lietuotki kalba (Lithuanian)EB atliktes dokarcije.1. Igalotko istovo vardu zersiagęs Peter Neckebrock pabirtina, kad zamau spraktya malina atlikna visas ivedinlu direktyvny nuscelatas;* Mechanznu okratyka 2008/42/EB* Elektronegnelniu suderinensnuro direktyve 2014/30/ES* Trafimis lauke direktyva 2005/96/EB / araklya 2011/85/KS - (ES) 2015/863 adl tam tikuyapcingjem medizigu naudojimo elektrics ir elektroninėje prampje apitobilino.2. Pretaso aprayymas a) Gaminyš - Zolarpová b) Funčica - žales povornas b) Modelis d) Titas e) Serijos numeris 3. Gamintages 4. Igalotasis sitolvas ir galinitis sudaryli lechnirne documentacij.5. Nuroda / italkylus standardus 6. Itunimo buke direktya 7. Hinsukloze ganso galingurno lygis 8. Garantuomas gareso galingurno lygis 9. Triukimo parametras d) Titas e) Registruksja istaiga 7. Vila 8. Data | Былгарски (Bulgarian)EC depokeringa za scontotstanie1. Догулидованиет Peter Neckebrock, от ikke на упільномощення представитег, с настоящиво декларима, че пімішните, писяна подому, отопарати на винки сопотні та розподів: * Direktivne 2006/92/EC относно квадините* Direktivne 2014/30/EC относно електромагнитата Северхови* Direktivne 2001/41/EC-2005/88/EC относно шумовите миски на своржония, предизначення за употреба квачи спредите* Direktivne 2011/85/EC - (EC) 2015/863 гонина стюсно оренечнаного за употреба на определен аралы мостави електремостію и електронного оборудане 2. Отсланне на квадините a) Продукт - КосCANb) фунция: косань на трета c) Модел d) Tin e) Серен номер 3. Правденту 4. Упакикоющен представи ек и отговорник за оставне на технижне документаи 5. Трепарати им привокипите стандарти 6. Direktivne относно шумовите емиски на своржония, предизначення за употреба квачи спредите a) Никореня звунова моност 7. Гаражирана звунова моност c) Параметратът вулм d) Приходурая за оценка на сметовів вето e) Нотифициран орган 8. Моста на изотенне. В. Дата на изотенне | Norsk (Norwegian)EF-Semvarsonkizing1. Underlegnede Peter Neckebrock va vegne an autorart representent herved anderer at masknet beckrevet nedenfor imfitir relevant informasjon la fatgende forskritor* Recktendrskov 2006/92/EF* Direktiv 2011/85/EC EK-Elektronegnelisk kombasili#* Direktiv om stay utierdans 2001/49/F-2005/88/EF* Direktiv 2011/85/EU - (EU) 2015/863 om restinkijner av bruk sv visee fatiga mætteler i elektik og elektronisk utsyr.2. Beskrivalse av produkt a) Produkt: Gnesskipper b) Farsicom : Klipore grees c) Modell d) Type e) Sertenimmar 3. Produsenti 4. Autorser representent og i stend til å uterbeide den tekniske dokumentasjonen a) Konsant til brukle standaroor 6. Ublends direkliv far slay a) Mall stay b) Maks stay c) Konstant stay d) Verdi vurderings prosedyre e) Sjeflerde kjordavkycopstammielskog 7. Sted & Data |
| Tilrik (Turkish)AT Uyguntuk Beyanı1. Postakutara bulunan Peter Neckebrock yoteli temakli adina, bu zanyla birlistke apogadiaki makins ile ilgit tim hökömlätkörin yerine gelatinidjini beyan etmekekidi*. Makina Emniyet Yometinelli 2005/62/AT* Elektroneryek Uyumuluk Yometinelli 2014/30/AS* Aki Aklanda Kullanlan Tachizat Tarifman Olisturanul Červedeli Čurištilo Emleyno ile ilgit Yometinelli 2014/30/AT 2011/69/AB - (AB) 2015/863 elektriku ve elektronik elekpinlarlanda bazı tehikoli mandelen kullanının yaseaklinnaesna ilikjin yoinelinelik2. Makennan tanti a) Dran : Çim bipyre makinesi b) Izelav : Çimion kezinski a) Model d: Tipi c) Seir numasi 3. Inalatsi 4. Tomik dosyayt hazramnakva yoshili olan Toplutukta yorišpiq yetkii temakio 5. Uygulanen standertiera listreden 6. Ajkil amon gurnitu Yoneineltigi a) Opšten ses guco b) Garant seletos pečno gluči c) Gurištilo parametrii d) Uyguntuk dejeglendmre prosedoru e) Onyaliannig kurušu 7. Revannan var : 8. Boysan tanti : | Isaliska (Icelandic)EC-Samtenisylfirsjeng 1. Underbate Parteski Neckebrock stadostir for með fyrh fond loggiltira adite á upljysinger un valbúbaná hér áb nedan erú telnévá varter alla tiheyrandí malátkoffa, svo sein 2. Leiboininger fyrir velbúbaná 2006/42/EB* Leiboininger fyrir ratsgulváč 2014/30/EU* Leiboininger um havodemengun 2000/41/EB-2005/88/AT* Tsuplen 2011/65/EC - (EU) 2015/863 varbandi kizboininger um naktur á hastulugam cfrum i rat og relenda bursá 2. Lysing a velbúbaná c) Oklubeti - Slastuvel b) Virken - Grza sagiad c) Gerid - Dje Turgand d) Serifel nimer 3. Framieldandi 4. Loggidir aditer og tear um áž talka seman toknisikjärin 5. Tilvisun til voldigandi stafda 6. Leobiningar un hivačaimengui a) Maštar havaba stykur b) Staflesser havaba stykur c) Hačete strytylele 7. Staflesning a girdestaltljen c) Markingar 8. Gert hija : 9. Dagseining : | Hrvatski(Croatian)EK Izavra z sukladnosti 1. Postakani Peralu Neckebrock u ime ovlastonog prostaznikva, ovima izjavljuje do strojev navedeni u nastavku lipsanjevaju šve vaterne odrđine:* Propisa za strigeve 2008/42/EK* Propisa o elektronegnelisko kompatisibilnosti 2014/30/EU* Propisa o buci na otvorencne 2000/14/EK-2005/88/EF* Direktiva 2011/85/EU - (EU) 2015/863 o agrikeniju ostrodcjnih opaznih supstanci u slektorenj i elektronisko oprerić.2. Opla stryes a) Prizvod : Kosilica za iravu b) Funcensornost : rozanje brava c) Kopisiči telj 4. Tipi c) Serijelski broj 3. Prozdvađ: 4. Ovatsten prestavnik i osoba za sastavljaną technikte dokumentacije 5. Referencija na primienlere stelande 6. Propis o buci na otvorencne a) Lemerena jašina zvolka b) Lepomona spačina zvolka c) Parameter buke d) Postupak za ocjenu sukladnosti e) Obavijesteno tijelo 7.U 8. Datum |
| Portugues (Portugues)Declaração CE de Conformidade1. O abaixo sessinado, Peter Neckbroeck, declara desta modo, em nome do mandastro, qua a máquina abaixo descrito cumpre todas as estipulações relevantes da:* Direciva 2008/42/CE relativa às máquinas* Direciva 2014/30/EU relativa a compatibilidade elektromagnetica* Direciva 2000/41/CE/2005/88/CE relativa as emissões sonoras para o meio ambiente dos equipamentos para utilização no exterior* Direciva 2011/85/EU - (UE) 2015/863 relativa a restriação do uso de determinadas substancias portigosas em equipamentos eotincos e elettrónicos2. Descrição da máquinaa) a) Produto: Carta reka) b) Função: corne de reia) c) Modio: d) Tipoe) Número de série3. Fabricante4. Mandatário com capacidade para compilar documentação técnica5. Referência as normas aplicadas6. Direciva relativa das emissões sonoras para o meio ambiente dos equipamentos para utilização no exteriori) a) Potência sonora mediteb) Potência sonora garantista) Paramejno de ruído) Procedimento de avaliação da conformidadee) Organismo notificado7. Fato em 8. Data | Polki (Polish)Doktarozga zgomości WE1. Náje podpsany, Peter Neckbroeck, w mileniu upowaznionago przedstaviciels, nimejszym doklaruje, ze ustrzecenie opisane zonizej spełnia всyszylkie odpowiednice pastanovania:* Dyrektywa Maszynova 2008/42/WE* Dyrektywy Kompatybniceci Elektronegnetycznej 2014/30/EU* Dyrektywa Halsowsa 2000/41/WE/ 2005/88/WE* Dyrektywy 2011/85/EU - (UE) 2015/863 w sprawic ograniczenia stosowania neklorych niezbepicznych substancji ve sprzcie elektrycznym i elektronicznym2. Opis urządzeniaa) Produkt: Kosizka4) Funkcja: šchranie trawyc) Model: c) Typ4) Nuryu sehyjne4) Producent4. Upoważniory Przedslanekiel oraz osoba upoważniora do przygotowania dokumentacji technicznej5. Odniensienie da zastosowanych norm6. Dyrektywa Halsowsa a) Zmietrany poziom mocy akustycznej6) Owareantowny poziom mocy akustycznej7) Warość haisuo4) Procedura oceny zgodnoseci9) Jednostka rotytkowana7. Miesos 8. Data | Suomi / Suomen kieli (Finnish)EY-VAATMUSTENMUKAIUSILVSAKUUTUS1. Allekjoitlanart, Peter Neckbroeck vallutellu valmistayan sadstaja, vakuittae tâten cêti alla menitu konsektoue laytlasa kaliki neurasya misarayksia:* Kondrektiv 2000/42/EY* Direklivi 2014/30/EU sathikemagnestinen yfteeresopvius* Direklivi 2000/41/ETV 2005/88/EY ympainston melu* direktvi 2011/85/EU - (EU) 2015/863 hetyjen vaarallisten amieden klýton rajpitamiszata száhlo ja elektronikarkatielassa2. TUOTTEEN KUVAUSA) Tucke - Ruchonleikkurib) Toiminto: ruhonl leiskausa) Malli: d) TYPPII4) SARJANUMERO5. WALMISTAJIA6. Valmistajan odrzejja teknister dokomettian lazia6. Villatsu sowievelittulih stembardelin8. Ympäristón meiadirektivi a) Mitaliu melutasob) Tosennukainen meutaseo) Malu parametri9) Ydenmukaseuden svolomnin meretelmé9) Tradvanontin10. TEHTY 9. PAVAMAARAHA |
| Magyar (Hungarian)EK megfelelożugi nyilaktozate1. Alkilott Peter Neckbroeck, a gyarto oleg třuvinyas képviselőjekent nyilaktozona, hogy az sitalunk gyrátiol góp megfelei az ósszes, ábbá folsorolt direktvának:* 2008/42/EK Direktivának berendeztszkeore* 2014/30/EU Direktivának elektronigneses megfelelobégre* 2009/41/EK/2005/88/EK Direktivának költeri zajszintre* Taracas 2011/85/EU - (EU) 2015/863 ogyas vazszydansu negog elektronik és elektronikus berendezteszben való alkalmazásának korlátozásáról2. A pep leirásaa) Tormék : Firyirdb) Forkoč: fő levégüsaC) Model: d) Tipusa) Sorozatszám3. Gyarto4. Moghatalmozart képviselője és képes osszeallítani a můszaki dokumentációt5. Referencia az alkalmazolt szabványokhoz6. Klitten zajsnit Direktivaa) Mérì hangorób) Szavaltoli hangeróc) Zajszint paramierD) Mapleteúsegi beclési eljáriasc) Kiplásti szoryezat9. Kellectics beryae8. Kellectics djege | Cestina (Czech)ES - Prohlázni o shodě1. Podepsenyý Peter Neckbroeck, jako autorzovaná osoba zle potružuje, že stroj proposány niže splňuje požadavky příslušných opatřní:* Směrnoc 2008/42/ES pro strojni zařízení* Směrnoe 2014/30/EU stencuvující technická požadavky na výrobky z hídiska elektronegnetičke komplitability* Směrnoe 2000/41/ES/2005/88/ES stencuvující technická požadavky na výrobky z hídiska emisi hluku zařízení pro weaknos použti*Rady 2011/85/EU - (EU) 2015/863 o můsení používání někierých nebezpečných látek v elektrických a elektronických zařízoních2. Popis zařízenía) Výrobcek : Saksceka na travuC) Funkce : Sekání trávyC) Model: d) LypC) Výrobcek : ŽádC) Výrobce4. Zalkromoczný zástupca a osoba pověřená kompletaci technicka dokumentaca5. Olikaz na planě standardy6. Směrjice pro tlituk pro venikovní použdía)* Naměření akuslický vykon* Garantovený akuslický vykon* Parametr hluku4) Způstro prezuzení shodya) Notifikovaná osoba7. Podepszínov y8. Datum | Latviełu (Latvian)EK oblatibilas deklaracija1. Peter Neckbroeck ar svyu penkatu zam st’řosobnega pārstila pārstila, pazpo, ka zemak aprakstitie malina, albist visam zemak noradito direktvu sadatlan:* Direktva 2006/42/EK per meštném* Direktva 2014/30/ES atieoba uz elektronegnetičko sviečojenímib* Direktva 2000/41/EK-2005/88/EK par trokšna osmisju vilo*: Direktva 2011/85/ES (ES) 2015/863 par dažu bistanu vielu iznanitošenas jerobežosanu elektriská es elektronikas oskirtas2. Lektrías spraklea6) Produkte: Ziles pávlějsaB) Funkcja: zales plušanaC) Modatis: d) Tips*Cerijas numurs3. Rešviljš4. Autorizveis pārstavis, spoj sastadi telhnisko dokumentáciju5. Atauscu uz pomorbajom standartnom6. Avko trokšju, Direktva a izmenita trokčina lieumis6) Plejušjamis trokčina lieumis7. Taldača vrt. Izips8) Altibčas veřelēmus procediðraa9) Informota listado7. Veita8. Datuma |
| Slovenčina (Slovak)ES vyhlászion o zhode1. Dolupoplesny, Peter Neckbroeck, ako autorizovany zástupca výrobou, tymo výnasupa, ža uvedeny stroove je zo zhode s naslednovyními smesamicu:* Smernica 2006/42/ES (Stroje zariadenia)* Smernica 2014/30/EU (Elektronologické kompositibilia)* Smernica 2000/41/ES/2005/88/ES (Fernise hluku)* Rady 2011/85/EU - (EU) 2015/863 o obmodzení používlenie určitých nebezpečných látek v elektrických a elektronických zariadeniacn2. Popis strojaa) Produkt : Koszka na strávuB) Funkoia: Koserine trávyC) Model: d) Typc) Výrobne Ġišlo3. Výrobne4. Autorizovany zástupca schopný zostavít technicků dokumentáciu5. Referencia na použile nornry6. Smorancia pro omschoku vo valnom prastrancovaa) Namerená hladina skutskíčerro výkoru7) Zurodná hladina akustokého výkoru8) RozminerD) Procedura posudzovana zhady9) Notifikovaná osoba7. Miesto 8. Datum | Eesti (Elonian)EU vastavusoklaratscion1. Kaseslevaga kinnitšb silekljutanu, Peter Neckbroeck, voltatost zasnáda nmei, ce sišpoli kerpidatur našme vastab kõlikdele al signjavnate direktivde satelele;* Masinate direktiv 2008/42/EU* Elektronegnetičke iskladuvau direktiv 2014/30/EL* Valenzo a olnaciv 2014/41/EU 2015/86/ER-E direktiv 2011/85/EL - (EL) 2015/863 telesavae chike arietu kesatouste piramisa kohta okstri- ja elektronikasadneotess2. Seadmete korjeliduaa) Toode: Murunituk4) Funklicovori: snuru nitrnireC) Model: e) Tolip4) Seerlimniber3) Toja4) Vořiadu esnístaja, kes on pádev talnira tehnilist dokumentacions5) Vidie kohalatud standarditele6) Věllamíra direktiva) Môdeiad velihčinsate taseC) Linstu sahtelinsate taseC) Mura parameeler4) Vaslevasihcanniamenellus5) Tevatiadus asutus7. Kont. 8. Kuřapčev | Slovensčina (Slovenian)ES irjava o skladnosti1. Spodji podpleani, Peter Neckbroeck, ki je poslačana osba in i minaru prizvaljena izjavlja, da spodji uolszma sloři usztreza vnen savedeniń direktvam:* Direktiva 2006/42/ES o strijih* Direktiva 2014/30/EU o elektronegnetič zadrúljnosti* Direktiva 2000/41/ES/2005/88/ES o trupnosti* Direktiva 2011/85/EU - (EU) 2015/863 o omojovanu upozate rokatstrih novamih snovy v elektronici opram2. Opis napravae) Prožvod: Vilna koslnicab) Funkoja: koslenje travec) Model: d) TipC) Sprjosa Strenkia3. Prozajelec4. Poblasčení prostavnik ki lahko prašloči tennično dokumentacijo5. Sídlo na uporabhjene standarde6. Direkliva o hrupnostia) gramarana zvočna močb) Garantirana zvočna inočc) Parametler4. Pozspek4. Postopak opravit7. Krzg. B. Datum |
UK Declaration of Conformity
- The undersigned, Peter Neckebroeck, on behalf of the authorized representative, herewith declares that the machinery described below fulfils all the relevant provisions of:
The Supply of Machinery (Safety) Regulations 2008 SI 2008 No. 1597
The Electromagnetic Compatibility Regulations 2016 SI 2016 No. 1091
The Noise Emission in the Environment by Equipment for use Outdoors Regulations 2001 SI 2001 No. 1701
The Restriction of the Use of Certain Hazardous Substances in Electrical and Electronic Equipment Regulations 2012 SI 2012 No. 3032
- Description of the machinery
Product: Lawnmower Function: cutting of grass
| Model | Type | Serial number |
| HRN536C | MANA | 1000000 - 9999999 |
- Manufacturer
Honda Power Equipment Mfg., LLC
PO Box 37
Honda Drive, NC Hwy 119
Sweepsonville, NC 27359 USA
- Authorized representative and able to compile the technical documentation
Honda Motor Europe Ltd
Cain Road, Bracknell, Berkshire,
RG12 1HL, United Kingdom
- References to applied standards
EN ISO 14982:2009
EN ISO 5395-1:2013+A1:2018
EN ISO 5395-2:2013+A1:2016+A2:2017
- Outdoor Noise Regulation – SI 2001 No. 1701
a) Measured sound power dB(A): 96
b) Guaranteed sound power dB(A): 98
c) Noise parameter (L, 1min 53 cm, 2950 min -1
d) Conformity assessment procedure: Annex VI
e) Notified body: AnP Certification Limited
2 Parkfield Street
Manchester, United Kingdom
-
Done at: Aalst, BELGIUM
-
Date: 1 June 2021
Peter Neckebroeck
Head of Certification
Honda Motor Europe Ltd – Aalst Office
Major Honda distributor addresses – Adresses des principaux concessionnaires Honda – Adressen der wichtigsten Honda-Haupthändler – Adressen van Honda-importeurs – Elenco dei maggiori distributori Honda – Adresser till Hondas huvuddistributörer – Adresy hlavných obchodných zástúpení spoločnosti Honda
| AUSTRIAHonda Motor Europe LtdHondastraße 12351 Wiener NeudorfTel.: +43 (0)2236 690 0Fax: +43 (0)2236 690 480http://www.honda.at HondaPP@honda.co.at | DENMARKTIMA A/SRyttermarken 10DK-3520 FarumTel.: +45 36 34 25 50Fax: +45 36 77 16 30http://www.tima.dk | ITALYHonda Motore Europe LtdVia della Cecchignola, 1300143 RomaTel.: +848 846 632Fax: +39 065 4928 400http://www.hondaitalia.cominfo.power@honda-eu.com | SLOVAK REPUBLICHonda Motor Europe Ltd Slovensko,organizačná zložkaPrievozská 6 821 09 BratislavaTel.: +421 2 32131111Fax: +421 2 32131112http://www.honda.sk |
| BALTIC STATES(Estonia/Latvia/Lithuania)NCG Import Baltics OU Meistri 1213517 TallinnHarju County EstoniaTel.: +372 651 7300Fax: +372 651 7301info.baltic@ncgimport.com | FINLANDOY Brandt AB.Tuupakantie 7B01740 VantaaTel.: +358 207757200Fax: +358 9 878 5276http://www.brandt.fi | NORTH MACEDONIAAS Domžale Moto center d.o.o.BrezenceSI-8216 Mirna PečTel.: +386 1 562 37 00http://www.honda-as.cominfo@honda-as.com | SLOVENIAAS Domzale Moto center d.o.o.BrezenceSI-8216 Mirna PečTel.: +386 1 562 37 00http://www.honda-as.cominfo@honda-as.com |
| BELARUSJV Scanlink LtdMontazhnikov lane 4th, 5-16Minsk 220019Republic of BelarusTel.: +375172349999Fax: +375172380404honda@jpmotors.it | FRANCEHonda Motor Europe LtdDivision Produit d'Equipement Parcd'activités de Pariest,Allée du 1er maiCroissy Beaubourg BP46, 77312Mame La Vallée Cedex 2Tel.: 01 60 37 30 00Fax: 01 60 37 30 86http://www.honda.freespace-client@honda-eu.com | MALTAThe Associated Motors Company Ltd.New Street in San Gwakkin RoadMriehel Bypass, Mriehel QRM17Tel.: +356 21 498 561Fax: +356 21 480 150mgalea@gasanzammit.com | SPAIN & all ProvincesGreens Power Products, S.L.Poligono Industrial Congost – Av RamonCiurans n°208530 La Garriga - BarcelonaTel.: +34 93 860 50 25Fax: +34 93 871 81 80http://www.hondaencasa.com |
| BELGIUMHonda Motor Europe LtdDoornveld 180-1841731 ZellikTel.: +32 2620 10 00Fax: +32 2620 10 01http://www.honda.bebh_pe@honda-eu.com | GERMANYHonda Deutschland Niederlassung derHonda Motor Europe Ltd.Hanauer Landstraße 222-224D-60314 FrankfurtTel.: 01805 20 20 90Fax: +49 (0)69 83 20 20http://www.honda.deinfo@post.honda.de | NORWAYBerema ASP.O. Box 454 1401 SkiTel.: +47 64 86 05 00Fax: +47 64 86 05 49http://www.berema.noberema@berema.no | SWEDENHonda Motor Europe Ltd fillalSverigeBox 31002 - Långhusgatan 4215 86 MalmöTel.: +46 (0)40 600 23 00Fax: +46 (0)40 600 23 19http://www.honda.sehpesinfo@honda-eu.com |
| BULGARIAPremium Motor LtdAndrey Lyapchev Blvd no 341797 SofiaBulgariaTel.: +3592 423 5879Fax: +3592 423 5879http://www.hondamotor.bgoffice@hondamotor.bg | GREECTechnellas S.A.92 Athinon Ave10442 Athens, GreeceTel: +30 210 519 31 10Fax: +30 210 519 31 14mail@technellas.gr | POLANDAries Power EquipmentPuławska 46702-844 WarszawaTel.: +48 (22) 861 43 01Fax: +48 (22) 861 43 02http://www.ariespower.plhttp://www.mojahonda.plinfo@ariespower.pl | SWITZERLANDHonda Motor Europe Ltd.Succursale de Satigny/GenèveRue de la Bergère 51242 SatignyTel.: +41 (0)22 989 05 00Fax: +41 (0)22 989 06 60http://www.honda.ch |
| CROATIAS Domžale Moto center d.o.o.BrezenceSI-8216 Mirna PečTel.: +386 1 562 37 00http://www.honda-as.cominfo@honda-as.com | HUNGARYMP Motor Co., Ltd.Kamaraerdei ut 3.2040 BudaorsTel.: +36 23 444 971Fax: +36 23 444 972http://www.hondakisgepek.huinfo@hondakisgepek.hu | PORTUGALGROW Productos de Forca PortugalRua Fontes Pereira de Melo, 16Abrunheira, 2714-506 SintraTel.: +351 211 303 000Fax: +351 211 303 003http://www.grow.com.ptgeral@grow.com.pt | TURKEYAnadolu Motor Uretim Ve Pazarlama AsSekerpinar MahAlbayrak Sok No 4Cayirova 41420KocaeliTel.: +90 262 999 23 00Fax: +90 262 658 94 17http://www.anadolumotor.com.trantor@antor.com.tr |
| CYPRUSPowerline Products LtdCyprus - NicosiaVasillas 18 2232 LatsiaTel.: 0035799490421info@powerlinecy.comhttp://www.powerlinecy.com | IRELANDTwo Wheels LtdM50 Business Park, BallymountDublin 12Tel.: +353 1 4381900Fax: +353 1 4607851http://www.hondaireland.iesales@hondaireland.ie | ROMANIAAgrisorg SRLSacadat Str PrincipalaNr 444/A Jud. BihorRomaniaTel.: (+4) 0259 458 336info@agrisorg.com | UKRAINEDnipro Motor LLC3, Bondarsky Alley,Kyiv, 04073, UkraineTel.: +380 44 537 25 76Fax: +380 44 501 54 27igor.lobunets@honda.ua |
| CZECH REPUBLICBG Technik cs, a.s.U Zavodiste 251/815900 Prague 5 - VelkaChuchleTel.: +420 2 838 70 850Fax: +420 2 667 111 45http://www.honda-stroje.cz | ISRAELMayer's Cars and Trucks Co.Ltd. -Honda DivisionShevach 5, Tel Aviv , 6777936Israel+972-3-6953162OrenBe@mct.co.il | SERBIA & MONTENEGROAS Domžale Moto center d.o.o.BrezenceSI-8216 Mirna PečTel.: +386 1 562 37 00http://www.honda-as.cominfo@honda-as.com | UNITED KINGDOMHonda Motor Europe LtdCain RoadBracknellBerkshireRG12 1 HLTel.: +44 (0)845 200 8000http://www.honda.co.uk |
BALTIC STATES
(Estonia/Latvia/Lithuania)
BELARUS
JV Scanlink Ltd
BELGIUM
BULGARIA
Premium Motor Ltd
CROATIA
CYPRUS
CZECH REPUBLIC
ISRAEL
ITALY
NORTH MACEDONIA
MALTA
SLOVAK REPUBLIC
SLOVENIA
SPAIN & all Provinces
NORWAY
POLAND
PORTUGAL
SWEDEN
SWITZERLAI
ROMANIA
TURKEY
UKRAINE
SERBIA & MONTENEGRO
UNITED KINGDOM
HONDA
- SAFETY MESSAGES
- DANGER
- WARNING
- CAUTION
- DAMAGE PREVENTION MESSAGES
- NOTICE
- HONDA
- OWNER'S MANUAL
- HRN536CVKEA • HRN536CVYEA
- PEDESTRIAN CONTROLLED
- LAWNMOWER
- CONTENTS
- SAFETY INSTRUCTIONS
- Tampering and Altering
- Disposal
- PRODUCT IDENTIFICATION PLATE
- COMPONENT IDENTIFICATION
- SETUP
- UNPACKING
- HANDLEBAR SETUP
- GRASS CATCHER ASSEMBLY
- ENGINE OIL
- FUEL
- BEFORE USING YOUR LAWNMOWER
- CONTROLS
- FUEL VALVE
- CUTTING-MEAN CONTROL SYSTEM
- VKEA Type
- VYEA Type
- SMART DRIVE CONTROL
- Adjusting the Smart Drive Control
- THROTTLE LEVER
- CUTTING HEIGHT ADJUSTMENT LEVERS
- CLIP DIRECTOR LEVER
- Objects
- People and Pets
- Lawn
- CHECK YOUR MOWER
- Cutting Means
- Engine Oil Level
- Fuel Storage Container
- Air Cleaner Inspection
- Rear Shield
- Handlebar Height Adjustment
- Grass Catcher
- Inspection
- Installation
- Removal
- Cutting Height
- Clip Direction
- Clip Director Adjustment
- IMPORTANT SAFETY PRECAUTION
- Mulching
- Catching or Rear Discharge
- Are You Ready to Mow?
- OPERATION
- MOWING PRECAUTIONS
- FREQUENCY OF USE
- STARTING THE ENGINE
- VKEA Type:
- VYEA Type:
- STOPPING THE ENGINE
- SAFE MOWING PRACTICES
- Slopes
- Obstacles
- Gravel and Loose Objects
- MOWING TIPS
- When to Mow
- Cutting Width
- Cutting Means Speed
- Cutting Means Sharpness
- Dry Grass
- Wet Grass
- Fallen Leaves
- Clogged Cutting-means Enclosure
- Mowing Patterns
- Catching
- Rear Discharge Mowing
- MAINTENANCE
- MAINTENANCE SAFETY
- SAFETY PRECAUTIONS
- MAINTENANCE SCHEDULE
- ENGINE MAINTENANCE
- Engine Oil Change
- Air Cleaner Service
- Spark Plug Service
- Spark Arrester Service
- Cutting Means Removal And Installation
- Cutting-means bolt torque: 54 N·m
- Cutting-means Mounting Bolt Inspection
- GRASS CATCHER CLEANING AND REPLACEMENT
- Cleaning
- Replacement
- OPERATION CHECK OF THE CUTTING-MEANS CONTROL
- VKEA Type only:
- TRANSPORTING
- BEFORE LOADING
- LOADING AND UNLOADING
- STORAGE
- Engine
- Mower Deck
- Drying
- Short Term Storage (30-90 days)
- Long Term or Seasonal Storage (greater than 90 days)
- ENGINE CYLINDER
- PLACING IN STORAGE
- Handlebar Folding
- REMOVING FROM STORAGE
- FRAME AND ENGINE SERIAL NUMBER
- PARTS
- TROUBLESHOOTING
- INTRODUCTION
- TABLE DES MATIÈRES
- HUILE MOTEUR
- CARBURANT
- SYSTÈME DE COMMANDE DE L'OUTIL DE COUPE
- Type VKEA
- MANETTE
- D'ACCÉLÉRATEUR
- Type VYEA
- Clip Director
- Réglage du Clip Director
- Prêt à tondre ?
- PRATIQUES D'UTILISATION SÛRES DE LA TONDEUSE
- AVIS
- Entretien des bougies
- NETTOYAGE ET REMPLACEMENT DU BAC DE RAMASSAGE Nettoyage
- SORTIE D'ENTREPOSAGE
- INHALTSVERZEICHNIS
- MOTORÖL
- KRAFTSTOFF
- Gashebel
- Typ VYEA
- Schnitthöhe
- HINWEIS
- REINIGEN UND ERSETZEN DES GRASFANGKORBS
- Reinigen
- INHOUDSOPGAVE
- MOTOROLIE
- BRANDSTOF
- VOORDAT U UW GRASMAAIER GEBRUIKT
- BESTURINGSSYSTEEM VAN DE SNIJBLADEN
- ⚠ WAARSCHUWING
- Cliprichting
- Bent u klaar om te maaien?
- VEILIGE MAAIPRAKTIJKEN
- LET OP
- Bougie onderhoud
- UIT DE OPSLAG HALEN
- INDICE
- OLIO MOTORE
- CARBURANTE
- PRIMA DI UTILIZZARE IL TOSAERBA
- SISTEMA DI COMANDO DELLE LAME
- Tipo VKEA
- AVVISO
- RIMESSA IN SERVIZIO
- INNEHÅLL
- MOTOROLJA
- BRÄNSLE
- INNAN DU ANVÄNDER GRÄSKLIPPAREN
- KNIVARNAS KONTROLLSPAK
- VKEA-typ
- VYEA-typ
- SMART KÖRKONTROLL
- JUSTERINGSSPAKAR FÖR KLIPPHÖJD
- Val av klippning
- OBS!
- ANVÄNDNING EFTER FÖRVARING
- OBSAH
- MOTOROVÝ OLEJ
- PALIVO
- PRED POUŽITÍM KOSAČKY
- SYSTÉM OVLÁDANIA ŽACIEHO NOŽA
- Typ VKEA
- OVLÁDANIE SMART DRIVE
- Vol'ba režimu vyhadzovania
- TIPY NA KOSENIE
- Kedy kosit'
- UPOZORNENIE
- VYBRATIE PO USKLADNENÍ
- UK Declaration of Conformity
- BALTIC STATES
- (Estonia/Latvia/Lithuania)
- BELARUS
- JV Scanlink Ltd
- BELGIUM
- BULGARIA
- Premium Motor Ltd
- CROATIA
- CYPRUS
- CZECH REPUBLIC
- ISRAEL
- ITALY
- NORTH MACEDONIA
- MALTA
- SLOVAK REPUBLIC
- SLOVENIA
- SPAIN & all Provinces
- NORWAY
- POLAND
- PORTUGAL
- SWEDEN
- SWITZERLAI
- ROMANIA
- TURKEY
- UKRAINE
- SERBIA & MONTENEGRO
- UNITED KINGDOM
Brand : Honda
Model : HRN 536C VK
Category : Lawn mower