
MOD-53 - Vacuum Cleaner MPM - Free user manual and instructions
Find the device manual for free MOD-53 MPM in PDF.

| Product type | Canister vacuum cleaner with bag |
| Brand | MPM |
| Model | MOD-53 |
| Power supply | Mains, 220-240 V ~ 50/60 Hz |
| Power cord length | 4.50 m |
| Cleaning radius | 6.50 m (cord + hose) |
| Dust bag capacity | Standard (disposable or textile bag) |
| Bag full indicator | Yes, turns red when full |
| Automatic cord rewinder | Yes, with rewinding button |
| Telescopic tube | Yes, adjustable length |
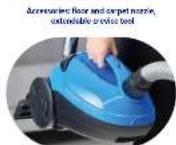
| Included accessories | Floor/carpet nozzle, crevice tool with movable brush |
| Motor filter | Yes, washable (do not immerse) |
| Exhaust filter | Yes, washable (do not immerse) |
| Usage | Household, dry surfaces only |
| Maintenance | Emptying bag, cleaning filters, cleaning housing with damp cloth |
| Safety | Unplug before maintenance, do not vacuum liquids or hot objects, keep out of reach of children under 8 |
| Weight | Approximately 4.5 kg (estimate) |
| Dimensions (L x W x H) | Approximately 40 x 25 x 30 cm (estimate) |
Frequently Asked Questions - MOD-53 MPM
User questions about MOD-53 MPM
0 question about this device. Answer the ones you know or ask your own.
Ask a new question about this device
Download the instructions for your Vacuum Cleaner in PDF format for free! Find your manual MOD-53 - MPM and take your electronic device back in hand. On this page are published all the documents necessary for the use of your device. MOD-53 by MPM.
USER MANUAL MOD-53 MPM
EN We wish you satisfaction from using the product and invite you to check a wide range of other MPM appliances
natural_image
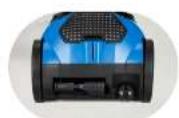
Blue and black vacuum cleaner with coiled hose (no text or symbols visible)MOD-53
VYSAVAC
STOCKSAGGER OLMUMEA
VACUUM CHAN R
ASPIRADORA
ASPIRAT-UR BOESZHIÓ
ASPIRAPOL VFRF
PUTEX SUCFIS
TOI ZUICER
(1) R_2
ASPIRATOR
VYSAVAC
ПИЛЮСОС
cz NAVOD K OBSLUZE 3

Vertical and horizontal parking system for convenient storage
natural_image
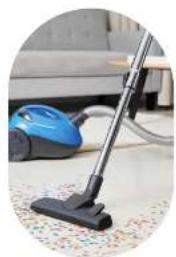
Close-up of a blue and black vacuum cleaner on a patterned floor, with no visible text or symbols.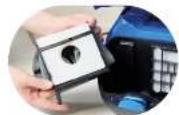
Synthetic dust bag capacity 1.5 l
Vacuum clearer dust indicator Metal telecopic tube
BEZPEČNOSTNÍ POKYNY PŘI POUŽÍVÁNÍ
PÕRANDA JA VAIBA KINNITAMINE
SAFETY INSTRUCTIONS FOR USE
- Read the following operating instructions carefully before use.
- Always remove the plug from the socket when not using the appliance or before cleaning the appliance.
- Check that the power supply parameters on the unit's rating plate match those of your mains supply.
- Do not hang the cable on sharp edges or allow it to come into contact with hot surfaces.
- Never pull the cord to disconnect the device from the power source.
- Never leave a vacuum cleaner on unattended.
- Take special care when children are around.
- Do not let the hoover ride on the mains cable, as this can damage the cable's insulation cover.
- Do not attempt to use the hoover if any technical fault is suspected.
- Do not use the appliance even if the mains cable or plug is damaged - in this case, have the appliance repaired at an authorised service centre.
- The use of accessories not recommended by the manufacturer may cause damage to the unit, injury or fire.
- Take special care when operating the hoover on stairs.
- Do not immerse the appliance, cord or plug in water or other liquids - the mains cord and plug must be kept dry at all times. - Do not use the hoover to collect flammable and corrosive liquids, solvents, matches, ashes, cigarette butts, oils, sharp objects, etc. This can cause damage to the device or even a fire! Also do not vacuum near flammable liquids and substances!
- Due to the hoover's plastic housing, keep the appliance away from all heat sources (radiators, cookers, etc.).
- Do not block the inlet and outlet openings of the hoover!
- The hoover is intended for domestic use only.
- This equipment may be used by children of at least 8 years of age and by persons of diminished physical and mental capabilities and persons with inexperience and lack of familiarity with the equipment if supervision or instruction is provided on how to use the equipment safely so that the associated risks are under-
stood. Unsupervised children should not carry out cleaning and maintenance of the equipment.
- Children are not allowed to play with the device.
- Keep the device and its cable out of the reach of children under 8 years of age.
- Do not vacuum people or pets, and be especially careful not to bring the suction tips close to your eyes and ears.
- Before replacing equipment, turn off the equipment and disconnect it from the power supply.
- Do not vacuum without a bag, filters or if they are damaged.
- Check the suction hose, pipes and squeegees - remove debris inside.
- Use the vacuum cleaner only indoors and only for vacuuming dry surfaces. Wet cleaned carpets dry before vacuuming.
- For the safety of children, please do not leave freely accessible parts of the packaging (plastic bags, cardboard boxes, polystyrene, etc.).
- WARNING! Do not allow children to play with the film. Danger of suffocation!
APPLIANCE OVERVIEW
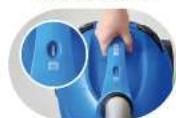
- On/off switch
- Carrying handle
- Guide
- Dust bag filling indicator
- Upper cover
- Upper cover opening button
- Suction hose connection opening
- Carrying handle in vertical position
- Power cord
- Air discharge filter grill
- Air discharge filter
-
Bag frame
-
Storage compartment for the movable brush
- Dust bag
- Wheels
- Metal telescopic wand
- Suction hose mounting ring
- Suction hose
- Suction hose handle
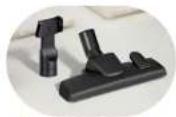
- Floor and carpet tool
- Slit attachment with movable brush
- Motor filter
- Cord winder button)
STATIC ELECTRICITY
Vacuum cleaning certain surfaces at a low air humidity may cause slight electrification of the appliance. This is natural, does not damage the appliance and does not constitute its defect. To minimise this phenomenon, it is recommended to:
- frequently discharge the appliance by touching items in the room with the metal pipe,
- increase air humidity in the room,
- use generally available anti-electrostatic products.
APPLIANCE ASSEMBLY
- Press both latches on the suction hose mounting ring (17), insert the ring into the opening (7) and release the latches. To disassemble, press the latches again and remove the ring (17) from the opening (7).
- Connect the telescopic tube (16) to the other side of the suction hose. Attach one of the suction attachments (20) or (21) to the end of the pipe.
USING THE APPLIANCE
- Before turning on the vacuum cleaner, unwind the power cord (9) to a suitable length and plug it into the mains socket. The yellow mark on the power cord indicates the optimum length. Do not pull out the cord beyond the red mark! While unwinding the cord, do not press the cord winder button (23).
- Press the switch (1) to turn on the vacuum cleaner.
WARNING! Dust bag filling level indicator light turns red when the suction hose is clogged or the dust bag is full. You need to clean the dust bag or remove the clogging from the suction hose.
- To wind the power cord, press the cord winder button (23) with one hand, while holding the cord with another hand to prevent a sudden movement that could damage it.
- To ensure optimum appliance setting upon the completion of work, use the guide (3) in the rear of the vacuum cleaner. Place the rail in the rear of the floor-carpet attachment with connected suction hose and telescopic pipe on the guide. The second guide that facilitates vacuum clean -er storage in the vertical position is under the bottom of the appliance.
ACCESSORIES OVERVIEW
FLOOR-CARPET ATTACHMENT
Designed for cleaning large flat surfaces. It is equipped with castors that facilitate move - ment in difficult to access places and a flexible joint, connecting it with the suction hose, which allows directing at various angles. When you press the button on the upper attach - ment housing (switch it to the brush mode), a row of rigid bristles will appear on the bottom to facilitate cleaning hard floors.
SLIT ATTACHMENT WITH MOVABLE BRUSH
Used for cleaning difficult to access areas, such as in room corners, by and below pieces of furniture and in bends and slits. It is also perfect for cleaning computer keyboards, drawers, radiators or window frames.
To empty the dust bag, turn off the vacuum cleaner, disconnect it from the power source, unhook the narrow suction hose (18), then use the button (6) to open the top cover (5) and remove the bag with the frame. Then slide the bag out of the frame (12) and remove the plastic seam sealing the bag above the waste bin. After emptying the bag, replace the bag's sealing seam, insert the bag into the frame and place the frame into the dust container. Finally, close the cover (5).
AIR FILTER CLEANING AND REPLACEMENT
Normal use of the vacuum cleaner requires periodical replacement or cleaning of the air filter, which protects the motor from the side of the dust bag, and the air outlet filter. For this purpose, disconnect the appliance from the power supply and detach the suction pipe.
- Open the cover (5), remove the dust bag (14) and then remove the motor filter grid (22). Slide out the filter insert.
- Remove the cover (10) and gently pull out the exhaust filter (11).
- Remove dust from the removed filters using fine bristles. Do not immerse or wash the filters in water or other liquids.
- Clean the cartridges every month or more often (depending on the frequency of use). If any of the cartridges is too dirty or damaged, replace it with a new one.
- After cleaning, reinstall the filters, install the cover (10), close the dust bag (14) and close the dust bag cover (5).
CLEANING AND MAINTENANCE
- Periodically clean the vacuum cleaner housing and other external elements with a damp cloth. This will allow maintaining good appearance of the appliance.
- For this purpose, do not use sharp objects or any strong detergents (e.g. solvents), as this will cause permanent damage to the vacuum cleaner housing.
- For air filters and dust bag, follow the above instructions.
IN CASE OF FAILURE
Failure type: Possible causes: Instructions:
| front cover not thoroughly closed | dust bag not attached or attached improperly | attach the dust bag properly |
| vacuum cleaner housing overheating | a slight housing temperature increase is normal, but if the temperature increases considerably, immediately turn off the vacuum cleaner and contact the service | |
| strongly contaminated filters clean or replace the filters | ||
| full dust bag replace the dust bag or empty the textile bag | ||
| low suction power | blocked hose or extension pipe remove all items blocking the hose or pipe | |
TECHNICAL DATA
Technical parameters are indicated on the product nameplate.
Length of power cord: 4,50 m
Working radius: 6.50 m

NOTE! MPM agd S.A. reserves its right to modify the technical data.
Proper disposal of the product (waste electrical and electronic equipment)
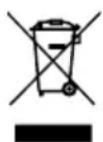
Marking on the product indicates that after the service-life of the product expires, it should not be disposed with other type of municipal waste. Used equipment may have a negative impact on the environment and health of people due to potentially containing hazardous substances, mixtures and components. Mixing electric waste with other types of waste or disassembling those in an unprofessional manner may cause a release of substances that are hazardous to the environment and health.
Used equipment should be handed-over to a point for collection of electric waste. In order to obtain detailed information regarding the electric waste collection points, the user should contact the municipal point of electric waste collection or used equipment processing department.
BESCHRIJVING VAN HET APPARAAT
INSTALLATIE VAN HET APPARAAT
- MOD-53
- BEZPEČNOSTNÍ POKYNY PŘI POUŽÍVÁNÍ
- PÕRANDA JA VAIBA KINNITAMINE
- SAFETY INSTRUCTIONS FOR USE
- APPLIANCE OVERVIEW
- STATIC ELECTRICITY
- APPLIANCE ASSEMBLY
- USING THE APPLIANCE
- ACCESSORIES OVERVIEW
- FLOOR-CARPET ATTACHMENT
- SLIT ATTACHMENT WITH MOVABLE BRUSH
- AIR FILTER CLEANING AND REPLACEMENT
- CLEANING AND MAINTENANCE
- IN CASE OF FAILURE
- TECHNICAL DATA
- Proper disposal of the product (waste electrical and electronic equipment)
- BESCHRIJVING VAN HET APPARAAT
- INSTALLATIE VAN HET APPARAAT
Brand : MPM
Model : MOD-53
Category : Vacuum Cleaner