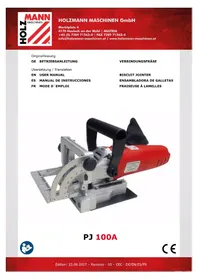
PJ 100A - Milling machine Holzmann - Free user manual and instructions
Find the device manual for free PJ 100A Holzmann in PDF.


| Product Type | Lamello Joiner (Biscuit Joiner) |
| Brand | Holzmann |
| Model | PJ 100A |
| Power Supply | 230 V ~ 50 Hz |
| Power Consumption | 700 W |
| Weight | 3.5 kg |
| Adjustable Cutting Depth | 8, 10, 12.3, 20 mm |
| Adjustable Cutting Angle | 0° to 90° |
| Adjustable Angle Stop | Yes, with scale |
| Joint Types Achievable | Corner, angle, frame, central wall, longitudinal, transversal |
| Compatible Biscuit Dimensions | No.0 (47×15×4 mm), No.10 (53×19×4 mm), No.20 (56×23×4 mm) |
| Arbor Lock | Yes, for blade change |
| Switch | ON/OFF with continuous lock |
| Dust Bag Included | Yes |
| Protection Class | II (double insulation) |
| Maintenance | Clean after each use, lubricate every 100 h |
| Safety | Disconnect before maintenance, wear PPE, do not wear gloves |
| Warranty | 2 years (non-commercial use), 1 year (commercial use) |
| Spare Parts | Available by order, use original parts |
Frequently Asked Questions - PJ 100A Holzmann
User questions about PJ 100A Holzmann
0 question about this device. Answer the ones you know or ask your own.
Ask a new question about this device
Download the instructions for your Milling machine in PDF format for free! Find your manual PJ 100A - Holzmann and take your electronic device back in hand. On this page are published all the documents necessary for the use of your device. PJ 100A by Holzmann.
USER MANUAL PJ 100A Holzmann
natural_image
Red and silver power tool with metal frame and scale markings (no readable text or symbols)PJ 100A
1 INHALT /INDEX
11.2 Operation....18
11.3 Adjustments.... 18
11.3.1 Setting the groove depth .....18
11.3.2 Selection of timber connectors....19
11.3.3 Adjustment of the angle stop....19
11.3.4 Adjustment of the pivot stop .....19
11.4 Operating....19
11.4.1 Connectivity....19
11.4.2 Switching on / off....20
12 MAINTENANCE 21
12.1 Cleaning 21
12.2 Storage 21
12.3 Disposal 21
13 PREFACIO (ES) 22
14 SEGURIDAD 23
EN CE-CONFORM: This product complies with EC-directives
EN READ THE MANUAL! Read the user and maintenance manual carefully and get familiar with the controls in order to use the machine correctly and to avoid injuries and machine defects.
EN ATTENTION! Ignoring the safety signs and warnings applied on the machine as well as ignoring the security and operating instructions can cause serious injuries and even lead to death.
EN Warning about cut injuries!
EN Operation with gloves forbidden!
EN Protective clothing!
EN Stop and pull out the power plug before any break and engine maintenance!
EN Protection class II!
6.3 Einstellungen
This manual contains information and important instructions for the installation and correct use of the biscuit jointer PJ 100A.
Following the usual commercial name of the machine (see cover) is substituted in this manual with the name "machine".
This manual is part of the product and shall not be stored separately from the product. Save it for later reference and if you let other people use the product, add this instruction manual to the product.

Please read and obey the security instructions!
Before first use read this manual carefully. It eases the correct use of the product and prevents misunderstanding and damages of product and the user's health.
Due to constant advancements in product design, construction pictures and content may diverse slightly. However, if you discover any errors, inform us please.
Technical specifications are subject to changes!
Please check the product contents immediately after receipt for any eventual transport damage or missing parts.
Claims from transport damage or missing parts must be placed immediately after initial product receipt and unpacking before putting the product into operation.
Please understand that later claims cannot be accepted anymore.
Copyright
© 2017
This document is protected by international copyright law. Any unauthorized duplication, translation or use of pictures, illustrations or text of this manual will be pursued by law. Court of jurisdiction is the Landesgericht Linz or the competent court for 4170 Haslach, Austria!
Customer service contact
The machine must only be used for its intended purpose! Any other use is deemed to be a case of misuse.
To use the machine properly you must also observe and follow all safety regulations, the assembly instructions, operating and maintenance instructions lay down in this manual.
All people who use and service the machine have to be acquainted with this manual and must be informed about the machine's potential hazards.
It is also imperative to observe the accident prevention regulations in force in your area.
The same applies for the general rules of occupational health and safety.
The machine is used for:
Culling grooves for biscuit dowel joints in solid wood, plywood, chipboard, plastic boards.
Work on the different materials with suitable blades only
This machine is not intended for use by persons (including children) with reduced physical, sensory or mental capabilities, or lack of experience and knowledge, unless they have been given supervision or instruction concerning use of the machine by a person responsible for their safety. Never allow children or people unfamiliar with these instructions to use the machine. Supervise children. This will ensure that children do not play with the unit.
Any manipulation of the machine or its parts is a misuse, in this case HOLZMANN-MASCHINEN and its sales partners cannot be made liable for ANY direct or indirect damage.

WARNING
- Use only blades allowable for this machine!
- Never use a damaged blade!
HIGHEST RISK OF INJURY!
Ambient conditions
The machine may be operated:
humidity
max. 70%
temperature
+5°C to +40°C (+41°F to +104°F)
The machine shall not be operated outdoors or in wet or damp areas.
The machine shall not be operated in areas exposed to increased fire or explosion hazard.
Prohibited use
- The operation of the machine outside the stated technical limits described in this manual is forbidden.
• The operation of the machine without provided protective devices is prohibited.
• The use of the machine not according with the required dimensions is forbidden. - The use of the machine not being suitable for the use of the machine and not being certified is forbidden.
• Any manipulation of the machine and parts is forbidden.
• The use of the machine for any purposes other than described in this user-manual is forbidden.
• The unattended operation on the machine during the working process is forbidden! - It is not allowed to leave the immediate work area during the work is being performed.
9.2 Safety instructions
Missing or non-readable security stickers have to be replaced immediately!
The locally applicable laws and regulations may specify the minimum age of the operator and limit the use of this machine!
To avoid malfunction, machine defects and injuries, read the following security instructions!
Work area safety:
- Keep work area clean and well lit. Cluttered and dark areas invite accidents.
- Do not operate power tools in explosive atmospheres, such as in the presence of flammable liquids, gases or dust. Power tools create sparks which may ignite the dust or fumes.
- Keep children and bystanders away while operating a power tool. Distractions can cause you to lose control.
Electrical safety:
- Power tool plugs must match the outlet. Never modify the plug in any way. Do not use any adapter plugs with earthed (grounded) power tools. Unmodified plugs and matching outlets will reduce risk of electric shock.
- Avoid body contact with earthed or grounded surfaces, such as pipes, radiators, ranges and refrigerators. There is an increased risk of electric shock if your body is earthed or grounded.
- Do not expose power tools to rain or wet conditions. Water entering a power tool will increase the risk of electric shock.
- Do not abuse the cord. Never use the cord for carrying, pulling or unplugging the power tool. Keep cord away from heat, oil, sharp edges and moving parts. Damaged or entangled cords increase the risk of electric shock.
- When operating a power tool outdoors, use an extension cord suitable for outdoor use. Use of a cord suitable for outdoor use reduces the risk of electric shock.
Personal safety:
- Stay alert, watch what you are doing and use common sense when operating a power tool. Do not use a power tool while you are tired or under the influence of drugs, alcohol or medication. A moment of inattention while operating power tools may result in serious personal injury.
- Use personal protective equipment. Always wear eye protection. Protective equipment such as dust mask, non-skid safety shoes, hard hat, or hearing protection used for appropriate conditions will reduce personal injuries.
- Prevent unintentional starting. Ensure the switch is in the off-position before connecting to power source and/or battery pack, picking up or carrying the tool. Carrying power tools with your finger on the switch or energising power tools that have the switch on invites accidents.
- Remove any adjusting key or wrench before turning the power tool on. A wrench or a key left attached to a rotating part of the power tool may result in personal injury.
- Do not overreach. Keep proper footing and balance at all times. This enables better control of the power tool in unexpected situations.
- Dress properly. Do not wear loose clothing or jewellery. Keep your hair, clothing and gloves away from moving parts. Loose clothes, jewellery or long hair can be caught in moving parts.
- If devices are provided for the connection of dust collectors and collection facilities, ensure these are connected and properly used. Use of dust collection can reduce dust-related hazards.
Power tool use and care:
- Do not overload the machine. Use the correct power tool for your application. The correct power tool will do the job better and safer at the rate for which it was designed.
- Do not use the power tool if the switch does not turn it on and off. Any power tool that cannot be controlled with the switch is dangerous and must be repaired.
- Disconnect the plug from the power source and/or the battery pack from the power tool before making any adjustments, changing accessories, or storing power tools. Such preventive safety measures reduce the risk of starting the power tool accidentally.
- Store idle power tools out of the reach of children and do not allow persons unfamiliar with the power tool or these instructions to operate the power tool. Power tools are dangerous in the hands of untrained users.
-
Maintain power tools. Check for misalignment or binding of moving parts, breakage of parts and any other condition that may affect the power tool's operation. If damaged, have the power tool repaired before use. Many accidents are caused by poorly maintained power tools.
-
Keep cutting tools sharp and clean. Properly maintained cutting tools with sharp cutting edges are less likely to bind and are easier to control.
- Use the power tool, accessories and tool bits etc. in accordance with these instructions, taking into account the working conditions and the work to be performed. Use of the power tool for operations different from those intended could result in a hazardous situation.
Additional safety instructions:
- Sawdust and splinters must not be removed while the machine is running.
- Do not use cutting discs or circular saw blades in the machine.
- Protect blades against shocks and impacts
- Only use properly sharpened blades, otherwise increased culling forces will shatter the work piece.
- Before use, inspect the blade for any damage. Do not use blades that are cracked, ripped or otherwise damaged
- Make sure that the work piece is sufficiently supported or clamped. Keep your hands away from the surface to be cut
- Use the machine only with the auxiliary handle.
- When blades have to be mounted on the thread of the spindle, make sure that the spindle has sufficient thread
- Make sure that the blade has been mounted and fastened properly. Do not use reducing rings or adapters to make the blade fit properly.
- Apply the machine to the work piece only when the machine is switched on.
- When working with the machine always hold the machine firmly with both hands and provide for secure distance.
- Always wear safety goggles and hearing protection. If desired or required also use another protection for example an apron or helmet
- Always disconnect the plug from the socket before carrying out any work on the machine, only plug in when the machine is switched off
- Keep mains lead clear from working range of the machine. Always lead the cable away behind you.
- The base plate must not be clamped down while the blade is extended. Lowering and raising the blade must be a smooth operation.
11 OPERATION
Please check the product contents immediately after receipt for any eventual transport damage or missing parts. Claims from transport damage or missing parts must be placed immediately after initial machine receipt and unpacking before putting the machine into operation. Please understand that later claims cannot be accepted anymore.
11.1 Assembly

WARNING
Perform all machine settings with the machine being disconnected from the power supply!


NOT ICE
Wear safety gloves when working on the blades!
11.1.1 Blade
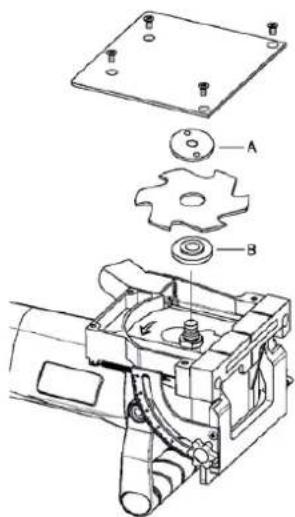
- Remove the 4 screws and remove the cover.
- Press the shaft (5) and solve with the face spanner (14) the blade flange
11.1.2 Dust bag
- If you do not use a dust collector, insert the dust bag into the dust collector plug.
- Empty the dust bag regularly so that the vacuuming performance remains intact.
11.2 Operation
Machine to be operated in a perfect state only. Inspect the device visually every time it is to be used. Check in particular the safety equipment, electrical controls, electric cables and screwed connection for damage and if tightened properly. Replace any damaged parts before operating the device.
11.3 Adjustments
11.3.1 Setting the groove depth
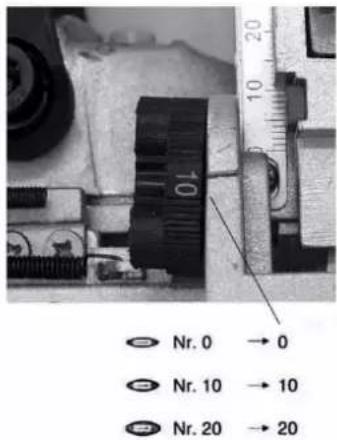
- Set the desired groove depth one with the wheel (9).
- The names on the dial reflect the different sizes of timber connectors.
- You can adjust the depth of the groove with the screw (10) fine.
- Slide the drive motor (3) forward to check the depth of cut. The power supply must be disconnected for this purpose.
| Marking | 0 | 10 | 20 | M |
| Size of the timber connector | 0 | 10 | 20 | --- |
| groove depth | 8 mm | 10 mm | 12,3 mm | 20 mm |
11.3.2 Selection of timber connectors
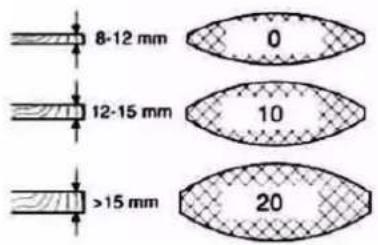
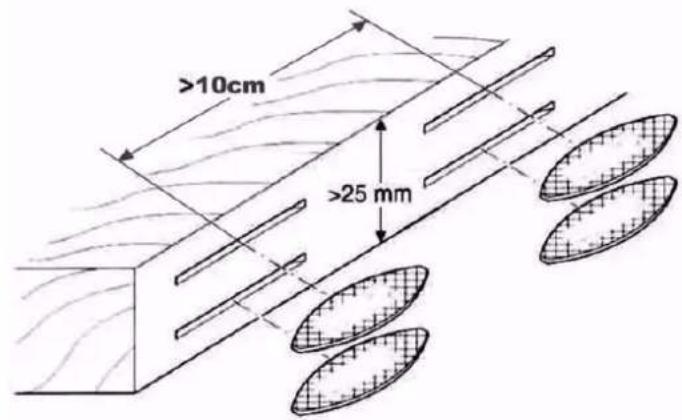
Always use the largest possible timber connector for a strong connection. For materials over 25 mm (1 inch) thick, and 2 wood connectors on each usable.
The distance between two should be at least 10 cm.
Wood connectors Dimensions:
Nr. 0 47×15×4mm
Nr. 10 53×19×4mm
Nr. 20 56×23×4mm
11.3.3 Adjustment of the angle stop
The height of the angled guide can be adjusted to adjust the position of the blade relative to the workpiece upper surface.
- To adjust the angle stop height loosen the clamping screw and cause the angle to the desired tick mark on the crosscut fence.
- Then tighten the clamping screw to the angle guide to secure. The scale indicates the distance between the angle stop and center of the cutting tool.
The angle guide can be removed depending on the job requirements from the stop.
11.3.4 Adjustment of the pivot stop
The flip stop can be set between 0° and 90°.
- To adjust the angle loosen the clamping screw and tilt the swivel stop until the arrow indicator to the desired angle on the angle scale matches.
- The adjusted angle with the pinch bolt.
11.4 Operating
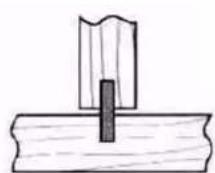
11.4.1 Connectivity
1
2
3
4
5
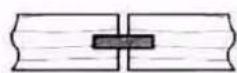
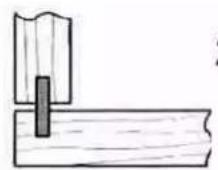
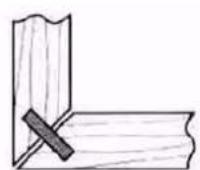
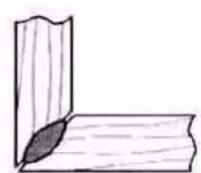
- corner joint
- miter
- frame connection
- middle wall connection
- longitudinal and transverse connecting
NOTE:
• The center of the groove must be run from the workpiece outer edge at least 50 mm.
- With several wood joints 100 mm - 150 mm groove spacing hold.
Only for corner joint and center wall connection
- The vertical workpiece clamp to the workbench.
Only with mitred
- Clamp a workpiece with the mitered edge up on the workbench.
Only for frame connections and the longitudinal and transverse links
A workpiece clamp to the workbench.
- Set the groove depth according to the size of the timber connector to be used.
• See the table in the section "Setting the groove depth 12.1.3".
- Adjust the angle stop on the cutting tool and workpiece center.
- Align the center mark on the base plate on the pencil line on the workpiece.
• Turn on the power and move it forward immerse the cutting tool into the workpiece.
- After reaching the preset cutting depth the unit carefully drive back to the starting position.
Only for corner joint and center wall connection
- Clamp the horizontal workpiece at the workbench
The biscuit jointer machine is suitable for joints in solid wood, plywood, particle board, fiberboard, Plexiglas and artificial marble, etc. 8 mm (5/16 in.) thickness.
11.4.2 Switching on / off
- Never use the spindle lock during starting or when the machine is working.
- Always make sure that the slide switch is working properly before connecting the machine and when you press the rear panel to the "OFF" position returns.
- The switch can be locked to make work easier for extended use in the "ON" position.
- Be careful, when you lock the switch in the "ON" position, and hold the tool firmly.
- To switch the unit to switch to the position "I" (ON) push. For continuous operation, the switch into place by pressing its front.
- To turn off the machine, press the rear of the slide switch and then the switch to the "O (OFF)" push.
12 MAINTENANCE
ATTENTI ON

Perform all maintenance machine settings with the machine being disconnected from the power supply!
Serious injury due to unintentional or automatic activation of the machine!

The machine does not require extensive maintenance. If malfunctions and defects occur, let it be serviced by trained persons only.
NOTICE
Clean your machine regularly after every usage – it prolongs the machines lifespan and is a prerequisite for a safe working environment.
Repair jobs shall be performed by respectively trained professionals only!
Check regularly the condition of the security stickers. Replace them if required.
Check regularly the condition of the machine!
12.1 Cleaning
Once a month the machine and all its parts must be thoroughly cleaned.
NOTICE
The usage of certain solutions containing ingredients damaging metal surfaces as well as the use of scrubbing agents will damage the machine surface!
Never use running water or a high pressure cleaner to clean the machine.
• After each use, clean the machine using a dry cloth or a brush if the machine is very dirty.
- Keep the ventilation slits clean and dustfree.
12.2 Storage
- Thoroughly clean the whole machine and its accessories.
- Store it out of the reach of children, in a stable and secure position, in a cool and dry place, avoid too high and too low temperatures.
- Protect it from exposure to direct sunlight. Keep it in the dark, if possible.
- Don't keep it in plastic bags to avoid humidity build-up.
12.3 Disposal
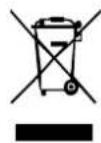
Do not dispose the machine in residual waste. Contact your local authorities for information regarding the available disposal options. When you buy at your local dealer for a replacement unit, the latter is obliged to exchange your old.
13 PREFACIO (ES)
Estimado Cliente,
(EN) With original HOLZMANN spare parts you use parts that are attuned to each other shorten the installation time and elongate your products lifespan.
IM PORTAN T
The installation of other than original spare parts voids the warranty!
So you always have to use original spare parts
When you place a spare parts order please use the service formular you can find in the last chapter of this manual. Always take a note of the machine type, spare parts number and partname. We recommend to copy the spare parts diagram and mark the spare part you need.
You find the order address in the preface of this operation manual.
For mechanical and electrical components Company Holzmann Maschinen GmbH garants a warranty period of 2 years for DIY use and a warranty period of 1 year for professional/industrial use - starting with the purchase of the final consumer (invoice date).
In case of defects during this period which are not excluded by paragraph 3, Holzmann will repair or replace the machine at its own discretion.
2.) Report:
In order to check the legitimacy of warranty claims, the final consumer must contact his dealer. The dealer has to report in written form the occurred defect to Holzmann. If the warranty claim is legitimate, Holzmann will pick up the defective machine from the dealer. Returned shippings by dealers which have not been coordinated with Holzmann will not be accepted. A RMA number is an absolute must-have for us - we won't accept returned goods without an RMA number!
3.) Regulations:
a) Warranty claims will only be accepted when a copy of the original invoice or cash voucher from the trading partner of Holzmann is enclosed to the machine. The warranty claim expires if the accessories belonging to the machine are missing.
b) The warranty does not include free checking, maintenance, inspection or service works on the machine. Defects due to incorrect usage through the final consumer or his dealer will not be accepted as warranty claims either.
c) Excluded are defects on wearing parts such as carbon brushes, fangers, knives, rollers, cutting plates, cutting devices, guides, couplings, seals, impellers, blades, hydraulic oils, oil filters, sliding jaws, switches, belts, etc.
d) Also excluded are damages on the machine caused by incorrect or inappropriate usage, if it was used for a purpose which the machine is not supposed to, ignoring the user manual, force majeure, repairs or technical manipulations by not authorized workshops or by the customer himself, usage of non-original Holzmann spare parts or accessories.
e) After inspection by our qualified staff, resulted costs (like freight charges) and expenses for not legitimated warranty claims will be charged to the final customer or dealer.
f) In case of defective machines outside the warranty period, we will only repair after advance payment or dealer's invoice according to the cost estimate (incl. freight costs) of Holzmann.
g) Warranty claims can only be granted for customers of an authorized Holzmann dealer who directly purchased the machine from Holzmann. These claims are not transferable in case of multiple sales of the machine.
4.) Claims for compensation and other liabilities:
The liability of company Holzmann is limited to the value of goods in all cases.
Claims for compensation because of poor performance, lacks, damages or
loss of earnings due to defects during the warranty period will not be accepted.
Holzmann insists on its right to subsequent improvement of the machine.
SERVICE
After Guarantee and warranty expiration specialist repair shops can perform maintenance and repair jobs. But we are still at your service as well with spare parts and/or product service. Place your spare part / repair service cost inquiry by filing the SERVICE form on the following page and send it:
via Mail to info@holzmann-maschinen.at
or use the online complaint.- or spare parts order formula provided on our homepage www.holzmann-maschinen.at under the category service/news.
We monitor the quality of our delivered products in the frame of a Quality Management policy.
Your opinion is essential for further product development and product choice. Please let us know about your:
- Impressions and suggestions for improvement.
- experiences that may be useful for other users and for product design
- Experiences with malfunctions that occur in specific operation modes
We would like to ask you to note down you experiences and observations and send them to us via FAX, E-Mail or by post:
Erworben von / purchased from:
E-Mail/ e-mail:
service inquiry spare part inquiry guarantee claim
Please describe amongst others in the problem: What has cause the problem/defect, what was the last activity before you noticed the problem/defect? For electrical problems: Have you had checked you electric supply and the machine already by a certified electrician?
3. Bitte beachten
Additional information
INCOMPLETELY FILLED SERVICE FORMS CANNOT BE PROCESSED! FOR GUARANTEE CLAIMS PLEASE ADD A COPY OF YOUR ORIGINAL SALES / DELIVERY RECEIPT OTHERWISE IT CANNOT BE ACCEPTED. FOR SPARE PART ORDERS PLEASE ADD TO THIS SERVICE FORM A COPY OF THE RESPECTIVE EXPLODED DRAWING WITH THE REQUIRED SPARE PARTS BEING MARKED CLEARLY AND UNMISTAKABLE. THIS HELPS US TO IDENTIFY THE REQUIRED SPARE PARTS FASTLY AND ACCEL- ERATES THE HANDLING OF YOUR INQUIRY.

- INHALT /INDEX
- MAINTENANCE 21
- PREFACIO (ES) 22
- SEGURIDAD 23
- Einstellungen
- Please read and obey the security instructions!
- Copyright
- Customer service contact
- The machine is used for:
- WARNING
- HIGHEST RISK OF INJURY!
- Ambient conditions
- Prohibited use
- Safety instructions
- Missing or non-readable security stickers have to be replaced immediately!
- The locally applicable laws and regulations may specify the minimum age of the operator and limit the use of this machine!
- Work area safety:
- Electrical safety:
- Personal safety:
- Power tool use and care:
- Additional safety instructions:
- OPERATION
- Assembly
- NOT ICE
- Blade
- Dust bag
- Operation
- Adjustments
- Setting the groove depth
- Selection of timber connectors
- Adjustment of the angle stop
- Adjustment of the pivot stop
- Operating
- Connectivity
- NOTE:
- Switching on / off
- MAINTENANCE
- ATTENTI ON
- NOTICE
- Cleaning
- Storage
- Disposal
- PREFACIO (ES)
- Estimado Cliente,
- IM PORTAN T
- The installation of other than original spare parts voids the warranty!
- 2.) Report:
- 3.) Regulations:
- 4.) Claims for compensation and other liabilities:
- SERVICE
- Bitte beachten
- Additional information
Brand : Holzmann
Model : PJ 100A
Category : Milling machine