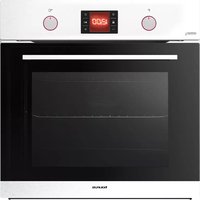
HM973IXD - Electric oven TAURUS - Free user manual and instructions
Find the device manual for free HM973IXD TAURUS in PDF.


| Product type | Built-in electric oven |
| Brand | Taurus |
| Model | HM973IXD |
| Dimensions (H x W x D) | 595 x 595 x 530 mm |
| Housing dimensions (H x W x D min) | 600 x 560 x 560 mm |
| Power supply | AC 220-240 V, 50 Hz, three-phase |
| Connection power | Not specified |
| Installation type | Built-in |
| Number of functions | 8 (conventional, defrost, fan assisted, grill, etc.) |
| Main functions | Natural convection, fan assisted, grill, combined grill, defrost, rapid heat, steam cleaning, lighting |
| Maximum temperature | 250 °C (estimate) |
| Timer | Yes, programmable up to 99 minutes, with automatic cooking end and audible alarm |
| Interior lighting | Replaceable bulb, 25 W, G9, 230-240 V, resistant to 300 °C |
| Door type | Removable glass for cleaning |
| Cleaning | Manual steam function, cleaning with warm water and dish soap |
| Safety | Lock controls, safety switch recommended for installation |
| Included accessories | Grid, deep tray |
| Country of manufacture | Not specified |
| Warranty | In accordance with current legislation (contact Taurus customer service) |
Frequently Asked Questions - HM973IXD TAURUS
User questions about HM973IXD TAURUS
0 question about this device. Answer the ones you know or ask your own.
Ask a new question about this device
Download the instructions for your Electric oven in PDF format for free! Find your manual HM973IXD - TAURUS and take your electronic device back in hand. On this page are published all the documents necessary for the use of your device. HM973IXD by TAURUS.
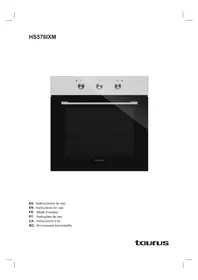
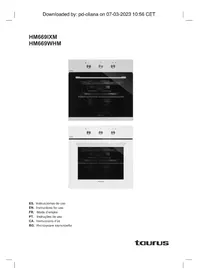
USER MANUAL HM973IXD TAURUS
English Electric oven HM973IXD
Description of the appliance
1 - Oven function selection knob
2 - Temperature control knob
3 - Timer
4 - Oven door handle
5-Fggr tray
6-Oven shelf
Installation
The kitchen area should be dry and well ventilated.
When installing the oven, easy access to all control elements should be ensured.
This is a built-in oven, and its back wall and one side wall can be placed next to a tall kitchen unit or a wall. Coatings or veneer used on fitted furniture must be applied with a heat-resistant adhesive (100^) . This prevents surface deformation or detachment of the coating
Ensure the aperture is as per the dimensions in the diagram.
Connect the oven to the mains when it is fully installed.
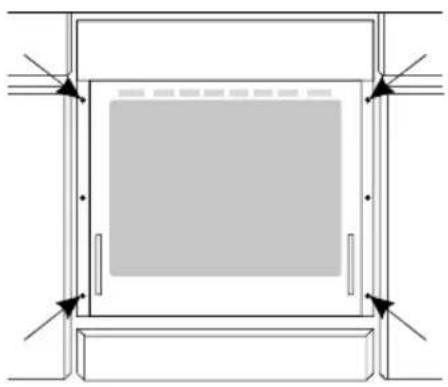
Insert the oven completely into the aperture ensuring the four screws as shown in the diagram will stay in place.
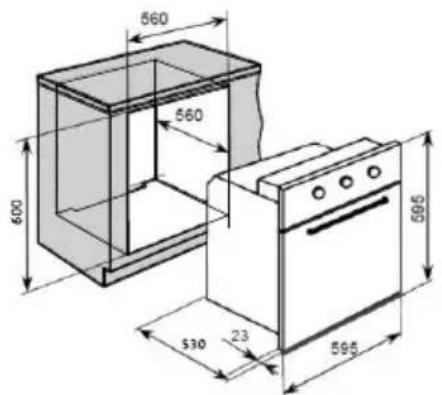
Product Dimensions
Aperture Dimensions
Height: 595mm
600mm
Width: 595mm
560mm
Depth: 530mm
560mm (min)
Electrical connection
Warning
All electrical work must be carried out by a qualified electrician. No alterations or changes in the electricity supply should be carried out.
Fitting guidelines
The oven is manufactured to work with three- phase alternating current (220V- 240V, 50Hz). The oven is equipped with a lead and plug.
Warning!
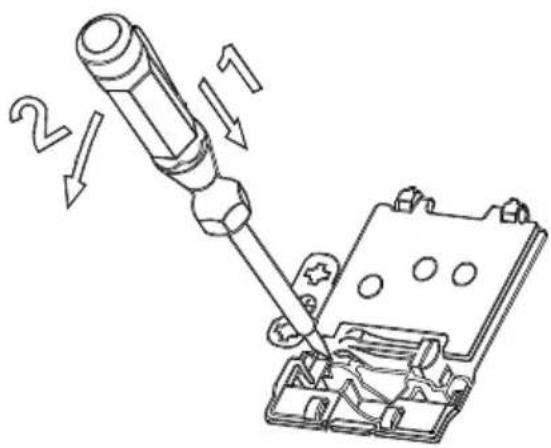
Remember to connect the safety circuit to the connection box terminal marked with the electricity supply for the oven must have a safety switch which enables the power to be cut off in case of emergency. The distance between the working contacts of the safety switch must be at least 3mm .

Before connecting the oven to the power supply, it is important to read the information on the data plate and the connection diagram.
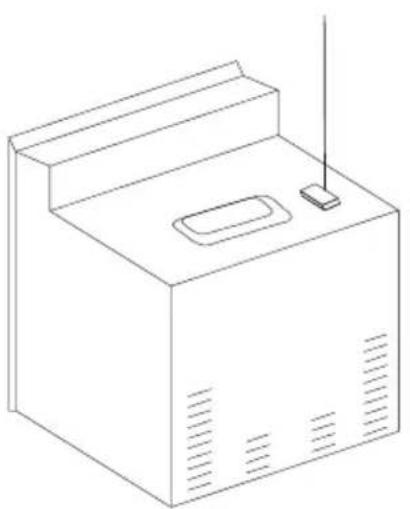
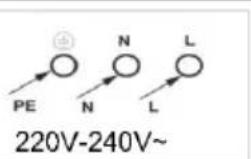
CONNECTION DIAGRAM
Caution! Voltage of heating elements 220V- 240V Caution! In the event of any connection the safety wire must be connected to the PE terminal

For 220V-240V earthed one phase connect on: Brown wire connect to L and blue wire connect to N, safety wire (Yellow green) connect to
Before first use
Remove all packaging material, tapes, polystyrene, etc. and clean the interior of the oven with warm water and washing-up liquid.
Remove and wash the oven accessories with warm soapy water.
Switch on the ventilation in the room or open a window.
Heat up the oven to a temperature of 250^ for approx. 30 min., when the oven has cooled down, clean the cavity with warm water and dry thoroughly.
Important!
The inside of the oven should only be washed with warm water and a small amount of washing-up liquid.
Operation
Control panel and display module
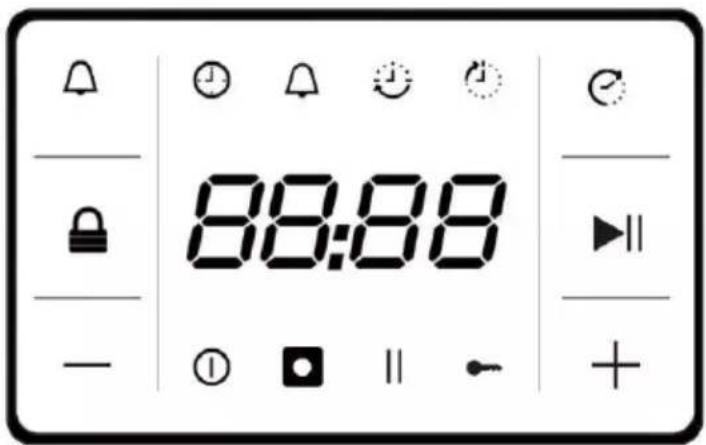
| Working hours icon |
| End of work time icon |
| Timer on off indicator light |
| Barbecue heating indicator light (the light will be on when the heating pipe is heated, and it will be off when the temperature point is reached, and the heating pipe will stop heating). |
| The clock icon |
| The alarm clock icon |
Keys
| The key time | |
| Lock key | |
| - | Reduction of |
| + | Add |
| The clock key | |
| Start cancel |
OPERATION
MANUAL OPERATION
You can use the oven once the oven is connected to the mains and installed.
The display will show "12:00". You can use it without setting the clock or the timer.
To use it follow the next steps:
- Select a cooking function with the functions knob.
- Select a temperature with the temperature knob.
The cooking and temperature light will turn on. ①
NOTE: In the manual operation without setting the timer the oven will be working all the time, it must be stopped manually.
SETTING THE CLOCK
When the oven is connected to the mains, the display will show "12:00" as default setting.
To adjust the clock to 15:15 follow the next steps.
- The "12" digit for hours will be blinking, to adjust it press "+" or -" to set it to "15".
- Press or to confirm.
- Now the minute "00" Will be blinking, to adjust it press "+" or -" to set it to "15".
- Press again or to confirm the setting.
NOTE: If you want to cancel or modify the clock settings press and the display will return to 12:00.
TIMER SETTING
This oven has two timer functions. First is to set the time that we want the oven to be on:
- You can set the timer indicating the time you want it to be on (example: 75 minutes). Then the oven will turn off.
- You can set additionally the time that you want it to finish the meal, you can set it to shut down at 15:30 pm for example (if the recipe is 75 minutes, then it will start working at 14:15 pm automatically.
Example
Assuming that we current time (clock) is 14:00 pm and we want to set this function for 75 minutes at 200^ , we should follow the next steps:
- Select the function with the function knob
- Select the desired temperature (200^) . Now the cooking and temperature light will turn on.
- Press, once you press it this light will turn on blinking, the display will show "00:00" with the first to digits "00" (hours) blinking. Use the "+" or "-" to set it at one hour "01:00" then press again to confirm. Now the hours digit "01" will be constantly on and the minute numbers will be blinking "00", use the "+" or "-" to set minutes to "15", then press again to confirm. Now the indicator that has been constantly blinking will keep on constantly. Now the oven is set to stop directly after 75 minutes.
If additionally, we want to add the finishing time, we should follow the next additional steps (considering we want the finishing time at 15:30 pm):
- Keep pressing until these two lights start blinking. The display will show "00:00" with the first to digits "00" (hours) blinking. Use the "+" or "-" to set it at "15" "15:00" then press again to confirm. Now the hours digit "15" will be constantly on and the minute numbers will be blinking "00", use the "+" or "-" to set the minutes to "30", then press to confirm. Now the two indicators that have been constantly blinking will keep on constantly
When the time goes to 14:15 pm, the light will turn off and this light will turn on, the oven will start working.
When the time goes to 15:30 pm (the finishing time), the alarm will sound 10 beeps and the light will be blinking, it means the cooking has been finished. The alarm can be silenced by pressing
MINUTE MINDER FUNCTION
With this function you are able to set the minute minder at any time, regardless of whether an oven function has been selected. You can set end time using the minute minder function and an alarm will sound when the finish time is reached.
Assuming the current time (clock) is 10:00, set the alarm at 11:15.
Press the button for 3 seconds, the light will be blinking, the display will show "00:00", the hour "00" is blinking, press the "+" or "-" to set the hour to "11", then press the to confirm, the hour to "11" will be constantly on, the minute "00" is blinking, press the "+" or "-" to set the minute to "15". Press the again, the light is constantly on.
An alarm will sound 10 beeps when the finish time 11:15 reached. The alarm can be silenced by pressing
NOTES:
During the period of cooking, the display can show the current clock and countdown time by pressing "+" or "-".
The cooking duration time can be set, but if the cooking end time is not set 5 seconds after it or by pressing, the oven will automatically start heating up. When the duration is reached, it will stop automatically.
You can set directly the end cooking time, without setting duration. Then the oven will automatically start heating immediately and when the end cooking time is reached, it will stop.
Oven on and off
In order to switch on the oven, you need to:
Set required working conditions of the oven, it's temperature and a mode of heating.
Set the knob to the required position, turning it right.
Oven functions and operation.
Natural convection oven (conventional)
The oven can be warmed up using the bottom and top heaters. The operation of the oven is controlled by the oven function selector knob. To set a required function, simply turn the knob to the required position.
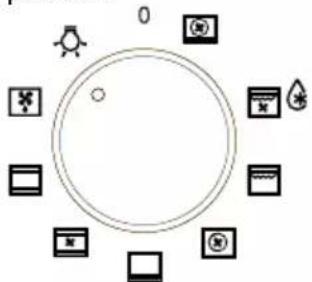
as well as the temperature regulator knob, to set a required function you should turn the knob to the selected position.
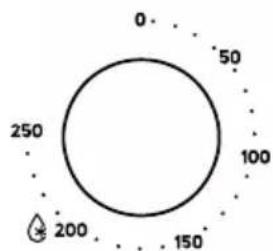
The oven can be switched off by setting both of these knobs to the position 0.
Caution!
In the grilling function position, when setting the temperature regulator to a position other than zero, the red light may come on, although the oven is not being warmed up.
OVEN FUNCTIONS
| Separate Oven Light By setting the knob to this position, the light inside the oven is switched on. Use it for example when cleaning the oven cavity. | |
| Defrosting This function allows all frozen foods to be rapidly and delicately thawed thanks to the internal fan. | |
| Bottom heater on When the knob is set to this position the oven is heated using only the bottom heater. Use for e.g. final baking from the bottom. | |
| Bottom and top heaters on setting the knob to this position allows the oven to be heated conventionally. | |
| Fan, bottom and top heaters on At this knob position the oven executes the cake function. Conventional oven with a fan. | |
| Combined grill (Grill and the top heater) When the “combined grill” is active it enables grilling with the grill and with the top heater switched on at the same time. This function allows a higher temperature at the top of the cooking area, which causes more intense browning of the dish and permits larger portions to be grilled. | |
| Fan and combined grill on. When the knob is turned to this position, the oven activates the combined grill and fan function. In practice, this function allows the grilling process to be speeded up and an improvement in the taste of the dish. You should only use the grill with the oven door shut. | |
| Central element with fan on This cooking mode allows homogenous distribution of the heat inside the oven, making it possible to cook several items of food at the same time. | |
| Bottom + circular + fan A crisp underside to pizza bases, quiches and pastry cases can be achieved by activating the intensive hot air setting. No need to preheat the oven when using this setting when cooking from frozen. | |
Caution!
When selecting any oven function, the oven will only be switched on after a temperature has been set via the temperature regulator knob.
When switching on the oven, two indicator lights, yellow and red, are activated. The yellow light indicates that the oven is ready and switched on.
The red light indicates that the oven is heating up to the desired temperature. When the red light goes off, the oven has reached the set temperature.
If a recipe recommends placing dishes in a warmed-up oven, this should not be done before the red light goes off for the first time, indicating that the temperature has been reached. When using the oven, the red light will temporarily come on and go off to maintain the temperature inside the oven. The yellow indicator light may also come on when the light function is selected.
Fast heat-up:
Fast heat up function is an option that allows you to reach 150^ in only 6 minutes approx.
Mode of operation:
Set the oven function to the position of bottom and top heater,
Set the temperature regulator knob to the position of 150^
The oven warms up to the temperature of 150^ (or lower if set); the oven reaching the temperature is signalled by the red light of the temperature regulator going off, now put the tray with dough into the oven,
Set the oven function knob to the selected heating mode
Important!
When the fast oven heat-up function has been selected, the chamber should not contain a baking tray with dough or other elements that do not constitute the oven fittings.
The fast heat-up function is not recommended for use with the programmer set.
Lock function
To lock the oven you must press the lock button, to unlock press again 3 seconds.
Cleaning and maintenance
By ensuring proper cleaning and maintenance of your oven, you can have a significant influence on the continuing fault-free operation of your appliance.
Before you start cleaning, the oven must be switched off and you should ensure that all knobs are set to the 0 position. Do not start cleaning until the oven has completely cooled down.
Caution!
If you use a scraper, the sharp blade should always be protected by adjusting the cover (just push it onto the blade with your thumb).
Injuries are possible so care is required when using a scraper. Keep it out of the reach of children.
Appropriate light cleaning or washing products are recommended or you can use also a solution of warm water with a little washing-up liquid or cleaning products for stainless steel sinks.
The oven should be cleaned after each use. When cleaning the oven, turn on the oven light for better visibility.
The oven cavity should only be washed with warm water and a small amount of washing-up liquid.
Follow up with clean water.
After cleaning, ensure the oven cavity is thoroughly dry.
Caution!
Do not use cleaning products containing abrasive materials for the cleaning and maintenance of the glass front panel.
WATERSTEAM cleaning function

This function allows you to clean the oven saving money and time. You should follow the next steps:
- Remove all internal parts before starting the cleaning function.
- Mix 200ml and a spoon of dishwasher soup.
- Pour the mixed liquid in the base of the oven.
- Select the WATERSTEAM function in the temperature and function knob, you should put the knobs in this position and leave it for 15 minutes.
- After the 15 minutes set the oven temperature to 0^ without removing the function and leave it for another 20 minutes.
- After the 20 minutes pass, wipe the internal parts with a soft cloth. You should wipe before 5 minutes passed from last step.
Replacement of the oven light bulb
In order to avoid the possibility of an electric shock ensure that the appliance is switched off before replacing the bulb.
Set all control knobs to the position 0.
and disconnect from the mains.
Unscrew and wash the lamp cover, then wipe it dry.
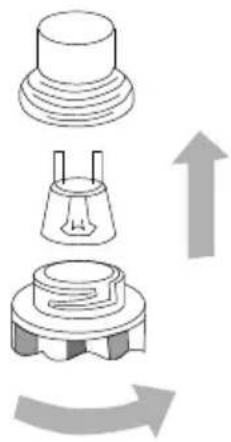
Unscrew the light bulb from the socket and replace the bulb with a high temperature suitable bulb:
-300°C
-Voltage 230-240 V
-Power 25 W
-G9
Replace the bulb, ensuring it is properly inserted into the ceramic socket.
Replace the lamp cover.
Removing the doors
- The oven door should be fully open.
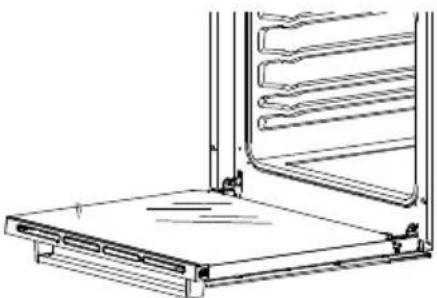
- The latch hinges completely lifted.

- Gently close the oven door until you hear the sound of engagement, once they reach a clamping position, with both hands holding the door and continue to push, pull up at the same time so that the hinge bolt removed from the oven.
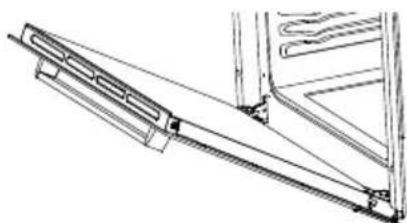

- After cleaning, the hinge needs to be aligned with the oven door latch; push gently until they clip into place.
- Push the latch down to its original position with the oven door fully open.
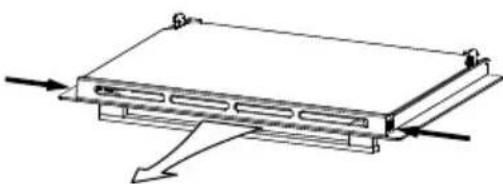
Removing the inner glass panel
- Press and hold the two sides of the grid with both hands to pull it out
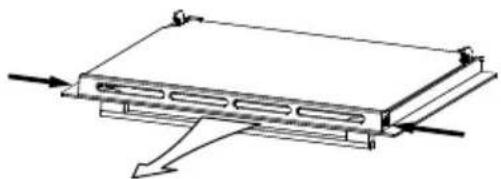
- After pulling out the grid, the inner glass can be removed.
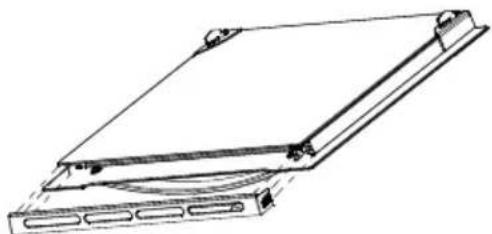
- The inner glass pulled out from beneath plastic fixed block. After cleaning, the inner glass, insert the following plastic fixed block, then install the above plastic mounting block.
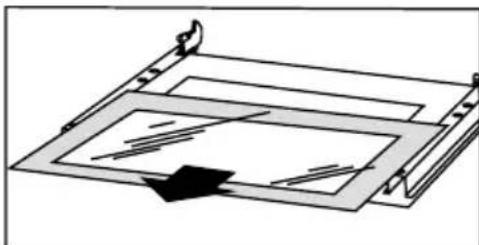
Operation in case of emergency
In the event of an emergency, you should:
Switch off the oven function and temperature controls
Disconnect the plug at the mains.
Call a service centre
Some minor faults can be fixed by referring to the instructions given in the table below:
| PROBLEM | REASON | ACTION |
| The appliance does not work. | Power Cut / Fuse blown | Check the household fuse box, if there is a blown fuse replace it with a new one |
| The oven light does not work | The bulb is loose or damaged | Tighten up or replace the blown bulb (see chapter Cleaning and Maintenance) |
François Four electrique HM973IXD
| ... | Working hours icon |
| End of work time icon | |
| ① | Timer on off indicator light |
| Barbecue heating indicator light (the light will be on when the heating pipe is heated, and it will be off when the temperature point is reached, and the heating pipe will stop heating). | |
| ② | The clock icon |
| The alarm clock icon |
Keys
| The key time | |
| Lock key | |
| - | Reduction of |
| + | Add |
| The clock key | |
| Start cancel |
UTILISATION
MODE D'EMPLOI
YKA3AHNIA PABOTA C YPEDA
3a da n3noJ3BaTe ypeDa, Heo6xOdImO e CbIyT Da e MOHTnpaH N CBbp3aH KbM eJeKtpnueckata MpeKa.
Ha ekpaHa ige ce n3nne no noDpa36bpahe «12:00». Moxete da n3noJ3BaTe fypHata, 6e3 da HacTpoBbTe YacOBHka nIi Temnopn3aTopa.
3a da ro n3noJ3BaTe no TO3n Haunn CneDba Da n3BbpuNTe CneHNTe CTbnKn:
- Upe3 KOHTpOepa n36peTe peXIM 3a roTbeHe.
2.Изберетемпатура урета коHTронета за temпатура.
CneTToBaIe Ce BKnHouat CBeTnHaTa 3a RotBeHe N 3a TemNepaTypa.
BEJEXKA: Pn pBcHNo n3noN3BaHe Ha cypHaTa n 6e3 HacTpoBaHe Ha Temnopn3aTopa cypHaTa.
Ie pa6oTu HepeKbChato n CneDba da ce n3KJIIOu npBcHo.
HACTPOUKHA YACOBHNUKA
CneB KIOUbaHe Ha YacOBnka KbM eIeKtpuYeckaTa MpeKa Ha ekpaHa nO noDpa3bUpaHe Ue ce n3nnse «12:00».
3a HarnacnHa Ha YacOBnka Ha 15:15 cneDb da ce n3nbHnT cneHnTe DeIcTBn.
- LufpaTa "12" yka3BaAa qacobete 3a npMnRb. 3a da haCTpOte HATNCHe +" IIN -", DOKATO IOCTnHETe Do "15".
- HatncheTe Hn , 3a Da NotBbPdnte.
- CneToBa INnKATOpbT 3a MNHyTN «00» Ie 3aNoUHe da npMnRBa. 3a HacTpoBaNHeTo My HaTnCHTe «+» NII «-», DOkATO DoCTnHHeTe do "15".
- OTHOBO HATNCHETe Ⅲn, 3a Da NOTBbPdnte HAcTpoiKaTa.
БЕLEЖKA: Ако кение за OTменITE ИПИ поменITE Настpoйкata Ha YacOBнka HATNCHete II.
Ekpanьт OTHOBО ще пожke12:00.
HACTPOIKN HA TEMNOPN3ATOPA
OTHOBO NOCTABETe KaNaka Ha JAmnata Ha MRCTO My.
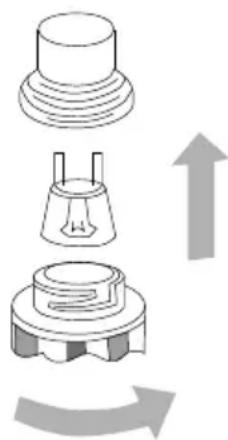
I3BaXdAHe Ha BpaTnTe
- BpataHa hФурнa tCneДBa da e HAnbJInO OTBopeHa.
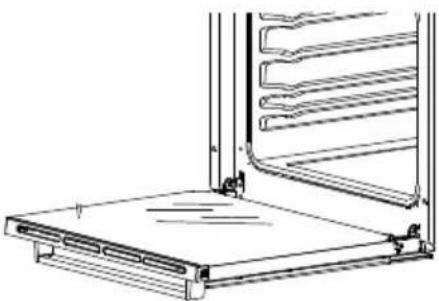
- NaHTnTe Ha 3aTBopa cIeDbA da ca HAnbJHo NOBdIrHaTn.
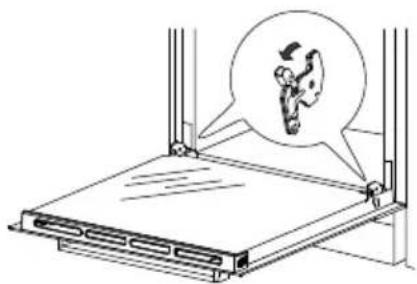
- 3aTbOpTe BnMaTeHNO BpaTaTaHa ypHaTa, DOKaTO ce ue n3uPaKBaHe i, cIeI KaTo DoCTnHte NIOJxEHNTo Ha uNkAta, 3aDpbXTe BpaTaTa C DBeTe pBuce I npOdbNxTe Da HATnCKate. N3DbPnaIte Harope eHOBpeMeHHo, Taka ye 3aTbopa Ha NaHTaTa da MOxe da Ce N3BaAn ot ypHaTa.
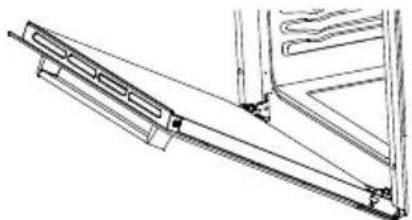
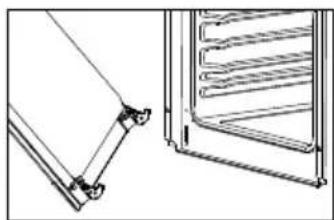
- Cnéi nouICTbaHTo nAHTaTa cIeDb Da e noIpaBHeHa cbc 3aTbopa Ha BpataHa foypHaTa. HatnckaiTe IeKO, DOKATO ce HAnache Ha MAcTOTO cn.
- HATNCHETe 3aTBopa Do NpBBOHaJHOTo My NOJOXeHne npn HaNBJHO OTBOpHa BpaTa Ha yphata.
Kak da otctpaHMM BbTpewHaTa CtbkJeHa nloya.
- 3a Na n3BaInte peWetkata, HATNCHeTe N NOIbPkaIte C DBe Pbue DBeTe N CTpaHn.
- Cnei n3BaXaHa He Ha peWetkata MoKe Da Ce n3BaAn BbTpewHOTO CTbKNo.

- BbtpeHOTo cTBKIO ce n3BaXda n3noi d fHKcnpaHn INaCTMaCOB 6JOK. Cnei nouchTbaHe Ha BbTpewHOTo cTBKIO BKapaiTe cneIbAunr fHKcnpaH INaCTMaCOB 6JOK. Cnei TOBA NOCTaBeTe TropHn MOHTaKeH INaCTMaCOB 6JOK.

DienCTBnB B n3BbHpeDn CnyuAn
Pn n3BbHpeDeH cnya CneDba Da noctbnte No cneHnaHn:
I3KIOUeTe KOTpOJIepuTe 3a TeMnepaTypa n peXIM HaФуphHaTa.
I3knHcyte uencena oT 3axpaHbauata Mpeka.
ObaTe ce Ha abapnHa cnyk6a
HЯkon NOBpeiM MORaT Da 6bDaT pa3peWeH, KaTo Ce obbpHeTe KbM yKa3aHnraTa B CneHaTa Ta6nua:
| ПОНБЛЕМ | ПРИЧИHA | ДЕЙСТВЕ |
| Урedingът не павOTи | Прекьсвае на тoka/Изrogenь 6ушон | Прегледаite Күлгета с 6ушони на чилишени, и посяма ИЗrogenь 6ушон во заменete с Нов. |
| Свettingина差别пфунота не павOTи | Крушикatinge otхлабена有很大 повраздана | Завиите подмене ИЗrogenлata крушиka (Вожte пала „Почиствае и подирьжka“) |
Espanol GARANTÍA Y ASISTENCIA TÉCNICA
English WARRANTY and Technical Assistance
This product enjoys the recognition and protection of the legal guarantee in accordance with current legislation. To enforce your rights or interests you must go to any of our official technical assistance services.
You can find the closest one by accessing the following web link: http://taurus-home.com/
You can also request related information by contacting us.
You can download this instruction manual and its updates at http://taurus-home.com/
Français GARANTIE ET ASSISTANCE TECHNIQUE
COUNTRY ADDRESS PHONE
| Algeria Zone d'Activite, N° 62, Constantine 21377077756 | ||
| Argentina Av. del Libertador 1298,(B1638BEY), Vicente López (Pcia. Buenos Aires) | 541153685223 | |
| Belgium Mariëndonkstraat 5, 5154 EG, Elshout 31620401500 | ||
| Benin 359 Av. Steinmetz, 1930, Cotonou 0299-21313798 | ||
| Bulgaria | 265,Okolovrasten Pat, Mladost 4, 1766, Sofia | 35929211120 / 35929211193 |
| Burkina Faso Avenue Bassawarga, 01 BP915, Ouagadougou 226 25301038 | ||
| Congo (Republic of) 98 Blvd General Charles de Gaulle, Pointe Noire 242066776656 | ||
| Cyprus | 20, Bethlehem Str. / P.O.Box 20430, 2033, Strovolos | 35722711300 |
| Czech Republic | Milady Horakove 357/4, 568 02, Svitavy | 420 461 540 130 |
| Democratic Republic of the Congo | AV. Pont Canale N° 3440, Kinshasa | 00243-991223232 |
| Equatorial Guinea | SN Av Patricio Lumumba y C/ Jesus B, Bata | 00240 333 082958 / 00240 333 082453 |
| Equatorial Guinea | Calle de las Naciones Unidas, PO box 762, Malabo | 240333082958 / 240333082453 |
| Espana Avda Barcelona, S/N, 25790 Oliana (Lleida) atencioncliente@taurus.es | 902 118 050 | |
| Ethiopia Lideta Sub City Kebele 10 H.NO 124, Addis Ababa | +251 11 5518300 | |
| France | Za les bas musats 18, 89100, Malay-le-Grand | 03 86 83 90 90 |
| Gabon | BP 574, Port-Gentil Centre-ville | 24101552689 / 24101560698 |
| Ghana | Ederick Place, Accra-Ghana | 302682448 / 302682404 |
| Gibraltar 11 Horse Barrack Lane, 54000, Gibraltar 00350 200 75397 / 00350 200 41023 | ||
| Greece Sapfous 7-9, 10553, Athens +30 21 0373 7000 | ||
| Guinea BP 206, GN, Conakry (224) 622204545 | ||
| Hong Kong Unit H,13/F., World Tech Centre, Hong kong (852) 2448 0116 / 9197 3519 | ||
| Hungary Keszmarik utca 11-13, 1158, Budapest +36 1 370 4519 | ||
| India C-175, Sector-63, Noida, Gautam Budh Nagar - 201301, Delhi | (+91) 120 4016200 | |
| Ivory Coast 01 Rue Des Carrossiers-Zone 3, B.P 3747, Abidjan 01 (RCI) | 22521251820 / 225 21 353494 | |
| Jordan 28 Basman St Down town, Amman +962 6 46 222 68 | ||
| Kuwait | P.O. BOX 3379 hawally, 32034, Hawally | +965 2200 1010 |
| Lebanon Damascus Highway; Sciale Building, Jamhour 9615922963 | ||
| Luxembourg | Mariëndonkstraat 5, 5154 EG, Elshout 31620401500 | |
| Mali | BP E2900, Dravela Bolibana | 223227216 / 223227259 |
| Marruecos | Avenue 2 Mars, Résidence Nassrallah, Appt n° 2 1er, Casablanca | (+212) 522 86 30 95 |
| Mauritania | 134 Avenue Gamal Abdener Ilot D, Nouakhchott | 2225254469 / 2225251258 |
| Mexico Rosas Moreno N° 4-203 Colonia de San Rafael C.P. 06470 – Delegación Cuauhtémoc, Ciudad de México | (+52) 55 55468162 | |
| Montenegro | Rastovac bb, 81400, Niksic | +382 40 217 055 |
| Netherlands | Mariëndonkstraat 5, 5154 EG, Elshout 31620401500 | |
| Nigeria 8, Isaac; John Str,G.R.A Ikeja Lagos 23408023360099 | ||
| Paraguay | Denis Roa 155 c/ Guido Spano, Asunción | 21665100 |
| Peru | Calle los Negocios 428, Surquillo, Lima | (511) 421 6047 |
| Portugal Avenida Rainha D. Amélia, n°12-B, 1600-677, Lisboa | +351 210966324 | |
| Romania | Dudesti Pantelimon 23, 410554, Bucharest | 031.805.49.58 |
| Serbia | Rastovac bb, 81400, Niksic | +382 40 217 055 |
| Slovakia Milady Horakove 357/4, 568 02, Svitavy 420 461 540 130 | ||
| Southafrica | Unit 25 & 26, San Croy Office Park, Die Agora Road, Croydon, Kempton Park, 1619, Johan- nesburg | (+27) 011 392 5652 |
| Tunisia | 2, Rue de Turquie, Tunis | 21671333066 |
| Ukraine | Block 6, Ap Housing Estate Topol-2, B, 49000, Dnepropetrovsk | 380563704161 / 380563704161 |
| United Arab Emirates | P.O.BOX 8543, Dubai | 14506246200 |
| Uruguay | Luis Alberto de Herrera 3468, 11600, Montevideo | 598 2209 28 00 |
| Vietnam Lot 7 Ind. Zone for, Ha Noi 84437658111 / 84437658110 | ||
- English Electric oven HM973IXD
- Description of the appliance
- Installation
- Electrical connection
- Fitting guidelines
- Warning!
- CONNECTION DIAGRAM
- Before first use
- Important!
- Operation
- Control panel and display module
- Keys
- MANUAL OPERATION
- SETTING THE CLOCK
- TIMER SETTING
- Example
- MINUTE MINDER FUNCTION
- NOTES:
- Oven on and off
- Oven functions and operation.
- Natural convection oven (conventional)
- Caution!
- OVEN FUNCTIONS
- Fast heat-up:
- Mode of operation:
- Lock function
- Cleaning and maintenance
- WATERSTEAM cleaning function
- Replacement of the oven light bulb
- Removing the doors
- Removing the inner glass panel
- Operation in case of emergency
- François Four electrique HM973IXD
- UTILISATION
- MODE D'EMPLOI
- YKA3AHNIA PABOTA C YPEDA
- HACTPOUKHA YACOBHNUKA
- HACTPOIKN HA TEMNOPN3ATOPA
- I3BaXdAHe Ha BpaTnTe
- Kak da otctpaHMM BbTpewHaTa CtbkJeHa nloya.
- DienCTBnB B n3BbHpeDn CnyuAn
- Espanol GARANTÍA Y ASISTENCIA TÉCNICA
- English WARRANTY and Technical Assistance
- Français GARANTIE ET ASSISTANCE TECHNIQUE
Brand : TAURUS
Model : HM973IXD
Category : Electric oven