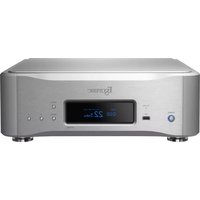
N-01XD - Digital to analog converter Esoteric - Free user manual and instructions
Find the device manual for free N-01XD Esoteric in PDF.


User questions about N-01XD Esoteric
0 question about this device. Answer the ones you know or ask your own.
Ask a new question about this device
Download the instructions for your Digital to analog converter in PDF format for free! Find your manual N-01XD - Esoteric and take your electronic device back in hand. On this page are published all the documents necessary for the use of your device. N-01XD by Esoteric.
USER MANUAL N-01XD Esoteric
The lightning flash with arrowhead symbol, within an equilateral triangle, is intended to alert the user to the presence of uninsulated "dangerous voltage" within the product's enclosure that may be of sufficient magnitude to constitute a risk of electric shock to persons.

The exclamation point within an equilateral triangle is intended to alert the user to the presence of important operating and maintenance (servicing) instructions in the literature accompanying the appliance.
WARNING: TO PREVENT FIRE OR SHOCK HAZARD, DO NOT EXPOSE THIS APPLIANCE TO RAIN OR MOISTURE.
CAUTION
●DO NOT REMOVE THE EXTERNAL CASES OR CABINETS TO EXPOSE THE ELECTRONICS. NO USER SERVICEABLE PARTS ARE INSIDE.
- IF YOU ARE EXPERIENCING PROBLEMS WITH THIS PRODUCT, CONTACT THE STORE WHERE YOU PURCHASED THE UNIT FOR A SERVICE REFERRAL. DO NOT USE THE PRODUCT UNTIL IT HAS BEEN REPAIRED.
- USE OF CONTROLS OR ADJUSTMENTS OR PERFORMANCE OF PROCEDURES OTHER THAN THOSE SPECIFIED HEREIN MAY RESULT IN HAZARDOUS RADIATION EXPOSURE.
1) Read these instructions.
2) Keep these instructions.
3) Heed all warnings.
4) Follow all instructions.
5) Do not use this apparatus near water.
6) Clean only with dry cloth.
7) Do not block any ventilation openings. Install in accordance with the manufacturer's instructions.
8) Do not install near any heat sources such as radiators, heat registers, stoves, or other apparatus (including amplifiers) that produce heat.
9) Do not defeat the safety purpose of the polarized or grounding-type plug. A polarized plug has two blades with one wider than the other. A grounding type plug has two blades and a third grounding prong. The wide blade or the third prong are provided for your safety. If the provided plug does not fit into your outlet, consult an electrician for replacement of the obsolete outlet.
10) Protect the power cord from being walked on or pinched particularly at plugs, convenience receptacles, and the point where they exit from the apparatus.
11) Only use attachments/accessories specified by the manufacturer.
12) Use only with the cart, stand, tripod, bracket, or table specified by the manufacturer, or sold with the apparatus. When a cart is used, use caution when moving the cart/ apparatus combination to avoid injury from tip-over.

13) Unplug this apparatus during lightning storms or when unused for long periods of time.
14) Refer all servicing to qualified service personnel. Servicing is required when the apparatus has been damaged in any way, such as power-supply cord or plug is damaged, liquid has been spilled or objects have fallen into the apparatus, the apparatus has been exposed to rain or moisture, does not operate normally, or has been dropped.
- The apparatus draws nominal non-operating power from the AC outlet with its POWER or STANDBY/ON switch not in the ON position.
- The mains plug is used as the disconnect device; the disconnect device shall remain readily operable.
- Caution should be taken when using earphones or headphones with the product because excessive sound pressure (volume) from earphones or headphones can cause hearing loss.
WARNING
Products with Class I construction are equipped with a power supply cord that has a grounding plug. The cord of such a product must be plugged into an AC outlet that has a protective grounding connection.
IN USA/CANADA, USE ONLY ON 120V SUPPLY.
CAUTION
- Do not expose this apparatus to drips or splashes.
- Do not place any objects filled with liquids, such as vases, on the apparatus.
- Do not install this apparatus in a confined space such as a book case or similar unit.
●The apparatus should be located close enough to the AC outlet so that you can easily reach the power cord plug at any time. - If the product uses batteries (including a battery pack or installed batteries), they should not be exposed to sunshine, fire or excessive heat.
- CAUTION for products that use replaceable lithium batteries: there is danger of explosion if a battery is replaced with an incorrect type of battery. Replace only with the same or equivalent type.
Supplier's Declaration of Conformity
Model number: N-01XD
Trade name: ESOTERIC

Responsible party: 11 Trading Company, LLC
Address: 3502 Woodview Trace #200 Indianapolis, IN 46268 U.S.A.
URL: https://11tradingcompany.com/contact-us/
This device complies with Part.15 of FCC Rules.
Operation is subject to the following two conditions:
1) This device may not cause harmful interference
2) This device must accept any interference received, including interference that may cause undesired operation.
Information
This equipment has been tested and found to comply with the limits for a Class B digital device, pursuant to Part 15 of the FCC Rules. These limits are designed to provide reasonable protection against harmful interference in a residential installation. This equipment generates, uses, and can radiate radio frequency energy and, if not installed and used in accordance with the instructions, may cause harmful interference to radio communications. However, there is no guarantee that interference will not occur in a particular installation. If this equipment does cause harmful interference to radio or television reception, which can be determined by turning the equipment off and on, the user is encouraged to try to correct the interference by one or more of the following measures:
- Reorient or relocate the equipment and/or the receiving antenna.
- Increase the separation between the equipment and receiver.
- Connect the equipment into an outlet on a circuit different from that to which the receiver is connected.
- Consult the dealer or an experienced radio/TV technician for help.
CAUTION
Changes or modifications not expressly approved by the party responsible for compliance could void the user's authority to operate the equipment.
Model for Canada
This Class B digital apparatus complies with Canadian ICES-003.
Model for Europe

This product complies with the European Directives request, and the other Commission Regulations.
Model for UK
This product complies with the applicable UK regulations.

For European Customers
Disposal of electrical and electronic equipment and batteries and/or accumulators
a) All electrical/electronic equipment and waste batteries/accumulators should be disposed of separately from the municipal waste stream via collection facilities designated by the government or local authorities.
b) By disposing of electrical/electronic equipment and waste batteries/accumulators correctly, you will help save valuable resources and prevent any potential negative effects on human health and the environment.
c) Improper disposal of waste electrical/electronic equipment and batteries/accumulators can have serious effects on the environment and human health because of the presence of hazardous substances in the equipment.
d) The Waste Electrical and Electronic Equipment (WEEE) symbols, which show wheeled bins that have been crossed out, indicate that electrical/electronic equipment and batteries/accumulators must be collected and disposed of separately from household waste.
If a battery or accumulator contains more than the specified values of lead (Pb), mercury (Hg), and/or cadmium (Cd) as defined in the Battery Directive (2006/66/EC, 2013/56/EU), then the chemical symbols for those elements will be indicated beneath the WEEE
e) Return and collection systems are available to end users. For more detailed information about the disposal of old electrical/electronic equipment and waste batteries/accumulators, please contact your city office, waste disposal service or the shop where you purchased the equipment.
Thank you for purchasing this ESOTERIC product.
Read this manual carefully to get the best performance from this product. After reading it, keep it in a safe place with the warranty card for future reference.
The Owner's Manual can be downloaded from the ESOTERIC website (https://www.esoteric.jp/en/).
To use this unit, you must also use a tablet or smartphone that has the dedicated app (free) installed and connect it to the same network as the unit.
ATTENTION
This unit only outputs analog signals from the one selected type of connector.
Set the analog output before use.
See "Setting mode" on page 15 and "Analog output setting" on page 17.

MQA
MQA and the Sound Wave Device are registered trade marks of MQA Limited.© 2016
roon READY
Being Roon Ready means that ESOTERIC uses Roon streaming technology, for an incredible user interface, simple setup, rock-solid daily reliability, and the highest levels of audio performance, without compromise.
“DSD” is a registered trademark.
Microsoft and Windows are either registered trademarks or trademarks of Microsoft Corporation in the United States and/or other countries.
Apple, Mac, OS X and macOS are trademarks of Apple Inc., registered in the U.S. and other countries.
App Store is a service mark of Apple Inc.
IOS is a trademark or registered trademark of Cisco in the U.S. and other countries and is used under license.
Android is a trademark of Google Inc.
Google Play is a trademark of Google Inc.
Wi-Fi is a trademark or registered trademark of Wi-Fi Alliance.
ESOTERIC is a trademark of TEAC CORPORATION, registered in the U.S. and other countries.
Other company names, product names and logos in this document are the trademarks or registered trademarks of their respective owners.
Information about copyrights and licensing related to open source software is provided in the separate "Important Notice Regarding Software" document.
IMPORTANT SAFETY INSTRUCTIONS 3
Before use....6
Included accessories 6
Note about pinpoint feet....6
Maintenance....6
Precautions for use 6
Network connections....7
Connections....8
Connecting using ES-LINK Analog 10
Changing the input source 10
Names and functions of parts....11
Using network player functions....12
Using the USB DAC function....13
Supported operating systems 13
Installing the driver....13
Downloading playback application ESOTERIC HR Audio Player .13
Playing audio files....14
Setting mode....15
Changing settings....15
Settings 1....16
PCM signal upconversion setting 16
Clock setting 16
PCM output gain setting 16
Analog output setting....17
Dimmer setting 17
Automatic display darkening setting....17
Automatic power saving setting....17
Settings 2....18
D/A converter operation setting....18
DSD filter setting 18
Volume adjustment setting....18
ETHERNET port LED setting....18
Network input circuit power supply setting....18
Remote control operation setting 19
Showing firmware versions....19
RAAT mode 19
Settings 3....20
Audio program update setting 20
MQA (Master Quality Authenticated)....20
Troubleshooting....21
General 21
Clock sync....21
USB connections with a computer....21
Specifications....22
Restoring factory settings....22
Dimensional drawings....24
Included accessories
Check to be sure the box includes all the supplied accessories shown below. Please contact the store where you purchased this product if any of these accessories are missing or have been damaged during transportation.
Power cord × 1
Felt pads × 4
HDMI cable × 1
Owner's manual (this document) × 1
Warranty card × 1
Note about pinpoint feet
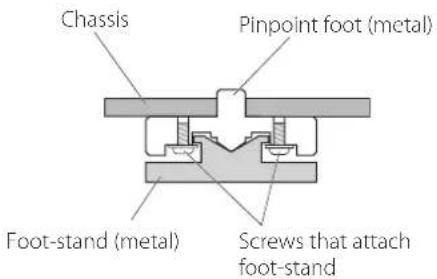
High-precision metal pinpoint feet are attached to the bottom plate of this unit.
The pinpoint feet and their stands are loose, but when the unit is placed in position, it is supported by these pinpoint feet, which effectively disperse vibrations.
text_image
Chassis Pinpoint foot (metal) Foot-stand (metal) Screws that attach foot-stand- Apply the included felt pads to the bottoms of the foot-stands to avoid scratching the surface where the unit is placed.
Maintenance
Use a soft dry cloth to wipe the surface of the unit clean. For stubborn smudges, use a damp cloth that has been thoroughly wrung out to remove excess moisture.
- Avoid allowing rubber or plastic materials to touch the unit for long periods of time because they could damage the cabinet.
●Never spray liquid directly on this unit. - Do not wipe with chemical cleaning cloths, thinner or other chemical agents. Doing so could damage the surface.
For safety, disconnect the power plug from the outlet before cleaning.
Precautions for use
- Do not place anything on top of the unit.
- Do not install this unit in a location that could become hot. This includes places that are exposed to direct sunlight or near a radiator, heater, stove or other heating equipment. Moreover, do not place it on top of an amplifier or other equipment that generates heat. Doing so could cause discoloration or deformation.
- In order to enable good heat dissipation, leave at least 20 cm (8") between this unit and walls and other equipment when installing it. If you put it in a rack, take precautions to prevent overheating by leaving at least 5 cm (2") open above the top of the unit and at least 10 cm (4") open behind the unit.
Failure to provide these gaps could cause heat to build up inside and result in fire.
- Place the unit in a stable location.
-
Do not move the unit during use.
-
Be careful to avoid injury when moving the unit due to its weight. Have someone help you move it if necessary.
- The voltage supplied to the unit should match the voltage printed on the rear panel. If you are in any doubt regarding this matter, consult an electrician.
- Do not open the body of the unit as this might result in damage to the circuitry or cause electric shock. If a foreign object should get into the unit, contact your dealer.
- When removing the power plug from the wall outlet, always pull directly on the plug; never yank on the cord.
- The ES-LINK format is unique to ESOTERIC and is not compatible with the HDMI specification. Do not connect the ES-LINK connector to an HDMI connector on a device made by another company.
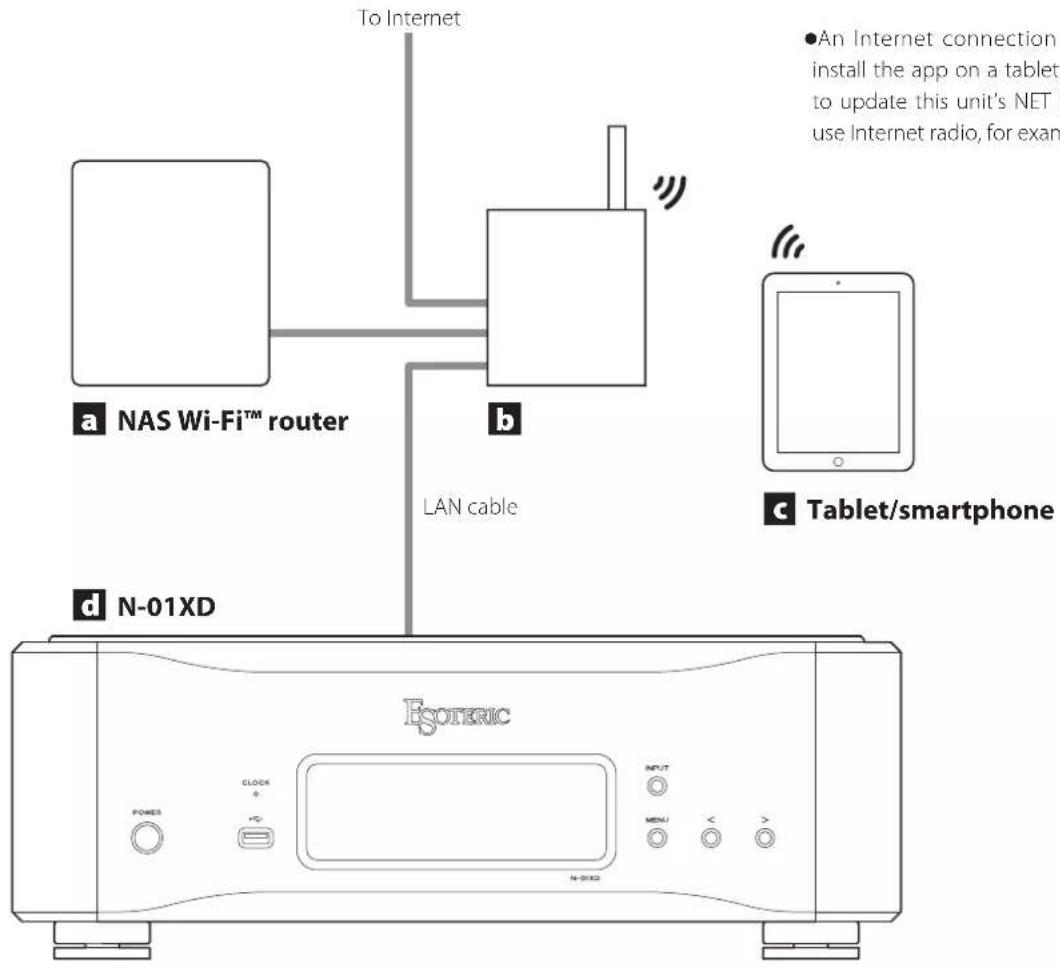
Connection example
text_image
To Internet a NAS Wi-Fi™ router b LAN cable c Tablet/smartphone d N-01XD ESOTERIC N-01XD ●An Internet connection to install the app on a tablet to update this unit's NET I use Internet radio, for example●An Internet connection is necessary to install the app on a tablet or smartphone, to update this unit's NET firmware and to use Internet radio, for example.
natural_image
Simple line drawing of a tablet with wireless signal icon above (no text or symbols)a NAS (network-attached storage)
Use to store audio files.
Operation as a UPnP server is necessary to use it as a media server.
Instead of using an NAS, audio files can also be put on a USB flash drive or other USB storage device and that device connected to a USB DRIVE port on this unit. Then, those files can be played back using the media server function of the N-01XD (page 12).
b Wi-Fi™ router
Use Wi-Fi to connect the tablet or smartphone to this unit and the NAS.
c Tablet/smartphone
Install the app to control this unit.
d N-01XD
This unit.
ATTENTION
By default, the ETHERNET port LED (LanLED>) setting is OFF (page 18).

cautions when making connections
● After completing all other connections, plug the power plug into a power outlet.
- Read the owner's manuals of all devices that will be connected, and follow their instructions.
flowchart
graph TD
    A["Stereo amplifier"] --> B["Audio input (LINE IN, etc.)"]
    B --> C["Computer"]
    C --> D["USB flash drive"]
    D --> E["Connect using a set of only one type."]
    E --> F["XLR cables"]
    E --> G["RCA cables"]
    F --> H["A"]
    G --> I["B"]
    H --> J["Line OUT R"]
    I --> K["Line OUT L"]
    J --> L["Line OUT L"]
    K --> M["E"]
    L --> N["G"]
    M --> O["BNC coaxial cable"]
    N --> P["G"]
    O --> Q["BNC coaxial cable"]
    P --> R["RCA coaxial cable"]
    Q --> S["RCA coaxial cable"]
    R --> T["RCA coaxial cable"]
    S --> U["RCA coaxial cable"]
    T --> V["RCA coaxial cable"]
    U --> W["RCA coaxial cable"]
    V --> X["RCA coaxial cable"]
    W --> Y["RCA coaxial cable"]
    X --> Z["RCA coaxial cable"]
    Y --> AA["RCA coaxial cable"]
    Z --> AB["RCA coaxial cable"]
    AA --> AC["RCA coaxial cable"]
    AB --> AD["RCA coaxial cable"]
    AC --> AE["RCA coaxial cable"]
    AD --> AF["RCA coaxial cable"]
    AE --> AG["RCA coaxial cable"]
    AF --> AH["RCA coaxial cable"]
    AG --> AI["Wall outlet"]
    AH --> AJ["Included power cord"]
    AI --> AK["Optical digital cable"]
    AJ --> AL["Optical digital cable"]
    AK --> AM["RXR digital cable"]
    AL --> AN["RXR digital cable"]
    AM --> AO["DIGITAL OUT (OPTICAL)"]
    AN --> AP["DIGITAL OUT (COAXIAL)"]
    AO --> AQ["DIGITAL OUT (COAXIAL)"]
    AP --> AR["DIGITAL OUT (COAXIAL)"]
    AQ --> AS["DIGITAL OUT (COAXIAL)"]
    AR --> AT["DIGITAL OUT (COAXIAL)"]
    AS --> AU["DIGITAL OUT (COAXIAL)"]
    AT --> AV["DIGITAL OUT (COAXIAL)"]
    AU --> AW["DIGITAL OUT (COAXIAL)"]
    AV --> AX["DIGITAL OUT (COAXIAL)"]
    AW --> AY["DIGITAL OUT (COAXIAL)"]
    AX --> AZ["DIGITAL OUT (COAXIAL)"]
    AY --> BA["DIGITAL OUT (COAXIAL)"]
    AZ --> BB["DIGITAL OUT (COAXIAL)"]
    BA --> BC["DIGITAL OUT (COAXIAL)"]
    BB --> BD["DIGITAL OUT (COAXIAL)"]
    BC --> BE["DIGITAL OUT (COAXIAL)"]
    BE --> BF["DIGITAL OUT (COAXIAL)"]
    BF --> BG["DIGITAL OUT (COAXIAL)"]
    BG --> BH["DIGITAL OUT (COAXIAL)"]
    BH --> BI["DIGITAL OUT (COAXIAL)"]
    BI --> BJ["DIGITAL OUT (COAXIAL)"]
    BJ --> BK["DIGITAL OUT (COAXIAL)"]
    BK --> BL["DIGITAL OUT (COAXIAL)"]
    BL --> BM["DIGITAL OUT (COAXIAL)"]
    BM --> BN["DIGITAL OUT (COAXIAL)"]
    BN --> BO["DIGITAL OUT (COAXIAL)"]
    BO --> BP["DIGITAL OUT (COAXIAL)"]
    BP --> BQ["DIGITAL OUT (COAXIAL)"]
    BQ --> BR["DIGITAL OUT (COAXIAL)"]
    BR --> BS["DIGITAL OUT (COAXIAL)"]
    BS --> BT["DIGITAL OUT (COAXIAL)"]
    BT --> BU["DIGITAL OUT (COAXIAL)"]
    BU --> BV["DIGITAL OUT (COAXIAL)"]
    BV --> BW["DIGITAL OUT (COAXIAL)"]
    BW --> BX["DIGITAL OUT (COAXIAL)"]
    BX --> BY["DIGITAL OUT (COAXIAL)"]
    BY --> BZ["DIGITAL OUT (COAXIAL)"]
    BZ --> CA["DIGITAL OUT (COAXIAL)"]
    CA --> CB["DIGITAL OUT (COAXIAL)"]
    CB --> CC["DIGITAL OUT (COAXIAL)"]
    CC --> CD["DIGITAL OUT (COAXIAL)"]
    CD --> CE["DIGITAL OUT (COAXIAL)"]
    CE --> CF["DIGITAL OUT (COAXIAL)"]
    CF --> CG["DIGITAL OUT (COAXIAL)"]
    CG --> CH["DIGITAL OUT (COAXIAL)"]
    CH --> CI["DIGITAL OUT (COAXIAL)"]
    CI --> CJ["DIGITAL OUT (COAXIAL)"]
    CJ --> CK["DIGITAL OUT (COAXIAL)"]
    CK --> CL["DIGITAL OUT (COAXIAL)"]
    CL --> CM["DIGITAL OUT (COAXIAL)"]
    CM --> CN["DIGITAL OUT (COAXIAL)"]
    CN --> CO["DIGITAL OUT (COAXIAL)"]
    CO --> CP["DIGITAL OUT (COAXIAL)"]
    CP --> CQ["DIGITAL OUT (COAXIAL)"]
    CQ --> CR["DIGITAL OUT (COAXIAL)"]
    CR --> CS["DIGITAL OUT (COAXIAL)"]
    CS --> CT["DIGITAL OUT (COAXIAL)"]
    CT --> CU["DIGITAL OUT (COAXIAL)"]
    CU --> CV["DIGITAL OUT (COAXIAL)"]
    CV --> CW["DIGITAL OUT (COAXIAL)"]
    CW --> CX["DIGITAL OUT (COAXIAL)"]
    CX --> CY["DIGITAL OUT (COAXIAL)"]
    CY --> CZ["DIGITAL OUT (COAXIAL)"]
    CZ --> DA["DIGITAL OUT (COAXIAL)"]
    DA --> DB["DIGITAL OUT (COAXIAL)"]
    DB --> DC["DIGITAL OUT (COAXIAL)"]
    DC --> DD["DIGITAL OUT (COAXIAL)"]
    DD --> DE["DIGITAL OUT (COAXIAL)"]
    DE --> DF["DIGITAL OUT (COAXIAL)"]
    DF --> DG["DIGITAL OUT (COAXIAL)"]
    DG --> DH["DIGITAL OUT (COAXIAL)"]
    DH --> DI["DIGITAL OUT (COAXIAL)"]
    DI --> DJ["DIGITAL OUT (COAXIAL)"]
    DJ --> DK["DIGITAL OUT (COAXIAL)"]
    DK --> DL["DIGITAL OUT (COAXIAL)"]
    DL --> DV["DIGITAL OUT (COAXIAL)"]
    DV --> DW["DIGITAL OUT (COAXIAL)"]
    DW --> DX["DIGITAL OUT (COAXIAL)"]
    DX --> DY["DIGITAL OUT (COAXIAL)"]
    DY --> DXF["DIGITAL OUT (COAXIAL)"]
    DXF --> DXG["DIGITAL OUT (COAXIAL)"]
    DXG --> DXH["DIGITAL OUT (COAXIAL)"]
    DXH --> DXI["DIGITAL OUT (COAXIAL)"]
    DXI --> DXJ["DIGITAL OUT (COAXIAL)"]
    DXJ --> DXK["DIGITAL OUT (COAXIAL)"]
    DXK --> DXL["DIGITAL OUT (COAXIAL)"]
    DXL --> DXM["DIGITAL OUT (COAXIAL)"]
    DXM --> DXN["DIGITAL OUT (COAXIAL)"]
    DXN --> DXO["DIGITAL OUT (COAXIAL)"]
    DXO --> DXP["DIGITAL OUT (COAXIAL)"]
    DXP --> DXQ["DIGITAL OUT (COAXIAL)"]
    DXQ --> DXR["DIGITAL OUT (COAXIAL)"]
    DXR --> DXS["DIGITAL OUT (COAXIAL)"]
    DXS --> DXT["DIGITAL OUT (COAXIAL)"]
    DXT --> DXU["DIGITAL OUT (COAXIAL)"]
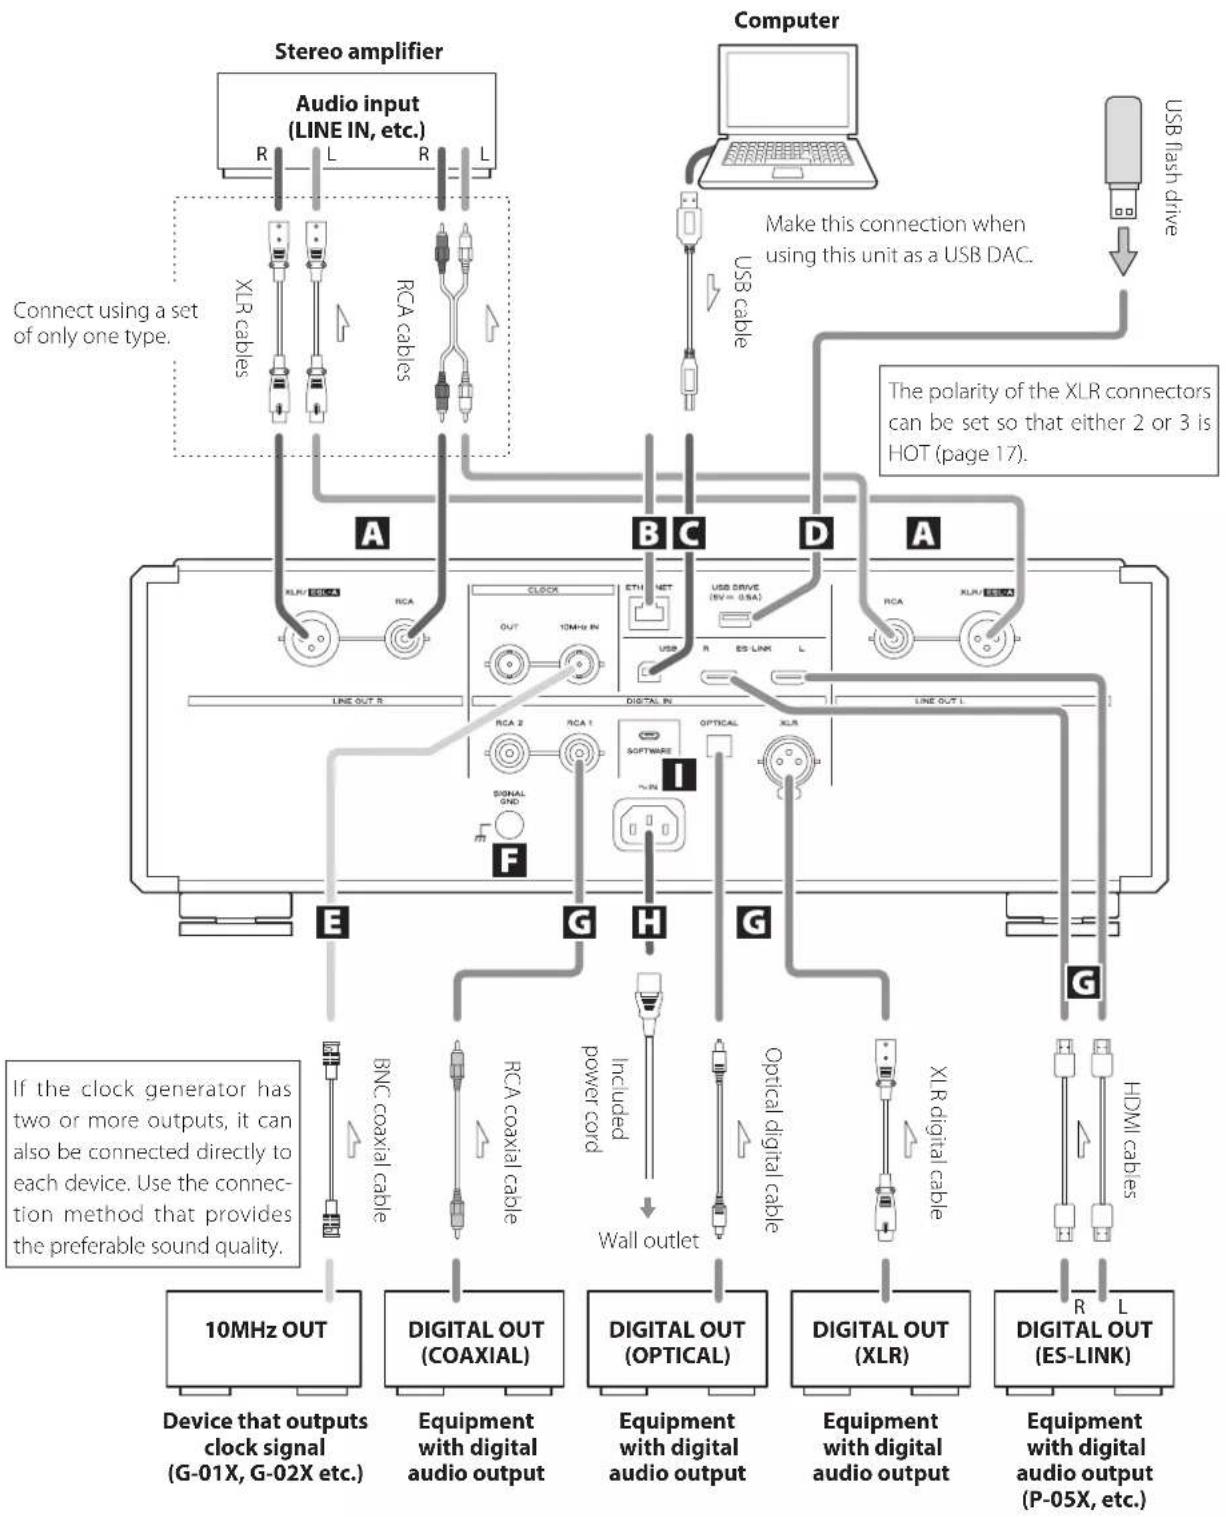
A Analog audio output (LINE OUT) connectors
These output 2-channel analog audio. Connect the XLR or RCA connectors to an amplifier.
Use commercially-available cables for connections.
XLR/ESL-A: XLR cables
RCA: RCA cables
Connect this unit's R connector to the R connector of the amplifier, and its L connector to the L connector of the amplifier.
Change the analog output setting according to the connector being used (page 17).
●Analog audio output can be set to XLR (polarity HOT for pin 2 or 3), RCA or ESLA (page 17).
- When connecting this unit with an amplifier that has ES-LINK Analog (ESL-A) connectors, we recommend connecting the analog audio output (XLR/ESL-A) connectors on this unit to the ES-LINK Analog (ESL-A) connectors on the amplifier (page 10).
B ETHERNET port
Use a LAN cable to connect to a network.
Use a commercially-available LAN cable for connection.
C USB port
Use to input digital audio from a computer. Connect it to a computer's USB port.
Use a commercially-available USB cable for connection.
● Before connecting, read pages 13 to 14.
D USB DRIVE port
Connect USB flash drives that contain audio files here.
- To play audio files on a USB flash drive connected to a USB DRIVE port, set the input source to NET and use an app for playback (page 12).
E CLOCK IN (10MHz) and OUT connectors
Use the CLOCK IN (10MHz) connector to input 10MHz clock synchronization signals.
To use clock synchronization, connect the clock output connector of the device outputting the clock signal to the CLOCK IN (10MHz) connector on this unit. Then, set the external clock (CLK>) setting to IN (page 16).
When outputting clock from this unit, connect its CLOCK OUT connector to the clock input connector on the digital audio output device. Then, set the clock (CLK>) setting to OUT44 or OUT48 (page 16).
Use commercially-available BNC coaxial cables for connections.
●BNC coaxial cables with 50Ω or 75Ω impedance can be used.
F SIGNAL GND grounding terminal
The audio quality might be improved by connecting this grounding terminal to an amplifier or other device that is connected to this unit.
●This is not a safety grounding terminal.
G Digital audio input (DIGITAL IN) connectors
Use to input digital audio signals.
They can be connected to the digital output connectors of a digital audio device such as the P-05X.
ES-LINK: HDMI cables
- The ES-LINK format is unique to ESOTERIC and is not compatible with the HDMI specification. Do not connect the ES-LINK connector to an HDMI connector on a device made by another company.
- We recommend using ES-LINK when connecting to a P-05X.
Use commercially-available cables for the following connections.
OPTICAL: optical digital cable (TOS)
RCA: RCA coaxial digital cable
XLR: XLR digital cable
- They can receive signals with sampling frequencies of 32–192 kHz and bit depths up to 24-bit.
H AC power inlet (\~IN)
Connect the included AC power cord to this AC inlet.
After completing all other connections, plug the power plug into a power outlet.
Use only a genuine ESOTERIC power cord. Use of other power cords could result in fire or electric shock.
Connect the power plug from the outlet if you will not use the unit for a long time.
I SOFTWARE maintenance port
This is used for maintenance. Do not connect anything to this port unless instructed to do so by our service department.
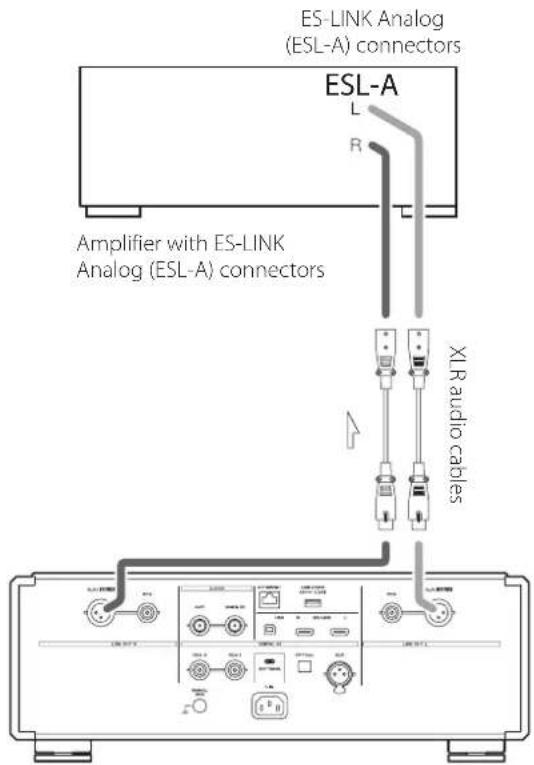
Connecting using ES-LINK Analog
text_image
ES-LINK Analog (ESL-A) connectors ESL-A L R Amplifier with ES-LINK Analog (ESL-A) connectors XL audio cablesUse XLR audio cables to connect the analog audio output (XLR/ESL-A) connectors on this unit to an amplifier that has ES-LINK Analog (ESL-A) connectors.
- Set this unit's analog output (AOUT) to ESLA.
- You can also connect using XLR or RCA connectors. Select the connection type that provides the audio quality you prefer.
ES-LINK Analog overview
Using a current transmission method that utilizes the high-performance of an HCLD buffer circuit, which boasts the ability to supply strong current at high speed, the effects of impedance on the signal path are suppressed and transmitting signals purely and powerfully is possible.
- Ordinary balanced cables (with XLR connectors) are used for connection. These connectors can only be used with compatible devices, however, because the transmission format is unique.
Changing the input source
text_image
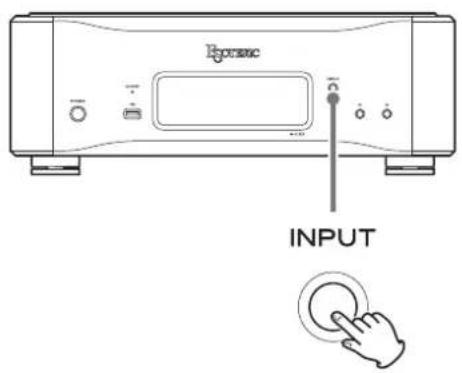
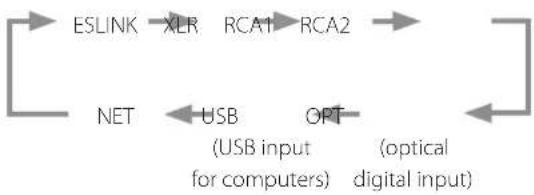
PORATE INPUTPress the INPUT button repeatedly to cycle through the following input sources.
flowchart
graph LR
    A["ESLINK"] --> B["XLR"]
    B --> C["RCA1"]
    C --> D["RCA2"]
    D --> E["OPT"]
    E --> F["(optical digital input)"]
    F --> G["USB (USB input for computers)"]
    G --> H["NET"]
    H --> A
- If the input signal is not a digital audio signal or uses an audio signal format that is not supported by this unit (such as Dolby Digital or DTS) “---” appears in place of the sampling frequency. Set the digital output of the connected equipment to PCM audio output.
- To play audio files on a USB flash drive connected to a USB DRIVE port, set the input source to NET and use an app for playback.
ATTENTION
When the network input circuit power supply setting (NETin>) is OFF, NET will not be shown (page 18).
text_image
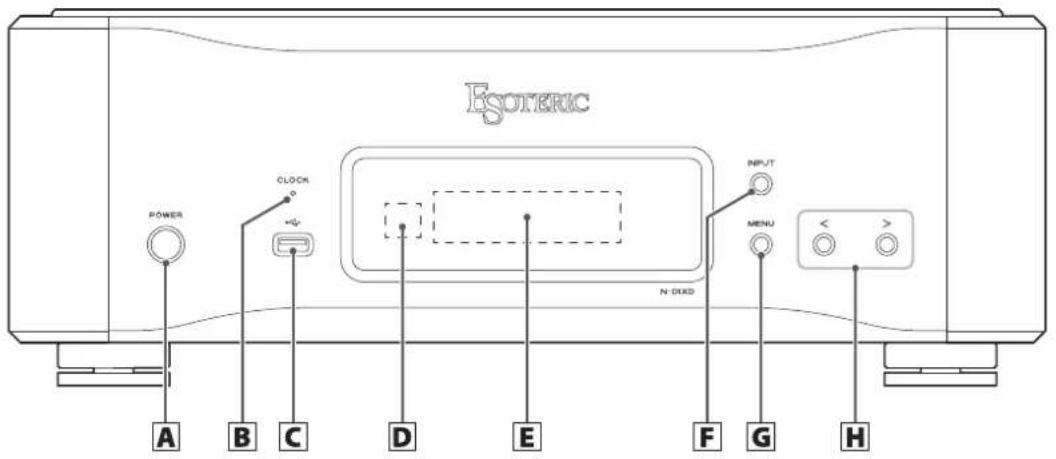
Esoteric POWER CLOCK N-DVD INPUT MENU A B C D E F G HA POWER button
Press to turn the unit on and off.
When the unit is on, the ring around the button lights.
When the unit is off, it is unlit.
When not using the unit, turn it off.
B CLOCK indicator
This shows the clock synchronization status.
This indicator blinks during clock synchronization and lights when synchronization completes.
C USB drive port ( )
Connect USB flash drives that contain audio files here.
- To play audio files on a USB flash drive connected to a USB DRIVE port, set the input source to NET and use an app for playback (page 12).
D Remote control signal receiver
This receives signals from the remote control. When using the remote control, point the end of it toward this receiver panel.
●This product does not include a remote control.
- The dimmer of this unit can be adjusted using a remote control included with another ESOTERIC product.
E Display
This shows various information, including the sampling frequency of the input source.
F INPUT button
Press to change the digital input. Select a connector that has a digital device connected. If no digital signal is being input, the display will blink.
G MENU button
Press to enter setting mode.
H Setting adjustment ( / ) buttons
Use to change parameters when in setting mode.
When NET is selected, these can be used to play and skip tracks in the playlist.
●You cannot change the volume with this unit.
- Press and hold the < button to switch between showing the playback time and the playback sampling frequency when the input source is NET.
- When the input source is NET, the > button can be pressed and held during playback to pause.
- When the input source is USB or NET and "READY" is shown, the > button can be pressed and held to switch between showing the display blinking or lit continuously.
The network player functions of this unit support OpenHome, Room Ready, Spotify Connect, Tidal Connect and other services. Music can be played back by using apps that are compatible with these services.
- The ESOTERIC Sound Stream app, which is compatible with iOS and Android, can be used for OpenHome control. Search for "ESOTERIC Sound Stream" in the App Store or Google Play Store.

text_image
ESOTERIC- Refer to the ESOTERIC Sound Stream User's Manual (https://www.esoteric.jp/en/product/sound_stream/download) to prepare play lists and play audio files.
- To use the ETHERNET port or USB drive (USB DRIVE and 9) ports, you must also use a tablet or smartphone that has the dedicated app (free) installed and connect it to the same network as the unit.
●Network module firmware is updated through ESOTERIC Sound Stream. We recommend that you regularly select this unit in ESOTERIC Sound Stream, and update it with the latest firmware.
A pop-up window recommending a firmware update will appear if one is available.
OpenHome http://openhome.org/
Playlist data is stored in this unit. Songs stored on a NAS or USB flash drive connected to this unit can be added to playlists and played back using ESOTERIC Sound Stream or another app that is compatible with OpenHome control. Using ESOTERIC Sound Stream, desired songs from Tidal, Qobuz and other streaming services can also be added to playlists. Since playlists are stored on the playback device when using OpenHome, after music has been added to a playlist, playback in playlist order is possible even after the control app has been quit.
Roon Ready https://roonlabs.com/
This unit supports music playback using the Roon music playback and management application released by Roon Labs. A Roon system is comprised of three elements: control, core and output. This unit fills the role of an audio output that supports RAAT (Roon Advanced Audio Transport), which is a high-quality audio transmission format unique to Roon.
This unit enables selection of RAAT mode, which allows maximum performance when playing audio with Roon. This mode is tailored for music playback using Roon and stops other services that are supported in normal mode, including Open Home, Spotify Connect and Tidal Connect.
- See page 19 for RAAT mode setting procedures.
- When in RAAT mode, control is possible only from the Roon app.
Spotify Connect https://www.spotify.com/Tidal Connect https://tidal.com/
This unit can be selected as the output from dedicated apps for the Spotify and Tidal music streaming services. Using the apps optimized for these services on a smartphone or other device enables music playback on this unit with easy operations, including music selection.
NOTE
See the apps for the services for detailed operation procedures.
Supported operating systems
This unit can be connected by USB and used with a computer running one of the following operating systems.
Operation with other operating systems cannot be assured (as of November 2019).
When using Mac
OS X Lion (10.7)
OS X Mountain Lion (10.8)
OS X Mavericks (10.9)
OS X Yosemite (10.10)
OS X El Capitan (10.11)
macOS Sierra (10.12)
macOS High Sierra (10.13)
macOS Mojave (10.14)
macOS Catalina (10.15)
When using Windows
Windows 7 (32/64-bit)
Windows 8 (32/64-bit)
Windows 8.1 (32/64-bit)
Windows 10 (32/64-bit)
Installing the driver
When using Mac
This unit can be operated with the standard OS driver, so there is no need to install a driver.
When using Windows
To use this unit for playback of files on a computer, install the dedicated driver on the computer.
Installing the driver on a computer
Install the dedicated driver software on the computer after downloading it from the following URL.
For detailed instructions about installing the driver, please also see the following URL.
https://www.esoteric.jp/en/product/n-01xd/download
IMPORTANT NOTICE
You must install the dedicated driver software before connecting this unit with a computer using a USB cable.
If you connect the unit to the computer by USB before installing the driver, it will not function properly.
Depending on the composition of the computer hardware and software, operation might not be possible even with the above operating systems.
Note about transmission modes
The sampling frequencies that can be transmitted are 44.1 kHz, 48 kHz, 88.2 kHz, 96 kHz, 176.4 kHz, 192 kHz, 352.8 kHz and 384 kHz. 2.8MHz, 5.6MHz, 11.2MHz and 22.5MHz DSD are also supported.
- 22.5MHz DSD is only supported with DSD Native playback. It is not supported with DoP (DSD Audio over PCM Frames) playback.
When connected correctly, you will be able to select "ESOTERIC USB AUDIO DEVICE" as the audio output for the operating system.
Audio data sent from the computer will be processed using this unit's clock during data transmission, enabling reduction of jitter.
Downloading playback application ESOTERIC HR Audio Player
You can use ESOTERIC HR Audio Player to play audio files on a computer. Please download this free application from the following URL.
https://www.esoteric.jp/en/product/hr_audio_player/download
ESOTERIC HR Audio Player is a software audio player for Windows and Mac that supports high-quality playback of high-resolution audio sources. You can use it to enjoy the high-quality playback of high-resolution audio sources, including DSD, without needing to make complicated settings.
ESOTERIC HR Audio Player setting note
To play 22.5MHz DSD recordings with ESOTERIC HR Audio Player, open the Configure window and set the "Decode mode" to "DSD Native."
To play formats other than 22.5MHz DSD, you can set this to either "DSD over PCM" or "DSD Native" as you like.
For details, see "Selecting DSD decoding mode" in the ESOTERIC HR Audio Player Owner's Manual.
Playing audio files
1 Connect this unit to the computer using a USB cable.
Use a commercially-available USB cable with a connector that matches that of this unit.
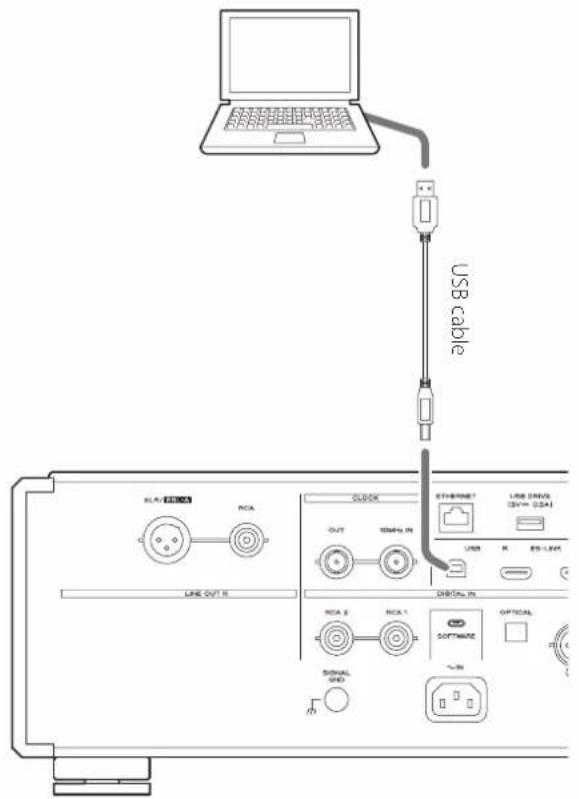
text_image
USB cable PLA-20005 RCA LINE OUT R CLOCK OUT TEMP. IN STHERMINT USB DRIVE REV+ GSA4 USER IN RS-LED RCA B RCA 1 DIGITAL IN SOFTWARE OPTICAL SIGNAL GND ~IN2 Turn the computer on.
Confirm that the operating system has started properly.
3 Press the POWER button to turn the unit on.
POWER

4 Press the INPUT button repeatedly to select USB (page 10).
INPUT
5 Start playback of an audio file on the computer.
For better audio quality, set the computer volume to its maximum and adjust the volume of the amplifier connected to this unit. Set the amplifier volume to the minimum when you start playback and gradually increase it.
- The computer cannot be used to control this unit, nor can this unit be used to control the computer.
●This unit cannot transmit audio files to the computer by USB.
- Do not do any of the following when playing back audio files over the USB connection. Doing so could cause the computer to malfunction. Always quit the audio playback software before conducting any of these operations.
●Unplug the USB cable
●Turn this unit off
- Change the input
- Computer operation sounds will also be transmitted when playing back audio files over the USB connection. To avoid outputting these sounds, make the necessary settings on your computer.
- If you start the audio playback software before connecting this unit with the computer or before setting the input to USB, audio files might not play back properly. If this occurs, restart the audio playback software or restart the computer.
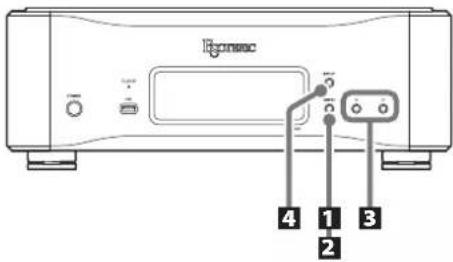
The settings for this unit are divided into four groups: Settings 1, Settings 2, Settings 3 and the volume adjustment setting. Depending on how the MENU button is pressed, the display will switch between Settings 1, Settings 2, Settings 3 and the volume adjustment setting.
text_image
Igmaec 4 1 3 2Changing settings
1 When stopped or during playback, press the MENU button.
MENU
Settings 1 will be shown.
To show Settings 2, press the MENU button again for at least two seconds while Settings 1 is shown.
To show Settings 3, press the MENU button again for at least two seconds while Settings 2 is shown.
2 Press the MENU button repeatedly to select the item to change.
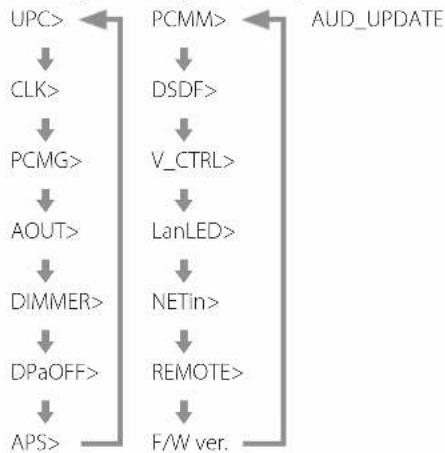
Each time you press the MENU button, the item shown on the display changes as follows.
Settings 1 Settings 2 Settings 3
flowchart
graph TD
    UPC --> CLK --> PCMG --> AOUT --> DIMMER --> DPaOFF --> APS
    PCMM --> DSDF --> V_CTRL --> LanLED --> NETin --> REMOTE --> F/W ver.
    AUD_UPDATE --> PCMM
- If you do nothing for ten or more seconds, setting mode will end and ordinary display will resume. However, setting mode will not end when Settings 3 AUD_UPDATE is in use.
- Depending on the selected source and operation status, some items might not appear.
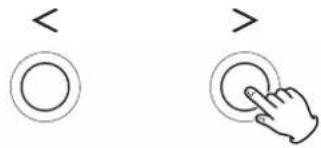
3 Use the setting adjustment (〈/〉) buttons to change the settings.
text_image
< >To change multiple items, repeat steps 2 and 3.
- Press the > setting adjustment button when "F/W ver." is shown to check the versions of other firmware. Press the > setting adjustment button when the DAC version is shown to return to showing F/W ver.
4 Press the INPUT button to end setting mode.
INPUT
Setting mode will also end and the ordinary display will reappear if nothing is done for ten seconds.
●Settings are retained even if the power plug is disconnected.
PCM signal upconversion setting
UPC>\*\*\*
When PCM signals are being input, they can be upconverted or converted to DSD signals.
●By default, the setting is ORG.
●This setting can be made for each input.
ORG
Upconversion will not occur.
- The input signal is sent as is to the D/A converter without being upconverted.
2Fs
When PCM signals with frequencies of less than 88.2 kHz are input, they are upconverted before being converted from digital to analog.
4Fs
When PCM signals with frequencies of less than 176.4 kHz are input, they are upconverted before being converted from digital to analog.
8Fs
When PCM signals with frequencies of less than 352.8 kHz are input, they are upconverted before being converted from digital to analog.
16Fs
When PCM signals with frequencies of less than 705.6 kHz are input, they are upconverted before being converted from digital to analog.
DSD
Signals are converted to DSD before being converted from digital to analog.
Clock setting
CLK>\*\*\*
Use this to set synchronization with an external clock or clock output to an audio source device that supports clock.
●By default, the setting is OFF.
- Set this to OFF when connected to a source device, other than NET or USB input, that does not support clock synchronization.
- When input is USB or NET, OUT44 and OUT48 cannot be selected.
OFF
Clock synchronization is not used. The unit will operate with the clock of the input digital signal.
The built-in oscillator will be used with NET and USB input.
The CLOCK indicator lights green.
IN
In this mode, the unit is synchronized with the 10MHz clock signal input through its CLOCK IN (10MHz) connector from a clock generator.
The CLOCK indicator lights. The CLOCK indicator blinks when in the process of synchronizing or unable to synchronize.
●The clock frequency that can be input is 10 MHz. The input audio signal and the input clock signal must be synchronized.
- Be aware that during music playback, if the clock generator is turned off or the BNC coaxial cable that is supplying the 10MHz clock signal is disconnected, causing the clock signal to stop, a loud noise could be emitted from the speakers.
OUT44
44.1 kHz is output from the CLOCK OUT connector.
OUT48
48 kHz is output from the CLOCK OUT connector.
PCM output gain setting
PCMG>\*\*\*
Use this to set the gain for PCM signal playback. This can be used to reduce the volume difference between PCM and DSD signal playback. Set it as necessary.
- By default, USB and NET are set to LOW and other inputs are set to FULL.
●This setting can be made for each input.
FULL
The gain is not adjusted.
LOW
The output level of PCM signals during full scale 0dB playback and the output level of DSD signals during 0dB playback are the same. Use when the volume of PCM signals during playback seem loud compared to DSD signals.
Analog output setting
AOUT>\*\*\*
Use this to select the analog output connector to be used.
●By default, the setting is XLR2.
XLR2
Analog audio signals are output through the XLR connectors with pin 2 HOT.
XLR3
Analog audio signals are output through the XLR connectors with pin 3 HOT.
RCA
Analog audio signals are output through the RCA connectors.
ESLA
Analog audio signals are output as ES-LINK Analog (ESL-A) through the XLR connectors.
●These connections use ordinary XLR cables, but the signals are transmitted in a unique format, so this setting should only be used with compatible devices.
●See page 10 for more about ES-LINK Analog (ESL-A).
Dimmer setting
DIMMER>\*\*\*
Use this to adjust the brightness of the unit's display.
By default, the setting is 2.
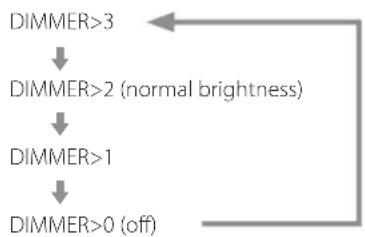
flowchart
graph TD
    A["DIMMER>0 (off)"] --> B["DIMMER>1"]
    B --> C["DIMMER>2 (normal brightness)"]
    C --> D["DIMMER>3"]
- Even when set to DIMMER>1 or DIMMER>0, setting menus and error messages will be shown with normal brightness (DIMMER>2).
Automatic display darkening setting
DPaOFF>\*\*\*
Use this to set the display to darken automatically.
●By default, the setting is ON.
- If the OEL display is left on with the same indication for a long time, brightness irregularities can occur. For this reason, we recommend that you set the automatic display darkening function to ON.
ON
If no operation is conducted for ten minutes, the display automatically turns off.
OFF
The display will not turn off automatically.
- If no operation is conducted for ten minutes, the display will dim to DIMMER>1 brightness to protect it from excessive wear.
Automatic power saving setting
APS>\*\*\*
If there is no input from the selected input source for the set time, the power will turn off automatically.
●By default, the setting is 30m.
- The input sources that are not selected have no effect on automatic power saving.
30m
30 minutes
60m
60 minutes
90m
90 minutes
120m
120 minutes
OFF
The automatic power saving function is disabled.
D/A converter operation setting
PCMM>\*\*\*
The D/A converter operation mode used during PCM playback can be set to three types: M1, M2 or M3.
This changes the modulator operation frequency and randomization algorithm used to absorb hardware error.
M1 is the ESOTERIC reference mode.
The operation frequency of the modulator becomes progressively lower in order from M1 to M2 to M3.
The replacement amount of the randomization algorithm increases progressively in order from M1 to M2 to M3.
Select the sound setting you prefer.
●By default, the setting is M1.
DSD filter setting
DSDF>\*\*\*
Use to set the digital filter during DSD playback. Set it as desired.
●By default, the setting is OFF.
OFF
No digital filter is used.
F1, F2, F3
A digital filter is used. F1, F2 and F3 are digital filters with different frequency responses. The cutoff frequency becomes progressively lower from F1 to F2 to F3.
Volume adjustment setting
V\_CTRL>\*\*\*
Use this setting to adjust the volume with the app during NET input.
●By default, the setting is OFF.
OFF (recommended)
This disables app volume adjustment.
Digital signals are transmitted to the D/A converter without passing through the volume adjustment block.
ON
This enables app volume adjustment.
Since volume is adjusted in the digital domain, DSD data is converted to PCM data before being transmitted to the D/A converter.
●11.2/22.5MHz DSD audio files cannot be played.
NOTE
When this setting is ON, "VOLON" will appear at the top left of the screen.
ETHERNET port LED setting
LanLED>\*\*\*
Use to set the ETHERNET port LED. When set to OFF, the ETHERNET port LED will not light, reducing the impact on audio quality.
●By default, the setting is OFF.
- Even when set to OFF, the LED will blink immediately after a LAN cable is connected and while the unit is initializing after being turned on (while "WAIT..." displayed).
OFF
The ETHERNET port LED stays unlit.
ON
Lighting and blinking of the ETHERNET port LED are enabled.
Network input circuit power supply setting
NETin>\*\*\*
Use to turn the network input circuit power supply on and off.
●By default, the setting is ON.
ON
This turns the network input circuit power supply on and plays audio files from the network.
OFF
This turns the network input circuit power supply off, stopping operation of the network input circuit.
NET will not be shown as an input source option (page 10).
Remote control operation setting
REMOTE>\*\*\*
Use this to set signal reception from ESOTERIC remote controls included with the P-05X and other products.
By default, the setting is OFF.
- Regardless of this setting, remote control DIMMER buttons will function.
- Set this to OFF when you are using an ESOTERIC amplifier. If set to ON, the amplifier will be operated at the same time.
OFF
This disables control of this product using the buttons on the remote control.
ON
This enables control of this product using the buttons for amplifier control on remote controls.
The following table shows the correspondence between remote control and unit buttons.
| Remote control N-01XD | |
| SETUP button MENU button | |
| INPUT button INPUT button | |
| VOLUME (+/-) buttons | Setting adjustment (<> ) buttons |
Showing firmware versions
F/W ver.
Press the > setting adjustment button when "F/W ver." is shown to check the versions of other firmware.
I/F ****
I/F firmware
NET ****
Network firmware
M *****
MQA/USB firmware
DIG ****
Digital FPGA firmware
DAC L**R**
DAC FPGA firmware
RAAT mode
- This function is supported from interface firmware v3.00 and NET firmware 150.
RAAT mode, which functions only with RAAT (Room Advanced Audio Transport), can be selected.
In order to maximize music playback performance using Roon, RAAT mode stops other services that are supported in normal mode, including OpenHome, Spotify Connect and Tidal Connect. Operation is possible only from the Roon control app.
Making RAAT mode settings
1 Select Showing firmware versions (F/W ver.) in Settings 2, and show NET.
2 Press and hold the > setting adjustment button on the unit.
NETM > RAAT will blink.
3 Press and hold the > setting adjustment button on the unit again.
This selects RAAT mode and automatically restarts the unit's network player program. After restarting, music playback will only be possible with Roon.
- When operating in RAAT mode RAAT will appear on the unit's display.
- When in RAAT mode, this unit will not be recognized by OpenHome control apps, including ESOTERIC Sound Stream, or Spotify or Tidal apps.
Switching back to normal mode from RAAT mode
1 Select Showing firmware versions (F/W ver.) in Settings 2, and show NET.
2 Press and hold the > setting adjustment button on the unit.
NETM > NORM will blink.
3 Press and hold the > setting adjustment button on the unit again.
This disables RAAT mode, reactivates normal mode and automatically restarts the unit's network player program. After restarting, OpenHome and other services will be usable.
Settings 3
MQA (Master Quality Authenticated)
Audio program update setting
AUD\_UPDATE
Use to update the audio signal processing program of the unit.
See the explanation included with the update program for details about how to update.
MQA is an award-winning British technology that delivers the sound of the original master recording. The master MQA file is fully authenticated and is small enough to stream or download.
Visit mqa.co.uk for more information.
The N-01XD includes MQA technology, which enables you to play back MQA audio files and streams, delivering the sound of the original master recording.
'MQA' or 'MQA.' indicates that the product is decoding and playing an MQA stream or file, and denotes provenance to ensure that the sound is identical to that of the source material. "MQA." indicates it is playing an MQA Studio file, which has either been approved in the studio by the artist/producer or has been verified by the copyright owner.
If you experience a problem with this product, please take a moment to review the following information before requesting service. Moreover, the problem might be caused by something other than this unit. Please also check the operation of the connected units. If this product still does not operate correctly, contact the retailer where you purchased it.
General
The unit does not turn on.
→Insert the power plug into an outlet.
→Check the connection of the power cord to this unit.
→ Confirm that power is being supplied to the outlet to which the power cord is connected by, for example, connecting another device to it.
The unit automatically turns off.
→This is because the automatic power saving function turned the unit off.
Press the POWER button on the main unit to turn it on.
Change the automatic power saving setting if necessary (page 17).
The unit does not respond when buttons are pressed.
→ Multiple button presses without pause can cause the unit to stop responding. After pressing a button, wait momentarily for the unit to respond.
There is noise.
→ Place the unit as far away as possible from TVs and other devices that have strong magnetism.
No sound is output from the speakers. The sound is distorted.
→Check the connections with the amp and the speakers.
→Adjust the volume of the amplifier and other devices.
→No sound is output when playback is paused. Use the app to resume ordinary playback.
→Check the analog output setting (page 17).
Clock sync
The CLOCK indicator does not stop blinking.
→Set CLK> to OFF when not using clock sync.
→A clock signal to which the unit cannot synchronize might be being input. Check the connection of the CLOCK IN (10MHz) connector and the settings of the connected device.
A cyclical noise is being output.
If a cyclical noise is being output when the unit is in clock sync mode, the connected device might not be in clock sync mode. Check the connection of the CLOCK IN (10MHz) connector and the clock synchronization setting of the connected device.
An audio file cannot be played back (correctly).
→ Different media servers (NAS) support different types of files. Check the specifications of the media server (NAS), too.
The sound breaks up during playback.
If files that use lossy compression, including MP3s, and files at 44.1 kHz and other low bit rates play back normally, but the sounds of files at 384 kHz and other high bit rates as well as FLAC and other files that use lossless compression break up, the ETHERNET speed might be too slow.
The audio data is transmitted from the NAS through the router. For this reason, using LAN cables to connect the NAS to the router and the router to this unit is preferable.
USB connections with a computer
Computer does not recognize this unit.
→ See page 13 for information about supported operating systems. Operation with unsupported operating systems is not guaranteed.
There is noise.
Starting other applications during playback of an audio file may interrupt playback or cause noise. Do not start other applications during playback.
When the unit is connected to a computer via a USB hub, for example, noise might be heard. If this occurs, connect the unit directly to the computer.
Audio files cannot be played back.
→Connect the computer with this unit and switch to USB before starting the audio playback software and audio file playback. Audio data might not play back correctly if you connect this unit with the computer or change its input to USB after starting the audio playback software.
Since this unit uses a microcontroller, external noise and other interference can cause the unit to malfunction. If this occurs, turn the unit off and wait about one minute before restarting operation from the beginning.
Note about condensation
If this unit is brought from a cold outdoor environment into a warm room, or the heater has just been turned on in the room where it is located, for example, condensation might occur, resulting in improper operation. If this occurs, leave the unit on and wait 1–2 hours. This should enable normal playback.
SpecificationsTroubleshooting (continued)
Restoring factory settings
natural_image
Line drawing of a portable electronic device with ports and control buttons (no text or symbols)POWER
MENU

Settings are retained even if the power plug is disconnected.
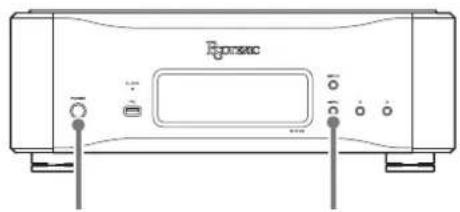
Follow these procedures to restore the factory default settings and erase all changes in memory.
1 Turn the unit off.
If the unit is on, press the POWER button to turn it off and wait for more than 30 seconds.
2 Press the POWER button while holding down the MENU button.
When "Setup CLR" (settings cleared) appears on the display, release the MENU button.
Digital audio inputs
ES-LINK.... 1 pair (L/R)
Input signal formats
Linear PCM (ES-LINKS)....44.1-768 kHz, 48-bit
DSD (ES-LINK5) ..... 2.8 MHz, 5.6 MHz, 11.2 MHz, 22.5 MHz
XLR....1
Input level 5.0 Vp-p
Input impedance.... 110 Ω
Input signal formats
Linear PCM (AES/EBU).... 32–192 kHz, 16-bit, 24-bit
DSD (ES-LINK1, ES-LINK2, DoP).... 2.8 MHz
RCA 2
Input level 0.5 Vp-p
Input impedance 75Ω
Input signal formats
Linear PCM (IEC 60958).... 32-192 kHz, 16-bit, 24-bit
DSD (DoP) 2.8 MHz
Optical digital 1
Input level -24.0 dBm to -14.5 dBm peak
Input signal formats
Linear PCM (IEC 60958).... 32-192 kHz, 16-bit, 24-bit
DSD (DoP) 2.8 MHz
USB 1 (Type B)
USB 2.0 or higher recommended
Input signal formats
Linear PCM....44.1-384 kHz
16-bit, 24-bit, 32-bit
DSD.... 2.8 MHz, 5.6 MHz, 11.2 MHz, 22.5 MHz
ETHERNET 1 (1000BASE-T)
Input signal formats
Linear PCM.... 44.1–384 kHz (stereo)
16-bit, 24-bit, 32-bit
●Only files with integer formats can be played.
DSD....2.8 MHz, 5.6 MHz, 11.2 MHz, 22.5 MHz (stereo)
Supported file formats
PCM lossless ..... FLAC, Apple Lossless (ALAC), WAV, AIFF, MQA
DSD lossless....DSF, DSDIFF (DFF), DoP
Compressed audio....MP3, AAC (m4a container)
USB DRIVE ports 2
Supported file systems . . . . . . . . . . . . . . . . . . . . . . . . . . . . . . . . . . . . . . . . . . . . . . . . . . . . . . FAT32, exFAT and NTFS
Single partition,
USB 2.0 or higher recommended
Maximum current supply.... 0.5 A
Input signal formats
Linear PCM.... 44.1–384 kHz (stereo)
16-bit, 24-bit, 32-bit
●Only files with integer formats can be played.
DSD....2.8 MHz, 5.6 MHz, 11.2 MHz, 22.5 MHz (stereo)
Supported file formats
PCM lossless ..... FLAC, Apple Lossless (ALAC), WAV, AIFF, MQA
DSD lossless....DSF, DSDIFF (DFF), DoP
Compressed audio....MP3, AAC (m4a container)
Clock input
BNC 1
Frequencies that can be input (±10 ppm).... 10 MHz
Input impedance.... 50 Ω
Input level
Rectangle wave....TTL level equivalent
Sine wave 0.5 to 1.0 Vrms
Clock output
BNC 1
Output level....TTL level equivalent (into 75 Ω)
Output frequencies.... 44.1 kHz, 48 kHz
Output frequency precision..... ±0.5 ppm (when shipped from the factory)
Analog audio outputs
XLR/ESL-A 1 pair (L/R)
RCA 1 pair (L/R)
Output impedance
XLR 40 Ω
RCA 15 Ω
Maximum output level (at 1kHz, 10kΩ load)
XLR....5.0 Vrms
RCA 2.5 Vrms
Frequency response 5 Hz to 30 kHz (-3 dB)
S/N ratio.... 113 dB
Distortion 0.0007% (1 kHz)
General
Power supply
Model for Europe....AC 220–240 V, 50/60 Hz
Model for USA/Canada AC 120 V, 60 Hz
Model for Korea AC 220 V, 60 Hz
Model for Hong Kong AC 230 V, 50 Hz
Power consumption 38 W
External dimensions (W × H × D, including protrusions)
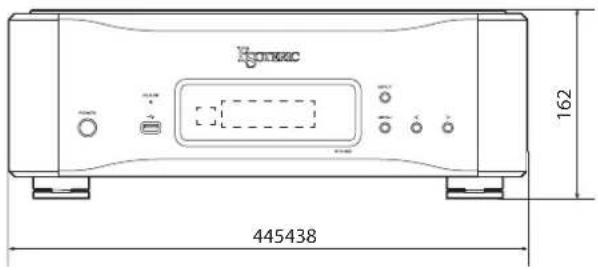
445 × 162 × 438 mm (17 5/8" × 6 1/2" × 17 1/4")
Weight 26.3 kg (58 lb)
Operating temperature....+5°C to +35°C
Operating humidity range.... 5% to 85% (no condensation)
Storage temperature -20^ to +55^
Included accessories
Power cord × 1
Felt pads × 4
HDMI cable × 1
Owner's manual (this document) × 1
Warranty card × 1
- Specifications and appearance are subject to change without notice.
●Weight and dimensions are approximate.
- Illustrations in this Owner's Manual might differ slightly from production models.
text_image
Sonic 162 445438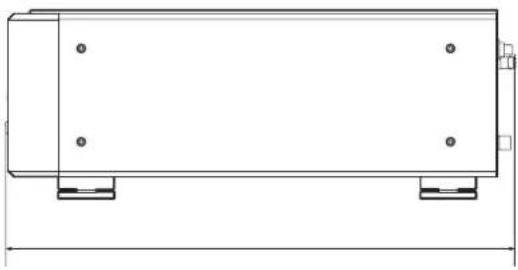
natural_image
Technical line drawing of a rectangular mechanical component with mounting feet and dimension lines (no text or symbols)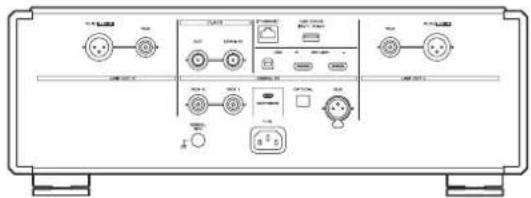
text_image
Technical diagram of an electronic device front panel with labeled ports, connectors, and control buttonsFoot placement diagram
text_image
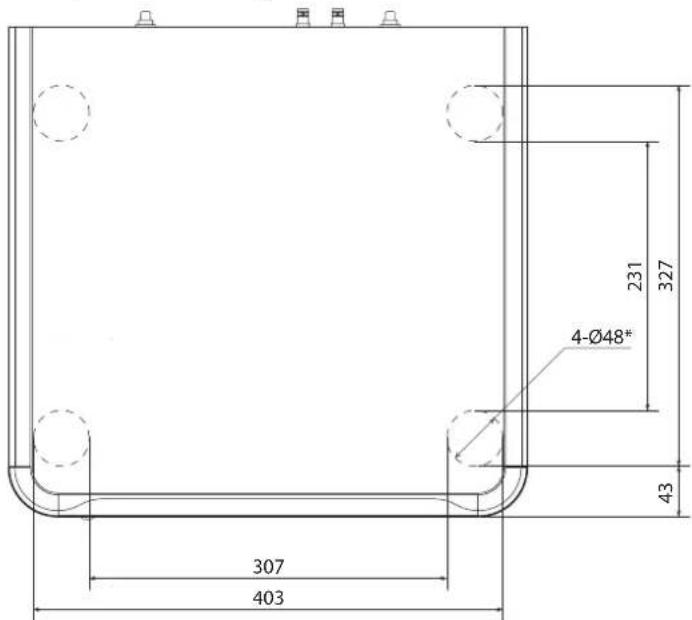
4-Ø48* 231 327 43 307 403*48mm diameter feet × 4
Dimensions in millimeters (mm)
CAUTION
RISK OF ELECTRIC SHOCK
DO NOT OPEN

ATTENTION : POUR RÉDUIRE LE RISQUE D'ÉLECTROCUTION, NE RETIREZ PAS LE CAPOT (OU L'ARRIÈRE). AUCUNE PIÈCE INTERNE N'EST RÉPARABLE PAR L'UTILISATEUR. CONFIEZ TOUTE RÉPARATION À UN SERVICE APRÈS-VENTE QUALIFIÉ.

MQA and the Sound Wave Device are registered trade marks of MQA Limited.© 2016
roon READY
Being Roon Ready means that ESOTERIC uses Roon streaming technology, for an incredible user interface, simple setup, rock-solid daily reliability, and the highest levels of audio performance, without compromise.
"DSD" is a registered trademark.
Microsoft and Windows are either registered trademarks or trademarks of Microsoft Corporation in the United States and/or other countries.
Apple, Mac, OS X and macOS are trademarks of Apple Inc., registered in the U.S. and other countries.
App Store is a service mark of Apple Inc.
IOS is a trademark or registered trademark of Cisco in the U.S. and other countries and is used under license.
Android is a trademark of Google Inc.
Google Play is a trademark of Google Inc.
Wi-Fi is a trademark or registered trademark of Wi-Fi Alliance.
ESOTERIC is a trademark of TEAC CORPORATION, registered in the U.S. and other countries.
MQA (Master Quality Authenticated)....42
natural_image
Simple line drawing of a tablet with wireless signal icon above (no text or symbols)Port SOFTWARE (maintenance)
text_image
PORATE INPUTSpotify Connect https://www.spotify.com/Tidal Connect https://tidal.com/
https://www.esoteric.jp/en/product/hr_audio_player/download
text_image
Two simple UI icons: one with a circle and arrow, the other with a hand pressing a button.MQA (Master Quality Authenticated)
PCM linéaire (AES/EBU).... 32–192 kHz, 16 bits, 24 bits
DSD (ES-LINK1, ES-LINK2, DoP) 2.8 MHz
RCA 2
16 bits, 24 bits, 32 bits
16 bits, 24 bits, 32 bits
Dimensions externes (L × H × P, saillies incluses)
445 × 162 × 438 mm
Poids 26,3 kg
natural_image
Technical line drawing of a rectangular mechanical component with mounting feet and dimension lines (no text or symbols)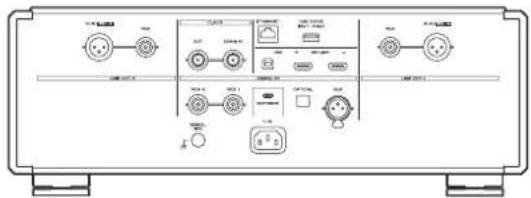
text_image
Technical diagram of an electronic device front panel with labeled ports, connectors, and control buttonsParte responsible: 11 Trading Company, LLC
URL: https://11tradingcompany.com/contact-us/
MQA and the Sound Wave Device are registered trade marks of MQA Limited.© 2016
roon READY
Being Roon Ready means that ESOTERIC uses Roon streaming technology, for an incredible user interface, simple setup, rock-solid daily reliability, and the highest levels of audio performance, without compromise.
“DSD” is a registered trademark.
Microsoft and Windows are either registered trademarks or trademarks of Microsoft Corporation in the United States and/or other countries.
Apple, Mac, OS X and macOS are trademarks of Apple Inc., registered in the U.S. and other countries.
App Store is a service mark of Apple Inc.
IOS is a trademark or registered trademark of Cisco in the U.S. and other countries and is used under license.
Android is a trademark of Google Inc.
Google Play is a trademark of Google Inc.
Wi-Fi is a trademark or registered trademark of Wi-Fi Alliance.
ESOTERIC is a trademark of TEAC CORPORATION, registered in the U.S. and other countries.
MQA (Master Quality Authenticated)....64
Solución de problemas....65
General 65
natural_image
Simple line drawing of a tablet with wireless signal icon above (no text or symbols)XLR/ESL-A: cables XLR
RCA: cables RCA
XLR: cable digital XLR
text_image
PORATE INPUTSpotify Connect https://www.spotify.com/Tidal Connect https://tidal.com/
https://www.esoteric.jp/en/product/hr_audio_player/download
MQA (Master Quality Authenticated)
natural_image
Front view line drawing of a portable electronic device with ports and control buttons (no text or symbols)POWER
MENU

PCM lineal (ES-LINK5).... 44,1–768 kHz, 48 bits
PCM lineal (AES/EBU).... 32–192 kHz, 16 bits, 24 bits
DSD (ES-LINK1, ES-LINK2, DoP) 2,8 MHz
RCA 2
PCM lineal (IEC 60958)....32–192 kHz, 16 bits, 24 bits
DSD (DoP) 2,8 MHz
Digital óptica....1
PCM lineal (IEC 60958)....32–192 kHz, 16 bits, 24 bits
DSD (DoP) 2,8 MHz
USB 1 (Tipo B)
16 bits, 24 bits, 32 bits
16 bits, 24 bits, 32 bits
16 bits, 24 bits, 32 bits
natural_image
Technical line drawing of a rectangular mechanical component with mounting holes and dimension lines (no text or symbols)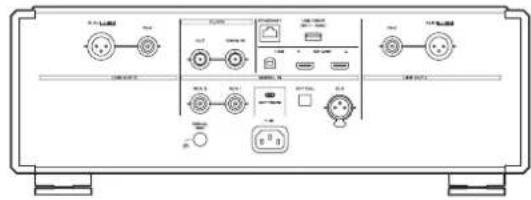
text_image
Technical diagram of an electronic device front panel with labeled ports and indicatorsThis product has a serial number located on the rear panel. Please write it here and retain this for your records.
Model name: N-01XD Serial number
1023·MA-3031F