TBB 80 - Ultrasonic cleaner GRUNDIG - Free user manual and instructions
Find the device manual for free TBB 80 GRUNDIG in PDF.

| Product type | Ultrasonic cleaner |
| Brand | Grundig |
| Model | TBB 80 |
| Tank capacity | 0.5 liter |
| Ultrasonic frequency | 40 kHz |
| Power | 30 W |
| Dimensions (L×W×H) | 20 × 12 × 14 cm |
| Weight | 0.8 kg |
| Power supply | 220-240 V ~ 50/60 Hz |
| Built-in timer | Yes, adjustable up to 10 minutes |
| Tank material | Stainless steel |
| Degassing function | Yes |
| Noise level | ~ 55 dB(A) |
| Color | White with blue buttons |
| Protection rating | IPX7 (handle only) |
| Included accessories | Cleaning basket, lid |
| Maintenance | Clean the tank after each use with a soft cloth |
| Safety | Automatic shut-off, double electrical insulation |
| Warranty | 2 years |
Frequently Asked Questions - TBB 80 GRUNDIG
User questions about TBB 80 GRUNDIG
0 question about this device. Answer the ones you know or ask your own.
Ask a new question about this device
Download the instructions for your Ultrasonic cleaner in PDF format for free! Find your manual TBB 80 - GRUNDIG and take your electronic device back in hand. On this page are published all the documents necessary for the use of your device. TBB 80 by GRUNDIG.
USER MANUAL TBB 80 GRUNDIG
natural_image
Electric toothbrush with blue and white body, displayed in a clear blue case (no visible text or symbols)DE EN TRES
FR HR PL

natural_image
Abstract grayscale curved shape on white background (no text or symbols)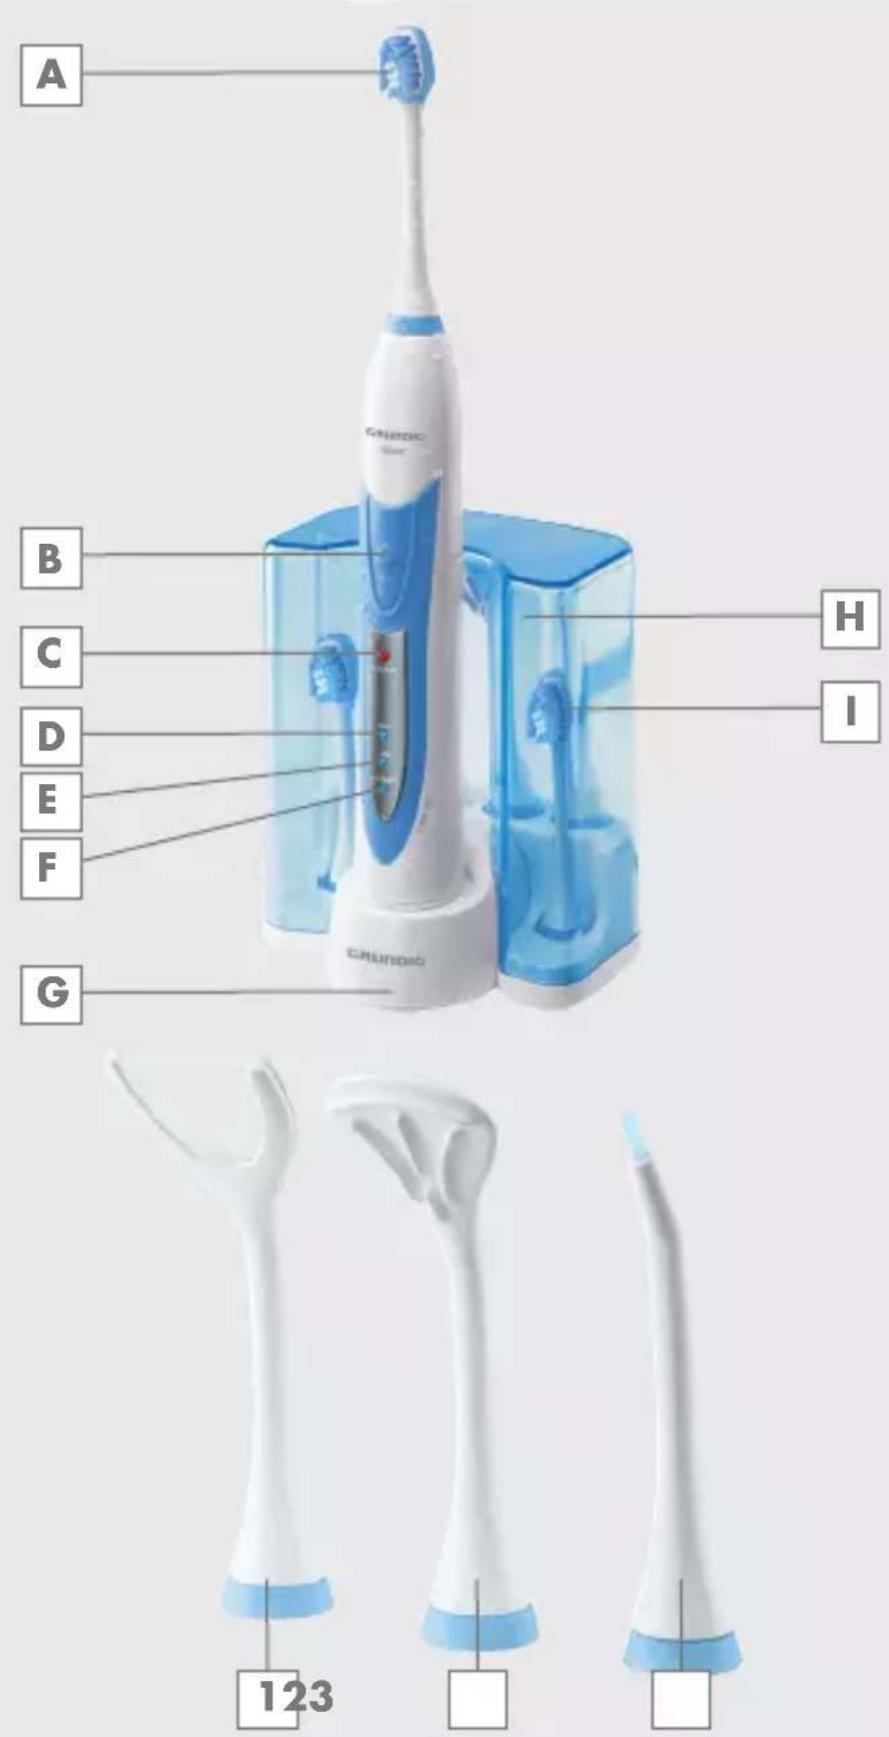
DEUTSCH 05-18
ENGLISH 19-30
TÜRKÇE 31-42
ESPAÑOL 43-56
HRVATSKI 57-69
FRANÇAIS 70-81
POLSKI 82-93
natural_image
Stylized grayscale illustration of a tree with leaves and roots, enclosed in a circular frame (no text or symbols)natural_image
Close-up of a blue toothbrush with white base, enclosed in a circular frame (no text or symbols)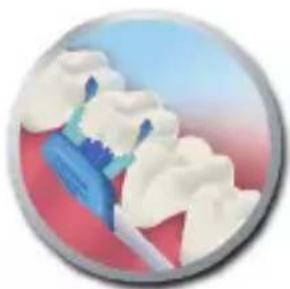
natural_image
Illustration of a toothbrush brushing teeth with blue and red tones (no text or symbols)natural_image
Illustration of a dental tool interacting with teeth (no text or symbols)2 Zungenreiniger
natural_image
Illustration of two human mouth gestures with a blue tool, one showing mouth and the other applying a toothbrush (no text or symbols)natural_image
Illustration of a dental procedure showing teeth and gum tissue (no text or symbols)natural_image
3D rendered mechanical component with purple base and gray housing, no visible text or symbolsGerät aufladen
natural_image
Close-up of a mechanical component with a lever and base, no visible text or symbolsHinweis
natural_image
Illustration of a dental tool interacting with teeth (no text or symbols visible)Hinweis
Please note the following instructions when using the appliance:
■ This appliance is intended for domestic use only.
■ This appliance is designed solely for cleaning and caring for human teeth. All other uses are expressly prohibited.
- Do not use if the appliance, attachments or the power cord on the charging unit is visibly damaged.
If the power cord from the charging unit is damaged, it is not possible to repair it. Please dispose the set according to environmental rules.
■ When the appliance is being charged, on no account should it or the charging unit come into contact with water or any other liquid.
- Keep the appliance out of direct sunlight, excessive heat and open flames.
■ Do not drop the appliance.
- Keep the appliance out of the reach of children.
This appliance can be used by children aged from 8 years and above and persons with reduced physical, sensory or mental capabilities or lack of experience and knowledge if they have been given supervision or instruction concerning use of the appliance in a safe way and understand the hazards involved. Children shall not play with the appliance. Cleaning and user maintenance shall not be made by children without supervision.
- Do not open the appliance under any circumstances. No warranty claims are accepted for damage caused by improper handling.
Dear Customer,
Congratulations on the purchase of your new GRUNDIG Sonic Tooth-brush Clean White Plus TB 8030 Power Edition.
Please read the following user notes carefully to ensure full enjoyment of your quality Grundig product for many years to come.
A responsible approach!

natural_image
Stylized grayscale illustration of a tree with leaves and roots, enclosed in a circular frame (no text or symbols)GRUNDIG focusses on contractually agreed social working conditions with fair wages for both internal employees and suppliers. We also attach great importance to the efficient use of raw materials with continuous waste reduction of several tonnes of plastic every year. Furthermore, all our accessories are available for at least 5 years.
For a future worth living.
For a good reason. Grundig.
Controls and parts
See the figure on page 3.
A Brush head attachment for brushing teeth.
B On/Off and mode switch
C Charge LED: lights up red when charging and green when it is fully charged.
D HIGH mode LED
E LOW mode LED
F MASSAGE mode LED
G Charging unit
H Detachable storage container for brushing and cleaning attachments
☐ Two brush heads with medium bristles and one brush head with soft bristles
Accessories
1 Attachment for floss
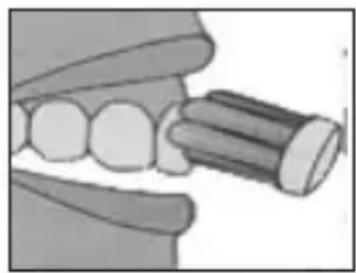
2 Attachment for tongue cleaning
3 Interdental brush for cleaning between the teeth
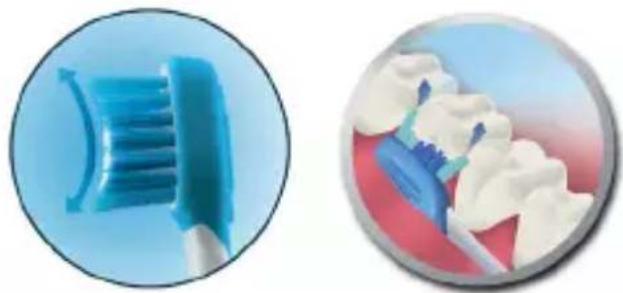
Features of the bristles
The bristles have a concave shape which adapt to the tooth perfectly and are ideal for cleaning between the teeth.
natural_image
Illustration of toothbrush and toothpaste with toothbrush and toothpaste (no text or symbols)Medium brush head
Intensive cleaning with special whitening bristles.
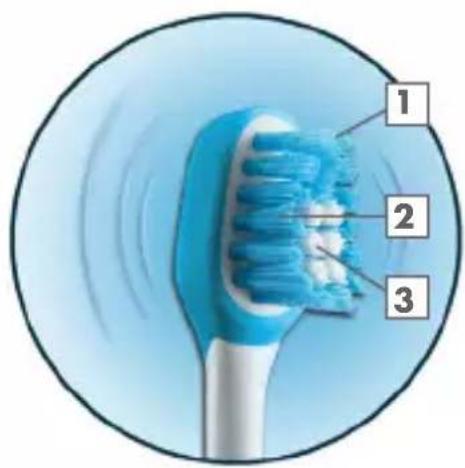
■ Whitening bristles 3
Remove discolouration within 60 days and the teeth become whiter.
■ Spiral magic bristles 1
Increase cleaning performance by more than 20% compared to normal, round bristles. The extended bristle tips reach the back teeth perfectly as well as between the teeth.
■ Wear indicator bristles 2
The bristles change colour and become a lighter shade of blue to show that it is time to replace the brush head.
Soft brush head
Intensive and especially gentle cleaning effect.
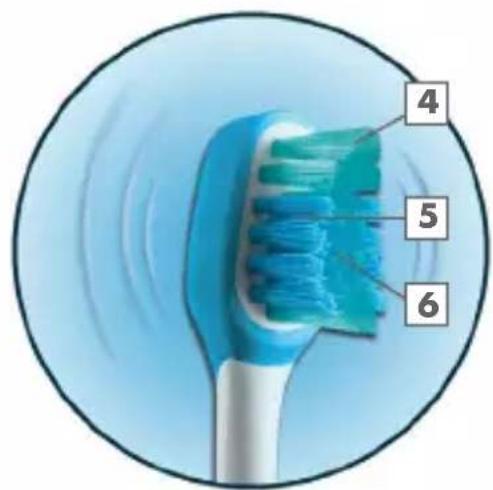
■ High-performance rubber soft bristles 6
Special bristle shape for intensive cleaning action and especially gentle on sensitive teeth. 37% improved cleaning effect compared to normal round bristles.
■ Spiral magic bristles 4
Increase cleaning performance by more than 20% compared to normal, round bristles. The extended bristle tips reach the back teeth perfectly and also clean between the teeth.
■ Wear indicator bristles 5
The bristles change colour and become a lighter shade of blue to show that it is time to replace the brush head.
Using in the bathroom
Your toothbrush has a waterproof handle, is electrically safe and can be used in the bathroom without hesitation.
Oral hygiene
Careful oral hygiene is essential for maintaining healthy, beautiful teeth.
Daily intensive oral hygiene can prevent tooth decay, gum disease, inflammation of the gums and bad breath.
Cleaning
The sonic electric toothbrush removes plaque more precisely and effectively than conventional manual toothbrushes due to the high speed of the brushing movements on the surface of the teeth.
Extremely fast sonic vibrations with 37,000 strokes / minute allow a perfect cleaning result.
Discolouration of the teeth from coffee, tea or tobacco can be removed in a natural way. Teeth, tongue and gums can be cleaned and cared for carefully.
Intensity
You can set the intensity of the cleaning at 3 modes (HIGH, LOW, MASSAGE).
The extensive accessories provide you with excellent conditions for personal oral hygiene.
Brushing time
The recommended time for brushing is 2 minutes. The timer then stops the function automatically.
Accessories
1 Floss
The floss attachment can be equipped regularly with standard floss.
It is best to use this attachment after brushing your teeth.
Set the appliance to the low mode, so you have more control over the cleaning.
natural_image
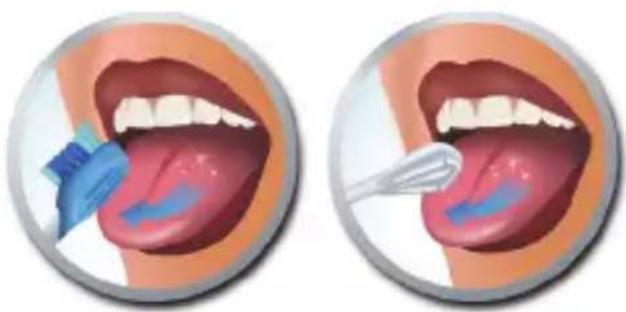
Illustration of a dental procedure showing tooth and jawbone structure (no text or symbols)2 Tongue cleaner
The tongue cleaner freshens your breath as it removes the bacteria from the tongue which create bad breath. You can use it every day before or after brushing your teeth and also with mouthwash.
Set the appliance to the low mode, so you have more control over the cleaning.
The back is also equipped with a rubberised tongue cleaner so the tongue can be cleaned with two different attachments.
natural_image
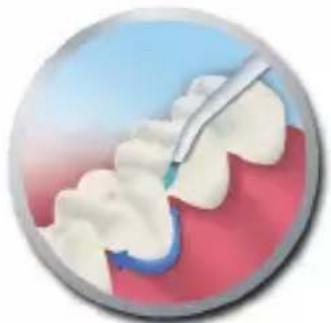
Illustration of two human mouth photos showing oral care application (no text or symbols)3 Interdental brush
The interdental brush cleans effectively between the teeth and helps to improve oral hygiene. This should be done before you clean your teeth.
Set the appliance to the low mode, so you have more control over the cleaning.
natural_image
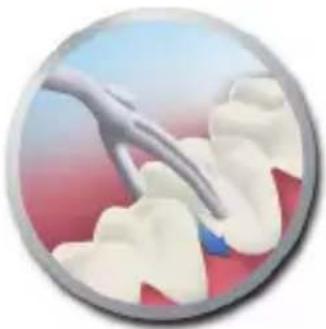
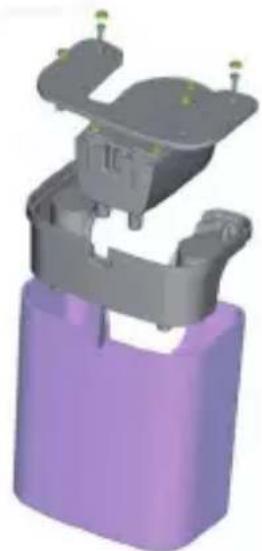
Illustration of a dental procedure showing tooth and gum with a toothbrush (no text or symbols)4 Detachable storage container
If you only want to use the charging base without the storage container, you can remove the container by unscrewing the 2 screws at the bottom, before the rubber dots have to be removed.

natural_image
3D rendered mechanical component with purple base and gray housing, no visible text or symbolsCharging
Check that the mains voltage on the type plate of the charging unit (on the bottom) corresponds to your local mains supply.
1 Place the toothbrush on the charging unit G.
2 Plug the charging unit into the wall socket.
- The charge LED C on the appliance lights up red and the mode LEDs D, E, F light up blue respectively until the appliance is fully charged.
- Once the appliance is fully charged, the charge LED lights up green and mode LEDs disappear.
Notes
- Charge the batteries fully before you use the appliance for the first time. It takes approximately 24 hours (12 hours charging time afterwards) to charge them initially. When the appliance is fully charged, the charge LED ⓒ lights up green.
■ The ambient temperature should be between 5 °C and 40 °C.
- When the batteries are fully charged, they provide approximately 45 minutes of operation. The charging process ends automatically once the batteries are fully charged. We recommend keeping the appliance in the charging unit so that it is available fully charged at all times.
1 Press On/Off and mode switch B to switch on the appliance.
- HIGH mode LED 📁 lights up blue and the appliance starts in HIGH mode.
2 Press On/Off and mode switch B consecutively to select a mode.
- LOW mode LED E lights up blue after pressing B once in HIGH mode.
- MASSAGE mode LED F lights up blue after pressing B twice in HIGH mode.
3 Press On/Off and mode switch B to switch off the appliance, regardless of the mode selected.
- The appliance switches off after MASSAGE mode LED disappears.
The 2 minute timer
Regardless of the mode selected, after 2 minutes the appliance switches off automatically. Every 30 seconds the appliance gives a vibration signal for your timing.
Changing the attachments
1 Remove the current attachment from the holder by turning it in the reverse direction of the arrows on the attachment and the holder.
26 ENGLISH
2 Take the other attachment out of the storage container for brushing and cleaning attachments H.
3 Place the attachment on the holder. Make sure that the notches of the holder match the attachment. Turn the attachment in the same direction of the arrows until it fits well into place.
Note
■ Replace the brush head when the bristles become bent and distorted and the wear indicator becomes brighter at the side. We recommend you to do this every 4 months.
General information
1 Brush your teeth:
- in the morning after breakfast
- after mealtimes and after snacking
- in the evening before bed for at least 2 minutes.
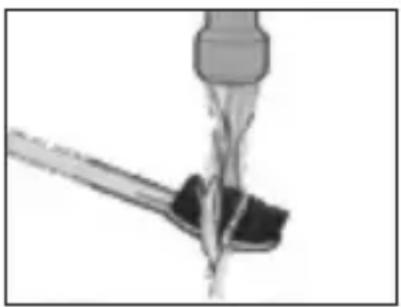
2 Rinse the brush under running water for a few seconds until it is thoroughly moist.
natural_image
Close-up of a mechanical component with fluid flow, no visible text or symbolsNote
■ Rinse your mouth out with water before brushing your teeth.
3 Put your regular toothpaste on the brush. Do not use special whitening toothpaste, because the abrasive particals in combination with the high vibration could damage the enamel on the teeth.
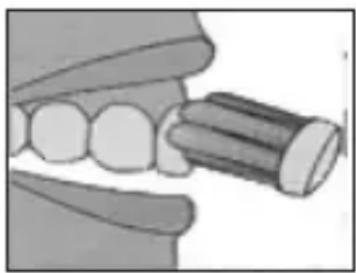
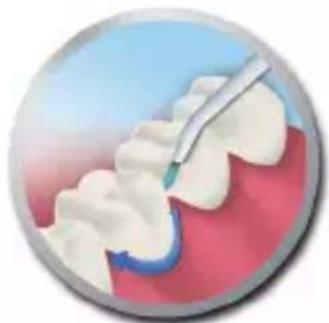
Brushing your teeth – step by step
1 Before switching on, position the bristles (medium or soft) of the brush head at an angle of 45^ onto the gum line so that the longer bristles reach between the teeth.
2 Tilt the handle slightly so that the bristles are resting at an angle on the gum line.
natural_image
Illustration of a dental tool interacting with teeth (no text or symbols visible)Note
■ Cleaning the area between the teeth and gums is extremely important.
3 Hold the handle loosely in your fingers and switch the appliance on with On/Off and mode switch B.
4 Gently move the vibrating brush head in small circles to allow the longer bristles to get to the gaps between the teeth. After a few seconds, move to the next section and repeat the circular movements again for a few seconds.
5 Continue in the same way for all the teeth within the 2 minutes to thoroughly remove plaque.
Notes
■ The toothbrush works best if you apply slight pressure when brushing and continue with the circular movements at the same time.
The tilted brush head and the narrow neck make it easier to reach the molars at the back and the surface of the teeth inside the mouth. Hold the toothbrush so that you have as much brush contact to the teeth as possible.
6 To ensure that all your teeth are cleaned evenly, the mouth can be divided into six sections:
1 Exterior upper jaw
2 Chewing surface upper jaw
3 Interior upper jaw
4 Exterior lower jaw
5 Chewing surface lower jaw
6 Interior lower jaw

flowchart
graph TD
    A["①"] --> B["②"]
    B --> C["③"]
    C --> D["④"]
    D --> E["⑤"]
    E --> F["⑥"]
    F --> G["⑦"]
    G --> H["⑧"]
    H --> I["⑨"]
    I --> J["⑩"]
    J --> K["⑪"]
    K --> L["⑫"]
    L --> M["⑬"]
    M --> N["⑭"]
    N --> O["⑮"]
    O --> P["⑯"]
    P --> Q["⑰"]
    Q --> R["⑱"]
    R --> S["⑲"]
    S --> T["⑳"]
    T --> U["㉑"]
    U --> V["㉒"]
    V --> W["㉓"]
    W --> X["㉔"]
    X --> Y["㉕"]
    Y --> Z["㉖"]
7 Clean the tongue with the tooth-brush switched on or off and using the tongue cleaner provided separately or the back of the brush head.
Apply slight pressure on the brush and scrape it forwards from the back - then rinse out.
Note
In some cases you might experience a tickling or tingling sensation when using an electric sonic toothbrush for the first time. This sensation gradually subsides once you have got used to the sonic toothbrush.
8 Rinse your mouth out with water after brushing.
9 Rinse the bristles under running water after brushing to remove any remaining toothpaste. Dry the bristles. Leave the toothbrush to dry for a few seconds.
Notes
■ We also recommend using a mouth wash.
- Consult your dentist if you feel any sensitivity while using the appliance for the first time.
Storage
If you do not plan to use the appliance for a long period of time, please store it carefully.
Make sure that it is unplugged and is completely dry.
Store the appliance in a cool, dry place.
Make sure the appliance is kept out of the reach of children.
Make sure the accessories are placed in the storage container H so that the container fits properly in position.
Environmental note
This product has been manufactured with high-quality parts and materials which can be reused and are suitable for recycling.
This device is sealed and offers a short time protection against water for the inner electrical parts and the battery.
Therefore the battery cannot be removed, this is done at the end of life of the device by our recycling partner.
Do not dispose the product with normal domestic waste at the end of its service life. Take it to a collection point for the recycling of electrical and electronic equipment. This is indicated by this symbol on the product, in the operating manual and on the packaging.
Please consult your local authorities to find out where the nearest collection point is.
Help protect the environment by recycling used products.
Technical data

This product complies with the European Directives 2004/108/EC, 2006/95/EC, 2009/125/EC and 2011/65/EU.
Power supply
Charging unit :
100 - 240 V\~, 50/60 Hz, 2 W
Appliance :
Nickel metal hydride battery 2.4 V

Ni-MH
IPX7
Design and specifications subject to change without notice.
Spare parts
Replacement brush heads TBB 80 medium brushes (4 pcs), TBB 81 soft brushes (4 pcs) and TBS 80 special attachments (3 pcs) are available for your toothbrush at:
■ the customer hot line
■ in the Internet at www.grundig.de /sonic
■ or the local dealer
natural_image
Stylized grayscale illustration of a tree with leaves and roots, enclosed in a circular frame (no text or symbols)natural_image
Close-up of a blue toothbrush inside a circular frame (no text or symbols)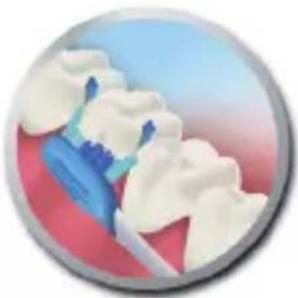
natural_image
Illustration of a tooth with dental restorations and gum tissue (no text or symbols)natural_image
Illustration of a dental tool interacting with teeth, enclosed in a circular frame (no text or symbols)2 Dil temizleyici
natural_image
Illustration of two human mouth oral surgery procedures showing tooth removal with blue and white applicators (no text or symbols)3 Diş arası fırçası
natural_image
Illustration of a dental procedure showing tooth with a toothbrush and gum (no text or symbols)natural_image
3D rendered mechanical component with purple base and gray housing, no visible text or symbolsŞari
natural_image
Close-up of a mechanical component with fluid flow, no visible text or symbolsDikkat
natural_image
Illustration of a dental tool interacting with teeth (no text or symbols visible)Dikkat
natural_image
Stylized grayscale illustration of a tree with leaves and roots, enclosed in a circular frame (no text or symbols)natural_image
Illustration of toothbrush and toothpaste with toothbrush and toothpaste, no text or symbols presentnatural_image
Illustration of a dental procedure showing tooth and jaw with gum tissue (no text or symbols)natural_image
Illustration of two human mouth gestures with a blue tool, showing mouth and tongue (no text or symbols)3 Cepillo interdental
natural_image
Illustration of a dental procedure showing tooth with a toothbrush and color filter (no text or symbols)VISIÓN GENERAL
natural_image
3D rendered mechanical component with purple base and gray housing (no text or symbols)natural_image
Close-up of a mechanical component with a lever and pivot point (no visible text or symbols)Nota
natural_image
Illustration of a dental tool interacting with teeth (no text or symbols visible)Nota
natural_image
Stylized grayscale illustration of a tree with leaves and roots, enclosed in a circular frame (no text or symbols)natural_image
Two circular images: one showing a toothbrush, the other showing teeth with dental restorations (no text or symbols)Tête de brosse medium
natural_image
Illustration of a dental procedure showing tooth and jawbone structure (no text or symbols)natural_image
Illustration of two human mouth photos showing oral care application (no text or symbols)natural_image
Illustration of a dental procedure showing tooth and gum with a tool (no text or symbols)natural_image
3D rendered mechanical component with purple base and gray housing, no visible text or symbolsALIMENTATION ÉLECTRIQUE
Charge
natural_image
Close-up of a mechanical tool interacting with a metallic component (no visible text or symbols)Remarque
natural_image
Illustration of a dental tool interacting with teeth (no text or symbols)Remarque
natural_image
Stylized grayscale illustration of a tree with leaves growing from soil, enclosed in a circular frame (no text or symbols)natural_image
Two circular images showing toothbrush and dental crowns (no text or symbols)Srednja glava četke
natural_image
Illustration of a toothbrush touching a dental model (no text or symbols)2 Čistač jezika
natural_image
Illustration of two human mouth photos showing oral care application (no text or symbols)3 Međuzubna četka
Međuzubna četka učinkovito čisti između zubi i pomaže kod poboljšanja oralne higijene. To se treba raditi prije čišćenja zubi.
Postavite uređaj na niski režim rada, tako da imate više kontrole nad čišćenjem.
natural_image
Illustration of a dental procedure showing teeth and toothbrush (no text or symbols)4 Odvojivi spremnik za pohranu
Ako želite koristiti samo bazu za punjenje bez spremnika za pohranu, možete ukloniti spremnik tako da odvijete 2 vijka na dnu, prije skidanja gumenih točaka.
natural_image
3D rendered mechanical component with purple base and gray housing (no text or symbols)Punjenje
Provjerite da napon napajanja na tipskoj pločici punjača (na donjoj strani) odgovara vašem lokalnom napajanju.
natural_image
Close-up of a mechanical tool tip interacting with a metallic component (no visible text or symbols)Napomena
■ Isperite usta vodom prije pranja zubi.
3 Stavite svoju običnu zubnu pastu na četkicu. Ne koristite posebne zubne paste za izbjeljivanje, jer abrazivne čestice u kombinaciji s visokom vibracijom mogu oštetiti caklinu na zubima.
PRanje zubi - korak po korak
1 Prije uključivanja, postavite čekinje (srednje ili meke) na glavu za četku pod kutom od 45° na crtu desni tako da dulje čekinje dosežu između zubi.
2 Malo nagnite ručku tako da čekinje prema rubu desni nalegnu pod kutom.