
DJ290SW - Camcorder LEXIBOOK - Free user manual and instructions
Find the device manual for free DJ290SW LEXIBOOK in PDF.

| Product type | Digital camcorder |
| Power supply | 3 LR03/AAA 1.5V batteries (not included) |
| Maximum video resolution | 1280 x 720 pixels |
| Maximum photo resolution | 4000 x 3000 pixels |
| Shooting modes | Video, Photo, Audio |
| Memory support | SD, MMC or SDHC card (not included) |
| Screen | LCD TFT |
| Zoom | Digital (W/T buttons) |
| Connectivity | USB 2.0, AV output |
| Included software | MAGIX Video easy SE, MAGIX Photo Manager 10 |
| Special functions | Self-timer, burst, fill light, webcam |
| Maintenance | Slightly damp cloth, no detergent |
| Safety | Do not expose to heat, moisture or disassemble |
| Warranty | 2 years (excluding failure to follow instructions) |
| Manufacturing | Made in China |
Frequently Asked Questions - DJ290SW LEXIBOOK
User questions about DJ290SW LEXIBOOK
0 question about this device. Answer the ones you know or ask your own.
Ask a new question about this device
Download the instructions for your Camcorder in PDF format for free! Find your manual DJ290SW - LEXIBOOK and take your electronic device back in hand. On this page are published all the documents necessary for the use of your device. DJ290SW by LEXIBOOK.
USER MANUAL DJ290SW LEXIBOOK
natural_image
Black digital camera with a stylized character and circular design (no visible text or symbols)MODE D'EMPLOI - INSTRUCTION MANUAL
LEXIBOOK®
DJ290SW
natural_image
Pure geometric lines and markers without any text, numbers, or symbols
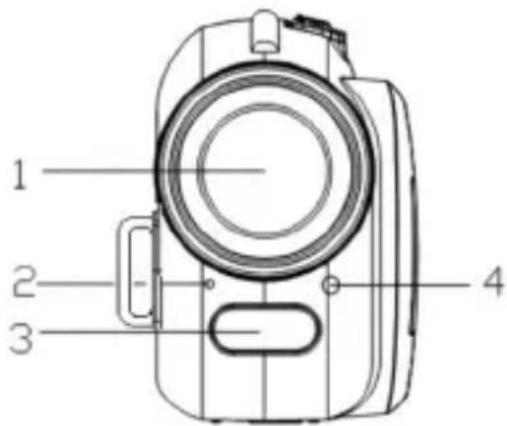


DESCRIPTION DU CAMÉSCOPE NUMÉRIQUE
Vue frontale
natural_image
Line drawing of a mobile phone receiver (no text or symbols)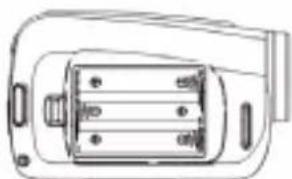
natural_image
Technical line drawing of a mechanical component with no visible text or symbols
natural_image
Technical line drawing of a mechanical component with a separate view of a textured surface (no text or symbols)Remarque :
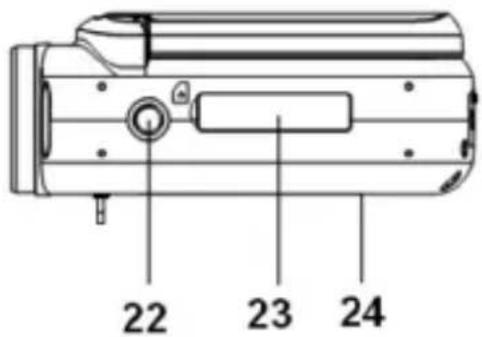
| Front view | 13. AV out jack |
| 1. Lens | 14. USB jack |
| 2. Microphone | 15. Right / LED On/Off |
| 3. Compensating lamp | 16. OK |
| 4. Self-timer LED | 17. Shutter |
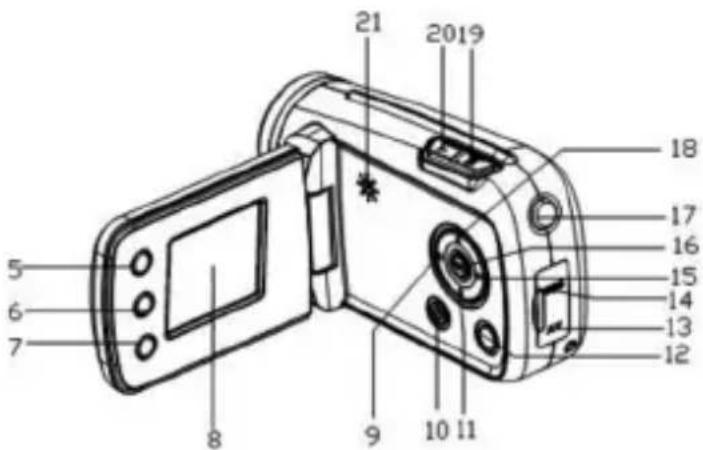
| 18. Up / Display | |
| Side view, with door open | 19. W / Zoom out |
| 5. Delete | 20. T / Zoom in |
| 6. Playback | 21. Speaker |
| 7. Mode | |
| 8. TFT LCD screen | Base view |
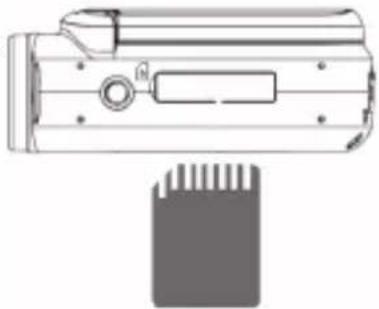
| 9. Left / Self-timer | 22. Tripod socket |
| 10. Power | 23. SD card slot |
| 11. Down | 24. Battery compartment |
| 12. Menu |
CONTENTS OF THE PACKAGING
1 x digital video camera / 1 x CD-ROM / 1 x USB cable / 1 x A/V cable
WARNING: All packaging materials, such as tape, plastic sheets, wire ties and tags are not part of this product and should be discarded for your child's safety.
INSERTING NEW BATTERIES
- Make sure the video camera is switched off.
- Using a screwdriver, open the cover of the battery compartment.
- Insert 3 x LR03/AAA 1,5V type batteries = (not included) with the positive (+) and negative
(-) poles matching the directions indicated in the battery compartment, and shown below. - Close the battery compartment and tighten the screw.
natural_image
Line drawing of a stylized 3D object resembling a camera or device (no text or symbols)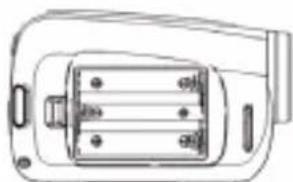
natural_image
Technical line drawing of a mechanical component with no visible text or symbols
Note: When the low battery icon appears on the LCD screen, replace the batteries.

ars on the LCD screen, replace the batteries.
Non-rechargeable batteries are not to be recharged. Rechargeable batteries are to be removed from the product before being charged. Rechargeable batteries are only to be charged under adult supervision. Different types of batteries or new and used batteries are not to be mixed. Only batteries of the same or equivalent type as recommended are to be used. Batteries are to be inserted with the correct polarity. Exhausted batteries are to be removed from the product. The supply terminals are not to be short circuited. Do not throw batteries into a fire. Remove the batteries if you are not going to use the product for a long period of time.
WARNING: Malfunction or loss of memory may be caused by strong frequency interference or electrostatic discharge. Should any abnormal function occur, remove the batteries and insert them again.
INSTALLING A MEMORY CARD (NOT INCLUDED)
This camera does not have an internal memory and requires an SD, MMC or SDHC card (not included) to record pictures and videos. To insert the card, please:
- Turn the video camera off.
- Disable the write-protect switch on the memory card (this is used to protect data from accidental deletion, and needs to be switched off before recording, formatting or deleting files on the memory card).
- Remove the rubber cover from the SD slot.
- Orient the card correctly, and push firmly into the slot as illustrated.
natural_image
Technical line drawing of a mechanical component with a base and mounting bracket (no text or symbols)Note:
- Never insert any other object into the memory card slot.
- Never remove the memory card while the camera is switched on.
- Never force the card into the slot if you feel resistance.
- If there is no SD card inserted in the video camera, the LCD screen will display the message "No card" when trying to shoot a video or take a picture.
- When an external memory card has been inserted in the camera, all photos/videos taken will be stored on the external memory card.
• To remove the card, push it in slightly to release it from the slot.
IMPORTANT NOTE: You must add a micro SD card to increase the storage capacity of the unit and use the video camera.
FORMATTING THE MEMORY CARD
All previous files will be deleted when formatting the memory card, including protected files. Please download important files to your computer before formatting.
- Turn the power on, press the Menu key to display the menu, and press the Right key to select the Setup menu.
- Press the Up or Down keys to select "Format", then press the OK or Right key to confirm.
- Press the Up or Down key to select "YES", and press OK to erase all previous data.
TURNING THE VIDEO CAMERA ON AND OFF
Open the LCD panel, and press the Power key to turn the video camera on or off. Note: The video camera will automatically power off after a period of inactivity. To change the power-off time, select the "Power Save" function in the Setup menu
SETTING THE LANGUAGE
Please select a language before using the video camera for the first time.
- Turn the power on. Press Menu and then the Right key to select the Setup menu
- Use the Up and Down keys to select the Language menu, then press OK or the Right key to confirm.
- Use the Up and Down keys to select the desired language, then press OK.
- Press the Menu key to close.
SETTING THE DATE AND TIME
- Turn the power on. Press Menu and select the Setup menu
- Use the Up and Down keys to select "Date & Time", then press OK.
- Use the Up and Down keys to change the highlighted setting, and use the Left and Right keys to move between settings.
- Press OK to confirm, and press the Menu key to close.


CHOOSING A MODE
This video camera has three recording modes: video, capture (for still pictures) and audio. When you turn the camera on, the default mode is video. Press the Mode button to change the mode, indicated by icons on the LCD display.
| Display | Title | Description | |
| Capture mode | For taking still photos. | ||
| Video mode | For recording movie clips. | ||
| Audio mode | For recording audio files. | ||

Note: To preview recorded files, press the Playback key to set the playback mode. To return to record mode, press the Playback key again.
SHOOTING VIDEOS (video mode)
Screen in video mode:
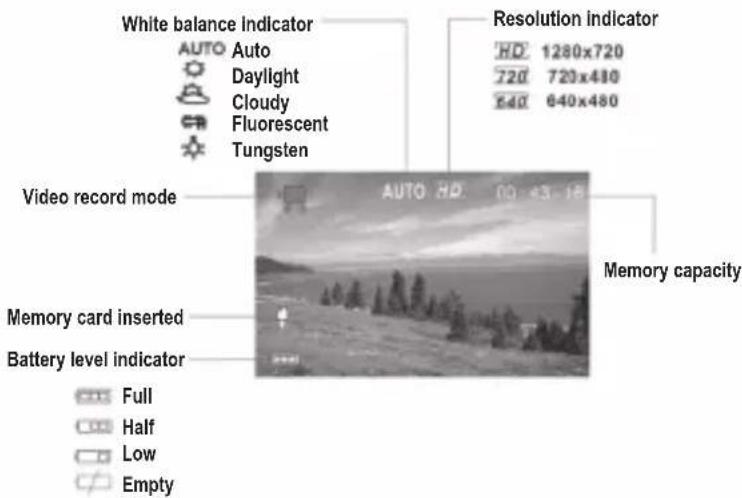
- Turn on your video camera. The default mode is video (the icon is displayed on the screen).
- Hold your video camera steady and press the Shutter key to start shooting. The recording length is displayed on the LCD screen.
- To pause, press the Up key. To continue recording, press the Up key again.
- Press the Shutter button again to end recording. If the memory is full, the camera will stop recording automatically.
Note:
- If there is not enough light, press the Right / LED key to turn on the compensating lamp. Press the key again to switch it off.
- If there is no SD card inserted in the video camera, when trying to shoot a video, the screen will display "No card" and the video will not be saved in memory. Insert a SD memory card to increase the storage capacity.
TAKING PICTURES (capture mode)
Screen in capture mode:
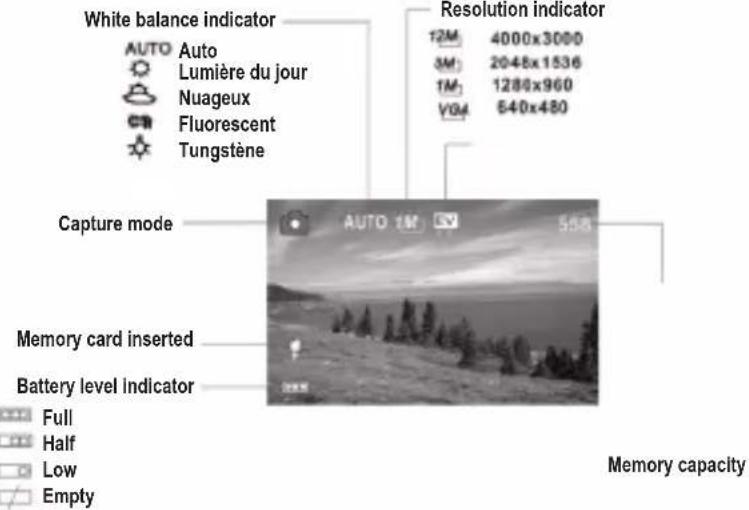
- Turn on your video camera.
- Press the Mode key to switch to capture mode (the icon appears on the screen).
- Use the LCD screen to compose your shot.
- Press the Shutter button to take the photograph.
Note:
- The number of pictures you have space for on your memory card (memory capacity) is displayed on the screen and automatically decreases by one each time a picture is taken. The words “Memory Full” will appear when there is no space left on your memory card.
- When there is insufficient light, press the Right / LED key to turn the compensating lamp on. Press the key again to switch it off.
- Do not remove the memory card or batteries while the video camera is saving or the image may be lost.
Using the self-timer and burst snapshot
The self-timer sets a delay from the time the Shutter button is pressed to the time the picture is taken. The burst snapshot takes three pictures continuously.
- To set the self-timer and burst functions, turn the camera on and set to capture mode using the Mode key.
- Use the Left key to select the self-timer mode: each time the key is pressed the icon in the upper left corner changes.

Off: takes pictures immediately.

2 seconds: the shutter release will delay for two seconds.

10 seconds: the shutter release will delay for 10 seconds.

Burst snapshot: press the Shutter button once to take three pictures continuously.
Note: You can also set the self-timer and burst snapshot using the Capture menu.
Using the zoom function
The digital zoom moves in or out using the W (wide angle) and T (telephoto) keys.
- Turn the video camera on and set it to capture or video record mode using the Mode key.
- Press the W or T button to compose the image. The level of magnification is displayed on the screen.
- Press the Shutter button to capture the picture.
RECORDING AUDIO FILES
Screen in audio mode:
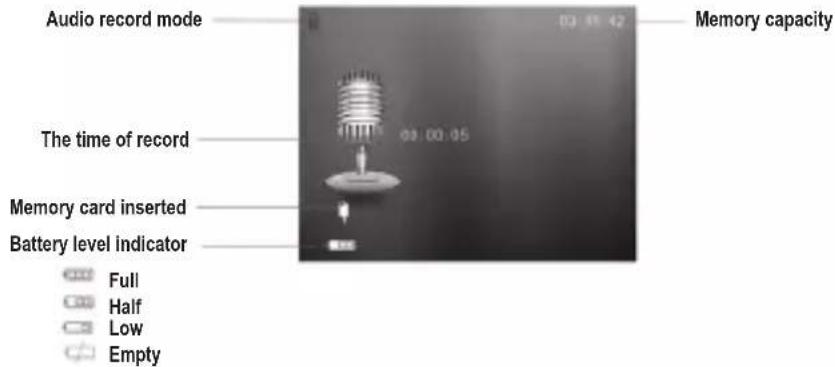
- Turn the video camera on and use the Mode key to choose audio record mode.
- Press the Shutter button to start recording. To pause, press the Up key; press the Up key again to continue.
- Press the Shutter button to end the recording. The recording will stop automatically if the memory is full.
Note: The length of the recording will be displayed on the screen while recording.

SETTINGS MENU
In record mode, press the Up, Down, Left, Right and OK keys to access the settings menus.
Please note, there is no menu for the audio record mode.
Video and capture mode
- In video record or capture mode, press the Menu key to display the menu. Use the Up and Down keys to select the sub-menus, and the OK or Right key to confirm.
- Use the Up and Down keys to choose an item on the sub-menu, and press OK to confirm.
- Press the Menu key to close.
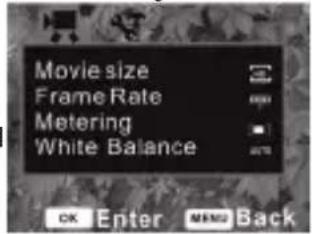
Video menu
- Movie size: select this option to choose file sizes – set small file sizes to record for longer. Three sizes are available: 1280x720, 720x480 and 640x480.
• Frame rate: choose High or Low. Select Low to record for longer. - Metering: select this option to change the brightness of the picture.
- Center: the exposure is calculated on the light in the middle of the image. Suitable for general use.
- Multi: exposure calculated on the average light.
- Spot: only the spot in the center of the LCD screen is metered for light.
- White balance: select this option to suit the light source – Auto, Daylight, Cloudy, Fluorescent and Tungsten.
Capture menu
- Resolution: select this option to set the resolution of your photograph. Choose from (high to low) 4000x3000, 2048x1536, 1280x960 or 640x480.
- Quality: select a lower image quality to reduce the file size and take more photographs. Choose from Super Fine, Fine and Normal.
- Metering: see above.
- White balance: see above.
- Exposure: select this option to set the exposure manually in unusual lighting conditions such as indirect indoor lighting, dark backgrounds or strong backlight. Settings from -2.0 to 2.0.
- Driver mode: select this option to turn on the self-timer and burst snapshot functions. Choose a two-second or 10-second self-timer delay, or a three-shot burst.
- Effect: select this option to choose a special-effect tone for the photograph. Choose from normal, B&W (black & white), sepia, negative, red, green or blue.
- Date stamp: select this option to add a date or a date and a time to your pictures.
Setup menu
- Power on, press the Menu key then the Right key to select the Setup menu

- Use the Up and Down keys to choose a sub-menu, then press OK to enter.


- Use the Up and Down keys to choose an item on the sub-menu and press OK to confirm.
- Press the Menu key to close.
- Sounds: using the Right key, choose the sounds for the Shutter and Start-up functions. Beep sets the operation sound and Volume adjusts the sound level.
- Auto review: select this option to choose how long to review a picture for on the screen immediately after shooting. Choose one second, three seconds, or switch the function off.
- Power frequency: select this option to set the right frequency for your region – 60Hz or 50Hz.
• Power save: select this option to choose the time period before the video camera powers
off – one minute, three minutes, five minutes or Off to switch the function off..
- Date & Time: see page 16.
• Language: see page 15.
• TV out: select the right video setting for your region, NTSC or PAL. - USB: select MSDC to use this camera as a removable disk, or PC CAM to use as a webcam.
- Start-up image: select this option to set your favorite picture as a start-up image by choosing "My Image". Choose "System" for the default image, or turn the function off.
- Format: see page 15.
- Reset all: select this option to reset the entire menu and button operations to the original factory settings.

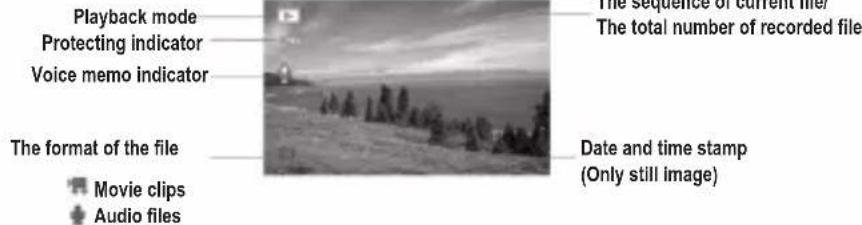
PLAYBACK MODE
Screen in playback mode:
Viewing photographs
- Turn the video camera on and press the Playback key, the latest recorded file appears on the screen. If there are no images stored a "No File" message appears.
- Use the Left and Right keys to preview (next/previous image).
Viewing videos and audio files
- Use the Left and Right keys to select the video clip or audio file you wish to play
- Press the Shutter button to start playing, and the Menu key to end. To pause, press the Up key; press the Up key again to continue.


- During playback, use the Right key to fast-forward and the Left key to rewind.
Viewing thumbnails
In playback mode, press the W button to view files as thumbnails and use the Up, Down, Left and Right keys to select a file. Press OK or the T key to view the file in full screen.
Locking files
- In playback mode, press the Menu key and select Lock, then press OK.
- Use the Up and Down keys to choose an item from the menu:
"Lock / Unlock one" – current file
"Lock All", "Unlock All" – locks or unlocks all files - Press OK to confirm.
- Press Menu to close.
Note: Once a file is locked this icon will be displayed on the screen. Locked files cannot be deleted.
Deleting files
- In playback mode, press the Menu key and select the Delete menu.
- Press OK to enter the menu, then select "One" to delete the current file or "All" to delete all except locked files.
- Use the Right and Left keys to select the item to be deleted.
- Press OK to confirm, and a dialog box will appear. Use the Up or Down keys to select "Yes".
- Press OK to delete.
Hot key: press the Delete key in playback mode to delete the file quickly.
Play a slide show
- In playback mode, press the Menu key and select the Slide Show menu.
- Use the Up and Down keys to select files for slide show.
- Set the time between each slide by selecting "Interval" and pressing Left or Right keys to choose time from 1 to 10 seconds.
-
Press "Start" to prepare files, then OK to start slide show.
-
Press Menu key to end.
Adding effects
- In playback mode, press the Menu key and select the Effect menu.
- Press OK to enter the menu, then use the Up and Down keys to choose the effect: B&W, Sepia, Negative, Red, Green, Blue, Binarize, Sunset, Warm, Cold, Contrast.
- Press OK to apply the effect.
Rotating the image
- In playback mode, select the image you wish to rotate.
- Press the Menu key, select the Rotate menu, then press OK.
- Choose "Rotate" to rotate the image 90 degrees, then press "Save" to store.
- Press "Back" to return to the Rotate menu.


1
,
1
,
,
-
4
1
-
,


Resizing an image
- Select the image to be resized.
- In playback mode, press the Menu key then choose the Resize menu. Press OK.
- Use the Up or Down keys to choose the required size: 2048x1536, 1280x960, 640x480.
- Press OK to save the resized image.
Note: The image can only be resized at a smaller size.
Adding a voice memo
- In playback mode, select the image.
- Press the Menu key, then choose the Voice Memo menu. Press OK to display dialog box (see illustration).
- Select "Add" then press OK to start recording the voice memo.
- Press the Shutter button to end the recording.

Setting a start-up image
- In playback mode, select an image.
- Press the Menu key and select the Start-up Image menu. Press OK.
- Use the Up and Down keys to select "Set" or "Cancel", then press OK to confirm.
- Set "Start-up Image" in the Setup menu to "My Image" mode.
CONNECTIONS
Connecting the video camera to a television
- Connect the camera and the TV using the supplied cable, and power on both. When the video camera's screen turns black, the TV is performing as its monitor.
- Set the TV to "AV".
- Set the video camera to record mode to preview anything you want to record on the TV screen.
- Set the camera to playback mode to review pictures, video and audio clips via the TV.
Connecting the camera to a PC
There are two ways to download your files to a computer: 1. By inserting the memory card into a card reader.


- By connecting the camera via a USB cable (supplied).
Using a card reader
- Eject the memory card from the video camera and insert into a card reader connected to a computer.
- Open "My Computer" or Windows Explorer and double-click the removable disk icon that represents the card reader.
- Copy images from the card onto your computer.
Using a USB cable
- Set the USB to MSDC mode.
- Connect the unit to your computer using the USB cable provided and double click the "My Computer" icon on your desktop.
- Double click the icon, then open the DCIM folder, and the 100MEDIA subfolder.
- Copy all files into any directory you choose on your computer.
Note: Do not remove the memory card or the batteries while the files are being copied or you risk destroying the files.
INSTALLING THE VIDEO SOFTWARE (Magix Video easy SE)
- Insert the CD Software (included) in your CD-ROM drive.
- In the main menu, click "Install MAGIX Video easy SE" and wait during the extraction.
- Follow the onscreen instructions and press "Install" to begin the installation.
- To launch "Magix Video easy SE" double click on the shortcut.
System requirements: Intel® Pentium 4 or AMD® Athlon® 1 GHz and higher, 512 MB RAM, 400 MB free hard disk memory and a DVD drive for program installation, graphics card with a screen resolution of at least 1024 x 768, sound card.
INSTALLING THE PHOTO SOFTWARE (Magix Photo Manager 10)
- Insert the CD Software (included) into your CD-ROM drive.
- In the main menu, click "Install MAGIX Photo Manager 10" and wait during the extraction.
- Select your language and click "OK".
- "The MAGIX Photo Manager 10 configuration" window displays. Follow the onscreen instructions and press "Install" to begin the installation.
- Once you have finished installing, the "MAGIX Photo Manager 10" shortcut will appear on the desk of your computer.
- To start using "MAGIX Photo Manager 10", double click on the shortcut. The pictures taken with the camera automatically appear on the home screen. System requirements (minimum configuration): Microsoft® Windows® 2000 XP I Vista® I 7. PC with Intel® Pentium® or AMD®

Athlon® 700 MHz or higher, 256 MB RAM, 120 MB hard disk space for program files, SVGA graphics card with min. 4 MB RAM, (min. resolution 1024 x 600, 16-bit high-color), Microsoft® compatible mouse.
Note: To enjoy unlimited use of "MAGIX Photo Manager 10" and "MAGIX Video easy SE", you need to register first.
- Connect the camera to a computer with the USB cable supplied.
- On your desktop, open the folder "Dual Mode Camera", and then double click "My Dsc".
-
Download your photos and videos by clicking the icon. Then the photos and videos stored in the camera's built-in memory are displayed on the screen.
-
Select the photo(s) and video(s) you want to save. Click the icon to select them all, or click directly the photo(s)/video(s) of your choice (a red frame will appear around each photo/video) if you don't want to save them all.
-
Save the selected photo(s) and video(s) by clicking the icon. Then choose a name and a location for the folder in which the selected photo(s) and video(s) will be saved.
Once you have saved your photo(s) and video(s) in your computer, you can use "MAGIX Photo Manager" to display them, numerize them, print them, create albums...
- Connect the camera to a computer with the USB cable supplied.
- On your desktop, double click on the "MAGIX Photo Manager 10" shortcut.
- Reach the photos and videos by selecting the location where they have been saved.
- According to what you want to do, follow the corresponding software's instructions.
Publishing your photos on social networking sites:
- Using "Magix Photo Manager 10", select the photo that you wish to publish on Facebook or Flickr.
- The selected image appears in an orange frame.
- In the menu bar, click the "Online" tab and select "Upload media to other web services" and then either "Upload media to Flickr" or "Upload media to Facebook". 4. The "Upload" window will be displayed on screen. Fill in the various fields (file name, description, key words, etc.).
- Click "Upload" to confirm.
- Depending on your upload destination, you will either open the Facebook or the Flickr home page.
- Next follow in the instructions displayed on the screen to finish uploading.


WEBCAM MODE
Connected to your computer (not compatible with Apple MACs), your video camera can be used as a webcam.
Webcam mode
- Connect the video camera to your computer using the USB cable provided. Turn on the camera and PC CAM or MSDC will appear on the LCD screen to indicate it is correctly connected to the computer.
- Use the Mode key to select PC CAM and double click the icon on your computer's desk to run the AMCAP program. If this is the first time this function has been used, click "Preview" (see illustration).
- The video camera is now operating as a webcam. To change the image size, select Video Capture Pin and increase the output size.
Instant messaging (chat)
You can use your camera as a webcam with your instant messaging client (Yahoo Messenger, MSN Messenger, Skype...).
MAINTENANCE
Only use a soft, slightly damp cloth to clean the unit. Do not use detergent. Do not expose the unit to direct sunlight or any other heat source. Do not immerse the unit in water. Do not dismantle or drop the unit. Do not try to twist or bend the unit.
WARRANTY
NOTE: Please keep this instruction manual, it contains important information. This product is covered by our two-years warranty. To make use of the warranty or the after-sales service, please contact your retailer and supply proof of purchase. Our warranty covers material or installation-related defects attributable to the manufacturer, with the exception of wear caused by failure to respect the instructions for use or any unauthorised work on the equipment (such as dismantling, exposure to heat or damp, etc).
Reference: DJ290SW
Designed in Europe – Made in China ©Lexibook®
© & ™ Lucasfilm Ltd.
www.lexibook.com
United Kingdom & Ireland
For any further information, please call Helpline: 0808 1003015


Environmental Protection
Unwanted electrical appliances can be recycled and should not be discarded along with regular household waste! Please actively support the conservation of resources and help protect the environment by returning this appliance to a collection centre (if available).


natural_image
Line drawing of a mobile phone casing with front panel and buttons (no text or symbols)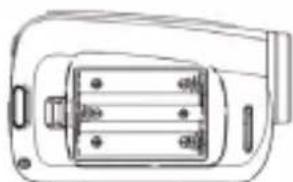
natural_image
Technical line drawing of a mechanical component with no visible text or symbols
natural_image
Technical line drawing of a mechanical component with a base and mounting holes (no text or symbols)Nota:
natural_image
Black-and-white image of a vintage microphone with no visible text or symbols on the device itself.natural_image
Line drawing of a mobile phone receiver (no text or symbols)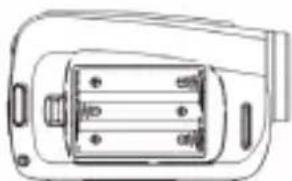
natural_image
Technical line drawing of a mechanical component with no visible text or symbols
natural_image
Technical line drawing of a mechanical component with a base and mounting holes (no text or symbols)Nota:


natural_image
Line drawing of a stylized device with no text or symbols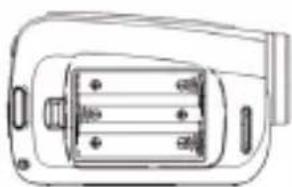
natural_image
Technical line drawing of a mechanical component with no visible text or symbolsnatural_image
Technical line drawing of a mechanical component with a separate view of a textured surface (no text or symbols)natural_image
Line drawing of a mobile phone casing with buttons and display screen (no text or symbols)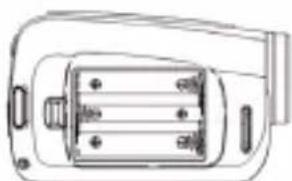
natural_image
Technical line drawing of a mechanical component with no visible text or symbols
natural_image
Technical line drawing of a mechanical device with a separate component (no text or symbols)Anmerkung:
Instant Messaging (Chat)
natural_image
Line drawing of a stylized device with rounded corners and a central screen (no text or symbols)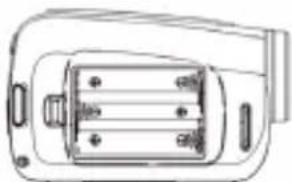
natural_image
Technical line drawing of a mechanical component with no visible text or symbols
natural_image
Technical line drawing of a mechanical component with a base and mounting holes (no text or symbols)natural_image
Black-and-white landscape photo of a coastal cliff with trees and distant buildings under a cloudy sky (no visible text or symbols)98


- DESCRIPTION DU CAMÉSCOPE NUMÉRIQUE
- Vue frontale
- Remarque :
- CONTENTS OF THE PACKAGING
- INSERTING NEW BATTERIES
- INSTALLING A MEMORY CARD (NOT INCLUDED)
- Note:
- FORMATTING THE MEMORY CARD
- TURNING THE VIDEO CAMERA ON AND OFF
- SETTING THE LANGUAGE
- SETTING THE DATE AND TIME
- CHOOSING A MODE
- SHOOTING VIDEOS (video mode)
- TAKING PICTURES (capture mode)
- Using the self-timer and burst snapshot
- Using the zoom function
- RECORDING AUDIO FILES
- SETTINGS MENU
- Video and capture mode
- Video menu
- Capture menu
- Setup menu
- PLAYBACK MODE
- Viewing photographs
- Viewing videos and audio files
- Viewing thumbnails
- Locking files
- Deleting files
- Play a slide show
- Adding effects
- Rotating the image
- Resizing an image
- Adding a voice memo
- Setting a start-up image
- CONNECTIONS
- Connecting the video camera to a television
- Connecting the camera to a PC
- Using a card reader
- Using a USB cable
- INSTALLING THE VIDEO SOFTWARE (Magix Video easy SE)
- INSTALLING THE PHOTO SOFTWARE (Magix Photo Manager 10)
- Publishing your photos on social networking sites:
- WEBCAM MODE
- Instant messaging (chat)
- MAINTENANCE
- WARRANTY
- Environmental Protection
- Nota:
- Anmerkung:
Brand : LEXIBOOK
Model : DJ290SW
Category : Camcorder