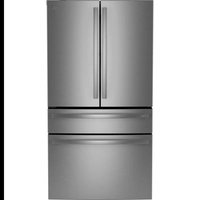
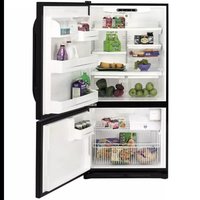
Profile PBV10R5VSS - Fridge GE - Free user manual and instructions
Find the device manual for free Profile PBV10R5VSS GE in PDF.

User questions about Profile PBV10R5VSS GE
0 question about this device. Answer the ones you know or ask your own.
Ask a new question about this device
Download the instructions for your Fridge in PDF format for free! Find your manual Profile PBV10R5VSS - GE and take your electronic device back in hand. On this page are published all the documents necessary for the use of your device. Profile PBV10R5VSS by GE.
USER MANUAL Profile PBV10R5VSS GE
SAFETY INFORMATION .... 3
USING THE REFRIGERATOR
Controls 5
Features....6
CARE AND CLEANING....7
INSTALLATION INSTRUCTIONS
Refrigerator Location 8
Reversing the Door Swing 8
Electrical Connection 12
TROUBLESHOOTING....14
LIMITED WARRANTY....15
CONSUMER SUPPORT ....16
OWNER'S MANUAL & INSTALLATION INSTRUCTIONS
PBV10
ENGLISH/FRANÇAIS/ ESPAÑOL
Write the model and serial numbers here:
Model # ____
Serial # ____
Find these numbers on a label inside the refrigerator compartment.
THANK YOU FOR MAKING GE APPLIANCES A PART OF YOUR RV.
Whether you grew up with GE Appliances, or this is your first, we're happy to have you in the family.
We take pride in the craftsmanship, innovation and design that goes into every GE Appliances product, and we think you will too. Among other things, registration of your appliance ensures that we can deliver important product information and warranty details when you need them.
Register your GE appliance now online. Helpful websites and phone numbers are available in the Consumer Support section of this Owner's Manual. You may also mail in the pre-printed registration card included in the packing material.

Profile
IMPORTANT SAFETY INFORMATION READ ALL INSTRUCTIONS BEFORE USING THE APPLIANCE
WARNING
To reduce the risk of fire, explosion, electric shock, or injury when using your refrigerator, follow these basic safety precautions:
■ This refrigerator must be properly installed and located in accordance with the Installation Instructions before it is used.
■ Disconnect the refrigerator from main power supply at rear of unit, remove refrigerator circuit fuse, or turn off circuit breaker before making repairs or cleaning.
NOTE: Power to the refrigerator cannot be disconnected by any setting on the control panel.
NOTE: Repairs must be performed by a qualified Service Professional.
■ Replace all parts and panels before operating.
■ Do not store or use gasoline or other flammable vapors and liquids in the vicinity of this or any other appliance.
■ Do not store explosive substances such as aerosol cans with a flammable propellant in this appliance.
■ Do not use an extension cord. Use only continuous supply wires connected directly between the DC voltage source or distribution panel and the refrigerator.
■ To prevent suffocation and entrapment hazards to children, remove the refrigerator and freezer doors from any refrigerator before disposing of it or discontinuing its use.
■ To avoid serious injury or death, children should not stand on, or play in or with the appliance.
■ Children and persons with reduced physical, sensory or mental capabilities or lack of experience and knowledge can use this appliance only if they are supervised or have been given instructions on safe use and understand the hazards involved.
■ This appliance is intended to be used in recreational vehicles.
■ Do not apply harsh cleaners to the refrigerator. Certain cleaners will damage plastic which may cause parts such as the door or door handles to detach unexpectedly. See the Care and Cleaning section for detailed instructions.
CAUTION
To reduce the risk of injury when using your refrigerator, follow these basic safety precautions.
- Do not clean glass shelves or covers with warm water when they are cold. Glass shelves and covers may break if exposed to sudden temperature changes or impact, such as bumping or dropping. Tempered glass is designed to shatter into many small pieces if it breaks.
- Keep fingers out of the “pinch point” areas; clearances between the doors and between the doors and cabinet are necessarily small. Be careful closing doors when children are in the area.
■ Do not touch the cold surfaces in the freezer compartment when hands are damp or wet, skin may stick to these extremely cold surfaces.
■ Do not refreeze frozen foods which have thawed completely.
WARNING

RE OR EXPLOSION HAZARD Flammable Refrigerant
This appliance contains isobutane refrigerant, also known as R600a, a natural gas with high environmental compatibility. However, it is also combustible. Adhere to the warnings below to reduce the risk of injury or property damage.
- When handling, installing and operating the appliance, care should be taken to avoid damage to the refrigerant tubing.
- Service shall only be performed by authorized service personnel. Use only manufacturer-authorized service parts.
- Dispose of refrigerator in accordance with the Federal and Local Regulations. The flammable refrigerant and
insulation material used in this product require special disposal procedures. Contact your local authorities for the environmentally safe disposal of your refrigerator.
-
Keep ventilation openings in the appliance enclosures or in the built-in structure clear of obstruction.
-
To remove frost, scrape with a plastic or wood spatula or scraper. Do not use an ice pick or a metal or sharp-edged instrument as it may puncture the liner and the flammable refrigerant tubing.
-
Do not use electrical appliances inside the food storage compartment of the appliance.
-
Do not use any electrical device to defrost your freezer.
READ AND SAVE THESE INSTRUCTIONS
IMPORTANT SAFETY INFORMATION READ ALL INSTRUCTIONS BEFORE USING THE APPLIANCE
WARNING

RE OR EXPLOSION HAZARD
Keep flammable materials and vapors, such as gasoline, away from refrigerator. Failure to do so can result in fire, explosion, or death.
WARNING
ER HAZARD.
To avoid risk of refrigerator tipping over, appropriate top mounting bracket must be used to secure the refrigerator.
CONNECTING ELECTRICITY
WARNING

LECTRICAL SHOCK HAZARD
Failure to follow these instructions can result in death, fire, or electrical shock.
For personal safety, this appliance must be properly grounded.
A 12 volt DC, 20-amp fused, grounded electrical supply is required. This provides the best performance and also prevents overloading RV wiring circuits which could cause a fire hazard from overheated wires.
Do not connect the refrigerator to AC voltage circuits, or to AC outlet of inverter.
The refrigerator should always be connected to its own individual electrical branch leading directly to the main DC voltage source or distribution panel.
Immediately discontinue use if the main power supply line has been damaged. If the supply line is damaged, it must be repaired by a qualified service professional.
When removing the refrigerator away from the wall, be careful not to roll over or damage the main power supply line.
PROPER DISPOSAL OF YOUR OLD REFRIGERATOR
WARNING
SUFFOCATION AND ENTRAPMENT HAZARD
Failure to follow these disposal instructions can result in death or serious injury
IMPORTANT: Child entrapment and suffocation are not problems of the past. Junked or abandoned refrigerators or freezers are still dangerous even if they will sit for “just a few days.” If you are getting rid of your old refrigerator or freezer, please follow the instructions below to help prevent accidents.
Before You Throw Away Your Old Appliance
■ Take off the refrigerator and freezer doors.
■ Leave the shelves in place so that children may not easily climb inside.
Refrigerant and Foam Disposal:
Dispose of refrigerator in accordance with Federal and Local Regulations. Flammable refrigerant and insulation material used require special disposal procedures. Contact your local authorities for the environmentally safe disposal of your refrigerator.
READ AND SAVE THESE INSTRUCTIONS
For safe food storage, allow 4 hours for the refrigerator to cool down before loading food. The continuously for the first few hours.
text_image
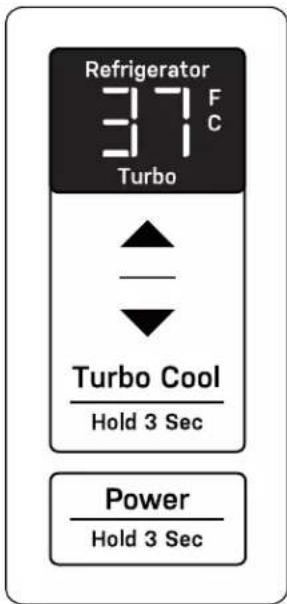
Refrigerator 37°C Turbo Turbo Cool Hold 3 Sec Power Hold 3 SecTemperature Setting
The electronic control controls refrigerator temperature. Allow several hours after setting adjustment for temperature to stabilize. Freezer temperature and automatically accordingly.
Refrigerator temperature setting range is 34^ F to 45^ F ( 7^ C). Use the UP or DOWN arrow setting.
Turbo Cool
Turbo Cool mode may be desired after loading large amount of food.
Touch Turbo Cool for 3 seconds to enter Turbo Cool mode. Display shows "Turbo".
After 8 hours, the refrigerator will automatically exit Turbo Cool mode and return to the previous setting. To manually exit Turbo Cool mode, press Turbo Cool for 3 seconds.
Door Ajar Alarm
If refrigerator door is left open for more than 2 minutes, buzzer sounds and display flashes "dr" to in open. To stop the alarm, close the door.
Door Ajar Alarm function does not monitor freezer door.
Sabbath Mode
Touch Turbo Cool and press Power simultaneously for 6 seconds to enter or exit Sabbath mode. Display show "SA" in Sabbath mode.
Sabbath mode automatically ends after 4 days if not manually exited.
Touch the UP and DOWN arrow simultaneously for 2 seconds to switch between Fahrenheit and Celsius temperature display.
Power
Press Power for 3 seconds to turn off the refrigerator. Cooling will stop. Lighting and control will turn off.
If the refrigerator will be off for some time, remove food, clean inside and leave doors ajar to avoid mold. See Care and Cleaning.
Press Power for 3 seconds to turn on the refrigerator.
NOTE: If external power has been off, the refrigerator defaults to turn back on when external power resumes.
Features
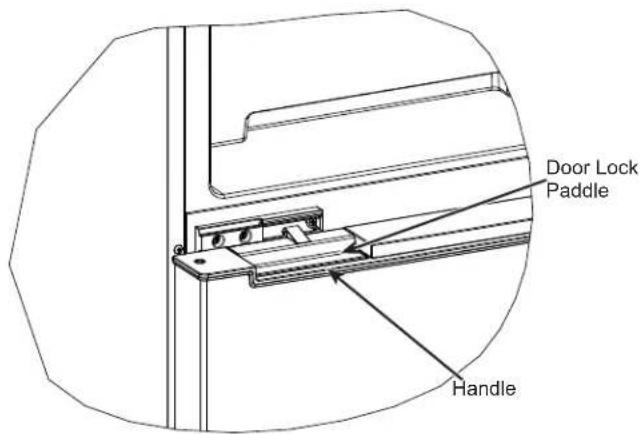
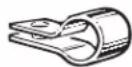
Door Lock
Door lock is part of the door handle, located at the bottom of the refrigerator door and on the top of the freezer door.
text_image
Door Lock Paddle HandlePush refrigerator door lock paddle up into handle pocket to disengage lock before pulling refrigerator door open.
Push freezer door lock paddle down into handle pocket to disengage lock before pulling freezer door open.
Forcing door open without disengaging lock may damage door lock and adjacent parts.
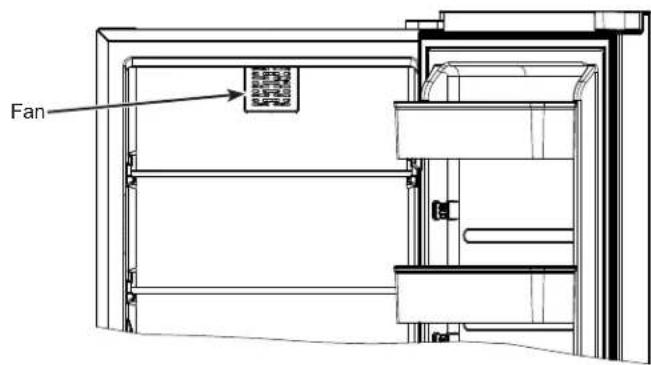
Refrigerator Fan
The refrigerator features an air circulation fan. For proper performance, do not block air passage of the fan when loading food onto the top shelf.
text_image
FanRefrigerator Shelves
Refrigerator shelves are fixed in place to prevent child climbing inside and entrapment. Do not remove shelves.
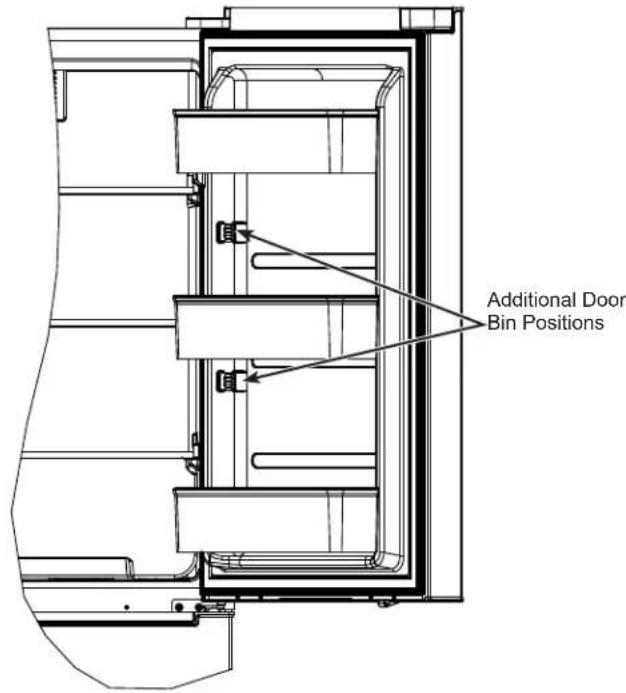
Refrigerator Door Bins
Height position of the refrigerator door bins is adjustable to accommodate tall items. Push up both ends of a door bin to remove it from door. Make sure both ends of a door bin are pushed down into place when installing a door bin.
text_image
Additional Door Bin PositionsCleaning the Outside
| DO USE DO NOT USE | |
| Soft, clean cloth or sponge Abrasive cloths, scrubbing sponges, scouring or steelwool pads | |
| Mild detergent mixed with warm waterApproved stainless steel cleaners; Visit the GE Appliances parts store for approved stainless steel cleaners:geapplianceparts.comor call 877.959.8688.Cleaners with oxalic acid such as Bar Keepers Friend Soft CleanserTMcan be used to remove surface rust, tarnish and small blemishes. | Abrasive powders or spraysWindow Sprays or AmmoniaCitrus or plant oil-based cleanersAcidic or vinegar-based cleanersOven cleanersCleaners containing acetone (propanone)Any cleaner with WARNING about plastic contact |
NOTE: DO NOT allow stainless steel cleaner to come in contact with any plastic parts such as trim pieces, handle hardware and liners. If unintentional contact of cleaners with plastic parts does occur, clean plastic part with a sponge and mild detergent mixed with warm water.
Cleaning the Inside
To help prevent odors, leave an open box of baking soda in the fresh food and freezer compartments.
Defrosting
WARNING
Risk of Fire or Explosion.
Flammable Refrigerant Used.
Defrost whenever frost on the walls or cooling coils of the freezer compartment become 1/4"thick. Never use a sharp or metallic instrument to remove frost as it may damage the cooling coils. (A punctured cooling coil will cause serious problems and void the warranty.) We recommend using a plastic scraper. Do not use any electrical device in defrosting your refrigerator.
To defrost:
■ Remove foods and drawers from the freezer compartment.
■ Turn off the refrigerator by pressing Power for 3 seconds. See Controls section.
Defrosting usually takes a few hours. To defrost faster, keep the freezer door open. Also, pouring warm (not hot) water on the frosted part may speed defrosting. Do not use boiling water—it may damage plastic parts.
After defrosting:
■ Wipe the freezer compartment with a damp cloth.
■ Turn on the refrigerator by pressing Power for 3 seconds. Set control to desired temperature setting. See Controls section. Return drawers and food to the refrigerator.
Preparing for Storage
For long storage or absences when refrigerator will not be used, remove food and either disconnect main DC power supply wires at rear of unit, or remove refrigerator circuit fuse or turn off circuit breaker in DC voltage distribution panel. Clean the interior with a baking soda solution of one tablespoon (15ml) of baking soda to one quart (1 liter) of water. Leave the door open.
Installation Instructions
PBV10
WARNING
To reduce the risk associated with choking, do not allow children under 3 years of age to have parts during the installation of this product.
REFRIGERATOR LOCATION
- Do not install the refrigerator in a location exposed to water (rain, etc.) or direct sunlight.
• Install it on a floor strong enough to support it fully loaded. - This refrigerator is designed to function properly in room temperatures ranging from 55^ (12.7°C) to 110^ (43°C). Operating the refrigerator in room temperatures outside this range will cause inadequate cooling.
- This refrigerator is designed for built-in application. Air clearances for sides, top and back are not required.
- Installation dimensions: width 23.5", depth 26.5", height 60".
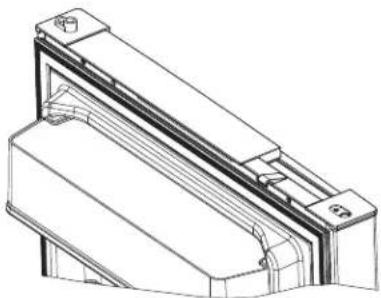
REVERSING THE DOOR SWING
⚠ WARNING
Follow all steps when reversing the
door swing. Failure to follow these instructions, leaving off parts, or overtightening screws, can lead to the door falling off and result in injury and property damage.
This product allows door swing reversal. Keep all hardware and screws in this process for reinstallation. Make notes of screw location during this process for proper reinstallation.
This section demonstrates the process of changing from right door swing to left door swing. Door swing reversal from left to right can be done following the same process.
Locate these parts in the Owner's Manual bag:
Left side upper hinge cover
Left side upper hinge
PARTS REQUIRED BUT NOT PROVIDED:
Top Mounting Bracket
TOOLS REQUIRED


Flat head screwdriver
Ratchet Wrench with 8mm and 10mm sockets
Removing Upper Hinge
- Tape refrigerator and freezer door on both left and right side to hold doors in place.
- Remove the upper hinge cover.
-
Use a 10 mm socket wrench to remove the four screws that secure the upper hinge, then remove the upper hinge. Keep the removed upper hinge cover and upper hinge for future door swing reversal.
-
Tuck sensor into the sensor enclosure.
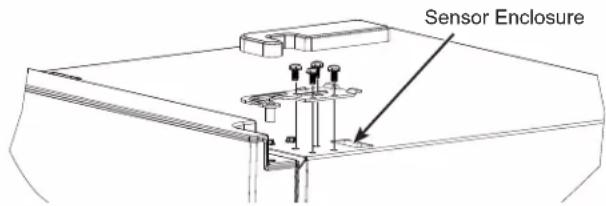
text_image
Sensor Enclosure- Remove the screw cover from left side where the upper hinge will be installed and install the cover onto right side.

text_image
Screw Cover- Remove tape on refrigerator door. Hold the door in place with one hand, depress door lock paddle with the other hand to clear the lock bracket on the mullion. Gently pull the door upward off the middle hinge to remove the door and carefully put it aside.
REVERSING THE DOOR SWING (Cont.)
Removing Middle Hinge
- Use an 8mm socket wrench and a Phillips Head screwdriver to remove the 3 screws that secure the middle hinge.
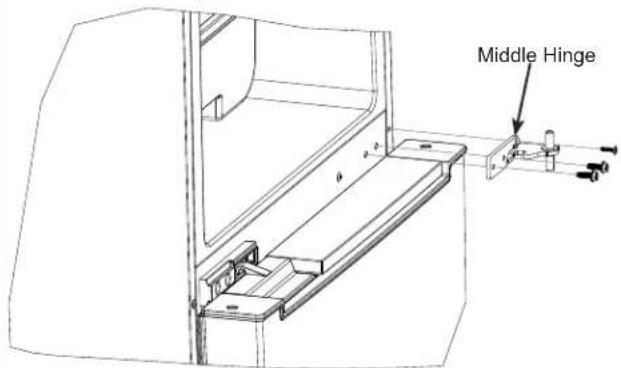
text_image
Middle Hinge-
Pull up on the hinge to remove it from freezer door.
-
Remove tape on freezer door. Hold the door in place with one hand, depress door lock paddle with the other hand to clear the lock bracket on the mullion. Gently pull the door upward off the bottom hinge to remove the door and carefully put it aside.
-
Use a Phillips Head screwdriver to remove the 3 screws that secure the door lock bracket and the other 2 pan head screws. Remove the door lock bracket.
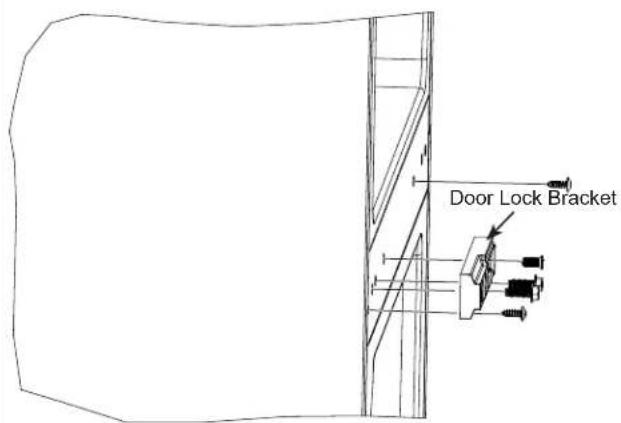
text_image
Door Lock BracketRemoving Bottom Hinge
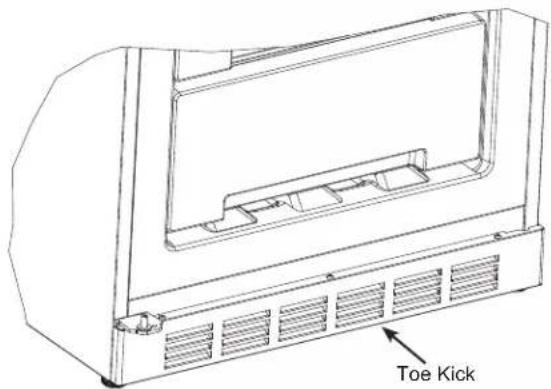
- Use a Phillips Head screwdriver to remove the 3 screws that secure the Toe Kick. Rotate the top of the Toe Kick forward, then pull it up to remove it.

text_image
Toe Kick- Use a 10 mm socket wrench to remove the 2 screws that secure the bottom hinge, then remove the bottom hinge.
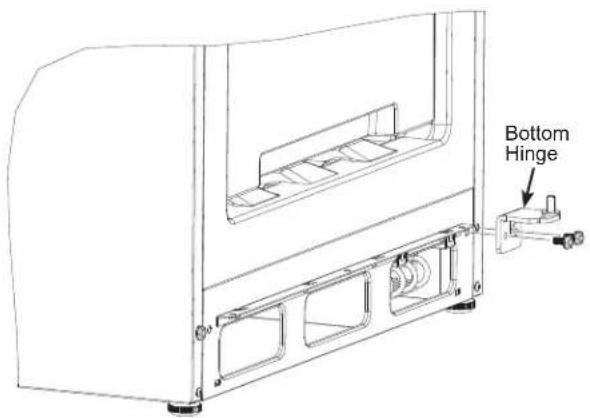
text_image
Bottom HingeREVERSING THE DOOR SWING (Cont.)
Reinstalling Bottom Hinge
- Use a Flat Head screwdriver to unscrew and remove hinge pin from the bottom hinge, then install it into the other screw hole on the bottom hinge all the way in tightly. The plastic shim should remain on the hinge pin during this process.
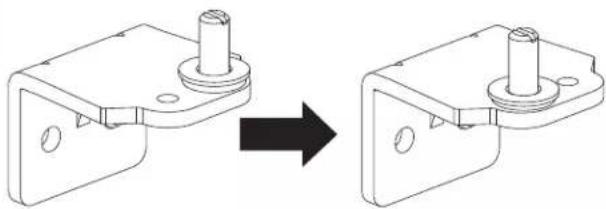
natural_image
Technical line drawing of a mechanical bracket with two cylindrical pins, shown before and after assembly (no text or symbols)- Use a 10 mm socket wrench to install bottom hinge onto the refrigerator with the 2 bottom hinge screws tightly.
- Insert the two tabs on the lower side of the Toe Kick into the openings on the lower-front of the refrigerator, rotate the top of the Toe Kick into position, then install the 3 Toe Kick screws with a Phillips Head screwdriver.
text_image
Toe KickReinstalling Freezer Door and Middle Hinge
- Flip the door lock bracket. Use a Phillips Head screwdriver to install the bracket onto the right side of the mullion with the 3 door lock bracket screws (2 Hex Head screws and 1 Flat Head screw).
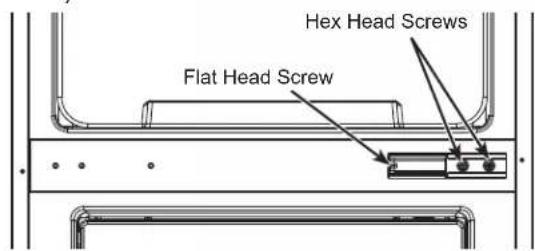
text_image
Hex Head Screws Flat Head ScrewReinstalling Freezer Door and Middle Hinge (Cont.)
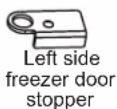
- Flip the freezer door upside down, facing the rear of the door, use a Phillips Head screwdriver to remove the 1 screw securing the right side freezer door stopper, then remove the stopper and keep it for future use. Install the left side freezer door stopper that came with the product onto the left side with the same screw.
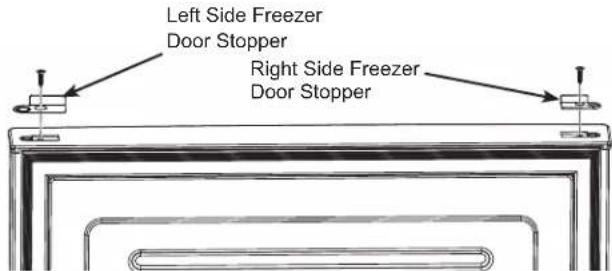
text_image
Left Side Freezer Door Stopper Right Side Freezer Door Stopper- Turn the freezer door upright. Facing the rear of the door, use a Phillips Head screwdriver to remove the 1 screw securing door cap. Start from the rear-left corner where the screw is removed, push door cap forward while pulling it up to disengage the left side clip, then do the same to the right side to remove the door cap.
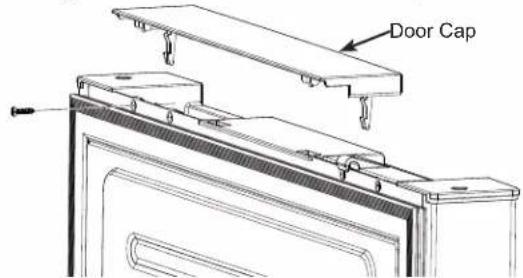
text_image
Door Cap- Use a Phillips Head screwdriver to remove the 2 screws securing freezer door lock, then remove the door lock.
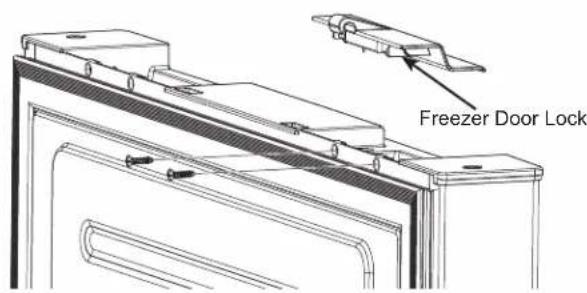
text_image
Freezer Door LockREVERSING THE DOOR SWING (Cont.)
Reinstalling Freezer Door and Middle Hinge (Cont.)
- Reverse the position of the freezer door lock and door cap, reinstall the 2 screws for door lock and 1 screw for door cap.
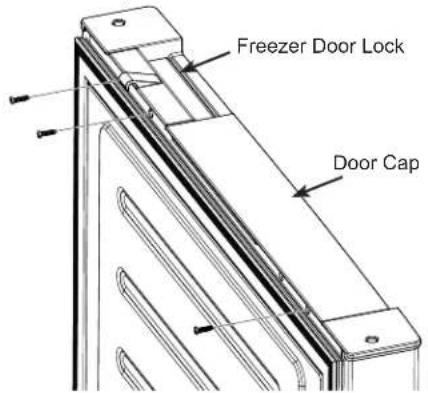
text_image
Freezer Door Lock Door Cap-
Align the hinge hole on bottom-left corner of the freezer door with bottom hinge pin, then lower the freezer door onto bottom hinge.
-
Flip the middle hinge upside down.
-
Insert lower side hinge pin into freezer door upper-left hinge hole, carefully position the freezer door against case and ensure door lock engages lock bracket. Use an 8mm socket wrench and a Phillips Head screwdriver to install the 3 middle hinge screws (2 Hex Head screws and 1 Flat Head screw). Check vertical and horizontal door alignment, door seal, door swing and door lock engagement before tightening the screws.
natural_image
Line drawing of a refrigerator front panel with lid and ventilation grilles (no text or symbols)- Install the 2 pan head screws left into the 2 remaining screw holes on mullion.
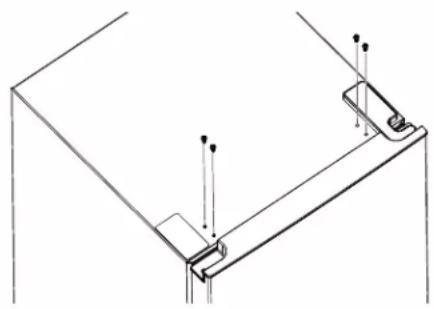
Reinstalling Refrigerator Door and Upper Hinge
- Flip the refrigerator door upside down, then remove door lock and door cap by following the same process as freezer door. Also remove the door stopper.
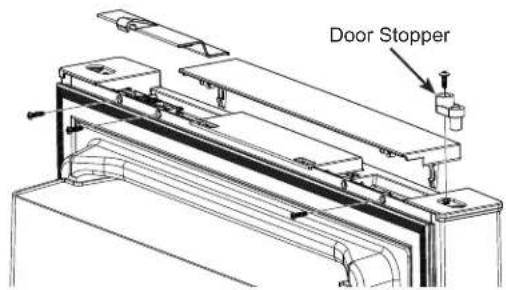
text_image
Door Stopper- Reverse the position of the refrigerator door lock and door cap, reinstall the 2 screws for door lock and 1 screw for door cap. Install the door stopper on the left corner.
natural_image
Technical line drawing of a mechanical component or bracket assembly (no text or symbols)-
Align the hinge hole on bottom-left corner of the refrigerator door with middle hinge pin, then lower the refrigerator door onto middle hinge.
-
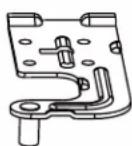
Insert upper hinge pin into refrigerator door upper-left hinge hole, carefully position the refrigerator door against case and ensure door lock engages lock bracket. Use a 10mm socket wrench to install the 4 upper hinge screws. Check vertical and horizontal door alignment, door seal, door swing and door lock engagement before tightening the screws.
-
Install upper hinge cover.
natural_image
Technical line drawing of a mechanical assembly with mounting brackets and connectors (no text or symbols)ELECTRICAL CONNECTION
WARNING

ECTRICAL SHOCK
HAZARD
Failure to follow these instructions can result in electric shock.
Long lengths of DC voltage supply lines combined with small gauge wiring can lead to excessive voltage drop at the refrigerator connection which decreases the cooling performance of the refrigerator and cause the wires to overheat possibly causing a fire. The below supply wire size is recommended.
| Supply Wire Size | Maximum Supply Line Length |
| 12 AWG 15 | FT |
| 10 AWG | 25 FT |
| 8 AWG 35 | FT |
- Before beginning the installation, disconnect power by removing refrigerator circuit fuse or turning off circuit breaker in the DC voltage distribution panel.
- Locate and remove the screws of the lower rear unit cover as indicated using a Phillips screwdriver.
natural_image
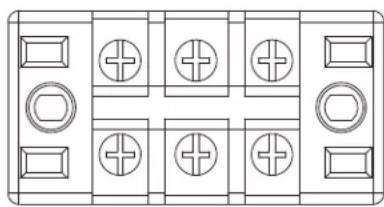
Pure electrical circuit lines without any symbols- Locate the power supply connection terminal block on the left side of the compressor compartment.
natural_image
Pure electrical circuit lines without any symbols


Power Input:
DC 12V (10.8-14V)
Current: 20A MAX
- Unsnap the clear plastic cover from the terminal block to access terminal screws. Loosen the supply side terminal screws on the lower side of the block with a Phillips screwdriver. Attach supply wires to the appropriate polarity and ground terminals, then replace clear plastic cover:
Connect the "+" terminal to positive 12 VDC wire. Connect the "-" terminal to negative 12 VDC wire. Connect the "GND" terminal to RV chassis.
- A wiring strain relief clip must be installed for the supply wires. From the selection of wire clips provided, select the appropriate size clip needed to fit the supply wires used.

- Use the screw provided to mount the strain relief clip on the base plate of the compressor compartment. The wires must be completely snug after clip is installed with no movement or slippage of the wires within the clip when the wires are tugged.
- Replace the rear unit cover, routing the supply wires through the opening provided.
- Move unit into its final position taking care not to roll over or damage the main power supply line.
- After completing installation, energize the appliance by replacing refrigerator circuit fuse or turning on circuit breaker in the DC voltage distribution panel.
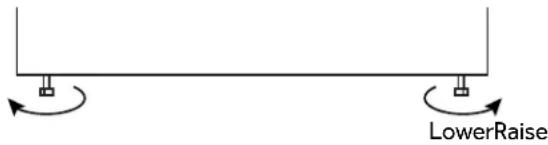
LEVELING REFRIGERATOR
- Your refrigerator has two leveling legs that are located in the front bottom corners of your refrigerator. After properly placing your refrigerator under its final position, you can level your refrigerator.
- Leveling legs can be adjusted by turning them clockwise to raise your refrigerator or by turning them counterclockwise to lower your refrigerator.
The refrigerator door will close easier when the leveling legs are extended.
text_image
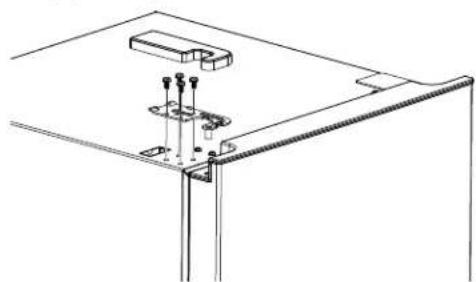
LowerRaiseINSTALLATION OF TOP MOUNTING BRACKET
WARNING
R HAZARD.
To avoid risk of refrigerator tipping over, appropriate top mounting bracket must be used to secure the refrigerator.
To install a top mounting bracket on this refrigerator, follow the below steps:
- Secure top mounting bracket (not shown) to the refrigerator using the four M5 x 16 mounting screws provided.
NOTE: Top mounting bracket is not provided. Contact distributor to identify top mounting bracket for this product. - Place the refrigerator into cabinetry.
- Secure top mounting bracket to cabinetry. Wood screws with a minimum size of #8 and a minimum length of 1" should be used to secure top mounting bracket to solid wood cabinetry.
natural_image
Pure technical line drawing of a mechanical bracket or mounting structure without any text, numbers, or symbolsINSTALLATION OF FLOOR SCREWS (Optional)
Floor screws are not a replacement of top mounting bracket. This is an optional additional measure to prevent possible sliding.
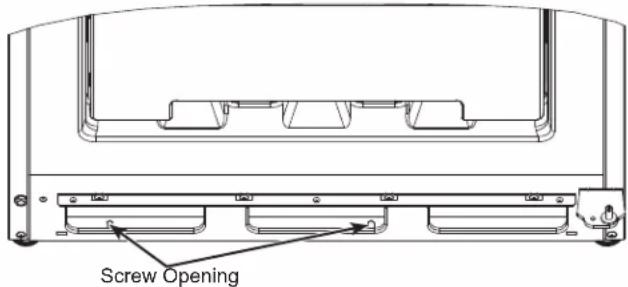
This refrigerator has provisions on the underside for installation of screws (not provided) to secure the refrigerator to floor.
- Remove Toe Kick. Locate the 2 screw openings inside lower rail.
- Use proper screws and shims to attach the refrigerator to floor.
- Replace Toe Kick.
text_image
Screw OpeningTroubleshooting Tips... Before you call for service
Save time and money! Review the charts on the following pages first and you may not need to call for service. If needed, service can be scheduled by visiting us online GEAppliances.com/service or calling 800.GECARES 800.432.2737. In Canada visit geappliances.ca/after-sales-support or call 800.561.3344.
| Problem Possible Causes What to | Do | |
| Refrigerator does not operate | The refrigerator is turned off | Turn on the refrigerator by pressing Power for 3 seconds. Set control to desired temperature setting. See Controls section. |
| The fuse is blown/circuit breaker is tripped. | Replace fuse or reset the breaker. | |
| Vibration or rattling (slight vibration is normal) | Front leveling legs need adjusting. | See Leveling Refrigerator section. |
| Motor operates for long periods or cycles | Normal when refrigerator is first turned on. | Wait 24 hours for the refrigerator to completely cool down. |
| Often occurs when large amounts of food are placed in refrigerator. | This is normal. | |
| Door left open. Check to see if package is holding door open. | ||
| Hot weather or frequent door openings. | This is normal. | |
| Temperature control set at the coldest setting. | See Controls section. | |
| Refrigerator too warm Temperature | control not set cold enough. | See Controls section. |
| Warm weather or frequent door openings. | Set the temperature control one step colder. See About the control. | |
| Door left open. Check to see if package is holding door open. | ||
| Refrigerator has odor Foods transmitting | Foods with strong odors should be tightly wrapped. | |
| Interior needs cleaning. | See Care and Cleaning section. | |
| Moisture forms on outside of refrigerator | Not unusual during periods of high humidity. | Wipe surface dry. |
| Moisture collects inside (in humid weather, air carries moisture into refrigerator when door is opened) | Too frequent or too long door openings | |
Refrigerator Limited Warranty
GEAppliances.com
For US Customers, all warranty service provided by our Factory Service Centers, or an authorized Customer Care® technician. To schedule service, on-line, 24 hours a day, visit us at GEAppliances.com/service, or call 800. GE.CARES (800.432.2737). Please have serial number and model number available when calling for service. In Canada, call 800.561.3344.
| For the Period of: GE | Appliances Will Replace |
| One YearFrom the date of the original purchase | Any part of the refrigerator which fails due to a defect in materials or workmanship. During the limited one-year warranty, GE Appliances will also provide, free of charge, all labor and related service to replace the defective part. |
| Five yearsFrom the date of the original purchase | Any part of the sealed refrigerating system (the compressor, condenser, evaporator and all connecting tubing) which fails due to a defect in materials or workmanship. During this limited five-year sealed refrigerating system warranty, GE Appliances will also provide, free of charge, all labor and related service to replace the defective part in the sealed refrigerating system. |
What is Not Covered:
■ Service trips to your home to teach you how to use the product.
■ Improper installation, delivery or maintenance.
■ Failure of the product if it is abused, misused, or used for other than the intended purpose or used commercially.
■ Loss of wine due to spoilage.
■ Replacement of house fuses or resetting of circuit breakers.
■ Damage caused after delivery.
■ Replacement of the light bulbs, if included, or water filter cartridge, if included.
■ Damage to the product caused by accident, fire, floods or acts of God.
■ Incidental or consequential damage caused by possible defects with this appliance.
■ Product not accessible to provide required service.
■ Damage to finish, such as surface rust, tarnish, or small blemishes not reported within 48 hours of delivery.
EXCLUSION OF IMPLIED WARRANTIES
Your sole and exclusive remedy is product repair as provided in this Limited Warranty. Any implied warranties, including the implied warranties of merchantability or fitness for a particular purpose, are limited to one year or the shortest period allowed by law.
For US Customers: This limited warranty is extended to the original purchaser and any succeeding owner for products purchased for home use within the USA. If the product is located in an area where service by a GE Appliances Authorized Servicer is not available, you may be responsible for a trip charge or you may be required to bring the product to an Authorized GE Appliances Service location for service. In Alaska, the limited warranty excludes the cost of shipping or service calls to your home.
Some states do not allow the exclusion or limitation of incidental or consequential damages. This limited warranty gives you specific legal rights, and you may also have other rights which vary from state to state. To know what your legal rights are, consult your local or state consumer affairs office or your state's Attorney General.
Warrantor US: GE Appliances, a Haier company Louisville, KY 40225
For Customers in Canada: This limited warranty is extended to the original purchaser and any succeeding owner for products purchased in Canada for home use within Canada. In-home warrant service will be provided in areas where it is available and deemed reasonable by Mabe to provide.
Warrantor Canada: MC Commercial, Burlington, Ontario, L7R 5B6
Consumer Support
GE Appliances Website
Have a question or need assistance with your appliance? Try the GE Appliances Website 24 hours a day, any day of the year! You can also shop for more great GE Appliances products and take advantage of all our on-line support services designed for your convenience. In the US: GEAppliances.com In Canada: GEAppliances.ca
Register Your Appliance
Register your new appliance on-line at your convenience! Timely product registration will allow for enhanced communication and prompt service under the terms of your warranty, should the need arise. You may also mail in the pre-printed registration card included in the packing material.
In the US: GEAppliances.com/register
In the Canada: geappliances.ca/after-sales-support
Schedule Service
Expert GE Appliances repair service is only one step away from your door. Get on-line and schedule your service at your convenience any day of the year. In the US: GEAppliances.com/service or call 800.432.2737 during normal business hours.
In Canada: geappliances.ca/after-sales-support or call 800.561.3344
Extended Warranties
Purchase a GE Appliances extended warranty and learn about special discounts that are available while your warranty is still in effect. You can purchase it on-line anytime. GE Appliances Services will still be there after your warranty expires.
In the US: GEAppliances.com/extended-warranty or call 800.626.2224 during normal business hours.
In Canada: geappliances.ca/purchase-extended-warranty or call 800.290.9029
Parts and Accessories
Individuals qualified to service their own appliances can have parts or accessories sent directly to their homes (VISA, MasterCard and Discover cards are accepted). Order on-line today 24 hours every day.
In the US: GEApplianceparts.com or by phone at 877.959.8688 during normal business hours.
Instructions contained in this manual cover procedures to be performed by any user. Other servicing generally should be referred to qualified service personnel. Caution must be exercised, since improper servicing may cause unsafe operation.
Customers in Canada should consult the yellow pages for the nearest Mabe service center, visit our website at geappliances.ca/parts-filters-accessories or call 800.661.1616.
Contact Us
If you are not satisfied with the service you receive from GE Appliances, contact us on our Website with all the details including your phone number, or write to:
In the US: General Manager, Customer Relations | GE Appliances, Appliance Park | Louisville, KY 40225
GEAppliances.com/contact
In Canada: Director, Consumer Relations, Mabe Canada Inc. | Suite 310, 1 Factory Lane | Moncton, N.B. E1C 9M3
GEAppliances.ca/contact-us
MESURES DE SÉCURITÉ....3
UTILISATION DU RÉFRIGÉRATEUR
Commandes 5
AU CONSOMMATEUR....16
text_image
Coup-de-piednatural_image
Technical line drawing of a mechanical bracket with two cylindrical components, one being rotated (no text or symbols)text_image
Coup-de-piednatural_image
Line drawing of a refrigerator with front panel and side door (no text or symbols)natural_image
Technical line drawing of a mechanical component or bracket assembly (no text or symbols)natural_image
Technical line drawing of a mechanical assembly with mounting brackets and mounting holes (no text or symbols)RACCORDS ÉLECTRIQUES
AVERTISSEMENT

QUE DE CHOC
natural_image
Pure electrical circuit lines without any symbolsnatural_image
Pure electrical circuit lines without any symbols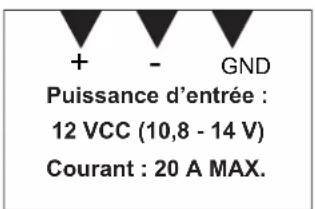
natural_image
Technical line drawing of a mechanical bracket or mounting structure with mounting holes and a clip (no text or symbols)INSTALLATION DES VIS DE PLANCHER (facultatif)
Louisville, KY 40225
Garant Canada : MC Commercial, Burlington, Ontario, L7R 5B6
In the US: General Manager, Customer Relations | GE Appliances, Appliance Park | Louisville, KY 40225 GEAppliances.com/contact
natural_image
Technical line drawing of a mechanical bracket before and after assembly (no text or symbols)natural_image
Line drawing of a refrigerator front panel with lid and side-mounted door (no text or symbols)natural_image
Technical line drawing of a mechanical component or bracket assembly (no text or symbols)natural_image
Technical line drawing of a mechanical assembly with mounting brackets and fasteners (no text or symbols)CONEXIÓN ELÉCTRICA
ADVERTENCIA

ESGO DE DESCARGA
natural_image
Pure electrical circuit lines without any symbolsnatural_image
Pure electrical circuit lines without any symbols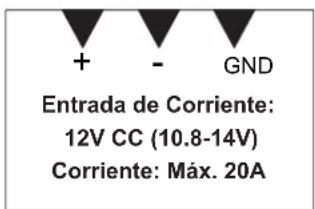
text_image
+ - GND Entrada de Corriente: 12V CC (10.8-14V) Corriente: Máx. 20Atext_image
Elevar Bajar Raisenatural_image
Technical line drawing of a mechanical bracket or mounting bracket with mounting holes and a clip (no text or symbols)Louisville, KY 40225