RDDBCR2000GN - Radio NEDIS - Free user manual and instructions
Find the device manual for free RDDBCR2000GN NEDIS in PDF.

User questions about RDDBCR2000GN NEDIS
0 question about this device. Answer the ones you know or ask your own.
Ask a new question about this device
Download the instructions for your Radio in PDF format for free! Find your manual RDDBCR2000GN - NEDIS and take your electronic device back in hand. On this page are published all the documents necessary for the use of your device. RDDBCR2000GN by NEDIS.
USER MANUAL RDDBCR2000GN NEDIS
Emergency DAB+/FM Crank Radio
with power supply
for every situation
RDDBCR2000GN
EN Quick start guide 4
DE Kurzanleitung 9
FR Guide de démarrage rapide 15
NL Snelstartgids 20
IT Guida rapida all'avvio 26
ES Guía de inicio=rápido 31
PT Guia de iniciação<rapida 37
SV Snabbstartsguide 42
PIka-aloitusopas 48
NO Hurtiguide 53
DA Vejledning til hurtig start 58
HU Gyors beüzemelési utmutató 63
PL Przewodnik Szybki start 69
EL Odbnyoc yrhoynopnc ekkivnonc 74
SK Rychly námod 80
CS Rychly námod 85
RO Ghid rapid de initiiere
Emergency DAB+/FM Crank Radio
RDDBCR2000GN

For more information see the extended manual online:ned.is/rddbcr2000gn
Intended use
This product is an emergency DAB+/FM crank radio that can be charged via the solar panel, hand crank, or the USB port.
This product is intended for indoor and outdoor use.
This product can be used by children aged from 8 years and above and persons with reduced physical, sensory or mental capabilities or lack of experience and knowledge if they have been given supervision or instruction concerning use of the product in a safe way and understand the hazards involved. Children shall not play with the product. Cleaning and user maintenance shall not be done by children without supervision. The product is not intended for professional use.
This product is intended for use in household environments for typical housekeeping functions that may also be used by non-expert users for typical housekeeping functions, such as: shops, offices other similar working environments, farm houses, by clients in hotels, motels and other residential type environments and/or in bed and breakfast type environments.
Any modification of the product may have consequences for safety, warranty and proper functioning.
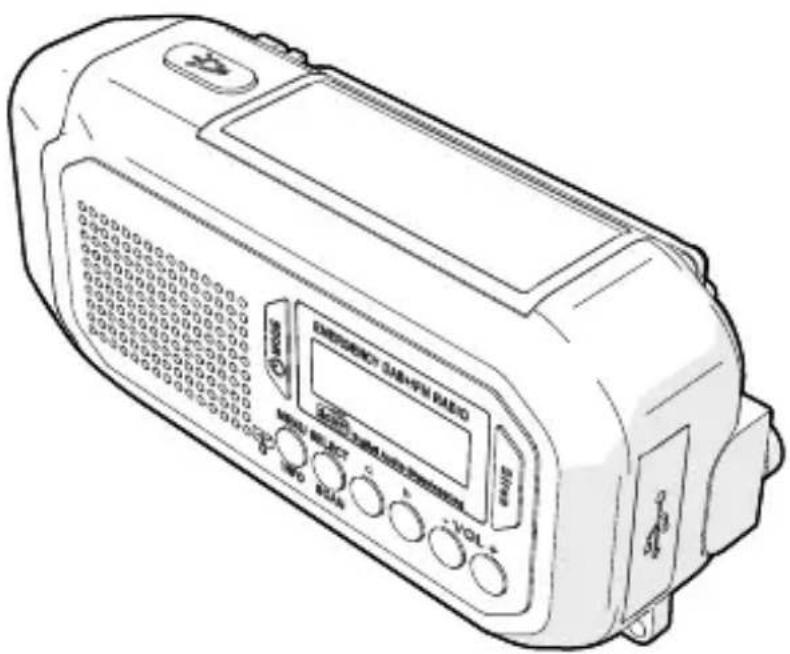
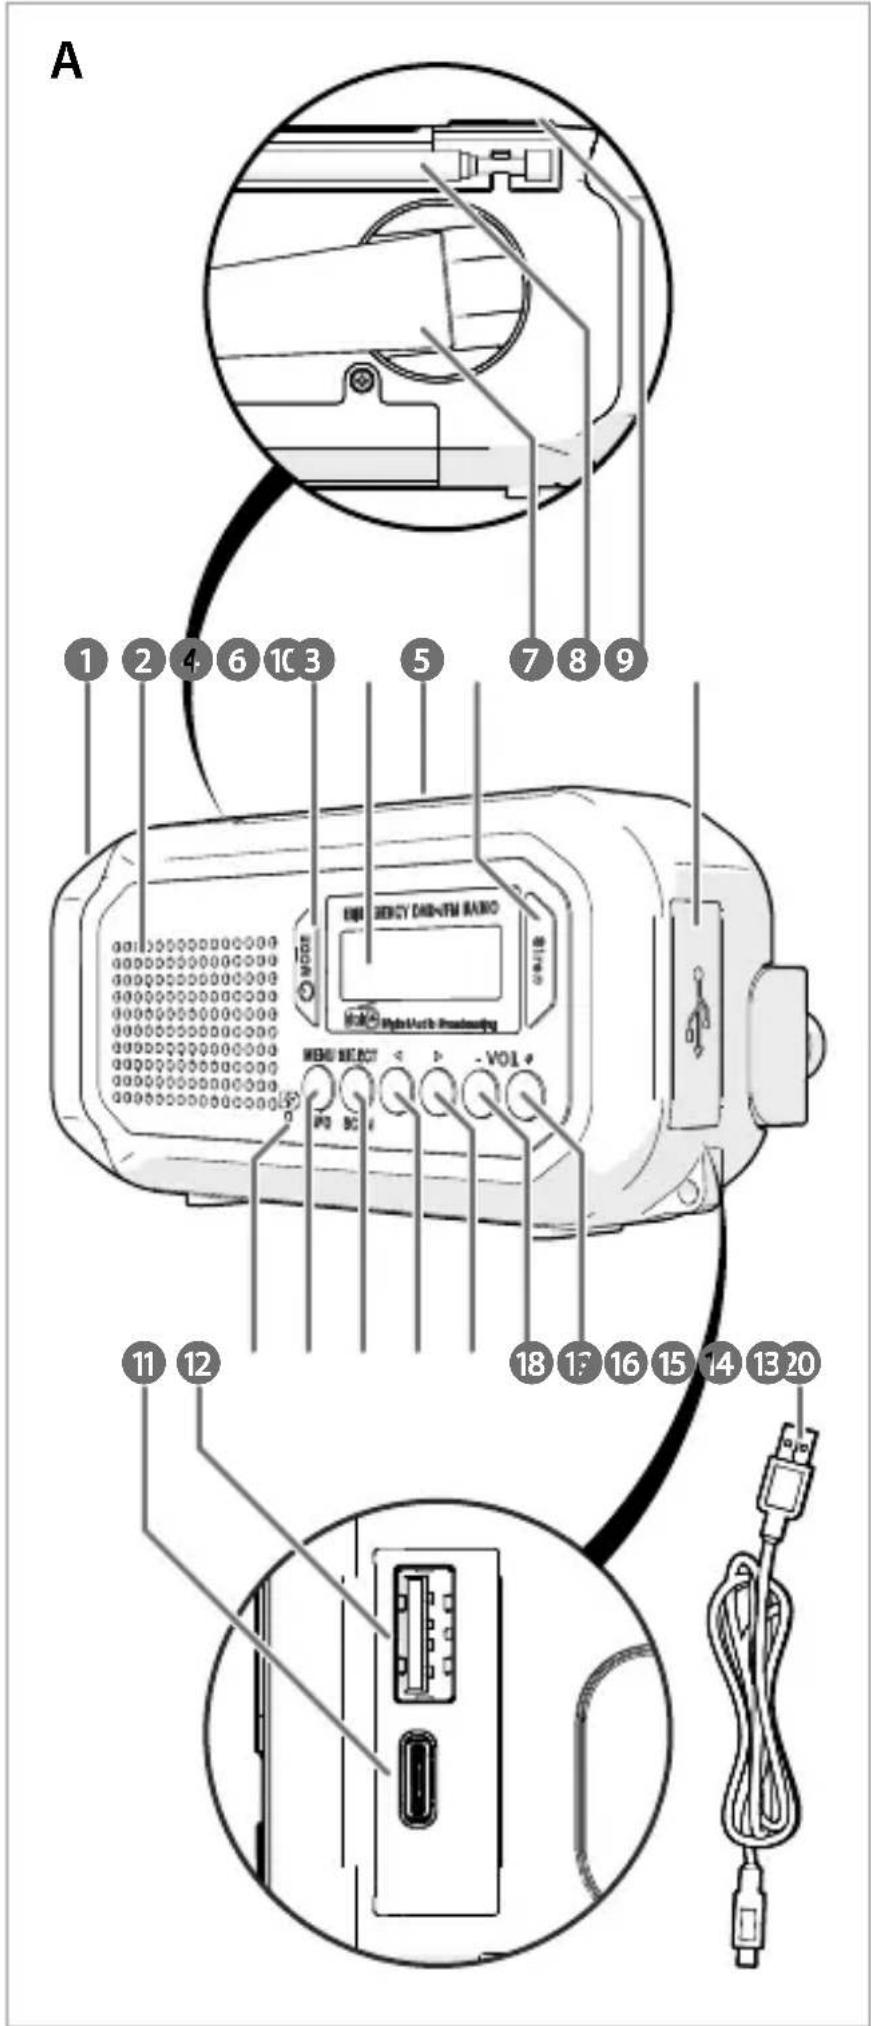
Main parts (image A)
LED reading light
2 Speaker
3 MODE button
4 Display
Solar panel
6 Siren button
7 Hand crank
8 Antenna
9 Flashlight button
Rubber cap
11 USB-C port
USB port
13 Battery indicator
14 MENU/INFO button
15 SELECT/SCAN button
16 Previous button
17 Next button
18 VOL- button
19 VOL+ button
20 USB-C cable
Safety instructions
WARNING
-
Ensure you have fully read and understood the instructions in this document before you install or use the product. Keep the packaging and this document for future reference.
-
Do not expose the product to a high pressure of water or moisture.
- Do not expose the product to water, rain, moisture or high humidity.
- Do not expose the product to very hot or very cold temperatures.
- Do not immerse the product in water.
- Do not charge when the product is wet.
- Only power the product with the voltage corresponding to the markings on the product.
- Only use the product as described in this document.
- Do not use the product if a part is damaged or defective. Replace a damaged or defective product immediately.
- Do not look directly into the LED reading light, doing so may damage your eyes.
- Do not drop the product and avoid bumping.
- Extended exposure to high volumes can cause hearing loss.
- Before cleaning and maintenance, switch off the product and disconnect the power.
- Do not use aggressive chemical cleaning agents such as ammonia, acid or acetone when cleaning the product.
- Cleaning and user maintenance shall not be done by children without supervision.
- Do not open the product, there are no user serviceable parts inside.
Charging the product
Solar panel:
- Place the solar panel A 5 in direct sunlight.
The battery indicator A13 blinks to indicate the product is charging. The battery indicator A13 burns continuously to indicate the product is fully charged.
Hand crank:
- Unfold the hand crank A 7
- Turn the hand crank A to generate power and charge the product. It takes around 3 - 5 minutes to fully charge the product using the hand crank.
The battery indicator A13 blinks to indicate the product is charging. The battery indicator A13 burns continuously to indicate the product is fully charged.
- Fold in the hand crank A 7
USB charging port:
- Open the rubber cap A 10.
-
Plug the USB-C cable A 20 into the USB-C port A 11
-
Plug the other end of the USB-C cable A 20 into a power source or a power adapter (not included).
- Plug the power adapter into a power outlet.
The battery indicator A13 blinks to indicate the product is charging. The battery indicator A13 burns continuously to indicate the product is fully charged.
Switching on the product
- Extend the antenna A 8
- Press and hold the MODE button A 3 to switch on the product.
- Press and hold the MODE button A ③ to switch on the display A ④ .
The product automatically switches to standby after 15 minutes of inactivity.
The product automatically selects DAB mode and starts scanning for DAB channels.
Navigating the interface
- Press and hold the MENU/INFO button A 14 to enter the menu.
- Press the previous or next button A 16 to navigate to the desired option.
Changing the language
- Enter the menu
- Select System.
- Press the SELECT/SCAN button A 15.
- Press the previous or next button A 16 to select Language.
- Press the SELECT/SCAN button A 15.
- Press the previous or next button A 16 to select the desired language.
- Press the SELECT/SCAN button A 15
Scanning for radio stations
Press the MODE button A to cycle between DAB and FM mode.
DAB mode
For automatic scanning:
- Enter the menu
- Select Station List.
- Press the previous or next button A 16 to select the desired station.
- Press the SELECT/SCAN button A 15 to start a station scan.
For manual scanning:
- Enter the menu
- Select the desired channel.
- Press the SELECT/SCAN button A 15
Press the previous or next button A16 to select the desired station.
FM mode
- Press the previous or next button A 16 to search for a station.
- Press and hold the previous or next button A 16 to start a station scan.
The scan stops when the first station is located.
Saving and listening to preset stations
- Search the desired station.
- Enter the menu
- Select Preset Store.
- Press the previous or next button A 16 to select the desired memory location.
- Press the SELECT/SCAN button A 15
- Enter the menu
- Select Preset Recall.
- Press the SELECT/SCAN button A 15.
- Press the previous or next button A 16 to select the desired station.
- Press the SELECT/SCAN button A15.
Changing the volume
Press the VOL- button A18 and VOL+ button A 19 to adjust the volume.
Using the alarm
- Press the MODE button A 3 to switch the product to standby mode.
- Enter the menu
- Select Set alarm.
- Press the SELECT/SCAN button A 15
- Press the previous or next button A 16 to select the desired alarm.
- Press the SELECT/SCAN button A 15.
- Press the previous or next button A 16 to switch the alarm on or off.
- Press the SELECT/SCAN button A 15.
-
Press the previous or next button A 16 to set the hours while the hours are blinking.
-
Press the SELECT/SCAN button A15.
- Press the previous or next button A16 to set the minutes while the minutes are blinking.
- Press the SELECT/SCAN button A15.
- Press the previous or next button A16 to select the alarm mode.
- Press the SELECT/SCAN button A15.
- Press the previous or next button A16 to select the alarm type.
- Press the SELECT/SCAN button A15.
- Press the previous or next button A16 to select the alarm volume.
- Press the SELECT/SCAN button A15.
- Press the SELECT/SCAN button A to snooze the alarm. The alarm rings again after 9 minutes.
- Press the MODE button A to switch the alarm off.
Using the LED reading light
- Unfold the solar panel A 5 to switch on the LED reading light A 1.
- Fold the solar panel A 5 to switch off the LED reading light A1.
Using the Siren button
Press the Siren button A to sound a siren.
Switching off the product
- Press the MODE button A 3 to switch the product to standby mode.
- Press and hold the MODE button A 3 to switch off the product.
The display A4 switches off.
Disposal

The product is designated for separate collection at an appropriate collection point. Do not dispose of the product with household waste.
For more information, contact the retailer or the local authority responsible for the waste management.
Declaration of Conformity
We, Nedis B.V. declare as manufacturer that the product RDDBCR2000GN from our brand Nedis®, produced in China, has been tested according to all relevant CE standards and regulations and that all tests have been passed successfully. This includes, but is not limited to the RED 2014/53/EU regulation.
The complete Declaration of Conformity (and the safety datasheet if applicable) can be found and downloaded via: nedis.com/RDDBCR2000GN#support
DE Kurzanleitung
For manuel scanning:
- Gå ind i menuen
- Vaelg den onskede kanal.
- Tryk på SELECT/SCAN-knappen A 15.