BH-G 726 - Hammer Global - Free user manual and instructions
Find the device manual for free BH-G 726 Global in PDF.

User questions about BH-G 726 Global
0 question about this device. Answer the ones you know or ask your own.
Ask a new question about this device
Download the instructions for your Hammer in PDF format for free! Find your manual BH-G 726 - Global and take your electronic device back in hand. On this page are published all the documents necessary for the use of your device. BH-G 726 by Global.
USER MANUAL BH-G 726 Global
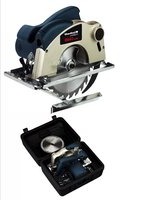
BH-G 726SDS-Plus chuckScroll chuck 1.5 - 13 mm Chuck keyHammer drill bit Ø 12, Ø 16, Ø 18 mmPointed chisel bit (15) and flat chisel bit (14)Additional handle with depth stop Case
This electric hammer drill is designed for drilling in woodand metal, for hammer drilling in concrete, stone andmasonry, and for screwdriving in wood and metal in theDIY sector. The machine also features a chiseling func-tion for working in concrete and masonry. It is to be usedonly with suitable accessories (see data published by themanufacturer). All other uses are expressly prohibited.
4. Important information
Please read these directions for use carefully and put allthe information into practice. This manual will acquaintyou with the machine’s features, its correct use andessential safety rules. Safety rules The BH-G 726 is not designed to drive attachment appliances. Use the machine for its inten- ded purpose only. Never use the machine near vapors or combustible liquids. Use only sharp drill bits and screwdriving bits. Always unplug the machine before cleaning it or changing drill bits etc. Keep the power cable safe from damage. Oil and acids can damage cables. Never carry the machine by its power cable. Never remove the plug from the socket-outlet by tugging on the power cable. Make sure the power switch is off before you plug in the machine. Always keep the power cable away from where you want to drill. Extension cables must have a minimum conductor cross sec- tion of 1.5 mm
. If you use a cable reel, run all the cable off the reel. Outdoor socket-outlets must have earth-leakage circuit-brea- kers. Never overload the machine. Always use the machine with the additional handle. Always hold the machine with two hands when it is running. Make sure of your footing, par- ticularly when working free-han- ded on ladders or scaffolding. Secure all workpieces so they cannot slip.GB
Never remove chips or splinters when the machine is running. Keep the machine out of child- ren’s reach! Persons below the age of 16 years are not allowed to use the machine. Use a detector to localize pipes and/or cables in walls with con- cealed electric, water or gas lines. Wear goggles and use a brea- thing mask on dusty jobs. The level of noise at the work- place may exceed 85 dB(A). In this case you will need to intro- duce noise protection measu- res for the user. Repairs are to be carried out by qualified electricians only. Use only original replacement parts. Follow the general safety rules for working with electric tools. Wear goggles Wear ear-muffs Wear a breathing mask
Mains voltage 230 V ~ 50 HzPower 750 WDrilling capacity max. Ø in concrete 26 mmin steel 13 mmin wood 30 mmIdle speed 0 - 880 rpmHammer rate 0 - 5180 minClamp neck Ø 43 mmSound pressure level LPA 94 dB(A)Sound power level LWA 107 dB(A)Vibration a 8,4 m/s Totally insulatedWeight 3,5 kg The noise from this electric tool was measured inaccordance with EN 50144-2-6. The vibrations from this electric tool were measu-red in accordance with EN 50144-2-6.
6.1 General information Use a detector to localize pipes and/or cables inwalls with concealed electric, water or gas lines. Before you plug in the machine, check that yourmains voltage is the same as that marked on therating plate.6.2 Fitting a bit (Figure 2)The hammer drill comes with an SDS-Plus chuck. Pull out the power plug! Clean the shaft of the SDS-Plus drill bit (a) chiselbit (14/15) or scroll chuck (13) and coat it with alittle machine grease before you insert it. Pull back the locking sleeve (17) and hold in thisposition while you insert the bit with a twist as faras it goes into the SDS-Plus chuck (1). Let go of the locking sleeve (17). The bit will auto-matically be locked in place. Pull on the bit to check that it is secure.6.3 Removing a bit Unplug the machine! Pull back the locking sleeve (17). Pull the bit out of the chuck (1).GB
6.4 Fitting the additional handle (Figure 3)
For safety reasons you should always use the hammer drill with the additional handle (4). Slacken the clamping screw (11). Slide the additional handle (4) over the chuck and turn to the desired position. Re-tighten the clamping screw (11) to fix the addi- tional handle (10) in this position.
6.5 Setting the drilling depth stop (Figure 3/4)
Insert the drill bit and lock in place. Slacken the clamping screw (11). Insert the drilling depth stop (2) in the handle and slide it forward until it extends the same distance as the drill bit. This is best done by holding the tip of the bit against the wall. Note the mm reading on the scale of the drilling depth stop (2) and deduct the desired drilling depth from this value. Set the calculated value on the drilling depth stop (2) and tighten the clamping screw (11)
7.1 Selecting the speed (Figure 5)
Always follow the speed recommendations issued by the manufacturer of the accessories you are using. This will minimize the strain on materials. Turn the wheel selector (6) to set the hammer drill to the required speed. Turn the wheel in PLUS (+) direction to increase the speed. Turn the wheel in MINUS (-) direction to reduce the speed. Infinite variation of the speed up to the speed pre- set with the selector wheel (6) is possible by apply- ing more or less pressure to the On/Off switch (7). With the On/Off switched (7) locked for continuous operation the machine will run at the preset speed.
Instant response operation: Switching on: Press On/Off switch (7) Switching off: Release On/Off switch (7) Continuous operation: Switching on: Press On/Off switch (7), keep pressed and lock with the locking button (8) Switching off: Press On/Off switch (7) and release
7.3 Clockwise/anticlockwise selector switch
(Figure 5) For hammer drilling, chiseling, drilling and driving in screws: Set the direction switch (5) to position „R“ for clockwise rotation. For removing screws: Set the direction switch (5) to position „L“ for anticlockwise rotation. Actuate the direction switch (5) only when the machine is at a standstill.
7.4 Drill/hammer selector switch (Figure 6/7)
For drilling with hammer action in concrete or masonry, set the selector switch (3) to position (Abb. 7) and the selector switch (4) to position (Figure 9). Set the machine for clockwise rotation and start at a low speed. Thanks to the electropneumatic ham- mer mechanism used in this machine, drilling per- formance is not dependent on the pressure you apply (unlike conventional hammer drills). Applying more pressure does not increase the performance. For drilling in wood and metal or for driving and removing screws, set the selector switch (3) to position (Figure 8) and the selector switch (4) in position (Figure 9).. If you want to use conventional wood or metal drill bits or screwdriver bits, insert the scroll chuck (9) (see section 6.2). Set the machine for clockwise rotation (or anticlockwise rotation for removing scr- ews). Set the required speed with the wheel selec- tor (6) and press the On/Off switch to start the machine. 7.5. Chiseling (Figure 7/10) For chiseling in concrete or masonry, set the sel- ector switch (3) to position (Figure 7) and the selector switch (4) to position (Figure 10).
Keep the air vents in the machine clean and un- blocked at all times. Remove dust and dirt from the machine at regular intervals. This is best done by blowing with com- pressed air or by wiping with a rag. Do not use aggressive agents to clean plastic parts. If sparking is excessive, check the carbon brushes.F