HKS 65-1500 L - Circular saw Güde - Free user manual and instructions
Find the device manual for free HKS 65-1500 L Güde in PDF.
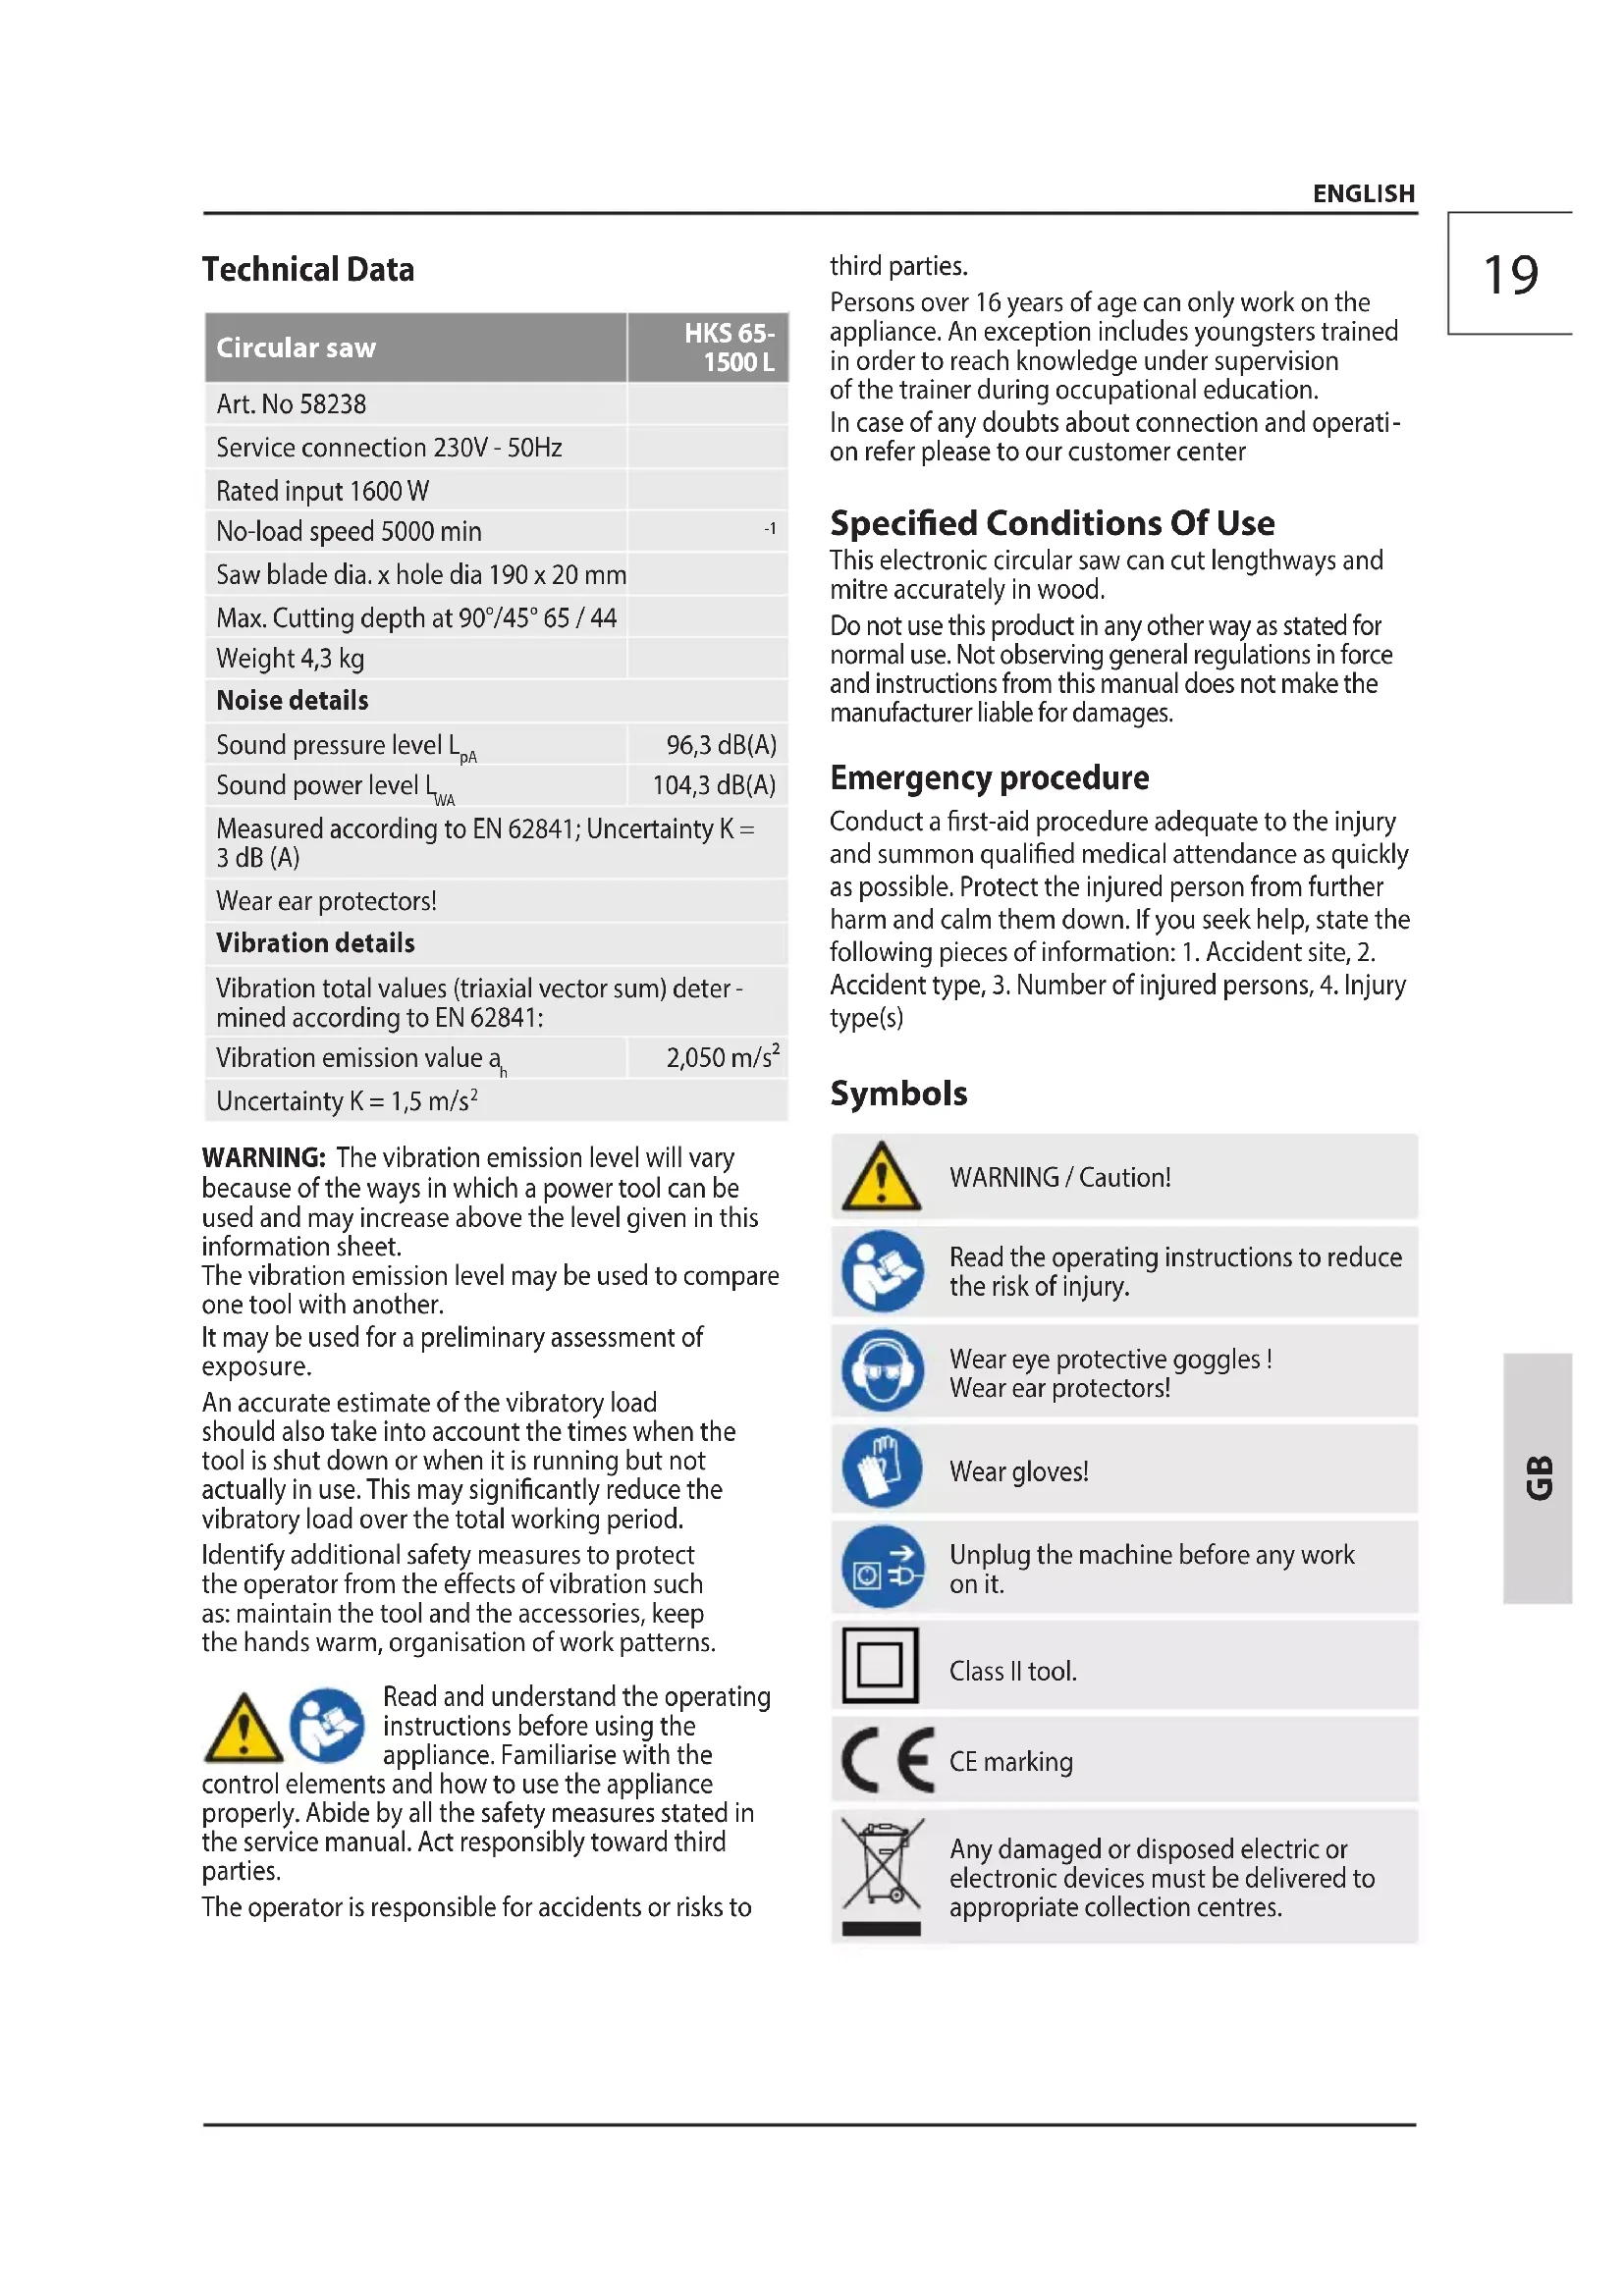
| Product type | Circular saw |
| Brand | Güde |
| Model | HKS 65-1500 L |
| Supply voltage | 230 V / 50 Hz |
| Rated power | 1600 W |
| No-load speed | 5000 min⁻¹ |
| Blade diameter | 190 mm |
| Blade bore | 20 mm |
| Max. cutting depth at 90° | 65 mm |
| Max. cutting depth at 45° | 44 mm |
| Weight | 4.3 kg |
| Sound pressure level L_pA | 96.3 dB(A) |
| Sound power level L_WA | 104.3 dB(A) |
| Vibration emission value a_h | 2.050 m/s² |
| Protection class | II |
| Intended use | Longitudinal wood cutting |
| Extraction system | Vacuum cleaner connection |
| Maintenance | Cleaning of ventilation slots, blade replacement |
| Safety | Lower protective guard, safety switch, insulated handles |
| Spare parts | Available at www.guede.com |
| Plunge cutting device | Yes |
Frequently Asked Questions - HKS 65-1500 L Güde
User questions about HKS 65-1500 L Güde
0 question about this device. Answer the ones you know or ask your own.
Ask a new question about this device
Download the instructions for your Circular saw in PDF format for free! Find your manual HKS 65-1500 L - Güde and take your electronic device back in hand. On this page are published all the documents necessary for the use of your device. HKS 65-1500 L by Güde.
USER MANUAL HKS 65-1500 L Güde
natural_image
3D rendering of a power tool with blue and silver casing, red buttons, and metal frame (no visible text or symbols)
HKS 65-1500 L
58238
GÜDE GmbH & Co. KG
Birkichstrasse 6
74549 Wolpertshausen
Deutschland


text_image
Güde

ENGLISH Please read the instructions carefully before starting the machine.
natural_image
3D rendering of a blue and silver power saw with red buttons, no visible text or symbols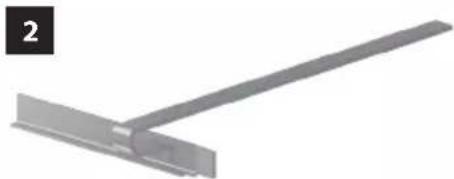
natural_image
Metal L-shaped metal bracket with a flat end, shown in 3D perspective (no text or symbols)
natural_image
Two abstract geometric shapes: a simple L-shaped tool and a shaded circular saw blade (no text or symbols)
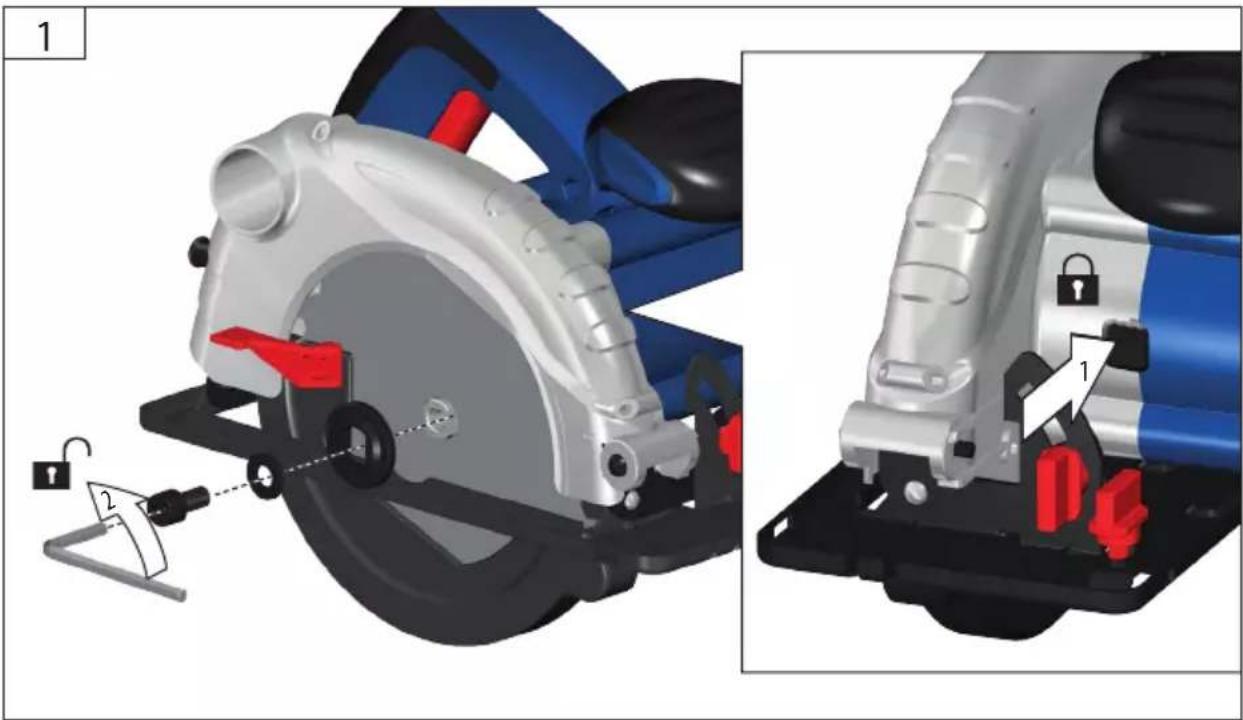
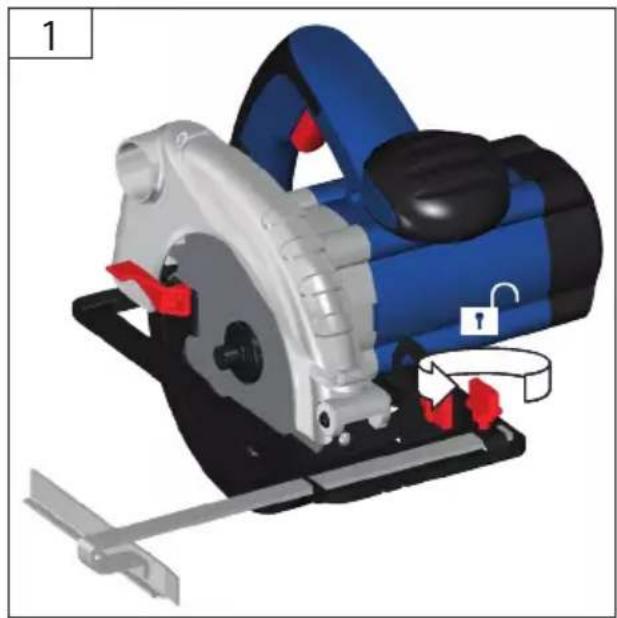
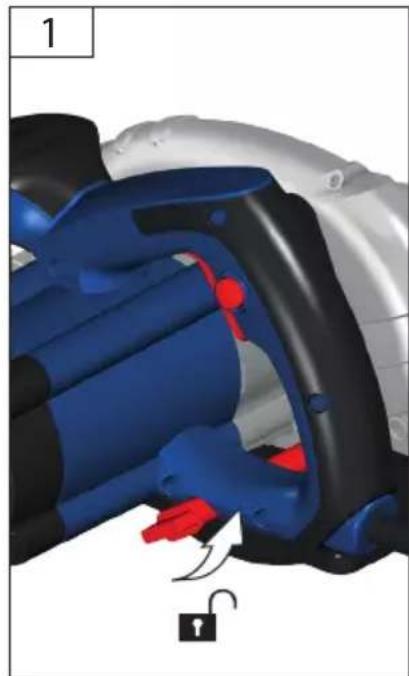
D Inbetriebnahme
GB Starting-up the machine
F Mise en service
1 Messa in funzione
E Puesta en marcha
natural_image
Close-up of a mechanical tool with a circular saw cutting through a wheel (no text or symbols visible)2-4
natural_image
Close-up of a mechanical power saw with blue and black components, no visible text or symbols5

natural_image
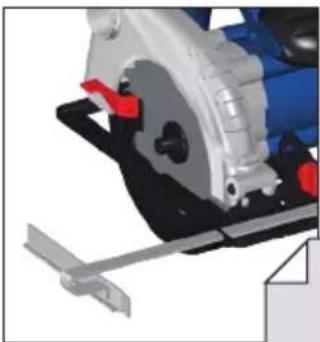
Close-up of a mechanical component with blue and gray parts, showing a wooden base and dimension line (no text or symbols)6-7
text_image
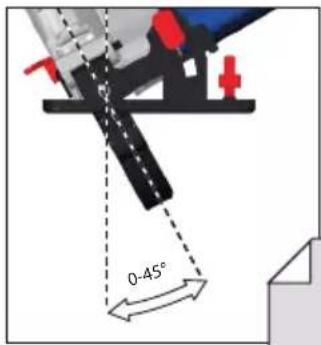
0-45°8
natural_image
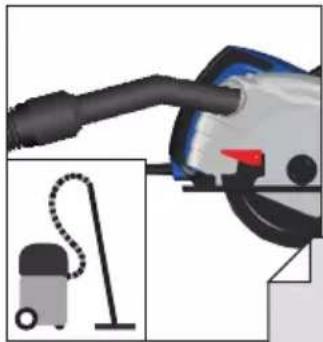
Illustration of a vacuum cleaner with attached tool and close-up view (no text or symbols)9
D Betrieb
GB Operation
F Fonctionnement
I Esercizio
E Funcionamiento
NL Gebruik
DK Drift
CZ Provoz
SK Prevádzka
GR Λειτουργία
H Üzemeltetés
SLO Delovanje
HR Rad
BG Работа
RO Functionare
TR İşletim
PL Eksploatacja
START
STOP
natural_image
Close-up of a blue and black mechanical component with red and gray markings (no visible text or symbols)10-11
natural_image
Illustration of a cut-out saw blade with red-handled blade and blue blade, resting on a wooden cutting board (no text or symbols)14
natural_image
Illustration of a person cutting a blade with a tool, no text or symbols present15
natural_image
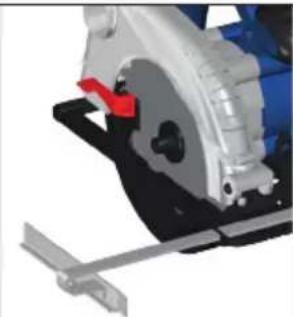
Close-up of a mechanical device with a large gray saw cutting through it, no visible text or symbolsD Inbetriebnahme
GB Starting-up the machine
F Mise en service
1 Messa in funzione
E Puesta en marcha
text_image
Safety warning sign showing a battery icon with an arrow and a warning triangle with an exclamation mark.| 58155 |
natural_image
Technical illustration of a blue and silver saw cutting tool with labeled parts (no text or symbols beyond labels)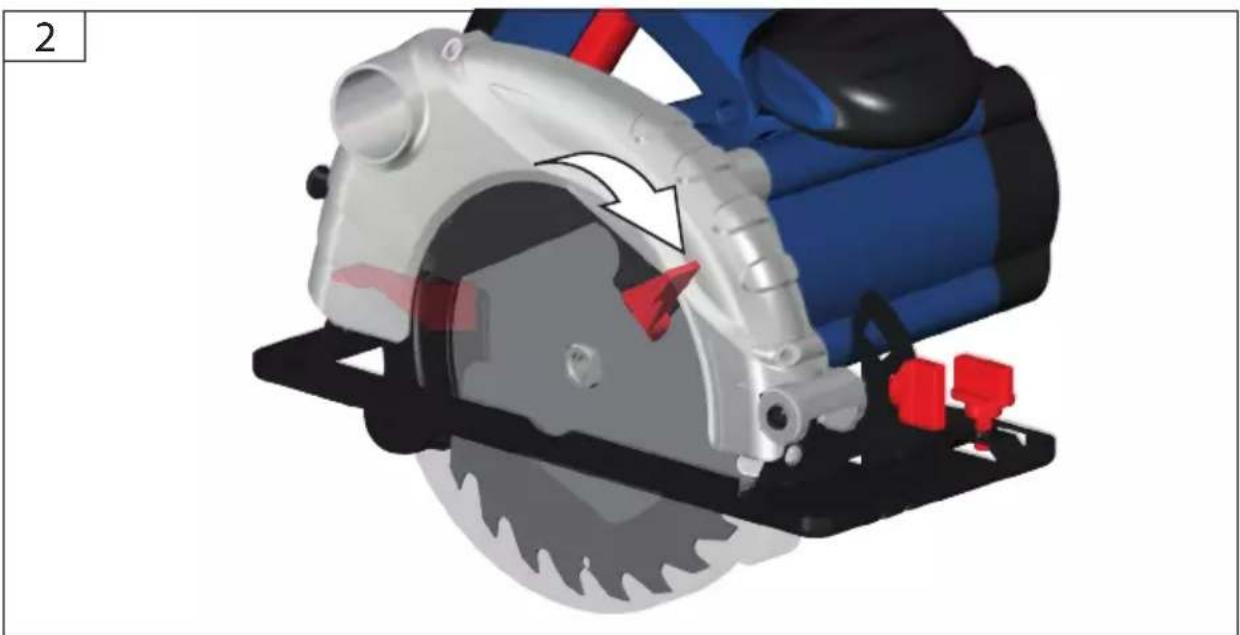
natural_image
3D rendering of a cut-out saw blade assembly with red and black components (no text or symbols visible)| D | Inbetriebnahme | GR | Прώτη θέση σε λειτουργία |
| GB | Starting-up the machine | H | Üzembe helyezés |
| F | Mise en service | SLO | Uvedba v pogon |
| I | Messa in funzione | HR | Puštanje u rad |
| E | Puesta en marcha | BG | Пускане в действие |
| NL | Inbedrijfstelling | RO | Punerea în funcțiune |
| DK | Ibrugtagning | TR | İşletime alma |
| CZ | Uvedení do provozu | PL | Uruchomienie |
| SK | Uvedenie do prevádzky |

natural_image
Close-up of a cut-out saw cutting into a circular cutter, showing blade and blade geometry (no text or symbols)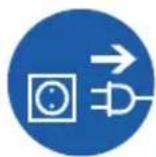

text_image
3 EN 847-1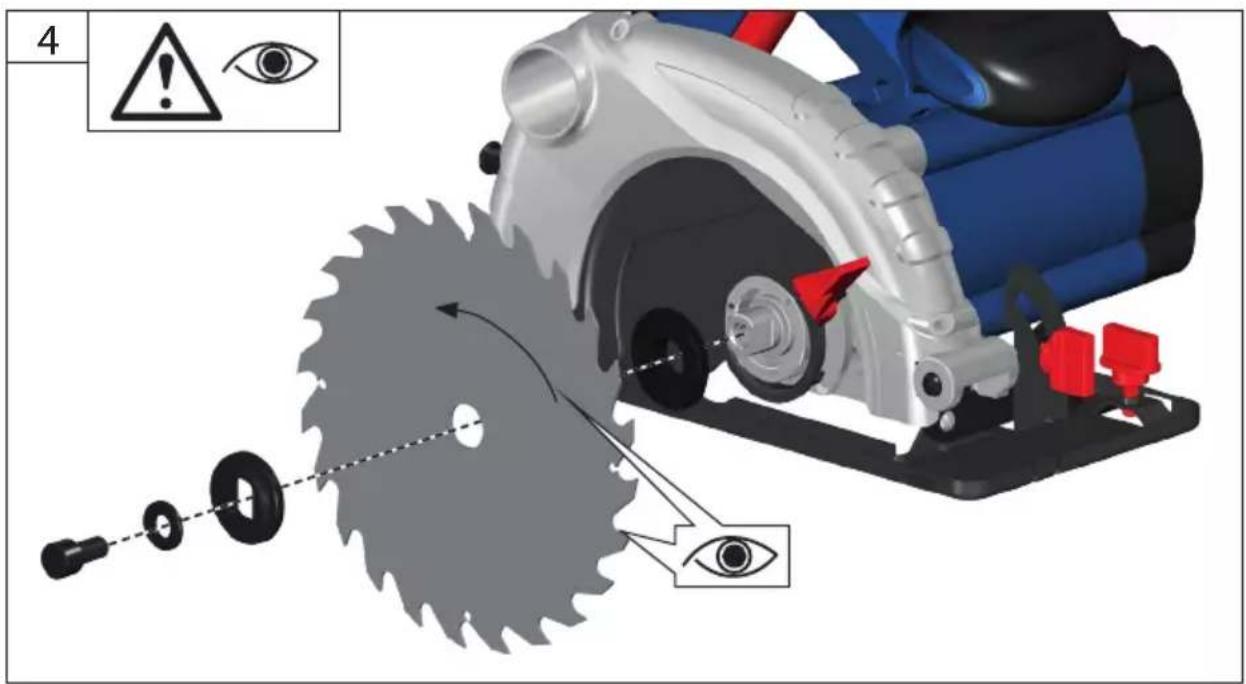
text_image
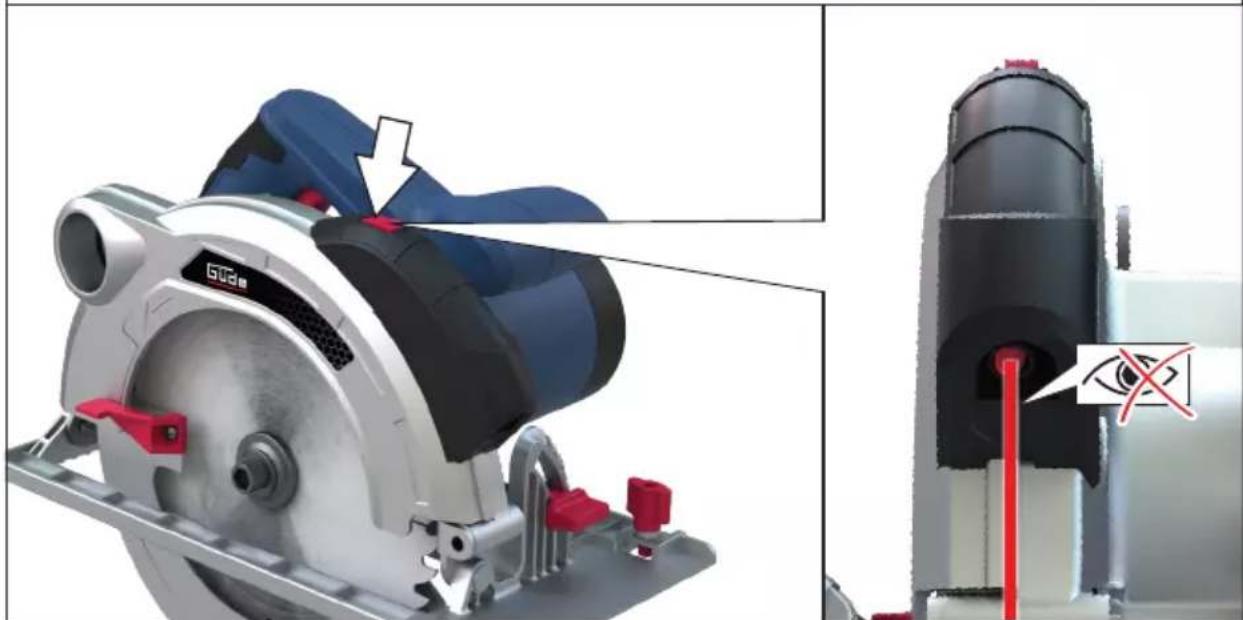
4 ! eye
natural_image
Close-up of a mechanical device with a circular saw cutting through it, showing blade and wheel (no text or symbols visible)D Inbetriebnahme
GB Starting-up the machine
F Mise en service
1 Messa in funzione
E Puesta en marcha
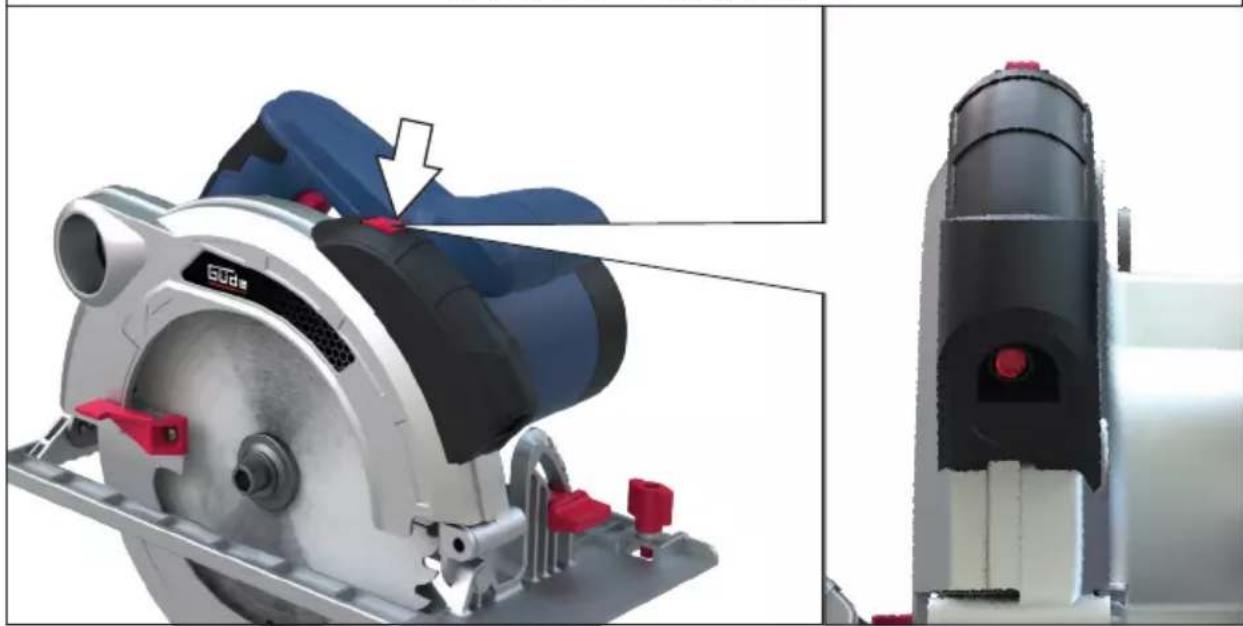
natural_image
Close-up of a mechanical device with a lock and red component, no visible text or symbols6TEST
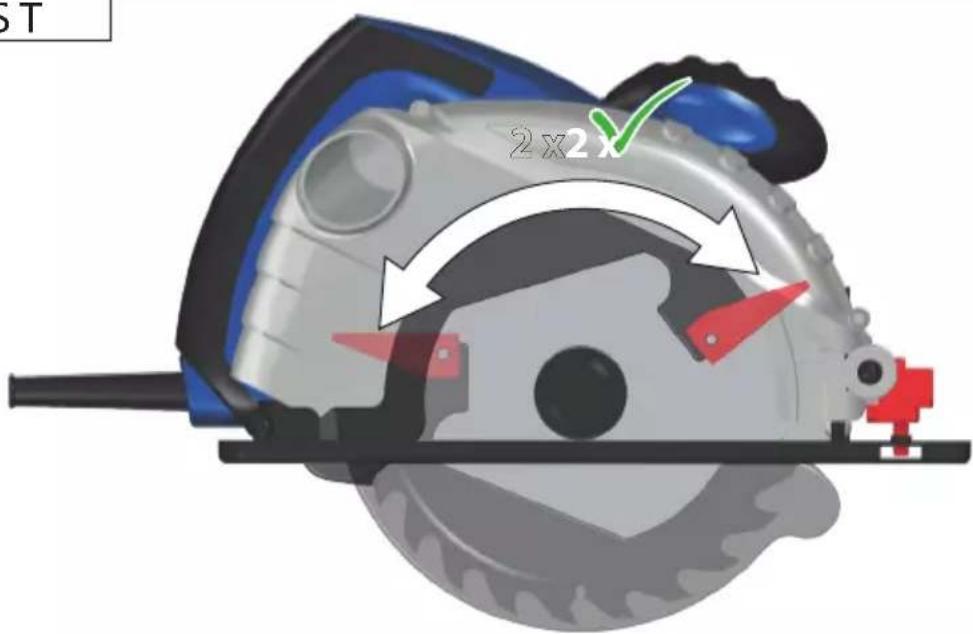
text_image
ST 2 x 2 x| D | Inbetriebnahme | GR | Прώτη θέση σε λειτουργία |
| GB | Starting-up the machine | H | Üzembe helyezés |
| F | Mise en service | SLO | Uvedba v pogon |
| I | Messa in funzione | HR | Puštanje u rad |
| E | Puesta en marcha | BG | Пускане в действие |
| NL | Inbedrijfstelling | RO | Punerea în funcțiune |
| DK | Ibrugtagning | TR | İşletime alma |
| CZ | Uvedení do provozu | PL | Uruchomienie |
| SK | Uvedenie do prevádzky |
natural_image
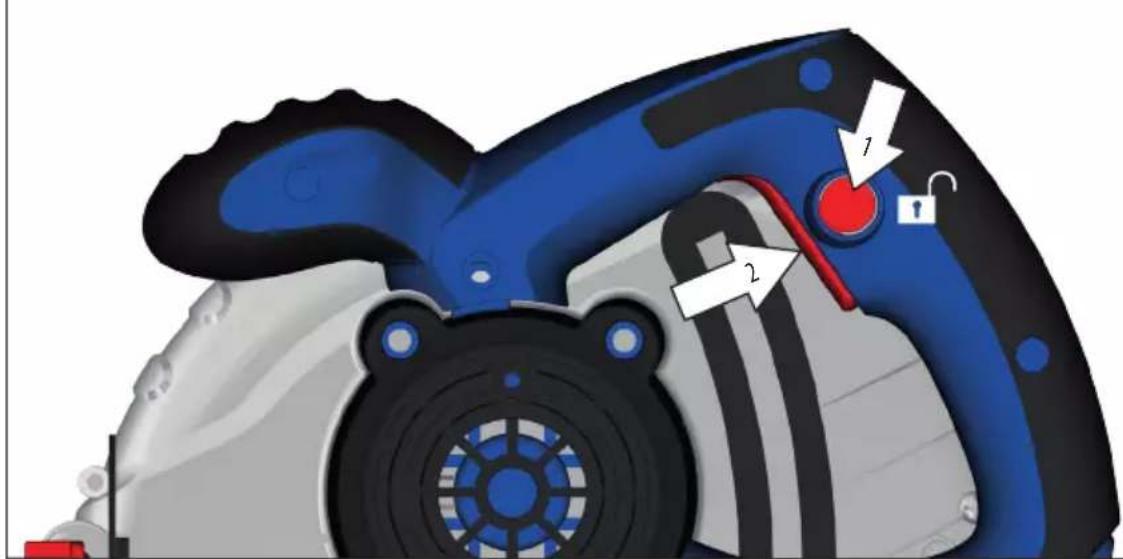
Close-up of a mechanical device with a red arrow indicating a specific component (no visible text or symbols)
natural_image
3D illustration of a blue and silver power saw with red buttons and a lock, mounted on a metal base (no text or symbols)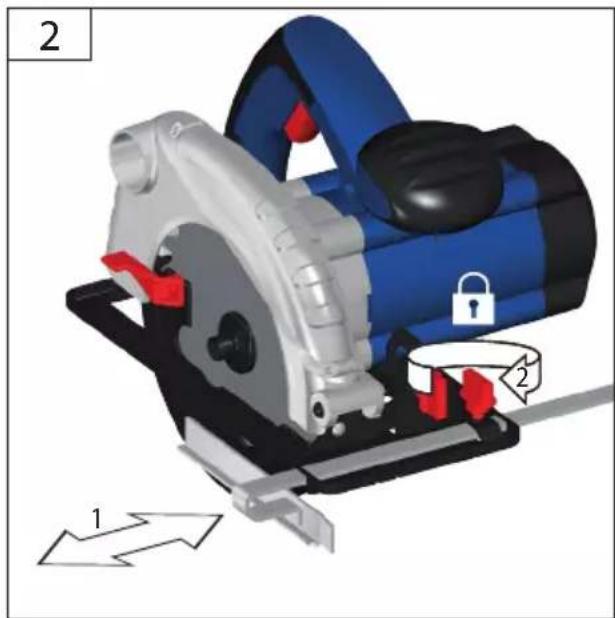
natural_image
3D illustration of a blue and silver power saw with red buttons and a lock, showing mechanical components and directional arrows (no text or symbols)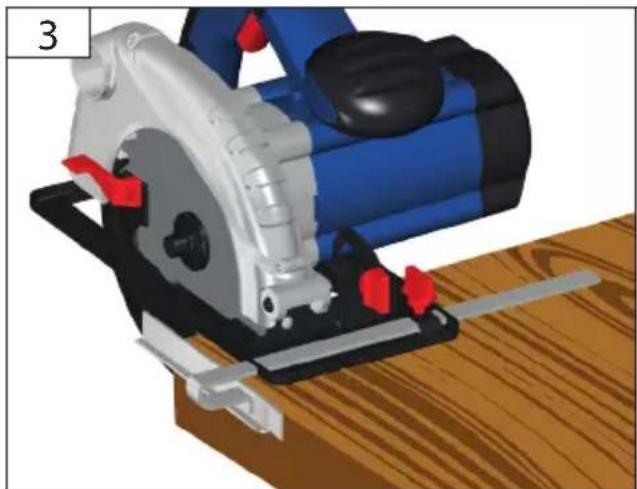
natural_image
3D rendering of a blue and silver power saw cutting a wooden workbench, no text or symbols visible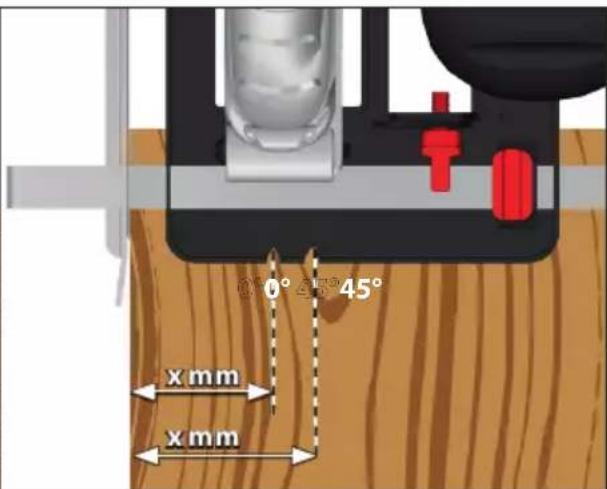
text_image
0° 0° 45° 45° x mm x mmProbeschnitt durchführen Carry out a test cut Effectuer une coupe d'essai Effettuare un taglio di prova Efectuar corte de prueba Proefsnede maken
Foretages et prøvesnit Provedte zkušební řez. Vykonat' skušobný rez. Праγματοποιήστε μια δοκιμαστική τομή. Végezzen teszvágást Opravite preizkusni rez!
Izvesti probno rezanje Направете пробно рязане! Efectuați un test de tăiere Deneme kesmesi yapin Wykonac próbę cięcia
| D | Inbetriebnahme | GR | Прώτη θέση σε λειτουργία | |
| GB | Starting-up the machine | H | Üzembe helyezés | |
| F | Mise en service | SLO | Uvedba v pogon | |
| I | Messa in funzione | HR | Puštanje u rad | |
| E | Puesta en marcha | BG | Пускане в действие | |
| NL | Inbedrijfstelling | RO | Punerea în funcțiune | |
| DK | Ibrugtagning | TR | İşletime alma | |
| CZ | Uvedení do provozu | PL | Uruchomienie | |
| SK | Uvedenie do prevádzky |

natural_image
Illustration of a saw cutting process with a red-handled tool, showing blade and wooden base (no text or symbols)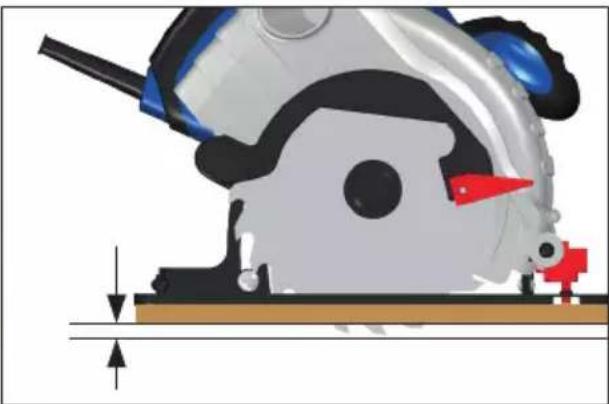
natural_image
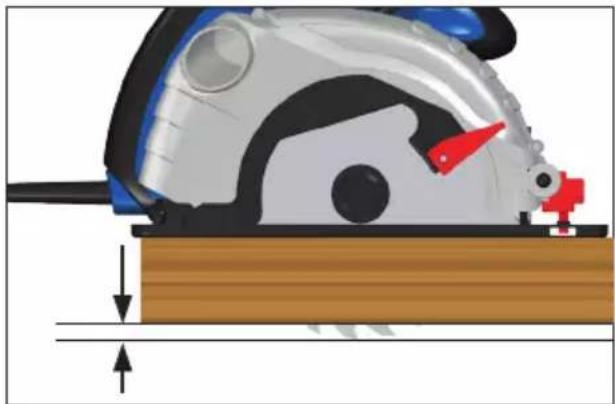
Illustration of a mechanical device with a tool and red component, showing motion or assembly (no text or symbols)Adjust the cutting depth to the thickness of the workpiece. Less than a full tooth of the blade teeth should be visible below the workpiece.
natural_image
Close-up of a car's head and front wheel assembly with a wooden base (no visible text or symbols)
natural_image
Close-up of a blue and black mechanical component with red adjustment knobs and a lock icon, no visible text or symbols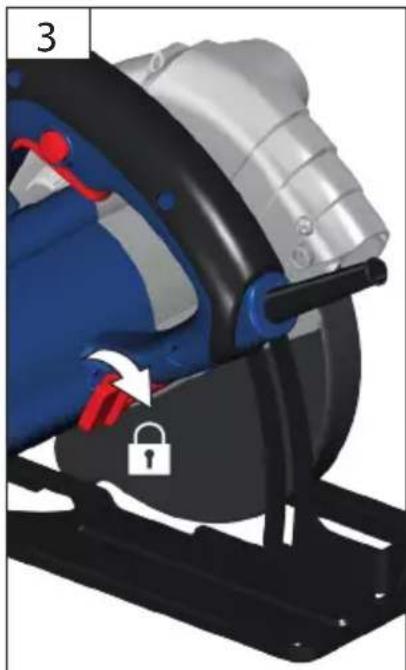
natural_image
Close-up of a car seatbelt mechanism with a lock icon and red ribbon (no text or symbols)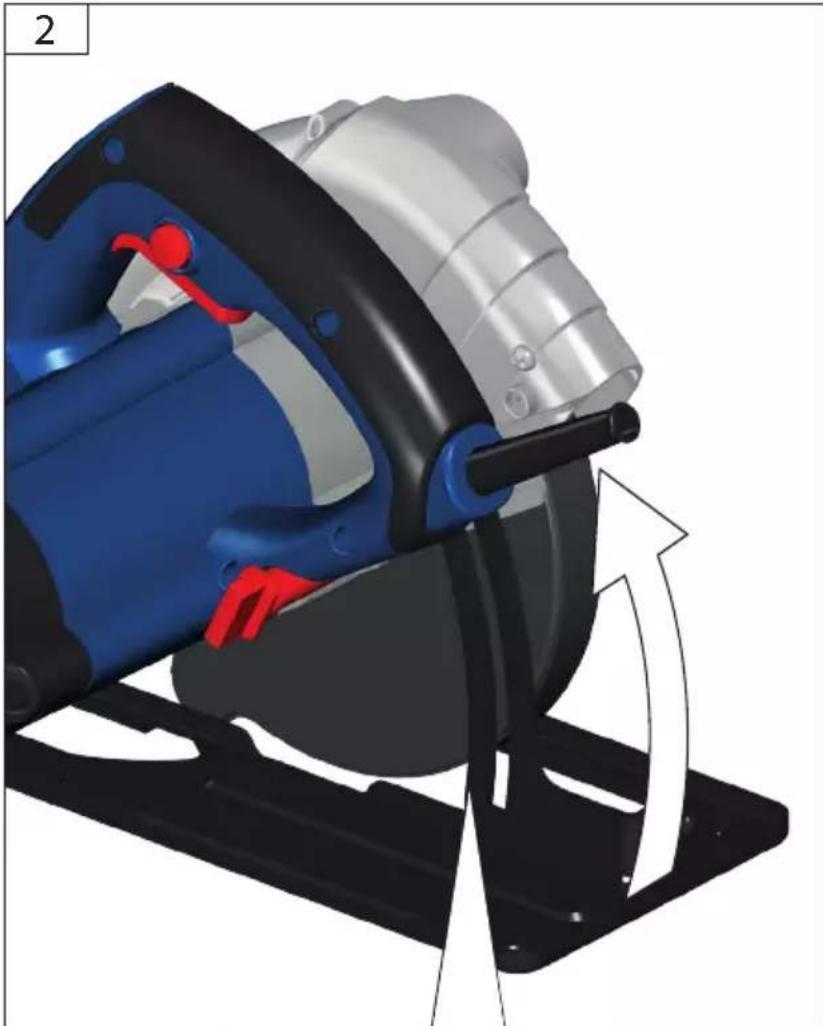
natural_image
3D rendering of a mechanical device with blue and silver components, showing a directional arrow (no text or symbols)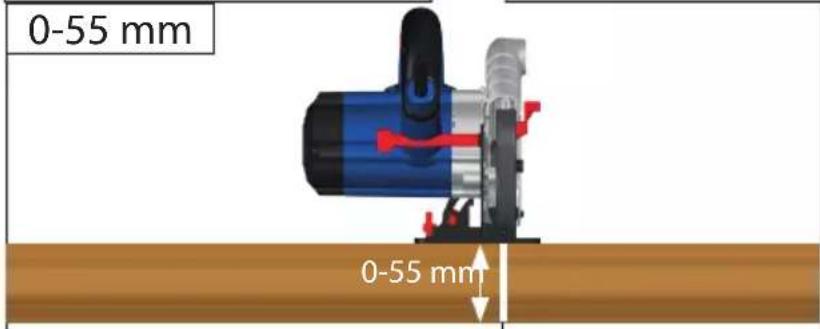
text_image
0-55 mm 0-55 mm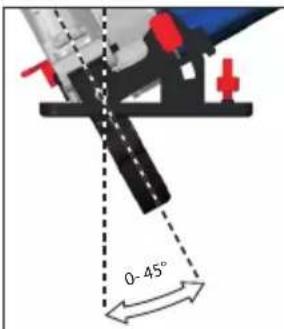
text_image
0-45°D Inbetriebnahme
GB Starting-up the machine
F Mise en service
I Messa in funzione
E Puesta en marcha
natural_image
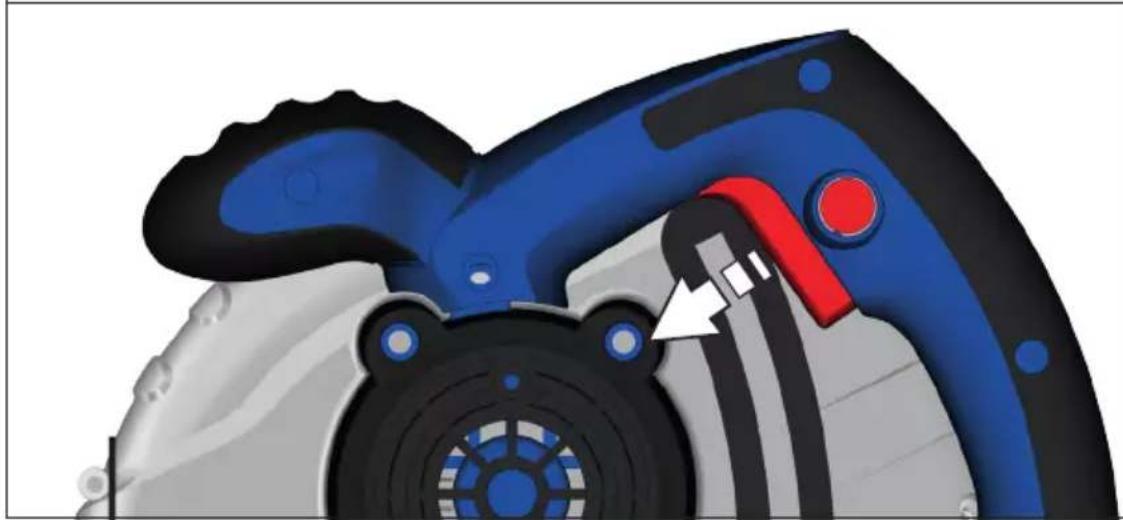
Diagram of a mechanical device with a lock and red button, showing internal components and a curved arrow indicating rotation (no text or symbols)2
text_image
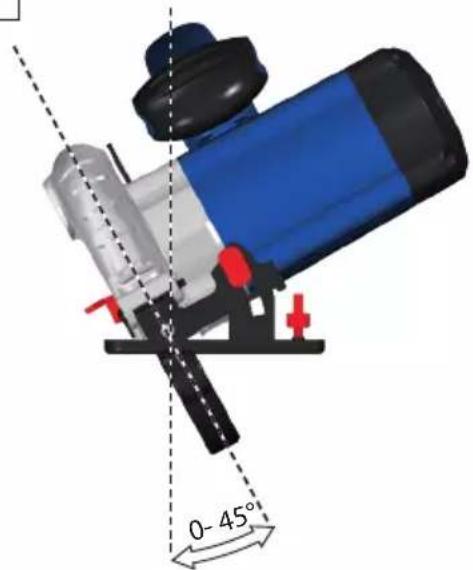
0-45°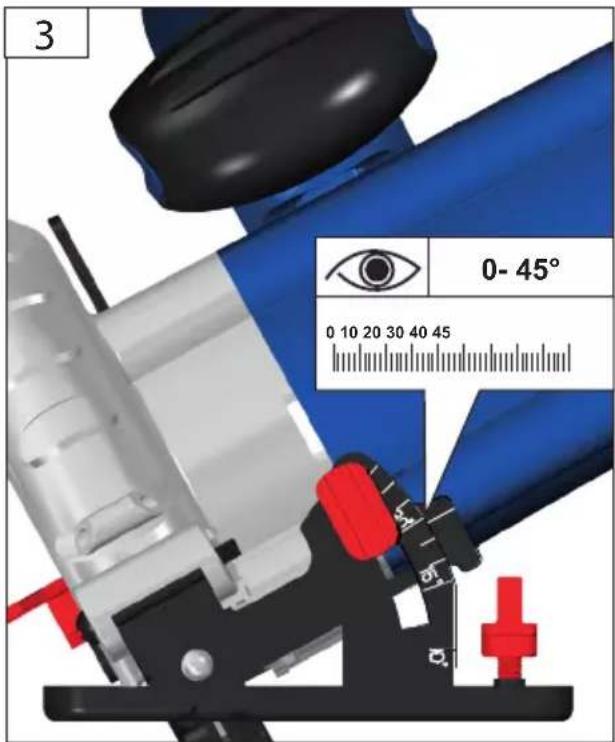
text_image
3 0- 45° 0 10 20 30 40 454
natural_image
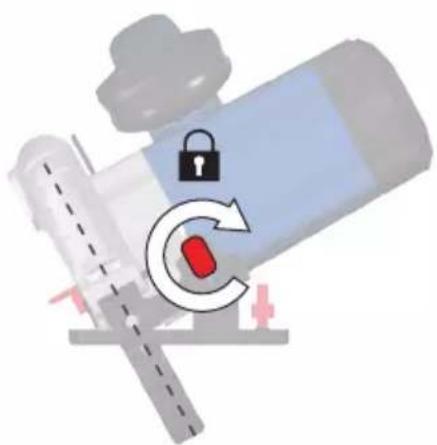
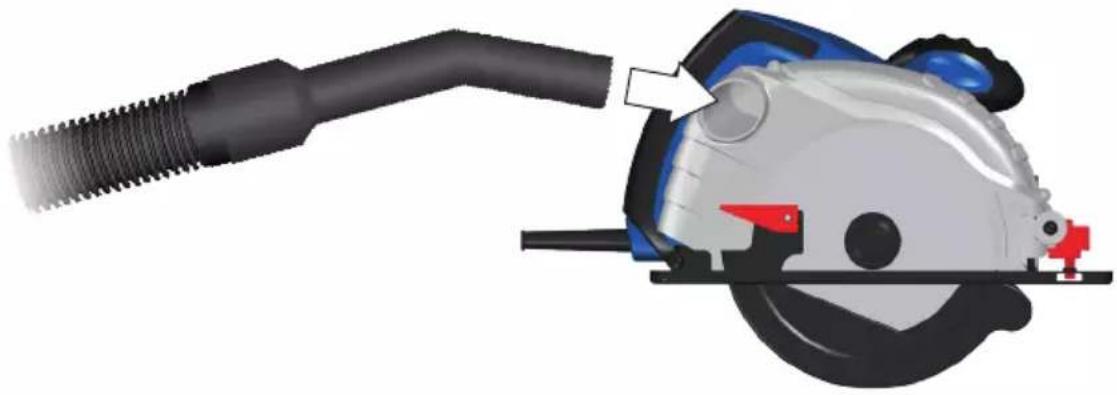
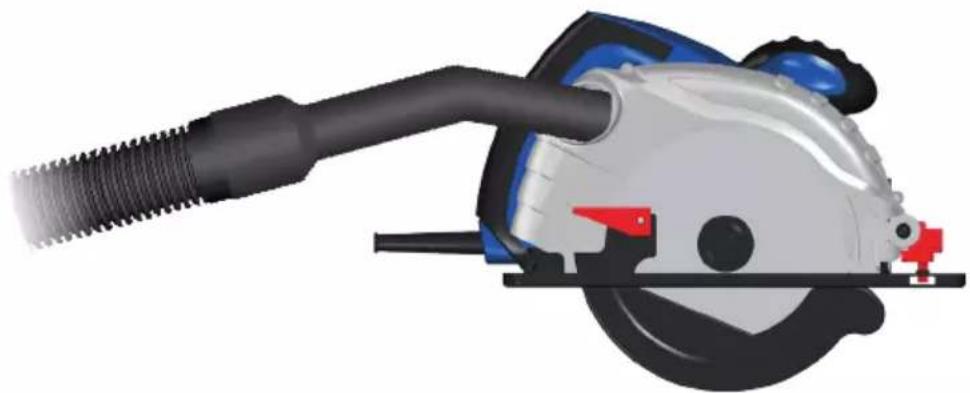
Diagram of a mechanical device with a lock and red capsule, showing internal components and motion arrows (no text or symbols)D Staubabsaugung
GB Dust extractor
natural_image
Illustration of a vacuum cleaner with a close-up of its arm and handle (no text or symbols)
1
natural_image
Illustration of a cut-out saw cutting into a circular cutter (no text or symbols)2
natural_image
Illustration of a cut-out saw cutting into a circular cutter (no text or symbols)START STOP
natural_image
Close-up of a blue and black handheld device with red buttons (no visible text or symbols)DE Betrieb
EN Operation
FR Fonctionnement
IT Esercizio
NL Gebruik
CZ Provoz
SK Prevádzka
HU Üzemeltetés


LASER 2

EN 60825-1:2014 P ≤ =1 mW λ = 650nm
natural_image
Close-up of a hand holding a damaged mechanical component, showing internal components and a close-up of a device with a red indicator light (no text or symbols visible)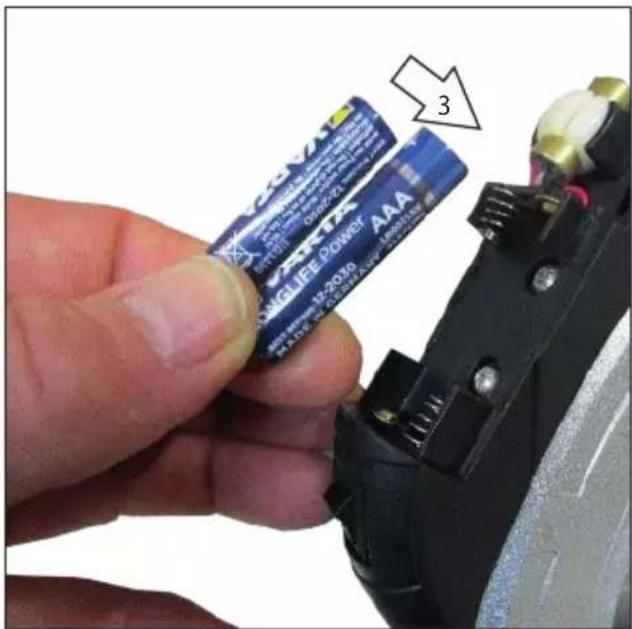
text_image
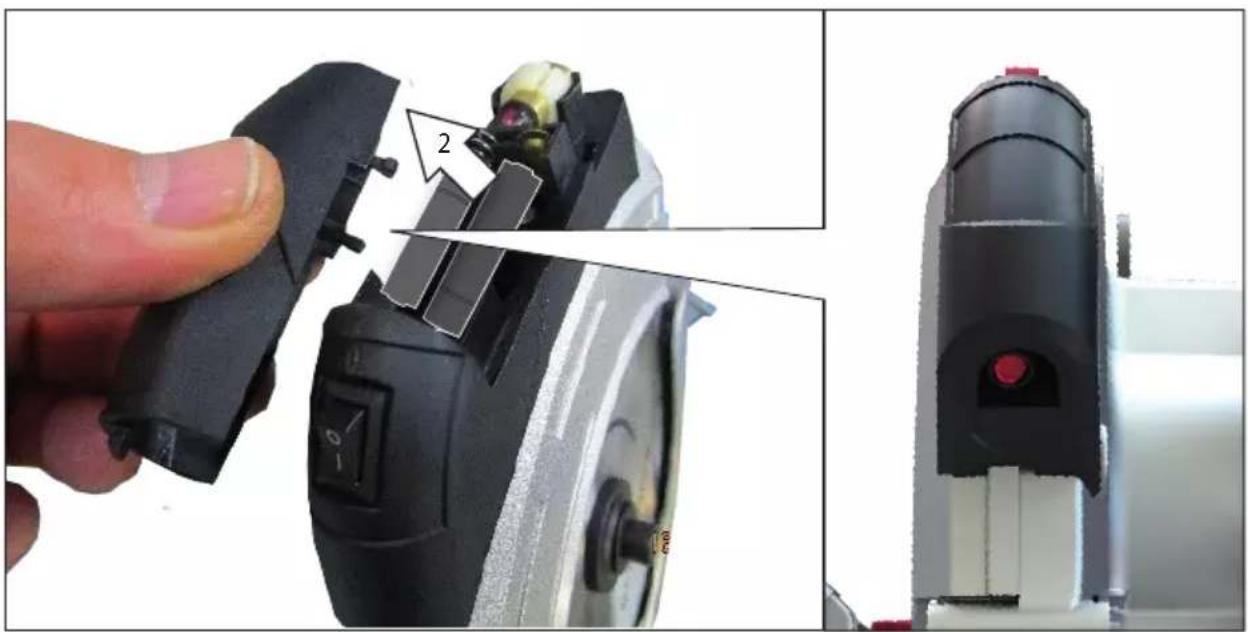
3 LONGLIFE POWER AAA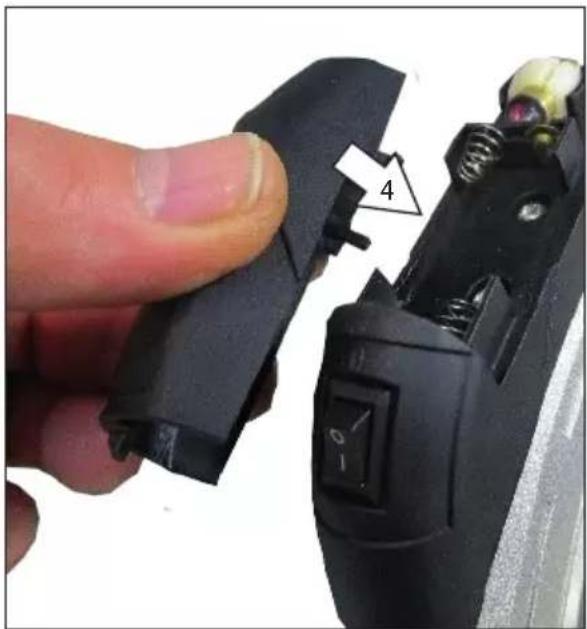
natural_image
Close-up of a hand holding a black plastic mechanical component with a labeled switch (no text or symbols visible)DE Betrieb
EN Operation
FR Fonctionnement
IT Esercizio
NL Gebruik
CZ Provoz
SK Prevádzka
HU Üzemeltetés
START
STOP
natural_image
Close-up of a blue and black handheld device with red buttons (no visible text or symbols)

LASER 2

EN 60825-1:2014 P <=1 mW λ = 650nm
START LASER
natural_image
Technical illustration of a cutting tool and a cylindrical device with a red warning symbol (no text or labels present)STOPP LASER
natural_image
Technical illustration of a 600D cutter and its side view showing blade assembly (no text or symbols)
text_image
START STOP| D | Betrieb | GR | Λειτουργία |
| GB | Operation | H | Üzemeltetés |
| F | Fonctionnement | SLO | Delovanje |
| I | Esercizio | HR | Rad |
| E | Funcionamiento | BG | Pабота |
| NL | Gebruik | RO | Funcționare |
| DK | Drift | TR | İşletim |
| CZ | Provoz | PL | Eksploatacja |
| SK | Prevádzka |


START
text_image
Diagram of a car brake caliper with labeled parts and directional arrows indicating key componentsSTOP
natural_image
Close-up of a blue and white car brake caliper with a red grip and circular head (no text or symbols visible)| D | Betrieb | GR | Λειτουργία |
| GB | Operation | H | Üzemeltetés |
| F | Fonctionnement | SLO | Delovanje |
| I | Esercizio | HR | Rad |
| E | Funcionamiento | BG | Pабота |
| NL | Gebruik | RO | Functionare |
| DK | Drift | TR | İşletim |
| CZ | Provoz | PL | Eksploatacja |
| SK | Prevádzka |

text_image
START STOP


text_image
A
natural_image
Diagram of a blue cylindrical device with a red X mark and a gray cap, resting on a brown surface (no text or symbols)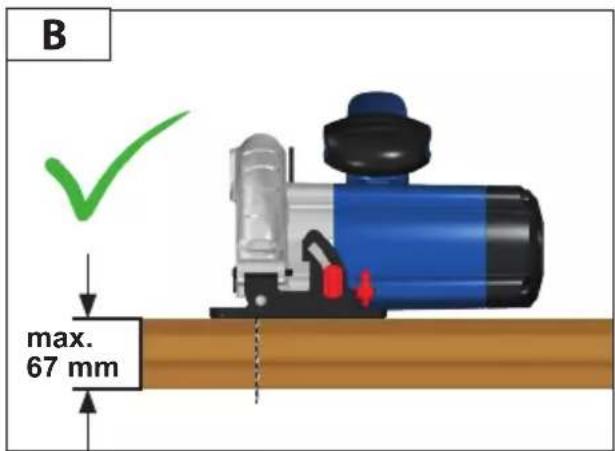
text_image
B max. 67 mm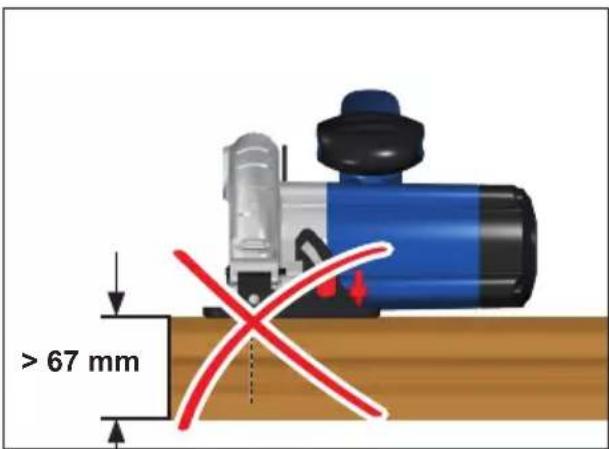
text_image
> 67 mm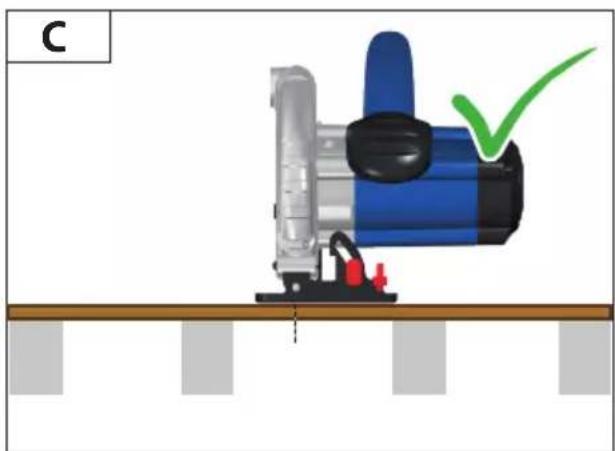
natural_image
Illustration of a mechanical device with a blue handle and green checkmark, mounted on a wooden surface (no text or symbols)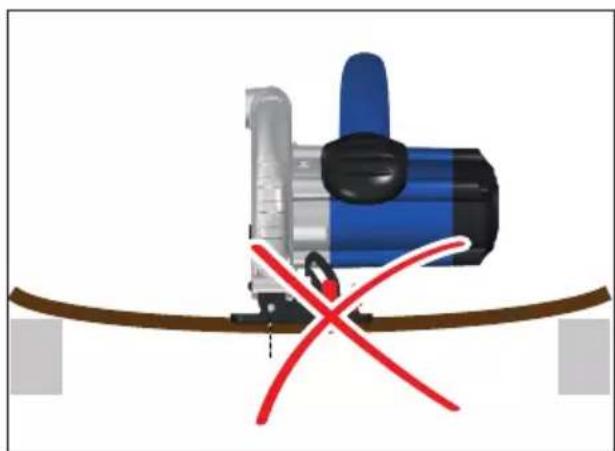
natural_image
Diagram of a mechanical device with blue and gray components, marked with red X (no text or symbols)| D | Betrieb | GR | Λειτουργία | |
| GB | Operation | H | Üzemeltetés | |
 | F | Fonctionnement | SLO | Delovanje |
| I | Esercizio | HR | Rad | |
| E | Funcionamiento | BG | Pабота | |
| NL | Gebruik | RO | Functionare | |
| DK | Drift | TR | İşletim | |
| CZ | Provoz | PL | Eksploatacja | |
| SK | Prevádzka |


text_image
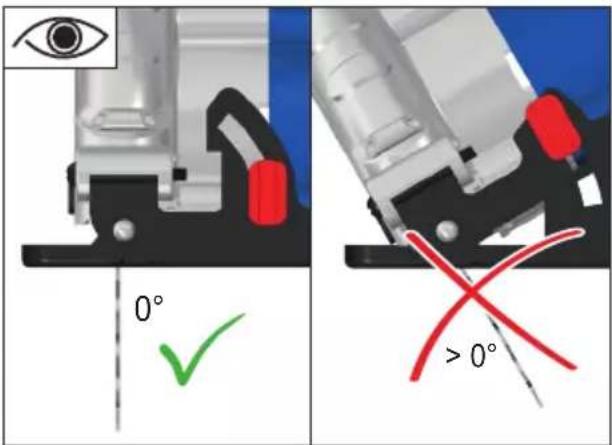
1 Eye ✓ X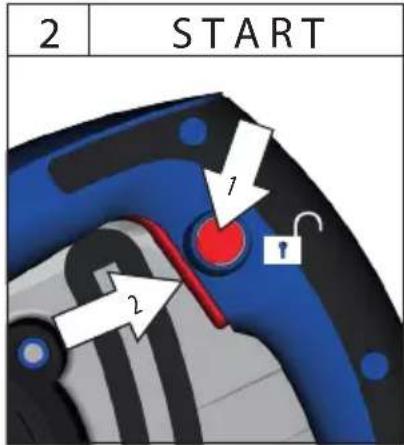
text_image
2 START 1 2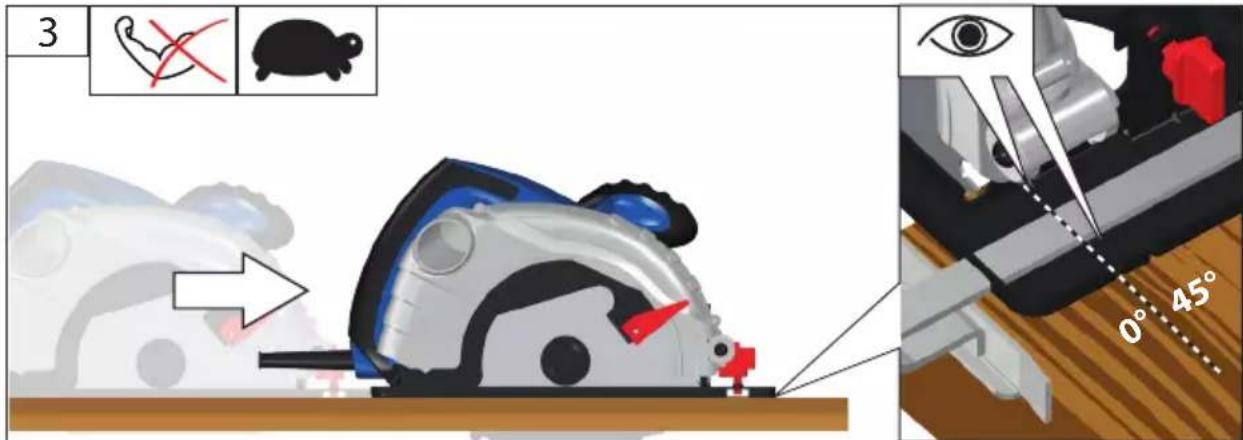
text_image
3 0° 45°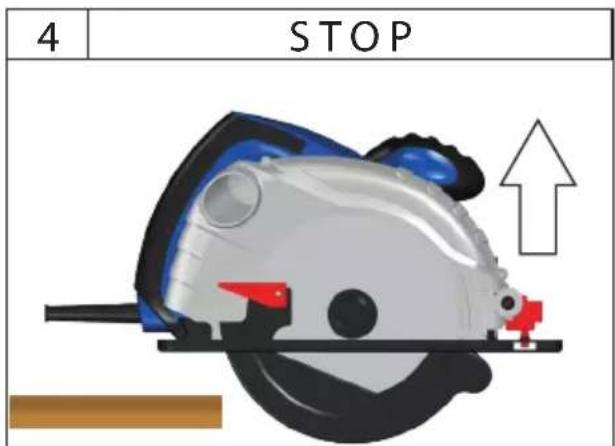
text_image
4 STOP| D | Betrieb | GR | Λειτουργία | |
| GB | Operation | H | Üzemeltetés | 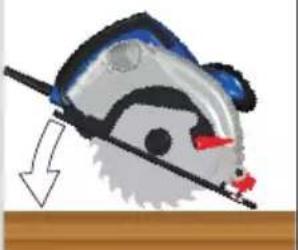 |
| F | Fonctionnement | SLO | Delovanje | |
| I | Esercizio | HR | Rad | |
| E | Funcionamiento | BG | Pábota | |
| NL | Gebruik | RO | Functionare | |
| DK | Drift | TR | İşletim | |
| CZ | Provoz | PL | Eksploatacja | |
| SK | Prevádzka |


text_image
0° ✓ > 0°
natural_image
3D rendering of a blue and silver power saw cutting a saw, with red buttons and a white arrow indicating rotation (no text or symbols)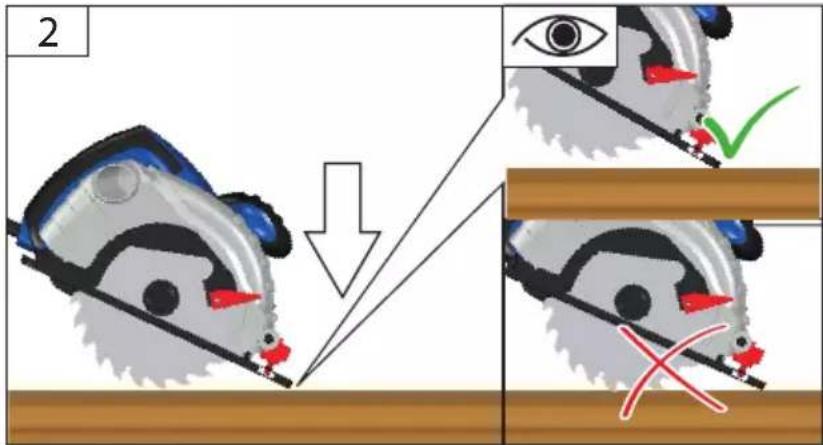
text_image
2 ↓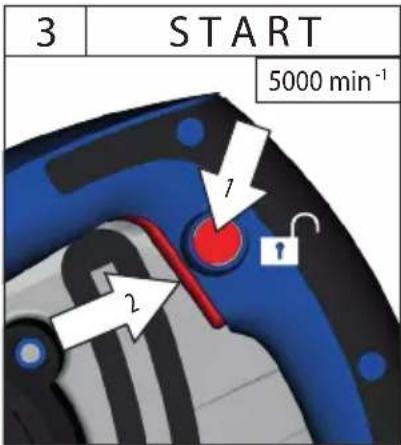
text_image
3 | START 5000 min⁻¹ 1 2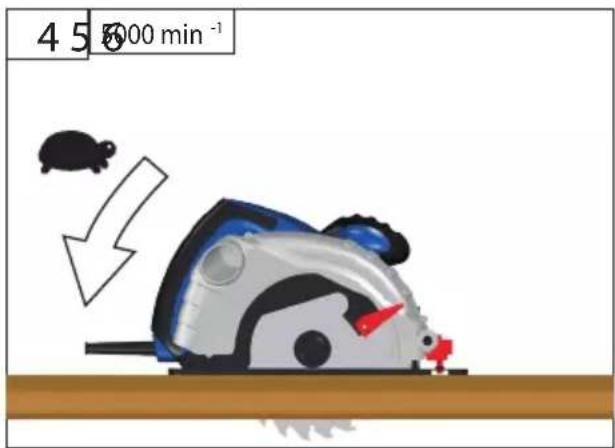
text_image
4 5 8000 min⁻¹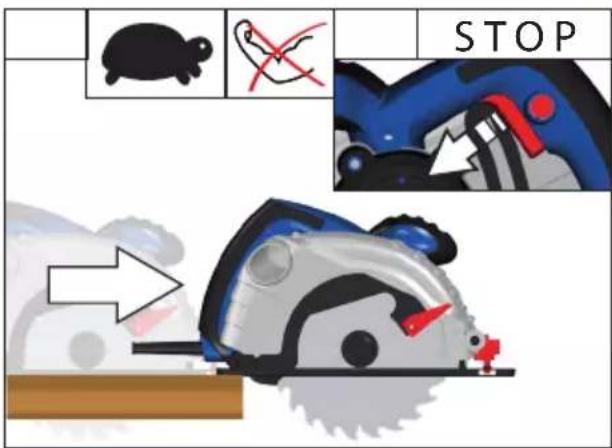
text_image
STOPTechnische Daten
| Circular saw | HKS 65-1500 L |
| Art. No 58238 | |
| Service connection 230V - 50Hz | |
| Rated input 1600 W | |
| No-load speed 5000 min | -1 |
| Saw blade dia. x hole dia 190 x 20 mm | |
| Max. Cutting depth at 90°/45° 65 / 44 | |
| Weight 4,3 kg | |
| Noise details | |
| Sound pressure level L_pA | 96,3 dB(A) |
| Sound power level L_WA | 104,3 dB(A) |
| Measured according to EN 62841; Uncertainty K = 3 dB (A) | |
| Wear ear protectors! | |
| Vibration details | |
| Vibration total values (triaxial vector sum) deter-mined according to EN 62841: | |
| Vibration emission value a_h | 2,050 m/s2 |
| Uncertainty K = 1,5 m/s2 | |
WARNING: The vibration emission level will vary because of the ways in which a power tool can be used and may increase above the level given in this information sheet.
The vibration emission level may be used to compare one tool with another.
It may be used for a preliminary assessment of exposure.
An accurate estimate of the vibratory load should also take into account the times when the tool is shut down or when it is running but not actually in use. This may significantly reduce the vibratory load over the total working period.
Identify additional safety measures to protect the operator from the effects of vibration such as: maintain the tool and the accessories, keep the hands warm, organisation of work patterns.


Read and understand the operating instructions before using the appliance. Familiarise with the
control elements and how to use the appliance properly. Abide by all the safety measures stated in the service manual. Act responsibly toward third parties.
The operator is responsible for accidents or risks to
third parties.
Persons over 16 years of age can only work on the appliance. An exception includes youngsters trained in order to reach knowledge under supervision of the trainer during occupational education.
In case of any doubts about connection and operation refer please to our customer center
Specified Conditions Of Use
This electronic circular saw can cut lengthways and mitre accurately in wood.
Do not use this product in any other way as stated for normal use. Not observing general regulations in force and instructions from this manual does not make the manufacturer liable for damages.
Emergency procedure
Conduct a first-aid procedure adequate to the injury and summon qualified medical attendance as quickly as possible. Protect the injured person from further harm and calm them down. If you seek help, state the following pieces of information: 1. Accident site, 2.
Accident type, 3. Number of injured persons, 4. Injury type(s)
Symbols

WARNING / Caution!

Read the operating instructions to reduce the risk of injury.

Wear eye protective goggles! Wear ear protectors!

Wear gloves!

Unplug the machine before any work on it.

Class II tool.

CE marking
Any damaged or disposed electric or electronic devices must be delivered to appropriate collection centres.

WARNING Read all safety warnings and all
instructions. Failure to follow the warnings and instructions may result in electric shock, fire and/or serious injury.
Save all warnings and instructions for future reference.
Safety instructions for manual circular saws
Cutting procedures
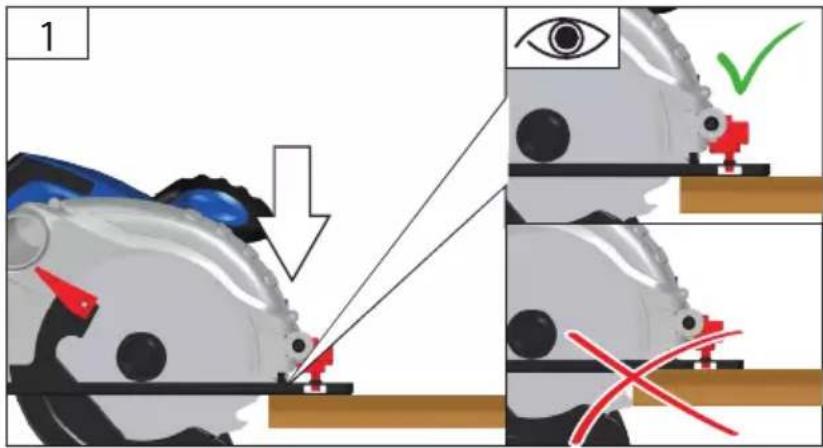
a) DANGER: Keep hands away from cutting area and the blade. Keep your second hand on auxiliary handle, or motor housing. If both hands are holding the saw, they cannot be cut by the blade.
b) Do not reach underneath the workpiece. The guard cannot protect you from the blade below the workpiece.
c) Adjust the cutting depth to the thickness of the workpiece. Less than a full tooth of the blade teeth should be visible below the workpiece.
d) Never hold piece being cut in your hands or across your leg. Secure the workpiece to a stable platform. It is important to support the work properly to minimize body exposure, blade binding, or loss of control.
e) Hold the power tool by insulated gripping surfaces only, when performing an operation where the cutting tool may contact hidden wiring or its own cord. Contact with a „live“ wire will also make exposed metal parts of the power tool „live“ and could give the operator an electric shock.
f) When ripping, always use a rip fence or straight edge guide. This improves the accuracy of cut and reduces the chance of blade binding.
g) Always use blades with correct size and shape (diamond versus round) of arbour holes. Blades that do not match the mounting hardware of the saw will run eccentrically, causing loss of control.
h) Never use damaged or incorrect blade washers or bolt. The blade washers and bolt were specially designed for your saw, for optimum performance and safety of operation.
Kickback causes and related warnings
– kickback is a sudden reaction to a pinched, bound or misaligned saw blade, causing an uncontrolled saw to lift up and out of the workpiece toward the operator;
– when the blade is pinched or bound tightly by the kerf closing down, the blade stalls and the motor reaction drives the unit rapidly back toward the operator;
- if the blade becomes twisted or misaligned in the cut, the teeth at the back edge of the blade can dig into the top surface of the wood causing the blade to climb out of the kerf and jump back toward the operator.
Kickback is the result of saw misuse and/or incorrect operating procedures or conditions and can be avoided by taking proper precautions as given below.
a) Maintain a firm grip with both hands on the saw and position your arms to resist kickback forces. Position your body to either side of the blade, but not in line with the blade. Kickback could cause the saw to jump backwards, but kickback forces can be controlled by the operator, if proper precautions are taken.
b) When blade is binding, or when interrupting a cut for any reason, release the trigger and hold the saw motionless in the material until the blade comes to a complete stop. Never attempt to remove the saw from the work or pull the saw backward while the blade is in motion or kickback may occur. Investigate and take corrective actions to eliminate the cause of blade binding.
c) When restarting a saw in the workpiece, centre the saw blade in the kerf and check that saw teeth are not engaged into the material. If saw blade is binding, it may walk up or kickback from the workpiece as the saw is restarted.
d) Support large panels to minimise the risk of blade pinching and kickback. Large panels tend to sag under their own weight. Supports must be placed under the panel on both sides, near the line of cut and near the edge of the panel.
e) Do not use dull or damaged blades. Unsharpened or improperly set blades produce narrow kerf causing excessive friction, blade binding and kickback.
f) Blade depth and bevel adjusting locking levers must be tight and secure before making cut. If blade adjustment shifts while cutting, it may cause binding and kickback.
g) Use extra caution when sawing into existing walls or other blind areas. The protruding blade may cut objects that can cause kickback.
Lower guard function
a) Check lower guard for proper closing before each use. Do not operate the saw if lower guard does not move freely and close instantly. Never clamp or tie the lower guard into the open position. If saw is accidentally dropped, lower guard may be bent. Raise the lower guard with the retracting handle and make sure it moves freely and does not touch the blade or any other part, in all angles and depths of cut.
b) Check the operation of the lower guard spring. If the guard and the spring are not operating properly, they must be serviced before use. Lower guard may operate sluggishly due to damaged parts, gummy deposits, or a build-up of debris.
c) Lower guard may be retracted manually only for special cuts such as „plunge cuts“ and „compound cuts“. Raise lower guard by retracting handle and as soon as blade enters the material, the lower guard must be released. For all other sawing, the lower guard should operate automatically.
d) Always observe that the lower guard is covering the blade before placing saw down on bench or floor. An unprotected, coasting blade will cause the saw to walk backwards, cutting whatever is in its path. Be aware of the time it takes for the blade to stop after switch is released.
Additional Safety and Working Instructions
Use protective equipment. Always wear safety glasses when working with the machine. The use of protective clothing is recommended, such as dust mask, protective gloves, sturdy non-slip footwear and ear defenders.
The dust produced when using this tool may be harmful to health. Do not inhale the dust. Use a dust absorption system and wear a suitable dust protection mask. Remove deposited dust thoroughly, e.g. with a vacuum cleaner.
Always keep the connection cable from the working area of the device. Always guide the cable backwards, away from the device!
Do not machine any materials that present a danger to health (e.g. asbestos).
When working in walls ceiling, or floor, take care to avoid electric cables and gas or waterpipes.
Please turn the device immediately off when the tool used gets blocked! Do not turn the device on again when the tool is still blocked. This could cause bounce back with a high reaction moment. Determine and remove the cause of the blocking of the tool used while respecting the safety instructions.
The possible causes may be:
- it is tilted in the workpiece to be machined
- it has pierced through the material to be machined
• the power tool is overloaded
Do not reach into the machine while it is running.
Chips and splinters must not be removed while the machine is running.
WARNING! Danger of burns
The insertion tool may become hot during use.
- when changing tools
- when setting the device down
Adapt the feed speed to avoid overheating the blade tips and to avoid melting plastic materials during cutting.
Mains Connection
Operation is only allowed with a safety switch against stray current (RCD max. stray current of 30mA).
Connect only to single-phase AC system voltage as indicated on the rating plate. It is also possible to connect to sockets without an earthing contact as the design conforms to safety class II. Only plug-in when machine is switched off.
Maintenance
⚠️ Unplug the machine before any work on it.
Repairs and works specified in these Instructions may only be performed by qualified authorised staff. Use only original accessories and original spare parts.
Keep the device, in particular the air vents, clean at all times. Never spray water on the device body! Do not clean the plastics with solvents, flammable or toxic fluids. For cleaning, use a damp cloth only.
Caution! If the power cord of the appliance gets damaged, it must be replaced by the manufacturer or its customer service or a similarly qualified person to avoid danger.
Only a regularly maintained and treated appliance can serve as a satisfactory aid. Insufficient maintenance and care can lead to unforeseen accidents and injuries.
If necessary, a list of spare parts can be found at www.guede.com.