
16310228 - Vacuum packaging machines Melissa - Free user manual and instructions
Find the device manual for free 16310228 Melissa in PDF.
| Product type | Vacuum packaging appliance |
| Brand | Melissa |
| Model | 16310228 |
| Power supply | 230 V, 50 Hz |
| Main functions | Vacuum sealing, sealing, dry/wet food selection, emergency stop (STOP), use with hose for containers and wine stoppers |
| Sealing power | Hot wire with integrated sealing line |
| Maximum bag capacity | Free space of at least 7 cm between the content and the edge of the bag |
| Dimensions (estimated) | Approximately 40 x 20 x 10 cm |
| Weight (estimated) | Approximately 1.5 kg |
| Material | ABS plastic |
| Included accessories | Vacuum hose, cutting blade, user manual |
| Usage type | Private, indoor only |
| Safety | Overheat protection with automatic shut-off, STOP button, lid lock |
| Maintenance and cleaning | Clean with a damp cloth and mild detergent. Do not use abrasive products. Clean the sealing line after each use. |
| Cooling time between uses | At least 60 seconds between two vacuum sealings, 30 seconds between two simple sealings |
| Estimated lifespan | 5 to 10 years depending on usage |
| Repairability | Repair only by an authorized repairer. Do not open or modify the appliance. |
| Spare parts | Available from the manufacturer or retailer (bags, hose, gaskets) |
| Warranty | Standard warranty according to manufacturer's conditions. Void in case of misuse or unauthorized repair. |
| General information | Made in China for Adexi A/S, Lægårdsvej 9C, DK-8520 Lystrup, www.adexi.eu |
| Manual | 69 pages, available in multiple languages (FR, DA, DE, EN, ES, FI, NL, SV) |
Frequently Asked Questions - 16310228 Melissa
User questions about 16310228 Melissa
0 question about this device. Answer the ones you know or ask your own.
Ask a new question about this device
Download the instructions for your Vacuum packaging machines in PDF format for free! Find your manual 16310228 - Melissa and take your electronic device back in hand. On this page are published all the documents necessary for the use of your device. 16310228 by Melissa.
USER MANUAL 16310228 Melissa
-
Kontrollamper for drift
-
VAC SEAL
text_image
Technical diagram of a device casing with numbered parts for identificationDK

natural_image
Line drawing of a printer with paper and a printed cover (no text or symbols)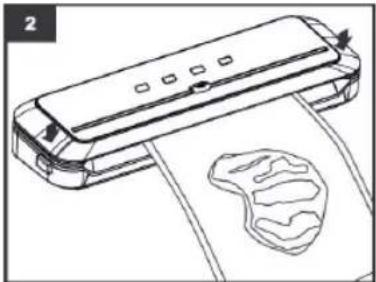
natural_image
Line drawing of a printer with a printed cover, no text or symbols present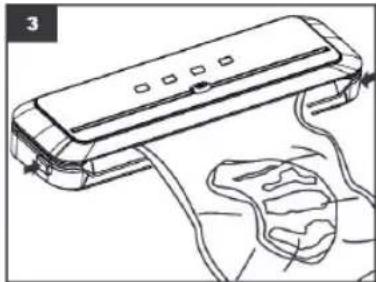
natural_image
Line drawing of a handheld electronic device with wires and connectors (no text or symbols)FORSEGLING OG VAKUUMFORSEGLING
natural_image
Line drawing of a hand holding a cable inserted into a device (no text or symbols)RENG∅RING
text_image
Technical diagram of a device casing with numbered components for identificationSE
natural_image
Line drawing of a printer with paper and a printed cover (no text or symbols)
natural_image
Line drawing of a printer with paper and cable, no text or symbols present
natural_image
Line drawing of a handheld electronic device with wires and a strap (no text or symbols)FÖRSEGLING OCH VAKUUMFÖRSEGLING
natural_image
Line drawing of a hand pressing down on a device with a ruler, showing no text or symbolsSE
INFORMATION OM KASSERING OCH ÅTERVINNING AV DENNA PRODUKT
text_image
Technical diagram of a device casing with numbered components for identificationFI

natural_image
Line drawing of a printer with paper and a printed cover (no text or symbols)
natural_image
Line drawing of a printer with paper and cable, no text or symbols present
natural_image
Line drawing of a handheld electronic device with wires and a strap (no text or symbols)KUUMASAUMAAMINEN JA TYHJIÖPAKKAAMINEN
natural_image
Line drawing of a hand pressing down on a device with a ruler, showing no text or symbolsFI
PUHDISTUS
To get the best out of your new vacuum sealer, please read through these instructions carefully before using it for the first time. Take particular note of the safety precautions. We also recommend that you keep the instructions for future reference.
GENERAL SAFETY INSTRUCTIONS
- This appliance may only be used by children aged from 8 years and above and persons with reduced physical, sensory or mental capabilities or lack of experience and knowledge if they are supervised or have been given instructions concerning use of the appliance in a safe way and understand the hazards involved. Children must not play with the appliance. Cleaning and user maintenance must not be performed by children without supervision.
- Never leave unattended when in use. Keep an eye on any children in the vicinity of the appliance when it is in use. The appliance is not a toy.
- Incorrect use of this appliance may cause personal injury or damage the appliance.
- Use for the intended purpose only. The manufacturer is not responsible for any injury or damage resulting from incorrect use or handling (see also Warranty Terms).
- For domestic use only. Not for outdoor or commercial use.
UK
- Remove all packaging and transport materials from the inside and outside of the appliance.
- Check that the appliance has no visible damage and that no parts are missing.
- Do not use with any cords other than that supplied.
- Check that it is not possible to pull or trip over the cord or any extension cord.
-
The appliance must not be used together with a timer switch or a separate remote control system.
-
Turn off the appliance and remove the plug from the socket when cleaning or when not in use.
- Avoid pulling the cord when removing the plug from the socket. Instead, hold the plug.
- Keep the cord and appliance away from heat sources, hot objects and naked flames.
- Ensure that the cord is fully extended.
• The cord must not be twisted or wound around the appliance.
UK
- Check regularly that neither the cord nor plug is damaged and do not use the appliance if there is any damage, or if it has been dropped on the floor, dropped in water or damaged in any other way.
- If the appliance, cord or plug have been damaged, have the appliance inspected and if necessary repaired by an authorised repairer.
- Connect to 230 V, 50 Hz only. The warranty is not valid if the appliance is connected to incorrect voltage.
- Never try to repair the appliance yourself. Please contact the store where you bought the appliance for repairs under warranty.
- Unauthorised repairs or modifications will invalidate the warranty.
- Caution! Some parts of this appliance can become very hot and cause burns if touched. Particular attention should be paid where children and vulnerable people are present.
- Keep the appliance and its cord out of reach of children aged less than 8 years.
SPECIAL SAFETY INSTRUCTIONS
- The appliance must be allowed to cool for 1 minute between heat-sealing or vacuum-sealing.
- Do not try to vacuum-seal bags containing liquids or runny food-stuffs, as the contents of the bag may be sucked into the appliance and destroy it.
UK
- Only use bags recommended by the stock-ist. Do not use kitchen film or similar, as it may damage the appliance.
- Remove the bag as soon as it has been heat-sealed/sealed. If it is left in the appliance while the hot wire cools, it may stick to the appliance.
• Always keep the hot wire clean to avoid contaminating the food or substances to be packed.
• Always keep the hot wire clean of food residues and dirt so that the sealing power is not reduced.
- Do not use the vacuum or sealing function when the lid is open. Make sure that the lid is locked (using the release button) before using the vacuum or sealing function.
ADVANTAGES OF VACUUM SEALING
Vacuum-packed food keeps better and longer in the fridge or freezer compared to food in packaging with air in it.
Some types of food can also be cooked/reheated by putting the sealed bag into a dish of water or in a microwave oven. When cooking food in a microwave oven, prick holes in the bag with a fork so that steam can escape.
It is also possible to seal/vacuum-seal items such as personal papers, medicines, etc. for travelling, camping or sailing so they do not get wet.

UK
flowchart
graph TD
    A["FOOD"] --> B["SEAL"]
    B --> C["VAC SEAL"]
    C --> D["STOP"]
    style A fill:#f9f,stroke:#333
    style B fill:#ccf,stroke:#333
    style C fill:#cfc,stroke:#333
    style D fill:#fcc,stroke:#333
If several indicator lights flash after continuous operation, the appliance has overheated. Allow it to cool down for 5-10 minutes before continuing to use it.
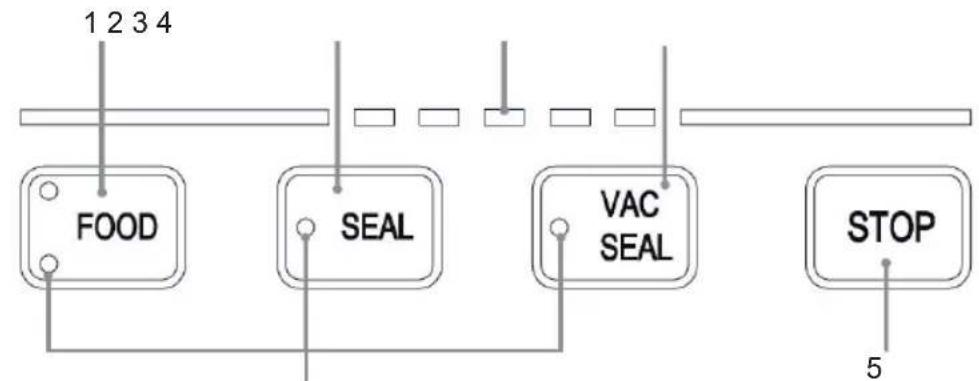
MAIN COMPONENTS
- FOOD
Button for dry/wet foods
- SEAL
Button for sealing
-
Indicator lights for operation
-
VAC SEAL
Button for vacuum and sealing
- STOP
Stop button
-
Lip
-
On/off button for vacuum hose
-
Vacuum nozzle
-
Vacuum chamber
-
Sealing line
-
Seal
text_image
Technical diagram of a device casing with numbered parts for identificationUK

natural_image
Line drawing of a printer with paper and a printed cover (no text or symbols)
natural_image
Line drawing of a printer with paper and cable, no text or symbols present
natural_image
Line drawing of a handheld electronic device with wires and a strap (no text or symbols)SEALING AND VACUUM-SEALING
- Plug the appliance into the mains.
- Fill the bag with the required contents. Make sure that there is at least 7 cm from the contents to the place where the bag will be sealed. Make sure that the bag is completely clean and dry on the area where it will be sealed.
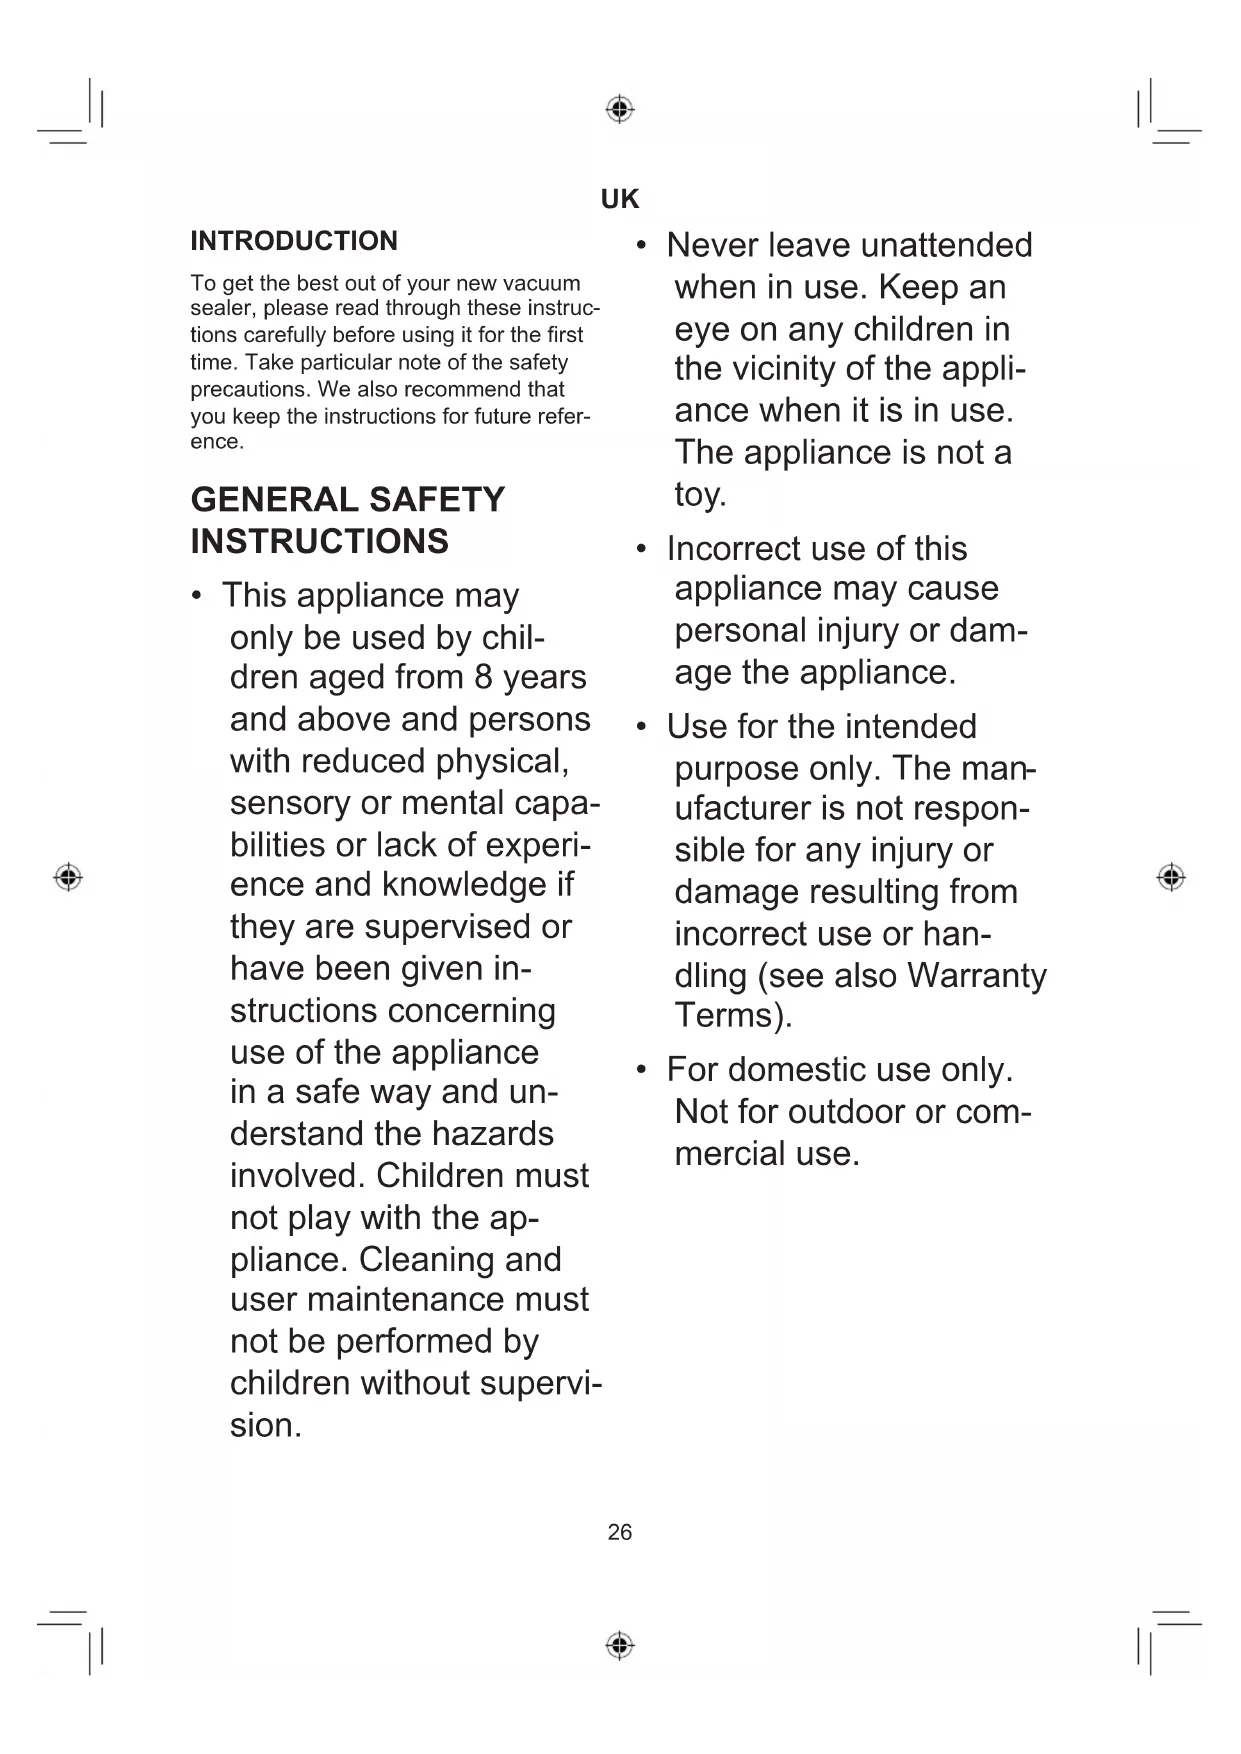
- Smooth the bag out, if possible. Place the open end of the bag in the appliance. Make sure that it does not block the vacuum nozzle. See figure 1.
- Close the lid by pressing both sides of it so that a click is heard. See figure 2.
- Press the VAC SEAL (4) button or the SEAL button (2).
The associated indicator light comes on.
The sealing or vacuum sealing process starts.
- Once the sealing or vacuum sealing process is complete, the indicator light goes out. Press the locks on each side of the appliance to open the lid and remove the sealed bag from the appliance. See figure 3.
Note!
- You can interrupt the vacuum or sealing process at any time by pressing the STOP button (5).
- Wait at least 60 seconds between each vacuum seal and at least 30 seconds between each seal without vacuum.
Settings
- Press the FOOD (1) button to choose between dry and wet foods.
The associated indicator light comes on.
The vacuum-sealing time is longer with wet foods.
UK
VACUUM-SEALING BOTTLES AND CONTAINERS
If you have a vacuum hose and vacuum containers or wine corks, you can use the appliance to suck the air out of the containers or wine bottles using the hose provided, allowing the contents to last longer.
- Attach the hose to the vacuum nozzle (8).
- Attach the hose to the wine cork or the vacuum container. There must be at least 2.5 cm clearance at the top of the container.
- Press the on/off button for the vacuum hose (7). The indicator light flashes. The appliance automatically switches off once the necessary vacuum pressure has been formed in the container.
- Do not use plastic bottles or similar.
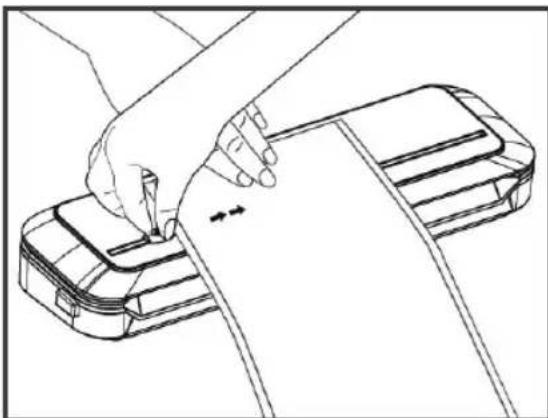
Using the blade
- Roll out the desired length of bag material so that it lies smooth against the lid. Run the blade across the lid to cut the bag off at the desired length. Seal one end to form a bag before putting food in the bag and vacuum sealing it.
natural_image
Line drawing of a hand holding a cable over a device (no text or symbols)CLEANING
• Always switch the appliance off at the wall socket and unplug before cleaning.
- Clean using a damp cloth and, if necessary, a little detergent. Never use abrasive detergents or solvents.
- If there are bag residues on the sealing line (10), you can make a seal without placing a bag in the appliance. Carefully wipe the sealing line before it is completely cold again.
UK
INFORMATION ON DISPOSAL AND RECYCLING OF THIS PRODUCT
Please note that this Adexi product is marked with this symbol:
This means that this product must not be disposed of along with ordinary household waste, as electrical and electronic waste must be disposed of separately.
According to the WEEE directive, every member state must ensure correct collection, recovery, handling and recycling of electrical and electronic waste. Private households in the EU can take used equipment to special recycling stations free of charge. In certain member states, used appliances can be returned to the retailer where they were bought on the condition you buy new products. Contact your retailer, distributor or the municipal authorities for further information on what to do with electrical and electronic waste.
WARRANTY TERMS
The warranty does not apply:
- if the above instructions have not been followed
- if the appliance has been interfered with
- if the appliance has been mishandled, subjected to rough treatment, or has suffered any other form of damage
- if the appliance is faulty due to faults in the electricity supply.
Due to the constant development of our products in terms of function and design, we reserve the right to make changes to the product without prior warning.
FREQUENTLY ASKED QUESTIONS
If you have any questions regarding the use of the appliance and cannot find the answer in this user guide, please try our website at www.adexi.eu.
You can also see contact details on our website if you need to contact us for technical questions, repairs, accessories or spare parts.
MANUFACTURED IN CHINA FOR
Adexi A/S
Lægårdsvej 9C
DK-8520 Lystrup
Denmark
www.adexi.eu
We cannot be held responsible for any printing errors.
DE
EINLEITUNG
text_image
Technical diagram of a device casing with numbered components for identificationDE

natural_image
Line drawing of a printer with paper and a printed cover (no text or symbols)
natural_image
Line drawing of a printer with a printed cover, no text or symbols present
natural_image
Line drawing of a handheld electronic device with wires and connectors (no text or symbols)VERSIEGELN UND VAKUUMVERSIEGELN
natural_image
Line drawing of a hand pressing down on a device with a ruler, showing no text or symbolsREINIGEN
text_image
Technical diagram of a device casing with numbered parts for identificationNL

natural_image
Line drawing of a printer with paper and a printed cover (no text or symbols)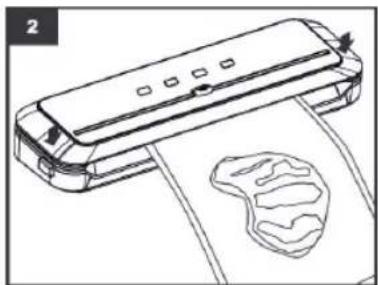
natural_image
Line drawing of a printer with paper and cable, no text or symbols present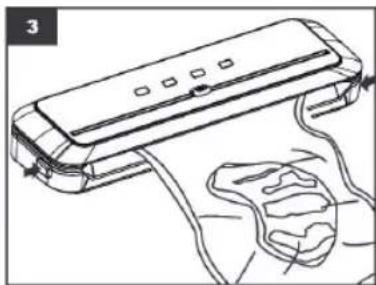
natural_image
Line drawing of a handheld electronic device with wires and a strap (no text or symbols)natural_image
Line drawing of a hand holding a pen over a device with a ruler, no text or symbols presentINFORMATIE OVER VERWIJDERING EN RECYCLING VAN DIT PRODUCT
text_image
Technical diagram of a device casing with numbered parts for identificationFR

natural_image
Line drawing of a printer with paper and a printed cover (no text or symbols)
natural_image
Line drawing of a printer with paper and cable, no text or symbols present
natural_image
Line drawing of a handheld electronic device with wires and a strap (no text or symbols)SCELLAGE ET SCELLAGE SOUS VIDE
natural_image
Line drawing of a hand holding a cable over a device (no text or symbols)NETTOYAGE
CONDITIONS DE LA GARANTIE
text_image
Technical diagram of a device casing with numbered parts for identificationES

natural_image
Line drawing of a printer with paper and a printed cover (no text or symbols)
natural_image
Line drawing of a printer with paper and cable, no text or symbols present