Perfection 890L - Coffee machine WMF - Free user manual and instructions
Find the device manual for free Perfection 890L WMF in PDF.
| Brand | WMF |
| Model | Perfection 890L |
| Product type | Fully automatic coffee machine |
| Power supply | 220-240 V~ / 50 Hz |
| Power consumption | 1550 W during operation |
| Pump pressure | 15 bar |
| Dimensions (H × W × D) | 395 × 285 × 480 mm |
| Weight | 12.0 kg |
| Water tank capacity | 2.0 l |
| Coffee bean container capacity | 250 g |
| Coffee grounds bin capacity | 15 portions |
| Number of profiles | 16 customizable profiles |
| Available recipes | Ristretto, Espresso, Lungo, Long coffee, Doppio, Americano, Cappuccino, Latte macchiato, Caffè latte, Flat white, Café au lait, Espresso macchiato, Hot milk, Milk foam, Hot water, Teas (black, white, green) |
| Ground coffee function | Yes, via dedicated chute |
| Milk system | Removable One Touch Cappuccino block with automatic cleaning |
| Touch screen | Yes, with navigation and settings |
| Adjustable grind fineness | Slider on top, step adjustment |
| Adjustable water hardness | From 0 (very soft) to 4 (very hard) |
| Maintenance programs | Automatic milk system cleaning, coffee/tea rinse, coffee cleaning, descaling |
| Safety | Automatic shut-off, indicator light, burn protection |
| Warranty | 2 years |
Frequently Asked Questions - Perfection 890L WMF
User questions about Perfection 890L WMF
0 question about this device. Answer the ones you know or ask your own.
Ask a new question about this device
Download the instructions for your Coffee machine in PDF format for free! Find your manual Perfection 890L - WMF and take your electronic device back in hand. On this page are published all the documents necessary for the use of your device. Perfection 890L by WMF.
USER MANUAL Perfection 890L WMF
text_image
WMF PERFECTION 2001 SERIES WMF PAPER WMF Series WMT Technologies (WMT) WMT Series WMT Series WMT Series WMT Series WMT Series WMT Series WMT Series WMT Series WMT Series WMT Series WMT Series WMT Series WMT Series WMT Series WMT Series WMT Series WMT Series WMT Series WMT Series WMT Series WMT Series WMT Series WMT Series WMT Series WMT Series WMT SeriesTESTVALUE ATSHEDING
text_image
Grid of 16 technical diagrams showing mechanical assembly or assembly steps with labeled components and directional arrowsBESTARITIE IN ECONOM
text_image
Technical diagram of a device with labeled components and internal layout, including zoomed-in views and component layouts.WASSENGATE CONSTITUTS

2 TASSON TIMES GETRASKES ARE TRIMAIL VACIEN
- TRIBERTING ITEMS NO CHEMBERS
SCIMELLE MICHENLINE
MAULIE TIEFFERINGINA DES MILCHSYSTUS
text_image
Grid of 20-step industrial process diagrams with Chinese labels, showing mechanical assembly and inspection stepsПИТОСКИЙНОГОЯНИЧ
text_image
Grid of 12 technical diagrams showing mechanical assembly or assembly steps with labeled components and directional arrows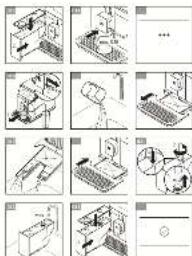
text_image
Grid of 12 technical diagrams showing mechanical assembly or assembly steps with labeled components and directional arrowsEN Operating Instructions 28
2.2| For Europe market only 32
2.3 Recommendations for installation 32
2.4| Important product information 34
2.5| Before using the first time 34
3| Components 34
4| Differences between the models 35
5| Overall view 36
5.1 Presentation of the different buttons 36
5.2| Lights settings 37
6| Installing the appliance 37
6.1| Measuring the water hardness 38
6.2| Filter installation 38
7| Important information before preparing drinks 39
7.1| Preparing the appliance 39
7.2| Preparing the grinder 39
7.3| Adjusting the coffee outlet 40
8| Preparing drinks 40
8.1 Coffee drinks 40
B.2 | Teas / hot water 40
8.3| Milky drinks 40
8.4 Ground coffee recipes 41
8.5| Permanent settings 42
9| Profile menus 44
9.1 | Create and delete a profile 44
9.2| Create and delete a favourite recipe 44
10 Setting menu 44
11 General maintenance 45
11.1 Maintaining coffee grounds collector and drip tray 45
11.2| Maintenance of water tank 46
11.3| Why and how do I maintain the milk system? 46
11.4| Why and how cleaning the coffee beans tank? 46
11.5| Why and how cleaning the coffee hatch? 47
11.6| Overview general maintenance 47
12| Other maintenance 48
13| Troubleshooting 49
LIST OF FIGURES
A First use | B Measuring the water hardness | C Make two cups of a recipe at once | D Make a milk recipe | E Quick milk rinsing | F Manual deep cleaning of milk system | G Descaling program | H Complete automatic cleaning of the machine | I Empty the coffee ground collector | J Empty the drip tray

WMF PERFECTION 800L-SERIES
FULLY AUTOMATIC COFFEE MACHINE
Congratulations! You are now the proud owner of your WMF Perfection fully automatic coffee machine.
The most frequently consumed drinks are accessible with one simple touch on the main interface. As for the screen, it allows you to follow the progress of your coffees and provides easy access to the different menus. Most drinks can be prepared in batches of two, which saves time and is more convivial.
We wish you many years of enjoyment with your WMF Perfection fully automatic coffee machine.
1 | TECHNICAL SPECIFICATIONS
Appliance: WMF Perfection
fully automatic coffee machine
Power supply: 220 - 240 V\~ / 50 Hz
Pump pressure: 15 bars
Coffee bean container: 250 g
Capacity grounds container: 15 portions
Water tank: 2.0 l
Power consumption: During operation 1,550 W
Use and storage: Indoors, in a dry place (protected from frost)
Cable length (m): approx. 1.1
Dimensions (mm) H × W × D: 395 × 285 × 480
Weight (kg): 12.0
The guarantee period of this appliance is
2 years. Please refer to the guarantee document for details on the other guarantee terms and conditions in your country.
Manufacturer:
SAS GSM
Important information is indicated in these operating instructions using symbols and signal words:
WARNING indicates a hazardous situation
that can cause serious injuries.
CAUTION indicates a potentially hazard-
ous situation that can cause minor or moderate injuries.
ATTENTION indicates a situation that can lead to material damage.
NOTE provides additional information regarding the safe handling of the product.
Symbols: observe and follow the indications.
2.1| PROPER USE
• This appliance is not intended for use by persons (including children) with reduced physical, sensory or mental capabilities, or lack of experience and knowledge, unless they have been given supervision or instruction concerning use of the appliance by a person responsible for their safety.
• Children should be supervised to ensure that they do not play with the appliance.
- Do not use the appliance if the power cord or plug is damaged. The power cord must be replaced by the manufacturer, its after-sales service or similarly qualified persons in order to avoid a hazard.
- Your appliance is intended for domestic use inside the home only at an altitude below 2.000 m.
- Do not immerse the appliance, power cord or plug in water or any other liquid.
- Your appliance is designed for domestic use only.
- It is not intended to be used in the following environments, which are not covered by the guarantee:
→ staff kitchen areas in shops, offices and other working environments;
→ farm houses;
→ by clients in hotels, motels and other residential type environments;
→ bed and breakfast type environments.
• Always follow the cleaning instruction to clean your appliance:
→ unplug the appliance,
→ do not clean the appliance while hot,
→ clean with a damp cloth or sponge,
→ never immerse the appliance in water or put it under running water.
- When using the nozzle to ensure that it is properly oriented in order to avoid the risk of burns.
- Do not insert foreign objects into the grain mill.
• The appliance shall not be placed in a cabinet when in use.
WARNING
Risks of injuries if you don't use this appliance correctly. After using, do not touch hot surfaces (steam nozzle), subjected to residual heat.
2.2 FOR EUROPE MARKET ONLY
- This appliance can be used by children of at least 8 years of age, as long as they are supervised and have been given instructions about using the appliance safely and are fully aware of the hazards involved.
- Cleaning and user maintenance shall not be made by children unless they are older than 8 and they are supervised by an adult.
- Keep the appliance and its cord out of reach of children under 8 years of age.
- This appliance may be used by persons with reduced physical, sensory or mental capabilities, or whose experience or knowledge is not sufficient, provided they are supervised or have received instruction to use the device safely and understand the dangers.
• Children should not use the device as a toy.
• European directive 2012/19/UE on Waste Electrical and Electronic Equipment (WEEE), requires that old household electrical appliances are not thrown into the normal flow of municipal waste. Old appliances must be collected separately in order to optimize the recovery and recycling of materials they contain and reduce the impact on human health and the environment.
2.3 | RECOMMENDATIONS FOR INSTALLATION
- Only use an earthed socket to plug the machine in. Check that the power voltage indicated on the nameplate of the appliance corresponds to that of your mains installation.
- Do not use the appliance if it is not working properly or if it has been damaged. If this occurs, contact an authorised service centre.
-
For your safety, this appliance conforms to applicable standards and regulations (Directives on low voltage, electromagnetic compatibility, materials in contact with foodstuffs, environment, etc.)
-
Any error in the electrical connection will negate your guarantee.
- Do not use if the drip tray and the grid are not in place.
- Unplug the appliance when you clean it manually.
- Remove the plug if a problem occurs during operation or before you clean the appliance.
- Do not pull on the cord to unplug the appliance.
- The power cord must never be close to or in contact with the hot parts of your appliance, near a source of heat or over a sharp edge.
- Ensure that the cord and your hands do not touch the hot parts of the appliance (cup warming plate, steam nozzle).
- Refer to the instructions for des- caling your appliance.
- All interventions other than cleaning and everyday maintenance by the customer must be performed by an authorised service centre.
• The accessories and the removable parts of the appliance are not dishwasher safe. - For your safety, only use the manufacturer's accessories and spare parts designed for your appliance.
• This appliance is not suitable for making drinks for babies under the age of 2 years.
- All appliances are subject to strict quality control procedures. These include actual usage tests on randomly selected appliances, which would explain any traces of use.
• To reduce the risk of injury, do not leave the cord hanging over the table or counter, where it can be pulled on by a child or trip someone.
- Never pour cold water in the tank immediately after a brew cycle. Let the appliance cool down between preparations.
- Do not place on or near a hot gas or electric burner, or in a heated oven.
- Do not use appliance for other than intended use.
- Never operate the appliance with wet hands.
2.4 IMPORTANT PRODUCT INFORMATION
NOTE

Read these instructions carefully and keep them for future reference. Please follow the safety guidelines.
The appliance may be used only for the intended purpose and in accordance with this manual. It contains instructions for using, cleaning and looking after the appliance. We accept no liability for any damage resulting from non-observance.
Keep this instruction manual in a safe place and pass it on to any subsequent user together with the appliance. Please also note the warranty information, which is enclosed separately. The safety precautions must be observed during use.
2.5 BEFORE USING THE FIRST TIME
1| Take the appliance and all accessories out of the box carefully and make sure that all components and accessories are complete and undamaged.
2| Ensure that all packaging material is removed before use.
3| Clean the appliance, components and accessories before the first use and after any long storage, as described in section 11. Always use a smooth cloth to clean all surfaces.
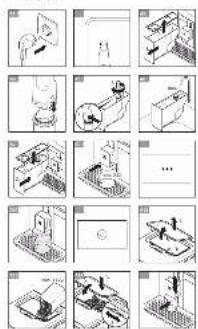
3| COMPONENTS
1 Coffee bean container lid
2 Grinding fineness adjustment dial
3 Pre ground coffee funnel / funnel for cleaning tablet
4 LED light
5 Accessory for cleaning the milk system, 2 in 1: disassembly tool + cleaning needle
6 Removable One Touch Cappuccino block
7 Ground coffee spoon
8 Milk pot + lid (according to model)
9 Milk lance
10 Milk tube
11 Coffee grounds collector
12 Milk tube connector
13 Grid and removable drip tray
14 Removable spout cover
15 Height-adjustable coffee outlets
16 Water tank
17 Claris - Aqua Filter System
with fitting accessory
18 Display panel
19 Care kit bag
20 1 descaling sachet
21 2 cleaning tablets
22 2 stick for testing water hardness
23 Pipe cleaner
24 Settings button
25 Cleaning button
26 On / Off button
27 Home button
28 Navigation touchscreen
29 Profile
3D Profile 3
31 Profile 2
32 Profile 4
4 DIFFERENCES BETWEEN THE MODELS
| FEATURES | WMF PERFECTION 890L | WMF PERFECTION 880L | WMF PERFECTION 860L | WMF PERFECTION 840L |
| Design | black silver silver silver | |||
| Recipes | ||||
| Rixtrelio | √ | √ | √ | √ |
| Espresso | √ | √ | √ | √ |
| Lungo | √ | √ | √ | √ |
| Long Coffee / Café Crème | √ | √ | √ | √ |
| Doppin / Double Espresso | √ | √ | √ | √ |
| Americano | √ | √ | √ | √ |
| Morning Coffee — — | √ | √ | ||
| Cappuccelno | √ | √ | √ | √ |
| Latte macchiato | √ | √ | √ | √ |
| Caffe Latte | √ | √ | √ | √ |
| Flat white | √ | √ | √ | √ |
| Milk Coffee / Cafe au Lait | √ | √ | √ | √ |
| Espresso macchiato | √ | √ | √ | √ |
| Hot milk | √ | √ | √ | √ |
| Frutty milk | √ | √ | √ | √ |
| Hot Water — — | √ | |||
| Hot water for black tea — | √ | √ | √ | |
| Hot water for white tea | √ | √ | √ | — |
| Hot water for green tea | √ | √ | √ | — |
Settings
| Profile settings 16 16 10 4 | ||||
| Coffee strength setting options 4 4 4 3 | ||||
| Function | ||||
| Ground Coffee | √ | √ | √ | √ |
| Accessory | ||||
| Glass milk container | √ | √ | √ | - |
5| OVERALL VIEW
5.1 PRESENTATION OF THE DIFFERENT BUTTONS
BUTTON DESCRIPTION / GENERAL FUNCTIONS
| Switching the machine on and off. It is necessary to press the button to start the machine. | |
| Home button. Allows you to return to the home menu. | |
| The machine has a range of settings - check them out! They let you create a more personalized experience. | |
| Go in the various cleaning options for the machine. Carrying not proper maintenance will optimize the life of your machine and preserve the authentic taste of your coffee. | |
| Allows you to return to the previous screen. | |
| >> | Go to the next. For instance, when preparing a Cappuccino, switch from milk preparation to espresso preparation after a certain time. |
| Browse upwards in the menu / increase the parameter selected. Browse downwards in the menu / decrease the parameter selected. | |
| + | You can prepare one or two cups with your appliance by pushing the button. |
| OK | Confirmation of selection. |
| START | Start the selection. |
| STOP | Stop the selection. |
| Profile buttons at the right of the screen. | |
| Profile button on the top left of the screen. | |
| ... | Contextual button, function depends on screen (advanced setting for recipes, settings for profiles, etc.). |
| A recipe with this symbol is prepared from ground coffee inserted via the pre ground coffee funnel [3]. |
5.2 LIGHTS SETTINGS
Specific information about the buttons' backlight
- When a button is not illuminated, the corresponding function is inaccessible.
- When it is slightly illuminated, the function is available and can be selected.
- While the function requested is in progress, the light becomes very bright.
Specific information about the light effects on the base of appliance
- When the machine is ON, the base shines brightly. You can switch the light on or off, as described in section 10.
- When the machine is OFF the base does not shine.
- When the light is in floating mode, a drink is being prepared.
- When the light in the base is blinking, consumer intervention is required to finish the action in progress.
- All generic information like warning information arises on the display panel 18
NOTE
This Product contains a light source of energy efficiency class D. Please note that the light element in the product is not intended for lighting purposes. The light is interchangeable by authorized service staff.
Specific information about the spout light of appliance
- The spout light is automatically activated when a recipe is in progress.
6| INSTALLING THE APPLIANCE
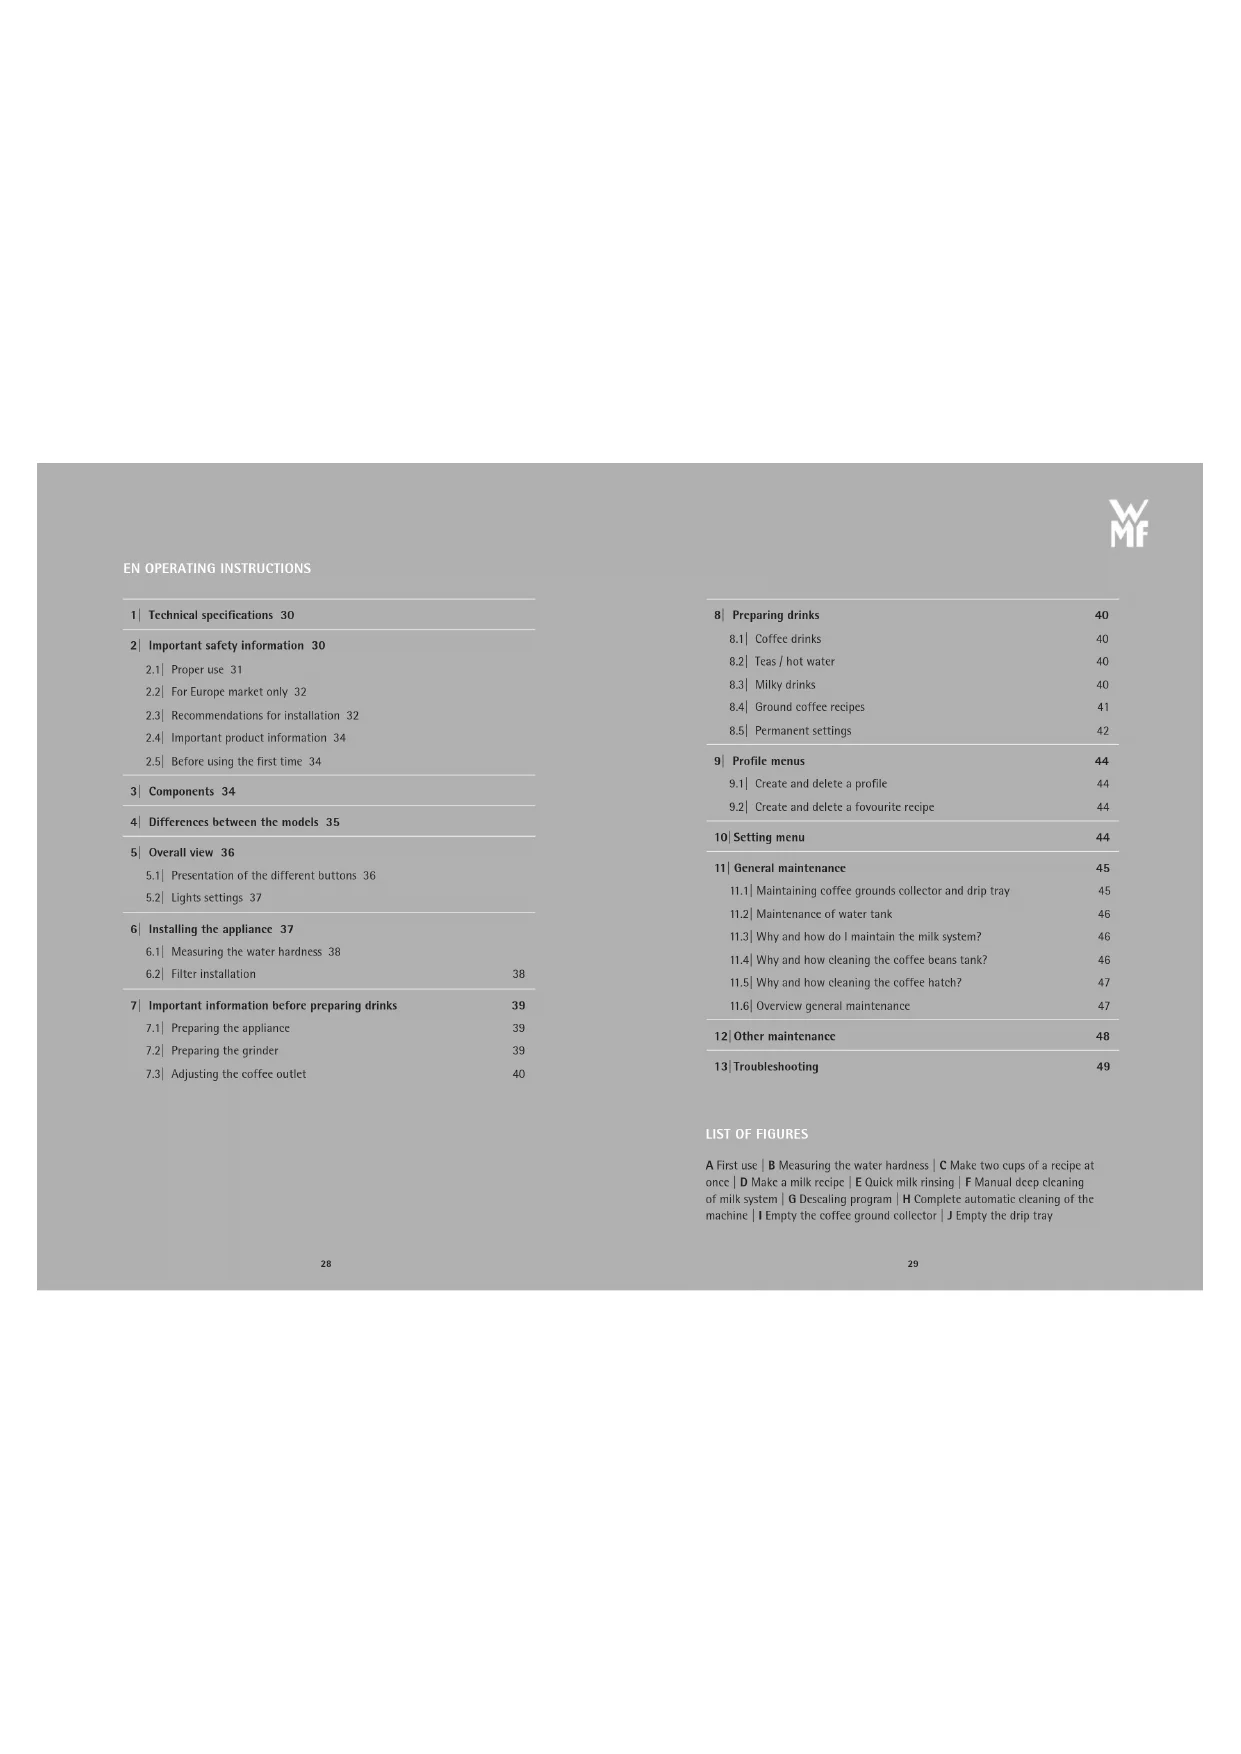
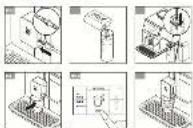
Refer to first use figure A1 - A15 earlier in the instruction.
WARNING
Connect the appliance to an earthed 230 V mains socket. Failure to do so means that you run the risk of fatal injury due to electricity! Respect the safety guidelines as indicated as described in section 10.
Place your machine on a stable, flat, heat-resistant surface away from water splashes and sources of heat. Insure that the location chosen is sufficiently well ventilated, as the appliance gives off heat. Please do not place the appliance on surfaces such as marble. Remove the protective film from the display panel [18].
Specific information about the drip tray It allows you to collect water or coffee that might flow out of the appliance during and after preparation. It is important to always leave it in place and to empty it regularly.
Switching on the appliance
Switch on the appliance by pressing the ON / OFF button[6], WMF-logo appears on the screen. Follow the instructions provided by your appliance (figure A1 - A15).
Initial settings
When using the machine for the first time, you will be prompted to configure various settings. Follow the indications displayed on the screen.
6.1 MEASURING THE WATER HARDNESS
You must set your machine depending on the hardness of your water, from 0 to 4. To do this, follow these instructions:
1| Before using the appliance for the first time, check the hardness of your water so that you can set the appliance accordingly. This opera-
The details of the classes are given in the table below:
DEGREE OF HARDNESS CLASSE 0 CLASSE 1 CLASSE 2 CLASSE 3 CLASSE 4
| ^* dH < 3° > 4° > 7° > 14° > 21° | ||
| ^* e < 3.75° > 5° > 8.75° > 17.5° > 26.25° | ||
| ^* f < 5.4° > 7.2° > 12.6° > 25.2° > 37.8° | ||
| Appliance setting 0 - very soft 1 - soft 2 - average | hardness | 3 - hard 4 - very hard |
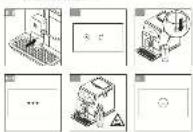
3| Fill a glass of water and insert a strip (figure B1-B2).
4| Put the strip back out of the glass. After 1 minute read the level of water hardness (figure B3-B4).
5| Indicate the number of red zones when configuring the appliance (figure B6).
6.2 FILTER INSTALLATION
When switching on for the first time, the appliance asks if you want to install the filter. If you wish to do so, select YES and follow the instructions on the screen.
1| Install the filter in the appliance.
2| ONLY screw the filter into the bottom of the water tank using the accessory supplied with the filter 17 (figure A4-A5).
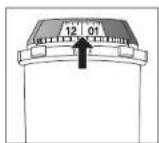
3| Set the month when the filter is fitted (position 1 on the illustration, left side figure in the opening) by turning the grey ring located
tion should also be carried out when you use your machine in a place where the hardness of the water is different or if you notice a difference in the hardness of the water.
2| To check the water hardness, use the test strip 22 supplied with your machine or contact your local water authority.
on the upper end of the filter. The month when the filter should be replaced is indicated in position 2 on the following illustration (right side figure in the opening).
4 | Please make sure to fill up the water tank after filter installation.
5| Put a container of 0.6 l under the steam exit (figure A8). The machine must be primed whether the filter has been installed or not. This means that the water circuits have to be filled. To do this, follow the instructions provided on the screen.
6| The machine will begin by filling the water circuits, preheating the circuits and then will complete an automatic rinse. The screen will inform you when installation is complete.
7 | IMPORTANT INFORMATION BEFORE PREPARING DRINKS
7.1 PREPARING THE APPLIANCE
1| Remove and fill the water tank 6 (figure A3-A6).
2| Replace the water tank 16 (figure A7).
3| Remove the lid of the coffee bean container 1 and add coffee beans (max. 250 g) (figure A12-A13).
4| Replace the lid of the coffee bean container 1 (figure A14).
CAUTION

Do not fill the water tank 6 with hot water, milk or any other liquid.
CAUTION
Never put ground coffee in the coffee container. It is recommended that you do not use oily, caramelized or flavored coffee beans for this appliance. These kinds of beans may damage the appliance. Check that the coffee beans do not contain any foreign particles such as grit, as any damage caused by the presence of foreign particles will invalidate the guarantee. Do not put water into the coffee bean container.
7.2 PREPARING THE GRINDER
Depending on the drinks chosen and the strength of coffee selected, your machine will automatically adjust the quantity of ground coffee.
You can also set the strength of your coffee by adjusting how finely the coffee beans are ground. In general, the finer the coffee is ground, the stronger and ercamier the coffee will be.
It may also vary according to the type of coffee used. We recommend a fine setting for espressos and a coarser setting for coffees.
Adjust the fineness of grinding by moving the slider of the coffee grounds fineness adjuster 2 which is located on the topside of the appliance (figure A14).
CAUTION
On new product the grinder position is a factory setting and should not be changed during 30 recipes to let the grinder set in its optimal configuration. However if the coffee dispenses too slowly you can move the slider 1 notch towards the right direction for more coarseness.
NOTE
This setting should be applied during grinding notch by notch. It is advised to move 1 notch at a time, you will notice a pronounced difference in taste after 3 recipes. If you set the grinder towards "fine" more than 1 notch at a time an alert screen might ask you to reset it coarser.
Setting the fineness of grinding is useful when you change the type of coffee or if you want to make coffee that is more or less strong. However, it is not advised to use this setting systematically.
7.3 ADJUSTING THE COFFEE OUTLET
For all the drinks available, you can lower or raise the coffee outlets 15 according to the size of your cup or glass (figure A15).
NOTE

Splashing or scalding may occur if the coffee outlets 15 are set to high in relation to the size of the cups.
8| PREPARING DRINKS
Preparation: Place the cup(s) under the coffee nozzles. Press the button for the desired drink.
8.1 COFFEE DRINKS
Possible settings: It is possible to increase the strength of the coffee by selecting different number of coffee beans.
You can prepare one or two cups with your appliance by pushing the + button (figure C3).
It is possible to adjust the volume of the coffee prepared by operating the quantities scale on the right side of the screen (possible to do it before launching recipe and during recipe flow). The machine starts by grinding the beans, tamping the ground coffee and finally brewing the coffee.
You can stop the preparation at any time by pressing STOP.
8.2| TEAS / HOT WATER
Possible settings: Your appliance allows you to prepare hot water for teas or herbal tea.
Model 840: One hot water recipe, you can adjust temperature and volume of the drink (before and during preparation).
Models 860, 880, 890: Three types of tea (black tea, white tea, green tea), the hot water temperature is adapted to the drink selection; you can adjust volume of the drink (before and during preparation).
8.3 MILKY DRINKS
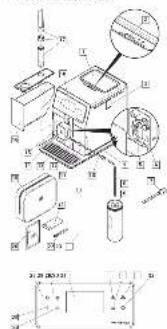
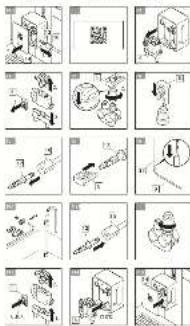
Refer to figure D1 - D6 earlier in the instruction.
Before recipe launching
1 | Connect the slimmer and longer side of the milk tube connector 12 to the One Touch Cappuccino block 6 (figure D1).
NOTE
Take care to well insert the slimmer and longer side of the milk tube connector 12. to insure recipe quality.
2| Immerse the other end in a receptacle filled with milk or directly in your bottle of milk (figure D3).
3 Place the cup(s) under the coffee / milk nozzles (figure D6).
Possible settings: It is possible to increase the strength of the coffee by selecting different number of coffee beans, and choose drink size.
The steam is used to froth the milk. As a higher temperature is required when producing steam, the appliance will run an additional pre-heating phase. The appliance allows to choose the quantity of milk foam, on several milky recipes.
You can push STOP to stop the recipe, you can can push ☑ to go to next recipe step (only for recipes with 2 or more steps).
NOTE

No possibility to modify the volume during processing milk recipes (coffee and milk).
Cleaning after preparing milky drinks Automatic milk cleaning: The screen indicates Clean milk? at the end of each milky preparation.
It is advised to rinse after using the milk function in order to ensure the cleanliness of the frothing accessories and the frothiness of the milk.
NOTE

For the best results, it is advised to clean the One Touch Cappuccino removable block 8 regularly (see section 11).
If you note a change in the quality of your milk froth, do not hesitate to repeat the rinsing and cleaning process: indeed a milk system that is not well maintained may cause this type of problem.
NOTE
Automatic rinsing outlets: according to the type of preparation (coffee or milky recipe), the machine may complete an automatic rinse program when it switches off. The cycle lasts only a few seconds and stops automatically (figure E3 - E5).
8.4| GROUND COFFEE RECIPES
Your appliance allows to prepare coffee and milky recipes with ground coffee.
Use the ground coffee beverage choice in the home screen or via a profile to prepare a beverage with ground coffee. After setting your recipe and pressing START, the appliance invites you to open pre ground coffee funnel 5 With the specific spoon provided 7 insert one ground coffee spoon in the hatch. Close it. Then repeat this operation a second time. Press OK to realize the recipe. We recommend to insert two ground coffee spoons (one after the other) to insure coffee taste.
CAUTION
Do not put more than 1 spoon of ground coffee in the pre ground coffee funnel 3 at once. For one recipe, do not put more than 2 spoons of ground coffee in the appliance: Any damage caused by introducing an excessive quantity of ground coffee will not be covered by the guarantee.
Do not put anything else than ground coffee in funnel: Any damage caused by introducing another substance will not be covered by the guarantee.
NOTE
Never open pre ground coffee funnel [3] during recipe progressing; if doing, recipe will be stopped and machine will launch automatic maintenance after hatch closing.
Possibility to realize ground coffee recipe even if there are no coffee beans.
When a cycle is interrupted, the appliance requests immediately to close the hatch, before running automatic maintenance.
8.5 PERMANENT SETTINGS
The following permanent settings can be made:
| PRODUCT NUMBER OF | GRINDING | DOUBLE RECIPE AVAILABLE | APPROXIMATE SIZE | DEFAULT STRENGTH (MIN / MED / MAX) | POSSIBLE SETTINGS ADVANCED SETTINGS BY | PUSHING PARAMETERS | GROUND COFFEE OPTION |
| Ristretto | 1 | Yes (2 grindings) | 25 ml | Med | Volume (20-35 ml, in 5 ml steps), strength | Coffee temperature T2 / T3 | Yes |
| Espresso | 1 | Yes (2 grindings) | 40 ml | Med | Volume (30-70 ml, in 10ml steps), strength | Coffee temperature T1 / T2 / T3 | Yes |
| Lungo | 1 | Yes (2 grindings) | 80 ml | Med | Volume (50-90 ml, in 10ml steps), strength | Coffee temperature T1 / T2 / T3 | Yes |
| Long Coffee/Cafe Creme | 1 | Yes (2 grindings) | 120 ml | Min | Volume (80-180 ml, in 10 ml steps), strength | Coffee temperature T1 / T2 / T3 | Yes |
| Doppio/Double Espresso | 2 | No | 80 ml | Med | Volume (60-140 ml, in 10 ml steps), strength | Coffee temperature T1 / T2 / T3 | No |
| Americano | 1 | No | 160 ml | Med | Volume (120-280 ml, in 10 ml steps), strength | Coffee temperature T1 / T2 / T3 | Yes |
| Morning Coffee | 1 | Yes (2 grindings) | 150 ml | Max (fixed) | Volume (120-170 ml, in 10 ml steps), strength | No | |
| Cappuccino | 1 | Yes (2 grindings) | 180 ml | Med | Volume (M L XL), strength | Foam volume, Coffee temperature T1 / T2 / T3 | Yes |
| Latte macchiato 1 Yes (2 grindings) 250 ml Med Volume ( M L XL), strength Foam volume, | Coffee temperature T1 / T2 / T3 | Yes | |||||
| Caffe Latte | 1 | No | 250 ml | Med | Volume ( M L XL), strength | Foam volume, Coffee temperature T1 / T2 / T3 | Yes |
| Flat white | 2 | No | 160 ml | Med | Volume ( M L XL), strength | Foam volume, Coffee temperature T1 / T2 / T3 | No |
| Milk Coffee/Cafe au Lait | 1 | No | 280 ml | Min | Volume ( M L XL ), strength | Foam volume, Coffee temperature T1 / T2 / T3 | Yes |
| Espresso macchiato | 1 | Yes (2 grindings) | 60 ml | Med | Volume (M L XL), strength | Foam volume, Coffee temperature T1 / T2 / T3 | Yes |
| Hot milk | No | 200 ml | Volume (M L XL) | ||||
| Frothy milk | No | 200 ml | Volume (M L XL) | Foam volume | |||
| Hot Water | Volume (50-300 ml, in 10 ml steps) | Water temperature (T1/T2/T3) | |||||
| Hot water for black tea | No | 200 ml | Volume (50-300 ml, in 10 ml steps) | ||||
| Hot water for white tea | No | 200 ml | Volume (50-300 ml, in 10 ml steps) | ||||
| Hot water for green tea | No | 200 ml | Volume(50-300 ml, in 10 ml steps) | ||||
T - Temperature
9| PROFILE MENUS
Profiles and favourite recipes allow you to record your preferred recipes, to personalize recipes and other settings like lights and display.
9.1 | CREATE AND DELETE A PROFILE
Method 1: Press one profile button at the right of the screen 29 - 32. If there is not a profile already recorded for this button, then follow instruction on the screen.
Method 2: Press profile icon (💡) on the top left of the screen, then press + (available if maximum of profile number is not reached).
Possibility to create up to 16 several profiles (depending on model). If you want to modify or delete a profile then press setting button in concerned profile.
9.2 | CREATE AND DELETE A FOVOURITE RECIPE
Method 1: From profile interface, press button to add a recipe and follow instructions on the screen.
Method 2: At the end of a recipe press following button: (**)
Possibility to record up to 8 recipes per profile. If you want to delete a favourite recipe then stay pressed on the concerned tile, then press the cross displayed on the top of the tile.
NOTE

No possibility to modify a recipe in profile menu or during recipe processing.
NOTE
If you stop your favourite drink in progress, this setting will be saved.
For each profile, you can set specific settings:
- Base light, on or off
• Auto on on a specific favourite recipe - Recipes display
- Add a name
- Choose a color
- Choose a short cut
10| SETTING MENU
Push gear wheel (☐) at the left of the display panel ☐.
The following settings can be made:
- Parameters: language, clock, date, water hardness, coffee temperature, tca temperature, measuring unit, base light brightness, screen brightness, Auto-off, automatic rinsing, recipe display (mosaic or slider), reset product.
• Information: drinks prepared, number of recipes done
• Help and tutorials: videos to explain how to use appliance
Below are the main settings available:
| Date | You must set the date, particularly when you are using an anti-limescale cartridge. |
| Clock | You can select to display a 12 or 24-hour clock. |
| Language | You can select the language of your choice from those offered. |
| Measuring Unit | You can set the unit of measurement to be ml or oz. |
| Screen brightness | You can adjust the screen brightness according to your preferences. |
| Drinks temperature | You can adjust the temperature of your coffres and / or your teas to three different levels. This adjustment is a generic setting, applied as default on all recipes. But you can modify it occasionally when you launch a recipe, by using advance setting of the recipe. |
| Water hardness | You can set your water hardness from 0 to 4 (see section 6.1). |
| Auto-off | You can choose the duration after which your appliance will switch off automatically (duration of non-use). This function lets you reduce your energy consumption. Set the automatic switch-off time to save energy (switch-off after 15) / 30 / 60 / 90 minutes after the last action on the machine). Set the automatic switch off time to the shortest duration (15 minutes) to save utmost energy. You can also reset it to the factory setting. |
| Automatic rinsing | You can choose to activate automatic rinsing of the coffee outlet or not when starting the machine (not concern tea recipes). |
| Base light | You can adjust the base light according to your preferences, on or off. This setting is independent of specific settings done in each profile. |
To exit the settings menu, press ☑ The settings will be stored in the memory if you unplug your machine.
11 | GENERAL MAINTENANCE
Carrying out proper maintenance will optimise the life of your machine and preserve the authentic taste of your coffee. For hygiene reason, it is important to carry on daily maintenance as proposed in the operating instructions, and run a rinsing program every day before first use or when not used for a long period (over 2 days).
11.1 MAINTAINING COFFEE GROUNDS COLLECTOR AND DRIP TRAY
The drip tray 13 collects the used water and the coffee grounds collector 11 collects the used ground coffee.
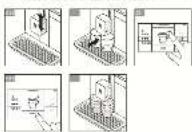
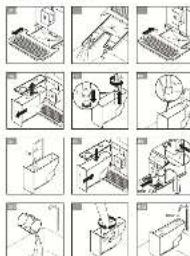
When and how should I empty the drip tray? When the machine notifies you. You can empty it more regularly, before the machine notifies you (figure J1 - J9).
It is recommended that you let it air dry before you put it back in the appliance. It is important to always leave it in place and to empty it regularly.
CAUTION

For hygienic reasons, as this container is in contact with milk and coffee, we tend that you fully dismantle and clean such element under hot water.
CAUTION

Not emptying the drip tray 13 regularly as may damage your machine. To clean an disassemble cover by pulling on indirea (figure J5).
When and how should I empty the coffee grounds collector?
When the machine notifies you. You can empty it more regularly, before the machine notifies you, but ensure that the machine is switched on so that it can record that the collector 11 has been emptied (figure 11 - 16).
CAUTION

Not emptying the coffee grounds collector 11 regularly may damage your ice. Do not put it in the dishwasher. For the reasons, we recommend that you clean a free ground container daily under hot with soap and sponge.
It is recommended that you let it air dry before you put it back in the appliance.
11.2 MAINTENANCE OF WATER TANK
For the preservation of best coffee flavor impacted by the quality of the water and hygienic reasons, we advise you to use only fresh water and to daily clean the water tank with hot water and a bottle brush.
11.3| WHY AND HOW DO I MAINTAIN THE MILK SYSTEM?
Maintain the milk system after making milky drinks.
NOTE

In order to obtain a consistent foam quality, we recommend that you:
- Start the machine's cleaning cycle. You can start a milk system cleaning at any time. To learn how to do this, see the tutorial stored in your machine: Performing a cleaning.
• Thoroughly clean the tube and nozzle with hot water immediately after each use. You can use the pipe cleaner inside the metal part of the milk tube. - We recommend to clean the milk pot after each use or when it is empty. The glass jar can be washed in the dishwasher.
11.4| WHY AND HOW CLEANING THE COFFEE BEANS TANK?
The coffee beans can leave oily stains in the tank that may affect coffee taste.
To preserve the best coffee flavour and for better hygiene, we recommend to wipe coffee beans tank with a soft and dry cloth, every time you fill it.
CAUTION

Do not clean it with water, because water in coffee beans tank may damage your product.
11.5| WHY AND HOW CLEANING THE COFFEE HATCH?
After ground coffee recipe: To preserve the best coffee flavour and for better hygiene, we recommend to brush pre ground coffee funnel ③ with the brush included in the spoon ⑦ (or with a dry cloth), after every ground coffee recipe.
After coffee cleaning: The pre ground coffee funnel 3 is used for coffee cleaning, to introduce cleaning tablet (see section 12). Before insert tablet, insure there is no ground coffee in the pre ground coffee funnel. When the cleaning program is finished, we recommend to brush the coffee hatch, to remove any residues of cleaning product.
11.6| OVERVIEW GENERAL MAINTENANCE
COMPONENT PREALERT ALERT NOTE
| Drip tray | Now, drip tray is full, you have to empty it to be allow to realize any recipes | It is not possible to realize any recipes if drip tray is not in place. | |
| Coffee beans tank | Now, coffee beans tank is empty, you have to fill it to be able to realize coffee with grinding | Note: You can realize recipes without grinding (ground coffee recipes and / or milk recipes and / or hot water). | |
| Water tank | In few recipes, you will have to fill water tank | Now, water tank is empty, you have to fill it to be allow to realize any recipes | It is not possible to realize any recipes if water tank is not in place and full. Please always place the water tank in the machine. |
| Coffee ground collector | In few recipes, you will have to empty coffee ground collector | Now coffee ground collector is full, you have to empty it to be allow to realize any recipes | It is not possible to realize any recipes if coffee ground collector is not in place. |
| Pre ground coffee funnel | If the coffee chute door is open, it is not possible to realize a recipe, you have to close it to be allow to realize recipes. If you open the coffee chute door during a recipe, the recipe will be stopped and the machine will run an automatic maintenance after closing the door. | ||
| Coffee beans cover | If the coffee beans cover is not on the appliance, it is not possible to realize grinding. Note : we invite you to keep the cover on the appliance all the time to protect coffee beans flavour. |
To access to maintenance menu, push cleaning button ( ) on the screen.
MAINTENANCE WHEN? EXPLANATION ACCESSORIES
REQUIRED
| Automatic milk cleaning30 s / 20 ml | After each milky drink, when the machine notifies you | Allows you to clean the machine's milk system. You can start a milk system cleaning at any time. | |
| Coffee rinsing45 s / 30 ml | At any time Allows you to rinse the machine's coffee system. This process uses hot water only. It ensures the authentic taste of your coffee. | ||
| Tea rinsing30 s - 20 ml | At any time Allows you to rinse with hot water to ensure an authentic taste of your tea or infusion. | ||
| Milk accessory cleaning5 min | When the machine notifies you and at any time | This involves removing and cleaning the removable One Touch Cappuccino block [6] for optimum milk frothing, clean this regularly. See above in the instructions: Figure F1 - F15 | Cleaning needle [5] |
| Coffee system cleaning13 min / 600 ml | When the machine notifies you or at any time | Allows you to clean and degrease the machine's coffee system. It guarantees optimal preservation of your drinks' aromas. Clean the coffee hatch before and after the cleaning program, above in the instructions: Figure H1 - H9 | 1 cleaning tablet |
| Descaling25 min / 600 ml | When the machine notifies you or after the first 60 beverages at any time | Allows you to perform a descaling procedure. Eliminates any limescale or tolar deposits that can affect the taste of the coffee. When the number of drinks is not sufficient to require descaling, this function is not active. Stir to dissolve product when pouring in tank. | 1 dose of descaler |
CAUTION

You do not have to run the cleaning program as soon as the appliance noti-
fies you, but you should do it reasonably soon after. If the cleaning is postponed, the alert message will remain displayed until the operation has been performed.
If you unplug your machine during cleaning or in the event of electrical failure, the cleaning program will restart. It is not possible to postpone this operation: it is mandatory in order
to rinse the water system. In this case, a new cleaning tablet may be necessary. For further explanations, please see the tutorials available in your machine's settings.
Want to know when you should perform the maintenance operations above? An alert message will appear on the screen as soon as there is an action you need to take.
13| TROUBLESHOOTING
WARNING

Only a qualified technician is authorized to carry out repairs on electrical wiring and carry out work on the electrical grid. If you do not follow these instructions, you risk death by electrocution. Do not use an appliance that is visibly damaged!
FUNCTION PROBLEM CORRECTIVE ACTION
| General operation | The machine displays a failure, the software hangs or your machine has a malfunction. | Switch off and unplug the appliance, remove the filter, wait for one minute and start the appliance again. Press and hold the on / off button for starting. |
| The appliance does not switch on when the ON / OFF button is pressed. | Check your fuses and plug sockets. Check that the power plug is correctly inserted into the socket. | |
| A power failure occurs during a cycle. | The appliance will automatically restart when the power is switched back on. Then follow screens instructions if necessary. | |
| The appliance asks to be unplugged and plugged back in again. | Unplug the appliance for 20 seconds, remove the Claris Aqua Filter System, then plug it back in again. If the error continues, contact the WMF Customer Service team. | |
| Use | The coffee grinder makes a strange noise. | There are most probably foreign bodies in the grinder. Try to clear it with a vacuum cleaner, otherwise contact the WMF Customer Service team. |
| The coffee fineness cursor is difficult to manipulate. | Only change the grinder setting when it is running. | |
| The appliance is not producing coffee, or any other requested recipe. | A problem has been detected during preparation of the drink. The appliance has restarted automatically and is ready for a new cycle. | |
| You have used ground coffee instead of coffee beans in coffee beans tank. | Use your vacuum cleaner to remove the ground coffee from the coffee bean container. Put only coffee beans in coffee beans tank, avoid any other products (such as spices) | |
| Coffee beans alert is switched on, even if there are coffee beans in the tank | You can open the lid and shake the beans with your hand. Avoid using oily, caramelized or flavoured coffee beans that do not easily go into the grinder. | |
| There is water underneath the appliance. | Before removing the water tank, wait for 15 seconds after the coffee has finished flowing so that the appliance finishes its cycle properly. Check that the drip tray is correctly positioned on the machine; it should always be in place, even when the appliance is not in use. The drip tray should not be removed during a cycle. |
FUNCTION PROBLEM CORRECTIVE ACTION
| There is water in coffee ground retainer. | If some water is flowing on the upper cover of the appliance, this flowing is directly conducted to coffee retainer. Avoid to slack a fully cup on the top of the appliance. | |
| When you turn off the appliance, warm water flows out of the coffee outlets and the One Touch Cappuccino block. | According to the type of recipe prepared, the machine may run an automatic rinsing cycle when it is turned off, to avoid clogging. This cycle lasts only a few seconds and stops automatically. | |
| Using beverages | The One Touch Cappuccino block does not suck the milk. | Check that the block is assembled correctly (in particular the connector in the milk tube). Ensure that the steam nozzle is not blocked. If this is the case, see below "The steam nozzle on your machine seems to be partially or completely blocked". Check that the connector is not blocked or dirty; soak it in a mixture of hot water and washing-up liquid, then rinse and dry before reassembling. Ensure that the flexible pipe is not blocked or twisted and that it is properly inserted into the One Touch Cappuccino block in order to avoid any air leaks. Check that it is fully immersed in the milk. Rinse and clean the block (see chapters concerning rinsing and cleaning the One Touch Cappuccino block). For milk drinks, we recommend that you use fresh, pasteurized or UHT milk which has been recently opened. It is also advisable to use a cold container. |
| Using milk froth | The One Touch Cappuccino blocks produces little or no froth. | |
| The milk or water is not flowing correctly into the cup(s). | Check that the One Touch Cappuccino block [6] is correctly positioned. | |
| There are traces of milk in an Americano or a Hot water. | Complete a milk rinsing cycle or dismantle and clean the One Touch Cappuccino accessory before running the preparation. | |
| The espresso or coffee is not hot enough. | Run a coffee circuit rinsing cycle before preparing your coffee. Increase the coffee temperature in the advanced menu or in the settings menu. Warm the cup by rinsing it with hot water before making the drink. Choose a cup according the volume of recipe you request. | |
| The coffee is too lightly coloured or too weak. | Avoid using oily, caramelized or flavoured coffee beans. Check that the coffee bean is dispensing correctly and that nothing is obstructing the sensor. Decrease the volume of the preparation and increase the strength of your drink. Push the grinding fineness adjustment cursor to the left to make the grounds finer. Make the drink in two cycles by using the 2 cups function. |
FUNCTION PROBLEM CORRECTIVE ACTION
| The coffee dispenses too slowly. | Push the lineness of grind adjustment cursor 2 to the right to make the ground coffee coarser (according to the type of coffee used). Run one or several rinsing cycles. Run a machine clean (see section 12). If it occurs during ground coffee recipe: choose a clarer ground coffee powder or use a mixture for espresso coffee machine | |
| Your tea is not hot enough or too hot. | Increase or reduce the hot water temperature in the Settings menu. | |
| After pre ground coffee funnel [3] closing, there is still ground coffee inside. | Before inserting the second spoon, check if the hatch is empty. If not, use the brush on the spoon to unstick coffee. Be careful to close the hatch after one spoon insertion, don't put several spoons in the hatch at the same time. Don't tamp the ground coffee in the hatch before closing it to avoid stuck coffee. | |
| Using steam | The steam nozzle on your machine seems to be partially or completely blocked. | Dismantle the nozzle from its support using the dismantling key (figure F4). Replace the support without the nozzle. Start the rinse cycle for the One Touch Cappuccino block to remove any remaining deposits. Clean the steam nozzle and ensure that the opening of the nozzle is not obstructed by the remains of milk or limescale. Use the cleaning needle if necessary (figure F5). |
| No steam comes out of the steam nozzle. | Ensure that the steam nozzle is not blocked. See The steam nozzle on your machine seems to be partially or completely blocked above. If this does not work, empty the water tank and remove the Claris filter temporarily. Fill the water tank with mineral water with high calcium content (>100 mg/l) and run steam cycles (5 to 10) consecutively into a container until you obtain a continuous jet of steam. Put the filter back in the tank and come back to use regular water. | |
| Steam is leaking from the drip tray grid. | Depending on the type of preparation, steam may escape from the drip tray grid. | |
| Using maintenance | The drip tray has been emptied, but the warning message is still displayed on the screen. | The metal contacts are dirty. Clean and wipe the metal contacts at the back of the drip tray. |
| The machine does not request descaling. | The descaling cycle is requested after a large number of recipes. | |
| There is few flowing through coffee nozzle during descaling. | During descaling, several actions are in progress in the appliance, without permanent flowing through nozzle. |
FUNCTION PROBLEM CORRECTIVE ACTION
| Some ground coffee has found its way into the drip tray. | A small amount of ground coffee may settle in the drip tray. The machine is designed to evacuate any excess ground coffee so that the percolation zone remains clean.For coffees done with ground coffee chute, pay attention to use only one coffee dose (correspond with spoon supplied with the appliance). | |
| After emptying the coffee grounds collector, the warning message is still displayed on the screen. | Correctly replace the coffee grounds collector and follow the instructions on the screen. Wall at least 6 seconds before replacing them. | |
| The water tank has been filled, but the warning message is still displayed on the screen. | You may not have put enough water for the product. In detect the water level, fill completely the tank.Check that the tank is installed correctly on the device. The float at the bottom of the tank should move freely. Check and unblock the float if necessary. |
CE The appliance complies with European directives 2014/35/EU, 201/30/EU and 2009/125/EU.
At the end of its life, this product must not be disposed of in normal household waste but must instead be delivered to a collection point for recycling electrical and electronic appliances. The materials are recyclable in accordance with their labelling. Reuse, recycling and other ways of reutilizing old appliances make an important contribution to protecting our environment. Please ask your local authorities for information about the appropriate disposal point.
Think about protecting the environment!
Your appliance contains valuable raw materials that can be recycled. Therefore, please hand in your appliance at a collection point in your city or municipality.
Subject to change
FR NOTICE D'UTILISATION
2.4 | INFORMATIONS IMPORTANTES SUR LE PRODUIT
REMARQUE

4| DIFFERENZE TRA I MODELLI
6.2 INSTALACE FILTRU
6 | INSTALLATION AF APPARATET
PAINIKE KUVAUS / YLEISET TOIMINNOT
6 | INSTALLERE APPARATET
7.1 KLARGJ∅RE APPARATET
11| GENERELT VEDLIKEHOLD
11.6 | OVERSIKT GENERELT VEDLIKEHOLD
KOMPONENT FORHÄNDSVARSEL VARSLING MERK
12| ANNET VEDLIKEHOLD
VEDLIKEHOLD NÅR? FORKLARING TILBEH∅R
N∅DVENDIG
STOPIEN TWARDOŚCI KLASA 0 KLASA 1 KLASA 2 KLASA 3 KLASA 4
7.2 PREPARAR O MOEDOR
6.1 | MĂSURA REA DURITĂȚII APEI
FUNCTIE PROBLEMÃ MÃSURÃ CORECTIVÃ
FUNCTIE PROBLEMÃ MÃSURÃ CORECTIVÃ
FUNCTIE PROBLEMĂ MĂSURĂ CORECTIVĂ
FUNCTIE PROBLEMÃ MÃSURÃ CORECTIVÃ
14 Avtagbart piplock
HÄRDHETSGRAD KLASS 0 KLASS 1 KLASS 2 KLASS 3 KLASS 4