FX-120 - DJ Equipment Omnitronic - Free user manual and instructions
Find the device manual for free FX-120 Omnitronic in PDF.

| Product type | DJ Mixer (Kill-Mixer) |
| Brand | Omnitronic |
| Model | FX-120 |
| Power supply | 230 V / 50 Hz via included AC 10 V / 1 A power supply |
| Power consumption | 10 VA |
| Dimensions (W x D x H) | 254 x 175 x 56 mm |
| Weight | 1.7 kg |
| Inputs | 2 phono (MM), 2 line (RCA), 1 mic (6.35 mm jack) |
| Outputs | 1 Master Out (RCA), 1 Rec Out (RCA) |
| Frequency response | 20 Hz - 20 kHz (± 3 dB) |
| Harmonic distortion | < 0.05 % |
| Signal-to-noise ratio | 60 dB (1 kHz) |
| Talkover attenuation | -14 dB |
| Kill function (treble/mid/bass) | -40 dB |
| Headphone impedance | 8 Ω (recommended) |
| Replacement crossfader | Item no. 10007190 |
| Main functions | Crossfader, Kill switches (treble/mid/bass), Cue pre-listening, Talkover, microphone control, Phono/Line selector |
| Maintenance and cleaning | Use a soft, damp cloth; do not use cleaning spray on the faders; avoid abrasive products |
| Safety | Protect from moisture; do not open the housing; disconnect before maintenance; keep out of reach of children |
| Spare parts and repairability | Replaceable crossfader (ref. 10007190); repairs by qualified technician |
| General information | Manufacturer: Omnitronic Showequipment GmbH, Germany; manual available in several languages |
Frequently Asked Questions - FX-120 Omnitronic
User questions about FX-120 Omnitronic
0 question about this device. Answer the ones you know or ask your own.
Ask a new question about this device
Download the instructions for your DJ Equipment in PDF format for free! Find your manual FX-120 - Omnitronic and take your electronic device back in hand. On this page are published all the documents necessary for the use of your device. FX-120 by Omnitronic.
USER MANUAL FX-120 Omnitronic
This is a product of OMNITRONIC Showequipment GmbH, GERMANY.
Further products of the OMNITRONIC-range:
2+1-channel kill-mixer
2 channels switchable to 2 phono, 2 line • 1 separate DJ-mic channel with input-sensitivity-control (Mic Level) and talkover-button • Microphone-input via 1/4" mono-jack on the frontpanel or on the rearpanel • 3 kill-buttons for every channel (bass, middle, treble) • High-quality and super-smooth ALPS-channel-faders • Super-smooth ALPS-crossfader replaceable from above • 2 LED-level-displays (master-out L/R) • Headphones-connection on the frontpanel • Headphones-output adjustable via Cue Level-control • Additional Cue Split/Cue Mix-button • Cue Split-function: the Cue-signal is on the one side of the headphones and the output-signal on the other side • Cue Mix-function: the adjustable mix of Cue-signal and output-signal is on both sides of the headphones • Mixing of the headphones-signal possible via cue mixing-fader • Master-control • Master-Out and Rec-Out via 2 RCA-sockets each • Rec-Out independent from Master-level for records with static level
Spider Edition
OMNITRONIC FX120 SPIDER Edition
No. 10006603
2+1 Kanal Kill-Mixer
2+1-channel kill-mixer
The SPIDER-edition • 2 channels switchable to 2 phono, 2 line • 1 separate DJ-mic channel with input-sensitivity-control (Mic Level) and talkover-button • Microphone-input via 1/4" mono-jack on the frontpanel or on the rearpanel • 3 kill-buttons for every channel (bass, middle, treble) • High-quality and super-smooth ALPS-channel-faders • Super-smooth ALPS-crossfader replaceable from above • 2 LED-level-displays (master-out L/R) • Headphones-connection on the frontpanel • Headphones-output adjustable via Cue Level-control • Additional Cue Split/Cue Mix-button • Cue Split-function: the Cue-signal is on the one side of the headphones and the output-signal on the other side • Cue Mix-function: the adjustable mix of Cue-signal and output-signal is on both sides of the headphones • Mixing of the headphones-signal possible via cue mixing-fader • Master-control • Master-Out and Rec-Out via 2 RCA-sockets each • Rec-Out independent from Master-level for records with static level
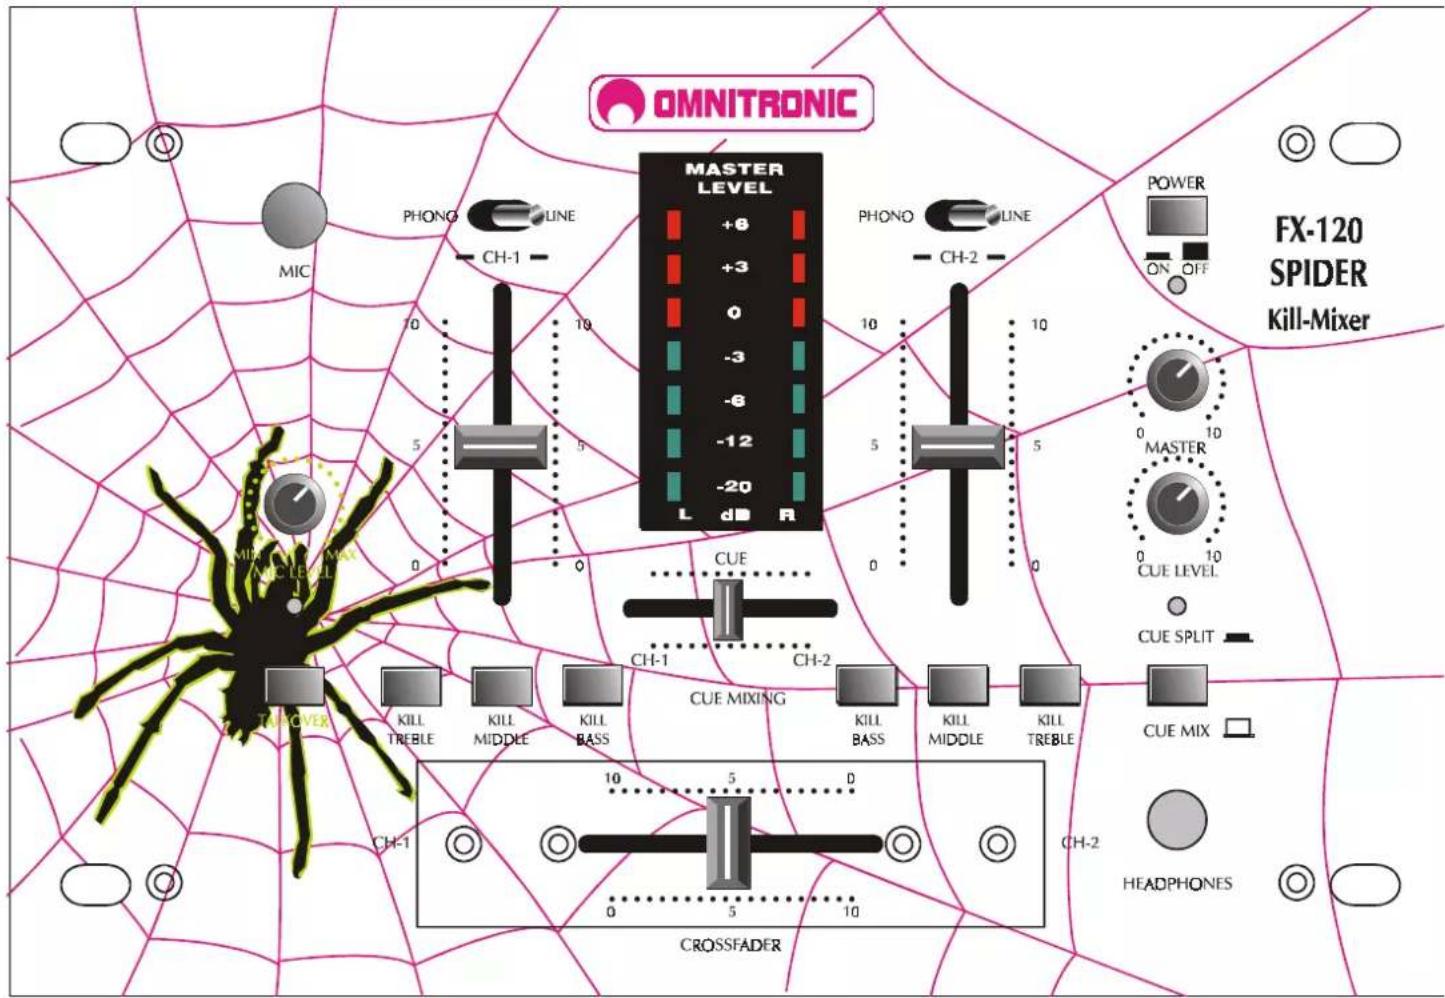
FRONTPANEL

REAR PANEL
BEDIENUNGSANLEITUNG

OMNITRONIC
SOUND AND LIGHT SYSTEMS FOR DJS
FX'1 20/FX'1 20 SPIDER
Kill'Mixer
ACHTUNG!
(14) HEADPHONES-BUCHSE
natural_image
Pure electrical circuit lines without any symbolsKeep this device away from rain and moisture!
Never open the housing!
For your own safety, please read this user manual carefully before you initial start-up.
All persons involved in the installation, operation and maintenance of this device have to:
- be qualified
- follow the instructions of this manual
1. INTRODUCTION
Thank you for having chosen a OMNITRONIC FX-120. If you follow the instructions given in this manual, we can assure you that you will enjoy this device for many years.
Unpack your OMNITRONIC FX-120.
Please make sure that there are no obvious transport damages. Should you notice any damages on the A/C connection cable or on the casing, do not take the device into operation and immediately consult your local dealer.
2. SAFETY INSTRUCTIONS

CAUTION!
Keep this device away from rain and moisture! Unplug mains lead before opening the housing!
This device has left our premises in absolutely perfect condition. In order to maintain this condition and to ensure a safe operation, it is absolutely necessary for the user to follow the safety instructions and warning notes written in this user manual.

Important:
Damages caused by the disregard of this user manual are not subject to warranty. The dealer will not accept liability for any resulting defects or problems.
Always plug in the power plug of the power-unit least. Make sure that the power-switch is set to OFF position before you connect the device to the mains.
English
Keep away from heaters and other heating sources.!
If the device has been exposed to drastic temperature fluctuation (e.g. after transportation), do not switch it on immediately. The arising condensation water might damage your device. Leave the device switched off until it has reached room temperature.
Never put any liquids on the device or close to it. Should any liquid enter the device nevertheless, disconnect from mains immediately. Please let the device be checked by a qualified service technician before you operate it again. Any damages caused by liquids having entered the device are not subject to warranty!
Never let the power-cord of the power-unit come into contact with other cables! Handle the AC-cord and all AC-connections with particular caution!
Before the device is switched on all faders and volume controls have to be set to 0 or min position.
Please note that damages caused by manual modifications on the device or unauthorized operation by unqualified persons are not subject to warranty.
Keep away children and amateurs!
There are no serviceable parts inside the device. Maintenance and service operations are only to be carried out by authorized dealers.
3. OPERATING DETERMINATIONS
You can install the device at any desired place. Please make sure that the device is not exposed to extreme heat, moisture or dust. There should not be any cables lying around. You endanger your own and the safety of others!
Do not operate the device in extremely hot (more than 30^ C) or extremely cold (less than 5^ C) surroundings. Keep away from direct insolation (particularly in cars) and heaters.
Operate the device only after having familiarized with its functions. Do not permit operation by persons not qualified for operating the device. Most damages are the result of unprofessional operation!
Never use spray cleaners in order to clean the faders!
Never use solvents or aggressive detergents in order to clean the device! Rather use a soft and damp cloth.
Please consider that unauthorized modifications on the device are forbidden due to safety reasons!
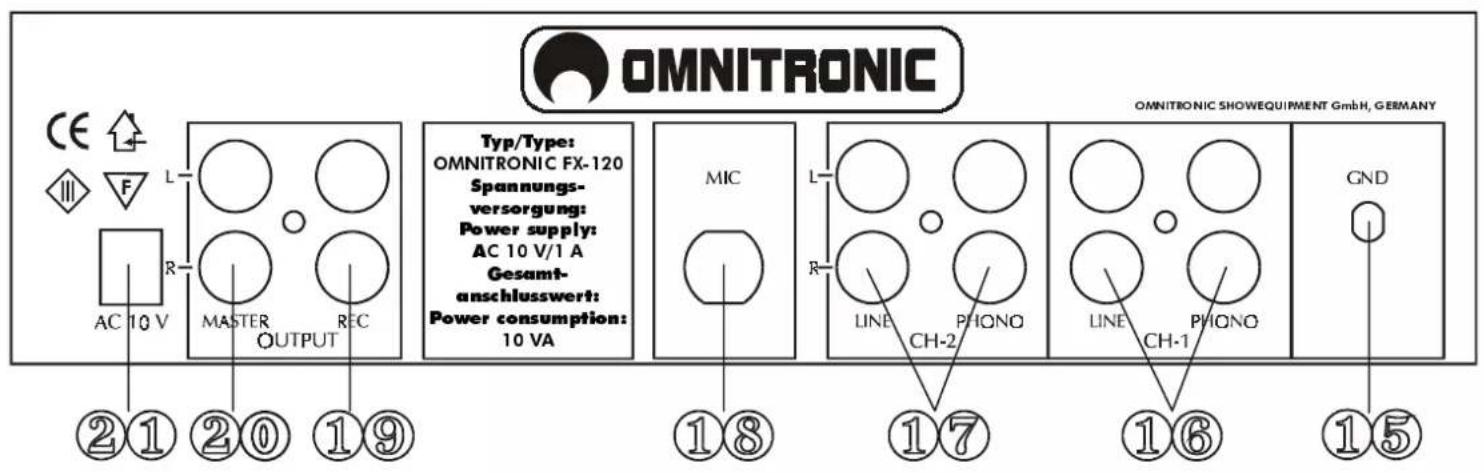
4. CONNECTIONS
- Make sure that the power switch is set to OFF. Before you connect the devices, all units have to be switched off and the master control is set to 0.
- In order to obtain highest sound quality, only use high-quality cables for connecting the devices. Make sure that the cables are properly fixed.
- Connect your amplifier to the MASTER OUT jacks. Make sure that the jacks are set properly (L & R).
- For recording, connect your tape recorder or cassette deck to the REC OUT jacks. The REC OUT level will not be influenced by the master control. You can set the output level with the channel faders.
- The FX-120 features one controllable microphone channel. The microphone can be connected via the 14 " mono jack plug on the frontpanel or on the rearpanel. With the Talkover-button, you can attenuate all other signals without affecting the microphone volume.
English
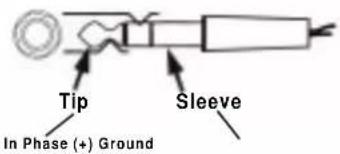
Occupation unbalanced mono-1/4" jack-plug:
Unbalanced mono 1/4" jack-plug:
- You can connect up to 2 record players using the PHONO 1 jacks and PHONO 2 jacks on the rearpanel. You can only control the record player signal after you switched the PHONO/LINE switches to PHONO. The signal is then controlled via the CH-1 and CH-2 faders.
-
Connect your tape recorder, tuner, CD-player, cassette deck or all other line signals to the LINE /AUX jacks on the rearpanel. You can only control the line signals after you switched the PHONO/LINE switches to line. The signal is then controlled via the respective faders.
-
FUNCTIONS
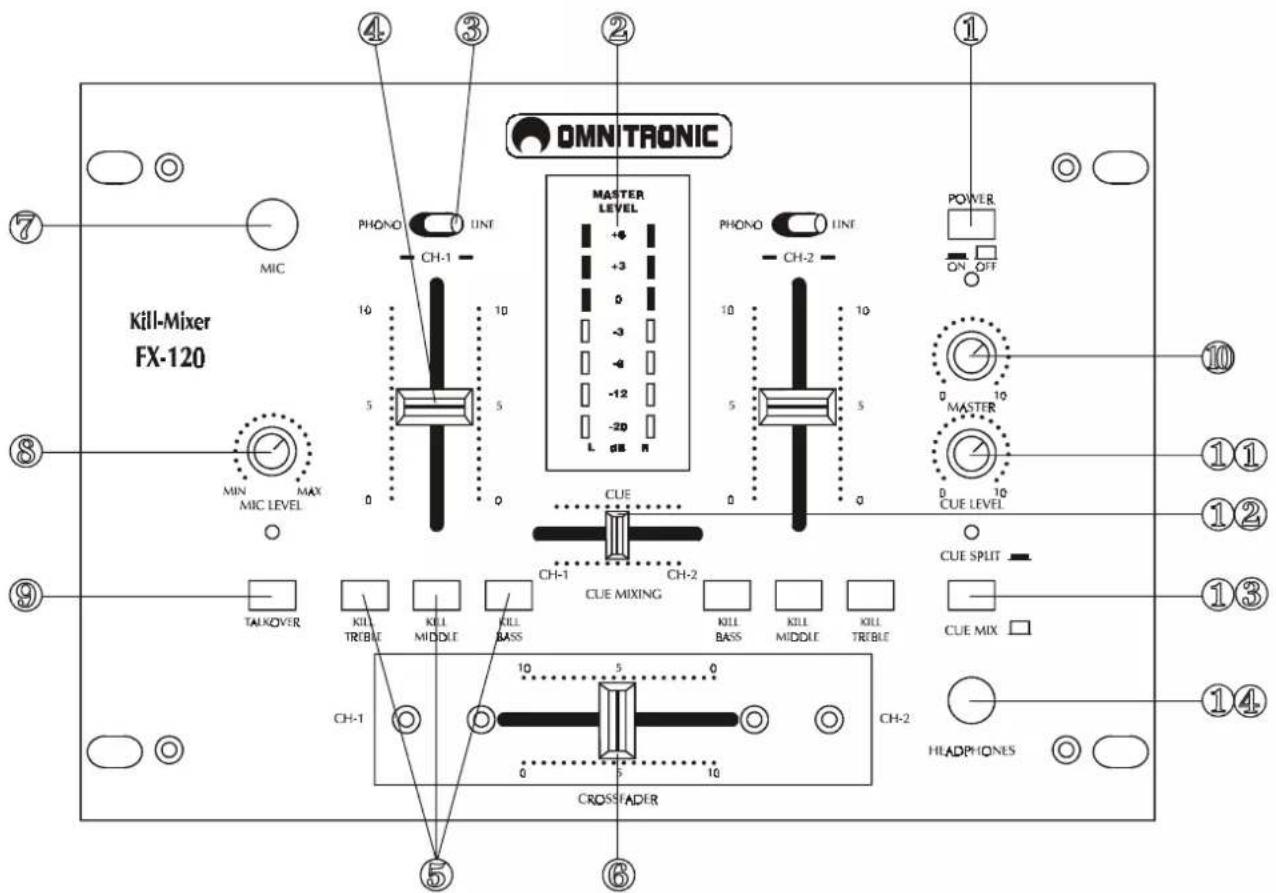
(1) POWER SWITCH
(2) MASTER LEVEL-DISPLAY
The display shows the level of the left and right master output.
(3) PHONO/LINE-SWITCH
Used to select the input to be sent to the individual channel.
(4) CHANNEL-FADER
Used to adjust the level of each channel.
(5) KILL-BUTTONS
In order to cut the respective signal completely off.
(6) CROSSFADER
Mixes the signals of one channel with another.
(7) MIC JACK
You can connect microphones with 14 " jack plug.
English
(8) MIC LEVEL-CONTROL
With the MIC LEVEL control, you can adjust the microphone volume.
(9) TALKOVER-BUTTON
Press this button if you want to use your microphone. When the button is pressed, all signals but the microphone level are attenuated by 14 dB. In the OFF-position, all signals return to their original level.
(10) MASTER-CONTROL
Adjusts the level of the master output.
(11) CUE LEVEL-CONTROL
With the CUE LEVEL control, you can adjust the phones volume without changing the output signal.
(12) CUE MIXING-FADER
Selects the channel for monitoring. The monitor signal comes from Prefader. This means it will not be affected by the channel faders.
Connect your headphones to the HEADPHONES jack. With the CUE MIXING-fader you can select the desired channel.
(13) CUE SPLIT/CUE MIX-BUTTON
Cue Split-function (button released): the Cue-signal is on the one side of the headphones and the output-signal (CH-2) on the other side.
Cue Mix-function (button pressed): the adjustable mix of Cue-signal and output-signal is on both sides of the headphones.
(14) HEADPHONES-JACK
Use this jack to connect the headphones. Headphones from 8 Ohms to 600 Ohms can be used. 8 Ohms is recommended.
6. IN- AND OUTPUTS:
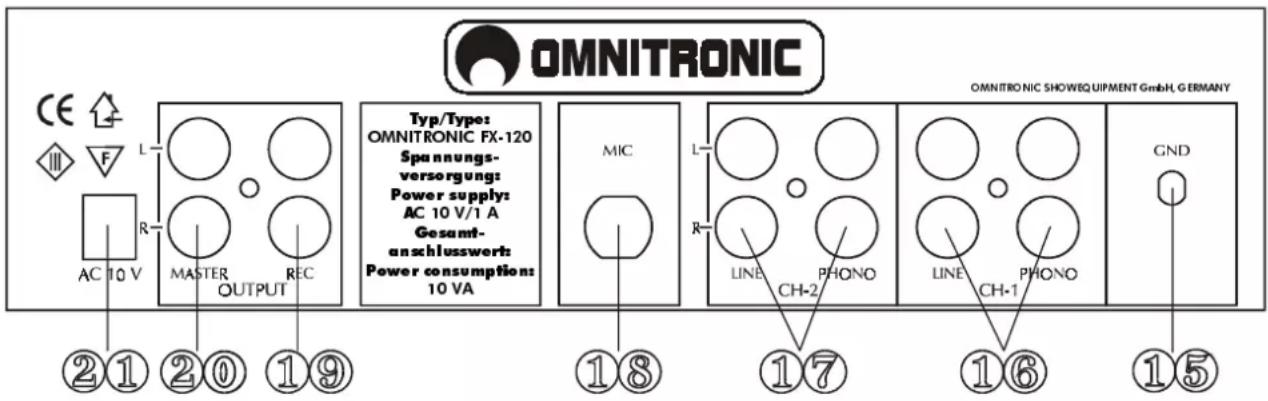
(15) GND (Ground terminal)
Connect the ground lead of the turntable with this terminal. This helps to reduce humming and pop noises.
(16), (17) LINE / PHONO INPUT JACKS
Input jack for CH-1 and CH-2. Connect turntables equipped with MM pickup cartridge to PHONO input. CD players or Tape Decks should be connected to LINE input. Line level musical instruments with stereo outputs such as Rhythm Machines or Samplers should also be connected to LINE inputs.
(18) MIC SOCKET
Connect your microphone with 14 " jack plug here. For permanent installations, we recommend to use the socket on the rearpanel.
(26) REC OUT
To connect your record unit.
(20) MASTÉR OUT
Output sockets for connecting your power amplifier.
(21) POWER CONNECTION
Connect your 10 V power-unit here.
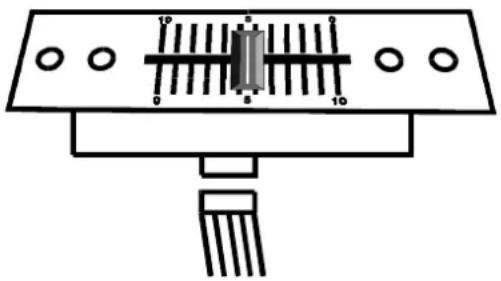
7. REPLACING THE CROSSFADER
natural_image
Pure electrical circuit lines without any symbolsInstructions for replacing the crossfader:
- Remove the fader knob.
- Remove the two outer screws on the fader-panel.
• Take the fader out and unplug the connection-cable. - Connect the new fader and fix it in the device.
The fader-panel of the replacement-crossfader cannot be used for the Design-version. In order to exchange the fader-panels, additionally unscrew the 2 inner screws and exchange the two fader-panels.
8. TECHNICAL SPECIFICATIONS
| Power supply: 230 V/50 Hz | |
| Via AC 10 V power-unit included in the delivery | |
| Power consumption: 10 W | |
| Inputs: 2 phono, 2 line, 1 mic | |
| Minimum input voltage: | |
| Microphone: 1.1 mV | |
| Phono: 2.5 mV | |
| Line: 75 mV | |
| Output power: 11.3 V (peak to peak) | |
| Outputs: 1 Master-Out, 1 Rec-Out via RCA | |
| Frequency range: 20 - 20,000 Hz, ± 3 dB | |
| Distortion: < 0.05 % | |
| S/N-ratio: 60 dB (1 KHz) | |
| Talkover-attenuation: -14 dB | |
| Kill-function: | |
| Treble/Middle/Bass: -40 dB | |
| Headphones impedance: | 8 Ohms |
| Dimensions: 254 x 175 x 56 mm | |
| Weight: | 1.7 kg |
| Replacement crossfader: | No. 10007190 |
Please note: All specifications are subject to change without prior notice.
12/98 © Errors and omissions excepted.
MODE D'EMPLOI

OMNITRONIC
SOUND AND LIGHT SYSTEMS FOR DJS
FX'1 20/FX'1 20 SPIDER
Table de mixage