
NV50AH - Stapler HiKOKI - Free user manual and instructions
Find the device manual for free NV50AH HiKOKI in PDF.
| Product Type | Pneumatic Stapler |
| Brand | HiKOKI |
| Model | NV50AH |
| Air Pressure | 4.9 – 8.3 bar |
| Nail Type | Coil nails diameter 1.8–2.3 mm, width 4.6–4.8 mm |
| Magazine Capacity | 200 – 400 nails (1 coil) |
| Dimensions (L × H × W) | 252 mm × 269 mm × 112 mm |
| Weight | 1.4 kg |
| Feeding Method | Reciprocating piston |
| Hose Inner Diameter | 6 mm minimum |
| Main Functions | Intermittent and continuous nailing, discharge depth adjustment, 360° air outlet orientation |
| Standard Accessories | Safety glasses, hex keys for M4/M5/M6 screws, oil bottle, case |
| Optional Accessory | Parts set for sequential trigger (code 881-012) |
| Lubrication | Shell Tonna oil or equivalent SAE 10W/20W, one drop every 5 to 10 nailings |
| Maintenance | Clean the magazine and push lever, check screws, replace exhaust cap if necessary |
| Safety | Wear safety glasses and hearing protection, do not point the tool at people, disconnect hose before maintenance |
| Sound Level (LpA) | 84 dB(A) at work station |
| Vibration Level | Less than 2.5 m/s² |
Frequently Asked Questions - NV50AH HiKOKI
User questions about NV50AH HiKOKI
0 question about this device. Answer the ones you know or ask your own.
Ask a new question about this device
Download the instructions for your Stapler in PDF format for free! Find your manual NV50AH - HiKOKI and take your electronic device back in hand. On this page are published all the documents necessary for the use of your device. NV50AH by HiKOKI.
USER MANUAL NV50AH HiKOKI
COIL NAILER COIL NAGLER CLOUEUR POUR COILS CHIODATRICE A BOBINA TROMMELSPIJKERAPPARAAT CLAVADORA PARA COILS
NV 50AH

natural_image
Technical line drawing of a mechanical device with no visible text or symbolsRead through carefully and understand these instructions before use. Diese Anleitung vor Benutzung des Werkzeugs sorgfältig durchlesen und verstehen. Lire soigneusement et bien assimiler ces instructions avant usage. Leggete attentamente queste istruzioni prima dell'utilizzo. Deze gebruiksaanwijzing s.v.p. voor gebruik zorgvuldig doorlezen. Leer cuidadosamente y comprender estas instrucciones antes del uso.
Handling instructions Bedienungsanleitung Mode d'emploi Istruzioni per l'uso Gebruiksaanwijzing Instrucciones de manejo
GENERAL OPERATIONAL PRECAUTIONS
- Operate the power tool safely for correct uses.
Do not use the power tool for uses other than those specified in this handling instructions.
- For safe operation, handle the power tool correctly.
Please follow the instructions given in this instruction manual and correctly handle this tool so as to ensure safe operation. Never let the tool be used by children or people who do not know enough to be able to handle it correctly, or let it be used by people who cannot operate it correctly.
- Confirm the safety of the workshop.
Keep unauthorized people away from the workshop. Especially children should be kept away.
- The right parts in the right places.
Do not remove any of the covers or screws. Keep them in place as they have their functions.
Moreover, because it would be dangerous, never make modifications to the tool or use it after making modifications.
- Check the tool before using it.
Before using the tool, always check that no parts of it are broken, that all screws are completely tight, and that no parts are missing or rusty.
- Excessive work could cause accidents.
Do not make tools and accessories work beyond their abilities. Excessive work not only damages the power tool but also it is dangerous in itself.
- Stop operation immediately if abnormalities are noticed.
Stop operation if you notice abnormalities, or if the power tool does not work properly; have the power tool inspected and serviced.
- Look after the power tool carefully.
If you drop or knock the power tool against things, the outer frame may be deformed and cracks or other kinds of damage may occur, so please handle it with sufficient care. Also, do not scratch or en-grave signs on the power tool. Owing to high pressure air inside the tool and cracks in the surface are dangerous.
Never use the power tool if a crack develops or if air is escaping from a crack.
- Take good care for a long service life.
Always take good care of the power tool and keep it clean.
- Inspection at regular intervals is essential for safety.
Inspect the power tool at regular intervals so that the power tool can be operated safely and efficiently at all times.
- Consult an authorized service center if repair or parts replacement is necessary.
Ensure that the power tool is serviced by authorized service centers only, and that only genuine, replacement parts are used.
- Keep the power tool in a proper place.
When not in use, the power tool should be kept in a dry place out of the reach of children. Put into the body about 2cc oil through the hose joint to protect the tool from rust.
- The exploded assembly drawing on this handling instructions should be used only for authorized service center.
PRECAUTIONS ON USING NAILER
- Safe operation through correct usage
This tool was designed for driving nails into wood and similar materials. Use it for its intended purpose only.
- Make sure air pressure is within the rated range of air pressure.
Please make sure that the air pressure is within a range of 4.9 bar – 8.3 bar (70 \~ 120 psi.), and that the air which is used is clean and dry. If the air pressure is greater than 8.3 bar (120 psi.), the service life of the power tool will be shortened and dangerous conditions could develop. Tools shall not be connected to pressure which potentially exceeds 14 bar (200 psi.).
- Never operate the equipment with high-pressure gases other than compressed air.
Never use carbon dioxide, oxygen or other gases from pressurized containers under any circumstances.
- Be careful of ignition and explosions.
Since sparks may fly during nailing, it is dangerous to use this tool near lacquer, paint, benzine, thinner, gasoline, gas, adhesives and similar inflammable substances as they may ignite or explode. Under no circumstances should this tool therefore be used in the vicinity of such inflammable material.
- Always wear eye protection (protective goggles).
When operating the power tool, always wear eye protection, and ensure that surrounding people wear eye protection too.
The possibility of fragments of the wire or plastic linking the nails or nails that were not properly hit entering the eye is a threat to sight. Eye protection can be bought at any hardware store. Always wear eye protection while operating this tool. Use either eye protection or a wide vision mask over prescription glasses.
Employers should always enforce the use of eye protection equipment.
- Protect your ears and head.
When engaged in nailing work, please wear ear mufflers and head protection. Also, depending on condition, ensure that surrounding people also wear ear mufflers and head protection.
- Pay attention to those working close to you.
It would be very dangerous if nails that were not properly driven in should hit other people. Therefore, always pay attention to the safety of the people around you when using this tool. Always make sure that nobody's body, hands or feet are close to the nail outlet.
- Never point the nail outlet toward people.
Always assume the tool contains fasteners.
If the nail outlet is pointed toward people, serious accidents may be caused if you mistakenly operate the tool. When connecting and disconnecting the hose, during nail loading or similar operations, be sure the nail outlet is not pointed towards anyone (including yourself). Even when no nails are loaded at all, it is dangerous to operate the tool while pointing it at someone, so never attempt to do so. No horseplay. Respect the tool as a working implement.
- Before using the power tool, check the push lever.
Before using the power tool make sure to check that the push lever and valve operate properly. Without nails loaded into the power tool, connect the hose and check the following. If the sound of operation occurs this indicates a fault, so in such a case do not
use the power tool until it has been inspected and repaired.
○If merely pulling the trigger causes operating sound of drive bit movement occur, the power tool is faulty.
○If merely depressing the push lever against the material to be nailed causes the sound of drive bit movement to occur, the power tool is faulty. Furthermore, with regard to the push lever, please note that it must never be modified or removed.
10. Use specified nails only.
Never use nails other than those specified and described in this handling instructions.
11. Be careful when connecting the hose.
When connecting the hose and loading nails in order not to fire the tool by mistake, make sure of the following.
○Do not touch the trigger.
○Do not allow the firing head to contact with any surface.
○Keep the firing head down.
Strictly observe the above instructions, and always make sure that no part of the body, hands or legs is ever in front of the nail outlet.
12. Do not carelessly place your finger on the trigger.
Do not place your finger on the trigger except actually nailing. If you carry this tool or hand it to someone while having your finger on the trigger, you may inadvertently firing a nail and thus cause an accident.
13. Completely Close the nail guide and do not open it during operation.
If nailing is attempted when the nail guide is open, nails will not be driven into the timber, and there is a risk of dangerous discharge.
14. Press the nail outlet firmly against the material to be nailed.
When driving in nails, press the nail outlet firmly against the material to be nailed. If the outlet is not applied properly, the nails may rebound.
15. Keep hands and feet away from the firing head when using.
It is very dangerous for a nail to hit the hands or feet by mistake.
16. Beware of the tool's kickback
Do not approach the top of the tool with your head etc. during operation. This is dangerous because the tool may recoil violently if the nail currently being driven in comes into contact with a previous nail or a knot in the wood.
17. Take care when nailing thin boards or the corners of wood.
When nailing thin boards, the nails may pass right through, as may also be the case when nailing the corners of wood due to deviation of the nails. In such
cases, always make sure that there is no one (and nobody's hands or feet; etc.) behind the thin board or next to the wood you are going to nail.
18. Simultaneous nailing on both sides of the same wall is dangerous
Under no circumstances should nailing be performed on both sides of a wall at the same time. This would be very dangerous since the nails might pass through the wall and thus cause injuries.
19. Do not use the power tool on scaffoldings, ladders.
The power tool shall not be used for specific application for example:
- when changing one driving location to another involves the use of scafforldings, stairs, ladders or ladder alike constructions, e.g. roof laths,
– closing boxes or crates, - fitting transportation safety systems e.g. on vehicles and wagons
20. Do not disconnect the hose with your finger on the trigger.
If you disconnect the hose with your finger on the trigger, the next time the hose is connected, there is a danger that the power tool will fire a nail spontaneously, or operate incorrectly.
21. Disconnect the hose and take out any nails left in the magazine after use.
Disconnect tool from compressed air before doing tool maintenance, cleaning a jammed fastener, leaving work area, moving tool to another location, or after use. It is very dangerous for a nail to be fired by mistake.
22. When removing a nail which has become stuck, make sure to first of all disconnect the hose and release compressed air.
When removing a nail which has become stuck in the nail outlet, first of all make sure to disconnect the hose and release compressed air inside the power tool.
Accidental firing of the nail could be very dangerous.
23. To avoid hazards caused by falling nails, never open the magazine with the nail outlet facing downward while loading nails.
24. A female plug (air socket) should not be used in the body.
If a female plug is installed in the body, the compressed air sometimes can not be drawn when the hose is disconnected so avoid this.
The tool and air supply hose must have a hose coupling such that all pressure is removed from the tool when the coupling joint is disconnected.
25. Do not remove the dust cover
Never operate with the dust cover removed in order to avoid the danger of breakage of the wire or plastic retaining the nails or missed-fired nails flying about.
SPECIFICATIONS
| Type of power Piston reciprocating | |
| Air pressure (Gauge) 4.9 – 8.3 | bar (70 – 120 psi.) |
| Applicable nails Refer to Nail selection | |
| Amount of loadable nails 200 | -400 nails (1 coil) |
| Size | 252 mm (L) × 269 mm (H) × 112 mm (W) (9-15/16" × 10-19/32" × 4-13/32") |
| Weight 1.4 kg (3.1 lbs) | |
| Nail-feeding method Piston reciprocation | |
| Hose (inside diam.) 6 mm (1/4") | |
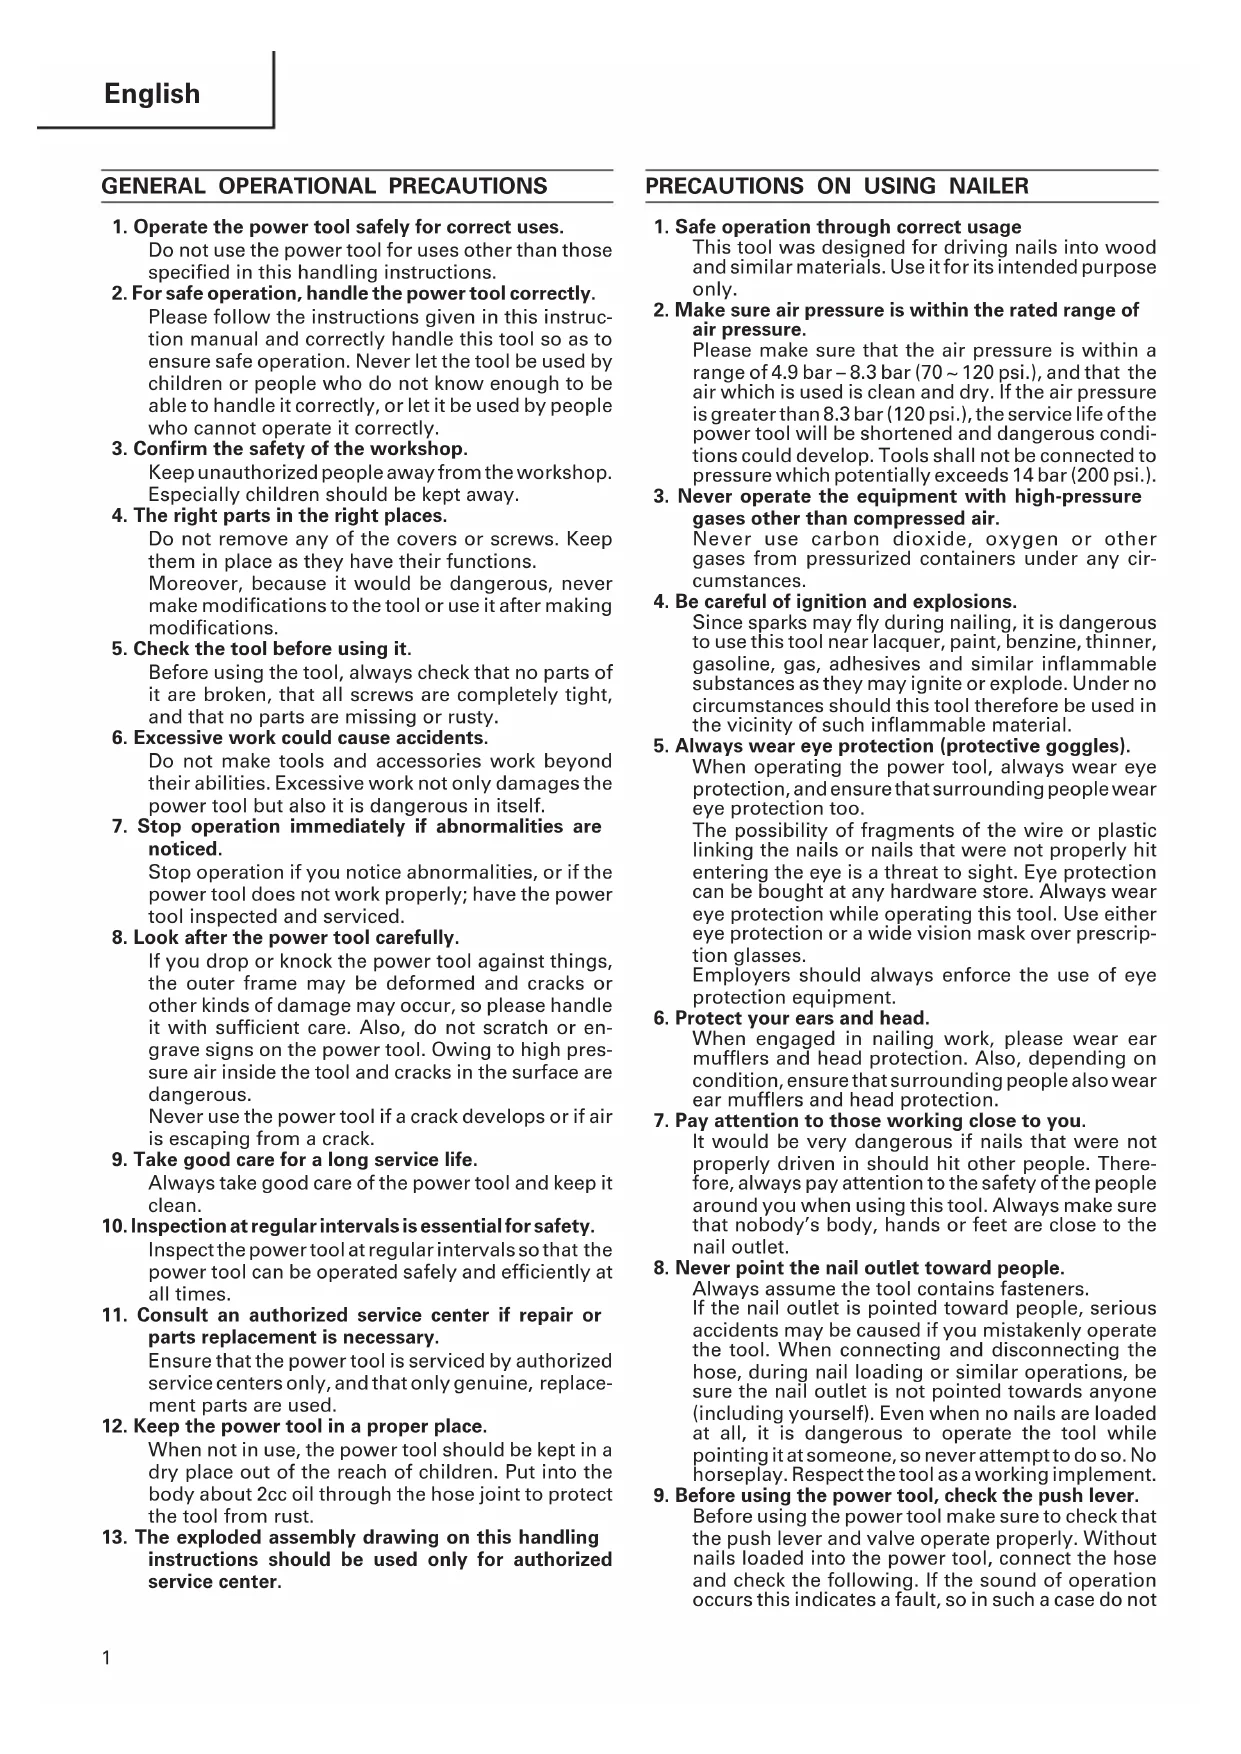
NAIL SELECTION
Choose a suitable nail from Fig. Nails which are not shown in Fig. can not be driven with this tool. Nails are linked and rolled.
| Nail | |
| Min. Max. | |
4.6 mm 4.8 mm(.181") (.189")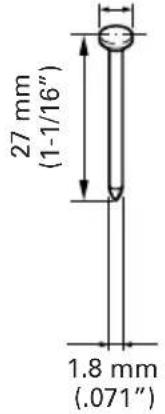 |  |
Dimensions of nails
STANDARD ACCESSORIES
(1) Eye protector .... 1
(2) Hexagon bar wrench for M4 screw 1
(3) Hexagon bar wrench for M5 screw 1
(4) Hexagon bar wrench for M6 screw 1
(5) Oiler 1
(6) Case 1
OPTIONAL ACCESSORY
○Sequential Fire Parts Set (Code No.881-012)
With the sequential fire parts, the nail is driven only by squeezing the trigger after pushing down the push lever.
By installing these parts, driving nails into improper positions and unexpected firing of nails caused by accidental operation of the push lever can be prevented.
APPLICATIONS
○Construction work such as wall sheathing, roof decking, subflooring.
○Mobile and modular home construction.
Be sure to use the hose provided with minimum 6 mm (1/4") inside diameter.
NOTE:
The air supply hoses must have a minimum working pressure rating of 12.8 bar (180 psi) or 150 percent of the maximum pressure produced in the air supply system, whichever is higher.
2. Check on safety
CAUTIONS:
○Unauthorized persons (including children) must be kept away from the equipment.
○Wear eye protector.
○Check the retaining screws which fix the exhaust cover, etc. for tightness.
Check the nailer for air leaks and defective or rusty parts.
○Check whether or not the push lever works correctly. Also check whether or not any dirt has adhered to the moving parts of the push lever.
○Recheck on operational safety.
BEFORE USE
1. Check the air pressure
CAUTION:
The air pressure must be constantly maintained at 4.9 – 8.3 bar (70 – 120 psi.).
Adjust the air pressure between 4.9 to 8.3 bar (70 – 120 psi.) according to the diameters and length of nails and hardness of the wood being nailed. Pay special attention to the output pressure, capacity, and piping on the air compressor, so that air pressure does not exceed the specified limit. Note that excessive pressure may affect overall performance, service life, and safety.
2. Lubrication
(1) Prior to operating this nailer, be sure to provide an air set between the air compressor and this device. Lubrication through the air set offers smooth operation, extended service life, and anticorrosion.
Adjust the oiler so that a single drop of oil is supplied at intervals of 5 to 10 nailing cycles.
(2) It is recommended using the recommended oil (SHELL TONNA). Other applicable oils are listed. Never mix two or more types of different oils.
3. Loading nails
(1) Load nails in the magazine
○Grip the nail guide and knob with fingers. Then depress the knob to open the nail guide towards the left. (See Fig. 1.)

Nail Guide
Fig. 1
○Adjust the position of the nail holder according to the length of the nail. (Fig. 2)

Fig. 2
For adjustment, turn the nail holder ① counterclockwise about 90 degrees. Move the nail holder ② up and down, adjust to the length of a nail to be used, and adjust the surface of the nail holder to the marked position of the magazine.
Turn the nail holder ③ clockwise (about 90 degrees) until it goes click. (Fig. 3)

Fig. 3
○Load the nails in the magazine.
At this time, if the wound portion of nails is inserted after it is once pulled out beforehand, the subsequent work can be much facilitated. (Fig. 4)

Fig. 4
○Bring the nail holder down to the magazine side, and close the cover after making sure that the nails are completely loaded in the magazine.
NOTE:
Before loading the nails in the magazine, position the nail holder according to the length of the nail. If the nail holder position is not adjusted, the nail jams. If the cover is forcibly closed without adjusting the position of the nail holder, the nail holder may be damaged.
(2) Load nails in the guide
Extend the nail line from the magazine.
Insert the first nail into the driving hole and the second nail between the pawls of the feeder. Insert the nail so that the nail head engages the guide slot. (Fig. 5)

Fig. 5
(3) Close nail guide
After making sure that the cover is closed, hook your finger to the nail guide and the knob, and while pushing the knob down, turn the nail guide clockwise to completely close it. (Fig. 6)
The above operation completes the loading of nails.

Fig. 6
NOTE:
The nail guide may not close properly or the nails may not advance properly if the linked bands or nails do not enter into the indicated position or the nails come away from the guide surface or the wire linked nails are warped.
CAUTION:
To prevent unintentional operation, never touch the trigger or place the top end of the push lever on a work bench or floor. Also, never face the nail outlet toward any of a person.
○Never use the head or body of this nailer as a hammer.
○Take precautions to ensure the safety of persons in the vicinity during operation.
1. Nailing procedures
(1) Method of intermittently driving nails (single shot) The single-contact change lever is in the single shot position (see Fig. 8).
This nailer includes a single shot structure to allow driving of a single nail by pushing down the push lever and pulling the trigger (see Fig. 7).
CAUTIONS:
☐[Method of intermittently driving nails (single shot)] explained here is not [Sequential fire]. When Single-contact Change Lever is at the Single shot position, if the push lever is pushed up in a state where the trigger is pulled, only one piece of nail in the shooting muzzle is fired: Be careful!
In the event it is used by Sequential fire, use the Sequential Fire Parts Set of Optical Accessory.
○If you do not pull the trigger quickly and crisply while in the single shot mode, the nailer will bounce and shoot several nails instead of just one. To avoid this, be sure to pull the trigger quickly and crisply.

Fig. 7

Fig. 8
○Push lever
When depressing the nail outlet, be sure to fully lift the push lever (see Fig. 7) to release the safety lock. Thus, nails cannot be driven without releasing the safety lock even though the trigger is pulled.
(2) Method for consecutive driving of nails (contact drive) The single-contact change lever is in the contact driving position (see Fig. 10).
Use the accessory hexagon bar wrench to turn the single-contact change lever to the contact driving position.
First pull back the trigger. Then press the nail outlet on the workpiece. Driving of nails will start. (Fig. 9)

Fig. 9

Fig. 10
CAUTION:
Exercise care when nailing corners of lumber. When consecutive nailing is carried out at corners of lumber, a nail may go astray or break through the corner.
NOTES:
○Precautions on no-load operation
Sometimes nailing will continue after driving in all nails previously contained in the magazine.
This is termed "no-load operation". Such operation may deteriorate the bumper, magazine, and nail feeder. To avoid no-load operation, occasionally confirm the amount of remaining nails. On the other hand, all nails should be removed after using this nailer.
○After completing operation, put into the body about 2cc oil through the hose joint to protect the tool from rust.
○Under low temperature conditions, the machine sometimes does not operate correctly. Always operate the machine at the appropriate ambient temperature.
2. Adjusting the nail-driving depth
CAUTION:
When making adjustments, be sure to remove your finger from the trigger. When making adjustments, be
sure that the nail outlet is not facing downward and that body parts or other persons are not in the path of the nail outlet.
○Adjusting the adjuster (Fig. 11)
Carry out test driving. If the nails are too deep, turn the adjuster to the shallow side ( ☐ mark).
If the nail depth is too shallow, turn the adjuster to the deep side (mark) (see Fig. 11, 12).
The ajuster moves 0.5 mm every time it is rotated with a click.

Fig. 11

Fig. 12
NOTES:
When adjusting the adjuster, it does not rotate more than 3 mm from the deepest point where a nail goes down. Do not rotate the adjuster by force beyond that point.
The nail-driving depth can also be adjusted by changing the air pressure used. Carry this out together with movement of the adjuster. Using a high air pressure that does not match the nail-driving resistance will shorten the service life of this nailer.
3. Changing the exhaust direction.
The direction of the exhaust vent can be changed within 360° by turning the head ring. (Fig. 13)

Fig. 13
INSPECTION AND MAINTENANCE
CAUTION:
Be sure to disconnect the hose during cleaning jams, inspection, maintenance and cleaning.
1. Countermeasure for nail jamming
(1) Remove the nail roll from the magazine, open the nail guide, insert a rod into the nail outlet and tap the rod with a hammer. (Fig. 14)
(2) Remove the jammed nail with slotted-head screw-driver. (Fig. 15)

Fig. 14
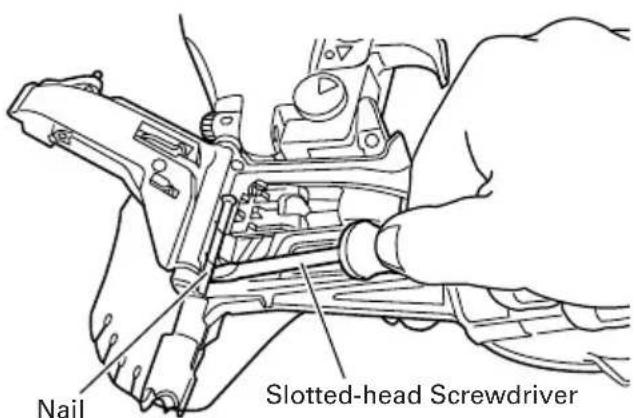
Fig. 15
(3) Cut off the defective part of the steel wire which links the nails with cutting nippers, correct the deformation, then load the nail roll in the magazine.
(4) In case of frequent jam, consult the Authorized Service Center from which you bought this nailer.
2. Check on mounting screws for each part
At regular intervals check every part for loose mounting screws and whether or not there are any air leaks. Retighten any loose screws. Operating the nailer with loose screws untightened will incur a hazard.
3. Inspecting the push lever
Check if the push lever can slide smoothly. (Fig. 16) Clean up the sliding area of the push lever and use the provided oil for lubrication from time to time. Lubrication enables smooth sliding and simultaneously serves to prevent the formation of rust.

Fig. 16
4. Inspecting the feeders
(1) Occasionally clean the knob sliding part and then apply the recommended oil. (See Fig. 17.)

Nail Guide
Fig. 17
(2) Open the nail guide and remove dust, etc., as shown in Fig. 18. Apply lubricant to the sliding groove of the feeder and feeder shaft. Check nail stopper (A) and nail stopper (B) slide smoothly by pushing them with your finger.

Fig. 18
(3) Also, apply the recommended oil to the feeding surface of the nose and nail guide after cleaning. This promotes smooth operation and retards corrosion.
CAUTION:
Check for smooth movement of the feeders and stoppers before use. If movement is uneven, nails could be fired at an irregular angle, presenting a hazard to the
operator and others nearby.
5. Inspecting the muffler
This Nailer has a built-in muffler in the exhaust to reduce noise and stirred-up dust during exhaust.
When the mesh of the muffler is filled or the muffler is damaged, replace the muffler with a new one. To replace the muffler, contact our Authorized Service Center.

Fig. 19
6. Inspecting the magazine
Clean the magazine. Remove dust of wooden chips which may have accumulated in the magazine.
7. Storing
When not in use for an extended period, apply a thin coat of the lubricant to the steel parts to avoid rust.
○Do not store the Nailer in a cold weather environment. Keep the Nailer in a warm area.
When not in use, the Nailer should be stored in a warm and dry place.
Keep out of reach of children.
8. Service parts list
A : Item No.
B : Code No.
C: No. Used
D:Remarks
CAUTION:
Repair, modification and inspection of HiKOKI Power Tools must be carried out by an HiKOKI Authorized Service Center.
This Parts List will be helpful if presented with the tool to the HiKOKI Authorized Service Center when requesting repair or other maintenance.
In the operation and maintenance of power tools, the safety regulations and standards prescribed in each country must be observed.
MODIFICATIONS:
HiKOKI Power Tools are constantly being improved and modified to incorporate the latest technological advancements.
Accordingly, some parts (i.e. code numbers and/or design) may be changed without prior notice.
COMPRESSOR
CAUTION:
When the maximum, operating pressure of the air compressor exceeds 8.3 bar (120 psi.), be sure to provide a reducing valve between the air compressor and nailer. Then, adjust the air pressure within the operating range of 4.9–8.3 bar (70–120 psi.). If the air set is installed, lubrication is also possible, thus providing additional convenience.
OILER-FILTER-REDUCING VALVE (Air Set)
So that the equipment can be operated under an optimum condition to ensure extended service life, it is advisable to use an oiler filter reducing valve. Please limit the length of the hose between the nailer and the air set to within 10m when using.

Fig. 20
APPLICABLE LUBRICANTS
| Type of lubricant Name of lubricant | |
| Recommended oil SHELL TONNA | |
| Motor oil SAE 10W, SAE 20W | |
| Turbine oil ISO VG32 ~ 68(#90 ~ #180) |
Noise Information
Noise characteristic values in accordance with Dr prEN 792-13, JUNE, 1997:
The typical A-weighted single-event sound power level L_WA, 1s, d = 91 dB
The typical A-weighted single-event emission sound pressure level at work station L _A,1s,d=84dB .
These values are tool-related characteristic values and do not represent the noise development at the point of use. Noise development at the point of use will for example depend on the working environment, the workpiece, the workpiece support and the number of driving operations, etc.
Depending on the conditions at the workplace and the form of the workpiece, individual noise attenuation measures may need to be carried out, such as placing workpieces on sound-damping supports, preventing workpiece vibration by means of clamping or covering, adjusting to the minimum air pressure required for the operation involved, etc.
In special cases it is necessary to wear hearing protection equipment.
Vibration Information
The typical vibration characteristic value in accordance with Dr prEN 792-13, JUNE, 1997 does not exceed 2.5 m/s ^4 .
This values is a tool-related characteristic value and does not represent the influence to the hand-arm-system when using the tool. An influence to the hand-arm-system when using the tool will for example depend on the gripping force, the contact pressure force, the working direction, the adjustment of energy supply, the workpiece, the workpiece support.
INSPECTION ET MANUTENTION
ATTENTION:
OPTIONELE ACCESSOIRES
| A | B | C | D |
| 1 949-819 | 1 | M5 × 10 | |
| 2 944-260 | 1 | ||
| 3 881-841 | 1 | ||
| 4 881-840 | 1 | ||
| 5 881-835 | 1 | ||
| 6 881-838 | 1 | ||
| 7 949-757 | 4 | M5 × 20 | |
| 8 881-879 | 1 | ||
| 9 881-839 | 1 | ||
| 10 881-851 | 1 | ||
| 11 877-699 | 2 | ||
| 12 881-837 | 1 | ||
| 13 881-834 | 1 | ||
| 14 881-833 | 1 | ||
| 15 881-832 | 1 | ||
| 16 990-067 | 1 | 1AS-50 | |
| 17 881-831 | 1 | ||
| 18 984-483 | 1 | S-36 | |
| 19A 881-864 | 1 | P-38 | |
| 20 881-829 | 1 | ||
| 21 881-830 | 1 | ||
| 22 881-877 | 1 | "43, 44" | |
| 23 955-479 | 1 | ||
| 24 — — — | 1 | ||
| 25 875-638 | 1 | S-12 | |
| 26 880-674 | 1 | ||
| 27 881-846 | 1 | ||
| 28 881-847 | 1 | ||
| 29 316-389 | 1 | ||
| 30 881-882 | 1 | ||
| 31 881-843 | 1 | ||
| 32 881-811 | 1 | ||
| 33 873-093 | 1 | 1AP-3 | |
| 34 881-870 | 1 | ||
| 35 949-660 | 2 | M6 × 20 | |
| 36 983-545 | 1 | ||
| 37 949-770 | 1 | D4 × 14 | |
| 38 878-132 | 1 | ||
| 39 878-340 | 1 | ||
| 40 881-818 | 1 | ||
| 41 881-873 | 1 | ||
| 42 877-371 | 1 | M5 | |
| 43 880-408 | 1 | ||
| 44 880-407 | 2 | ||
| 45 880-183 | 1 | ||
| 46 880-379 | 1 | ||
| 47 872-035 | 1 | ||
| 48 881-827 | 1 | ||
| 49 880-881 | 1 | M5 × 30 | |
| 50 949-518 | 2 | D3 × 18 | |
| 51 949-539 | 1 | D3 × 25 | |
| 52 959-155 | 1 | D3.97 | |
| 53 982-454 | 1 | ||
| 54 880-086 | 1 | ||
| 55 878-881 | 1 | ||
| 56 878-885 | 1 | S-18 | |
| 57 878-925 | 2 | ||
| 58 981-317 | 1 | S-4 | |
| 59 880-672 | 1 | ||
| 60 878-887 | 1 |
| A | B | C | D |
| 61 | 878-884 | 1 | |
| 62 | 880-673 | 1 | |
| 63 | 878-888 | 1 | |
| 64 | 880-671 | 1 | |
| 65 | 949-429 | 1 | M4 |
| 66 | 881-853 | 1 | |
| 67 | 878-222 | 1 | D1.6 × 12 |
| 68 | 881-848 | 1 | |
| 69 | 881-845 | 1 | |
| 70 | 872-645 | 1 | |
| 71 | 880-168 | 1 | |
| 72 | 873-570 | 1 | P-18 |
| 73 | 880-409 | 1 | |
| 74 | 877-476 | 1 | |
| 75 | 880-170 | 1 | |
| 76 | 983-748 | 1 | |
| 77 | 880-177 | 1 | |
| 78 | 881-850 | 1 | |
| 79 | 881-825 | 2 | |
| 80 | 877-826 | 2 | |
| 81 | 881-821 | 1 | |
| 82 | 881-822 | 1 | |
| 83 | 878-184 | 1 | |
| 84 | 881-003 | 1 | |
| 85 | 880-398 | 1 | |
| 86 | 881-824 | 1 | |
| 87 | 878-791 | 1 | D2.5 × 12 |
| 88 | 881-823 | 1 | |
| 89 | 881-826 | 1 | |
| 90 | 874-436 | 1 | P-4 |
| 91 | 878-103 | 1 | |
| 92 | 880-446 | 1 | |
| 93 | 881-871 | 1 | |
| 94 | 881-872 | 1 | |
| 95 | 880-393 | 2 | |
| 96 | 881-814 | 1 | |
| 97 | 881-815 | 1 | |
| 98 | 881-816 | 1 | |
| 99 | 878-337 | 1 | |
| 100 | 880-413 | 1 | M4 × 10 |
| 101 | 878-183 | 1 | |
| 102 | 881-820 | 1 | "79-82, 84-89" |
| 501 | 943-277 | 1 | 3MM |
| 502 | 944-458 | 1 | 4MM |
| 503 | 944-459 | 1 | 5MM |
| 504 | 877-153 | 1 | 30CC |
| 505A | 875-769 | 1 | |
| 506 | 881-849 | 1 |
| English Italia ho | ||
| EC DECLARATION OF CONFORMITYWe declare under our sole responsibility that Coil Nailer, identified by type and specific identification code *1), is in conformity with all relevant requirements of the directives *2) and standards *3). Technical fi le at *4) – See below.The European Standard Manager at the representative office in Europe is authorized to compile the technical fi le.The declaration is applicable to the product affi xed CE marking. | DICHIARAZIONE DI CONFORMITÀ CEDichiariamo sotto la nostra esclusiva responsabilità che la chiodatrice a bobina, identificata dal tipo e dal codice identificativo specifico *1), è conforme a tutti i requisiti pertinenti delle direttive *2) e degli standard *3). Documentazione tecnica presso *4) – Vedere sotto.Il gestore delle norme europee presso l'ufficio di rappresentanza in Europa è autorizzato a compilare il fascicolo tecnico.La dichiarazione è applicabile ai prodotti cui sono applicati i marchi CE. | |
| Deutsch NederlandsEG-KONFORMITÄTSERKLÄRUNGWir erklären in alleiniger Verantwortung, dass der durch den Typ und den spezifischen Identifizierungscode *1) identifizierte Coil-Nagler allen einschlägigen Bestimmungen der Richtlinien *2) und Normen *3) entspricht. Technische Unterlagen unter *4) – Siehe unten.Die Leitung der repräsentativen Behörde für europäische Normen und Richtlinien ist berechtigt, die technischen Unterlagen zusammenzustellen.Die Erklärung gilt für die an dem Produkt angebrachte CE-Kennzeichnung. | ||
| EC VERKLARING VAN CONFORMITEITWij verklaren onder onze eigen verantwoordelijkheid dat Trommelspijkerapparaat, geïdentificeerd door het type en de specifieke identificatiecode*1), voldoet aan alle relevante bepalingen van de richtlijnen*2) en normen*3). Technische documentatie bij*4) – zie onder.De Europese Normen Manager bij de vertegenwoordiging in Europa is gemachtigd om het technisch dossier samen te stellen.Deze verklaring is van toepassing op producten voorzien van de CE-markeringen. | ||
| Français Español | ||
| DECLARATION DE CONFORMITE CENous déclarons sous notre entière responsabilité que le Cloueur Pour Coils, identifié par le type et le code d'identification spécifique *1) est en conformité avec toutes les exigences applicables des directives *2) et des normes *3). Dossier technique en *4) - Voir ci-dessous.Le Gestionnaire des normes européennes du bureau de représentation en Europe est autorisé à constituer le dossier technique.Cette déclaration s'applique aux produits désignés CE. | DECLARACIÓN DE CONFORMIDAD DE LA CEDeclaramos bajo nuestra única responsabilidad que la Clavadora para coils, identificada por tipo y por código de identificación específico *1), está en conformidad con todas las disposiciones correspondientes de las directivas *2) y de las normas *3). Documentación técnica en *4) – Ver a continuación.El Director de Normas Europeas en la oficina de representación en Europa está autorizado para elaborar el expediente técnico.La declaración se aplica al producto con marcas de la CE. | |
| *1) NV50AH C320801B*2) 2006/42/EC*3) EN792-13:2000+A1:2008 | ||
| *4) Representative offi ce in EuropeHikoki Power Tools Deutschland GmbHSiemensring 34, 47877 Willich, GermanyHead offi ce in JapanKoki Holdings Co., Ltd.Shinagawa Intercity Tower A, 15-1, Konan 2-chome, Minato-ku, Tokyo, Japan | 29. 6. 2018Naoto YamashiroEuropean Standard Manager29. 6. 2018A. NakagawaCorporate Offi cer | |
Koki Holdings Co., Ltd.

- COIL NAILER COIL NAGLER CLOUEUR POUR COILS CHIODATRICE A BOBINA TROMMELSPIJKERAPPARAAT CLAVADORA PARA COILS
- GENERAL OPERATIONAL PRECAUTIONS
- PRECAUTIONS ON USING NAILER
- Use specified nails only.
- Be careful when connecting the hose.
- Do not carelessly place your finger on the trigger.
- Completely Close the nail guide and do not open it during operation.
- Press the nail outlet firmly against the material to be nailed.
- Keep hands and feet away from the firing head when using.
- Beware of the tool's kickback
- Take care when nailing thin boards or the corners of wood.
- Simultaneous nailing on both sides of the same wall is dangerous
- Do not use the power tool on scaffoldings, ladders.
- Do not disconnect the hose with your finger on the trigger.
- Disconnect the hose and take out any nails left in the magazine after use.
- When removing a nail which has become stuck, make sure to first of all disconnect the hose and release compressed air.
- To avoid hazards caused by falling nails, never open the magazine with the nail outlet facing downward while loading nails.
- A female plug (air socket) should not be used in the body.
- Do not remove the dust cover
- NAIL SELECTION
- STANDARD ACCESSORIES
- OPTIONAL ACCESSORY
- APPLICATIONS
- NOTE:
- Check on safety
- CAUTIONS:
- BEFORE USE
- Check the air pressure
- CAUTION:
- Lubrication
- Loading nails
- Nailing procedures
- ○Push lever
- NOTES:
- Adjusting the nail-driving depth
- Changing the exhaust direction.
- INSPECTION AND MAINTENANCE
- Countermeasure for nail jamming
- Check on mounting screws for each part
- Inspecting the push lever
- Inspecting the feeders
- Inspecting the muffler
- Inspecting the magazine
- Storing
- Service parts list
- MODIFICATIONS:
- COMPRESSOR
- OILER-FILTER-REDUCING VALVE (Air Set)
- APPLICABLE LUBRICANTS
- Noise Information
- Vibration Information
- INSPECTION ET MANUTENTION
- ATTENTION:
- OPTIONELE ACCESSOIRES
- Koki Holdings Co., Ltd.
Brand : HiKOKI
Model : NV50AH
Category : Stapler