
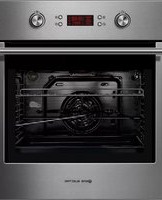
EMV48DTN - Oven EAS Electric - Free user manual and instructions
Find the device manual for free EMV48DTN EAS Electric in PDF.
| Product type | Built-in oven |
| Brand | EAS Electric |
| Model | EMV48DTN |
| Capacity | 35 L |
| Product dimensions (W x D x H) | 594 x 580 x 455 mm |
| Net weight | 29 kg |
| Voltage | 220-240 V |
| Frequency | 50/60 Hz |
| Total power | 2246-2673 W |
| Recommended circuit breaker | 16 A |
| Installation type | Built-in |
| Main functions | Convection, fan-assisted oven, grill, defrost, quick cooking |
| Child safety | Yes (control panel lock) |
| Removable door | Yes (for cleaning) |
| Interior light | Yes (25 W bulb, type E14, resistant to 300°C) |
| Cavity material | Enamel |
| Door material | Tempered glass |
| Included accessories | Metal grill, baking tray |
| Power cable length | About 1.5 m (estimated) |
| Warranty | 3 years (Spain and Portugal) |
| Spare parts available | Bulb, door, seal, heating elements |
Frequently Asked Questions - EMV48DTN EAS Electric
User questions about EMV48DTN EAS Electric
0 question about this device. Answer the ones you know or ask your own.
Ask a new question about this device
Download the instructions for your Oven in PDF format for free! Find your manual EMV48DTN - EAS Electric and take your electronic device back in hand. On this page are published all the documents necessary for the use of your device. EMV48DTN by EAS Electric.
USER MANUAL EMV48DTN EAS Electric
natural_image
Line drawing of a standard open oven with control panel and indicator lights (no text or symbols)EMV48DTN
Escanee para ver este manual en otros idiomas y actualizaciones Scan for manual in other languages and further updates Manuel dans d'autres langues et mis à jour Manual em outras línguas e actualizações


8.3 Modo Pizza " " 1880-2237W
8.7 Resistencia superior " [icon] " 1400-1668W
natural_image
Pure mechanical diagram showing a valve assembly with no text or symbols10. INSTALACIÓN
natural_image
Pure schematic diagram of a rectangular structure with dashed and solid lines indicating internal components (no text or symbols)V.2
natural_image
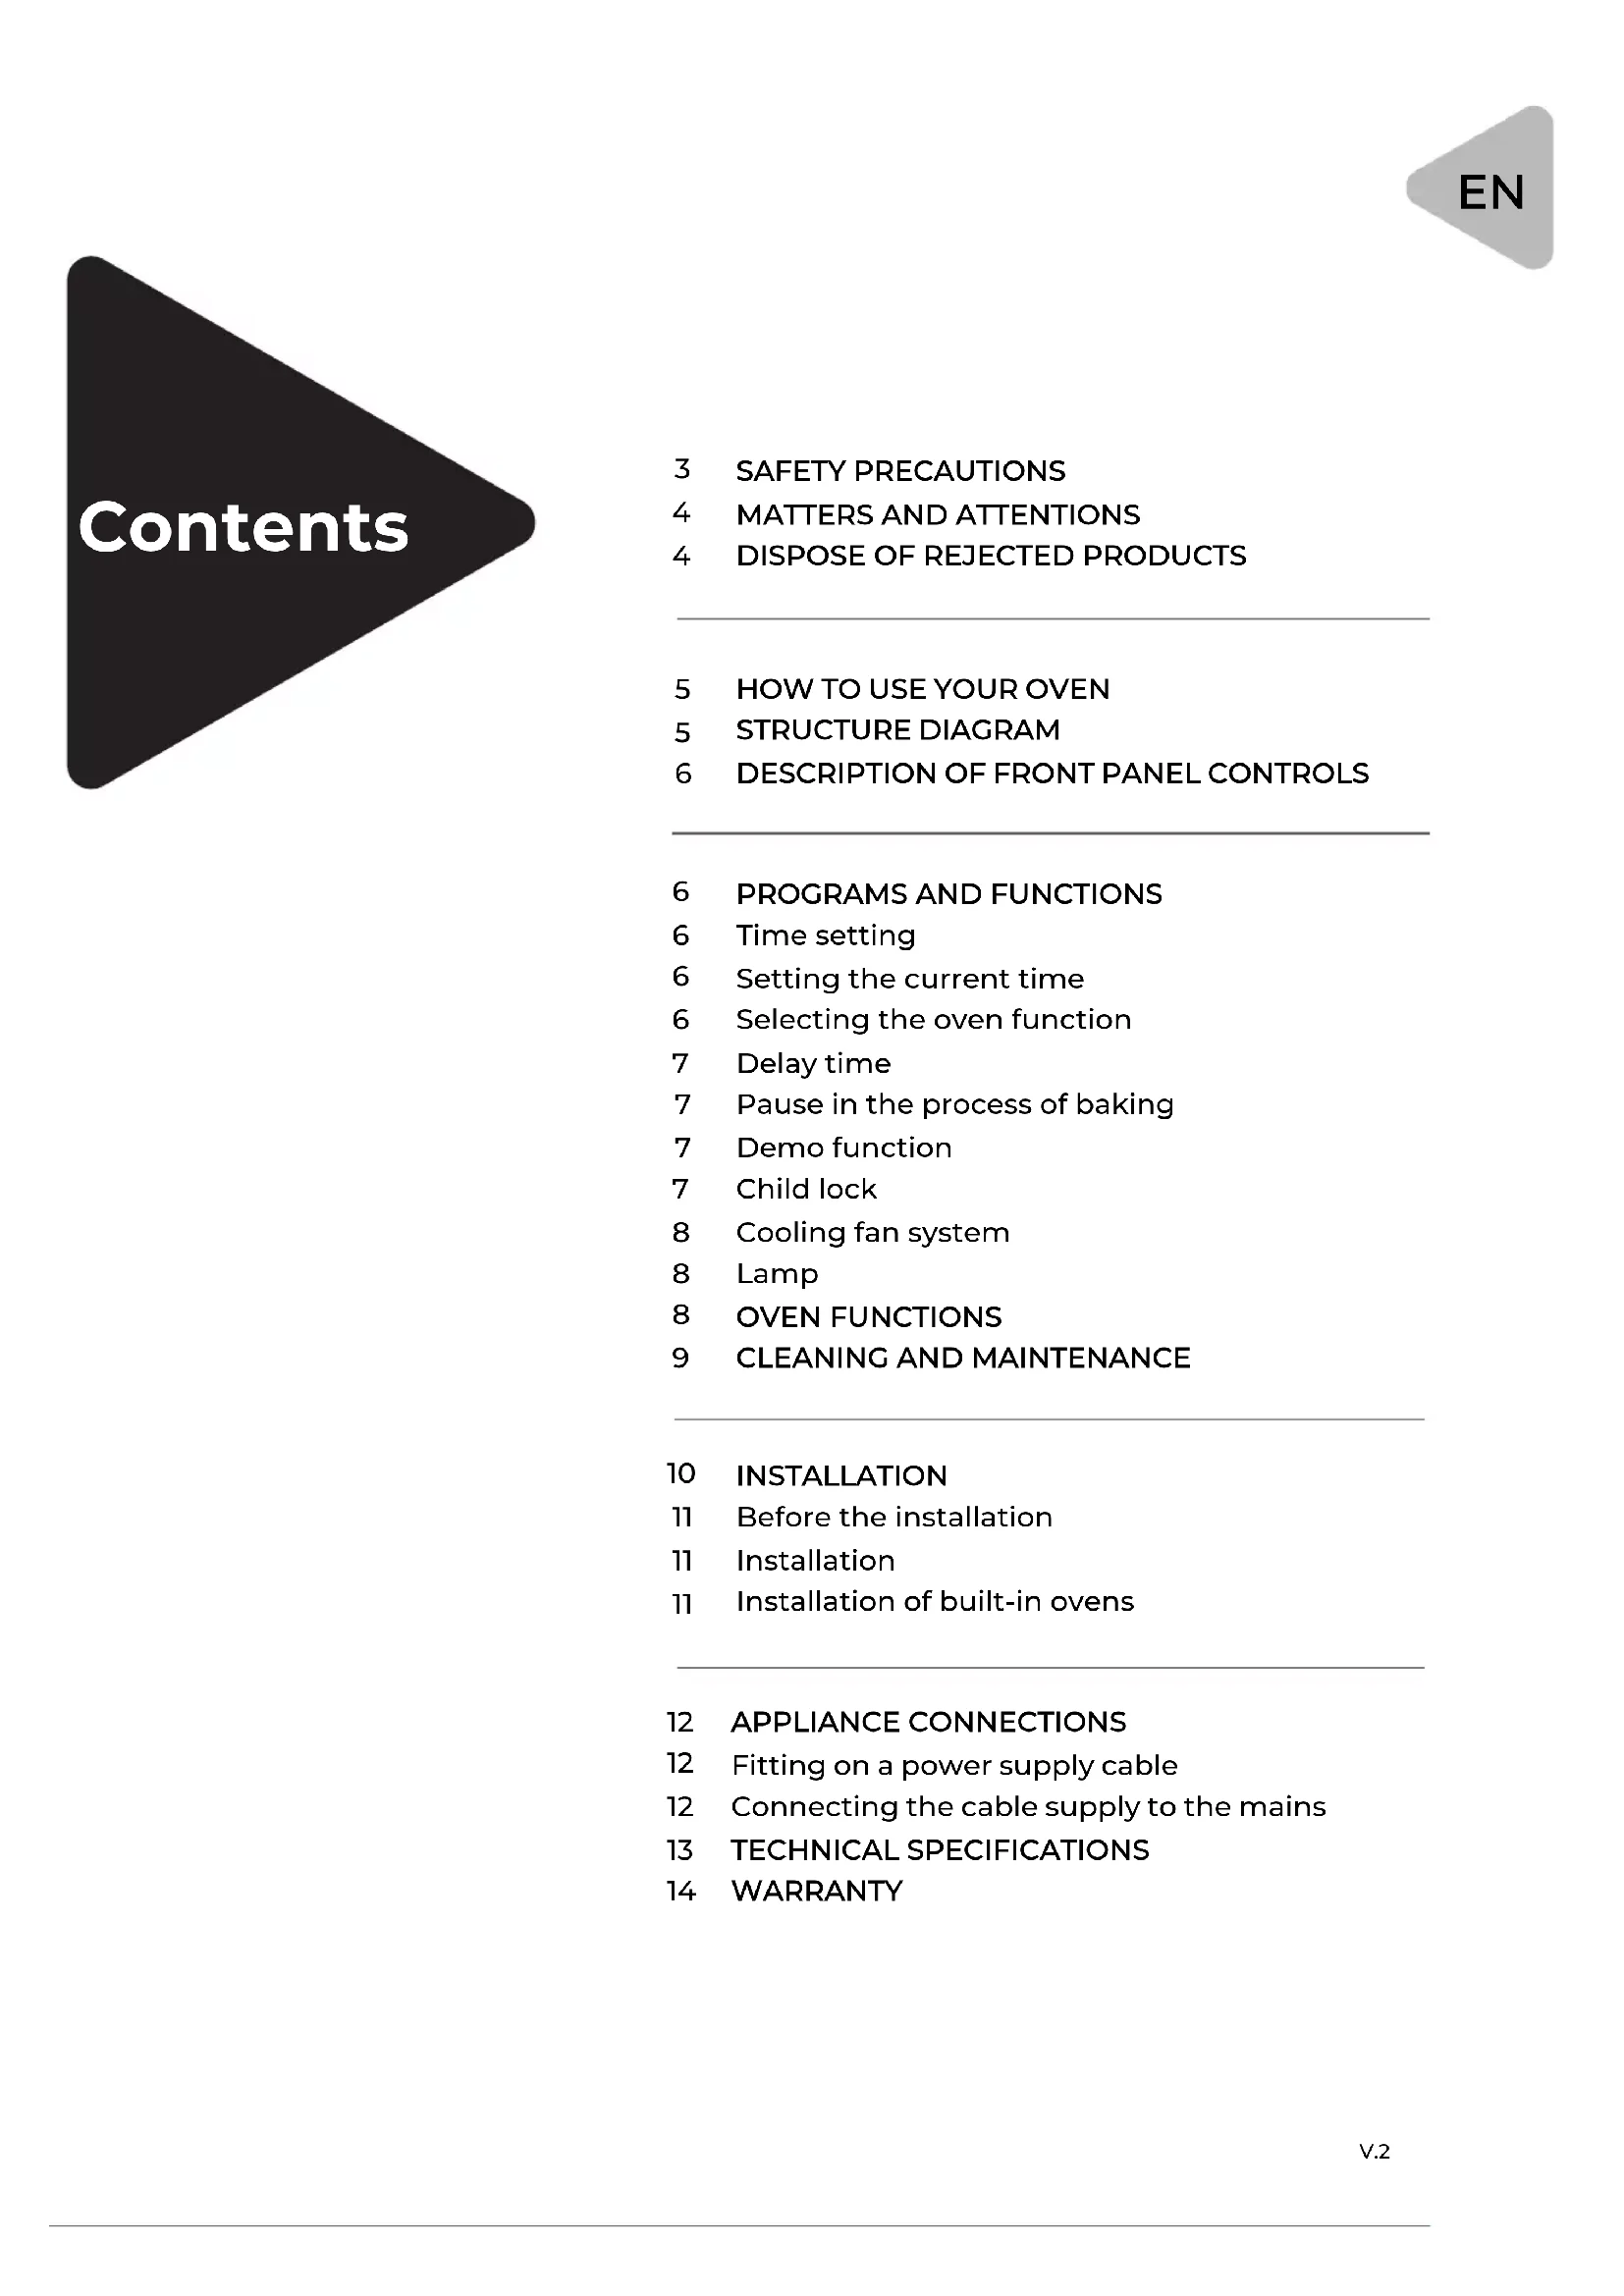
Technical line drawing of two open oven units with internal compartments and mounting brackets, showing structural details (no text or symbols)3 SAFETY PRECAUTIONS
4 MATTERS AND ATTENTIONS
4 DISPOSE OF REJECTED PRODUCTS
5 HOW TO USE YOUR OVEN
5 STRUCTURE DIAGRAM
6 DESCRIPTION OF FRONT PANEL CONTROLS
6 PROGRAMS AND FUNCTIONS
6 Time setting
6 Setting the current time
6 Selecting the oven function
7 Delay time
7 Pause in the process of baking
7 Demo function
7 Child lock
8 Cooling fan system
8 Lamp
8 OVEN FUNCTIONS
9 CLEANING AND MAINTENANCE
10 INSTALLATION
11 Before the installation
11 Installation
11 Installation of built-in ovens
12 APPLIANCE CONNECTIONS
12 Fitting on a power supply cable
12 Connecting the cable supply to the mains
13 TECHNICAL SPECIFICATIONS
14 WARRANTY
We recommend that you read the instructions in this owner's manual carefully before use for the best performance and to extend the life of your appliance, as it will provide you with all the instructions you require to ensure its safe installation, use and maintenance. Always keep this owner's manual close to hand since you may need to refer to it in the future. Thank you.
1. SAFETY PRECAUTIONS
- In order to avoid bump against people or oven when carrying the oven, please grip the hand shank on the two external side. Do not carry in the shake hands handle place. This might damage the oven.
- To ensure your safety all electric appliance should only be installed or service by qualified staff. If the supply cord is damaged, it must be replaced by the manufacture, its service agent or similarly qualified staff in order to avoid a hazard.
- Do not place supply cord on the edge of table and counter, or touching heated appliance.
- In order to avoid electric shock, do not immerse supply cord, plug or other parts into water.
- Do not place the production near electric stove, heated oven, microwave or other heat source.
- In order to avoid burn or explosion, combustibles (curtains, cloth, wallpaper and others) or packaged and canning should be removed.
- Do not place paperboard, plastic or other similar items in the oven. When the oven is not be used, everything should be removed except provided accessory.
- Do not cover slag pan or other parts with tinsel since it will result in overheat.
- Accessible parts may become hot during use, children should be kept away.
- Never obstruct vents provided for ventilation and heat dispersal.
- The ends of door handle may become hot during use, so please grip the middle parts.
- Disconnect the oven from the power supply before cleaning or maintenance.
- When your oven is fault, please send it to nearest service agent to examine, repair or adjust.
■ Take insulation special gloves to carry ovenware or handle oil plate.
- Disconnect the oven from the power supply and waiting until it is cool, before cleaning.
- In order to avoid electric shock, please never use wiry brush to clean since pieces of metal is easy to touch live part.
- Never use metal scouring pads or sharp scrapers which will damage the door surface, and leading to glass broken.
- In order to avoid burn or electric shock, never putting too much food or metal utensils.
- Please make sure the oven has been closed when it is not be used, and only display clock mode. Unplug the socket when you are planning not to use the oven.
■ Never use your oven outside. - Other purpose except baking is not allowed.
- This equipment has the impact resistance, safe glass door; more than common glass can resist impact damage. Toughened glass if be destroyed, other parts will have sharp edges, please to avoid hand contact to the door of the surface of the broken glass or metal stents sharp edges. If the door glass already cataclysmic, please contact the dealer provide new replace glass
- Do not lean on the opened oven door. This may damage the oven, especially in the hinge zone. The door can bear a maximum weight of 8 kg.
2. MATTERS AND ATTENTIONS
- Accessible parts may become hot during use, children should be kept away.
- In order to avoid electric shock, please make sure the oven has been shut off before replacing the lamp.
- Only use original accessories.
- Do not use wet parts of body to touch oven.
- Do not use the oven barefoot.
- Do not pull and push oven or supply cord, this may cause the socket to disconnect.
- Improper or dangerous operations must be forbidden.
- Never obstruct vents provided for ventilation and heat dispersal.
- Do not let the power cord of other appliances touch the heated parts of oven.
- The oven should not be exposed to rain or sunshine.
- Do not use the oven as a pantry.
- Do not use flammable objects near the oven.
- Distributors and users decline all liability for not following above instructions, brake components and parts and not use original accessories or some improper operations which caused personal injury and property loss.
3. DISPOSE OF REJECTED PRODUCTIONS
Please recycle the package since the materials are Eco-Friendly. In order to prevent children from potential asphyxiation when playing with them; please do not discard plastic packaging.
Please send your rejected productions to Environmental Conservation Organization or authorized Electrical recycle bin, this will recycle useful materials and reduce the hazards of environment.
natural_image
Symbol of a trash bin with crossed lines indicating no waste or discharge (no text or labels)DISPOSAL: Do not dispose this product as unsorted municipal waste. Collection of such waste separately for special treatment is necessary.
The european directive 2012/19 /UE on wasted electrical and electronic equipments (WEEE), requires that household electrical appliances must not be disposed of in the normal unsorted municipal waste stream. appliances must be collected separately in order to optimize the recovery and recycling of the materials they contain, and reduce the impact on human health and the environment.
The crossed out “wheeled bin” symbol on the product reminds you of your obligation, that when you disposed of the appliances, it must be separately collected. Consumers should contact their local authority or retailer for information concerning the correct disposal of their old appliance.
4. HOW TO USE YOUR OVEN
4.1 The first time you use your appliance, we recommend that set the thermostat to the highest setting and leave the oven on for about half an hour with nothing in it, with the oven door shut. Then open the oven door and let the room air in. The odor that is often detected during this initial use is due to the evaporation of substances used to protect the oven during storage and until it is installed.
4.2 Place the dripping pan provided on the bottom shelf of the oven to prevent any sauce and/or grease from dripping onto the bottom of the oven only when grilling food or when using the rotisserie (only available on certain models). For all other types of baking, never use the bottom shelf and never place anything on the bottom of the oven when it is in operation because this could damage the enamel. Always place your cookware (dishes, aluminum foil, etc. etc.) On the grid provided with the appliance inserted especially along the oven guides.
4.3 After baking food contains sugar and salt, please clean your oven promptly, or these will attach to the pan surface.
4.4 You can place the shelf in two side guide rail .Put a slice of bread directly on the rack (From down to third rail); Place specific small pan on the rack, food in the pan.
4.5 Use pan to roast high temperature food such as meat, poultry, fish, others. Place shelf on the pan, when using both pan and grill.
5. STRUCTURE DIAGRAM
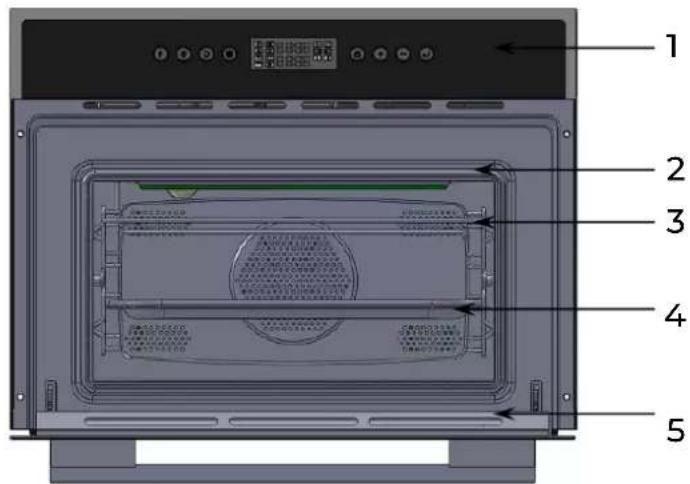
- Control Panel
- Door Seal
- Grill
- Perforated baking tray
- Door
6. DESCRIPTION OF FRONT PANEL CONTROLS


Standby function key

Baking time setting (baking time, delay time)

Function adjustment (baking temperature)

Clock setting (standby time)

Child lock

Modifying parameters (function, time, increase temperature)

Modifying parameters (function, time, decrease temperature)

Start/Pause
Functions Description

Convection Mode

Bottom heating element+ Convection Mode

Top and bottom heating elements+ circulation fan

Top heating element circulation fan

Top heating element

Clock

Working Time

Heat up

Top and bottom heating elements + Convection

Top and bottom heating elements

Defrost

Child Lock

Delay Time

Temperature Reached
7 PROGRAMS AND FUNCTIONS
7.1 Time Setting
On the first use, the display screen shows a flashing "0:00"; it prompts to set current time. The symbol of clock "☐" is always displayed. Press the button "☐" or "☐" to increase or decrease the hours. After setting the hour press "☐" to set the minutes.
Press "⊕" or "⊖" to increase or decrease the minutes and press "◎" to confirm the current time.
7.2 Setting the current time
Keep "☐" pressed for 3 seconds if you want to set again.
Clock set range: 0:00 - 23:59.
Notice: When you selected functions repeatedly, just leave the appliance away, the appliance will go to standby mode after 5 minutes.
7.3 Selecting the oven function
- In standby state, press "☐" for 1 second to enter the function selection mode.
Press "⊕" and "⊖" to select the desired function, "⊖", "⊖" will light up, 30:00 and 180°C will appear on the screen.
- Press "☐" to set baking time, use "⊕" and "☐" to increase or decrease baking time (89 minutes and 59 seconds can be set as maximum)
- Press "☐" again to set delay time, the delay time symbol "☐" will light up (For further information about delay time setting, see point 'Delay Time Setting')
- Press "☐" to set temperature, use "☐" and "☐" to increase or decrease the desired temperature.
- Press "DH" to start baking
Notice: The delay time is the continuation of clock time. For example, if the current time is 10:00 and you want the appliance start working after 2 hours, you should set delay time at 12:00, Press the " 🔒" key waiting for confirmation.
7.4 Delay time
When "☐" is pressed to define a delayed start time the corresponding light starts to blink. The screen shows the current time "AUTO". Press "⊕" and "⊖" to set hours. Press "☐" again to set minutes, use "⊕" and "⊖" to set minutes.
Press "☐" to confirm the delayed start time. After pressing "☐" again, the appliance starts working. Screen shows the delayed start time, Auto and the current time alternately when the appliance is in standby.
Press "☐" for 1 seconds if you want to cancel the selected function.
7.5 Pause in the process of baking
Stop baking and change the parameters
Press the "☐" start/pause button, can be in baking process stop baking, at this time can be adjusted in the process of baking time and temperature.
Press " ", enter the function menu selection mode and choose a function.
Press the "◎" baking time set key, then press "⊕" and "⊖" to set the cooking time. Press the "◎" adjust function keys to switch to baking temperature setting mode; Press "◎" to continue baking.
End baking and cancel the program
At each function after baking, the oven will emit a signal consisting of three beeps, which will beep 3 times and the display will show "END". At 30 second intervals every 5 minutes the beep will sound 3 times and the display will show "END" flashing, 5 minutes later the oven will go into standby, or press " [IMAGE] " to enter standby mode. In the configuration menu or during the cooking process, press " [IMAGE] for 1 second to stop the appliance and enter standby mode, then press " [IMAGE] ' to switch off the appliance. The display will only show [IMAGE].
7.6 Demo function
With the oven in standby state, press and hold " 🔒" and " 🔒" and the display will show OFF SHO, meaning the demo function is inactive. Press " ⏻and " ☑o activate the demo show (ON SHO) or deactivate it again (OFF SHO). Demo function is mainly convenient for sales personnel, but for normal use of the oven, it should be set to OFF SHO. Set this parameter according to your need, then press " 🔒" return to the initial oven standby mode.
7.7 Child Lock
Lock: In waiting state, press " ☑ for 3 seconds, there will be a long "beep", denoting entering into the children-lock state and " ☑ indicator will light up. In any case after lock, screen will always display "Block" for 3 seconds, and then return to the previous interface.
Unlock: Pressing "☐" for 3 seconds in the state of lock, you will hear "beep". Screen shows the current time and the symbol "☐" light go out.
The appliance is equipped with a cooling system which comes into operation as soon as a baking function starts. This system will start after the set temperature is reached. Operation of the fans generates a normal air flow which comes out above the door and may continue for a short time even after the appliance is switched off. Notice: When the furnace temperature less than 75 degrees, the cooling fan system will stop to work.
7.9 Lamp
The furnace lamp always light when the oven is operation except pause.
8. OVEN FUNCTIONS
8.1 Convection mode " [icon] " 1056-1257W
The temperature can be adjusted between 110^ C and Max and the longest time is 90 minutes. The back heating elements and fan will come on to ensure the heat remains constant uniform throughout the oven. The model is suitable for baking delicate food, such as cream puff, sweet biscuit, sponge cake, etc
8.2 Multi-baking mode " [icon] " 2246-2673W
The temperature can be adjusted between 110^ C and Max, and the longest time is 90 minutes. The top, bottom and back heating elements, as well as the fan, will come on alternately. Since the heat remains constant and uniform throughout the oven, the air cooks and browns food uniformly over its entire surface, so food can be put in different levels to roast. The model is suitable for baking bread or other foods which need long time to cook. In addition, this mode will turn down the temperature to avoid water losses and make barbecue more fragrant crisp. This heating mode is particular suitable for baking fish.
8.3 Pizza Mode " [icon] " 1880-2237W
The temperature can be adjusted between 110^ C and Max, and the longest time is 90 minutes. The bottom and back heating elements, as well as the fan, will come on. The combination of these functions can make the oven temperature lift quickly since the oven will provide a lot of energy. The bottom and back heating elements will come on alternately when keeping warm status, the pizza mode is ideal for foods requiring high temperatures to cook, like pizzas and large roasts.
8.4 Fast Baking Mode "2246-2673W
The temperature can be adjusted between 110°C and Max. And the longest time is 90 minutes. The top, bottom and back heating elements, as well as the fan ,will come on alternately, guaranteeing constant heat distributed uniformly throughout the oven. This mode is especially recommended for baking pre-packed food quickly (as pre-heating is not necessary), such as for example: frozen or pre-cooked food; as well as for a few “home-made” dishes.
8.5 Top heating element + Fan Mode "1442-1693W
The temperature can be adjusted between 110^ C and Max and the longest time is 90 minutes. The top elements and the fan will come on. The combination of these functions can heat the oven through the air circulation and improve unidirectional heat divergence effect. This is help to avoid burning the surface of food and to let energy into food internal. This mode is recommended for baking shish kebab, sausage, sibs, lamb chop, etc. This mode must close oven door to cook.
8.6 Convection Mode "☐" 2246-2673W
The temperature can be adjusted between 110^ C and Max and the longest time is 90 minutes. The top and bottom heating elements come on. This is the classic, traditional type of oven which has been perfected, with heat distribution and reduced energy consumption. The convection oven is still unequalled when it comes to baking dishes made up of ingredients. Excellent results are achieved when preparing veal or beef-based dishes as well which need to cook slowly and basting or the addition of liquid. It remains the best system for baking cakes as well as fruit and baking using covered casserole dishes for oven baking. When baking in convection mode, only use one dripping pan or baking rack at a time, otherwise the heat distribution will be uneven. Using the different rack heights available, you can balance the amount of heat between the top and the bottom of the oven. Select from among the various rack heights based on whether the dish needs more or less heat from the top.
8.7 Top heating element "1400-1668W
The temperature can be adjusted between 110^ C and Max and the longest time is 90 minutes. The extremely high and concentration toleration will make your food crisp outside and soft inside. We recommend that this mode is suitable for baking food need high temperature to heat food surface, like: steak, veal, steak, fillet, hamburger, etc.
8.8 Defrost Mode "056-1257W
The fan located on the bottom of the oven makes the air circulate at room temperature around the food. This is recommended for the defrosting of all types of food, but in particular for delicate types of food which do not require heat, such as for example: ice cream cakes, cream or custard desserts, fruit cakes. By using the fan, the defrosting time is approximately halved. In the case of meat, fish and bread, it is possible to accelerate the process using the "Baking" mode and setting the temperature to 45^ C- 75^ C.
9. CLEANING AND MAINTENANCE
Before cleaning your oven, or performing maintenance, disconnect it from the power supply. To extend the life of your oven, it must be cleaned frequently, keeping in mind that:
The enameled or stainless steel parts should be washed with lukewarm water without using any abrasive powders or corrosive substances which could ruin them. Stainless steel could get stained. If these stains are difficult to remove, use special products available on the market. After cleaning, it is advisable to rinse thoroughly and dry.
The inside of the oven should preferably be cleaned immediately after use, when it is still warm, with hot water and soap; the soap should be rinsed away and the interior dried thoroughly. Avoid using abrasive detergents (for example cleaning powders, etc) and abrasive sponges for dishes or acids (such as limescale remover, etc) as these could damage the enamel. If the grease spots and dirt are particularly tough to remove, use a special product for oven cleaning, following the instructions provided on the packet. Never use a steam cleaner for cleaning inside of oven.
Never line the oven bottom with aluminum foil, as the consequent accumulation of heat could compromise the baking and even damage the enamel.
Clean the glass door using non-abrasive products or sponges and dry it with a soft cloth.
How to remove the oven door
For a more thorough clean, you can remove the oven door. Proceed as follows:
1) Open the door fully.
2) Lift up and turn the small levers situated on the two hinges.
3) Grip the door on the two external sides; shut it slowly but not completely.
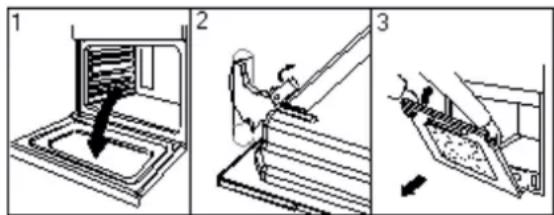
4) Pull the door towards you, pulling it out of its seat;
Reassemble the door by following the above procedures backwards.
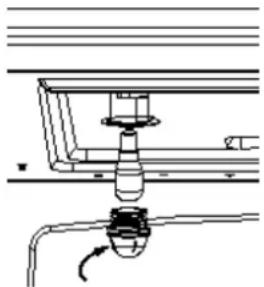
Replacing the oven Lamp
1) Disconnect the oven from the power supply by means of the omnipolar switch used to connect the appliance to the electrical mains; or unplug the appliance if the plug is accessible;
2) Remove the glass cover of the lamp-holder ;
3) Remove the lamp and replace with a lamp resistant to high temperatures (300°C) with the following characteristic.
■ Voltage: 220-240V
■ Wattage: 25W
■ Type: E14
4) Replace the glass cover and reconnect the oven to the mains power supply.
natural_image
Pure mechanical diagram showing a valve assembly with no text or symbols10. INSTALLATION
10.1 Before the Installation
Please check the products shell and make sure that there is no trace caused by striking or heavy load. Check that the oven door is level, and you can close door flexibly.
Parameter on the nameplate is in compliance with the relevant regulations. When the oven is working in a abnormal way, it must be stopped and unplug the power supply until it has been repaired by a competent person from local agency or factory authorized service. It is hazardous for anyone other than a competent person to carry out any service or repair operation.
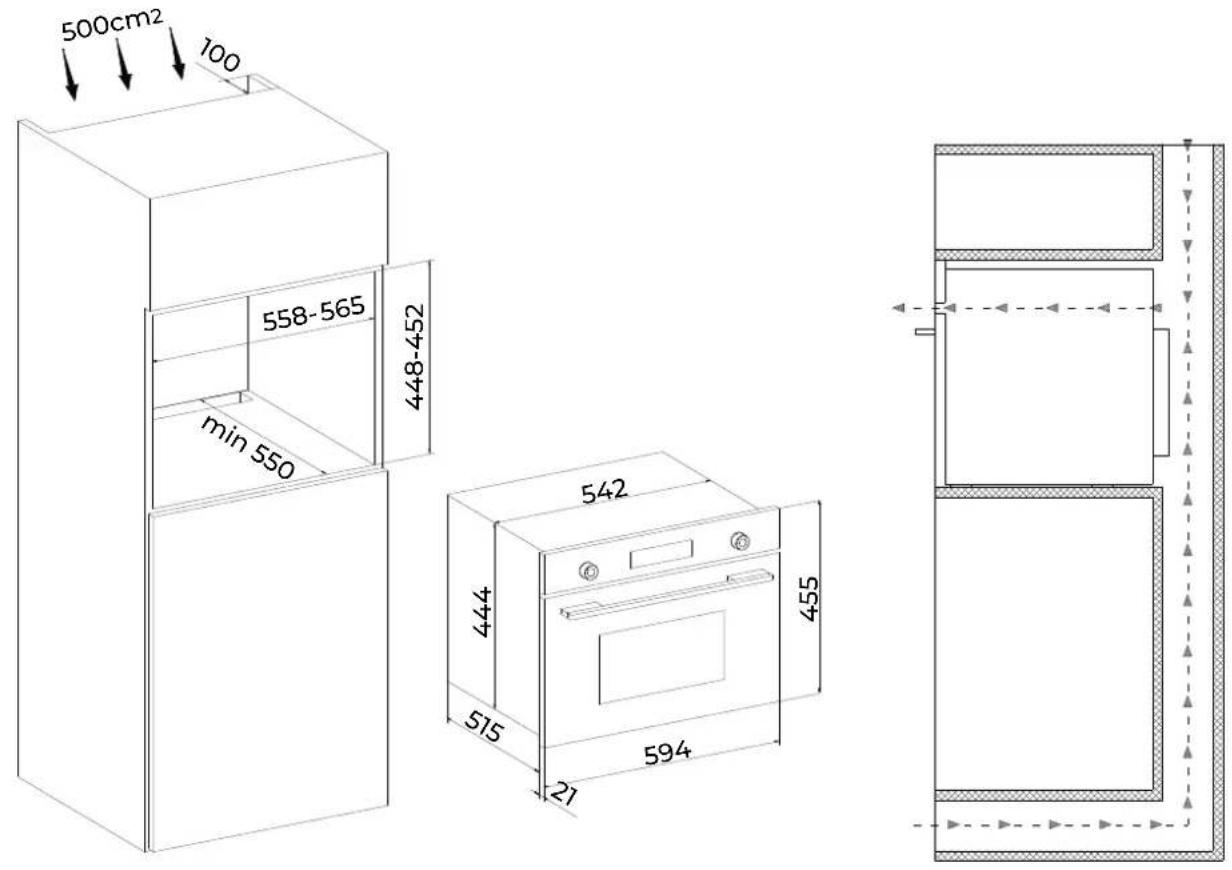
10.2 Installation
Only a qualified person in compliance with the instructions provided must install the appliance. Manufacturer declines all responsibility for improper installation, which may harm persons and animals and damage property.
Important:
- The power supply to the appliance must be cut off before any adjustments or maintenance work is done on it;
- Air duct is supposed to use in Ventilation.
- The AC power supply should be 220-240 v, 50/60 Hz, the minimum 16 A distribution circuit fuse, or at least 16 a distribution circuit breaker
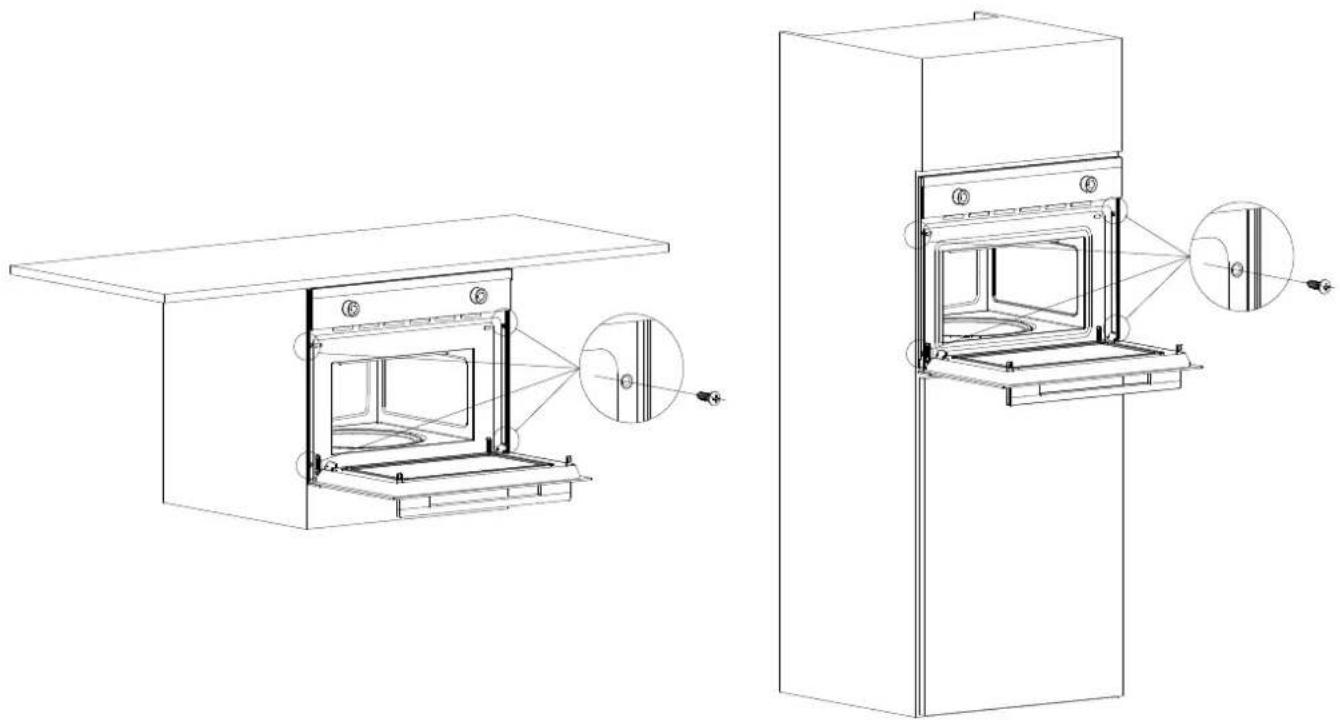
10.3 Installation of Built-in Ovens
If we put the oven into cabinet, the material cabinet should be insulated, and the clearance between the edge of the cabinet and the oven should be over 500mm for ventilation.
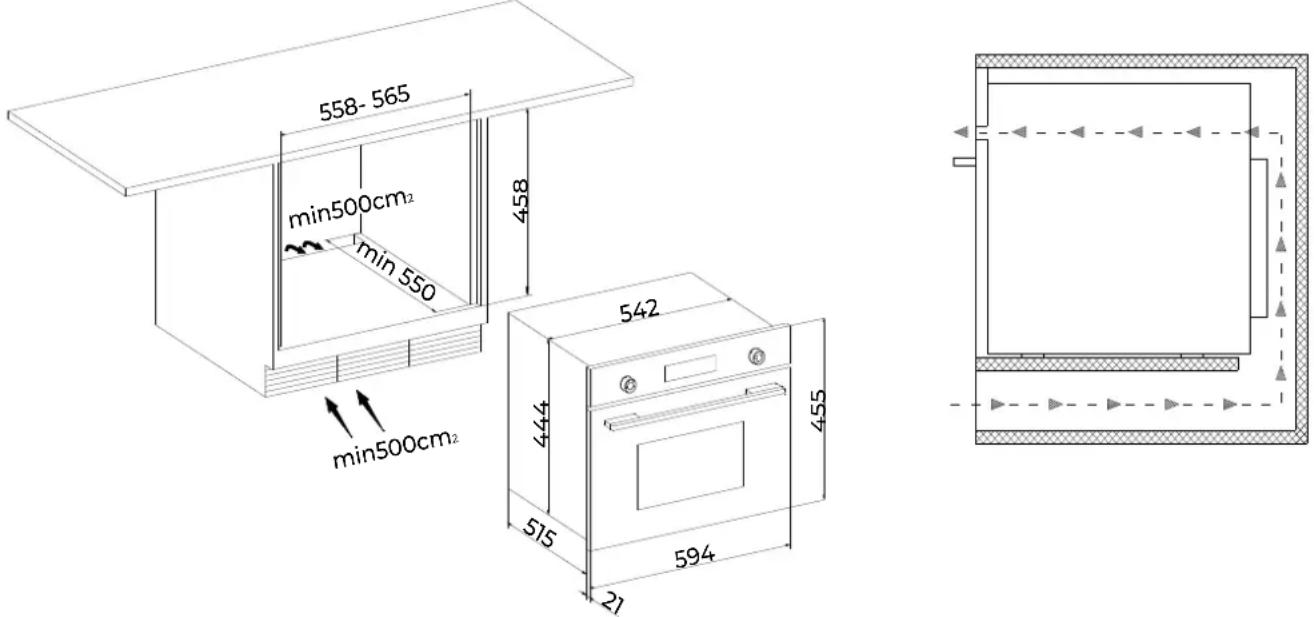

In order to fix the oven with cabinet, please open the oven door and insert four wood screws into the four holes around frame and fix them.
natural_image
Technical line drawing of two open oven units with internal compartments and mounting brackets, showing structural details (no text or symbols)Note: the installation and handling, please do not use the handle for stress point

The panels of the adjacent cabinets must be made of heat-resistant material. In particular, cabinets with a veneer exterior must be assembled with glues which can withstand temperatures of up to 100^ C. In compliance with current safety standards, contact with the electrical parts of the oven must not be possible once it has been installed. All parts, which ensure the safe operation of the appliance, must be removable only with the aid of a tool.
11. APPLIANCE CONNECTIONS
11.1 Fitting on a Power Supply Cable
Those ovens equipped with a three-pole power supply cable are designed to operate with an alternating current. The wire for earthing the appliance is yellow-green in color.
Opening the terminal board:
Using a screwdriver, prize the bolt on the side tabs of the Terminal board cover; Unscrew the bolt, pull open the cover of the terminal board.
To install the cable, proceed as follows:
Remove the wire clamp screw and the three contact screws L-N -
Fasten the wires beneath the screw heads using the following color scheme :Blue (N) Brown (L) Yellow-Green ( )
Fasten the supply cable in place with the clamp and close the cover of the terminal board.
The AC power supply should be 220-240 v, 50 Hz, the minimum 16 A distribution circuit fuse, or at least 16 a distribution circuit breaker.
11.2 Connecting the supply cable to the mains
Install a standardized plug corresponding to the load indicated on the data plate. When connecting the cable directly to the mains, install an Omni polar circuit breaker with a minimum contact opening of 3 mm between the appliance and the mains. The Omni polar circuit breaker should be sized according to the load and should comply with current regulations (the earth wire should not be interrupted by the circuit breaker).
The supply cable should be positioned so that it does not reach a temperature of more than 50^ with respect to the room temperature, anywhere along its length, or protected by insulation sleeping having an appropriate rating.
Before making the connection, check that:
The electrical safety of this appliance can only be guaranteed if the cooker is correctly and efficiently earthed, in compliance with regulations on electrical safety. Always ensure that the earthling is efficient; if you have any doubts call in a qualified technician to check the system. The manufacturer declines all responsibility for damage resulting from a system which has not been earthed. Before plugging the appliance into the mains, check that the specifications indicated on the date plate (on the appliance and/or packaging) correspond to those of the electrical mains system of your home.
Check that the electrical capacity of the system and sockets will support the maximum power of the appliance, as indicated on the data plate. If you have any doubts, call in a qualified technician.
If the socket and appliance plug are not compatible, have the socket replaced with a suitable model by a qualified technician. The latter, in particular, will also have to ensure that the cross sections of the socket cables are suitable for the power absorbed by the appliance. The use of adapters, multiple sockets and/or extensions, is not recommended. If their use cannot be avoided, remember to use only single or multiple adapters and extensions which comply with current safety regulations. In these cases, never exceed the maximum current capacity indicated on the single adapter or extension and the maximum power indicated on the multiple adapter. The plug and socket must be easily accessible.
- TECHNICAL SPECIFICATION
| CAPACITY | 35L |
| VOLTAGE (V) | 220-240 |
| FREQUENCE (Hz) | 50/60 |
| CIRCUIT BREAKER (A) | 16 |
| POWER (W) | 2246-2673 |
| PRODUCT DIMENSION (mm) | 594X580X455 |
| PACKAGE SIZE (mm) | 670X663X525 |
| GROSS/NET WEIGHT (kg) | 33.0/29.0 |
Notice:
(1) Product Dimension is approximate number, the sequence is wide, deep, high.
(2) Package Size is peripheral package size of the box.
(3) Physical parameters may be different from label because our products are in continuous improvement, so please refer to physical parameters to make sure of the definite size.
WARRANTY CONDITIONS
This appliance is guaranteed for three years from the date of sale against all manufacturing defects, including labour and spare parts. In order to justify the date of purchase, it will be compulsory to present the invoice or purchase receipt. The conditions of this warranty apply only to Spain and Portugal. If you have purchased this product in another country, please consult your distributor for the applicable conditions.
WARRANTY EXCLUSIONS
- Remote controls, drain intake rubbers, dockings and door seals, weather stripping.
- Damage to enamels, paints, nickel plating, chrome plating, oxidation or other types of aesthetic parts or components that do not affect the internal functioning of the appliance.
- Damage to wear parts due to use, corrosion or oxidation, whether caused by normal use of the appliance or accelerated deterioration due to unfavorable environmental or climatic circumstances. Not suitable for outdoor use.
- Damage to fragile pieces of glass, glass ceramic, plastics, handles, baskets, doors or light bulbs when their failure or breakage is not attributable to a manufacturing defect.
- Faults produced by fortuitous causes or accidents of force majeure, or as a consequence of abnormal, negligent or inappropriate use of the device.
- Civil liabilities of any nature.
- Consequential damage to the appliance as long as it has not been caused by an internal malfunction.
- Maintenance or upkeep of the appliance: periodic reviews, adjustments and greases.
- Faults that accessories and complements, adapters, external cables, bags, spare parts of all kinds, lamps, as well as any part considered consumable by the manufacturer, may suffer.
- Faults caused by incorrect or illegal installation, inadequate ventilation, lack of grounding in the home, power disturbances, inappropriate modifications or use of non-original spare parts.
- Appliances used in industrial applications or for commercial purposes.
- Appliances with illegible or altered serial number.
- Defects or breakdowns produced as a result of fixes, repairs, modifications, or disassembly of the installation of the device by the user or by a technician not authorized by the manufacturer, or as a result of manifest non-compliance with the manufacturer's instructions for use and maintenance.
- During the warranty period it is essential to keep all manuals together with the equipment. If the equipment is sold, donated or given away, the manual and all related documents must be given to the new user. If any of these are lost, their replacement cannot be claimed.
- Faults that have their origin or are a direct or indirect consequence of: contact with liquids, chemicals and other substances, as well as conditions derived from the climate or the environment: earthquakes, fires, floods, excessive heat or any other external force, such as insects, rodents and other animals that may have access to the interior of the machine or its connection points.
- Damages derived from terrorism, riot or popular tumult, legal or illegal demonstrations and strikes; facts of actions of the Armed Forces or the State Security Forces in times of peace; armed conflicts and acts of war (declared or not); nuclear reaction or radiation or radioactive contamination; vice or defect of the goods; facts classified by the Government of the Nation as "national catastrophe or calamity".
Design and specifications are subject to change without notice for product improvement. Any changes to the manual will be updated on our website, you can check the latest version.

EAS ELECTRIC
SMART TECHNOLOGY
www.easelectric.es

3 MESURES DE SÉCURITÉ
4 AVERTISSEMENTS
4 INSTRUCTIONS D'ÉLIMINATION
5 MODE D'EMPLOI
5 PIÈCES DE L'APPAREIL
6 DESCRIPTION DU PANNEAU DE CONTRÔLE
6 PROGRAMMES ET FONCTIONS

8. FONCTIONS DU FOUR
8.1 Mode convection " 1056-1257W
8.3 Mode Pizza " 1880-2237W
8.6 Mode Convection " 2246-2673W
natural_image
Pure mechanical diagram showing a valve assembly with no text or symbols10. INSTALLATION
10.1 Avant l'installation
natural_image
Technical line drawing of two open oven units with internal compartments and mounting brackets, showing structural details (no text or symbols)CONDITIONS DE LA GARANTIE
EXCLUSIONS DE LA GARANTIE

Função standby

8.3 Modo Pizza " [icon] " 1880-2237W
natural_image
Technical diagram of a mechanical assembly with pipes and a valve (no text or symbols)10. INSTALAÇÃO
natural_image
Pure schematic diagram of a rectangular structure with dashed and solid lines indicating internal components (no text or symbols)V.2

natural_image
Technical line drawing of two open oven units with internal compartments and mounting brackets, showing structural details (no text or symbols)Azul (N) Castanho (L) Amarelo-Verde (⊥)
Scan for manual in other languages and further updates:


- Resistencia superior " [icon] " 1400-1668W
- INSTALACIÓN
- SAFETY PRECAUTIONS
- MATTERS AND ATTENTIONS
- DISPOSE OF REJECTED PRODUCTIONS
- HOW TO USE YOUR OVEN
- STRUCTURE DIAGRAM
- DESCRIPTION OF FRONT PANEL CONTROLS
- Functions Description
- PROGRAMS AND FUNCTIONS
- Time Setting
- Setting the current time
- Selecting the oven function
- Delay time
- Pause in the process of baking
- End baking and cancel the program
- Demo function
- Child Lock
- Lamp
- OVEN FUNCTIONS
- Top heating element "1400-1668W
- Defrost Mode "056-1257W
- CLEANING AND MAINTENANCE
- How to remove the oven door
- Replacing the oven Lamp
- INSTALLATION
- Before the Installation
- Installation
- Installation of Built-in Ovens
- APPLIANCE CONNECTIONS
- Fitting on a Power Supply Cable
- Opening the terminal board:
- To install the cable, proceed as follows:
- Connecting the supply cable to the mains
- Notice:
- WARRANTY CONDITIONS
- WARRANTY EXCLUSIONS
- FONCTIONS DU FOUR
- Mode Convection " 2246-2673W
- Avant l'installation
- CONDITIONS DE LA GARANTIE
- EXCLUSIONS DE LA GARANTIE
- INSTALAÇÃO
Brand : EAS Electric
Model : EMV48DTN
Category : Oven