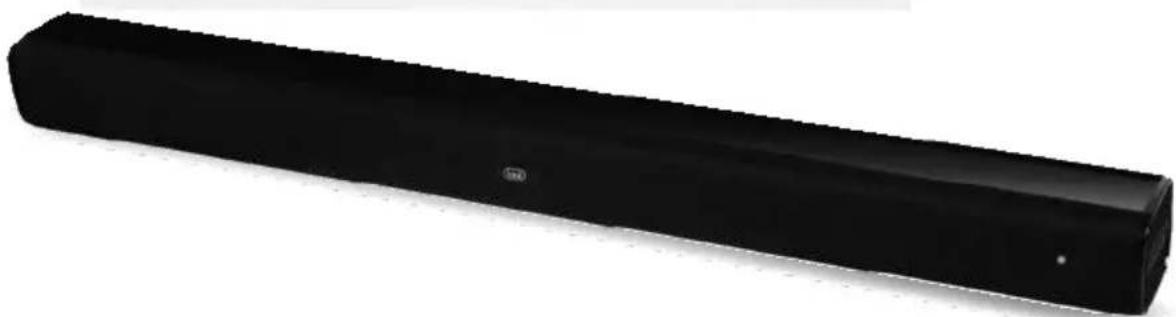
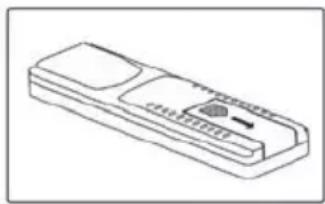
SB 8315 TV - Soundbar Trevi - Free user manual and instructions
Find the device manual for free SB 8315 TV Trevi in PDF.

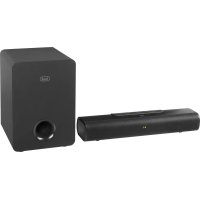
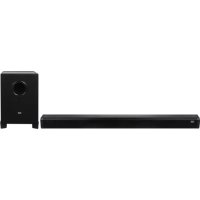
| Product type | Soundbar |
| Brand | Trevi |
| Model | SB 8315 TV |
| Dimensions (W x H x D) | 750 x 66 x 75 mm |
| Weight | 1.4 kg |
| Power supply | 230 V ~ 50 Hz |
| Power consumption | 60 W |
| Maximum output power | 2 x 25 W |
| Frequency response | 80 Hz - 20 kHz |
| Signal-to-noise ratio | ≥ 72 dB |
| Distortion | ≤ 0.5 % (1 kHz / 1 W) |
| Inputs | USB, AUX (3.5 mm jack), Digital optical |
| Bluetooth | Version 2.4 GHz, power 2.5 mW |
| Functions | Bluetooth, equalizer (Std, Movie, News, Music), treble and bass adjustment, USB playback, auto standby |
| Remote control | Yes, AAA batteries (2 × 1.5 V) |
| Care and cleaning | Use a soft, slightly damp cloth. Do not use solvents or abrasive substances. |
| Safety | Do not expose to water or moisture. Leave at least 5 cm of space around the device for ventilation. Do not block the ventilation slots. |
Frequently Asked Questions - SB 8315 TV Trevi
User questions about SB 8315 TV Trevi
0 question about this device. Answer the ones you know or ask your own.
Ask a new question about this device
Download the instructions for your Soundbar in PDF format for free! Find your manual SB 8315 TV - Trevi and take your electronic device back in hand. On this page are published all the documents necessary for the use of your device. SB 8315 TV by Trevi.
USER MANUAL SB 8315 TV Trevi
2.0 SOUNDBAR STEREO WITH BLUETOOTH/ USB Connection and Operation Manual
SOUNDBAR 2.0 STEREO AVEC BLUETOOTH/ USB Mode d'emploi et branchement
SOUNDBAR 2.0 STEREO MIT BLUETOOTH/ USB Gebrauchs- und Anschlusshandbuch
natural_image
Black-and-white photo of two musicians performing on stage with a microphone, no visible text or symbols
natural_image
Black rectangular electronic device with a small logo on the side (no visible text or symbols)WARNING: DO NOT OPEN THE SET. NEITHER CONTROLS OR SPARE PARTS TO BE USED BY THE USER ARE TO BE FOUND INSIDE IT. APPLY TO AUTHORISED TREVI CENTERS FOR SERVICE OPERATIONS.
ATTENTION

RISQUE DE DECHARGES ELECTRIQUES
NEPASEXPOSERA LAPLUIE ETA L'HUMIDITE

ATTENTION: NE PASOUVRIR L'APPAREIL, A L'INTERIEUR IL N'Y A PAS DE COMMANDES AMANIPULERPARL'UTILISATEUROU DE PIECES DERECHANGE. POUR TOUTES LES OPERATIONS DE SERVICE IL FAUT S'ADRESSER A UN SERVICE D'ASSISTANCE AUTORISE TREVI.
ACHTUNG
To avoid possible hearing damage, limit the listening time to high volumes.

natural_image
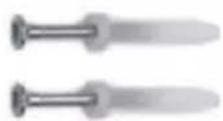
Two 3D line drawings of cylindrical objects with textured surfaces, no text or symbols present
natural_image
Pure technical line drawing of a rectangular frame with mounting holes and a vertical post (no text or symbols)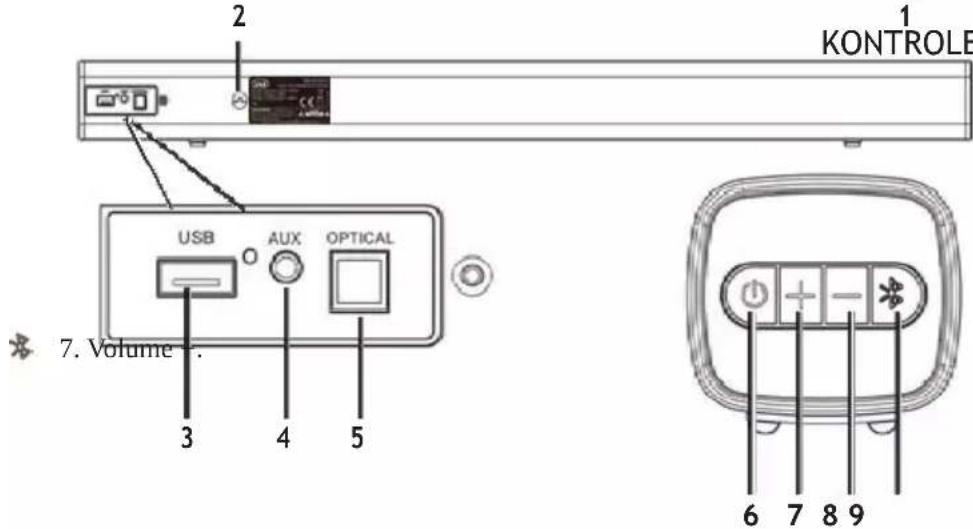
text_image
2 1 KONTROLE USB O AUX OPTICAL 7. Volume 3 4 5 6 7 8 9KONTROLE I UTIČNICE NA UREĐAJU:
- LED indikator.
- Mrežni kabel (230V\~50Hz).
- USB utičnica.
- AUX-IN utičnica (kabel 3.5mm stereo).
- Optičkki digitalni ulaz.
- Tipka za uključivanje / isključivanje i odabir funkcije / ulaza.
- Volume -.
- Tipka spajanje uređaja u funkciji Bluetooth.
text_image
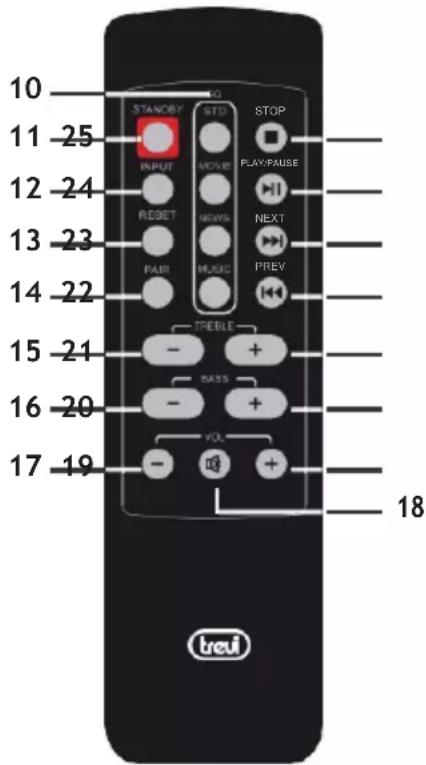
10 11 -25 12 -24 13 -23 14 -22 15 -21 16 -20 17 -19 STANOSY INPUT RESET PAIR TREBLE BASS VOL STOP PLAY/FAUSE NEXT PREV + + + + - 18TIPKE NA DALJINSKOM UPRAVLJAČU:
- Tipke EQ, odabir izjednačenja zvuka (std, movie i sl.)
- Tipka za uključivanje/Stand-by.
- Tipka INPUT: odabir funkcije/ulaza.
- Tipka RESET.
- Tipka PAIR: pokretanje spajanja uređaja u BT.
- Tipka za regulaciju visokih tonova -.
- Tipka za regulaciju bas tona -.
- Tipka za regulaciju glasnoće Volume - .
- Tipka MUTE, deaktivaciju / aktivaciju zvuka.
- Tipka za regulaciju glacnoće Volume+.
- Tipka za regulaciju bas tona +.
- Tipka za regulaciju visokih tonova +.
- Tipka ◀, odabir prethodnog zapisa.
- Tipka▶, odabir sljedećeg zapisa.
- Tipka ▶ / II , reprodukcija/pauza.
- Tipka, zaustavljanje reprodukcije.
UMETANJE I ZAMJENA DALJINSKIH BATERIJA
natural_image
Line drawing of a remote control device (no text or symbols)text_image
Diagram of a remote control panel with labeled components and arrows indicating internal structurenatural_image
Line drawing of a remote control device with buttons and a scroll (no text or symbols)Zelena = AUX-IN ulaz
natural_image
Diagram showing a device with a control panel and a close-up of its internal components (no text or symbols visible)3 Umetnite potporne poklopce unutar otvora i zavijte vijcima.

natural_image
Illustration of a hand using a hammer to measure a wall-mounted object, with no visible text or symbols.2 Izmjerite razmak između dvije rupe zidnih nosača. Napravite rupe odgovarajuće veličine prema materijalu potpornog zida i umetnite potporne
natural_image
Illustration of a hand tool applying material to a rectangular object (no text or symbols)Leave a 3.5-4.0mm gap between the wall and the screw's head. ( screw diameter is 4.0m Pustite glavu vijka da strsi 3,5-4 mm od zida. Umetnite utore u nosačima zvučne šipke u izbočene glave vijaka. Uvjerite se da su potporni poklopci i sidro zvučne trake dobro zabrtvljeni.
text_image
3.5-4mm 4mm >31mm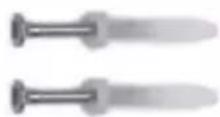
PROBLEMI I RJEŠENJA
● To avoid possible hearing damage, limit the listening time to high volumes.
● This is a precision electronic appliance; avoid using it in the following cases:
- Near strong heat sources, such as central heating plants or stoves.
- In very humid places such as bathrooms, swimming pools, etc.
- In very dusty places.
-
In places subject to strong vibrations.
-
Position the appliance in such a way that there is always enough room for free air circulation (at least 5 cm).
- Do not block the air inlets.
- If any liquid enters the appliance, unplug it immediately from the socket and take it to the nearest TREVI authorised service centre.
● Before switching on the appliance, always check that the power cable and the connection cable are properly installed. - No naked flame sources, such as lighted candles, should be placed on the appliance.
- The appliance must not be exposed to dripping or splashing water and no objects filled with liquids, such as vases, must be placed on the appliance.
- Keep this manual for future reference.
CARE AND MAINTENANCE
Use a slightly damp soft cloth for cleaning. Do not use solvents and abrasive substances.
IMPORTANT
This appliance has been carefully built to ensure long-lasting perfect performance. However, should any inconvenience occur, please contact your local authorised TREVI Service Centre.
TREVI follows a policy of ongoing research and development. Therefore products may have different features from those described.
DESCRIPTION OF CONNECTORS/CONTROLS
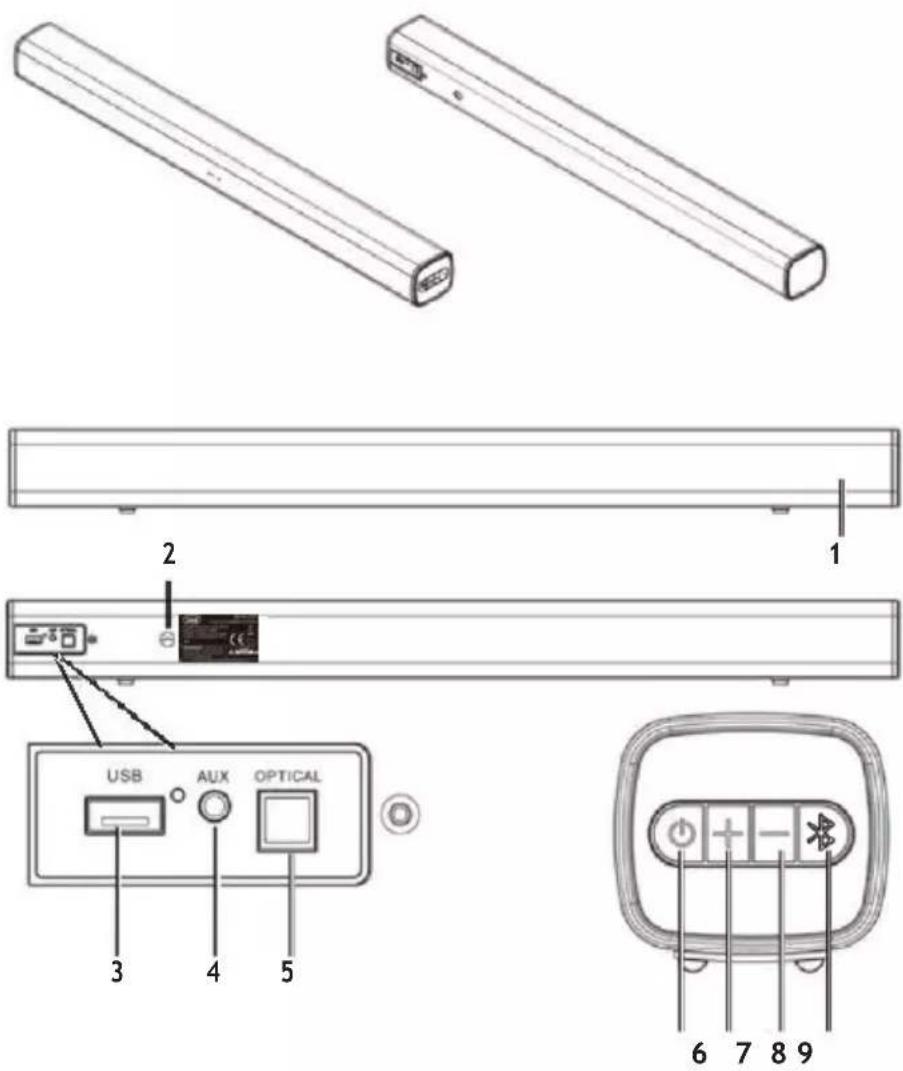
CONTROLS:
- LED indicator.
- Power cord (230V\~50Hz).
- USB input.
- AUX-IN (jack 3.5mm stereo) input.
- Optical input.
- Power ON/Stand-by button.
- Volume +.
- Volume -.
- *button.
text_image
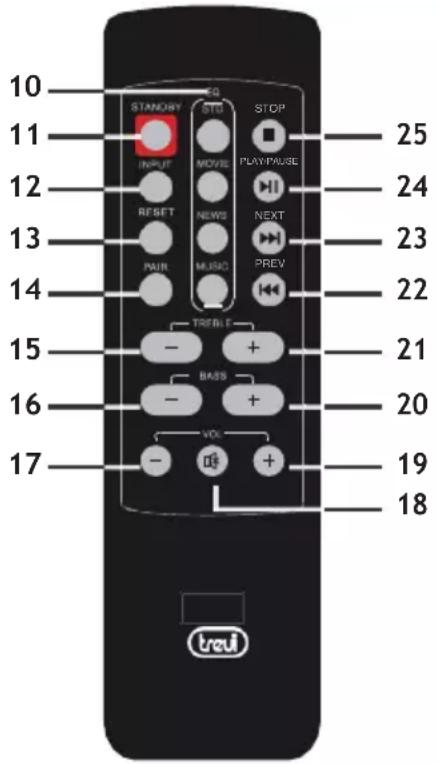
10 11 12 13 14 15 16 17 EQ STANDRY STB STOP INPUT MOVIE PLAY/PAUSE RESET NEWS NEXT INJRI MUSIC PREV TREBLE - + BASS - + VOI - + 19 18 25 24 23 22 21 20REMOTE CONTROL:
- EQ-Std/ Movie/ News and Music.
- Stand-by mode for power ON/OFF.
- INPUT: AUX-IN/ USB/ BT/ OPTICAL.
- RESET: location retrieval.
- PAIR: connector disconnect to the pairing device.
- TREBLE -: treble decrease button.
- BASS -: bass decrease button.
- VOL -: Volume downward adjustment button.
- MUTE mode.
- VOL +: Volume increase button.
- BASS +: bass increase button.
- TREBLE +: treble increase button.
- ◀, prev. song.
- ▶, next song.
- ▶ / II, play/pause.
- ■, press to stop.
REMOTE CONTROL BATTERY ACTIVATION AND REPLACEMENT
natural_image
Line drawing of a remote control device with buttons and a scroll (no text or symbols)Remove the battery compartment cover

text_image
Diagram of a mobile phone casing with labeled components and battery indicatorsInser 2 "AAA" batteries according to the markings inside compartment
natural_image
Line drawing of a remote control device with buttons and ports (no text or symbols)Close the compartment
INSTALLATION
CONNECTING TO THE POWER SUPPLY
Fit the plug into an 230V\~50Hz socket. Do not plug the appliance to different power.
POWER ON/ STANDBY AND AUTO POWER OFF FUNCTION
- Press the power-ON/standby key (6) to switch ON the device.
- Press the power-ON/standby key (6) again to switch the device back to standby mode.
This device is equipped with Auto Power Off function; this function allows the automatic shutdown when no audio signal inputs after 30 minutes. - Press the INPUT button (12) on the remote control and select the desired source;
The LED indicator can change in 5 different colors representing the different inputs:
Red= Stand-by
Blue= Bluetooth function / pairing mode
Green= AUX-IN input
Wathet= Optical digital input
Violet= USB (if an external memory is inserted in the USB socket)
Note: If the Sound Base does not react to any operation or does not work properly, disconnect the power cable for 30 seconds to reset the device.
VOLUME ADJUSTMENT AND MUTE FUNCTION
It's possible to adjust the volume of the unit with the volume keys (4 on the device, 7 on the remote control)
- Press the + button to increase the volume of the device.
- Press the - button to decrease the volume.
Note:
When connecting to the headphone output of a TV or a device that has its own speakers, these usually are disabled and to have a good output signal need to adjust the volume to the maximum level through the commands of TV (or device).
When connecting to the audio output of a TV-Scart (or any audio output that is not the headphone jack of another device), the level of the sound output is constant and not adjustable via the command own the TV (or device); the speakers of the TV (or device) is not disabled and if you want to silence them need to lower the volume completely otherwise the reproduction is in addition to the Sound Base.
MUTE: To activate the mute function of the device via the MUTE button (18) on the remote control; to reactivate listening press the MUTE button.
Note:
- Some audio outputs which you connect the Sound Bar (like headphone output) can have its own volume control: makes sure you have set on the source device an adequate level audio output otherwise the Sound Bar will sound even at maximum volume.
- If the sound played by the Sound Bar be distorted means that the input signal is too strong: lower the volume of the Sound Bar or paid on a level audio source device output more low.
- In case of connection to a TV by headphone output, it may happen that the sound reproduced bye Soundbar is low even at maximum volume; in this case try connecting the Soundbar to the audio-scart output using an adapter (not supplied).
AUX-IN
- Plug in 3.5mm AUX cable.
- Tum ON the unit and press INPUT (12) button to select the AUX mode till the LED light in Green color.
- For proper playback sound refer to chapter VOLUME ADJUSTMENT AND MUTE FUNCTION.
OPTICAL INPUT
- Touse a digital optical cable (not included) to connect the OPTICAL input (5) to the digital optical output of your TV or other source devices.
Note: Some TVs or devices it is necessary to enable the digital optical output.
-
Turnon the unit and press the INPUT button (12) on the remote control to select the OPTICAL input. The function indicator LED (1) must become Wathet.
-
Adjust the volume using the Vol+ and Vol - keys.
Note: PCM digital audio must be set on the source device for playback from this input.
BLUETOOTH OPERATION
- Turn on the unit and press the INPUT button (12) on the remote control to select the BLUETOOTH function. The function indicator LED (1) must become Blue;
- The system automatically goes into search, if not for a few seconds press the PAIR button (14) on the remote control or press and hold for 5 seconds. the key (9) on the unit;
- Activate the Bluetooth functionality on the external device to be paired;
- Start the device search. At the end select the "SB 8315TV" device;
- Enter the password "0000" if required;
- Press ▶ / II button (24 on the remote control) to start playback and the ◀ or ▶ buttons (22 and 23 on the remote control) to select tracks;
- Press the PAIR button (14) on the remote control for a few seconds or press and hold for 5 seconds. the ✦ key (9) on the unit, to stop the active connection and pair a new device.
TREBLE, BASS CONTROL AND EQUALIZER
It is possible to adjust the high and low tones on the reproduced audio:
- Treble: press the TREBLE- (15) or TREBLE+ (21) buttons to adjust.
- Bass: press the BASS- (16) or BASS+ (20) buttons to adjust.
- Status LED indications (3) during adjustment: flashing pink indicates adjustment in progress, fixed pink at the end of regulation level.
There are also four different types of sound equalization with which to listen to music:
The soundbar has a pre-set equalizer system, press the EQ (10) buttons on the remote control during playback to select the audio dynamic that best suits the music style being played (Music, Movie, News and Std).
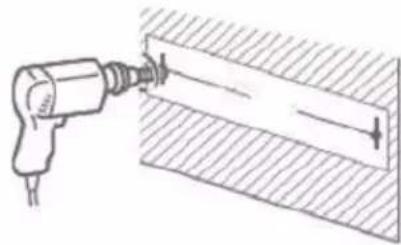
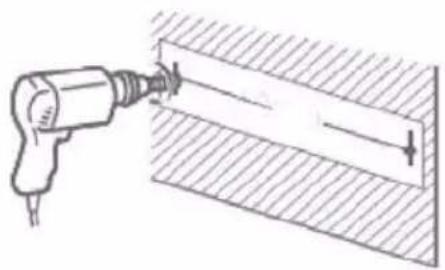
WALL MOUNTING
1 Fix wall brackets with screw on sound bar steadily. More details please refer to below picture.

natural_image
Close-up of a black electronic device with a control panel and indicator lights, no visible text or symbols.2 Drill 2 parallel holes, the distance between 2 parallel holes must be same as distance between two wall brackets on sound bar.
natural_image
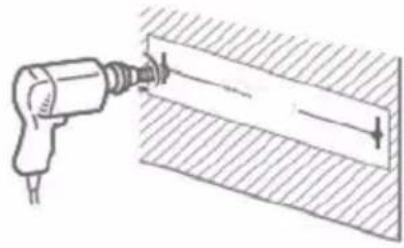
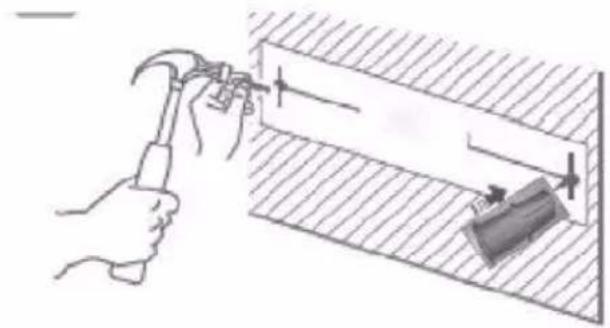
Illustration of a drill bit being inserted into a rectangular block, with no text or symbols present.3 Drive the plastic product into the holes.
natural_image
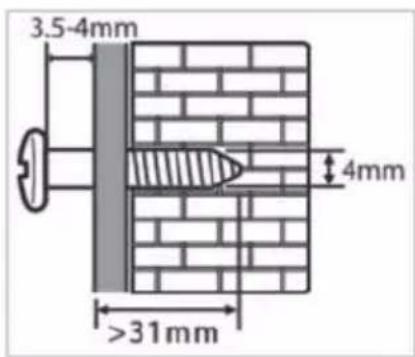
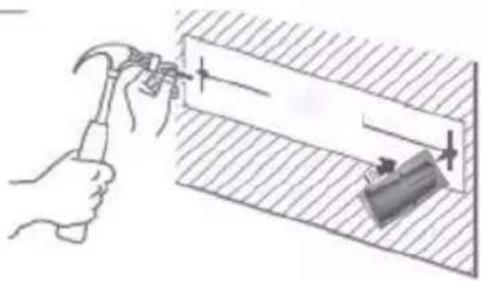
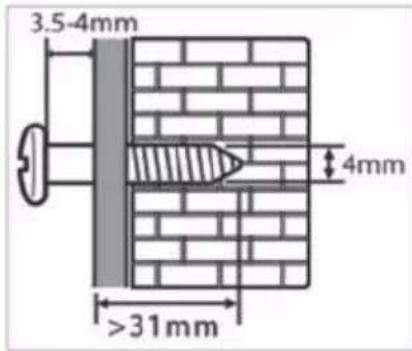
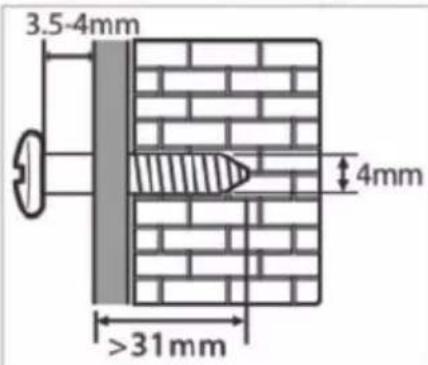
Illustration of a hand using a hammer to install a rectangular component on a tiled floor (no text or symbols)4 Leave a 3.5-4.0mm gap between the wall and the screw's head. (screw diameter is 4.0mm
text_image
3.5-4mm 4mm >31mm
5 Lift sound bar with the attached wall brackets over the heads of screws and slot into place.
TROUBLESHOOTING
If the Sound Bar does not work properly, check this short list before taking it to a TREVI authorised service centre.
In any case, do not try to repair the device, this will void the warranty. Only TREVI authorised service centres are authorised to perform operations on this product.
No Sound
- Check that the MUTE function is not activated.
- Check that the correct input has been selected.
- Check and adjust the volume of the Sound Bar and the TV (or the device connected).
The Sound Bar does not turn on or turns off automatically
- Check that the power cable is correctly inserted.
■ If the Sound Bar does not receive any signal for some time it automatically turns to standby mode.
Pairing problems with Bluetooth devices:
- If the audio quality is poor after pairing Bluetooth with an external device, bring the external device closer to the soundbar or remove any obstructions between them.
- If the connection between the soundbar and the device does not occur, check that the coupling function of the device is enabled; refer to the device manual to enable the function.
If the coupling with the external device is activated and deactivated continuously, bring the external device closer to the soundbar or remove any obstacle between them. In some external devices, the Bluetooth pairing can be switched off automatically to safeguard the consumption of its battery, this is not a malfunction of the device.
I can't find the Bluetooth name of this unit on my Bluetooth device for Bluetooth pairing
■ Ensure that the unit is switched on.
- Ensure that the Bluetooth function is activated on your Bluetooth device.
The remote control does not work
- Replace the battery
The device does not react to any operation
- Disconnect the power cable from the device for 30 seconds to reset it.
TECHNICAL FEATURES
GENERAL FEATURES
| Power supply: | 230V~50Hz |
| Consumption: | 60W |
| Maximum output power: | 2x25W |
| Frequency response: | 80Hz-20KHz |
| S/N Ratio: | ≥72db |
| Distortion: | </=0.5% (1K/1W) |
| Input sensitivity: | 800mV±50mV |
| Bluetooth transmission power: | 2.5mW |
| Bluetooth transmission: | 2.4GHz |
| Sound Bar size: | 750x66x75mm |
| Weight | 1.4Kg |
USERS INFORMATION pursuant to Legislative Decree No. 49 of March 14, 2014
"Implementation of Directive 2012/19 / EU on Waste Electrical and Electronic Equipment (WEEE)"
This wheeled bin symbol on the product indicates that at the end of its life must be collected separately from other waste. The user must, therefore, take the remote control integrates the essential components that got to its life to the appropriate differentiated collection centers for electronic and electro-technical waste, or return it to the dealer when purchasing a new appliance of equivalent type, in terms of one to one, or one to zero for equipment having longer side of less than 25 cm. Appropriate separate collection for the decommissioned equipment for recycling, processing and environmentally compatible disposal helps prevent negative impact on the environment and human health and promotes recycling of the materials making up the product. Illegal dumping of the product by the user entails the application of administrative sanctions stated in Legislative Decree n. Legislative Decree No. 49 of March 14, 2014.
NOTES D'EMPLOI
text_image
Technical diagram showing exploded and assembled views of a remote control panel with labeled components including USB, AUX, and optical controls.COMMANDES ET PRISES SUL
L'APPAREIL:
natural_image
Line drawing of a remote control device (no text or symbols)text_image
Diagram of a remote control panel with labeled components and arrows indicating assembly or statusnatural_image
Line drawing of a remote control device with buttons and ports (no text or symbols)natural_image
Two 3D isometric views of rectangular rods, one with a labeled section and the other with a 'ISO' marking (no text or symbols on the rods themselves)
natural_image
Simple line drawing of a rectangular beam with two supports at one end, labeled with numbers 1 and 2 (no text or symbols on the beam itself)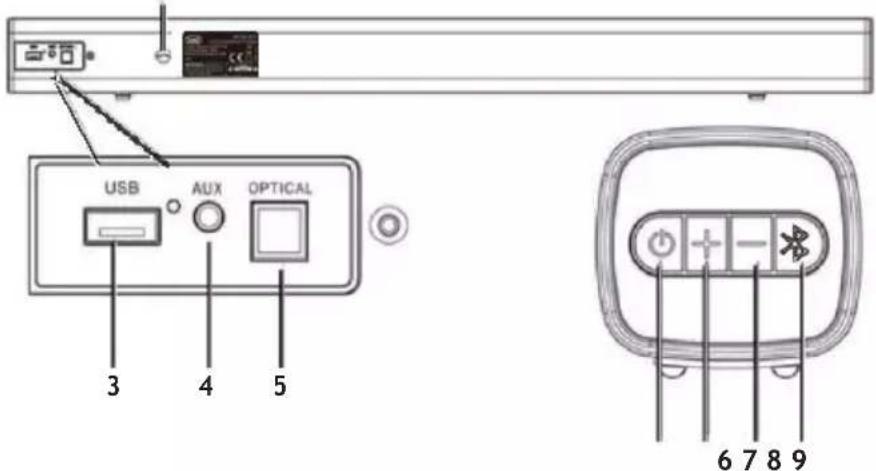
text_image
USB AUX OPTICAL 3 4 5 6 7 8 9KONTROLLEN UND STECKDOSEN AM GERÄT:
natural_image
Line drawing of a remote control device with buttons and a scroll (no text or symbols)text_image
Diagram of a remote control device with labeled ports and battery connectionsnatural_image
Line drawing of a remote control device with buttons and ports (no text or symbols)natural_image
Line drawing of a remote control device with buttons and a scroll (no text or symbols)text_image
Diagram of a remote control panel with labeled components and arrows indicating internal structurenatural_image
Line drawing of a remote control device with buttons and ports (no text or symbols)natural_image
Diagram showing a device with a control panel and a hand holding a device (no text or symbols visible)2
natural_image
Diagram of a drill bit being inserted into a cylindrical component, showing tool and base (no text or symbols)3
natural_image
Illustration of a hand using a hammer to install a wall-mounted component, with no visible text or symbols.4 Leave a 3.5-4.0mm gap between the wall
e
text_image
3.5-4mm 4mm >31mmv diameter is 4.0m

text_image
treviTrevi S.p.A.
Strada Consolare Rimini-San Marino, 62 47924 Rimini (RN) Italy
Tel. 0541/756420 - Fax 0541/756430 - www.trevi.it - e-mail: info@trevi.it
DICHIARAZIONE DI CONFORMITÀ UE SEMLIFICATA
SIMPLIFIED EU DECLARATION OF CONFORMITY
Hereby TREVI Spa declares that the radio equipment type SB 8315 TV is in compliance with directive 2014/53/EU.
The full text of the EU declaration of conformity is available at the following internet address www.trevi.it