GHW880BK - Basket Glem Gas - Free user manual and instructions
Find the device manual for free GHW880BK Glem Gas in PDF.

| Product type | Range hood |
| Brand | Glem Gas |
| Model | GHW880BK |
| Installation type | Wall-mounted |
| Usage modes | External evacuation or internal recirculation (optional charcoal filter) |
| Air outlet diameter | 150 mm (120 mm reducer supplied) |
| Number of speeds | 4 |
| Control | Capacitive touch (glass) |
| Lighting | Halogen bulb 20 W, 12 V, socket GU4 |
| Timer | Yes (auto shut-off after 15 minutes; at speed 4, automatic switch to 3 after 7 min) |
| Clean air program | Yes (operates with hood off; cycle of 10 min/h for 5 cycles) |
| Grease filters | Metal, dishwasher safe (every 3-4 weeks) |
| Charcoal filter | Optional, not washable, replace every 3 months max. |
| Minimum distance to cooking surface | 40 cm (electric), 65 cm (gas) |
| Material | Stainless steel (structure) |
| Power supply | Mains 220-240 V (typical) |
| Filter saturation indicator | Yes (flashing light after 30 hours of operation) |
| Safety | Disconnect before maintenance; do not cook with open flame; adequate ventilation if used with other appliances |
Frequently Asked Questions - GHW880BK Glem Gas
User questions about GHW880BK Glem Gas
0 question about this device. Answer the ones you know or ask your own.
Ask a new question about this device
Download the instructions for your Basket in PDF format for free! Find your manual GHW880BK - Glem Gas and take your electronic device back in hand. On this page are published all the documents necessary for the use of your device. GHW880BK by Glem Gas.
USER MANUAL GHW880BK Glem Gas
natural_image
Technical line drawing of a mechanical device with internal components and housing (no text or symbols)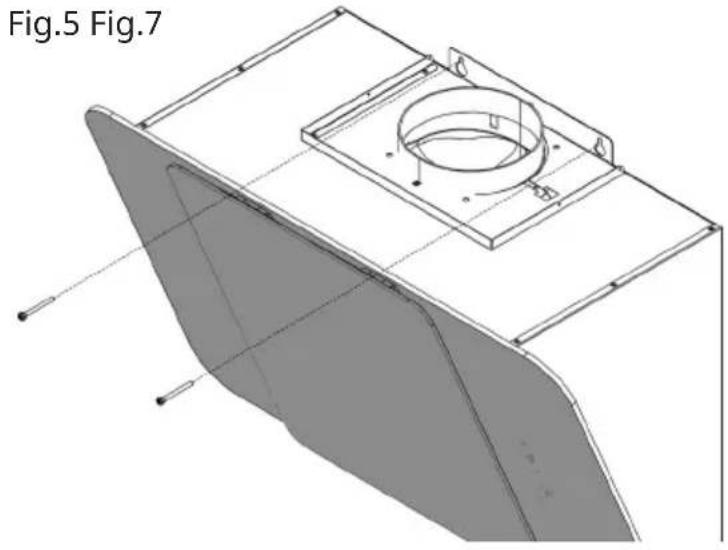
natural_image
3D technical drawing of a mechanical component with a circular housing and triangular base, labeled Fig.5 (no text or symbols on the diagram itself)Fig.6
natural_image
Technical line drawing of a mechanical device with internal components and mounting brackets (no text or symbols)

ENGLISH
EN
GENERAL INFORMATION
Carefully read the following important information regarding installation safety and maintenance. Keep this information booklet accessible for further consultations.
INSTALLING INSTRUCTIONS
This hood is prepared to be installed above a hob by fixing it to the wall. It can be installed in two ways:
- EXHAUST MODE: the kitchen vapours are purified by the metal anti-grease filters and carried outside through a ducting system.
- RECIRCULATING MODE: the kitchen vapours are purified by the metal anti-grease filters and an activated carbon filter, then conveyed back into the kitchen.
We suggest to have installation carried out by qualified personnel, in compliance with all the current regulations and in particular with the ones concerning air exhaust.
The manufacturer cannot be held liable for damages caused by improper installation or if it has not been carried out according to the state-of-the-art.
SAFETY
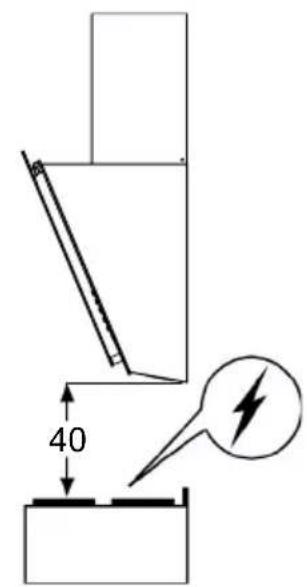
The minimum distance between the supporting surface for the cooking equipment on the hob and the lowest part of the range hood must be not less than 40cm from electric cookers and 65cm from gas or mixed cookers. It is possible to install the hood so that the distance between the cooking top and the fats filter is not less than less than 65 cm in the case of gas or mixed cookers. If the instructions for installation for the gas hob specify a greater distance, this must be adhered to. (Fig.10).
- If a connection tube composed of two parts is used, the upper part must be placed outside the lower part.
- Do not connect the cooker hood exhaust to the same conductor used to circulate hot air or for evacuating fumes from other applian-
ces generated by other than an electrical source.
- Take care when the cooker hood is operating simultaneously with an open fireplace or burner that depend on the air in the environment and are supplied by other than electrical energy, as the cooker hood removes the air from the environment which a burner or fireplace need for combustion. The negative pressure in the environment must not exceed 4 Pa (4x10 -5 bar).
- Provide adequate ventilation in the environment for a safe operation of the cooker hood. Follow the local laws applicable for external air evacuation.
- Use screws and screw anchors suitable for wall (e.g. reinforced cement, plasterboard) for the mounting of the cooker hood. Where screws and screw anchors are supplied ensure that they are suitable for the type of wall where the cooker hood is to be mounted.
COMPONENTS LIST > see Fig.2
MOUNTING THE COOKER HOOD TO THE WALL
- Drill holes A-B-C according to indications quoted in (fig.3).
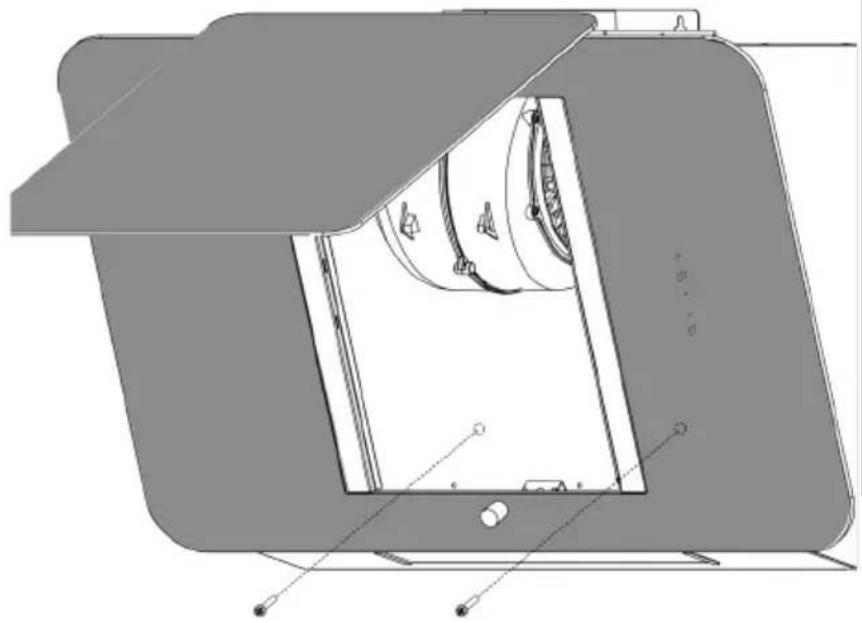
- Hang the cooker hood on the wall using the drill holes A (Fig.5).
- Fasten the cooker hood using the fastening drill holes B (Fig.6).
- Connect the flange Y of ∅150 mm (fig.2) to the discharge opening with a connecting tube.
If the apartment is equipped with an external ∅120 mm air duct, apply the reduction fitting provided. (do not carry out the above instructions for recirculating mode).
- Thread the upper chimney E to the inside of the lower chimney F; Insert them vertically on of the cooker hood body (Fig.7).
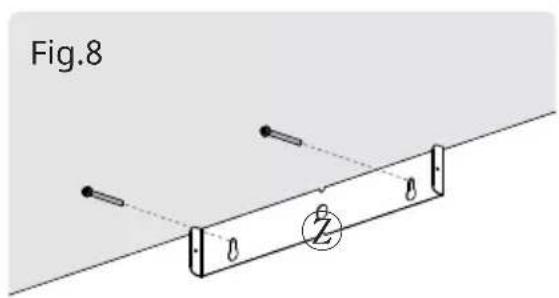
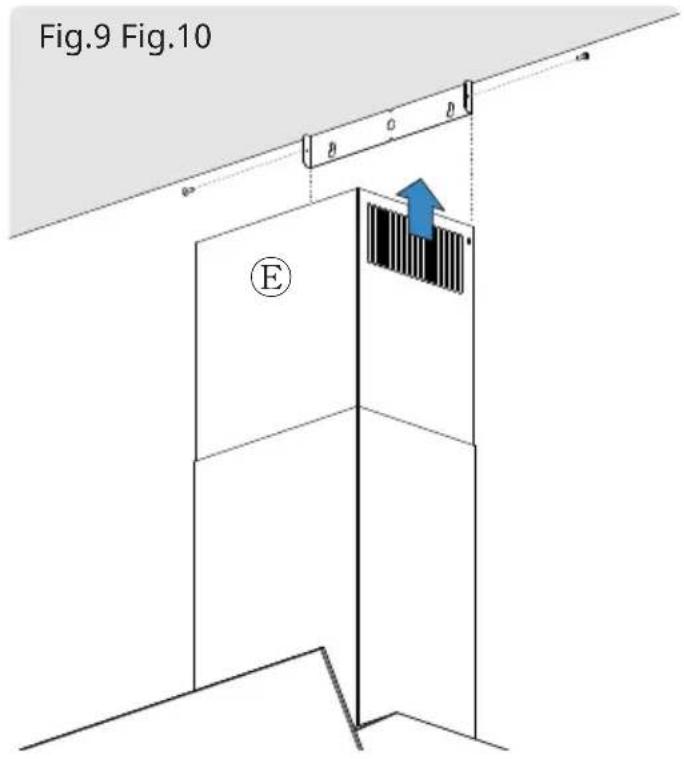
- Affix the bracket Z (Fig.8) to the wall via the drill holes C.
- Slide the upper chimney E towards the top, locking it in with the appropriate screws in the drill holes of the bracket Z previously affixed to the wall (fig.9).
RECIRCULATING MODE INSTALLATION
In order to transform your cooker hood from the exhaust version to the recirculating version, it is necessary to install activated carbon filters (Fig. 4).
ELECTRICAL CONNECTION
Check that the mains voltage complies with the that required by the hood. This is indicated on the plate that is applied inside the appliance.
OPERATING CHECKS
Check lights and motor start-up on all 4 speeds.
USE INSTRUCTIONS
Version with TOUCH CONTROL on glass (capacitative) (Fig.1)
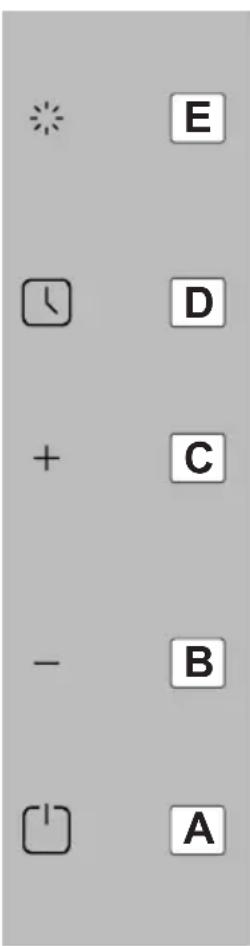
A.ON/OFF: turns on the hood at 0 speed, and turns off the hood (lights included)
B. - Key Starts the hood at 1° speed (decreases speed and brings the hood back to ON).
C.+ key. Increases speed from 2^ to 3^ to 4^ speed
NOTE: speed increase starts from 1° Speed.
D. Timer – the timer is activated by pressing this key, and the motor is turned off after 15 minutes. When operation speed is set at 4 speed, the timer activates automatically and the speed is automatically set at 3 speed after 7 minutes.
Timer programs stop: by pressing the "TIMER" key or increasing/decreasing + OR - keys, the timer programs are deactivated.
E. Light (only when the hood is ON)
SAFETY INSTRUCTIONS
In certain circumstances electrical appliances may be a danger hazard.
- The hood has been designed to remove the kitchen smells; any other additional use shall be regarded as non-intended.
- Aerate the room if other appliances that are not supplied by electrical power are being used while the hood is on.
- Do not leave the cooker on if it is not being used.
- Do not flambé food directly under the cooker hood to prevent the grease filter catching fire due to flames.
- Constantly check food frying to avoid that the overheated oil may become a fire hazard.
- Do not check the status of the filters while the cooker hood is operating.
- Do not touch the light bulbs after appliance use.
USE AND MAINTENANCE
It is recommended to switch on the appliance before cooking. It is also recommended to leave the appliance in operation for 10 minutes after cooking is terminated in order to completely eliminate cooking vapours and odours. The proper function of the cooker hood is conditioned by the regularity of the maintenance operations, in particular, the active carbon filter.
Clean the fan and other surfaces of the cooker hood regularly using a cloth moistened with denatured alcohol or non abrasive liquid detergent.
WARNING: unplug the appliance or switch off the circuit breaker before carrying out maintenance operations.
METAL ANTI-GREASE FILTERS (Fig.2M)
The metal anti-grease filters capture the grease particles of the vapours that develop during cooking, therefore they are subject to clogging according to the frequency of the use of the appliance.
In order to prevent fire hazard, it is recommended to clean the filter every 2 months
by carrying out the following instructions:
- Remove the filters from the cooker hood and wash them in a solution of water and neutral liquid detergent, leaving to soak.
- Rinse thoroughly with warm water and leave to dry.
The filters may also be washed in a dishwasher.
The aluminium panels may alter in colour after several washes. This is not cause for customer complaint nor replacement of panels.
ACTIVATED CARBON FILTERS (Fig.2L)
(Recirculating mode only)
The activated carbon filters purify the kitchen vapours, the air is then conveyed back into the kitchen.
The saturation of the active carbon filter depends on the frequency of use of the appliance, by the type of cooking and the regularity of cleaning the anti-grease filters. The filters are not washable nor re-useable and must be replaced at maximum every four months.
To assemble the carbon filter it is necessary to:
- remove the metal anti-grease filters (Fig.2M)
- rotate the 2 carbon filters to remove them (Fig.4)
LIGHTING
- Before undertaking any replacement, always disconnect the appliance from the electricity supply.
- Replace the lamp with one that has the same features otherwise this may cause severe damage to the electrical system.
- Caution: bulbs might be hot!
CLEANING WARNING LIGHT AND MAINTENANCE OF FILTERS
The function reminds you to clean and maintenance of the hood filters. It is activated automatically, every 30 hours of work, and is highlighted by the flashing of the On / Off light led (Fig.1-E). To deactivate the function, simply hold down the On / Off light button for 3 or more seconds (Fig.1-E).
CLEAN AIR PROGRAM
The program allows within the kitchen, where the hood is installed, to filter the saturated air of the environment.
N.B. The program can be activated, when the hood is off.
It is activated by holding down the “-” and “+” keys at the same time (Fig.1-B / C) for at least 3 sec., and is evident with the flashing of the same.
The program activates the hood in second speed for 10 minutes every hour, for number of 5 cycles.
To deactivate the function, just hold down for at least 3 seconds the “-” and “+” keys (Fig.1-B/C).
TECHNICAL SPECIFICATIONS
- STAINLESS STEEL STRUCTURE
- HOOD WITH TELESCOPIC FLUE WITH ADJUSTABLE HEIGHT
-ELECTRICAL SYSTEM ACCORDING TO THE INTERNATIONAL REGULATIONS
-4 OR 3 OPERATING SPEEDS - LIGHTING: 2 halogen lamps, 20W 12V GU 4
Disposal of old electrical appliances
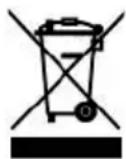
The European Directive 2002/96/EC on Waste Electrical and Electronic Equipment (WEEE), requires that old household electrical appliances must not be disposed of in the normal unsorted municipal waste stream. Old appliances must be collected separately in order to optimise the recovery and recycling of the materials they contain and reduce the impact on human health and the environment. The crossed-out dustbin symbol on the product reminds you of your obligation regarding separated waste collection. Consumers should contact their local public service or their local dealer for more information on the correct disposal of exhausted household appliances.
THE MANUFACTURER DECLINES ALL RESPONSIBILITY FOR EVENTUAL DAMAGES CAUSED BY BREAKING THE ABOVE WARNINGS. THE WARRANTY IS NOT VALID IN THE CASE OF DAMAGE CAUSED BY FAILURE TO COMPLY WITH THE ABOVE WARNINGS.