GFMC530IX - Oven Glem Gas - Free user manual and instructions
Find the device manual for free GFMC530IX Glem Gas in PDF.
| Product type | Built-in oven |
| Brand | Glem Gas |
| Model | GFMC530IX |
| Usable dimensions (H x W x D) | 340 x 440 x 390 mm |
| Usable volume | 59 litres |
| Power supply | 220-240 V ~ 50/60 Hz |
| Maximum power consumption | 2.65 kW (depending on mode) |
| Cooking functions | Defrost, conventional, fan-assisted, grill, double grill, grill+fan, bottom heat, top heat, pizza, rotisserie, etc. |
| Programmer type | Electronic with clock, timer, semi-auto and auto programming |
| Interior lighting | 25W lamp, E-14 fitting |
| Child safety | Control lock (child protection) |
| Automatic shut-off | Yes, via programmer |
| Door | Removable, internal glass removable |
| Supplied accessories | Grills, drip tray, rotisserie (depending on model) |
| Cleaning | Soft cloth and liquid detergent; ammonia for stubborn stains |
| Self-cleaning panels | Optional (available separately) |
| Installation | Built-in, fixing with 4 screws |
| Approximate weight | Approximately 30 kg |
| Electrical connection | Cable cross-section min. 1.5 mm², omnipolar switch |
| Standards | CE (73/23/EEC, 89/336/EEC, 2006/95/CE, etc.) |
Frequently Asked Questions - GFMC530IX Glem Gas
User questions about GFMC530IX Glem Gas
0 question about this device. Answer the ones you know or ask your own.
Ask a new question about this device
Download the instructions for your Oven in PDF format for free! Find your manual GFMC530IX - Glem Gas and take your electronic device back in hand. On this page are published all the documents necessary for the use of your device. GFMC530IX by Glem Gas.
USER MANUAL GFMC530IX Glem Gas
GB This appliance is marked according to the European directive 2002/96/EC on Waste Electrical and Electronic Equipment (WEEE).
By ensuring this product is disposed of correctly, you will help prevent potential negative consequences for the environment and human health, which could otherwise be caused by inappropriate waste handling of this product.

The symbol on the product, or on the documents
accompanying the product, indicates that this appliance may not be treated as household waste. Instead it shall be handed over to the applicable collection point for the recycling of electrical and electronic equipment.
Disposal must be carried out in accordance with local environmental regulations for waste disposal.
For more detailed information about treatment, recovery and recycling of this product, please contact your local city office, your household waste disposal service or the shop where you purchased the product.
Instructions for the user 3-6
Installation instruction 6-9
Control panel 10
Description of cooking functions 11-12
Cooking table 13
Using the grill 14
Using the rotisserie 14
Minute minder 15
End of cooking 120' 15
Analog programmer 16
Analog timer 16
Electronic programmer 17-29
Replacing the oven light 30
Removing the oven door 30
Removing the oven door inner glass panel 31-32
Removing and refitting the oven door (when hooked on the side) 33-34
Optional 35
Cleaning and maintenance 36
Thank you for choosing one of our products. It will offer you many years of excellent performance. Please carefully read the instructions and suggestions contained in this manual for correct use of our products.
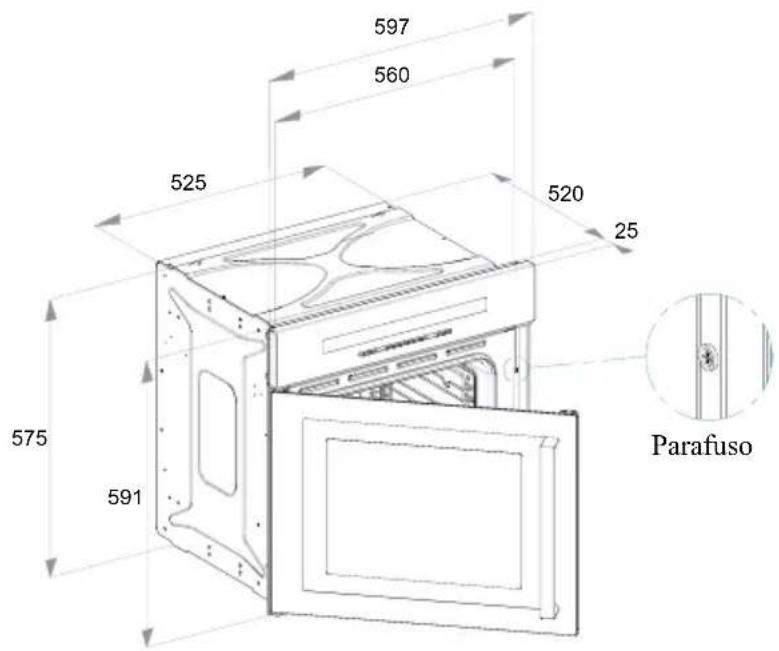
TECHNICAL DATA
Voltage regulations
220-240 V\~ 50/60 Hz
Muffle dimensions:
Height : 340 mm
Length : 440 mm
Depth : 390 mm
Volume : 59 lt
Voltage of heating elements
Static oven 1:
- Lower heating element : 1,3 kW
- Top heating element : 1,3 kW
- Maximum input of heating element : 2,65 kW
Static oven 2:
- Lower heating element : 1,3 kW
- Top heating element : 0,9 kW
- Grill element : 1,35 kW
- Maximum input of heating element : 2,25 kW
Fan oven :
- Fan heating element : 2,3 kW
- Grill heating element : 1,35 kW
- Maximum input of heating element : 2,38 kW
Fan-Multifunction oven:
- Lower heating element : 1,3 kW
- Top heating element : 0,9 kW
- Grill element : 1,35 kW
- Maximum input of heating element : 2,28 kW
Multifunction oven :
- Lower heating element : 1,3 kW
- Top heating element : 0,9 kW
- Fan heating element : 2,3 kW
- Grill element : 1,35 kW
- Maximum input of heating element : 2,38 kW
IMPORTANT: The unit must be correctly installed in accordance with Manufacturers instructions and by qualified person.
Maintenance and service must be carried out after the power supply has been disconnected.
ELECTRICAL CONNECTION: Make sure that the voltage supply is the same as what is on the rating plate which can be found on the lower part of the front of the oven.
The oven must be connected at the back using a cable with minimum section of 1.5 mm, providing an omnipole switch in compliance with current regulations with a contact opening distance of at least 3 mm.
Warning: this appliance must be earthed.
Our company declines any liability for failures in the earth connection of for earth connection that is not in compliance with the regulation in force.
DECLARATION OF CE COMPLIANCE
This appliance is in compliance with the following European Directives:
93/68 : General regulations
2006/95/CE : Concerning low tensions
89/336/CEE : Electromagnetic compatibility
this appliance is suitable to come in contact with food products.
INSTRUCTIONS FOR THE USER
This manual is an integral part of the appliance.
It is necessary to keep it for the life cycle of the oven and to read it carefully for the installation, use, maintenance, cleaning and handling of the appliance.
Unplug the appliance before undertaking any sort of intervention on it.
Attention: earth connection is required by law.
During oven operation, keep children away.
During operation the oven becomes very hot.
Do not touch heating elements on the inside.
Do not use steam cleaners to clean the oven.
Do not use the appliance to heat the room.
The manufacturer will not be held liable if accident prevention measures are not observed. The manufacturer will not be held liable for damage to persons or property due to poor or lacking maintenance of the appliance.
The manufacturer reserves the right to make any changes to the product which are felt to be useful or necessary without any advance notice.
Packaging materials (sheets, polystyrene) may be hazardous to children (danger of suffocation). Keep packaging materials out of the reach of children.
The appliance is designed for adult users who are familiar with these instructions.
Children are often not able to recognize the risks involved with the use of the appliance.
Please supervise properly and do not let children play with the appliance.
Heat is generated during cooking; the door of the appliance may get very hot, specially if it is made of glass. There is the risk of burns; do not touch and keep children away.
The physically impaired must be assisted by capable adults.
Do not carry out any modifications, tampering or repair attempts, especially with tools such as screwdrivers on the inside or outside of the appliance.
Repair work, especially on the electrical parts, must be performed only by specialized personnel.
Improper repair work can cause serious accidents, damage the appliance and equipment as well as impair proper operation.
Appliances repaired in technical service centres must undergo routine tests, especially a continuity test of the earth circuit.
THIS PRODUCT WAS DESIGNED FOR HOME USE.
THE MANUFACTURER WILL NOT BE HELD LIABLE FOR DAMAGE TO PERSONS OR PROPERTY CAUSED BY IMPROPER INSTALLATION, OR BY IMPROPER, WRONG OR SENSELESS USE.
WARNING: IN CASE OF DISASSEMBLY, MAINTENANCE AND CLEANING OF THE APPLIANCE, PLEASE USE SUITABLE PREVENTION AND PROTECTION EQUIPMENT (GLOVES, ECT.).
In case of a failure in operation or an indispensable repair job, ask for the intervention of the customer technical service centre.
If the oven shows visible signs of damage, do not use it.
Unplug it and contact the customer technical service centre.
The oven must be unplugged as soon as an operating problem is discovered.
Make sure the power cord of the appliance is not crushed by the oven door as this may damage the electrical insulation.
If the power cord has been damaged, it must be replaced by the technical service centre in order to avoid the creation of hazardous situations.
Before closing the oven door, make sure there are no foreign bodies or pets inside the oven.
Do not place heat-sensitive or flammable materials in the oven such as detergents, oven sprays, and so on.
The oven gets extremely hot during operation.
The oven remains hot for a long time, even after it has been turned off, and cools off only very slowly until reaching room temperature. Wait for a suitable period of time before carrying out work such as cleaning.
When opening the oven door, steam and water droplets may come out.
If the oven contains steam, it is not advisable to insert the hands.
Superheated grease and oil may easily catch fire.
Never use water in an attempt to extinguish burning grease or oil (there is the danger of explosion). Suffocate the fire with wet cloths.
The rack, the plates and the cooking containers become extremely hot.
Use insulated glove or pot holders.
When using and maintaining the oven, be careful not to get fingers caught in the door hinges to avoid crushing or other injuries.
This is specially important when children are around.
Leave the door open only in an ajar position.
If the door is open there is the hazard of tripping or crushing the fingers.
Do not sit or lean on the door and do not use it as a work surface.
All work on the appliances must be carried out by qualified personnel.
For maintenance, moving, installation and cleaning of the appliance use suitable prevention and protection equipment (gloves, etc.).
Lifting and moving of appliances weighing more than 25 kg must be carried out using proper equipment, or by two persons, in order to avoid risks or injuries.
Preparation of the oven and pre-use
Attention: the oven must be unplugged from the electrical mains. Before using the oven, carefully clean the interior, the racks and the drip pan with non-abrasive soap and lukewarm water. Insert the racks and the drip pan into their respective runners. When this operation is complete, plug the oven into the electrical mains and bring it up to maximum temperature for at least 20 minutes in order to eliminate any residual grease, oil or resins from manufacturing which may cause unpleasant odours during cooking; then ventilate the room.
After completing this simple operation, the oven is ready to cook for the first time.
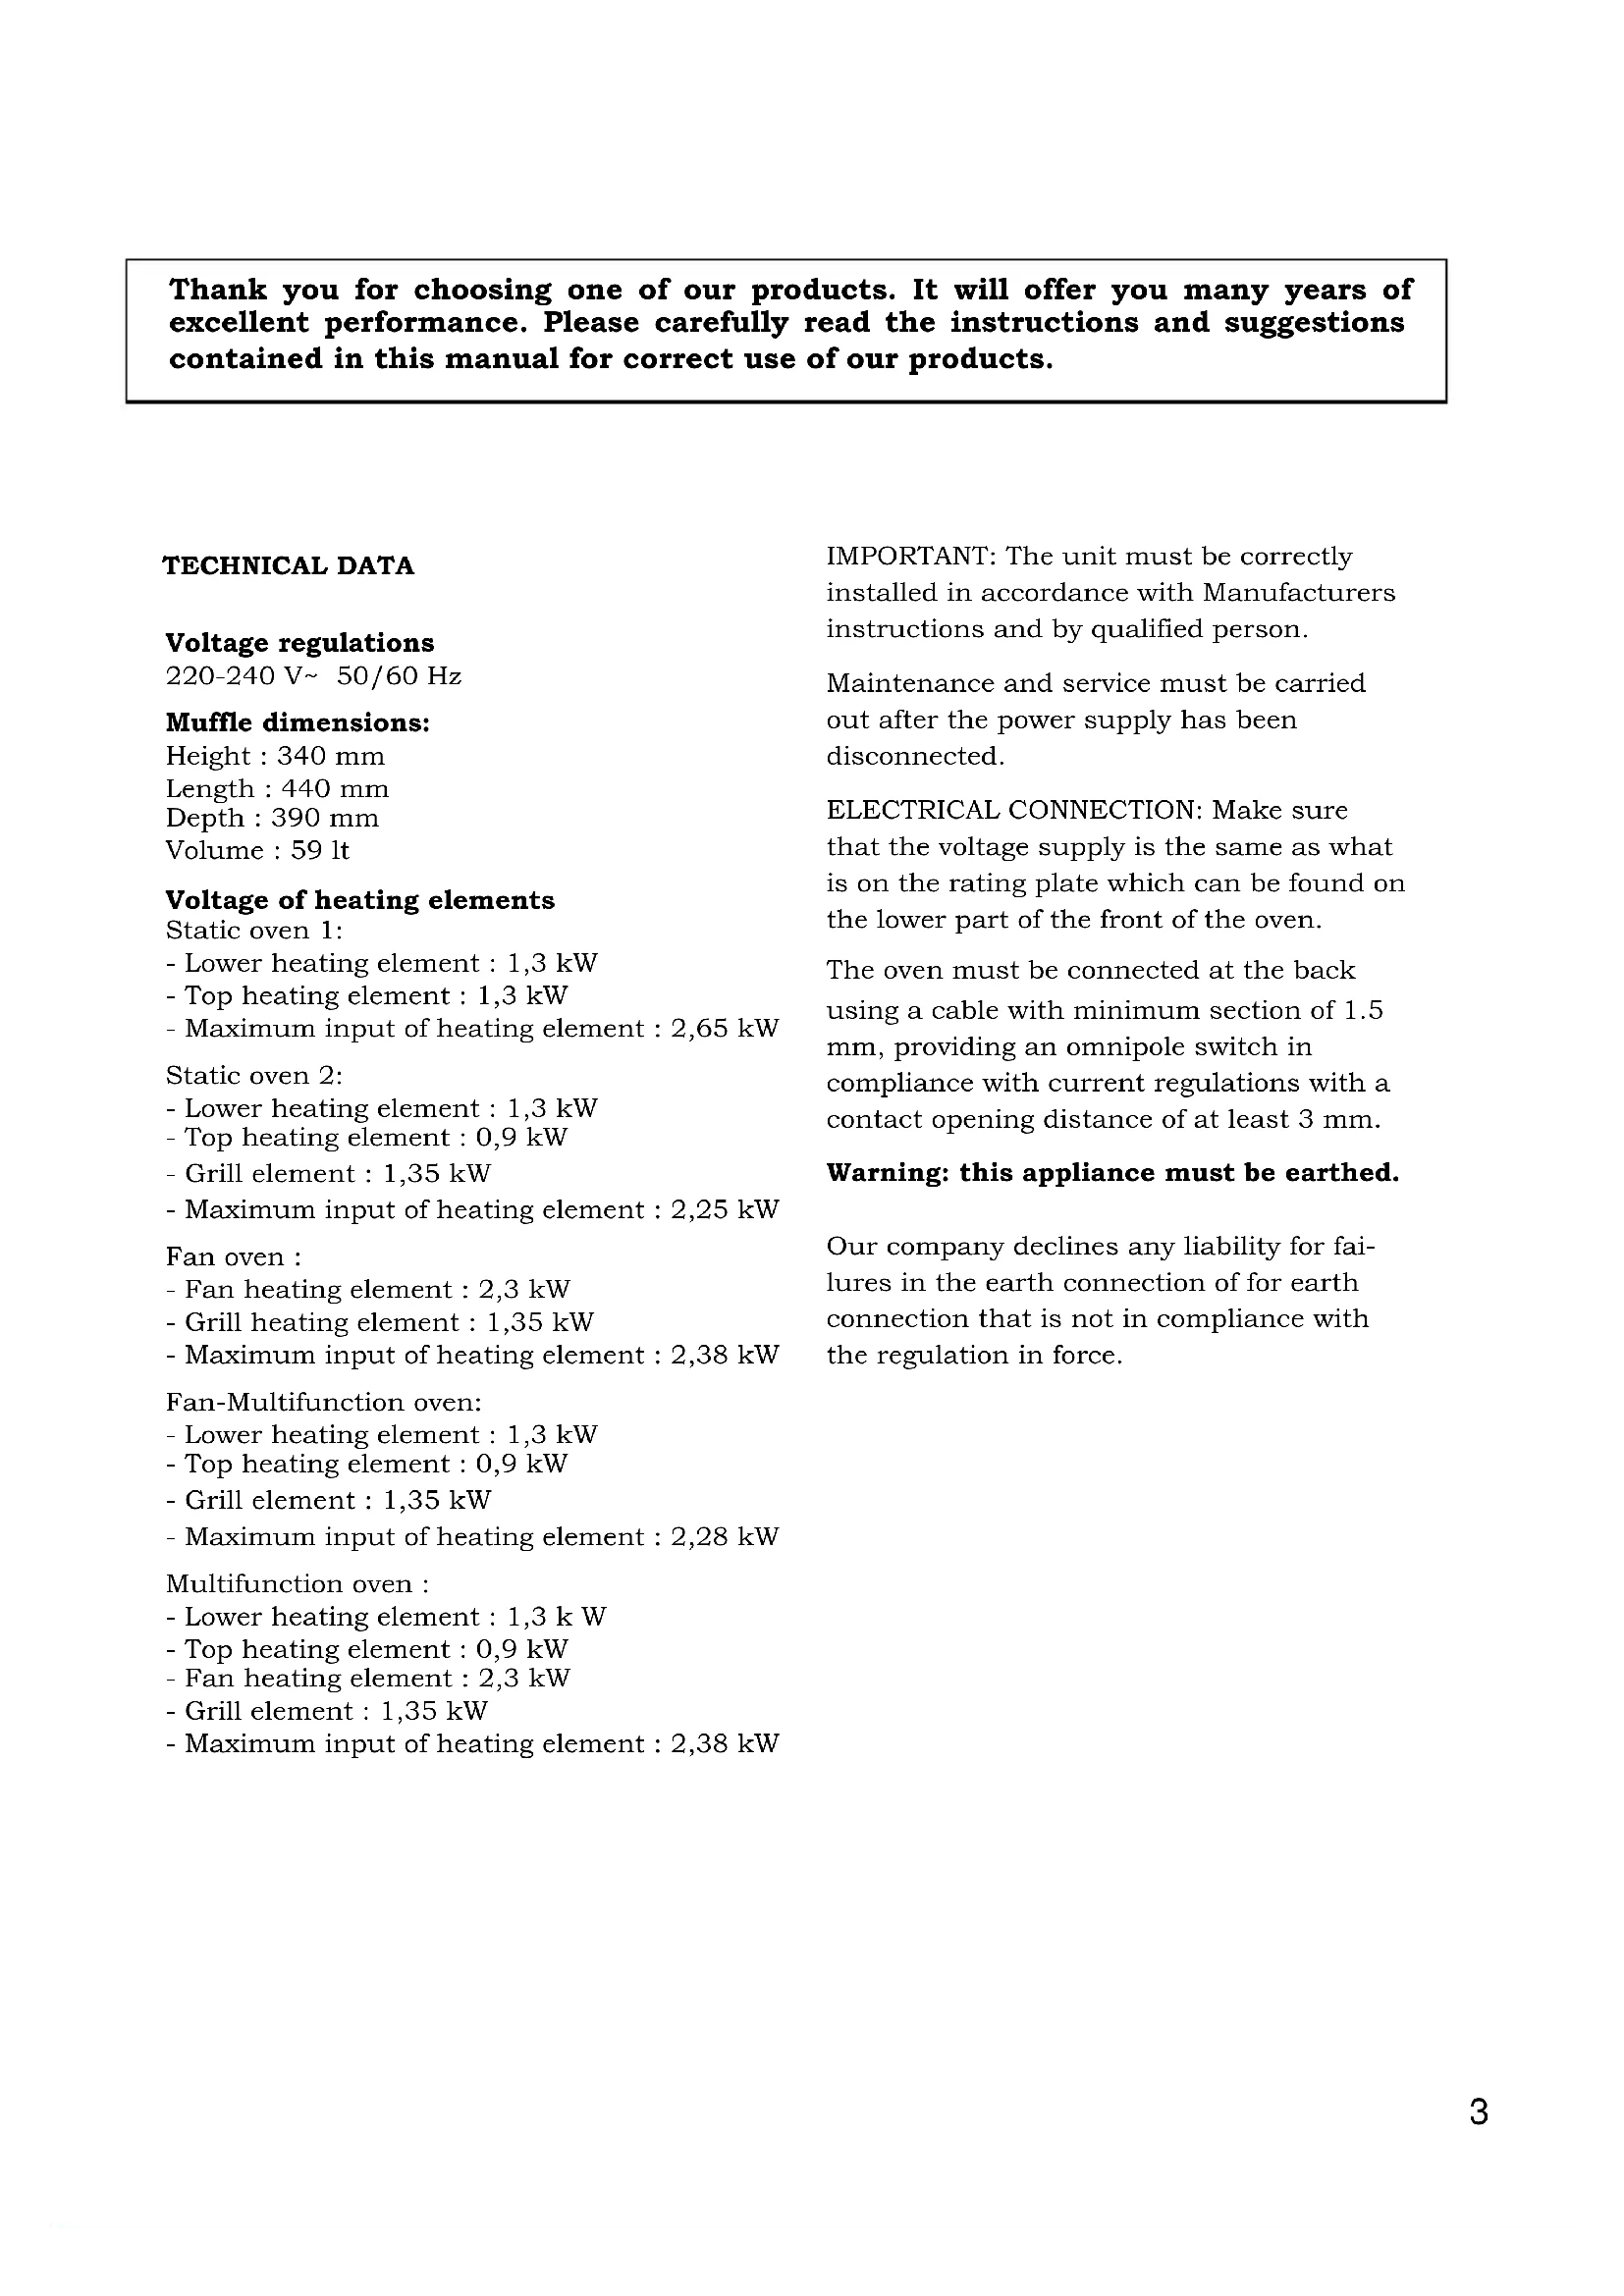
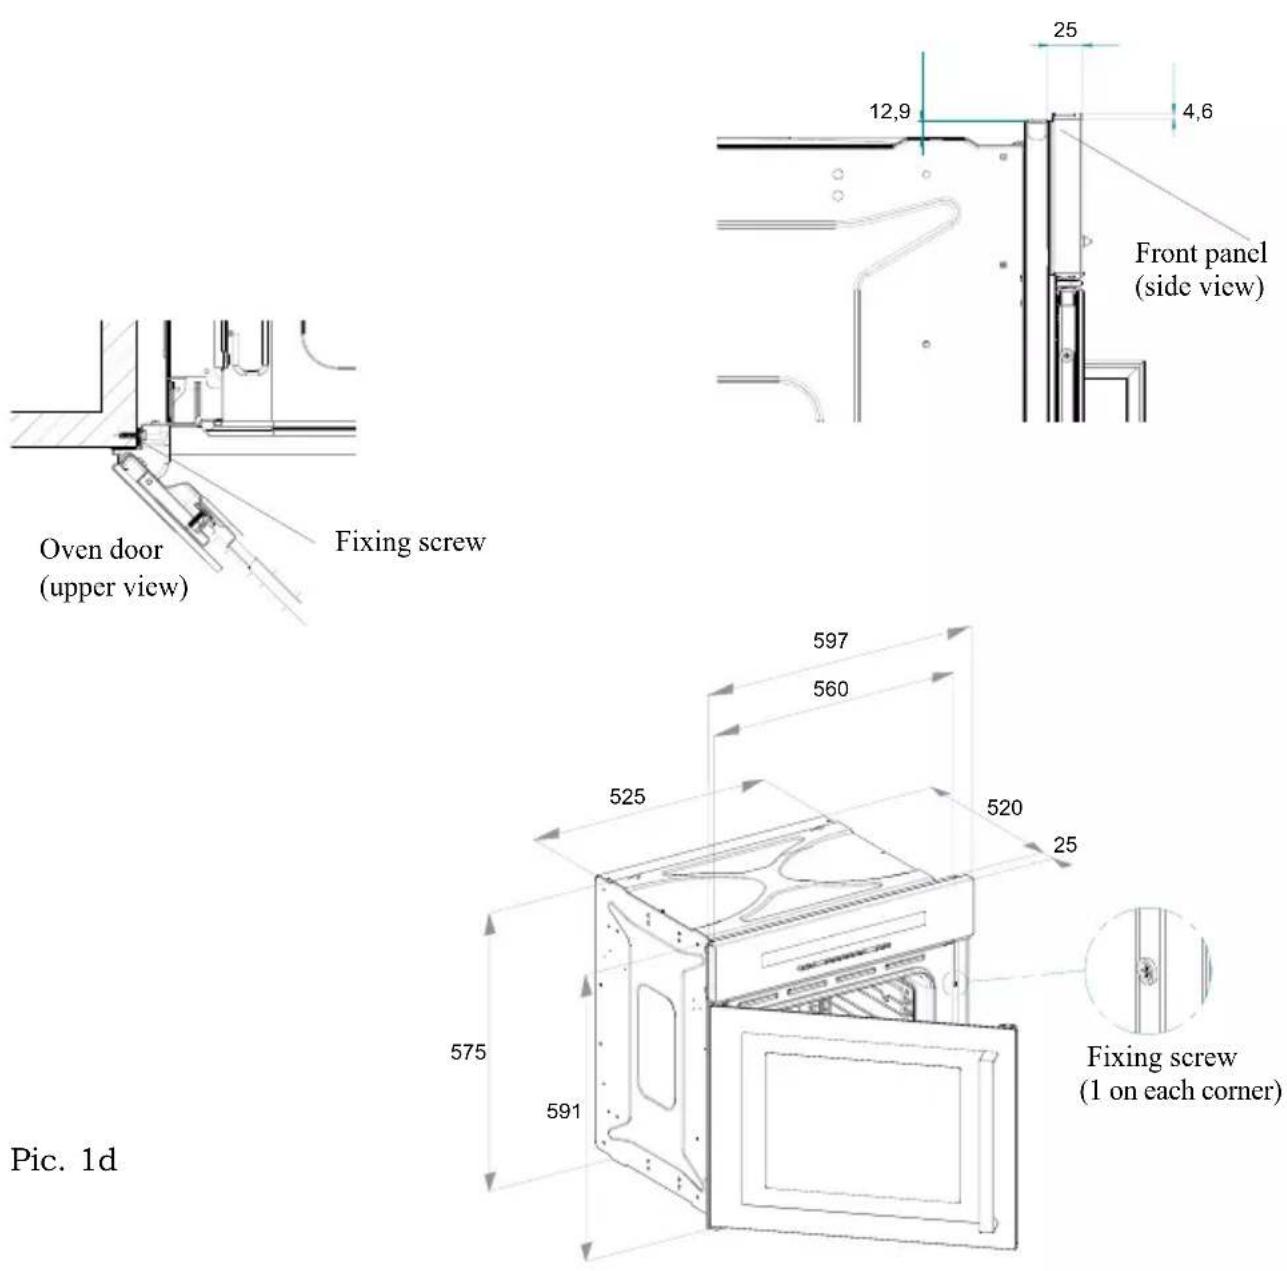
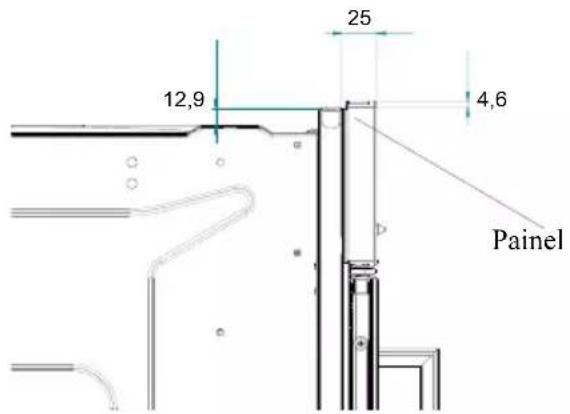
Important notices for the installation
The oven can be built into a standard 560mm housing unit (see pics. 1a and 1b), either when built under the work top or built in a tall housing unit.
In both cases ventilation provisions must be made; for this reason, there must be a gap of 85-90mm at the back of the housing unit (see pics. 1a and 1b).
The fixing of the oven in the cabinet is made by 4 screws A that are on the corners of the oven door frame (see pics. 1a and 1b).
When placing the appliance in the housing unit, do not use the oven door as a lever for lifting the oven.
To open the oven door, always take the handle in the middle.
Do not place heavy objects on or lean on the oven door when open, as this can cause damage to the hinges.
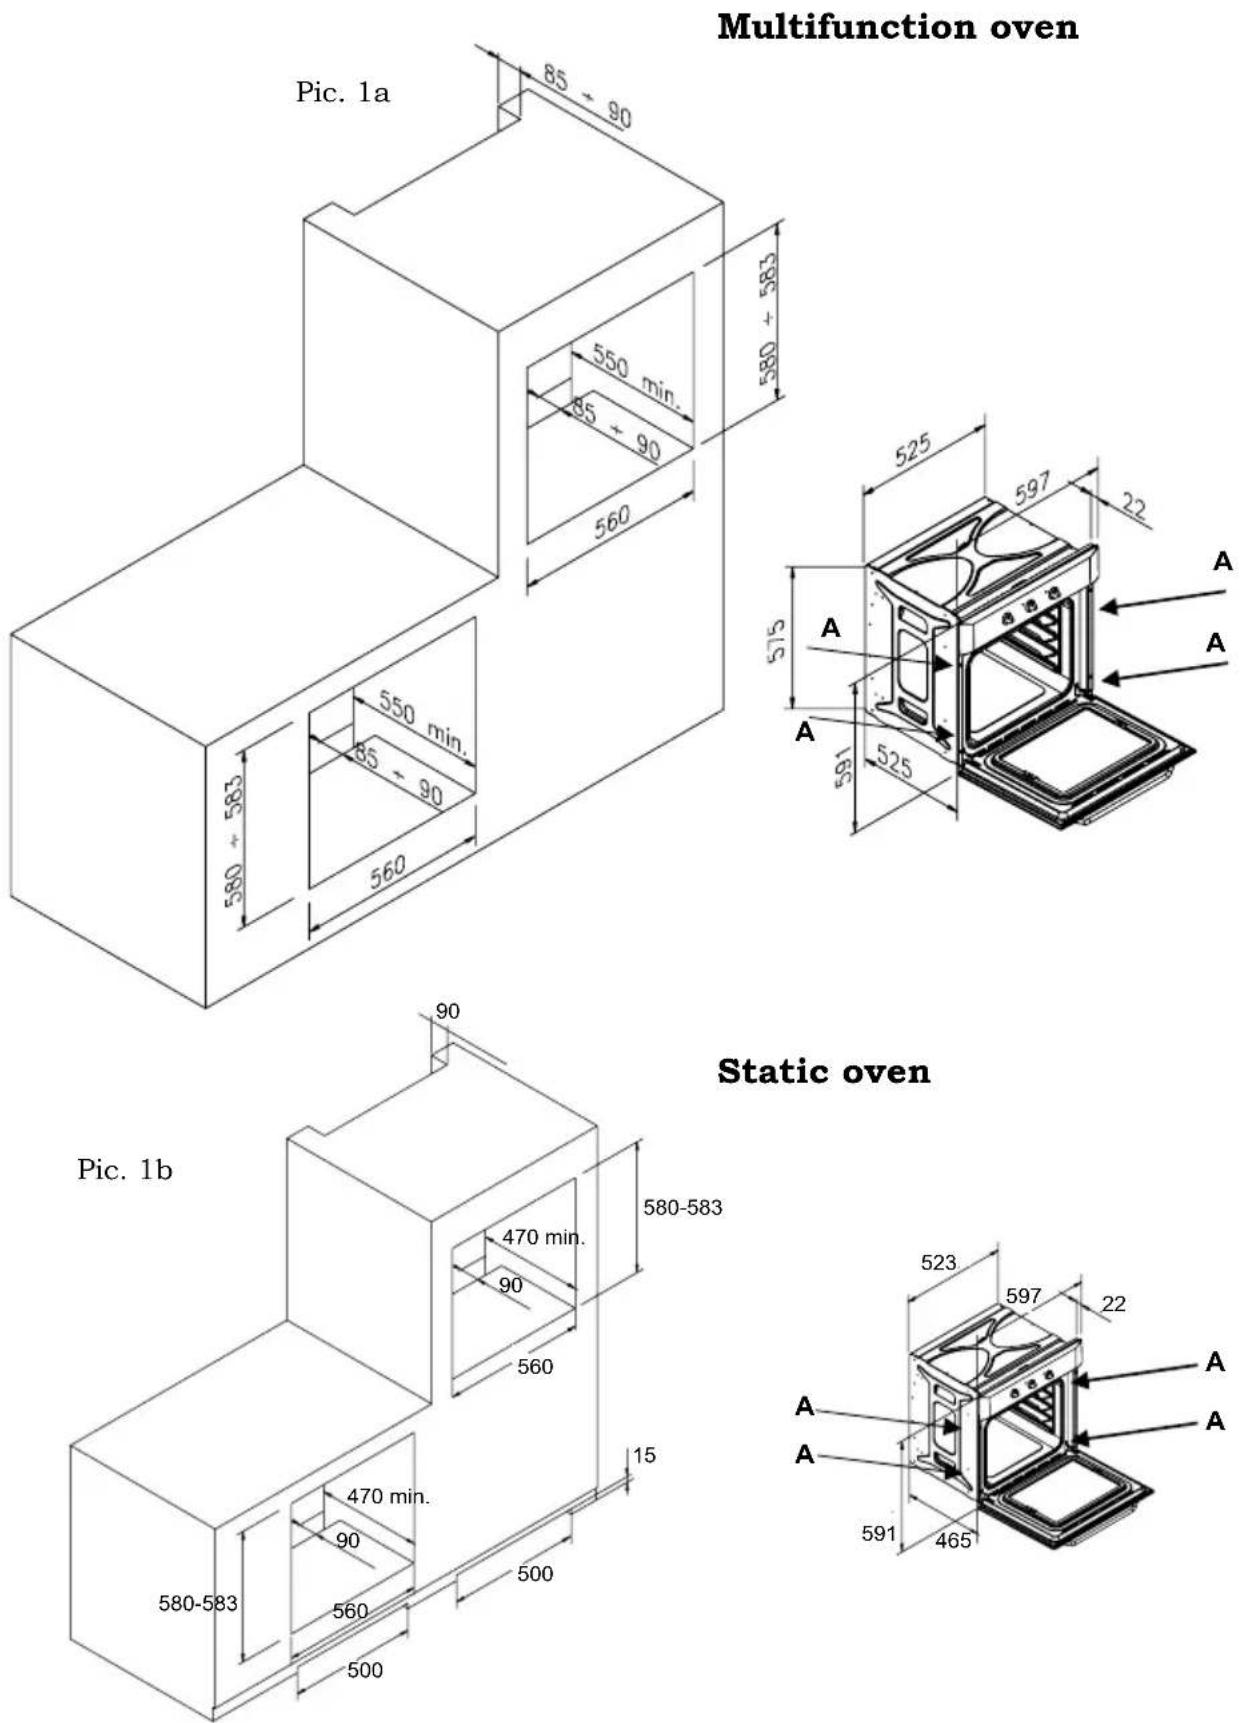
Pics. 1c-1d :
Installation scheme for the oven with reversible door
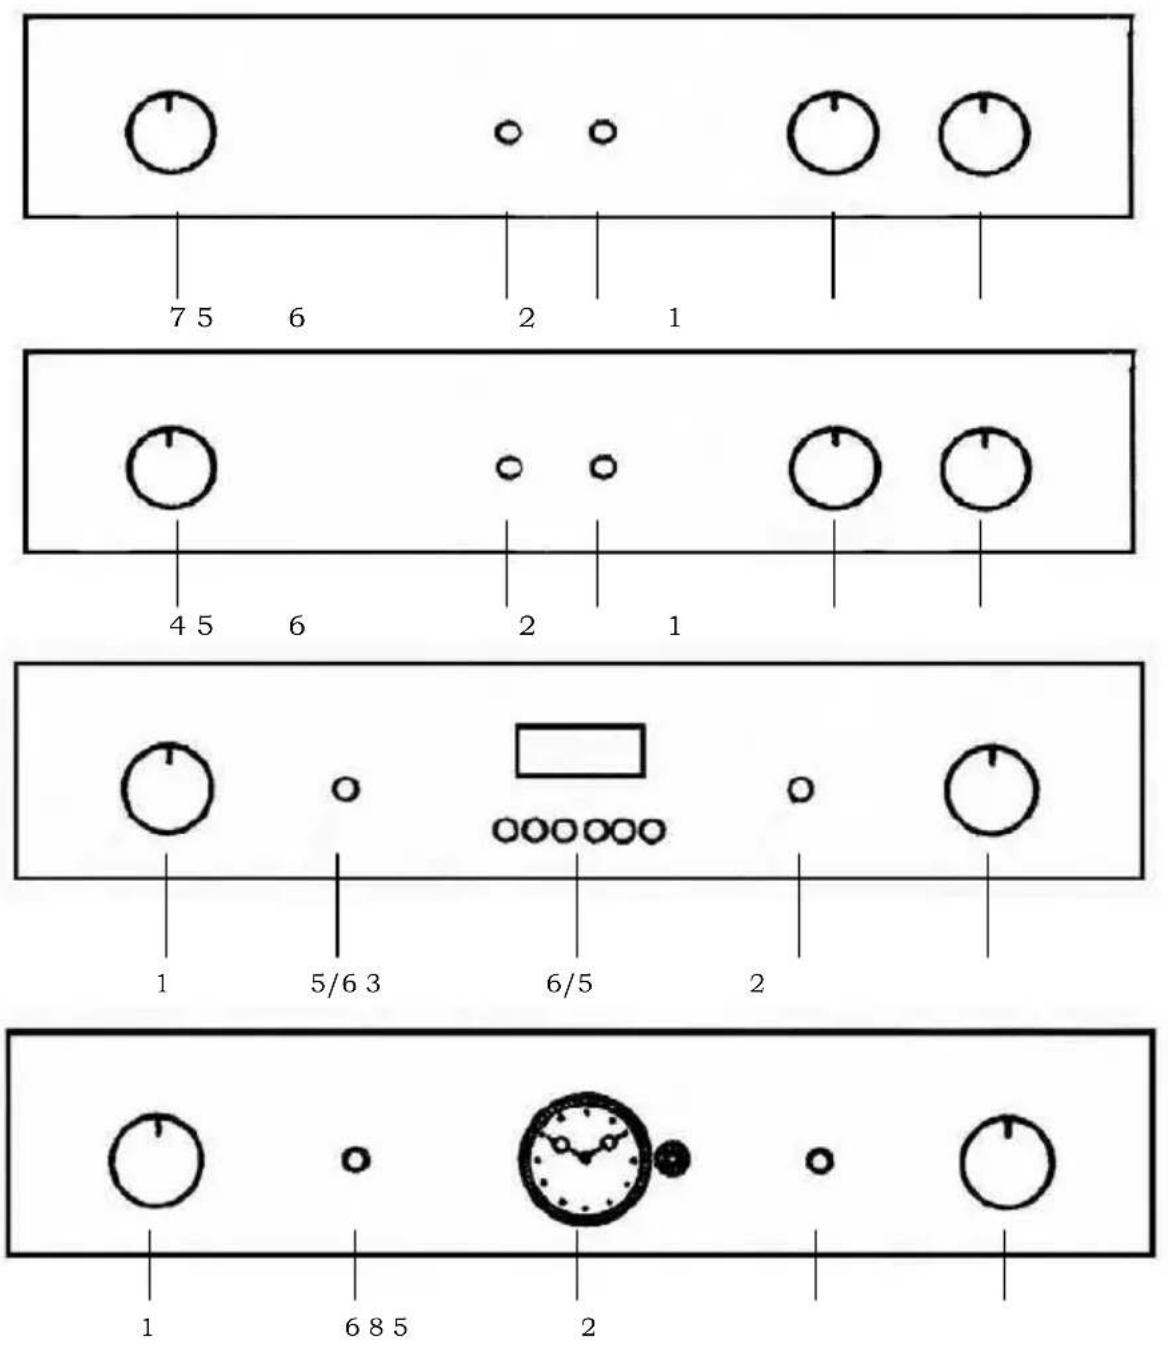
Control panel
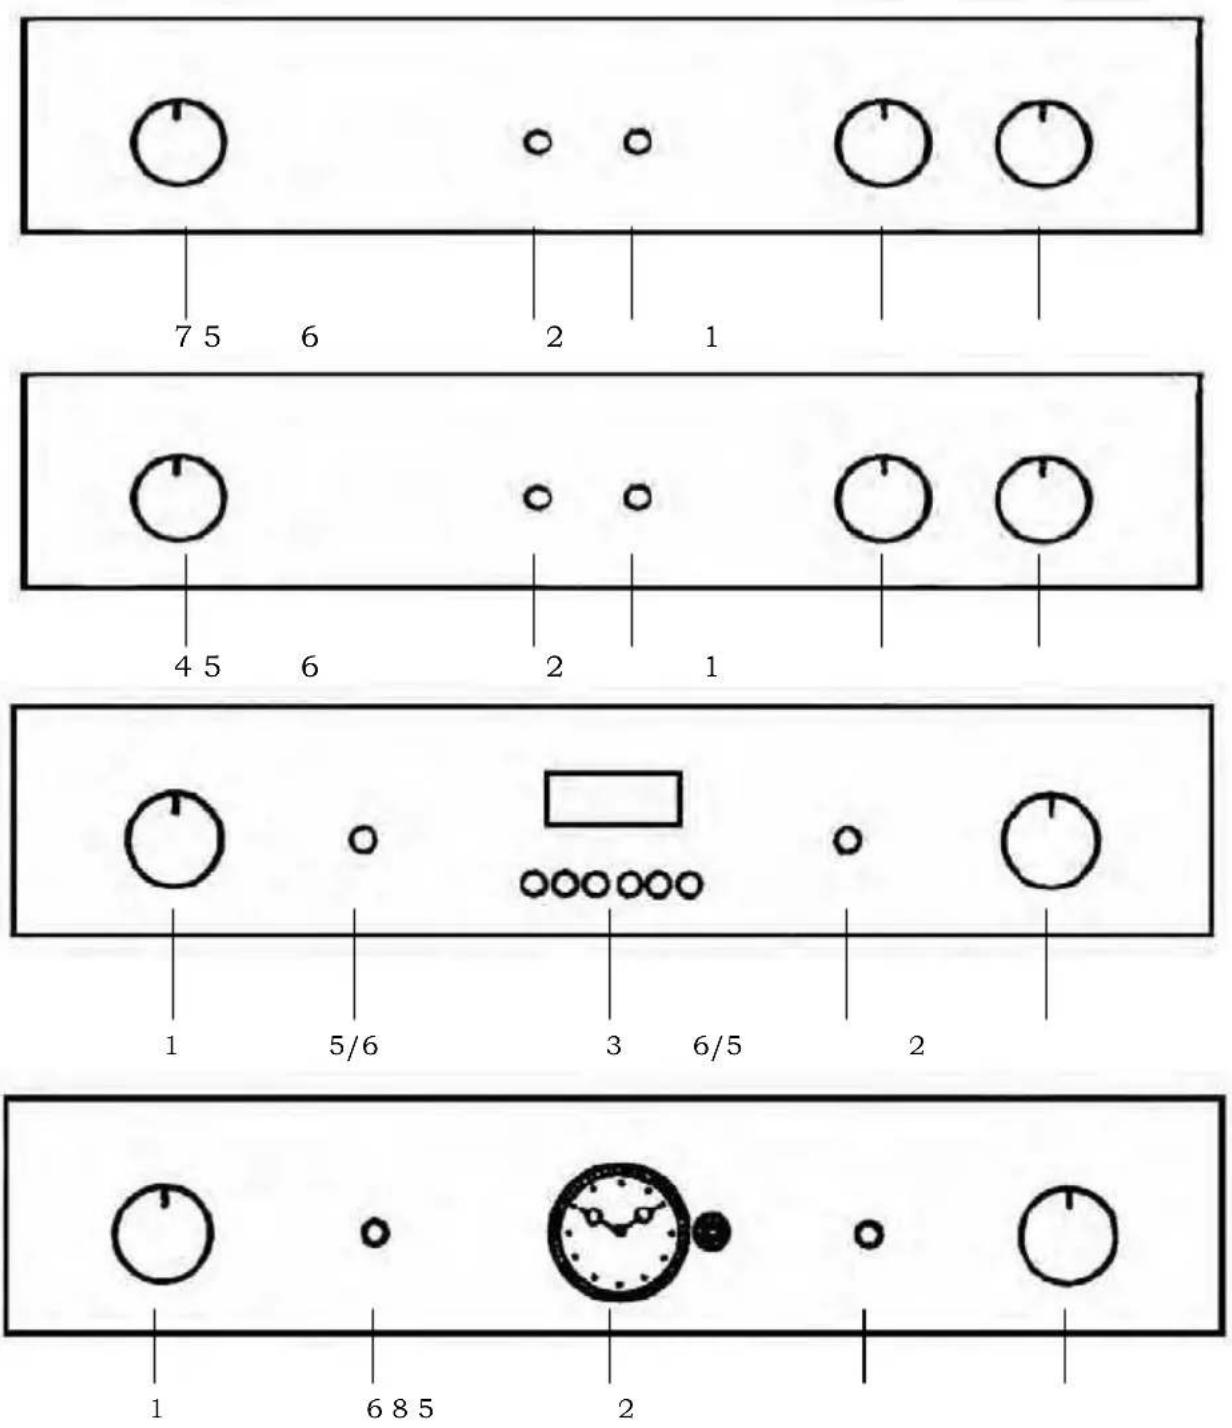
- Thermostat
- Selector
- Electronic timer
-
End of cooking
-
Green light
- Yellow light
- Minute minder
- Analog programmer and Analog timer
Selector functions:
DEFROSTING
The oven and the green light will stay on during this and all the following functions.
The fan motor comes on, but there is no heat. The oven door should be kept in the close position. Recommended use: for defrosting frozen foods in general, this will help cut down the defrosting time by about on third of the normal time.
TRADITIONAL OVEN COOKING
By turning the thermostat knob, a desired temperature of 50^ C to 250^ C can be selected. The yellow light will go off when the oven has reached the desired temperature. It is recommended that the oven is pre-heated before introducing the food.
MULTIFUNCTION
The fan and the circular element come on. The heat is diffused by the fan to give an even temperature in the oven by adjusting the thermostat, a desired temperature of 50^ C to 250^ C can be obtained.
It is necessary to pre-heat the oven before introducing the food.
CENTRAL GRILL ELEMENT
By turning the thermostat knob, a desired temperature of 50^ C to 250^ C can be selected, keeping the door closed.
Recommended use: for grilling smaller items of food.
DOUBLE GRILL ELEMENT
By turning the thermostat knob, a desired temperature of 50^ C to 250^ C can be selected, keeping the door half-open or closed. In the latter case the use of the grill deflector is not necessary.
Recommended use: for grilling larger area of food.
SEMI FORCED AIR CONVECTION
The thermostat has to be set at the desired temperature between 50^ C and 250^ C. The fan and the grill element allow a fast and deep cooking for particular food. It is recommended that the oven be pre-heated for a few minutes.
SEMI FORCED AIR CONVECTION WITH LOWER ELEMENT
The thermostat has to be set to the desired temperature.
It is recommended that you have to pre-heat the oven.
Recommended use: for warming or very slow cooking of food.
Selector functions:
TRADITIONAL COOKING + FAN
By turning the thermostat knob, a desired temperature of 50^ C to 250^ C can be selected, keeping the door closed. This cooking mode integrates natural convection and ventilation.
Cooking mode suited to bake bread, pizzas and lasagne.
It is recommended that the oven be pre-heated

LIGHT ONLY
BOTTOM ELEMENT ONLY
Select the desired temperature between 50^ C and 250^ C. Suitable for very slow cooking and warming up of food.
TOP HEATING ELEMENT
Select the thermostat temperature from 50^ C to 250^ C. For keeping cooked food warm or gently reheating.
GRILL + TURNSPIT
By turning the thermostat knob, a desired temperature of 50^ C to 250^ C can be selected, keeping the door closed. When the grill is in use the turnspit automatically is on.
SEMI FORCED AIR CONVECTION WITH LOWER HEATING ELEMENT
The fan will come on with the lower heating element.
The thermostat has to be set to the desired temperature.
It is recommended that you pre-heat the oven.
Recommended use: for warming or very slow cooking of food.

PIZZA FUNCTION
This kind of cooking is ideal for pizza and vegetable dishes.
With this function, lower heating element, circular heating element and fan motor work at the same time.

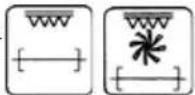
VENTILATED GRILL + TURNSPIT
By turning the thermostat knob, a desired temperature of 50^ C to 250^ C can be selected, keeping the door closed.
When the grill is in use the turnspit automatically is on.
Cooking table
| Type of food | Temp. °C | Insertion* guide | Cooking time in minutes | |
| Cake in mould with beaten mixture | Suggested | Personal | ||
| Panettone or focaccia | 175 2 55 - 65 | |||
| Focaccia | 175 3 60 - 70 | |||
| Cake | 175 3 60 - 70 | |||
| Pie in mould (short pastry) | ||||
| Pie base | 200 3 8 - 10 | |||
| Pie base with ricotta cheese | 200 3 25 - 35 | |||
| Pie base with fruit | 200 3 25 - 35 | |||
| Cake in mould with raised mixture | ||||
| Pie base | 180 3 30 - 45 | |||
| White bread (2,2 lb of flour) | 200 3 25 - 35 | |||
| Small pastries | ||||
| Puff pastry | 200 3 10 - 15 | |||
| Choux pastry | 200 2 35 - 45 | |||
| Biscuit pastry | 200 3 15 - 20 | |||
| Lasagne | 225 2 40 - 50 | |||
| Meat (cooking time per cm. of thickness) | ||||
| Slowly cooked roast (ex. roast veal) | 200 2 120 - 150 | |||
| Fast cooked roast (ex. roast beef) | 200 2 60 - 90 | |||
| Meatloaf | 200 2 30 - 40 | |||
| Poultry | ||||
| Duck 3,3 lb | 200 2 120 - 180 | |||
| Goose 6,6 lb | 200 2 150 - 210 | |||
| Roast chicken | 200 2 60 - 90 | |||
| Turkey 11 lb | 175 2 about 240 | |||
| Game | ||||
| Hare | 200 2 60 - 90 | |||
| Leg of roe | 200 2 90 - 150 | |||
| Leg of deer | 175 2 90 - 180 | |||
| Vegetable | ||||
| Baked potatoes | 220 2 30 - 40 | |||
| Vegetable pudding | 200 2 40 - 50 | |||
| Fish | ||||
| Trout | 200 2 40 - 50 | |||
| Grey mullet | 200 2 40 - 50 | |||
| Pizza | 240 3 10 - 20 | |||
| Grill | ||||
| Pork chops | 4 | 8 | - | |
| Sausages | 4 10 - 12 | |||
| Grilled chicken | 2 | 25 - 35 | ||
| Roas t veal on spit (1,3 lb) | 50 - 60 | |||
| Chicken on spit | 60 - 70 | |||
| * The guide number refers to the lowest level (excluding the bottom, since it is not possible to insert the drip-pan) | ||||
| THE GIVEN ABOVE DATA ARE INDICATIVE BECAUSE THE COOKING TYPE A ND TIME VARIES WITH THE FOOD QUANTITY AND QUALITY | ||||
1
How to use the grill
Lay the food in the wire shelf or, in a tray in case of small pieces.
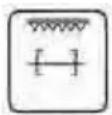
The rack must be positioned in the highest runner possible and the grease drip pan in the runner below. Close the door and turn on the element as follows:
A. Static oven: adjust selector on position

B. Fan oven: adjust selector on position

C. Multifunction-Fan oven : adjust selector on position
D. Multifunction oven: adjust selector on position , ,
Each kind of food (fish, poultry etc.) has to be turned over to permit the grilling on both sides.
Under are few cooking suggestions:
| Dishes for grilling | Cooking time in minutes | ||
| Top side Under side | |||
| Slices of thin meat | 6 | 4 | |
| Slices of meat of medium thickness | 8 | 5 | |
| Slices of thin descaled fish | 10 | 8 | |
| Fish (e.g. trout ,salmon) | 15 12 | ||
| Sausages | 12 10 | ||
| Toast | 5 | 2 | |
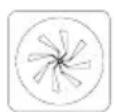
How to use the rotisserie (where available)
- Pic. 2
It is possible, to use the rotisserie and the grill together.
Meat has to be inserted onto the skewers and blocked by the two clamps.
Proceed now as follows:
A) Fit the tip of the spit in the hollow shaft of the motor on the back of the oven.
B) Rest the support in the spit groove.
C) Unscrew and remove the handgrip.
D) Fit the drip pan in the lowest runner.
E) Set the selector to the position to operate the motor.
F) At the end of cooking, tighten the spit handgrip and take it out of the oven. (See Fig. 2).
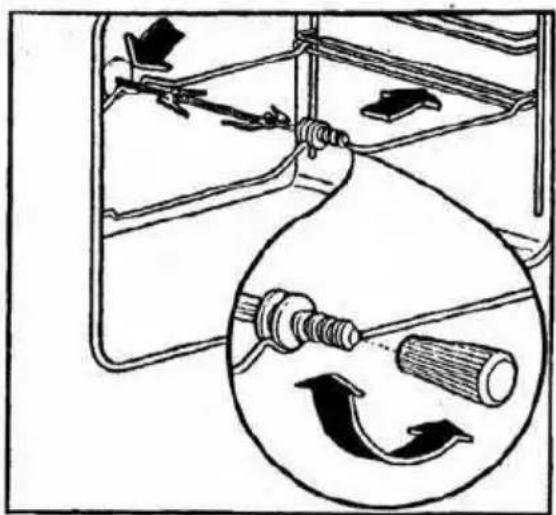
natural_image
Diagram showing a mechanical device with internal components and a magnified circular view of a rotating tool (no text or symbols)Pic. 2
Programming your oven with mechanical60 minutes timer - Pic. 3
The regulating knob (pic. 3) must be turned in a clockwise direction until it reaches the 60 minutes position and then turned to the desired time by turning the knob in a counter clockwise direction.
The oven will not be turned off automatically. A minute counter ringing will advise that the cooking time is over.

Pic. 3
Programming your oven with electrical 120minutes cut-off timer - Pic. 4
The function of the programming timer is to turn on the oven for a pre-determined amount of time.
1. OPERATING
After having set the oven switch knob at the desired temperature, turn the timer knob in a clockwise direction to the desired cooking time (maximum 120 minutes).
When the timer will return to position "O", a minute counter ringing will advise that the oven will automatically turn off.
2. MANUAL POSITION
If the cooking time is longer than the 2 hours programme, or if you wish to use the oven manually, to turn it off when you desire, turn the knob to position 🏠 (Pic. 4).
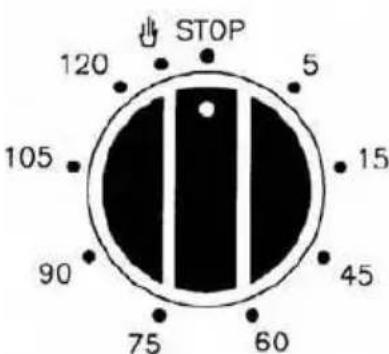
Pic. 4
Analog programmer - Pic. 5
Regulate time by pressing and turning the knob "A" anti-clockwise.
Select the beginning of cooking time by pulling and turning the knob "A" anti-clockwise until the index "B" coincides with the desired time of cooking beginning.
Select the end of cooking time by turning the knob "A" anti-clockwise until the desired time (max 180') coincides with the fixed index (corresponding to XII).
At the end of cooking the oven automatically stops and a bell sounds until the knob "A" is turned to the symbol ☒.
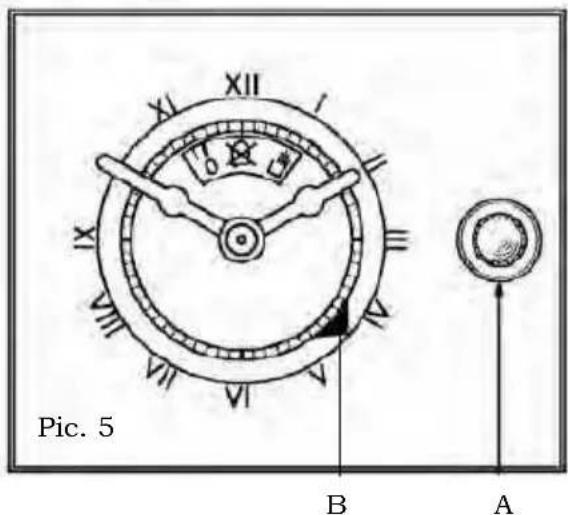
If you want to use the oven excluding the programmer (manual running) turn the know "A" until the symbol ⇧ coincides with the fixed index.
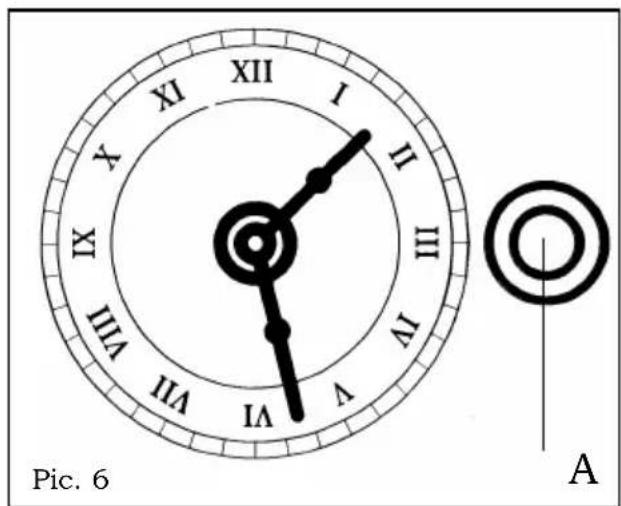
Analog timer - Pic. 6
Setting the clock: to set the clock, press and turn the knob "A" in a clockwise or anticlockwise direction.
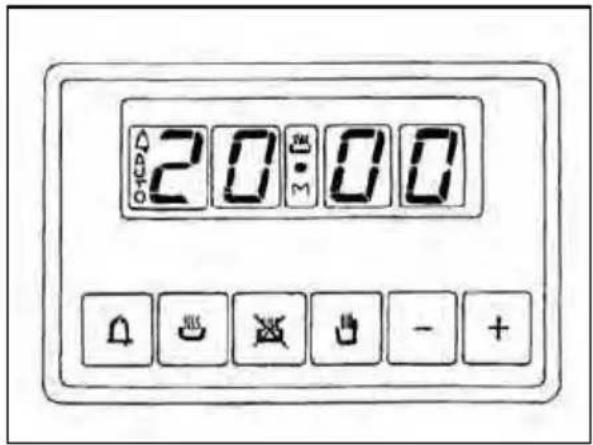
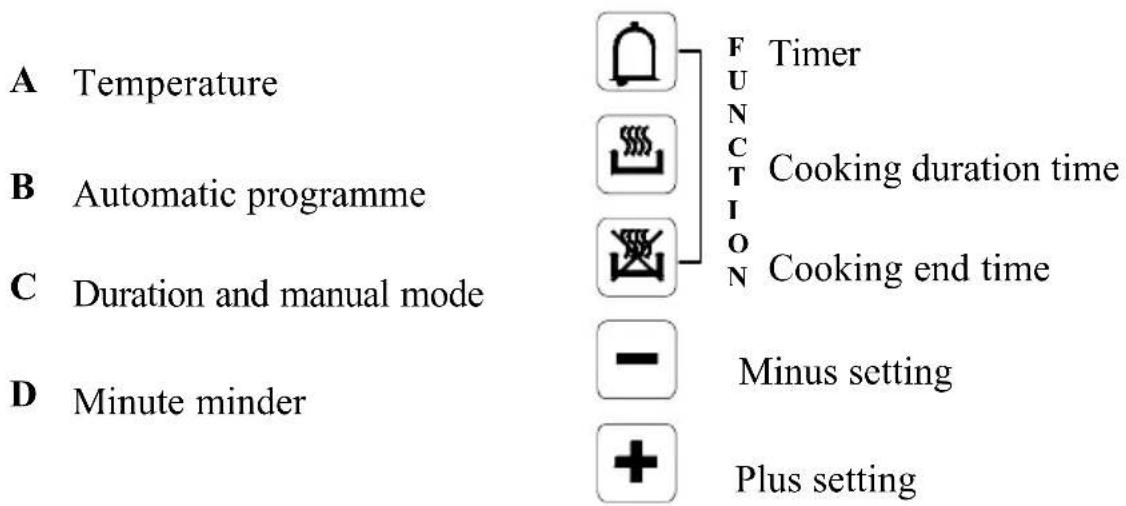
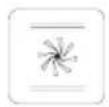
Electronic programmer - Pic. 7
The electronic programmer is a device which groups together the following functions:
- 24 hours clock with illuminated display
- Timer (up to 23 hours and 59 min.)
- Program for automatic beginning and end of cooking
- Program for semi-automatic cooking (either start or finish only).
Description of buttons

"TIMER"

"COOKING TIME "

"END OF COOKING TIME"

"MANUAL POSITION "

"ADVANCEMENT OF THE NUMBERS OF ALL PROGRAMS"

" TURNING BACK OF THE NUMBERS OF ALL PROGRAMS "
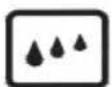
Description of lighted symbols
« AUTO » - (flashing) - Programmer in automatic position but not programmed.
« AUTO » - (always lighted) - Programmer in automatic position with inserted program.

Automatic cooking taking place

Timer in operation

and « AUTO » (both flashing) - Program Error.
No lighted symbol except clock numbers: programmer on manual set.
Pic. 7
Digital clock
Clock numbers show hours (0-24) and minutes.
Upon immediate hooking up of the oven or after a blackout, three zeros will flash on the programmer panel.
To set the hour it is necessary to push simultaneously the 🎨 + 🎨 buttons and AT THE SAME TIME to push the [+] button or [-] until you have set the exact hour. The regulation speed depends on the pressure exercised on the [+] [-] buttons.
Manual cooking without using the programmer
To use manually the oven, that is, without the auxiliary programmer, it is necessary to cancel the flashing «AUTO» by pushing the ⏻ button.
If «AUTO» is always flashing (it means a cooking program is still memorized) it is necessary to cancel the inserted cooking program by pushing the ⏻ button until setting the clock on zero.
Automatic cooking (start and end)
1) Set the length of cooking time by pushing the 📄 button.
2) Set the end of cooking time by pushing the 📄 button.
3) Set temperature and cooking program by using the thermostat knob and the selector knob.
After this setting the symbol «AUTO» will flash, this means the oven has been programmed.
An example: cooking lasts 45 minutes and is expected to stop at 14.00.
- Push 📄 until having set 0.45.
- Push 📄 until having set 14.00.
After having finished the setting, the clock hour will appear on the panel and «AUTO» symbol will flash permanently. This means the cooking program has been memorized.
At 13.15 h. (14.00 h. minus 45 minutes) the oven turns on automatically.
During cooking time the 📄 button and «AUTO» are flashing.
At 14.00 h. the oven turns off automatically, a buzzer goes on until it is stopped by pushing the 🔒 button.
Semi-automatic cooking
A. Set the length of cooking time
B. Set the end of cooking time
A) Set the length of cooking time by pushing the 📄 button. The oven will turn on immediately.
«AUTO» and the 📄 symbols will light. When the set cooking time has elapsed, the oven will turn off, a buzzer will ring until it is stopped as above described.
B) Set the end of cooking time by pushing the 📄 button. The oven will turn on immediately. «AUTO» and 📄 will light.
At the set time, the oven will turn off and a buzzer will ring until it is stopped as above described.
The cooking program may be seen at any moment by pushing the corresponding button.
The cooking program may be cancelled at any moment by pushing the 🎨 until zero appears on the display. Then by pushing the 🔊 button the oven can work manually.
Timer = buzzer
The timer program consists only of a buzzer which may be set for a maximum period of 23 hours and 59 min.
To set the timer, push the button and, at the same time, [ + ] or [ - ] until you read the desired time on the display.
After the setting, the clock hour and the symbol will appear.

The countdown will start immediately and may be seen at any moment on the display by simply pressing the 🔒 button.
At the end of the set time, the symbol will turn off and the buzzer will ring until it is stopped by pressing the button.
ATTENTION! An energy blackout makes the clock go to zero and cancels the set programs.
After a blackout three zeros will flash on the panel and cooking can be programmed once again.
You can also adjust the sound level of the audio signal by pressing the symbol " - " : the audio signal can be adjusted to 3 different levels.
This operation must be performed after the time setting.
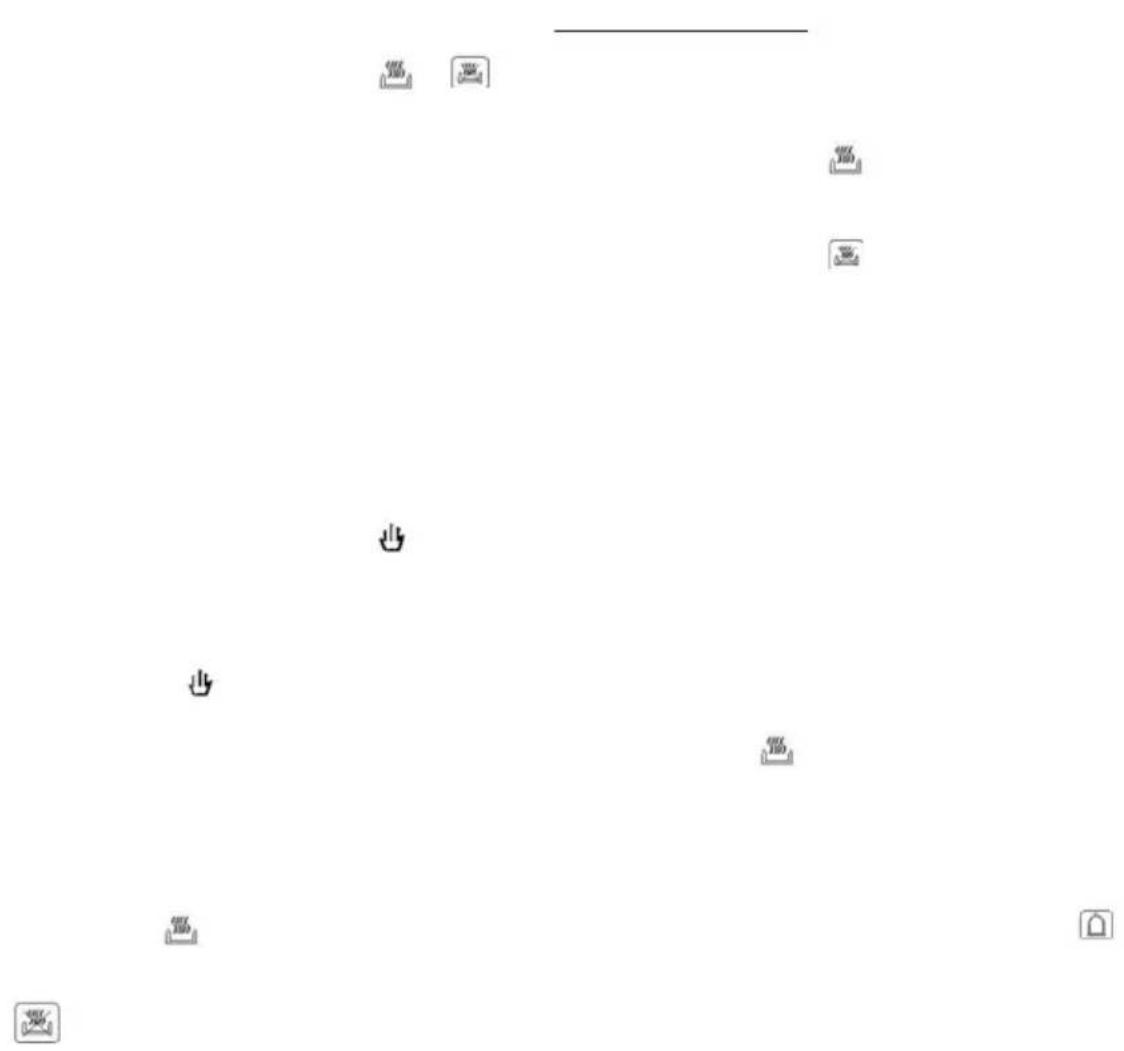
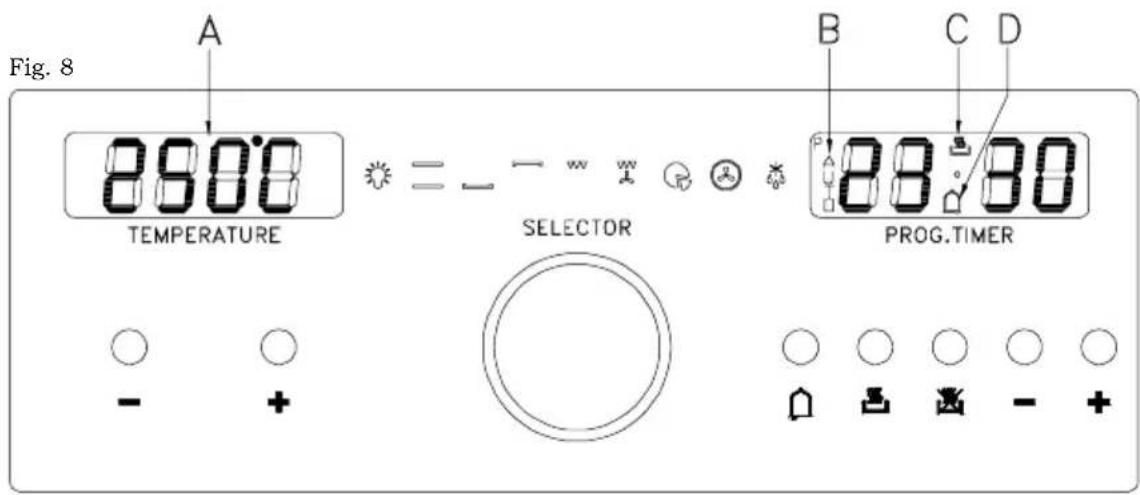
USING THE ELECTRONIC PROGRAMMER (pic. 8)

Pic. 8
Setting the clock
Switch the oven on; 00.00 will appear in blinking mode on the display. the display. To set the clock, simultaneously press the duration and end of cooking keys together. Using the +/- keys on the right, select the time of day required. With the key “+” the time increases, with the key “-” the time decreases at a speed directly proportional to the duration of the pressure exerted on the key. When the time is stored, the point between the hours and the minutes will stop blinking approximately 7 seconds after the last operation. To update the time, repeat the operation.
Manual operation
Press duration ⚡ and end time button ⚡ together. If an automatic program is on the “AUTO” symbol (B) will be erased, the pot symbol (C) is illuminated. Any programme which has been previously set is cancelled.
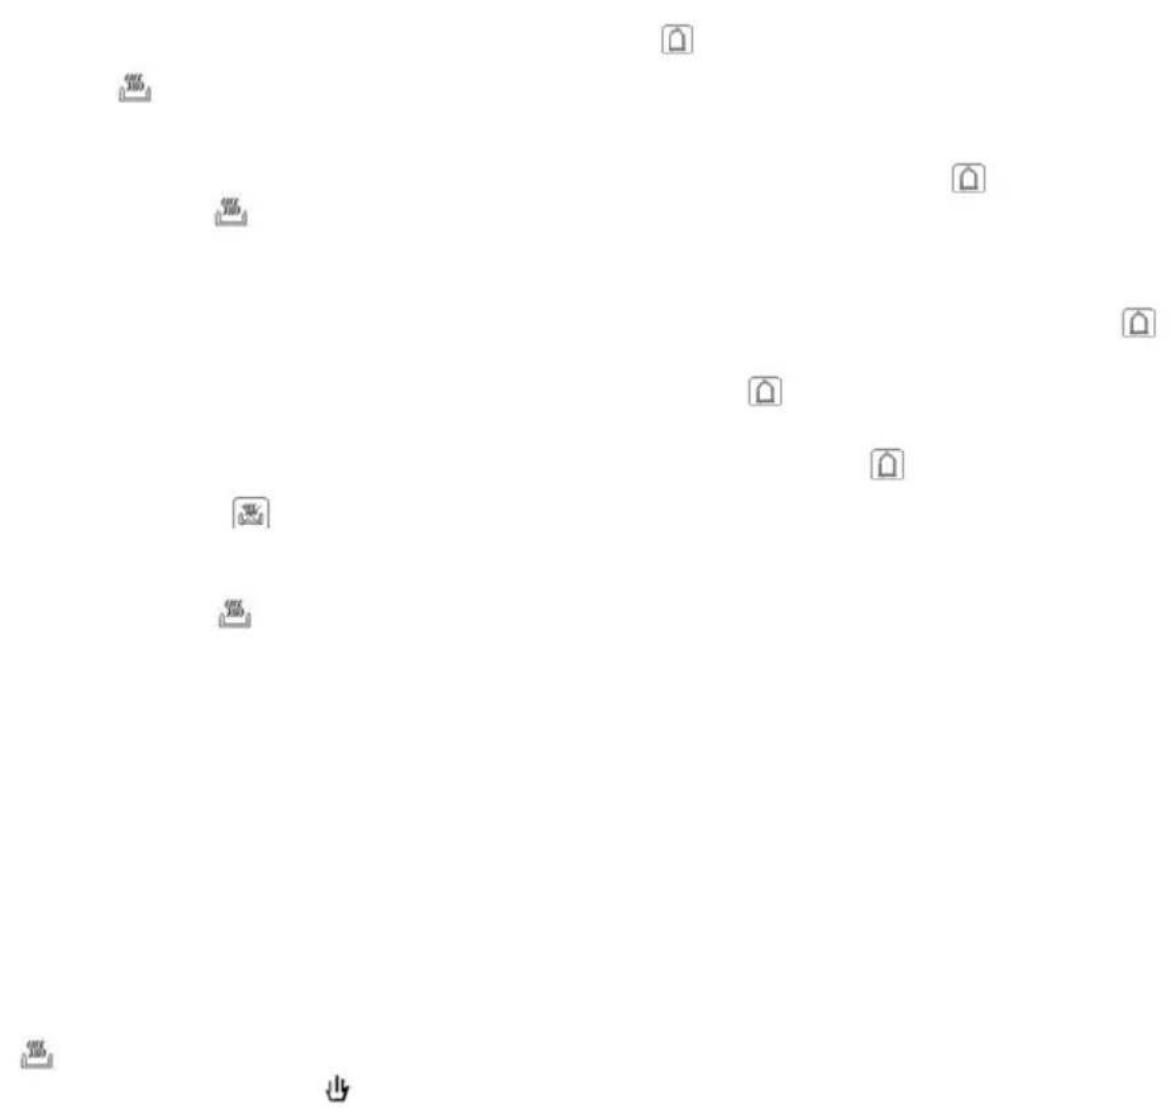
Semiautomatic operation with cooking duration
Select cooking duration function and set required duration with the +/- keys on the right. “AUTO” (B) and cookpot (C) symbols appear. If time of day = cooking end time the relay output and the cookpot symbol (C) are switched off. The audible signal sounds.
The symbol “AUTO” (B) blinks. The cooking will be finished.
Semiautomatic operation with cooking end time
Select cooking end time function and set required end time using the +/- keys on the right. The “AUTO” (B) and cookpot (C) symbols appear. Turn the switch knob and the thermostat knob to the cooking function and to the desired temperature.
If time of day = cooking end time the oven doesn't heat any longer and the cookpot symbol (C) are switched off. The audible signal sounds and "AUTO" (B) blinks.
Fully automatic operation
1) Set the length of cooking time by pushing the button and the +/- keys on the right.
2) Set the end of cooking time by pushing the [icon] button and the +/- keys on the right.
3) Set temperature and cooking program by using the thermostat knob and the selector knob.
After this setting the symbol “AUTO” (B) will appear, this means the oven has been programmed. When the time in the display is the same of the cooking start time the cookpot symbol (C) will appear and the oven will start to work.
Cooking Start Time= Cooking End Time - Cooking Duration Time An example: cooking lasts 45 minutes and is expected to stop at 14.00.
- Push and “+” key on the right until having set 0.45.
- Push and “+” key on the right until having set 14.00.
After having finished the setting, the clock hour will appear on the panel and “AUTO” symbol (B) will flash permanently. This means the cooking program has been memorized.
At 13.15 h. (14.00 h. minus 45 minutes) the oven turns on automatically. During cooking time the cookpot button (C) and "AUTO" (B) switch on.
At 14.00 h. the oven turns off automatically, “AUTO” (B) flashes. The cookpot button (C) switches off and a buzzer goes on until it is stopped.
Minute counter
Select the minute counter function 📄. The fixed time is set at 5 min.; to change it, press the keys +/- on the right. When the point between the hours and minutes and the symbol begin to blink, it means that the countdown has begun. The display shows the hour and the minutes of the countdown; by pressing the symbol 📄 you can choose whether to display the countdown or the time.
Audible signal
The audible signal sounds at the end of a minute counter cycle or of a cooking programme for a period of 7 minutes. To turn it off just press any program input key (the first three on the left).
You can also regulate the sound level of the audio signal, selecting a more pleasing level, by pressing the symbol “-” on the right for about 2 seconds when you see the time on the display.
Program start and control
Press the cooking duration key 📁 or the end-of-cooking time key 📁 to know the remaining time period.
Input error signal
When a data input is mistaken the audio signal sounds and the symbol “AUTO” (B) flashes.
Cancelling a program
A program can be cancelled pushing at the same time the button and 📄.
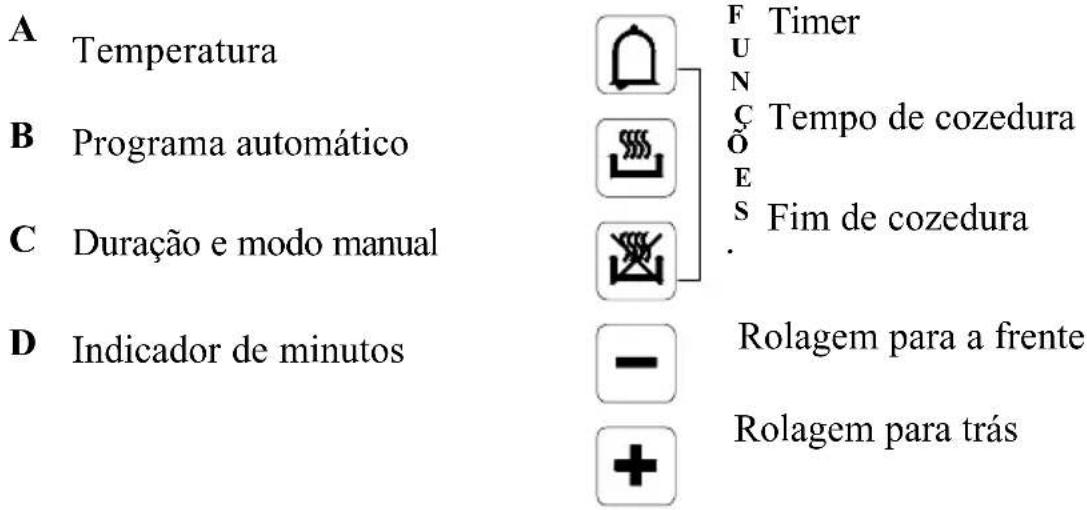
Switch functions
The following functions can be set by turning the switch knob.
The following will be shown on the display:
| Light | |
| 190°C | |
| 50°C | |
| 190°C | |
| 250°C | |
| 165°C | |
| 165°C | |
| 165°C | |
| Defrost |
The temperature shown on the display can be changed via the keys +/- on the left. Increase or decrease is in 5°C steps, from a minimum of 40°C to a maximum of 250°C. The symbol °C will blink until the required temperature is reached.
CONTROL PANEL (pic. 9)

Pic. 9
FUNCTION BUTTONS
▼
Decreases temperature
▲
Increases temperature
ON/OFF
ON/OFF and Controls Lock Function

Minute minder

Cooking time

End time
一
Minus setting
+
Plus setting
◀
Program setting
▶
Program setting
OPERATION
The timer flashes on the display when switched on for the first time or after a power cut, and the oven cannot be operated; follow the "Setting the time" procedure to start it.
SETTING THE TIME
Press buttons and simultaneously and then release them.
Use buttons— and+ to set the exact time.
Note: this operation must be completed in 3 sec. time, while the 2 dots on the timer display keep flashing.
Once you have completed the time setting, wait for the 2 dots stop flashing.
SOUND SIGNAL
The oven performs sound signals to show different functions, as for example the end of cooking.
There are 3 different sound levels, which can be modified:
When the oven is switched off, press the — key, and with each pressure the oven performs the sound to a different level; the last one performed will be automatically set.
SWITCHING ON THE OVEN
Press and release the ON/OFF then you will hear a sound signal.
The timer display will show ON, the bulb symbol lights on and the internal oven light turns on. Now you can proceed to set a cooking function.
MINUTE MINDER
The minute minder is only a counter of time and it is totally independent from any cooking function.
It can be useful, for example, when set to remember to stop a cooking operation.
To set the minute minder, switch on the oven by pressing and releasing the ON/OFF key, then press the △ key:
The display reset to zero and the 2 dots start flashing. Now you have 3 seconds to set the desired time by using the keys — and to 23h59m.
Once the set time has elapsed, you will hear a sound signal and the symbol flashes.
To stop the sound and the flashing symbol just press one of the following keys


MANUAL OPERATION FOR AN INDEFINITE PERIOD OF TIME
Switch on the oven and select an available cooking function using the keys


The oven will suggest a preset temperature, which can be changed by using the keys


start working up to the preset temperature and the centigrade degree symbol ° starts blinking, which means the preheating of the oven.
When the requested temperature is reached this symbol stops blinking and the oven beeps.
To switch off the oven, just press and release the ON/OFF key.
It is recommended to set the duration of cooking.
Switch on the oven, then press and release the key ON/OFF and set the desired time of cooking with the keys and up to 10h and 00m.

On the display the symbol A appears (automatic operation). After that, wait until the timer shows the current hour and then select an available cooking function with the keys ◀ and ▶
The oven suggests a preset temperature for each function, which can be changed with the keys ▼ and ▲.
The oven starts working for the set time; when this time has elapsed the oven automatically stops cooking. you will hear a sound signal, while the temperature display and the cooking function display turn off, the timer display shows the current hour and the symbols 🎨 and A blink.
To stop the sound and exit to the program, just press one of the following keys


Now the oven is ready to be programmed again; you can select a new cooking function or switch the oven off by pressing and releasing the key ON/OFF

It is recommended to set the end of cooking time.
Switch on the oven, then press and release the key and set the end of cooking time with the and keys, + within the next 23h59m. Once you have done this, wait until the timer shows the current hour.
Then select an available cooking function with the ◀ and ▶ keys.
The oven will suggest a preset temperature, which can be changed by using the ▼ and leys.
The oven starts cooking and when fixed time has elapsed, it will automatically turn off.
At the end of the fixed cooking time, the oven beeps, the temperature display and the cooking function display turn off, the timer display shows the current hour and the 2 symbols and A blink.
To stop the oven beep or to cancel the program just push one of the following keys


Now the oven is ready to be programmed again; you can select a new cooking function or switch the oven off by pressing and releasing the key ON/OFF.

AUTOMATIC OPERATION
It is recommended to set the duration and the end of cooking
Switch on the oven, then press and release the ☐ key and set the duration of cooking with the — and + keys. Wait until the 2 dots on the timer display stop flashing and the timer shows the current hour. Then press the STOP key and set the end of cooking with the — and + key.
Wait again for the 2 dots stop blinking and select an available cooking function.
The oven will suggest a preset temperature, which can be changed by using the keys ▼ and ▲.
Once the dots have stopped blinking, the oven begins the delayed start mode: it will automatically start for the requested duration and stop at the requested time.
When the oven is cooking, you see the selected temperature, the current hour and the selected function on the corresponding displays. The internal oven light turns off.
However, both the temperature and the function can be changed by repeating the above mentioned instructions.
At the end of the program, the oven beeps, the temperature display and the cooking function display turn off, the timer display shows the current hour and the 2 symbols and A blink.
To stop the oven beep or to cancel the program just push one of the following keys


Now the oven is ready to be programmed again; you can select a new cooking function or switch the oven off by pressing and releasing the key ON/OFF.

AUTOMATIC AND SEMIAUTOMATIC COOKING RESTRICTIONS
The preheating (PRH) and defrosting functions are not compatible with the above mentioned automatic and semiautomatic operation.
-After setting the preheating or the defrosting function, it is not possible to set either the duration or the end of cooking.
-When programming the oven with the automatic operation, you cannot choose the preheating or the defrosting function.
DISPLAY SYMBOLS

Pot: when it lights up, it shows that a cooking function is on.
The pot does not light up when the oven light, preheating or defrosting function is activated.
When the pot is flashing, it shows the end of a cooking time. During the delayed start phase, the symbol is off and lights up when the oven starts cooking.
A (automatic): when it lights up, it shows that a cooking time has been set; when flashing, it means the end of a cooking program.

Bell: when it lights up, it means that the minute minder is on.
When flashing, it means the end of the minute count.
SELECTING THE COOKING TEMPERATURE
With the oven switched on, the cooking temperature can be selected by using the ▼ and ▲
keys : the temperatures increases between the low and high setting with 5 degrees increases, which are shown on the temperature display.
Note: each cooking function has a preset temperature, which can be changed as described above.
SELECTING THE COOKING FUNCTION
With the oven switched on, the cooking functions can be selected by using the ◀ and ▶ keys: the cooking function icons sequentially light up.
COOKING FUNCTIONS

OVEN LIGHT
The internal oven light turns on by pressing and releasing the key. To turn it off press and release again the same key.
When selecting a cooking function, the oven light turns on, and once the selected temperature is achieved, the light remains on for another 3 minutes.
During a cooking operation or defrosting it is possible to turn on the oven light by pressing one of the following
keys


The light remains on for 1 minute.
The light can also be turned on when the Controls Lock function is active by pressing
one of the following keys


PRH PREHEATING
This function allows to preheat faster the oven, before choosing a cooking function.
When this function is operating, a moving symbol appears on the temperature display.
The preheating ends when its preset temperature is achieved by the oven; this temperature cannot be changed. At this point, the oven beeps, the light symbol and the oven light turn on. Now you can choose an available cooking function with the ◀ and ▶eys.

TRADITIONAL COOKING

This provides traditional cooking with heat from the top and bottom elements.

LOWER ELEMENT MODE
This is for slow cooking or for warming up meals.

TOP ELEMENT MODE
This is for gentle cooking, browning or keeping cooked dishes warm.

GRILL HEATING ELEMENT
It is suggested for grilling food.

GRILL HEATING ELEMENT WITH FAN
This function is suggested for a gently grilling of food.

PIZZA FUNCTION
This kind of cooking is ideal for pizza and vegetable dishes.

FAN OVEN MODE
This provides even heating with the fan and allows different dishes to be cooked at the same time on different levels.

DEFROST MODE
This function allows to reduce the defrost time for frozen food.
The fan runs without any heating of the oven.
On the temperature display appears the message dEF, which means this function is active.
OTHER FUNCTIONS
OVEN OFF MODE
When the oven is switched off, the temperature and program displays are off and the timer shows the current hour.
"CHILDREN CARE" - CONTROLS LOCK FUNCTION
This function can be activated in any moment to prevent children to play with the oven.
In particular, if this function is activated with the oven turned off, it will not be possible to switch the oven on: to operate with the oven it is necessary to remove the lock.
To activate the locking function, hold down the key ON/OFF until the display shows the symbol n=-0 (about 5 sec.) followed by ON, then the display shows again the current hour.
Note: once you have done this operation, it cannot be set any program or cooking function, except for the setting of the minute minder.
If the lock is activated after any program or cooking function, it will only be possible to set the minute minder or switch off the oven by pressing and releasing the ON/OFF key.
By pressing any other key, the = - display
will remember you that the locking function is activated.
The automatic or manual switching off of the oven will not disable the locking function.
To disable the locking function hold down the ON/OFF key until the n-0 display (about 5 sec.) followed by OFF, then the display shows again the current hour.
When the locking function is activated it is not possible to switch it on with the ON/OFF key, but only to switch it off.
When the oven is switched on, the key lets you to switch off the oven whatever function is selected and in any moment. To switch off the oven, just press and release the ONOFF key.
When switching off the oven, any cooking function or program is cancelled. To set a new cooking program, follow the corresponding instructions from the beginning.
When the oven is switched on and the locking function is activated, you can switch off the oven just pressing and releasing the ON/OFF key, but the locking function keeps active.
To disable the lock hold on the ON/OFF key for about 5 seconds until the n = -0 display followed by OFF, then the display will show the current hour.
“○” SYMBOL
This symbol appears on the temperature display and represents the centigrade degrees.
If the symbol is blinking it means the oven is heating up to reach the temperature that has been set.
If the symbol is permanently on it means that the set temperature has been reached.
TIMER RESET
With the oven switched on, it is possible to reset the settings of the timer by pushing together the □ and □ keys.
Attention: the oven keeps switched on with the set function, and in manual operation.
It is possible to set again a cooking program, or also switch off the oven by pressing and releasing the ON/OFF key.
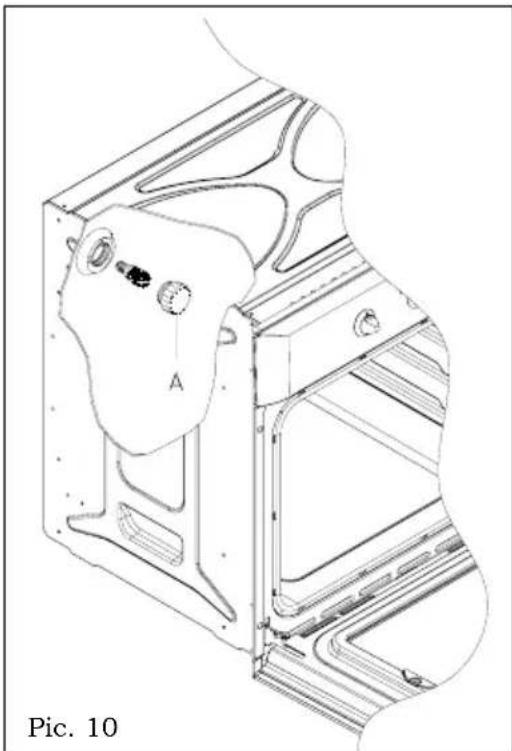
Replacing the oven light - Pic. 10
The oven is equipped with a lamp having the following features:
25W
screw cap E-14
T 300°C
WARNING: disconnect the appliance from the power supply.
If the oven light needs to be replaced, the protective cover «A» must be removed by turning it anticlockwise. After the light has been replace, refit the protective cover «A». (Pic. 10).
natural_image
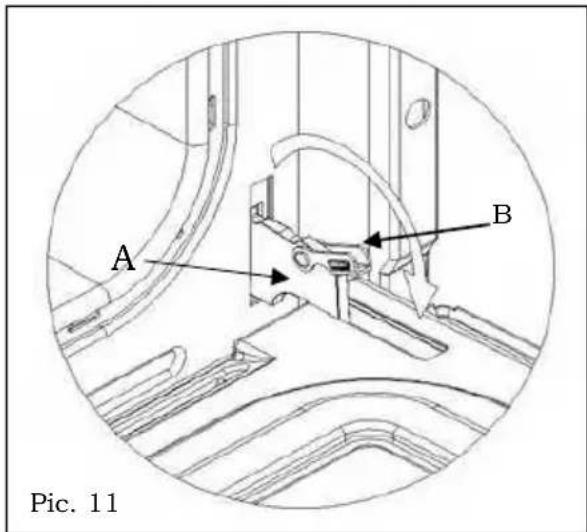
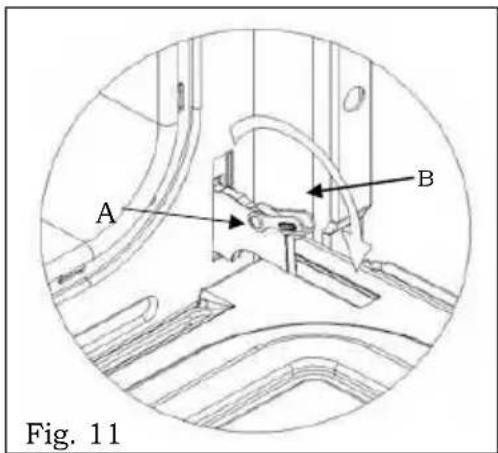
Technical line drawing of a mechanical component with labeled section A, no readable text or symbols presentRemoving the oven door -Pic. 11
To aid cleaning and make access to the oven interior easier, the oven door can be simply removed.
To facilitate cleaning of the oven, the door can be removed via the hinges as follows:
hinges with movable bolt
We recommend to take the handle in the middle when opening the oven door.
With the door open, you can see the 2 hinges A which are provided with 2 movable bolts B. When the bolt B is raised, the hinge is released from its housing.
Having done this, the door must be lifted upwards and removed, sliding it towards the outside;
grip the sides of the door near the hinges when performing these operations.
To refit the door, firstly slide the hinges into their slots.
Before closing the door, remember to rotate the two movable bolts B used to hook the two hinges.
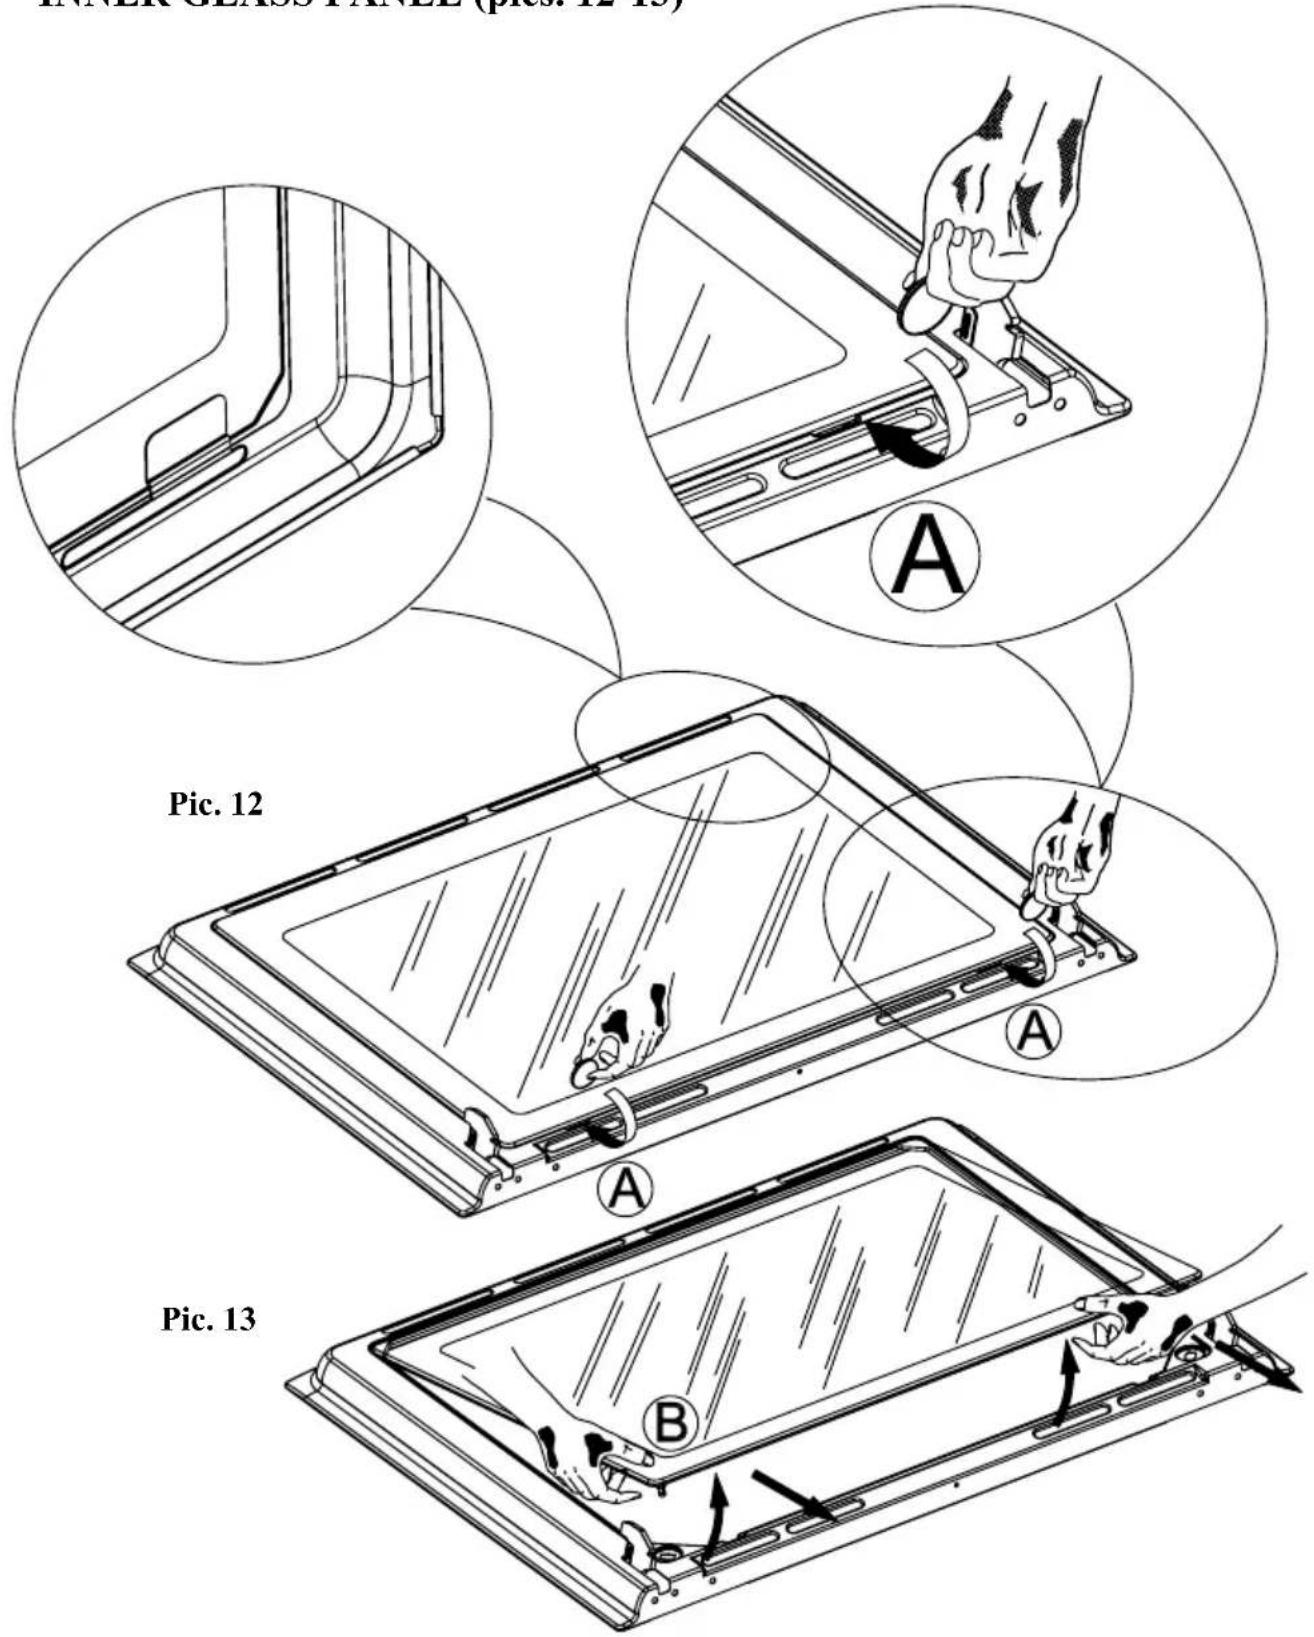
REMOVING THE OVEN DOOR INNER GLASS PANEL (pics. 12-13)
Do not use any abrasive medium that could cause damage.
Remember that if the surface of the glass panel becomes scratched, this could lead to a dangerous failure.
To remove the oven door inner glass panel, use a coin to perform a levering action in the two grooves (A) until the two pins (B) are released from their housing (pic. 12).
Then raise the glass as shown in pic. 13 and take it out from the top.
To refit the door, repeat the two previous operations in reverse.
Reinsert the glass by resting it on the inner door and pushing it in.
Press on the glass until the pins slot back into their initial position (pic. 13).
Care must be taken when cleaning between the door glasses, and inside the inner frame as some of the edges maybe sharp due to the manufacturing process.
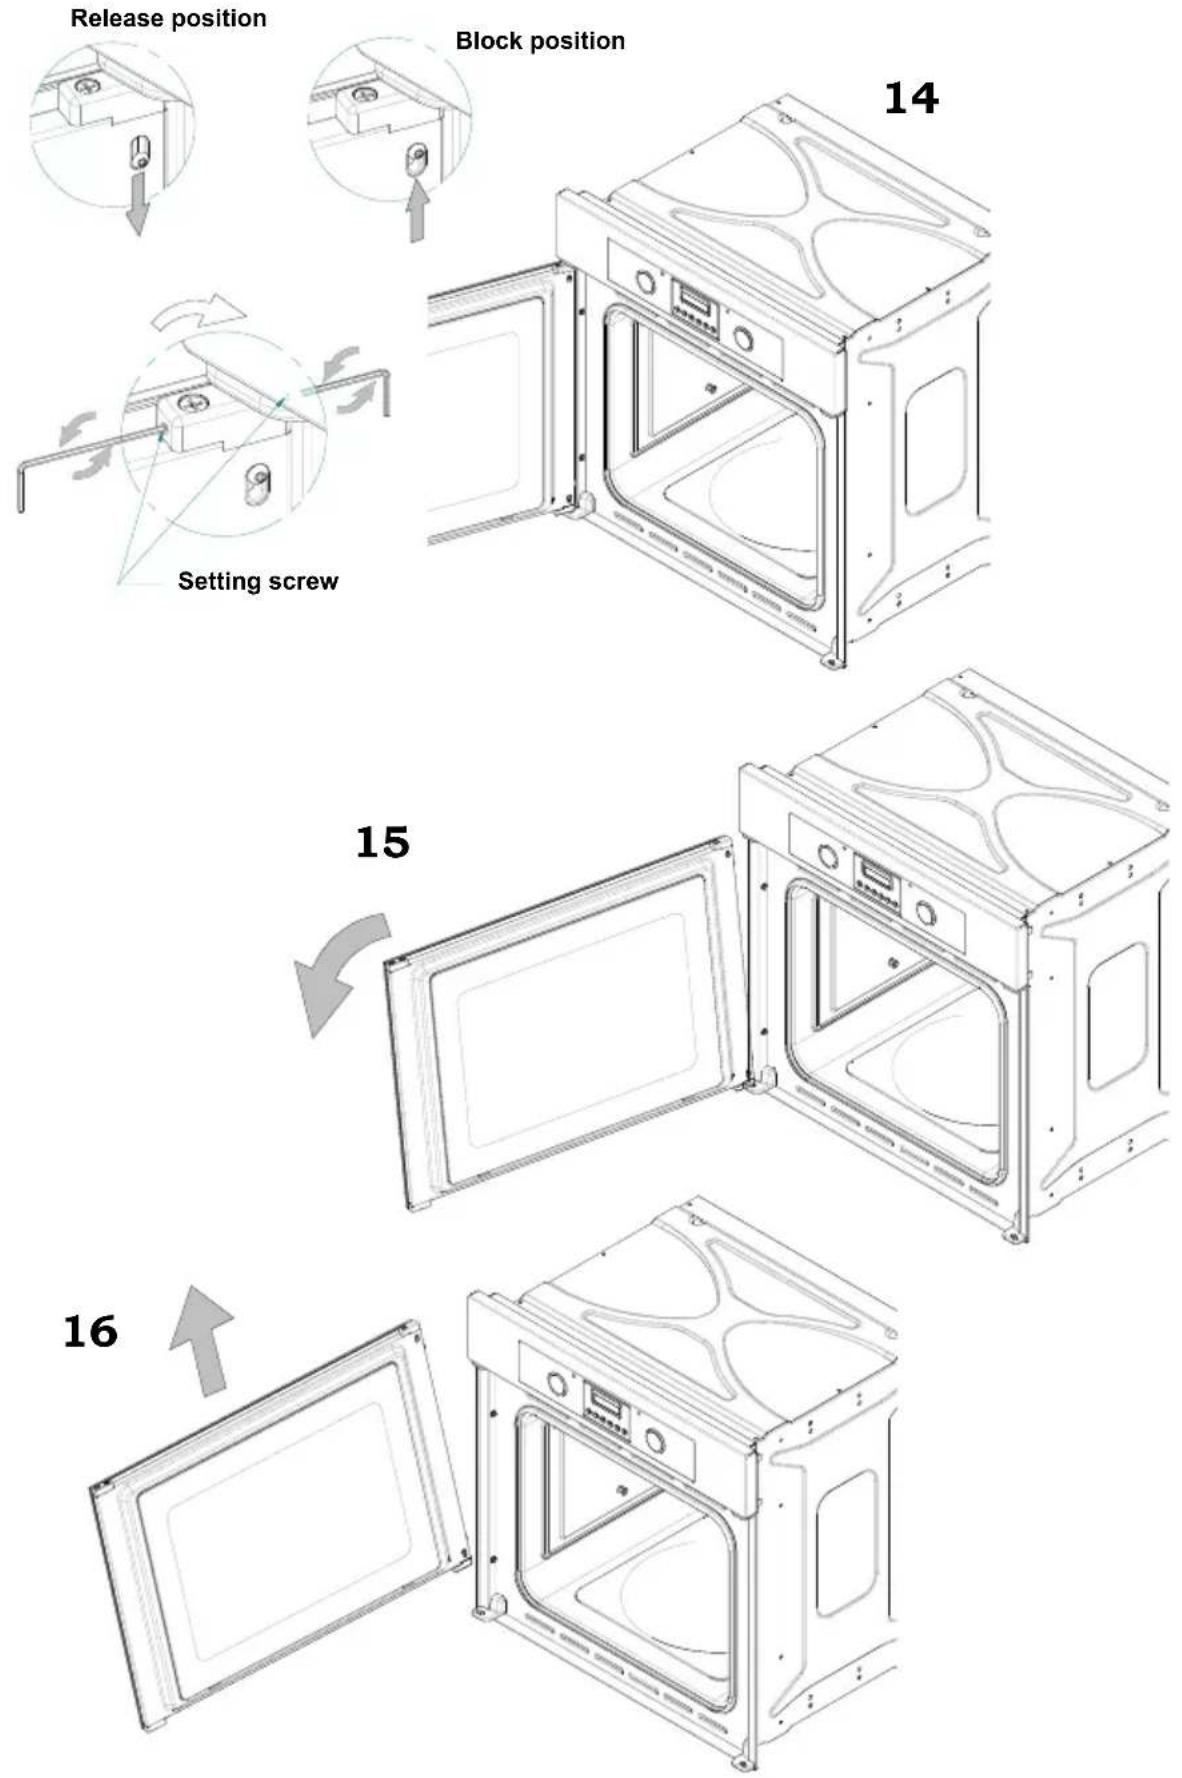
REMOVING THE OVEN DOOR
INNER GLASS PANEL (pics. 12-13)
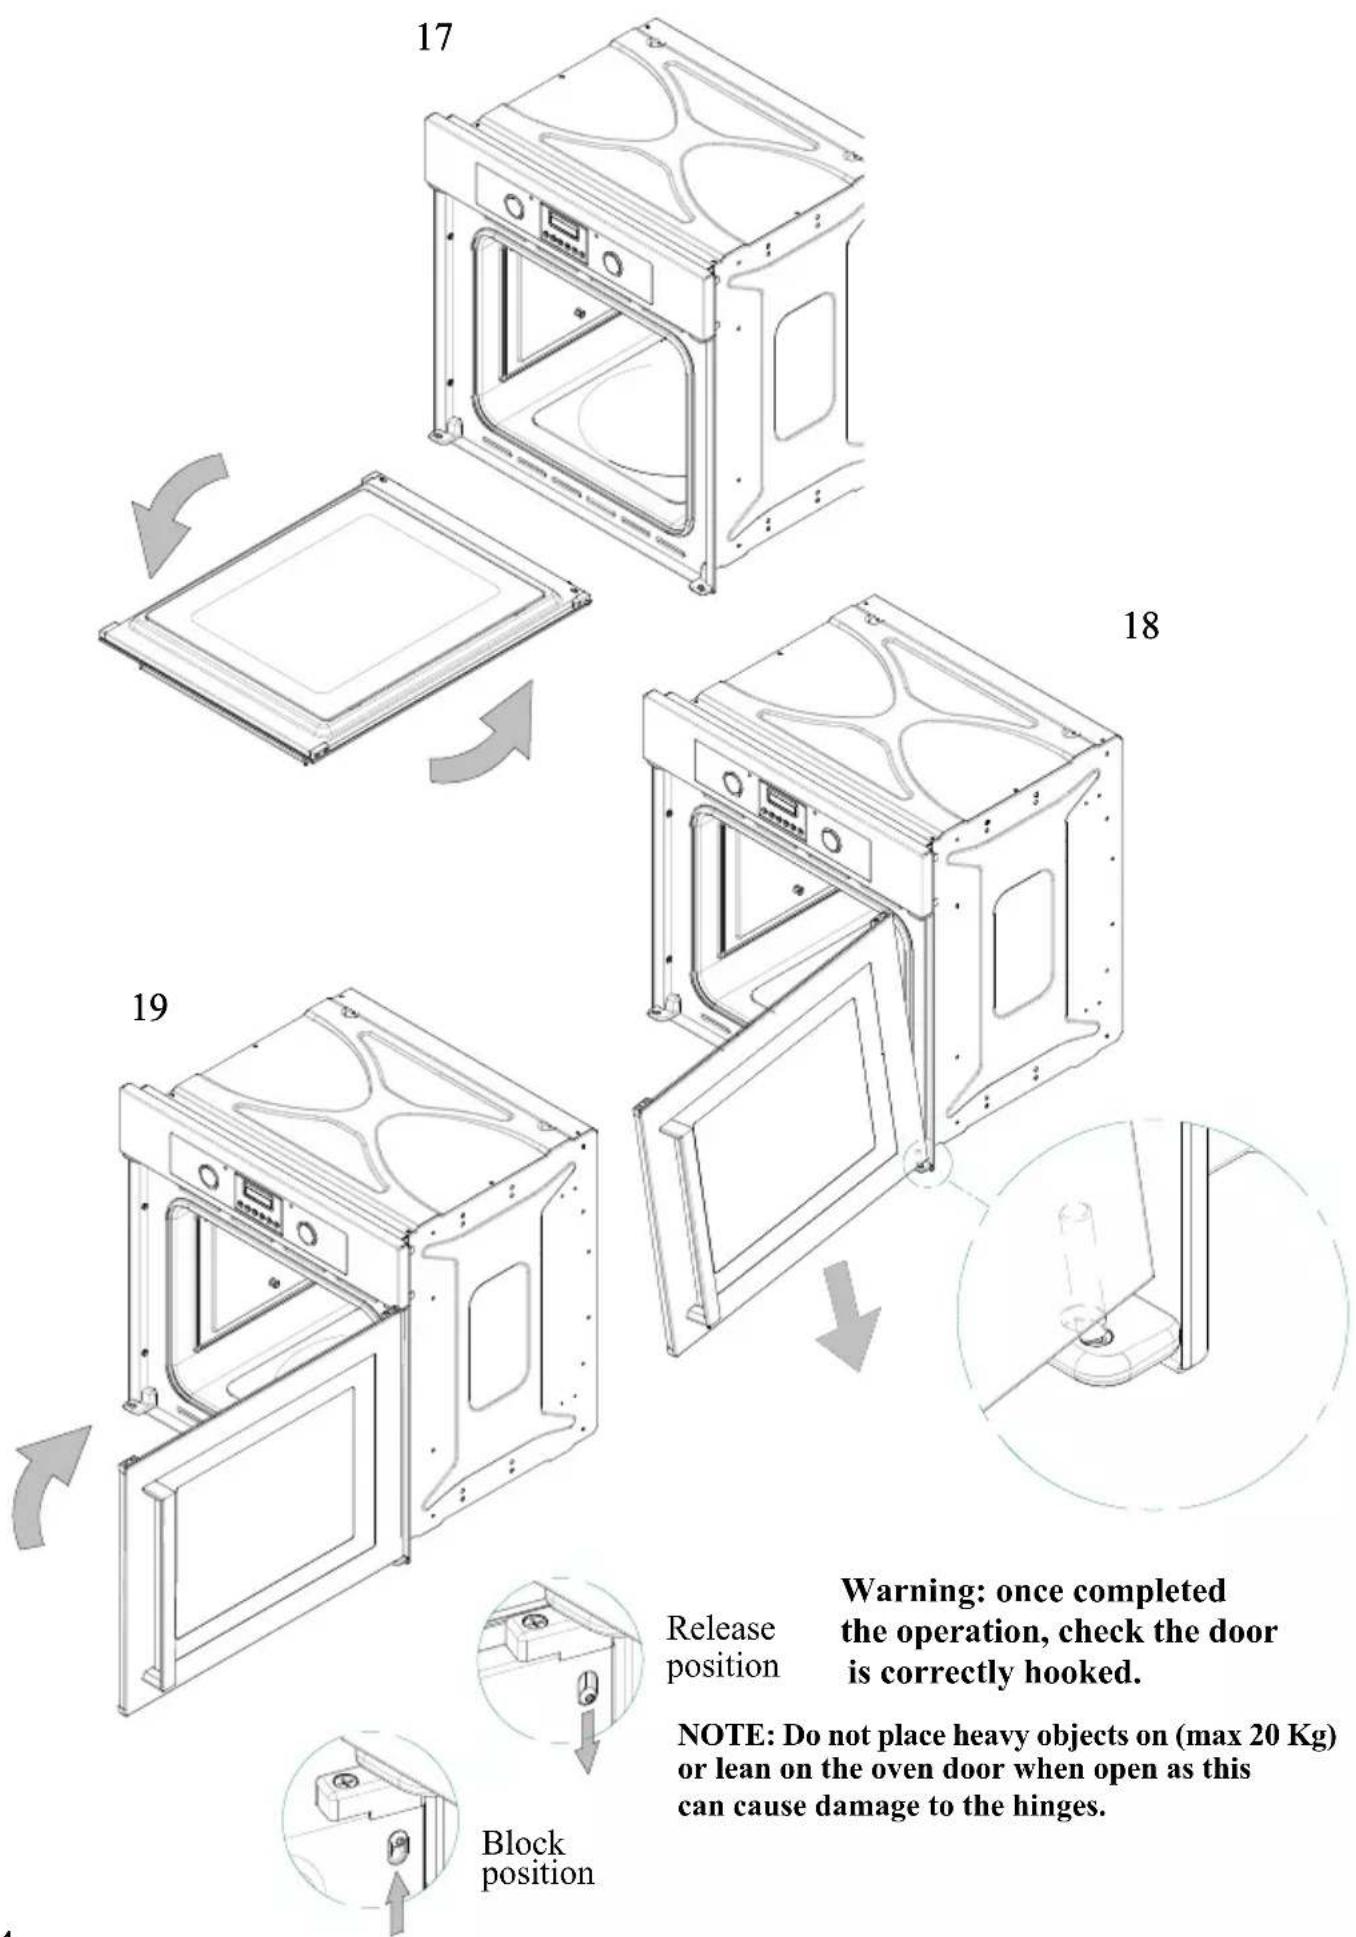
REMOVING AND REFITTING THE OVEN DOOR (pics. 14-19)
The door can be hooked on both sides
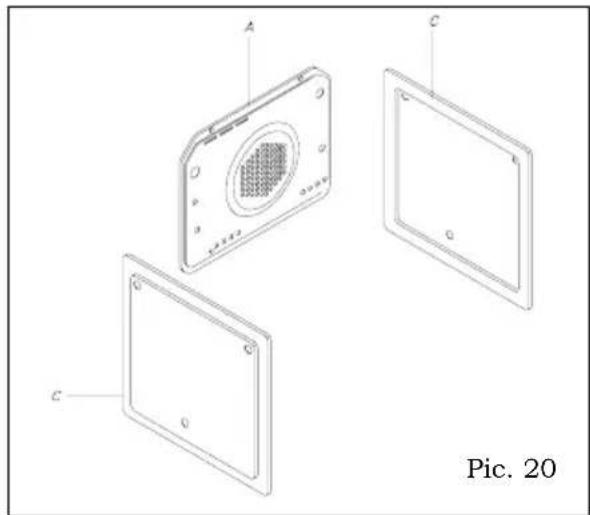
Installation of the self-cleaning liners (optional) - Pic. 20
1) Fix the wall (A) with four auto-tapping screws.
2) Lean the walls (C) against the side of the oven and refasten the guides which were earlier taken away.
3) Replace the accessories into the oven.
natural_image
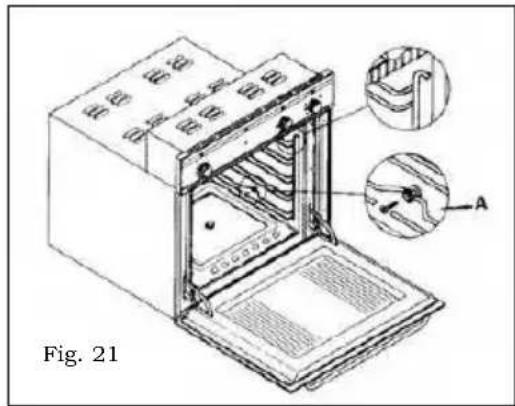
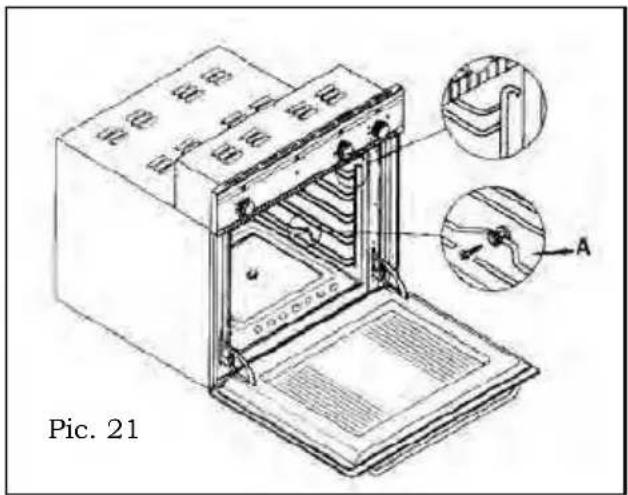
Exploded view diagram of a device showing internal components labeled A, C, and C (no text or symbols beyond labels)Oven accessories - Pic. 21
The appliance can be equipped with lateral guides which have to be fixed on the oven side. Slide oven shelves and trays on lateral guides.
Lateral guides can be removed by a light downwards pressure on device A.
Cleaning and maintenance
Important: The cleaning of the appliance must be carried out after the power supply has been disconnected.
How to clean the oven: The cleaning of the oven, with no self-cleaning panels, has to be carried out after cooking, whilst the oven is still lukewarm (not hot), so that the food spillages on the oven surface can be removed easily. Remove the lateral guides, pulling their front side and unhooking them. Wipe the inside of the oven by using a damp cloth with a diluted ammonia product; rinse and dry the oven.
In case of persistent marks, leave a soaking ammonia cloth at the bottom of the oven muffle for some hours with the door closed; then wash away with warm water and liquid detergent.
Rinse and dry carefully. For external parts, use a soft cloth and soapy water water, rinse and dry carefully.
Do not use abrasives, bleach or coarse cleaning material.
Do not use a steam cleaner with this appliance.
Do not use harsh abrasive cleaners or sharp metal scrapers to clean the oven door glass since they can scratch the surface, which may result in shattering of the glass.
The Manufacturer declines responsibility for damages to persons or things due to a bad or improper installation of the appliance.
Owing to our policy of continuous improvements, we reserve the right to adjust and modify our product without prior notification.
Indice
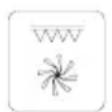
natural_image
Diagram showing a mechanical device with a magnified inset illustrating rotational motion (no text or symbols)Fig. 2
Contaminuti meccanico 60 min - Fig. 3
ACCENSIONE DEL FORNO
natural_image
Technical line drawing of a mechanical component with labeled section A, no readable text or symbols presentnatural_image
Exploded view diagram of a device showing internal components labeled A, C, and G (no text or symbols beyond labels)DÉCLARATION DE CONFORMITÉ CE
natural_image
Diagram of a mechanical device with a magnified inset showing internal components and rotational motion (no text or symbols)"TEMPS DE CUISSON (DURÉE)"

"FIN DE CUISSON"

" POSITION MANUELLE "

"AUGMENTATION DES VALEURS DE TOUS LES PROGRAMMES"

" DIMINUTION DES VALEURS DE TOUS LES PROGRAMMES "
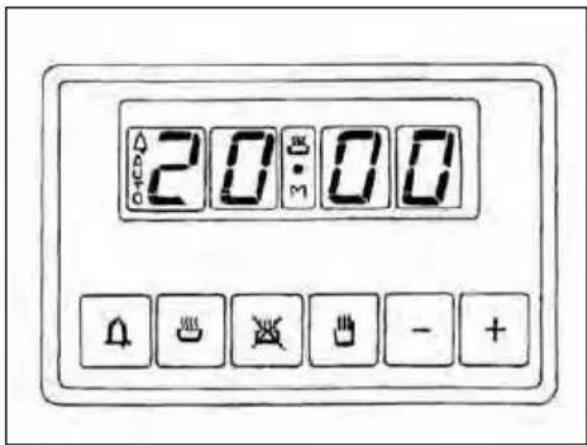
Fig. 7
MODALITÉ FOUR ÉTEINT
natural_image
Technical line drawing of a mechanical assembly with labeled component A, no readable text or symbols presentnatural_image
Exploded view diagram of a device showing internal components labeled A, C, and C (no text or symbols beyond labels)Accessoires en dotation - Fig. 21
natural_image
Diagram of a mechanical assembly with a magnified inset showing internal components and motion arrows (no text or symbols)"AUMENTO CIFRA MARCADOR (DISPLAY)"

“ DISMINUCIÓN CIFRA MARCADOR (DISPLAY) ”
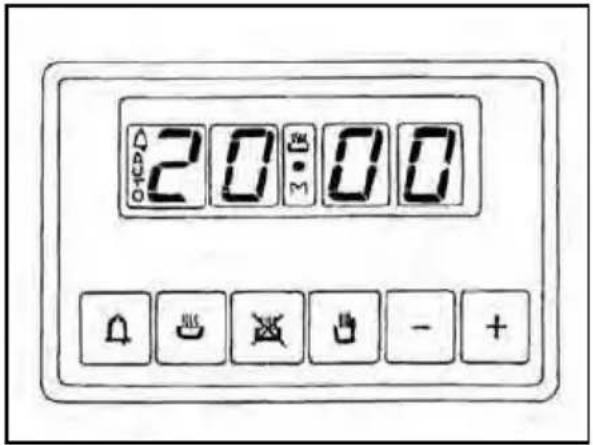
Fig. 7
natural_image
Technical line drawing of a mechanical assembly with labeled component A, no readable text or symbols presentnatural_image
Exploded view diagram of a device showing three labeled components (A, C, C) with no text or symbols beyond labels.Fig. 1d


natural_image
Pure electrical circuit lines without any symbols
natural_image
Diagram of a mechanical device with a magnified inset showing internal components (no text or symbols)minutos
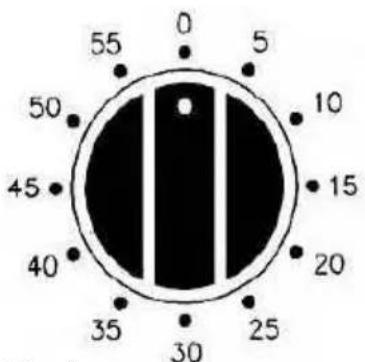
Fig. 3
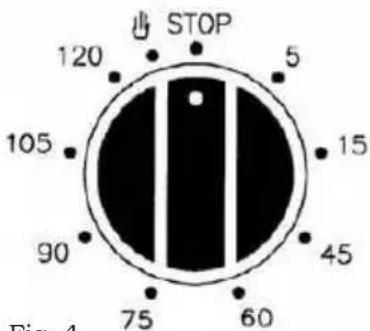
Fig. 4
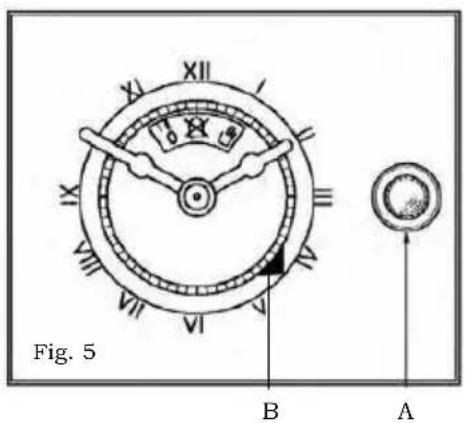
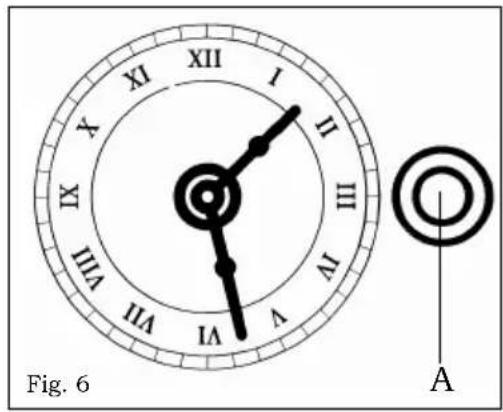
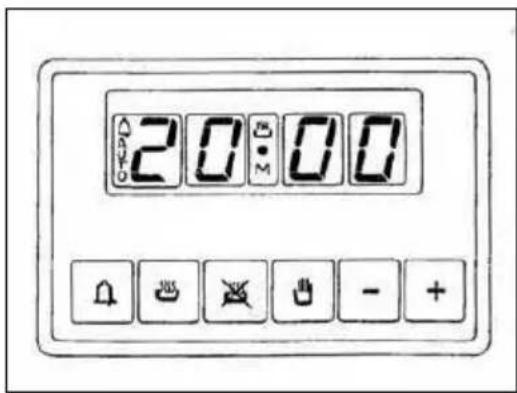
Fig. 7
USO DO PROGRAMADOR ELETRÔNICO (fig. 8)
natural_image
Technical line drawing of a mechanical component with labeled section A, no readable text or symbols present11
REMOÇÃO DO PAINEL DE VIDRO INTERNO DA PORTA DO FORNO (fig. 12-13)
natural_image
Exploded view diagram of a device showing internal components labeled A, C, and C (no text or symbols beyond labels)21