
SCPH-10171 - Game console SONY - Free user manual and instructions
Find the device manual for free SCPH-10171 SONY in PDF.

| Product type | DVD Remote Control for PlayStation 2 with Infrared Receiver |
| Brand | Sony |
| Model | SCPH-10171 |
| Power supply | 3 V DC (2 AAA batteries) |
| Dimensions (remote control) | Approx. 59 x 159 x 17 mm (L x H x D) |
| Weight (remote control, without batteries) | Approx. 72 g |
| Battery life | Approx. 6 months under normal use |
| Included accessories | DVD remote control, infrared receiver unit, DVD Player disc, 2 AAA batteries, instruction manual |
| Main functions | Play, pause, stop, forward/backward search, slow motion playback, access to DVD menus, selection of angle, subtitles and audio language, programmed, random and repeat playback |
| Intended use | Control of DVD playback on PlayStation 2 console (models for North American market) |
| Compatibility | PlayStation 2 console (SCPH-30001, SCPH-35001 GT and later models with DVD Player software version 2.00 or higher) |
| Remote control range | Approx. 10 m (under normal conditions, without obstacles) |
| Receiver connection | Insert the connector of the infrared receiver unit into a controller port of the PlayStation 2 console |
| Maintenance and cleaning | Clean with a soft, dry cloth; do not use solvents or chemicals |
| Safety instructions | Do not disassemble, do not expose to moisture or heat sources, keep out of reach of children (risk of ingestion of the receiver) |
| Warranty information | 90-day limited warranty by SCEA (United States and Canada) |
| Technical support | Helpline: 1-800-345-7669 |
Frequently Asked Questions - SCPH-10171 SONY
User questions about SCPH-10171 SONY
0 question about this device. Answer the ones you know or ask your own.
Ask a new question about this device
Download the instructions for your Game console in PDF format for free! Find your manual SCPH-10171 - SONY and take your electronic device back in hand. On this page are published all the documents necessary for the use of your device. SCPH-10171 by SONY.
USER MANUAL SCPH-10171 SONY
(for PlayStation®2) with IR Receiver Unit
Télécommande DVD
Thank you for purchasing the DVD remote control (for PlayStation®2) with IR receiver unit. Before using this product, carefully read this manual and retain it for future reference.
This remote control is exclusively for use with the PlayStation®2 computer entertainment system.
Mode d'emploi
This product has been designed with the highest concern for safety. However, any electrical device, if used improperly, has the potential for causing fire, electrical shock or personal injury. To ensure accident-free operation, be sure to follow these guidelines:
- Observe all warnings, precautions and instructions.
- Do not use the device if it functions in an abnormal manner.
- If the device does not function properly, contact our technical support line at 1-800-345-7669 for assistance.
Warning marks and their meanings
The following marks are used throughout this instruction manual. Please take a moment to familiarize yourself with the meaning of these marks before continuing to read this manual.
Warning
If the warnings following this mark are not adhered to, serious injury or death from fire may result, or accidents causing personal injuries may occur.
Caution
If the cautions following this mark are not adhered to, accidents causing injury or damage to surrounding property may occur.
Information
For customers in the USA
This equipment has been tested and found to comply with the limits for a Class B digital device, pursuant to Part 15 of the FCC Rules. These limits are designed to provide reasonable protection against harmful interference in a residential installation. This equipment generates, uses, and can radiate radio frequency energy and, if not installed and used in accordance with the instructions, may cause harmful interference to radio communications. However, there is no guarantee that interference will not occur in a particular installation. If this equipment does cause harmful interference to radio or television reception, which can be determined by turning the equipment off and on, the user is encouraged to try to correct the interference by one or more of the following measures:
- Reorient or relocate the receiving antenna.
- Increase the separation between the equipment and receiver.
- Connect the equipment into an outlet on a circuit different from that to which the receiver is connected.
- Consult the dealer or an experienced radio/TV technician for help.
You are cautioned that any changes or modifications not expressly approved in this manual could void your authority to operate this equipment.
Table of contents
WARNING 2
Precautions 4
Discs that can be played with the PlayStation®2 console .... 7
Notes on use 8
Disc handling 9
Static image caution ...... 10
Setup 11
Before use 11
Inserting batteries into the DVD remote control (for PlayStation®2) 12
Attaching the IR receiver unit (for PlayStation®2) ...... 13
Startup with the supplied DVD Player disc ...... 14
Installing the DVD Player on a memory card (8MB) (for PlayStation®2) 14
Viewing a DVD video ... 16
Playing a DVD video 16
When the DVD video is finished ..... 17
Operating the DVD Player 17
Operating with the Control Panel .... 18
Operating with the DVD remote control (for PlayStation®2) ...... 22
Operating with the analog controller (DUALSHOCK®2) 24
Playback from the last stopping point (Resume Play) 26
Playback in desired order (Program Play) 27
Playback in random order (Shuffle Play) ... 29
Repeated playback (Repeat Play) .... 30
Repeated playback of a selected section (A←→B Repeat) ...... 31
Using the Control Panel 32
Using the DVD menu.... 32
Displaying the Title menu 33
Changing the audio language...... 34
Changing the viewing angle .... 35
Displaying subtitles 36
Selecting a specific scene for playback 37
Displaying title and chapter numbers 38
Displaying the list of direct button functions (Help) 39
Finding a particular point on a disc (Search) 40
Using the Setup display 41
Setup display item list 42
Setting language options (Language Setup) 43
Setting TV display options (Screen Setup) 45
Setting viewer options (Custom Setup) 47
Setting sound options (Audio Setup) ..... 51
Troubleshooting ... 54
Specifications ..... 56
LIMITED WARRANTY ... 57
Precautions on the DVD remote control
Caution
If the cautions below are not adhered to, accidents causing injury or damage to surrounding property may occur.
- Keep the IR receiver unit (for PlayStation®2) in a place out of the reach of small children. If swallowed, the IR receiver unit can cause choking. If the IR receiver unit is swallowed, immediately contact your physician.
- Do not disassemble or modify the DVD remote control or IR receiver unit.
- Keep the DVD remote control and IR receiver unit away from heat and dust, and from smoky, greasy or humid locations.
- Do not leave the DVD remote control or IR receiver unit on the floor.
- Do not place the DVD remote control or IR receiver unit on unstable surfaces.
- Do not allow water or other foreign substances to get into the DVD remote control or IR receiver unit.
- Dispose of all packaging materials and worn-out products properly.
Precautions on safe battery use
To avoid the danger of overheating, fire, explosion or battery content leakage, observe the following instructions.
Warning
Do not touch material from a leaking battery.
Contact of the material with the eyes or body can result in injury or burns to the eyes or skin. Even if foreign substances are not immediately visible, chemical changes in the material can result in injuries occurring at a later time.
If you do come into contact with material from a leaking battery, be sure to take the following actions:
→If the material gets into the eyes, do not rub. Flush the eyes with clean water and immediately seek medical attention.
→If the material comes into contact with the skin or clothes, rinse the affected area thoroughly with water. Consult your doctor if inflammation or soreness develops.
Keep batteries in a place out of the reach of children.
If batteries are swallowed, this can result in choking or injury to the stomach.
→Seek the care of a physician immediately if batteries are swallowed.
Never throw batteries into a fire. Do not heat, break open or modify batteries, and do not get batteries wet. Never attempt to recharge non-rechargeable type batteries.
Any of these activities can cause explosion or battery content leakage and result in injury.
Precautions on safe battery use (continued)
To avoid the danger of overheating, fire, explosion or battery content leakage, observe the following instructions.
Caution
Do not use batteries other than those specified (size AAA), and always replace with the same type of battery. Do not mix old and new batteries.
The use of different batteries can result in explosion or content leakage, causing injury.
Insert batteries with the plus and minus ends in the correct direction.
Inserting batteries with the poles reversed can result in a short circuit and cause the battery to release heat, explode or leak its contents, with the potential for injury.
→Always insert batteries in the correct direction as indicated in the battery compartment.
Remove batteries when they have reached the end of their useful life, or if the DVD remote control is to be stored for a long period of time.
Leaving the batteries in place can cause content leakage and the potential for injury.
Discs that can be played with the PlayStation®2 console
The following discs can be played on the PlayStation®2 console:
| Disc type | DVD video | |
| Disc logo |  The “DVD VIDEO” logo is a trademark. The “DVD VIDEO” logo is a trademark. | |
| Contents | Audio and video | |
| Disc size | 12 cm 8 cm | |
| Play time | About 4 hrs (single-sided) About 80 min (single-sided)About 8 hrs (double-sided) About 160 min (double-sided) | |
● DVD video systems and regional restrictions
- This console conforms to the NTSC broadcast standard. You cannot play discs recorded for other broadcast standards (such as PAL or SECAM) on this console.
- Most DVD videos are marked with region numbers such as ①. The number contained within the symbol represents the region number of DVD players on which the disc can be played. DVD videos that do not bear this symbol, or that do not display the number 1, cannot be played on your console.
DVDs with the ALL label can also be played on this console. If you attempt to play any other DVDs, a message stating, “This disc cannot be played due to regional restrictions.” will appear on the screen. Some DVDs that have no region code markings may still be subject to area restrictions and may not be playable on the console.
Note on the playback of DVD video
This console plays DVD video as originally designed by the software producers. Some of the playback features of this console may not have been incorporated into the DVD video design. As a result, some playback features may not be available with certain software. Please refer to the instructions supplied with your DVD video for details.
- Some PlayStation®2 or PlayStation® format software may not function properly when operated using the DVD remote control (for PlayStation®2).
- The DVD remote control will not work if you push more than one button at a time.
- Two or more DVD remote controls or IR receiver units should not be used simultaneously.
- Do not expose the DVD remote control or IR receiver unit to high temperatures, high humidity or direct sunlight (use in an environment where temperatures range 5^ - 35^ / 41^ - 95^ ).
- Do not allow liquid or small particles to get into the DVD remote control or IR receiver unit.
- Do not put heavy objects on the DVD remote control or IR receiver unit.
- Never disassemble or modify the DVD remote control or IR receiver unit.
- Do not throw or drop the DVD remote control or IR receiver unit, or subject either item to strong physical shock.
- Do not touch the metal parts or insert foreign objects into the IR receiver unit.
-
When cleaning the DVD remote control or IR receiver unit, use a soft, dry cloth. Do not use paint thinner, solvents or other chemicals.
-
Never use the supplied DVD Player disc in other machines. This can cause damage to the machine, or injure the eyes or ears.
- The supplied DVD Player disc marked with is for use with North American specification PlayStation®2 consoles only.
- When inserting a disc into the PlayStation®2 console, always set it into the disc tray with the label side facing up (data side down).
- Do not leave discs near a heat source, in direct sunlight or in areas of high humidity.
- Store discs in their cases when they are not in use. Stacking discs or standing them at an angle without putting them in their cases can cause the discs to warp.
- Do not touch the disc surface when handling; hold the disc by the edges.
- Do not stick paper or tape onto the disc.
- Do not write on the disc with a marker, etc.
- Fingerprints or dust on the disc can distort the picture or reduce sound quality. Make sure discs are clean before use.
- Clean discs using a soft cloth, lightly wiping from the center outwards.
- Do not use solvents, record cleaners or anti-static sprays as these can damage your discs.
- Do not use cracked or malformed discs or those that have been repaired with adhesives as this can cause the PlayStation®2 console to malfunction.
- Do not insert fingers, etc. into the center hole of the disc on purpose. This can result in injury.
- Never throw the disc, as this can damage the disc or cause injury.
- Sony Computer Entertainment America will not be held liable for injury resulting from the mishandling of discs.
Static image caution
Static, non-moving images, such as DVD menus, configuration displays, or images “paused” may leave a faint image permanently on the TV screen if left on for extended periods of time. Projection TVs are more susceptible to this than other types of displays. Do not operate the PlayStation®2 console in such a manner that this could occur.
Before use
Please confirm that you have the following items:
- DVD remote control (for PlayStation®2) (1)
- IR receiver unit (for PlayStation ^ 2) (1)
- DVD Player (for PlayStation ^ 2) disc (1)
- Size AAA batteries (2)
- Instruction manual (1)
If any items are missing, please contact our technical support line at 1-800-345-7669.
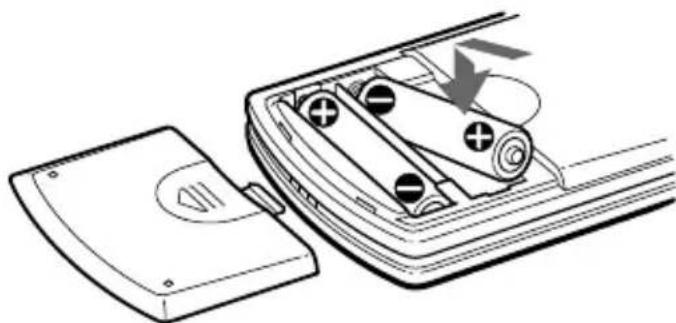
- Inserting batteries into the DVD remote control (for PlayStation®2)
Insert the two, size AAA batteries (supplied) into the DVD remote control paying attention to the plus and minus ends (polarity) as indicated in the battery compartment.
natural_image
Diagram of a car interior showing battery slots and a switch, with no visible text or symbolsNotes
- Incorrect use of batteries can result in battery content leakage or explosion. When using batteries, be sure to abide by the following instructions:
- Make sure that the plus and minus ends of the batteries are inserted in the correct directions.
- Do not mix old and new or different types of batteries.
- Do not attempt to recharge non-rechargeable type batteries.
- Remove the batteries when the DVD remote control will not be used for an extended period of time.
- If battery contents have leaked, be sure to carefully remove all residue before inserting new batteries.
- When using the DVD remote control, be sure that the IR receiver of the IR receiver unit is not in direct sunlight or exposed to other strong light. The DVD remote control may not function properly under such conditions.
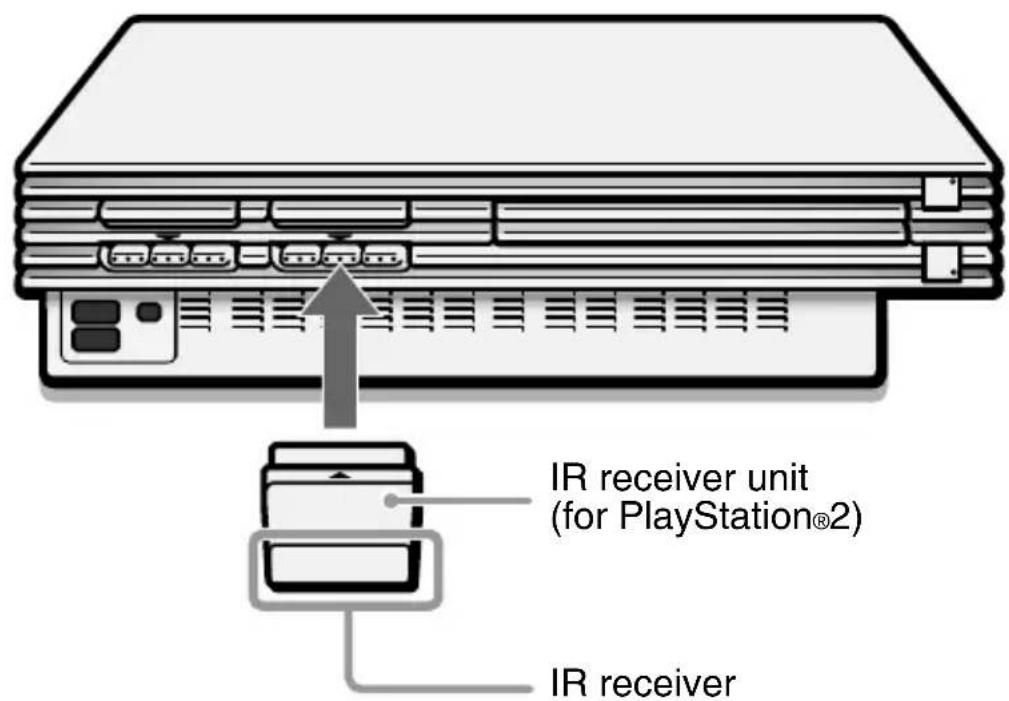
- Attaching the IR receiver unit (for PlayStation®2)
Holding the IR receiver unit with the arrow mark facing up, securely insert the connector into a controller port of the PlayStation®2 console.

Note
When using the IR receiver unit for the first time, be sure to remove the protective scratch resistant film before inserting the unit into the PlayStation®2 console.
Startup with the supplied DVD Player disc
To use all DVD remote control functions, you may need to install the DVD Player (for PlayStation®2) on a memory card (8MB) (for PlayStation®2) (sold separately). For details, refer to the “Notes” section on page 15.
1 Press the MAIN POWER switch on the PlayStation®2 console rear to turn the console on.
The ⏻ (standby) indicator turns red, and the console is in standby mode.
2 Press the ⏻/RESET button.
The ⏻ indicator turns green and the console startup screen is displayed.
3 Press the ≜ (open) button.
The disc tray opens.
4 Place the disc into the disc tray with the label side facing up (data side down).
5 Press the ≜ button.
The disc tray closes. Once the disc has started, the disc startup screen is displayed.
Note
The DVD Player (for PlayStation®2) is software that allows playback of DVD videos on the PlayStation®2 console.
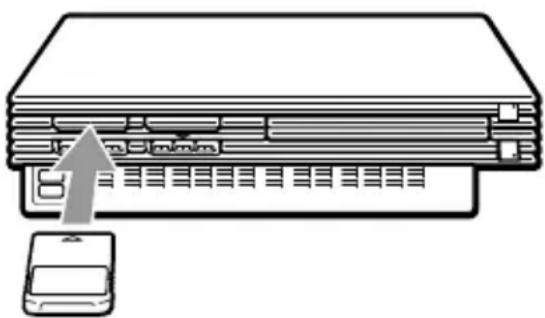
- Installing the DVD Player on a memory card (8MB) (for PlayStation®2)
The DVD Player can be installed on a memory card (8MB) (for PlayStation®2) (sold separately). If you delete the DVD Player, you can install it from the supplied disc again at any time.
1 Insert the memory card (8MB) (for PlayStation®2) into MEMORY CARD slot 1 of the PlayStation®2 console.
natural_image
Diagram showing a device with a smartphone connected to a stack of books or documents (no text or symbols present)2 Start the supplied DVD Player disc (see page 14 for instructions).
3 On the startup screen, press the × (enter) button.
The Basic Operations screen is displayed.
4 With the Basic Operations screen displayed, press the × button.
The Menu screen is displayed.
5 Select the "Installing DVD Player" option from the Menu screen and press the × button.
Complete the installation following the on-screen instructions.
Notes
- To view DVD video using the DVD Player installed on a memory card (8MB) (for PlayStation®2), you must insert the memory card (8MB) (for PlayStation®2) into a MEMORY CARD slot of the PlayStation®2 console.
- Some DVD remote control functions will not work if you use DVD Player software earlier than version 2.00. Refer to the PlayStation®2 console instruction manual for details on how to check the version of your DVD Player software.
For PlayStation®2 consoles of model numbers SCPH-30001 and SCPH-35001 GT, you must install DVD Player (ver 2.00), or later, on a memory card (8MB) (for PlayStation®2) to activate all DVD remote control functions. - Before installing the DVD Player on the memory card (8MB) (for PlayStation®2), be sure that at least 2,200KB (2.2MB) of free space is available on the memory card.
- Insert the memory card (8MB) (for PlayStation®2) into MEMORY CARD slot 1 of the PlayStation®2 console. Installation is not possible with the memory card in MEMORY CARD slot 2.
- Do not remove the memory card (8MB) (for PlayStation®2) while the installation is in progress. The installation will be incomplete if the memory card is removed or the PlayStation®2 console is turned off or reset while installing.
To view DVD video using the DVD Player installed on a memory card (8MB) (for PlayStation®2), you must insert the memory card (8MB) (for PlayStation®2) into a MEMORY CARD slot of the PlayStation®2 console.
Some DVD remote control functions will not work if you use DVD Player software earlier than version 2.00. Refer to the PlayStation®2 console instruction manual for details on how to check the version of your DVD Player software.
For PlayStation®2 consoles of model numbers SCPH-30001 and SCPH-35001 GT, you must install DVD Player (ver 2.00), or later, on a memory card (8MB) (for PlayStation®2) to activate all DVD remote control functions.
For detailed installation instructions, see “Installing the DVD Player on a memory card (8MB) (for PlayStation®2)” on pages 14-15.
● Playing a DVD video
1 Insert the memory card (8MB) (for PlayStation®2) containing the installed DVD Player into any MEMORY CARD slot of the PlayStation®2 console.
2 Press the MAIN POWER switch on the PlayStation®2 console rear to turn the console on.
3 Press the ⏻ (standby)/RESET button.
4 Press the ≅ (open) button.
5 Insert the DVD video you would like to play into the disc tray with the label side facing up (data side down).
6 Press the ≜ button.
The disc tray will close and playback will begin.
Notes
- Do not remove the memory card (8MB) (for PlayStation®2) containing the DVD Player before playback of the DVD video begins.
- With some discs, playback will not begin immediately, but a Title menu or DVD menu will be displayed.
- After the DVD video has finished playing, press the ≡ button on the console to eject the disc and display the browser screen.
- If the power is turned off during playback, any optional settings you have made will be lost.
Notes on the playback of DTS audio from a DVD video
DTS audio signal can only be output through an optical digital cable (sold separately). Please note that it cannot be output through a regular audio cable.
- Do not set the “DTS” option of “Audio Digital Out” under “Audio Setup” to “On” when using an audio component that does not have a built-in DTS decoder. In such cases, if you play a DTS audio track, a loud noise (or no sound) will come from the speakers, possibly hurting your ears or damaging the speakers.
- When the “DTS” option of “Audio Digital Out” under “Audio Setup” is set to “Off,” the DVD’s DTS audio output will not be played back, even if you connect with an optical digital cable.
● When the DVD video is finished
1 Press the ≅ (open) button on the PlayStation®2 console.
2 Remove the disc.
3 Press the ≜ button.
4 Press and hold the ⏻ (standby)/RESET button for about two seconds.
Note
To save your changes, be sure to eject the DVD before pressing the ⏻/RESET button or turning off the console with the MAIN POWER switch. Please note that changes will not be saved if you reset or turn off the console without first ejecting the DVD.
● Operating the DVD Player
The DVD Player can be operated in the following three ways:
• through the on-screen Control Panel
• directly with the DVD remote control
- directly with the analog controller (DUALSHOCK®2).
Notes
- Depending on the disc used, some operations may vary or may not be possible.
- The method of operation for certain functions may vary depending on whether the IR receiver unit is inserted into the PlayStation®2 console or not.
● Operating with the Control Panel
The Control Panel can be used to search for a specific scene, to playback scenes in a different order, to change viewing angle, and so on.
The actual functions available may vary from disc to disc.
For more information on the Control Panel, see the detailed explanations on pages 32 through 53.
Direct item selection is also available.
A number of items can be directly selected using the buttons of the DVD remote control or analog controller (DUALSHOCK®2). In this case, only the selected items will be displayed. For more details, see “Operating with the DVD remote control (for PlayStation®2)” on page 22, or “Operating with the analog controller (DUALSHOCK®2)” on page 24.
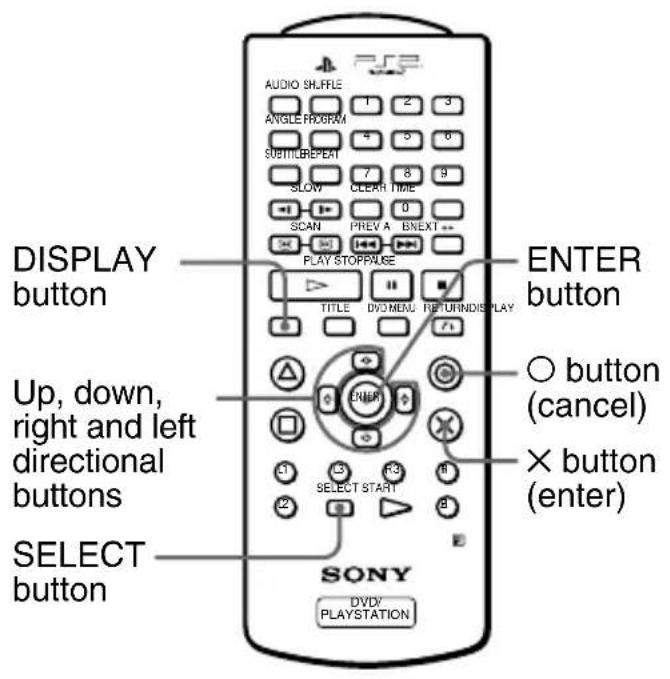
1 Press the DISPLAY or SELECT button of the DVD remote control.
The Control Panel is displayed on the screen.
US
2 Use the directional buttons to move to the desired item.
3 Press the × (enter) button.
Note
The × button and the ENTER button of the DVD remote control, and the × button of the analog controller (DUALSHOCK®2) can all be used as the ENTER button. For convenience, this manual will explain using the × button only.
Viewing a DVD video (continued)
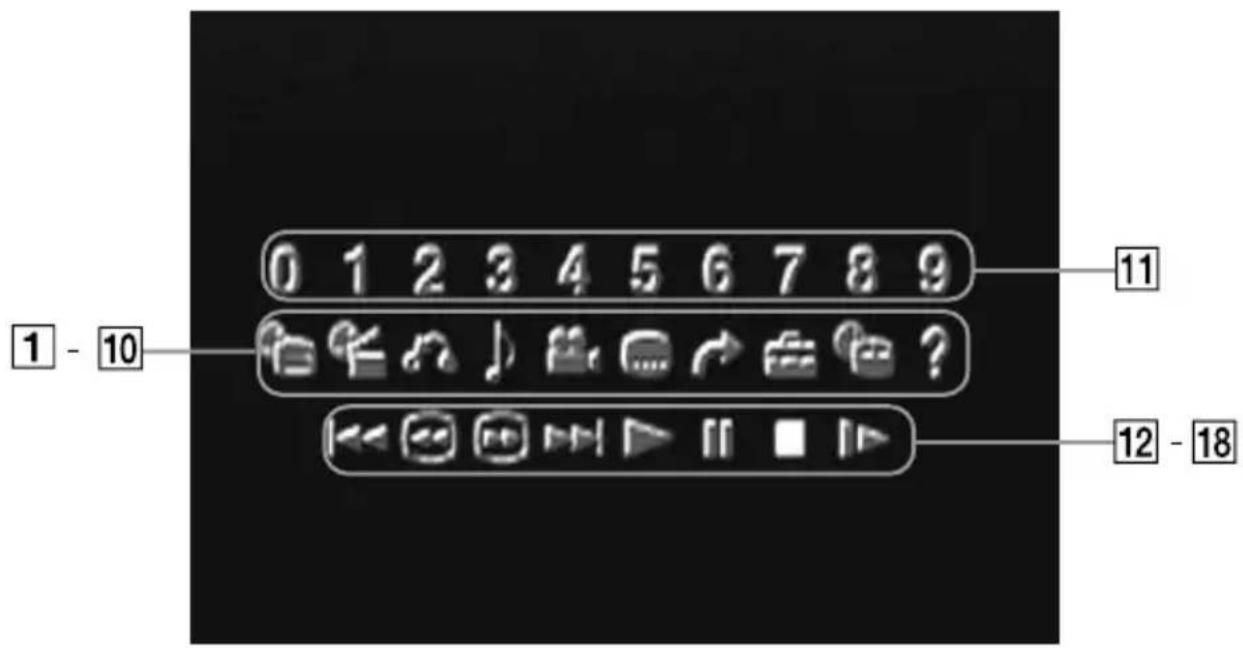
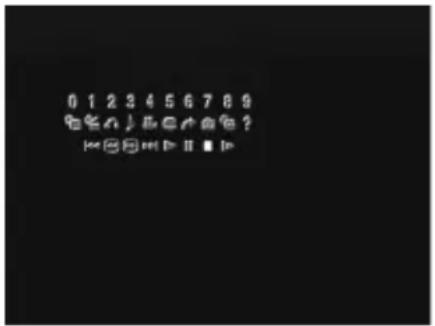
1 DVD Menu
Displays the DVD menu.
2 Title Menu
Displays the Title menu.
3 Return
Returns to the previously selected screen.
4 Audio Options
Displays and changes audio options.
5 Angle Options
Displays and changes viewing angle options.
6 Title Options
Displays and changes subtitle options.
7 Go to Title
You can skip to a different title or chapter by specifying the elapsed time or selecting the title or chapter number with the number buttons.
8 Setup
Using the Setup display, you can change the initial settings, adjust the picture and sound, and set various other output options. For DVD viewing, you can also choose a language for subtitles, restrict playback by children, and so on.
9 Chapter Display
While playing a disc, the current title and chapter numbers can be displayed.
10 Help
Displays the direct button functions of the analog controller (DUALSHOCK®2).
11 Go to Chapter/Number Buttons
The desired chapter number or numerical value can be selected.
12 Previous
Skips back to the beginning of the current or previous chapter.
13/ Search
You can locate a particular point on the DVD quickly by monitoring the picture.
14▶▶I Next
Skips to the beginning of the next chapter.
15▶ Play
Selects playback.
16 II Pause
Momentarily stops playback.
17 ■ Stop
Stops playback of the DVD.
18 Slow
Selects slow playback of the on-screen image.
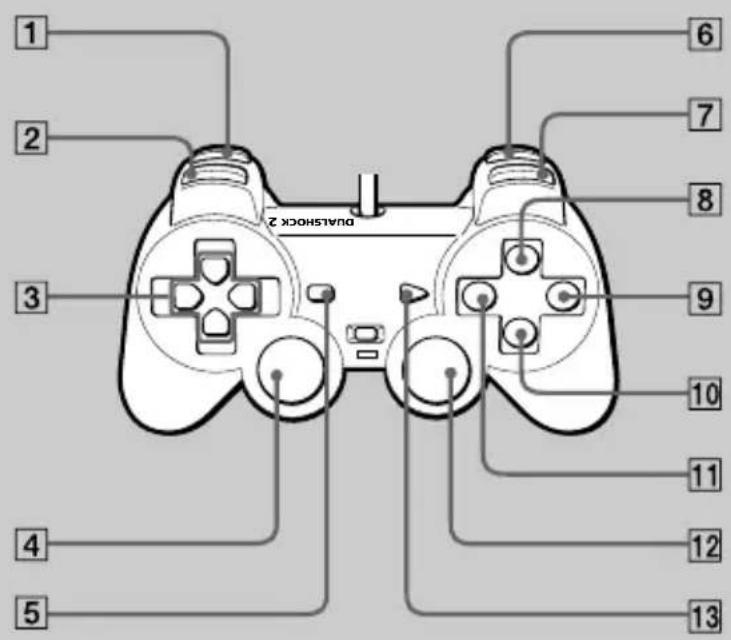
● Operating with the DVD remote control (for PlayStation®2)

1 AUDIO button Displays and changes audio options.
2PROGRAM button Selects programmed playback.
③ ANGLE button Displays and changes viewing angle options.
4 REPEAT button Selects repeated playback.
5 SUBTITLE button Displays and changes subtitle options.
6 CLEAR button Clears selected numbers or playback modes.
7/ SLOW buttons Select slow playback of the on-screen image.
8/ SCAN buttons You can locate a particular point on the DVD quickly by monitoring the picture.
9 I ◀◀/▶▶▶I PREV/NEXT buttons
Skip to the beginning of either the previous or next chapter.
10 ▷ PLAY button
Selects playback.
11 TITLE button
Displays the Title menu.
12DISPLAY button
Displays the Control Panel.
13 Up, down, right and left directional buttons
Used to select items from the on-screen display.
14SHUFFLE button
Selects playback in a random order.
15 Number buttons
Allow for numerical selection of items in the on-screen display.
16TIME button
Displays the playing time.
17A←→B button
Selects repeated playback of a specific section.
18 II PAUSE button
Momentarily stops playback.
19 ■ STOP button
Stops playback of the DVD.
20 DVD MENU button
Displays the DVD menu.
21 RETURN button
Returns to the previously selected screen.
22 ENTER button
Enters the item selected on the screen.
23 Buttons identical to those on the analog controller
(DUALSHOCK®2) are also identical in function.
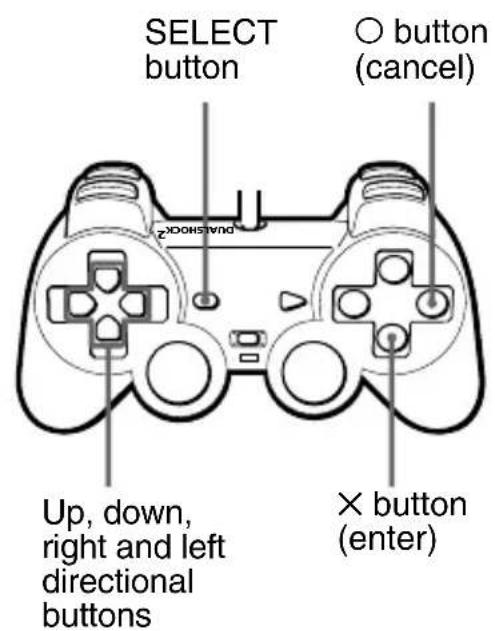
● Operating with the analog controller (DUALSHOCK®2)
1 L2 button (SEARCH)
You can locate a particular point on the DVD quickly by monitoring the picture (backward search).
2 L1 button (PREVIOUS CHAPTER)
Skips back to the beginning of the current or previous chapter.
③ Up, down, right and left directional buttons
Used to select items from the on-screen display.
4 L3 button (SUBTITLE) \*
Displays and changes subtitle options.
5 SELECT button
Displays the Control Panel.
6 R2 button (SEARCH)
You can locate a particular point on the DVD quickly by monitoring the picture (forward search).
7 R1 button (NEXT CHAPTER)
Skips to the beginning of the next chapter.
8△ button (DVD MENU)
Displays the DVD menu.
9 ○ button (STOP)
Stops playback of the DVD.
10× button (ENTER)
Enters the item selected on the screen.
11 □ button (TITLE)
Displays the Title menu.
12 R3 button (AUDIO OPTIONS) *
Displays and changes audio options.
13 START button (PLAY/PAUSE)
Selects playback or a momentary stop in play.
* When using a controller without the L3 or R3 buttons, use the on-screen Control Panel or the DVD remote control to select among available subtitle and audio options.
● Playback from the last stopping point (Resume Play)
1 During playback, press the ■ STOP or ○ button on the DVD remote control to stop play.
The message, “Press [Play] to resume viewing. To start from the beginning, press [Stop] and then [Play].” will appear on the screen.
2 Press the ▷ PLAY button on the DVD remote control.
Playback begins from the point in step 1 where it was stopped.
Using the Control Panel
flowchart
graph TD
    A["Start"] --> B{Process Step}
    B --> C["End"]
    style A fill:#f9f,stroke:#333
    style B fill:#ccf,stroke:#333
    style C fill:#cfc,stroke:#333
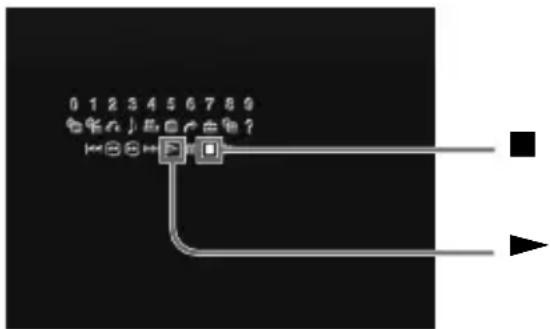
1 During playback, use the directional buttons to move to the ■ (Stop) icon of the Control Panel and press the × button to stop playback.
2 Select the ▶ (Play) icon and press the × button.
Playback begins from the point in step 1 where it was stopped.
Notes
- To play the disc from the beginning, press ■ one more time after stopping playback, then press ▷.
- Resume Play may not be available on some DVD discs.
- Depending on where you stopped the disc, the console may resume play from a slightly different point.
-
The recording of the point where playback was stopped is cleared when:
-
you open the disc tray
- you shift to standby mode by pressing and holding down the ⏻ (standby)/RESET button
- you turn the power off using the MAIN POWER switch on the console rear
- you start playback after selecting a title or chapter.
● Playback in desired order (Program Play)
You can set the DVD to play scenes in any order you like by arranging the order of titles or chapters on this screen. This function can be accessed only with the DVD remote control.
1 Press the PROGRAM button.
2 Select the item number and press the × button.
3 Use the directional buttons to select the number of the title that includes the desired chapter and press the × button.
4 Use the directional buttons to select the number of the desired chapter and press the × button.
5 Repeat steps 3 and 4 to continue arranging the desired order of titles.
6 Press the ▷ PLAY button.
Program Play begins.
To end Program Play
Press the CLEAR button.
To change Program Play settings
1 In step 2, select the number of the item to be changed and press the × button.
Settings can be changed while Program Play is in use. Please note, however, that the item currently in play cannot be changed.
2 Repeat steps 3 and 4 above to enter new settings.
To clear Program Play settings
To cancel all settings, select “Clear all” in step 2 at the top of this page. To cancel settings one-by-one, stop play and use the directional buttons in step 3 to select the item to be cleared. Press the × button, select “Clear” and press the × button again to remove the item.
Using Program Play again after playback has finished
The same programmed sequence can be viewed again by pressing the ▷ PLAY button.
Repeat Play and Shuffle Play can be selected during Program Play.
During Program Play, press the REPEAT or SHUFFLE button. For more details, see “Playback in random order (Shuffle Play)” on page 29, or “Repeated playback (Repeat Play)” on page 30.
Notes
- Program Play is not available on some DVD discs.
- Only the numbers of titles and chapters recorded on the disc are displayed.
- Program Play settings are cleared when:
- you open the disc tray
- you reset the console by pressing the ⏻ (standby)/RESET button
- you shift to standby mode by pressing and holding down the ⏻/RESET button
- you turn the power off using the MAIN POWER switch on the console rear.
- By setting Program Play, A←→B Repeat is cancelled.
● Playback in random order (Shuffle Play)
Playback of the DVD is done in a random order with no relation to the original title and chapter numbers. This function can be accessed only with the DVD remote control.
Press the SHUFFLE button.
With each press of the button, the display cycles among “Title Shuffle,” “Chapter Shuffle,” and “Shuffle Off.”
To end Shuffle Play
Select “Shuffle Off” or press the CLEAR button.
Shuffle Play can be set even when the disc is not playing.
Press the SHUFFLE button and choose the desired setting. Then press the ▷ PLAY button to begin playback in Shuffle Play mode.
Program Play or Repeat Play can be selected during Shuffle Play.
During Shuffle Play, press the PROGRAM or REPEAT button. For more details, see “Playback in desired order (Program Play)” on page 27, or “Repeated playback (Repeat Play)” on page 30.
Notes
- Shuffle Play may not be available on some DVD discs.
- Shuffle Play is cleared when:
- you display the DVD menu or Title menu
- you open the disc tray
- you turn the power off using the MAIN POWER switch on the console rear.
- By setting Shuffle Play, A↔B Repeat is cancelled.
- When “Chapter Shuffle” is selected, up to 200 chapters on the disc are played back in random order.
● Repeated playback (Repeat Play)
All of the titles on the DVD, or one title or chapter can be repeatedly played back with Repeat Play. When used in combination with Shuffle or Program Play, this function will repeat the Program or Shuffle Play order. This function can be accessed only with the DVD remote control.
Press the REPEAT button.
With each press of the button, the display cycles among “Disc Repeat,” “Title Repeat,” “Chapter Repeat,” and “Repeat Off.”
To end Repeat Play
Select "Repeat Off" or press the CLEAR button.
Repeat Play can be set even when the disc is not playing.
Press the REPEAT button and choose the desired setting. Then press the ▷ PLAY button to begin playback in Repeat Play mode.
Program Play or Shuffle Play can be selected during Repeat Play.
During Repeat Play, press the PROGRAM or SHUFFLE button. For more details, see “Playback in desired order (Program Play)” on page 27, or “Playback in random order (Shuffle Play)” on page 29.
Notes
- Repeat Play may not be available on some DVD discs.
- Repeat Play is cleared when:
- you open the disc tray
- you turn the power off using the MAIN POWER switch on the console rear.
- By setting Repeat Play, A B Repeat is cancelled.
● Repeated playback of a selected section (A↔B Repeat)
During playback, you can set a specific section of the disc for repeated playback. This is convenient for language studies, learning a new song, and many other applications. This function can be accessed only with the DVD remote control.
1 Press the A←→B button at the starting point (point A) of the section for repeated playback.
The starting point is set.
2 Press the A←→B button again at the ending point (point B) of the section for repeated playback.
The selected section begins repeated playback.
To cancel A←→B Repeat
Press the CLEAR button.
Notes
- A B Repeat may not be available on some sections of some DVD discs.
- Only one section can be selected for A↔B Repeat at a time.
• A ↔B Repeat is cleared when: - you press the ■ STOP button twice
- you display the DVD menu or Title menu
- you open the disc tray
- you turn the power off using the MAIN POWER switch on the console rear.
- Setting A←→B Repeat cancels Shuffle Play, Repeat Play and Program Play.
This section describes various functions that can be performed using the Control Panel.
This manual describes Control Panel operations using the DVD remote control. When using an analog controller (DUALSHOCK®2), refer to “Operating with the Control Panel” on page 18.
● Using the DVD menu
Some DVDs allow you to select disc contents from a menu. When you play such DVDs, you can select the item to be played, the language for subtitles, the language for audio, etc., using the DVD menu.
1 Select the (DVD Menu) icon using the directional buttons and press the × button.
The DVD menu is displayed. The DVD menu content varies from disc to disc.
2 Select the item to be changed using the directional buttons and press the × button.
3 Change the setting and press the × button.
4 To change other items, display the DVD menu again and repeat from step 2.
You can select the DVD menu directly
Press the DVD MENU button on the DVD remote control.
To set the language for the DVD menu
Bring up the Setup display and select the 📄Language Setup) icon. For details, refer to “Setting language options (Language Setup)” on page 43.
To return to the previous screen
Select the ⬇ (Return) icon and press the × button. You cannot perform this operation with some DVDs.
Notes
- Some DVDs do not have a DVD menu.
- Some DVDs refer to “DVD menu” simply as “Menu.”
● Displaying the Title menu
Some DVDs are recorded with multiple titles. A title is a major separation of video recorded in the DVD. When playing such a DVD, you can use the Title menu to select a desired title.
Select the 📄(Title) icon using the directional buttons and press the × button.
The Title menu is displayed. The Title menu content may vary from disc to disc.
You can select the Title menu directly
Press the TITLE button on the DVD remote control.
To return to the previous display
Select the ⬇ (Return) icon and press the × button. You cannot perform this operation with some DVDs.
Notes
- Some DVDs do not have a Title menu.
- Some DVDs refer to “Title menu” simply as “Title.”
● Changing the audio language
Some DVDs are recorded with multiple languages (multilingual tracks). You can change the language even during playback.
Select the ⌘(Audio Options) icon using the directional buttons and press the × button.
The audio language changes each time you press the × button.
You can select Audio Options directly
Press the AUDIO button on the DVD remote control. The language changes each time you press this button.
Notes
- Due to the programming on some DVDs, you may not be able to change languages even if multiple languages are recorded on the disc.
- If you change titles, the audio language may change as well.
- When you set the “DTS” option of “Audio Digital Out” to “Off” under “Audio Setup” in the Setup display, you cannot set the sound recording system to DTS even when playing a DVD with DTS sound recorded.
● Changing the viewing angle
With DVDs on which multiple angles are recorded, you can change the viewing angle on scenes for which multiple angles are available.
For example, while playing a scene of a train in motion, you can change the view from either the front of the train, the left window, or the right window, without having the train's movement interrupted.
US
Select the 🎨Angle Options) icon using the directional buttons and press the × button.
The angle switching operation may vary from disc to disc. For details, refer to the on-screen instructions.
You can select Angle Options directly
Press the ANGLE button on the DVD remote control. The angle changes each time you press this button.
Notes
- The number of angles varies from disc to disc and from scene to scene. You can choose from among the angles recorded for each individual scene.
- Due to the programming on some DVDs, you may not be able to change angles even if multiple angles are recorded on the disc.
● Displaying subtitles
With DVDs on which subtitles are recorded, you can turn the subtitles on or off whenever you want while playing the DVD. With DVDs on which multilingual subtitles are recorded, you can also change the subtitle language while playing the DVD. For example, you can turn the subtitles on as an aid for practicing a foreign language.
Select the 📄 Subtitle Options) icon using the directional buttons and press the × button.
The language changes each time you press the × button. The languages you can select vary from disc to disc.
You can select Subtitle Options directly
Press the SUBTITLE button on the DVD remote control. The language changes each time you press this button.
To turn the subtitles off
Press the SUBTITLE button on the DVD remote control until “Subtitles Off” is displayed.
Notes
- When playing a DVD on which no subtitles are recorded, no subtitles can be displayed.
- Due to the programming on some DVDs, you may not be able to display subtitles or switch among subtitle languages even if subtitles are recorded on the disc.
- Depending on the DVD, you may not be able to turn the subtitles off.
- The type and number of languages for subtitles varies from disc to disc.
- While playing a DVD, the subtitle settings may change when you change titles.
- Selecting a specific scene for playback
When the IR receiver unit is connected to the console, you can search for a scene to be played back by specifying the title number, chapter number and elapsed time.
1 While playing a disc, select the (Go to Title) icon using the directional buttons and press the × button.
2 Select the appropriate item using the directional buttons and press the × button.
- Title = Specify the title number.
- Chapter = Specify the chapter number.
- C -::-: - (or T -::-: -) = Specify the elapsed time for chapter (or title).
3 Input numbers for the fields listed above using the number buttons of the DVD remote control.
Playback of the selected scene is started.
Note
When the IR receiver unit is connected, you cannot use the number buttons of the Control Panel; use the number buttons on the DVD remote control.
When the IR receiver unit is not connected to the console
You can specify only the title number.
1 While playing a disc, select the (→ to Title) icon using the directional buttons and press the × button.
2 Select the number of the title to be played back using the directional buttons.
In some cases, you can specify the chapter number using the number buttons of the Control Panel.
Note
You cannot select a scene by specifying the remaining time of the chapter or title (only elapsed time can be used).
● Displaying title and chapter numbers
While playing or pausing a disc, select the Chapter Display) icon using the directional buttons and press the × button.
The display is turned on or off each time you press the × button.
To display the elapsed time and remaining time
Press the TIME button on the DVD remote control several times. Each time you press this button, the display beside the title number and chapter number changes as follows:
Elapsed time of the current chapter → Remaining time of the current chapter → Elapsed time of the current title → Remaining time of the current title → Display off → Title and chapter numbers → Elapsed time of the current chapter → ...
C -::-:- = Elapsed time of the current chapter.
C - -::- = Remaining time of the current chapter.
T -::-:- = Elapsed time of the current title.
T - -::-: = Remaining time of the current title.
When the IR receiver unit is not connected
You can display only the current title and chapter numbers.
● Displaying the list of direct button functions (Help)
The functions of the direct buttons of the analog controller (DUALSHOCK®2) are displayed in list form.
Select the ?(Help) icon using the directional buttons and press the × button.
To turn off the Help screen
Press the × button.
● Finding a particular point on a disc (Search)
While playing a disc, you can locate a particular point on the disc quickly by using Search forward or Search backward.
Note
The Search function is not available on some DVDs.
To search for a point using Search forward or Search backward
1 While playing a disc, select the (Search forward) or the (Search backward) icon using the directional buttons and press and hold down the × button.
2 When you find the desired point, release the × button.
You can search for a point directly
Press the ☐r SCAN button on the DVD remote control and watch until you find the point you are looking for. When you find the desired point, press the ▷ PLAY button.
Each time you press the ➕ or ➗ SCAN button, the search speed changes (three speeds).
To search by slow-motion play
1 While playing a disc, select the (Slow) icon using the directional buttons and press the × button.
Slow-motion play is started.
2 When you find the desired point, select the ▶ (Play) icon and press the × button.
Normal speed play is resumed.
You can choose slow-motion play directly
Press the ▶ or SLOW button on the DVD remote control and watch until you find the point you are looking for. When you find the desired point, press the ▷ PLAY button.
● Using the Setup display
Using the Setup display, you can change the initial settings, adjust the picture and sound and set various other output options. You can also choose a language for subtitles, restrict playback by children, and so on. For details on the Setup display, refer to pages 42 to 53.
1 Select the (Setup) icon using the directional buttons and press the × button.
The Setup display appears.
2 Select the category you want using the directional buttons and press the × button.
The category is selected and the menu becomes active.
3 Select the item you want to change using the directional buttons and press the × button.
The item is selected and the sub-menu becomes active.
4 Select or input changes to the sub-menu(s) as appropriate.
To save your changes, be sure to eject the DVD before pressing the ⏻ (standby)/RESET button or turning off the console with the MAIN POWER switch. Please note that changes will not be saved if you reset or turn off the console without first ejecting the DVD.
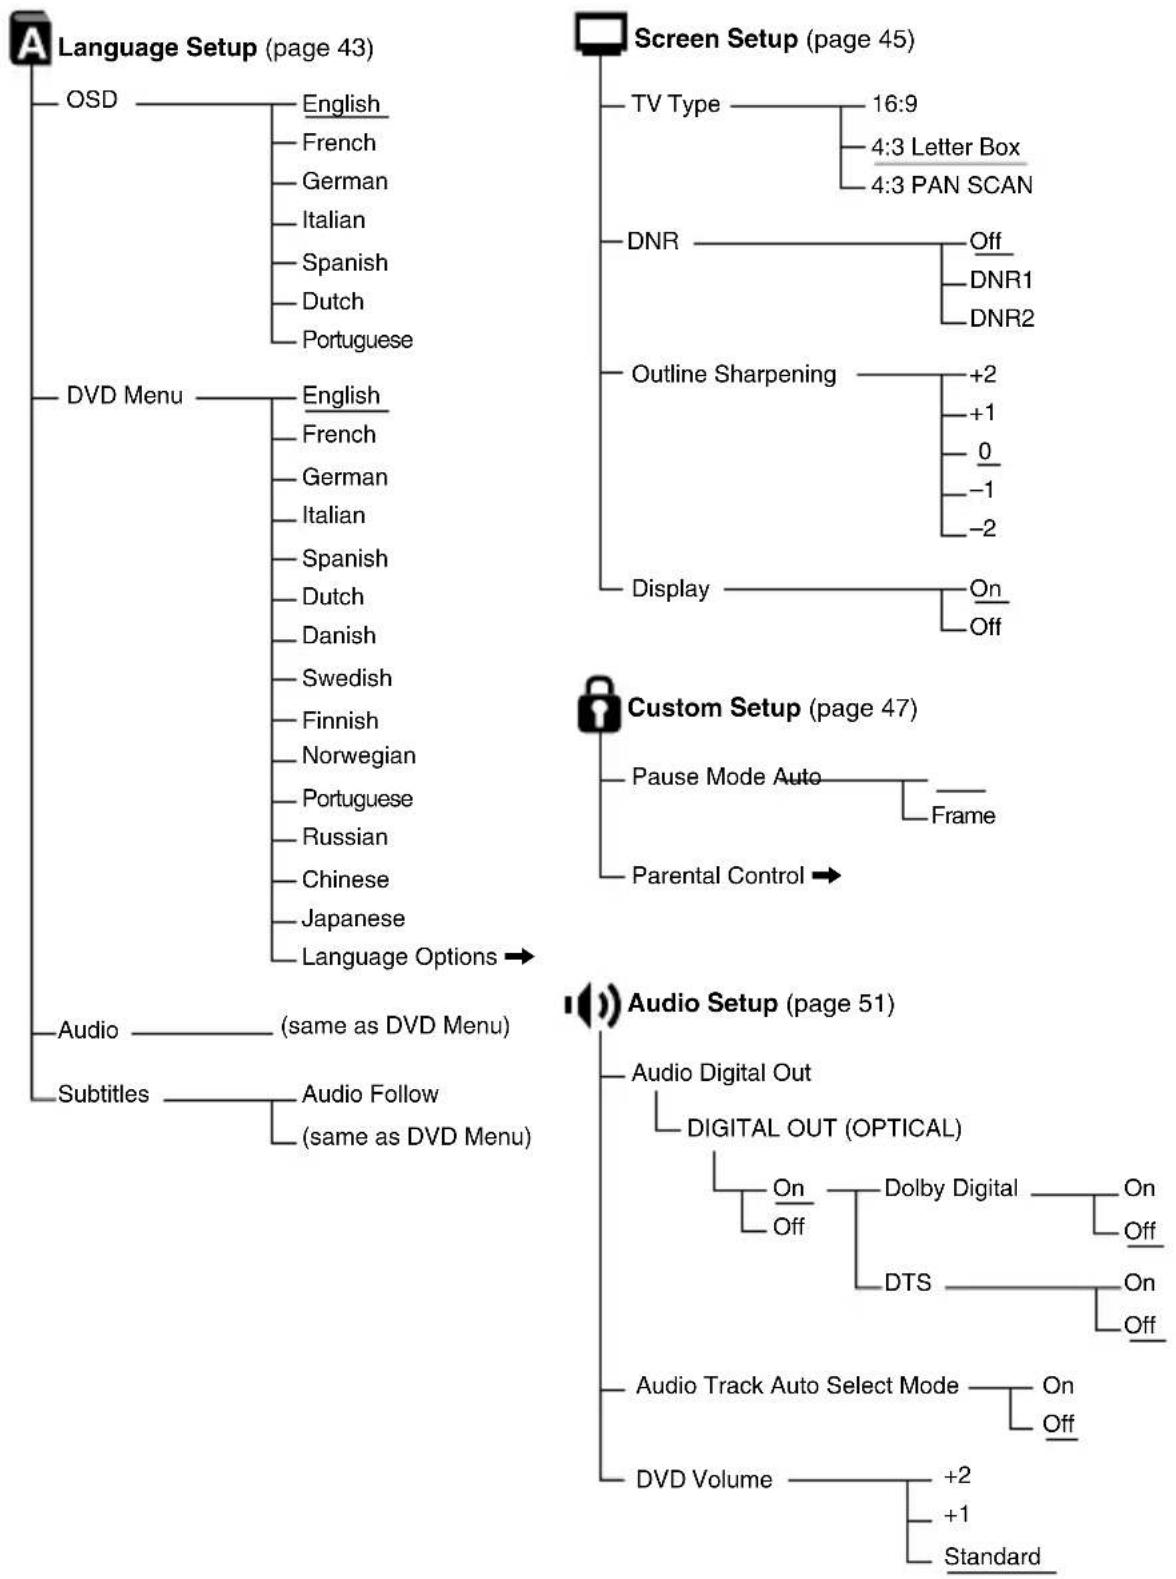
● Setup display item list
The default settings for each item are underlined.
flowchart
graph TD
    A["Language Setup (page 43)"] --> B["OSD"]
    A --> C["DVD Menu"]
    A --> D["Audio"]
    A --> E["Subtitles"]

    F["Screen Setup (page 45)"] --> G["TV Type"]
    F --> H["DNR"]
    F --> I["Outline Sharpening"]
    F --> J["Display"]
    F --> K["Custom Setup (page 47)"]
    K --> L["Pause Mode Auto"]
    K --> M["Parental Control"]

    N["Audio Setup (page 51)"] --> O["Audio Digital Out"]
    N --> P["Digital OUT (OPTICAL)"]

    O --> Q["On Off"]
    O --> R["Dolby Digital"]
    O --> S["On Off"]
    O --> T["DTS"]

    U["Audio Track Auto Select Mode"] --> V["On Off"]
    W["DVD Volume"] --> X["+2 +1 Standard"]
● Setting language options (Language Setup)
“Language Setup” allows you to choose languages for the on-screen display (OSD), the DVD audio and other items.
The default settings are underlined.
Select the 📄Language Setup) icon in the Setup display.
To save your changes, be sure to eject the DVD before pressing the ⏻ (standby)/RESET button or turning off the console with the MAIN POWER switch. Please note that changes will not be saved if you reset or turn off the console without first ejecting the DVD.
Notes
- When you select a language that is not recorded on the DVD, one of the recorded languages is automatically selected for the “DVD Menu,” “Audio,” and “Subtitles” settings.
- Depending on the DVD, the language you have selected for the “DVD Menu,” “Audio,” or “Subtitles” settings may not be used.
OSD
Selects the language for the on-screen display.
- English
- French
- German
- Italian
- Spanish
• Dutch - Portuguese
DVD Menu
Selects the language for the "DVD Menu" which is recorded in the DVD.
- English
- French
• German - Italian
- Spanish
• Dutch
• Danish - Swedish
Using the Control Panel (continued)
- Finnish
- Norwegian
- Portuguese
- Russian
- Chinese
- Japanese
- Language Options
By choosing “Language Options,” you can select from an extensive list of languages.
Audio
Selects the language for the DVD audio.
- English
- French
- German
- Italian
- Spanish
- Dutch
- Danish
- Swedish
- Finnish
- Norwegian
- Portuguese
- Russian
- Chinese
- Japanese
- Language Options
By choosing “Language Options,” you can select from an extensive list of languages.
Subtitles
Selects the language for subtitles recorded on the DVD.
- Audio Follow *
• (same options as for “Audio” above)
● Setting TV display options (Screen Setup)
“Screen Setup” allows you to set the aspect ratio of the connected TV, and set other display options. The default settings are underlined.
Select the □(Screen Setup) icon in the Setup display.
To save your changes, be sure to eject the DVD before pressing the ⏻ (standby)/RESET button or turning off the console with the MAIN POWER switch. Please note that changes will not be saved if you reset or turn off the console without first ejecting the DVD.
TV Type
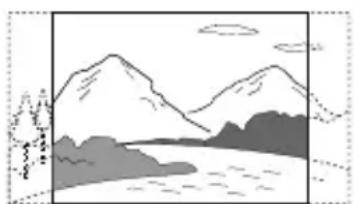
Sets the aspect ratio of the TV.
You can change this setting only when the DVD is stopped.
- 16:9 : Select this option when using a wide-screen TV, or a standard TV that displays in wide mode.
- 4:3 Letter Box : Select this option when using a standard TV. This setting displays a wide picture with margins on the upper and lower portions of the screen.
- 4:3 PAN SCAN : Select this option when using a standard TV. Displays a wide picture adjusted to match the height of the screen, automatically cutting off the portions at left and right that do not fit.
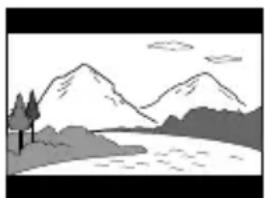
16:9

natural_image
Simple line drawing of a mountain landscape with trees and water (no text or symbols)4:3 Letter Box

natural_image
Simple line drawing of a mountain landscape with trees and a river (no text or symbols)4:3 PAN SCAN

natural_image
Simple line drawing of a mountain landscape with water and clouds (no text or symbols)Using the Control Panel (continued)
Note
With some DVDs, the picture is automatically output in a predetermined aspect ratio.
DNR\*
This feature allows for the reduction of roughness of the image to provide a clearer picture.
• Off
• DNR1
• DNR2
* DNR is an abbreviation for Digital Video Noise Reduction.
Notes
- Although DNR2 is more effective for reducing image roughness than DNR1, in some cases an afterimage may appear. If an afterimage appears, select “Off.”
- Depending on the DVD, the DNR function may produce limited results.
■ Outline Sharpening
This function allows for the sharpening or softening of the outline of on-screen images. The higher the value, the sharper the outline.
• +2
• +1
- 0: Normally select this position.
-1
-2
■ Display
This function displays or turns off the playing status information in the upper right corner of the TV screen.
- On: When using the DVD Player, status information is displayed for several seconds.
- Off: The status information is turned off.
● Setting viewer options (Custom Setup)
“Custom Setup” allows you to set Parental Control levels, etc. The default settings are underlined.
Select the (Custom Setup) icon in the Setup display.
To save your changes, be sure to eject the DVD before pressing the ⏻ (standby)/RESET button or turning off the console with the MAIN POWER switch. Please note that changes will not be saved if you reset or turn off the console without first ejecting the DVD.
■ Parental Control
Playback of certain DVD content can be restricted depending on the age of the viewers.
The “Parental Control” function allows you to set this playback restriction level.
Setting the Parental Control level
Select the (Custom Setup) icon in the Setup display.
1 Select "Parental Control" using the directional buttons and press the × button.
If a password has not been registered
The screen for registering a password is displayed.

Using the Control Panel (continued)
If a password has already been registered
The password confirmation screen appears. Proceed with step 3.

2 Enter a four-digit password using the number buttons.
The password confirmation screen appears.
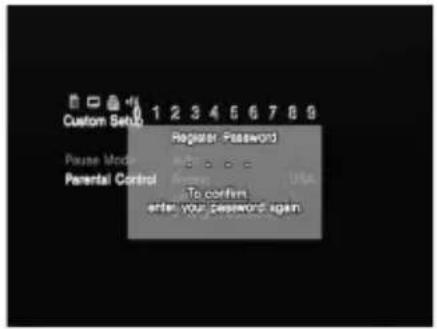
3 For confirmation, enter the password once again.
The screen for choosing a geographic region, setting Parental Control level, and changing your password is displayed.
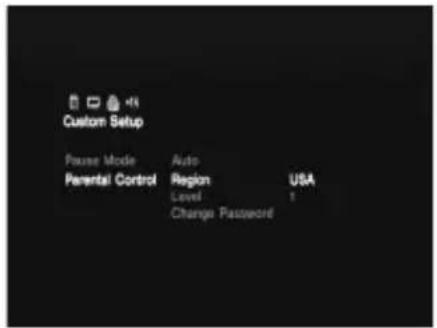
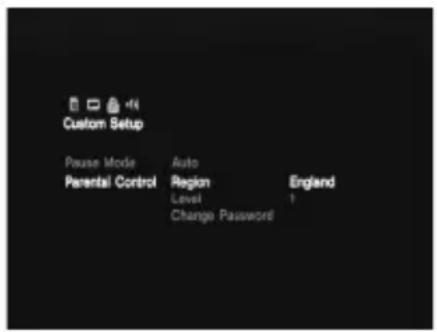
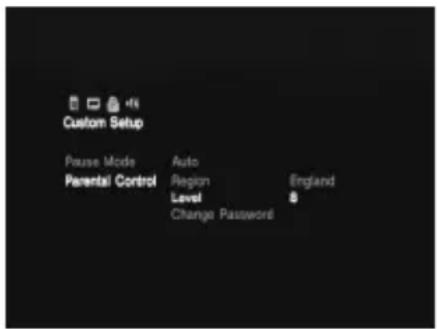
4 Select "Region" using the directional buttons and press the × button.
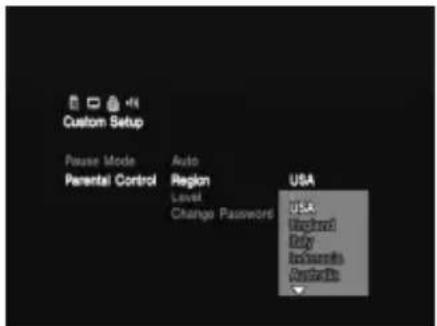
5 Select a geographic region using the directional buttons to set the standard Parental Control level for that region and press the × button.
US
6 Select "Level" using the directional buttons and press the × button.

7 Select the desired level using the directional buttons and press the × button.
The lower the value, the more strict the restriction.
To turn off Parental Control and play the DVD after entering your password
Set “Level” to “Off” in step 7 and press the ▷ PLAY button on the DVD remote control.
To change your password
1 In step 3 of "Setting the Parental Control level," select "Change Password" using the directional buttons and press the × button.
The screen for changing your password appears.
2 Perform steps 2 and 3 once again to register a new password.
To play a disc that is protected by Parental Control
1 Insert the disc.
Playback is started automatically. When you come to a section of the DVD that is protected by Parental Control, the screen for entering your password appears.
2 Enter your four-digit password using the number buttons and press the × button.
Playback is resumed.
When you stop playing the DVD, the Parental Control level returns to the original setting.
If you forget your password
Press the SELECT button and enter the four-digit number “7444” when the “Parental Control” display asks you for your password. The old password is deleted.
Notes
- When you play DVDs that do not have the Parental Control function, playback will not be restricted even if you set a playback restriction level on the PlayStation®2 console.
- If you do not set a password, you cannot change the Parental Control settings.
- Depending on the DVD, you may be asked to change the Parental Control level while playing the disc. In this case, enter your password and change the level. When you stop playing the DVD, the Parental Control level returns to the original setting.
■ Pause mode
Sets the picture status in pause mode.
- Auto: A picture including subjects that move dynamically can be seen without jitter. Normally select this option.
- Frame : A picture including subjects that do not move dynamically can be seen with high resolution.
● Setting sound options (Audio Setup)
“Audio Setup” allows you to adjust your audio settings according to the playback conditions. The default settings are underlined.
Select the Audio Setup icon in the Setup display.
To save your changes, be sure to eject the DVD before pressing the ⏻ (standby)/RESET button or turning off the console with the MAIN POWER switch. Please note that changes will not be saved if you reset or turn off the console without first ejecting the DVD.
■ Audio Digital Out
Switches the method of outputting audio signals when you connect the following equipment to the DIGITAL OUT (OPTICAL) connector using an optical digital cable (sold separately):
- a receiver (amplifier) with a digital connector
- an audio component with a built-in Dolby Digital or DTS decoder
- an MD (MiniDisc) or DAT (Digital Audio Tape) deck
For details on connection, refer to the PlayStation®2 console instruction manual.
• DIGITAL OUT (OPTICAL)
Selects whether to output signal via the DIGITAL OUT (OPTICAL) connector.
- On : Select this when you connect with an optical digital cable (sold separately). Normally select this option. If you select “On,” select the appropriate settings for “Dolby Digital” and “DTS.”
- Off: Select this when you do not want sound (audio) signal to be output via the DIGITAL OUT (OPTICAL) connector.
Note
When “Off” is selected, neither “Dolby Digital” nor “DTS” can be set.
Using the Control Panel (continued)
- Dolby Digital
Selects the Dolby Digital signal that is output when you connect to the console with an optical digital cable (sold separately).
- On: Select this option when you have an audio component with a built-in Dolby Digital decoder connected to the console. If the console is connected to an audio component without a built-in Dolby Digital decoder, do not turn this option on. If you select this option by mistake, when you play a Dolby Digital audio track, a loud noise (or no sound) will come out from the speakers, possibly hurting your ears or damaging the speakers.
- Off: Select this option when you have an audio component without a built-in Dolby Digital decoder connected to the console.
• DTS
Selects the DTS signal that is output when you connect to the console with an optical digital cable.
- On : Select this option when you have an audio component with a built-in DTS decoder connected to the console.
If the console is connected to an audio component without a built-in DTS decoder, do not turn this option on. If you select this option by mistake, when you play a DTS audio track, a loud noise (or no sound) will come out from the speakers, possibly hurting your ears or damaging the speakers.
- Off: Select this option when you have an audio component without a built-in DTS decoder connected to the console.
■ Audio Track Auto Select Mode
Gives priority to the audio track with the highest number of channels when you play a DVD on which multiple audio formats (PCM, Dolby Digital, or DTS) are recorded.
- On : Priority given.
- Off: No priority given.
Notes
- If you set this option to “On,” the language may change because the “Audio Track Auto Select Mode” setting has higher priority than the “Audio” setting of “Language Setup” (page 43).
- If the “DTS” option of “Audio Digital Out” is set to “Off” under “Audio Setup,” the DTS audio track will not be played even if you set “Audio Track Auto Select Mode” to “On” and the DTS audio track has the highest number of channels.
- If PCM, Dolby Digital, and DTS have the same number of channels, the console selects PCM, Dolby Digital, and DTS in this order.
- Depending on the DVD, the audio track with priority may be predetermined. In this case, you cannot give priority to the DTS or Dolby Digital format by selecting “On.”
DVD Volume
If the audio output level of the DVD is low, you can turn up the volume of the DVD. The “DIGITAL OUT (OPTICAL)” option of “Audio Digital Out” must be set to “Off,” to change the volume.
- +2 : Turns up the volume (maximum).
• +1 : Turns up the volume. - Standard : Original audio volume. Normally select this position.
Notes
- Sound clipping may occur in places where loud sound is present. If sound clipping occurs, select “Standard.”
- If you turn up the volume too high, your ears may be injured or the speakers damaged.
Please go through this section if you experience difficulty in operating the DVD remote control.
If you experience any of the following difficulties, use this troubleshooting guide to help remedy the problem before requesting repair. Use the troubleshooting guide in the PlayStation®2 console instruction manual together with this troubleshooting guide. Should any problem persist, contact our technical support line at 1-800-345-7669 for assistance.
Operation
DVD remote control doesn't work.
→There is an obstacle between the DVD remote control and the PlayStation®2 console.
→The distance between the DVD remote control and the console is too long.
→You are not pointing the DVD remote control toward the IR receiver on the IR receiver unit connected to the PlayStation®2 console.
→The batteries in the DVD remote control have run out.
→You are using the DVD remote control for another appliance.
→The IR receiver unit is not connected properly to the controller port of the console.
→The IR receiver on the IR receiver unit is exposed to strong light such as direct sunlight or the light from a lamp.
→ You are playing PlayStation®2 or PlayStation® format software. Some PlayStation®2 and PlayStation® format software will not function properly when operated using the buttons on the DVD remote control. Also, the DVD remote control will not work if you push more than one button at a time.
→You are trying to play a DVD video without first inserting a memory card (8MB) (for PlayStation®2) containing the DVD Player into a MEMORY CARD slot of the PlayStation®2 console.
Another Sony DVD player responded to the DVD remote control (for PlayStation®2).
→The DVD remote control (for PlayStation®2) may operate other Sony DVD players, due to its design.
Picture quality
When you play a DVD video, picture noise appears.
→The settings are not correct.
When using the component AV cable (for PlayStation®2), you must set the “Component Video Out” option of the console System Configuration menu to “Y Cb/Pb Cr/Pr.” For details, refer to the PlayStation®2 console instruction manual.
DVD video operation
Disc playback does not start from the beginning of the DVD.
→ Program Play, Shuffle Play, Repeat Play or A←→B Repeat is set. Refer to the instructions on pages 27-31 of this manual for the method of clearing each of these special playback modes.
Specifications
• Power supply : 3V DC (size AAA battery × 2)
- Dimensions : Approx. 59 × 159 × 17mm ( 2^1/4 × 6^1/4 × ^1/2 in) (w × h × d)
- W eight: Approx. 72g (2 ^1/2 oz) (not including batteries)
- Accessories : Refer to page 11.
- Battery life: About 6 months under normal operating conditions.
When the batteries run down, the DVD remote control will not operate normally or the operating distance will become shorter than usual. When this happens, replace both batteries with new ones.
Design and specifications are subject to change without notice.
LIMITED WARRANTY
Sony Computer Entertainment America (SCEA) warrants to the original purchaser that this product is free from defects in material and workmanship for a period of ninety (90) days from the date of purchase. Upon a showing of proof of purchase, SCEA agrees for a period of ninety (90) days to either repair or replace, at its option, the SCEA product. You must call 1-800-345-7669 to receive instructions to obtain repair/replacement services.
This warranty shall not be applicable and shall be void if the defect in the SCEA product has arisen through abuse, unreasonable use, mistreatment, neglect, or means other than from a defect in materials or workmanship. THIS WARRANTY IS IN LIEU OF ALL OTHER WARRANTIES AND NO OTHER REPRESENTATIONS OR CLAIMS OF ANY NATURE SHALL BE BINDING ON OR OBLIGATE SCEA. ANY IMPLIED WARRANTIES APPLICABLE TO THIS PRODUCT, INCLUDING WARRANTIES OF MERCHANTABILITY AND FITNESS FOR A PARTICULAR PURPOSE, ARE LIMITED TO THE NINETY (90) DAY PERIOD DESCRIBED ABOVE. IN NO EVENT WILL SCEA BE LIABLE FOR INCIDENTAL OR CONSEQUENTIAL DAMAGES RESULTING FROM POSSESSION, USE OR MALFUNCTION OF THE SCEA PRODUCT.
SOME STATES OR PROVINCES DO NOT ALLOW LIMITATION ON HOW LONG AN IMPLIED WARRANTY LASTS AND SOME STATES DO NOT ALLOW THE EXCLUSION OR LIMITATIONS OF CONSEQUENTIAL OR INCIDENTAL DAMAGES, SO THE ABOVE LIMITATIONS OR EXCLUSION MAY NOT APPLY TO YOU.
This warranty gives you specific legal rights, and you may also have other rights which vary from state to state or province to province. This warranty is valid only in the United States and Canada.
Avertissement
natural_image
Diagram of a device's internal components with battery and switch, showing no text or symbolsRemarques
natural_image
Illustration of a computer tower with an attached device (no text or symbols)12 Touche R3 (CHOIX AUDIO)*
natural_image
Simple line drawing of a mountain landscape with trees and a river (no text or symbols)4:3 Letter Box

natural_image
Simple black-and-white landscape illustration with mountains, a river, and trees (no text or symbols)4:3 PAN SCAN

natural_image
Simple line drawing of a mountain landscape with a river and trees (no text or symbols)• DIGITAL OUT (OPTICAL)
natural_image
Diagram of a device's internal components with battery and switch, showing no text or symbolsNotas
natural_image
Diagram showing a computer with an open port and a smartphone on the side (no text or symbols present)6Botón CLEAR (borrar)
natural_image
Simple line drawing of a mountain landscape with trees and water (no text or symbols)4:3 Tipo buzón
natural_image
Simple black-and-white landscape illustration with mountains, trees, and a winding river (no text or symbols)4:3 EXPLO PAN
natural_image
Simple line drawing of a mountain landscape with peaks and a river, no text or symbols present.• DIGITAL OUT (OPTICAL)
"PlayStation" and "DUALSHOCK" are registered trademarks of Sony Computer Entertainment Inc.
"SONY" and "are registered trademarks of Sony Corporation.


- Télécommande DVD
- Mode d'emploi
- Warning marks and their meanings
- Warning
- Caution
- Information
- For customers in the USA
- Table of contents
- Setup 11
- Startup with the supplied DVD Player disc ...... 14
- Viewing a DVD video ... 16
- Using the Control Panel 32
- Troubleshooting ... 54
- Specifications ..... 56
- LIMITED WARRANTY ... 57
- Precautions on the DVD remote control
- Precautions on safe battery use
- Do not touch material from a leaking battery.
- If you do come into contact with material from a leaking battery, be sure to take the following actions:
- Keep batteries in a place out of the reach of children.
- Never throw batteries into a fire. Do not heat, break open or modify batteries, and do not get batteries wet. Never attempt to recharge non-rechargeable type batteries.
- Precautions on safe battery use (continued)
- Discs that can be played with the PlayStation®2 console
- ● DVD video systems and regional restrictions
- Note on the playback of DVD video
- Static image caution
- Before use
- - Inserting batteries into the DVD remote control (for PlayStation®2)
- Notes
- - Attaching the IR receiver unit (for PlayStation®2)
- Note
- Startup with the supplied DVD Player disc
- - Installing the DVD Player on a memory card (8MB) (for PlayStation®2)
- ● Playing a DVD video
- Notes on the playback of DTS audio from a DVD video
- ● When the DVD video is finished
- ● Operating the DVD Player
- ● Operating with the Control Panel
- Direct item selection is also available.
- Press the DISPLAY or SELECT button of the DVD remote control.
- Viewing a DVD video (continued)
- Setup
- Chapter Display
- Help
- Go to Chapter/Number Buttons
- Previous
- 13/ Search
- 14▶▶I Next
- 15▶ Play
- II Pause
- ■ Stop
- Slow
- ● Operating with the DVD remote control (for PlayStation®2)
- I ◀◀/▶▶▶I PREV/NEXT buttons
- ▷ PLAY button
- TITLE button
- 12DISPLAY button
- Up, down, right and left directional buttons
- 14SHUFFLE button
- Number buttons
- 16TIME button
- 17A←→B button
- II PAUSE button
- ■ STOP button
- DVD MENU button
- RETURN button
- ENTER button
- Buttons identical to those on the analog controller
- ● Operating with the analog controller (DUALSHOCK®2)
- L2 button (SEARCH)
- L1 button (PREVIOUS CHAPTER)
- ③ Up, down, right and left directional buttons
- L3 button (SUBTITLE) \*
- SELECT button
- R2 button (SEARCH)
- R1 button (NEXT CHAPTER)
- ● Playback from the last stopping point (Resume Play)
- During playback, press the ■ STOP or ○ button on the DVD remote control to stop play.
- Press the ▷ PLAY button on the DVD remote control.
- Using the Control Panel
- ● Playback in desired order (Program Play)
- To end Program Play
- To change Program Play settings
- To clear Program Play settings
- Using Program Play again after playback has finished
- Repeat Play and Shuffle Play can be selected during Program Play.
- ● Playback in random order (Shuffle Play)
- Press the SHUFFLE button.
- To end Shuffle Play
- Shuffle Play can be set even when the disc is not playing.
- Program Play or Repeat Play can be selected during Shuffle Play.
- ● Repeated playback (Repeat Play)
- Press the REPEAT button.
- To end Repeat Play
- Repeat Play can be set even when the disc is not playing.
- Program Play or Shuffle Play can be selected during Repeat Play.
- ● Repeated playback of a selected section (A↔B Repeat)
- To cancel A←→B Repeat
- ● Using the DVD menu
- You can select the DVD menu directly
- To set the language for the DVD menu
- To return to the previous screen
- ● Displaying the Title menu
- Select the 📄(Title) icon using the directional buttons and press the × button.
- You can select the Title menu directly
- To return to the previous display
- ● Changing the audio language
- Select the ⌘(Audio Options) icon using the directional buttons and press the × button.
- You can select Audio Options directly
- ● Changing the viewing angle
- Select the 🎨Angle Options) icon using the directional buttons and press the × button.
- You can select Angle Options directly
- ● Displaying subtitles
- Select the 📄 Subtitle Options) icon using the directional buttons and press the × button.
- You can select Subtitle Options directly
- To turn the subtitles off
- - Selecting a specific scene for playback
- When the IR receiver unit is not connected to the console
- ● Displaying title and chapter numbers
- To display the elapsed time and remaining time
- When the IR receiver unit is not connected
- ● Displaying the list of direct button functions (Help)
- ● Finding a particular point on a disc (Search)
- To search for a point using Search forward or Search backward
- You can search for a point directly
- To search by slow-motion play
- You can choose slow-motion play directly
- ● Using the Setup display
- ● Setup display item list
- ● Setting language options (Language Setup)
- OSD
- DVD Menu
- Using the Control Panel (continued)
- Audio
- Subtitles
- ● Setting TV display options (Screen Setup)
- TV Type
- DNR\*
- ■ Outline Sharpening
- ■ Display
- ● Setting viewer options (Custom Setup)
- ■ Parental Control
- Setting the Parental Control level
- Select "Parental Control" using the directional buttons and press the × button.
- If a password has already been registered
- Enter a four-digit password using the number buttons.
- For confirmation, enter the password once again.
- Select "Region" using the directional buttons and press the × button.
- To change your password
- To play a disc that is protected by Parental Control
- If you forget your password
- ■ Pause mode
- ● Setting sound options (Audio Setup)
- ■ Audio Digital Out
- - Dolby Digital
- • DTS
- ■ Audio Track Auto Select Mode
- DVD Volume
- Please go through this section if you experience difficulty in operating the DVD remote control.
- Operation
- DVD remote control doesn't work.
- Another Sony DVD player responded to the DVD remote control (for PlayStation®2).
- Picture quality
- When you play a DVD video, picture noise appears.
- DVD video operation
- Disc playback does not start from the beginning of the DVD.
- Specifications
- LIMITED WARRANTY
- Avertissement
- Remarques
- Notas
Brand : SONY
Model : SCPH-10171
Category : Game console