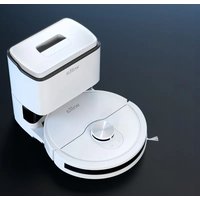
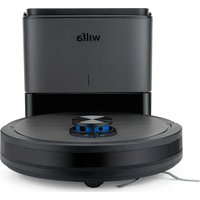
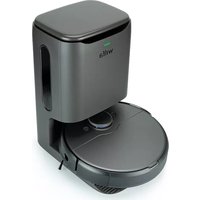
Innobot RVC-D4000LIN - Robot vacuum WILFA - Free user manual and instructions
Find the device manual for free Innobot RVC-D4000LIN WILFA in PDF.

| Product type | Robot vacuum cleaner |
| Brand | Wilfa |
| Model | Innobot RVC-D4000LIN |
| Battery capacity | 5200 mAh |
| Main functions | Suction and mopping (mop), edge modes, spot cleaning, specified area, scheduled, memory mapping, ToF 3D obstacle detection, virtual walls/forbidden zones, Do Not Disturb mode |
| Connectivity | Wi-Fi, iOS 14.0+ and Android 10.0+ mobile app |
| Safety | Anti-drop and anti-collision sensors, not to be used unattended by children under 8 years, do not use on elevated surfaces without barrier |
| Maintenance and cleaning | Regular cleaning of dustbin, filter, side brush and silicone brush, water tank, sensors |
| Spare parts and repairability | Side brush (replace every 3-6 months), silicone brush (6-12 months), filter, removable battery for recycling |
| Warranty | 5 years (manufacturing defects, domestic use) |
Frequently Asked Questions - Innobot RVC-D4000LIN WILFA
User questions about Innobot RVC-D4000LIN WILFA
0 question about this device. Answer the ones you know or ask your own.
Ask a new question about this device
Download the instructions for your Robot vacuum in PDF format for free! Find your manual Innobot RVC-D4000LIN - WILFA and take your electronic device back in hand. On this page are published all the documents necessary for the use of your device. Innobot RVC-D4000LIN by WILFA.
USER MANUAL Innobot RVC-D4000LIN WILFA
natural_image
Black robotic vacuum cleaner with a circular control knob and 'wilfa' logo (no text on device body)INNOBOT
ROBOT VACCUUM RVC-D4000LIN
EN · Instruction manual
NO · Bruksanvisning
SE · Bruksanvisning
IMPORTANT SAFETY INSTRUCTIONS
- This appliance can be used by children aged from 8 years and above and persons with reduced physical, sensory or mental capabilities or lack of experience and knowledge if they have been given supervision or instruction concerning use of the appliance in a safe way and understand the hazards involved. Children shall not play with the appliance. Cleaning and user maintenance shall not be made by children without supervision.
- This product is only used for floor cleaning in home environment, and should not be used in outdoor, non-floor, commercial or industrial environment.
- Do not let children play with the machine. Please supervise children and pets to keep them as far away as possible when the machine works.
- If the power cord is damaged, it must be replaced with a special cord or a special component purchased from its manufacturer or maintenance department.
- Do not let children, pets sit on the machine at any time.
-
Do not handle this robot by using the protective cover of laser radar as handle.
• This appliance shall not be used by children -
Do not use it in suspended environments without protective fences (such as duplex floors, open balconies and furniture tops).
- Do not use it in an environment where the temperature is higher than 35^ C lower than 0^ C or there are any liquids and sticky objects on the ground.
- Do not use it to clean any burning objects.
- Before use, please arrange and fold the wires on the floor in case of any obstruction that blocks the machine movement.
- Please put away fragile objects and sundries (such as vases and plastic bags, etc.) on the ground, to avoid damage to valuables at home when the machine is blocked during operation or slightly collided.
- Do not use the mopping mode on the carpet. When mopping the floor, please set up virtual walls or forbidden zones in the carpet area.
- Do not let the machine absorb hard objects or sharp objects (such as decoration waste, glass and nails, etc.).
-
Please clean and maintain the appliance and base in power-off state.
-
Do not turn the machine upside down on the ground for a long time.
- If products need to be transported, please make sure that the machine is turned off, and it is recommended to use the original packaging box for packaging protection.
BATTERY AND CHARGING
- Do not use any third-party battery, power cord or base.
- Do not disassemble, repair or modify the battery or base without permission.
- Do not place the auto-clean base near the heat source (such as radiator, etc.).
- Before scrapping the machine, the power supply must be disconnected, and the battery should be taken out of the machine.
- If it is not used for a long time, please turn off the machine after being fully charged and put it in a cool and dry place.
- It is recommended to charge at least once a month.
INSTRUCTIONS ON ENVIRONMENTAL PROTECTION
The following information is only applicable when
discarding this robot, and is not a daily operation instruction:
Chemical substances contained in the built-in lithium-ion battery of this product will pollute the environment. Please remove the battery before you discard the machine, and hand it over to a professional battery recycling station for centralized disposal.
Steps to disassemble the battery:
- Let the robot run until it is low in power and cannot be cleaned without touching the auto-clean base.
- Turn the robot off.
- Disassemble the bottom shell of the robot.
- Press the buckle and pull out the connector plug of the battery, then take out the battery.
- Remove the battery cover plate and take the battery out.
NOTE:
- When disassembling the battery, make sure that the battery is exhausted and operated away from the base.
- Please disassemble the whole battery pack together, and do not damage the battery pack casing, in case of short circuit or leakage of
dangerous substances.
- If you touch battery fluid, please rinse with plenty of water and get medical assistance immediately.
SYSTEM DISCLAIMER
The list of smartphone types in the market is long and increasing. System performance can vary for different combinations of the operating system and how it is implemented in the phone model. Alterations from industry can have an impact too. Therefore, although we expect good performance in most cases, the expected performance of the app is not guaranteed. Although the app most likely will work for a long time with older hardware and software versions you need to keep your phone's operations systems updated to be sure to get the app fully functional.
Minimum requirement of January 2023:
- iOS 14.00
- Android 10.0
PRODUCT OVERVIEW – GENERAL
text_image
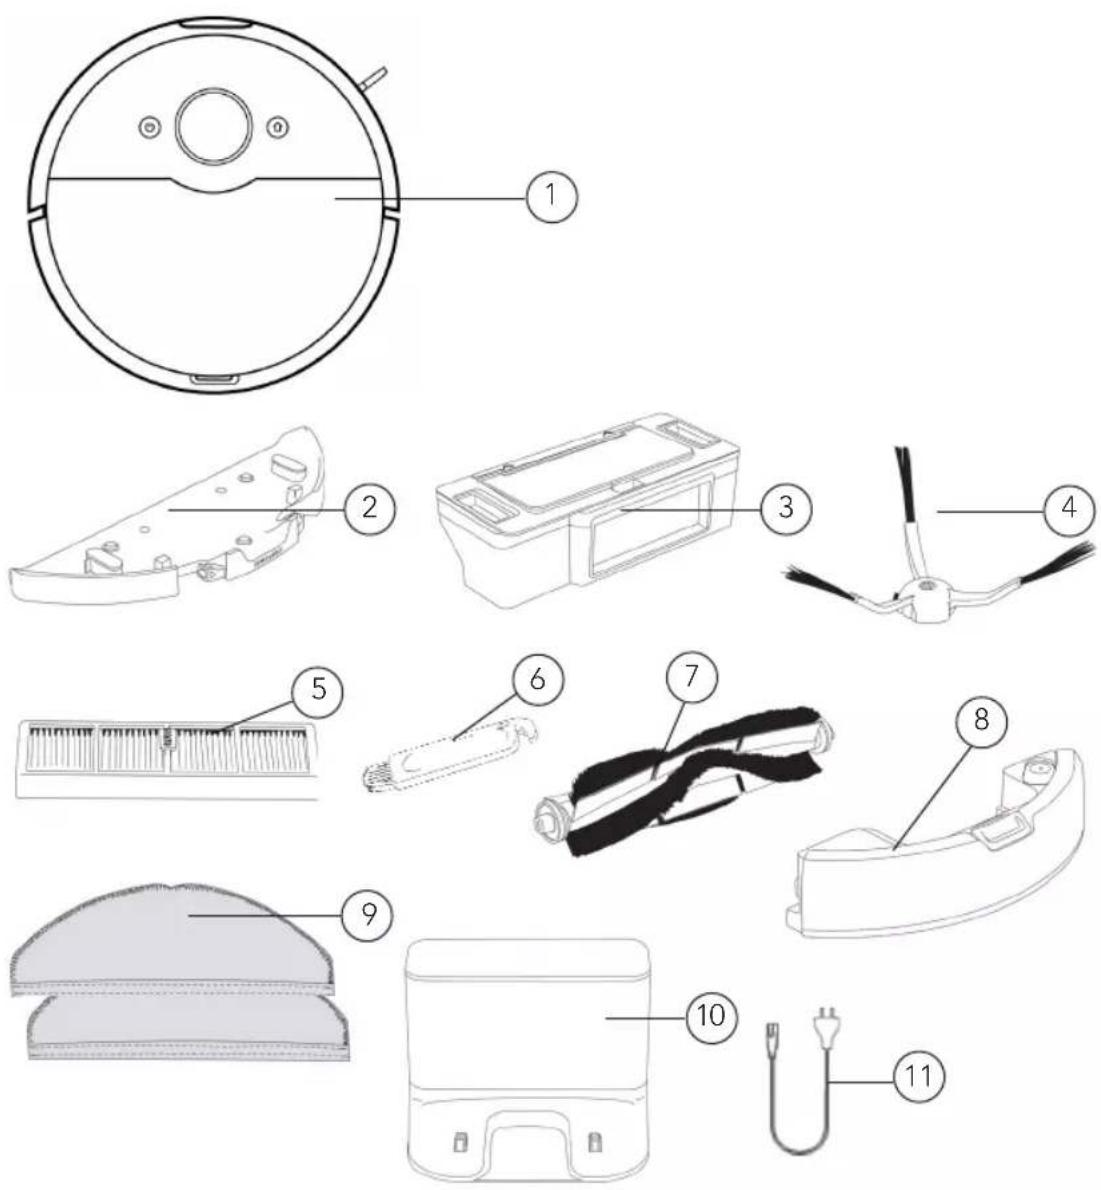
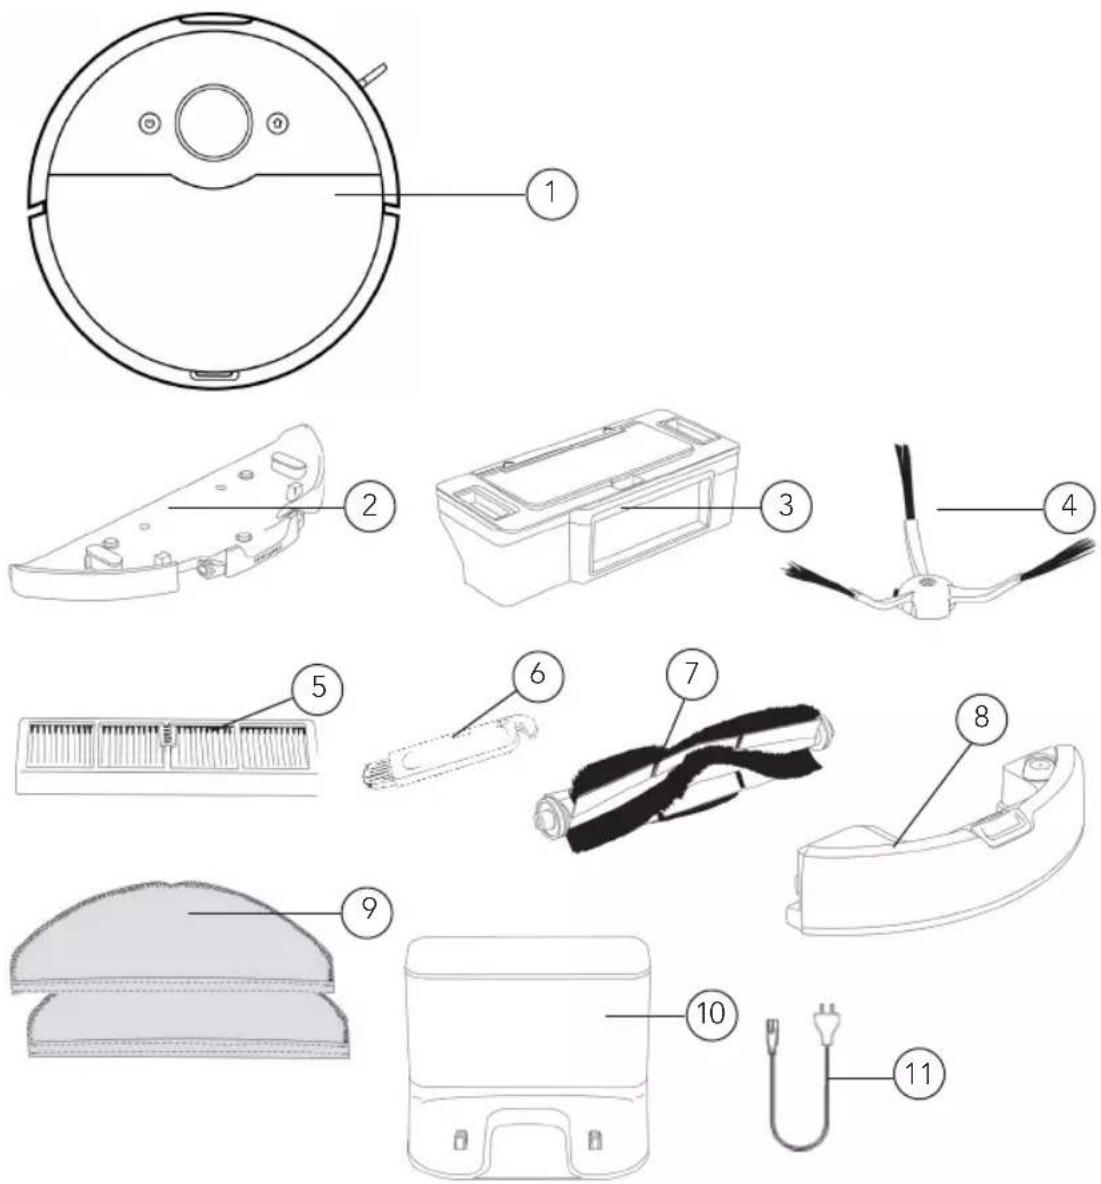
Exploded diagram of a robotic vacuum cleaner with numbered parts for identification- Robot vacuum cleaner
Accessories:
- Removable wet mop-plate
- Dust box
- Side brush
- Filter screen
-
Cleaning tool
-
Main brush
- Water tank
- Wet mop
10.Chargingstation - Power cord
EN
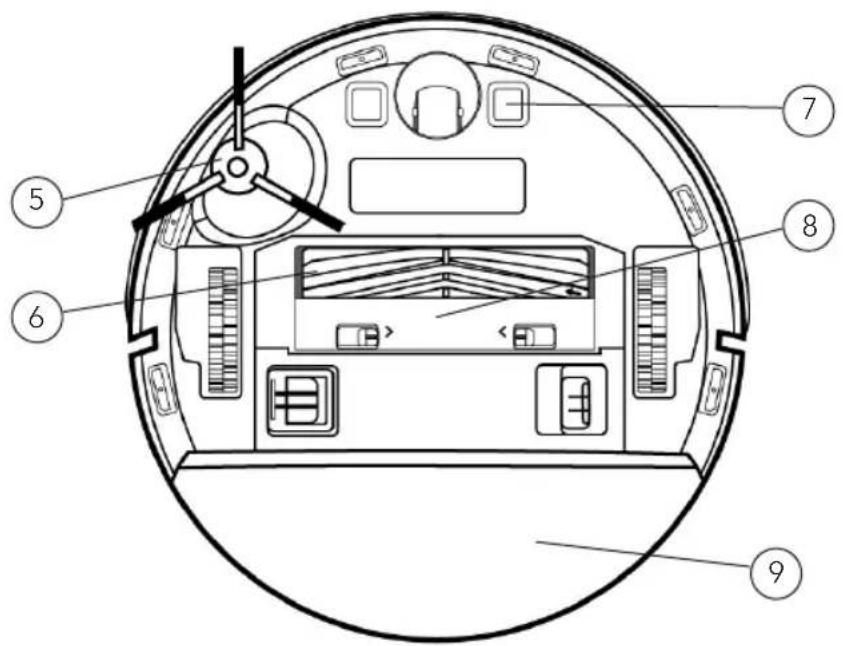
PRODUCT OVERVIEW – VACUUM CLEANER
text_image
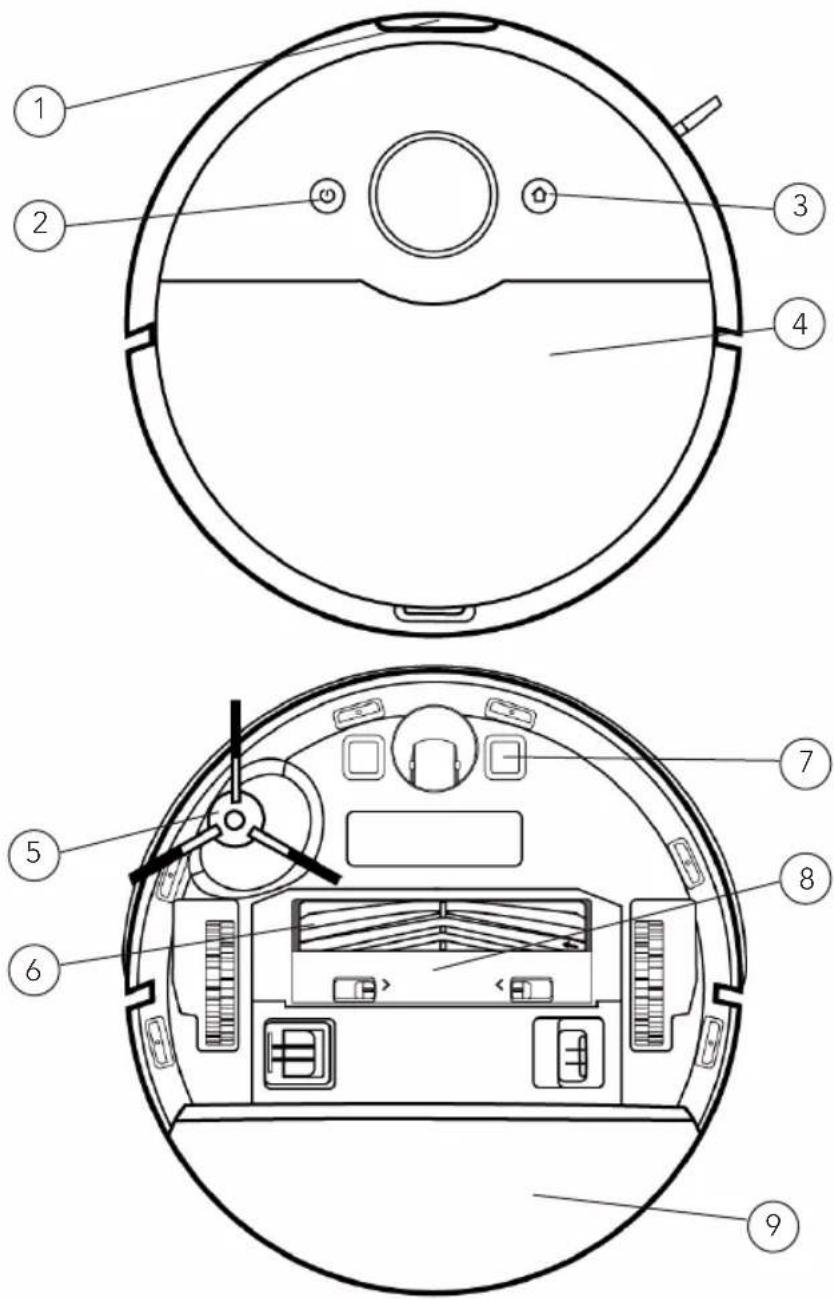
Technical diagram of a robotic vacuum cleaner with numbered parts for identification and assembly.- Sensor
- ON/Off button
- Home button
- Cover
-
Side brush
-
Main brush
- Charging electrodes
- Main brush cover
- Wet mop holder
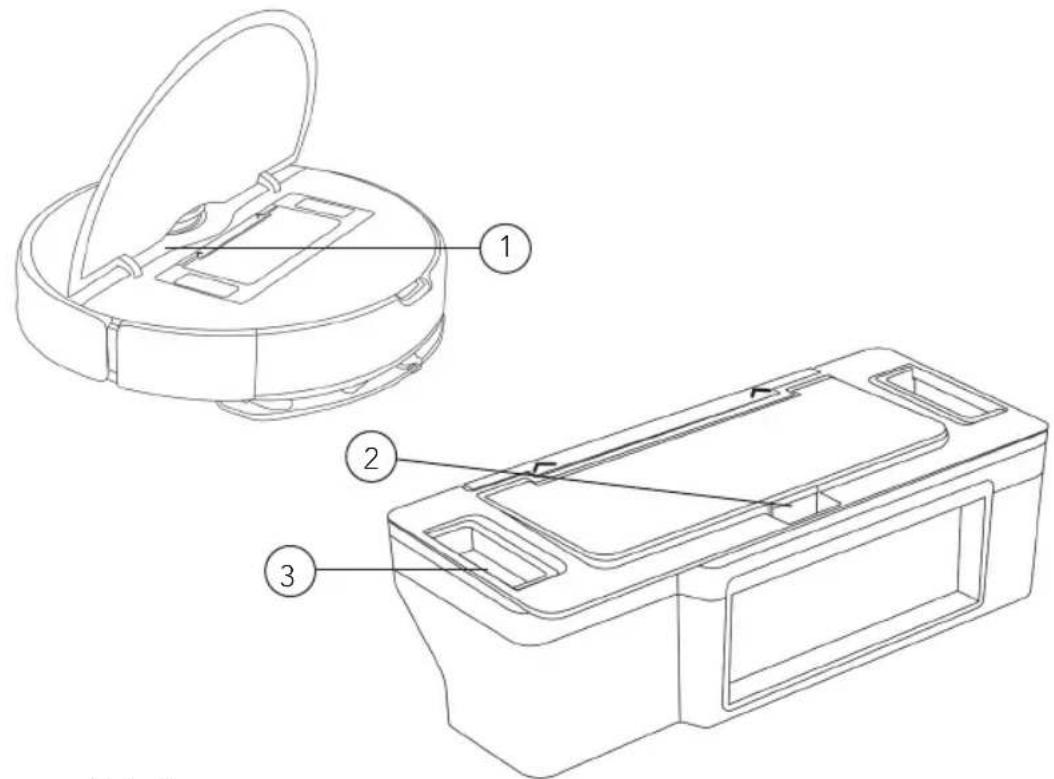
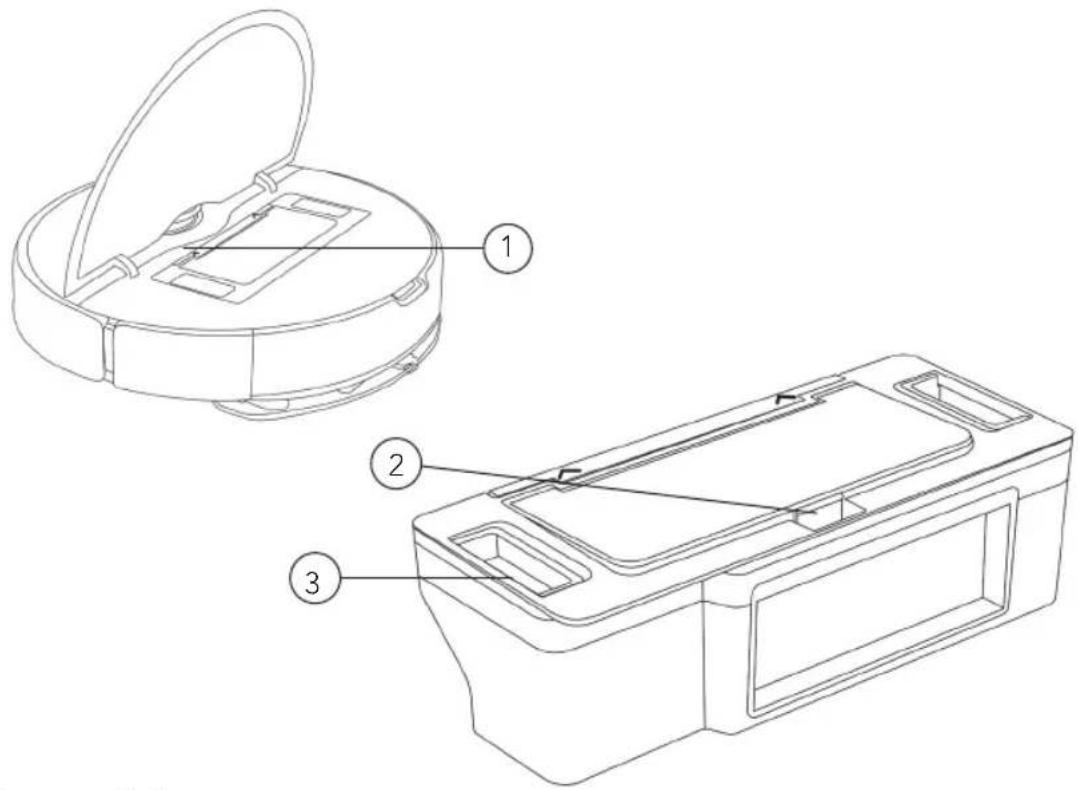
PRODUCT OVERVIEW - DETAILED
ROBOT DUSTBOX
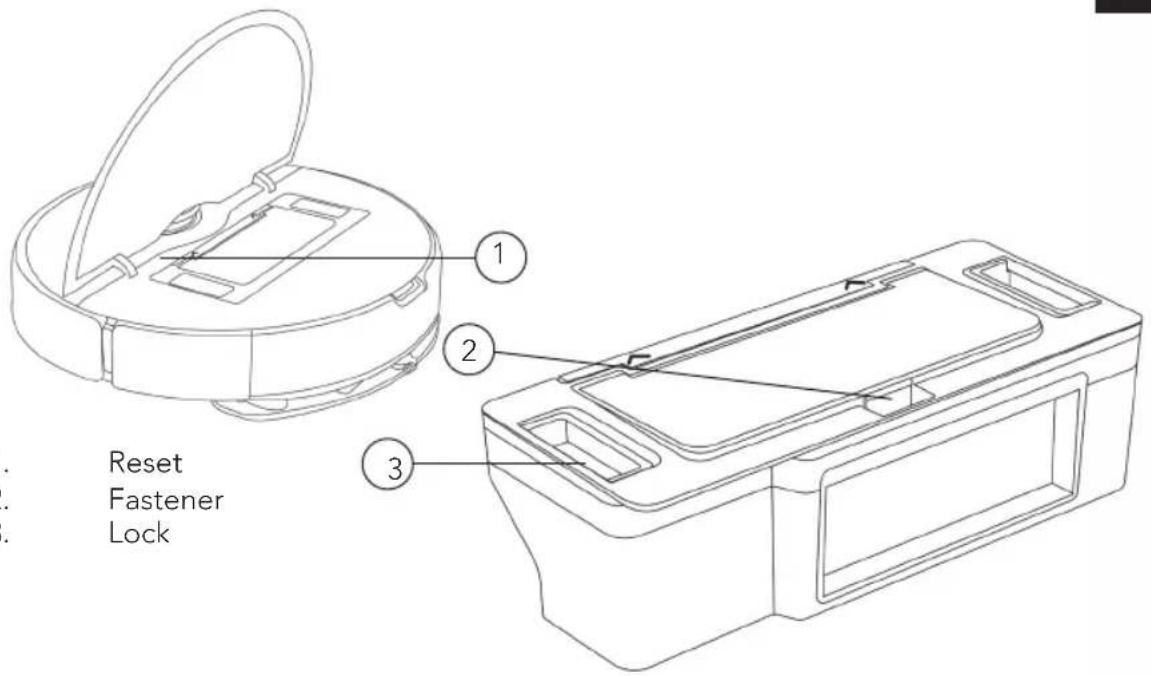
text_image
Reset Fastener LockPRODUCT OVERVIEW – LIGHTS AND BUTTONS
White light is always on Standby / Normal operation / Wi-Fi is connected
White light breaths Firmware upgrade in progress / Restoring factory settings / Starting up
White light flashes Connecting to the network
Yellow light breaths Charging
Yellow light flashes Recharging / Power is lower than 15%, robot is disconnected from the charger.
Red light flashes Abnormal state
On/Off button Long press for 3s, power on or power off. Short press, start or pause.
Recharging button In operation state, short press, robot pauses cleaning. In pause state, short press start recharging. In charging state, short press to stop recharging.
EN
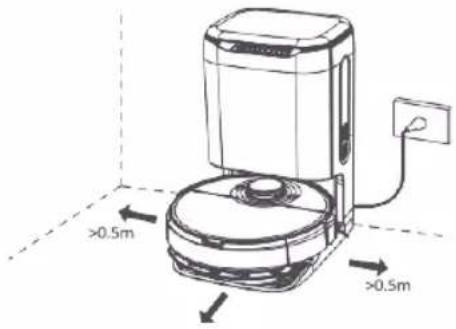
INSTALLATION
To install the charging station, place it against the wall, and connect the power cord. Make sure there is enough space in front and on the sides of the charger.
Note:
- Do not place the charging station in direct sunlight.
- The charger requires more than 1.5-meter space in front and more than 0.5-meter space on both sides.
• Make sure the power cord is not placed where the robot can drag it.
text_image
>0.5m >0.5mPOWER ON AND CHARGE
Put the robot on the base and align the charging electrodes with charging contact. For daily use, you can start intelligent recharge by short pressing the button
- Robot can't start up when it has low power. Please put it on the charger to recharge.
- Robot will start up automatically after connecting to the charger and can't be shut down while recharging.
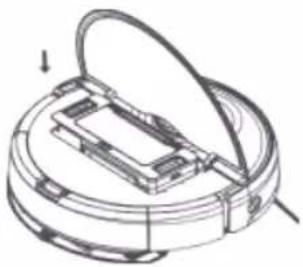
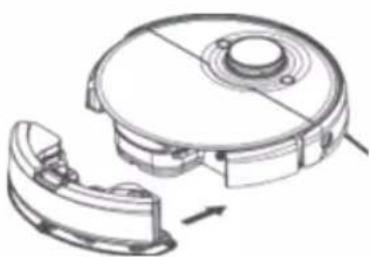
SWEEPING MODE
Insert the mop along the slot of the mop holder and stick it on the hook and loop fastener. Note: Clean the dust box regularly in case of the dirt affecting the cleaning effect.
natural_image
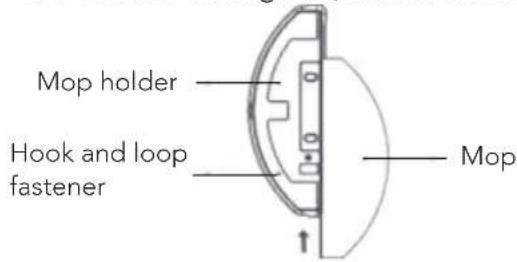
Technical line drawing of a mechanical component with a circular base and internal structure (no text or symbols)MOPPING MODE
-
Insert the mop along the slot of the mop holder and stick it on the hook and loop fastener.
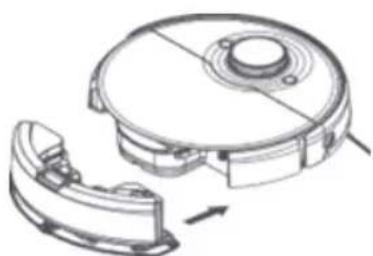
-
Open the water tank lid, fill the water tank and then fasten the water tank lid.
Note:
- Do not use detergents, disinfectants, solid cleaners or other cleaning
text_image
Mop holder Hook and loop fastener Mopproducts, or inject hot water into the water tank in case of corrosion and damage to the water tank.

natural_image
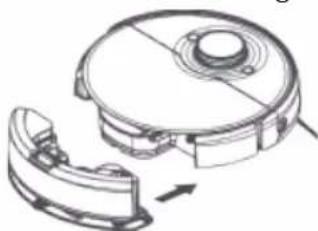
Technical line drawing of a mechanical housing or enclosure component (no text or symbols visible)- The water tank should be dry before performing a mopping task.
- Push the water tank into the bottom of the robot, and it will make a "click" sound when it is installed in place.
Note:
natural_image
Technical line drawing of a mechanical device with a circular housing and internal components, showing no text or symbols.- When mopping the floor, please set up virtual walls or no-mop zones in the carpet area.
- Before starting sweeping/mopping function, be sure to remove any water accumulated on the floor.
APP USE
CLEANING MODE/LEVEL SELECTION
You can choose various cleaning modes and water flow rates.
DO NOT DISTURB MODE (DND)
When Do Not Disturb mode is activated, proceeding at breakout point, scheduled cleaning and active voice reporting are unavailable in robot. Do Not Disturb mode is activated by default during the period from 22:00 to 9:00. Do Not Disturb mode can be deactivated in App.
CLEANING MODE WITHOUT MAP
When no map is stored, the robot will start cleaning each zone by a square area of 6m × 6m . When a map is stored, the robot will start cleaning each room along the route planned automatically and return to base after completion.
MEMORY MAP
When memory map is activated in the App, the robot will save and update the map after finishing cleaning task and recharging successfully. After a map is completed successfully, you can split or merge zones or name any room in the App.
EDGE CLEANING MODE
When choosing edge cleaning mode in the App, the robot will automatically recognize range of the area to clean, and start cleaning along the edges, and return to base automatically after finishing cleaning.
SPECIFIED AREA CLEANING MODE
When an area to be cleaned is specified in the App, the robot will clean the specified area. Note: During cleaning, the robot may go beyond a defined area, remove any obstacle on the floor within defined area since definition of any area will not ensure safe separation.
FIXED-POINT CLEANING MODE
When choosing fixed-point cleaning and have selected a target point in the App, the robot will route cleaning task and start cleaning within a rectangular area of 2m × 2m based on the target position defined in the map in App.
SCHEDULED CLEANING MODE
User can schedule a cleaning task in App, and robot will start the cleaning task as scheduled and return to the base upon end of the task. Note: Any scheduled cleaning task will not be executed during the time when Do Not Disturb mode is activated.
User can define virtual wall/ no-go area in App which the robot will avoid cleaning. Note: Before using this function, you have to store a map in the App. Moving the robot or change of indoor environment may cause the original map lost and any virtual wall/ no-go zone unavailable.
RESET/RESTORE SYSTEM
- By long pressing the Reset button for 3 seconds, you will not only restore factory settings, but also reset the firmware to the last version.
- By long pressing Reset button for 10 seconds, the machine will clear all network connection information, map information, scheduled task and do-not-disturb information, and customization information, and reset the suction power to the default level.
Note: After resetting/restoring the system, the robot needs to reconnect the APP, and the relevant settings in the APP are removed.
MAINTENANCE AND CLEANING
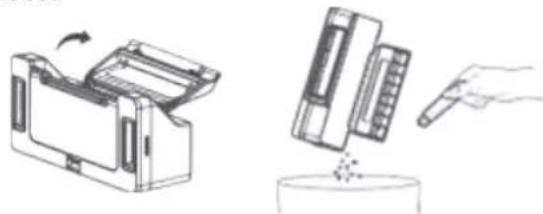
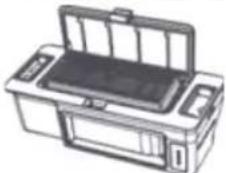
DUST BOX
- Open the cover, press the dust box lock and take out the dust box
- Dispose the trash in dust box, and clean the box with cleaning brush
- Remove the dust box cover, take the filter screen out, dispose trash and clean the screen.

natural_image
Diagram of a mechanical device with a circular housing and internal components, no visible text or symbolsNote:
natural_image
Illustration of a printer and its corresponding wafer, showing mechanical components and a hand inserting a pin (no text or symbols present)- It is recommended to clean the dust box at least once a week. Dry the dust box and filter screen before use (at least 24 hours)
natural_image
Illustration of a printer with front panel and internal casing (no text or symbols)- Do not wash the dust box with water, it can damage electric components.
EN
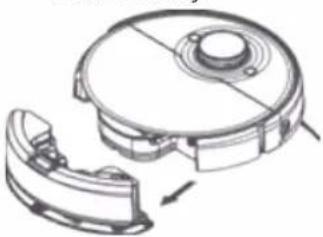
WATER TANK
- As shown in the figure, press the tank fastener down, and draw the tank out horizontally.
natural_image
Technical line drawing of a mechanical component with no visible text or symbols- Turn the plastic tank cover, discharge any residual water in it and mount the cover in place.
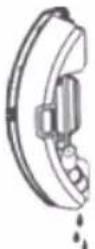
- As shown in the figure, mount the tank properly.
natural_image
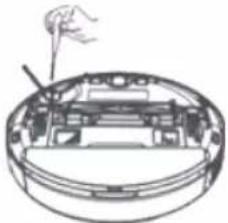
Technical line drawing of a mechanical device with a circular housing and a separate curved component (no text or symbols)SIDE BRUSH
- Turn the robot over and remove the side brush fixing screws.
- Remove and clean the side brush.
- Reinstall the side brush and tighten the screws.
natural_image
Diagram of a mechanical device with a handle and central component (no text or symbols)Note: It is recommended to replace the side brush every 3-6 months to ensure the cleaning effect.
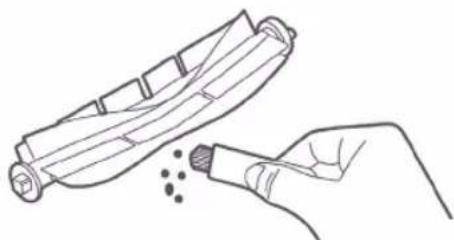
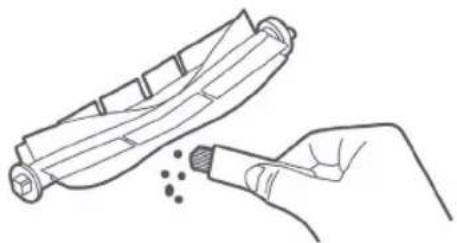
MAIN BRUSH
- Turn the robot over, press and hold the two release buttons to remove the main brush cover.
- Take out the main brush upwards.
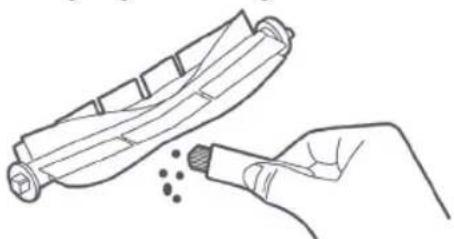
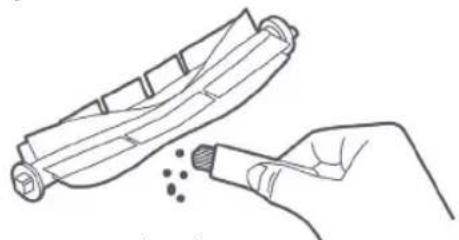
- Use the knife on the cleaning brush to cut the entangled hair and clean the main brush.
- Put back the main brush and the main brush cover, and press the main brush cover to install it in place.
Note: It is recommended to replace the main brush every 6-12 months to ensure the cleaning effect.
BRUSH CLEANING METHOD
Use the included cleaning tool.
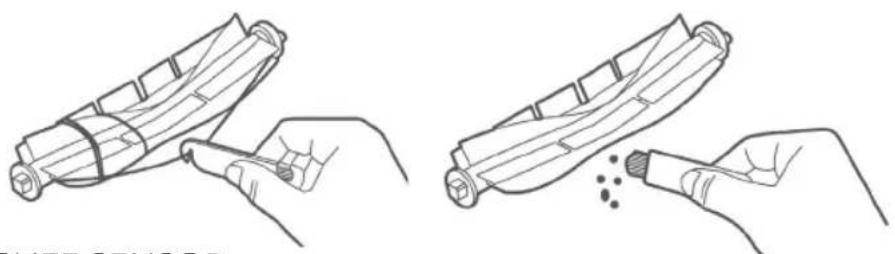
natural_image
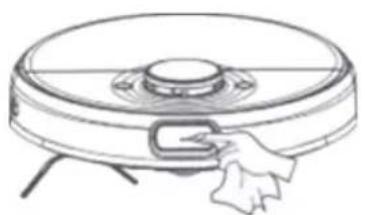
Line drawings showing two steps of a device being processed, with no visible text or symbols.CLIFF SENSOR
Use a soft dry cloth to clean the cliff sensor every 3 months.

Cliff sensor
OPTICAL SENSOR
The robot contains precision optical sensor: Front sensor. Be sure to clean these sensors with soft and dust-free cloth to remove any dirt or dust on them, which, if accumulating heavily, may impair the obstacle avoidance performance of the robot. Note: Do not use chemicals such as detergent or spray to clean the sensor.
natural_image
Line drawing of a robotic vacuum cleaner with a hand adjusting the component (no text or symbols)TROUBLESHOOTING
| Problem Solution | |
| Unable to power on 1. The battery is low2. The ambient temperature is too low (below 0°C) or too high (above 35°C) | |
| Robot fails to start sweeping Low battery level. Charge it to full battery level | |
| Robot cannot return for charging | Too many barriers around charger. Place it in an unblocked area.Robot is too far from charger. Place robot near the charger and try again. |
| Abnormal robot actions Please shut down and restart the robot | |
| Abnormal sound during cleaning | Please check and clean the foreign matters on the main brush, side brush, left/right wheel after the machine is turned off. |
| Cleaning performance deteriorates or dust drops | Dust box is full. Please empty the dust box.Filter screen is blocked. Please clean the screen.Main brush is blocked by any foreign object. Please clean the main brush. |
| Robot is offline 1. Weak wi-fi signals. Make sure robot is in proper coverage of Wi-Fi signals.Wi-Fi connection fails. Reset Wi-Fi connection and download the latest app and try again. | |
| Robot fails to proceed at breakout point | Make sure do not disturb mode is not activated, which will disable proceeding at breakout point.Proceeding at breakout point is unavailable when manually start recharging by performing operations in the app or short pressing recharging button or the appliance is moved to the charger. |
| Unable to charge Make sure there is sufficient spaces around the charger, and there is no dust or blockage on the surface of electrode of the charger. | |
| Fail to do scheduled cleaning 1. Make sure the equipment has been connected to the network, as disconnection from network will fail sync and scheduled cleaning task.2. Make sure Do Not Disturb mode is not activated, which will deactivate scheduled cleaning. | |
| Robot is always offine Please ensure that the robot network configuration is successful and that the robot is always within the coverage of Wi-Fi signal. | |
| Robot fails to connect to the app | Ensure that the robot and the auto clean base are in the area with good Wi-Fi signal; reset Wi-Fi according to the steps described in the Instruction Manual; then pair again. |
FAULT MESSAGES
| Problem Solution | |
| Place robot on a horizontal ground and start it. | It is detected that robot stays inclined. Place robot on a horizontal ground and start it, or perform leveling in App and then restart robot. |
| Put the robot on the ground to start | The wheel is suspended. Please move to the new position to start. |
| After a long-distance displacement, start the cleaning task again | Manually moving the robot will cause routing to fail. Please start the cleaning task again. |
| The laser radar is entangled or stuck. Please clean it up. | The radar is entangled by fiber. Please remove any fiber. |
| Please make sure the laser ranging sensor is not blocked before starting. | Laser ranging sensor is blocked or jammed by foreign matter. Remove the blockage or foreign matter. If removal is impossible, relocate the robot and then start it. |
| Make sure that visual recognition sensor is not blocked. | Visual recognition sensor is blocked or jammed by foreign matter. Remove the blockage or foreign matter. If removal is impossible, relocate the robot and then start it. |
| Please confirm that the visual recognition sensor is not blocked. | The visual recognition sensor is blocked or jammed by foreign objects, please remove the obstructed object or foreign objects. If it cannot be cleared, please move the host to a new location to start. |
| Please clean the cliff sensor and move to a new position to start it. | The robot is off ground. Relocate and restart the robot. Cliff sensor is dirty. Clean the cliff sensor |
| Check the collision sensor and remove any foreign matter on it. | Collision sensor is jammed. Remove foreign matter by tapping the sensor. If there is no foreign matter, relocate and restart the robot. |
| Please clean the edge IR sensor. | Edge IR sensor may be attached with foreign matter. Please clean it. |
| The TOF sensor fails. Please check and clean the sensor. | Front sensor may be attached with foreign matter. Please clean it. |
| Please clean the surfaces of the front part of the robot and the bottom sensor to remove any dust. | Front sensor, edge IR sensor or cliff sensor is dusty. Please clean it. |
| The cliff sensor fails. Please clean and move it to a new position to start. | Cliff sensor may be attached to foreign matter or dirt. Please clean and move it to a new position to start it. |
| Laser radar is blocked. Check the laser radar | The radar on the top tower is blocked and routing fails. Remove blockage. |
| The dust box has not been cleaned for a long time. Please clean it immediately. | Dust box is full. Please empty it. |
| Virtual wall or forbidden area detected. Please move the robot out of this area. | The robot is at a virtual wall or forbidden area. Please move it out of the area. |
| Appliance is trapped. Remove any obstacle around the device and try again. Please put the appliance back onto the base. | The robot is trapped by obstacle around it. Please remove any obstacle. The robot fails to locate base. Place it manually back onto the base. |
| A new environment is detected. Please re-start cleaning task. | The robot is in a new environment and no map is created yet. Please re-start vacuuming task. |

text_image
BEYOND EXPECTATIONS 5 SINCE 1948 YEAR GUARANTEEGUARANTEE
Wilfa issues a 5 year guarantee on this product from the day of purchase. The guarantee covers production failure or defects that arise during the guarantee period. Your purchase receipt works as proof towards retailer if claiming your guarantee.
The guarantee is valid only for products that are bought and used in private households. The guarantee is not valid if the product is used commercially. The guarantee is not valid if the product is misused, used by negligence, if not following instructions given by Wilfa, if modified or if unauthorized reparation is done. The guarantee is also not valid for normal wear of the product, misuse, lack of maintenance, use of wrong electrical voltage or:
• Overloading of product
- Parts which are normally worn down
- Parts you can expect being replaced regularly (e.g. filter, battery etc.)
Instruction manual is also available at our website; wilfa.com
PRODUCT SPECIFICATIONS
Size
358×97mm
Rated power 80 W
Rated voltage 14.6 V/14.8 V
Charging voltage 20 V
Battery capacity: 5200 mAh
SUPPORT AND SPARE PARTS
For support please visit us at wilfa.com, and see our customer service/support page. Here you will find frequently asked questions, spare parts, tips and tricks and all our contact information.
RECYCLABILITY
This marking indicates that this product should not be disposed with other household wastes throughout the EU. To prevent possible harm to the environment or human health from uncontrolled waste disposal, recycle it responsibly to promote the sustainable reuse of material resources. To return your used device, please use the return and collection systems or
contact the retailer where the product was purchased. They can take this product for environmentally safe recycling free of charge.
NO
NO
INNHOLD
28 VIKTIGE SIKKERHETSANVISNINGER
30 BATTERI OG LADING
30 ANVISNINGER OM MILJ∅VERN
32 ANSVARSFRASKRIVELSE - SYSTEM
33 PRODUKTOVERSIKT - GENERELT
34 PRODUKTOVERSIKT - ST∅VSUGER
35 PRODUKTOVERSIKT - DETALJERT
36 PRODUKTOVERSIKT – LYS OG KNAPPER
37 INSTALLASJON
39 BRUK AV APPEN
40 VEDLIKEHOLD OG RENGJ∅RING
43 FEILS∅KING
45 FEILMELDINGER
48 GARANTI
49 PRODUKTSPESIFIKASJONER
49 SUPPORT OG RESERVEDELER
49 GJENVINNING
VIKTIGE SIKKERHETSANVISNINGER
PRODUKTOVERSIKT – GENERELT
text_image
Exploded diagram of a robotic vacuum cleaner with numbered parts for identification- Robotstøvsuger
Tilbehør:
text_image
Technical diagram of a robotic vacuum cleaner with numbered parts for identification and assembly reference.text_image
Technical diagram of a device with labeled components: top view, front view, and internal structure.text_image
>0.5m >0.5mSLÅ PÅ STR∅MMEN OG START LADINGEN
natural_image
Technical line drawing of a mechanical component with a circular base and internal structure (no text or symbols)MOPPEFUNKSJON
natural_image
Technical line drawing of a mechanical housing or enclosure component (no text or symbols visible)OBS!
- Ikke bruk vaskemidler, desinfeksjonsmidler, faste rengjøringsmidler eller andre rengjøringsprodukter, og ikke sprøyt varmt vann inn i vanntanken. Det kan forårsake korrosjon eller skade på vanntanken.
-
Det er ikke tillatt å spyle eller bløtlegge vanntanken.
-
Skyv vanntanken inn i bunnen av roboten. Den vil lage en klikkelyd när den läses på plass.
natural_image
Technical line drawing of a mechanical device with a circular housing and internal components, showing no text or symbols.OBS!
natural_image
Diagram of a mechanical device with a circular base and internal components, showing no text or symbols.natural_image
Illustration of a printer and its internal components, showing a hand inserting a component into a cylindrical base (no text or symbols present)natural_image
Line drawing of a printer with open lid and side ports (no text or symbols)OBS!
natural_image
Technical line drawing of a mechanical component with a circular housing and a separate curved housing (no text or symbols)natural_image
Technical line drawing of a mechanical device with a circular top and two separate views (no text or symbols)SIDEB∅RSTE
natural_image
Cross-sectional diagram of a mechanical device with a handle and base plate (no text or symbols)NO
HOVEDB∅RSTE
natural_image
Line drawing of a hand holding a cylindrical object with a curved handle (no text or symbols)Kutt hår
natural_image
Line drawing of a hand holding a brush applying powder to a cylindrical object (no text or symbols)Rengjør smuss
TRAPPESENSOR
natural_image
Line drawing of a robotic vacuum cleaner with a hand adjusting the component (no text or symbols)NO
FEILS∅KING
Problem Lösning
text_image
Exploded diagram of a robotic vacuum cleaner with numbered parts for identificationtext_image
Technical diagram of a circular robotic device with numbered components labeled 1 to 4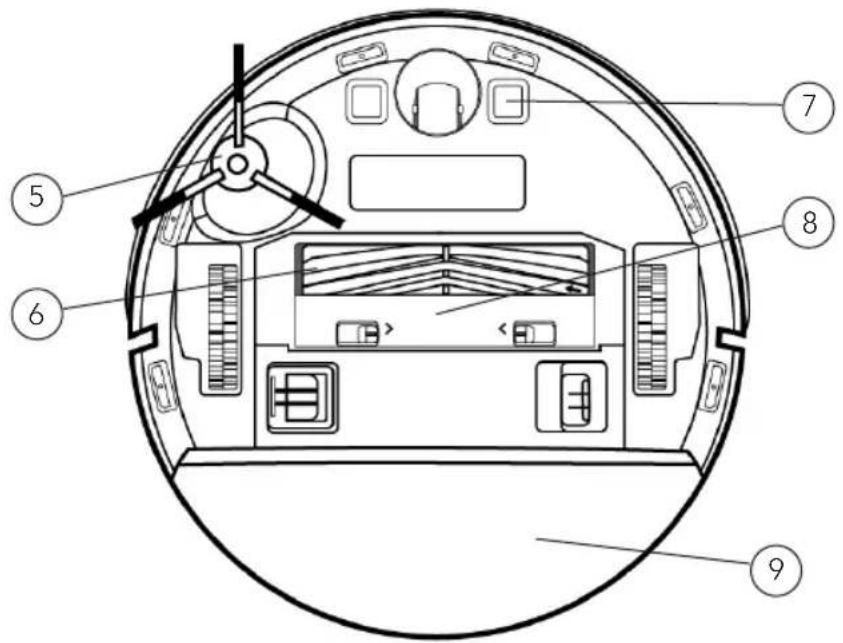
text_image
Technical diagram of a circular device interior with numbered components for identificationtext_image
>0.5m >0.5mnatural_image
Technical line drawing of a mechanical component with a circular base and internal structure (no text or symbols)MOPPNINGSLÄGE
natural_image
Technical line drawing of a mechanical housing or enclosure component (no text or symbols visible)Obs!
natural_image
Technical line drawing of a mechanical device with a circular housing and a separate housing component (no text or symbols)Obs!
natural_image
Diagram of a mechanical device with a circular base and internal components, no visible text or symbolsnatural_image
Illustration of a printer and a mechanical device with a hand pointing to it (no text or symbols present)natural_image
Line drawing of a printer with open lid and base (no text or symbols)Obs!
natural_image
Technical line drawing of a mechanical component with no visible text or symbolsSE
natural_image
Technical line drawing of a robotic vacuum cleaner with a circular housing and attached clamped component (no text or symbols)SIDOBORSTE
natural_image
Cross-sectional diagram of a mechanical device with internal components and a handle (no text or symbols)natural_image
Line drawing of a hand holding a rolled-up cable or cable (no text or symbols)natural_image
Line drawing of a hand holding a brush applying powder to a cylindrical object (no text or symbols)STUPSENSOR
natural_image
Line drawing of a robotic vacuum cleaner with a hand cleaning the component (no text or symbols)FELSÖKNING
Problem Lösning
text_image
Technical diagram of a circular robotic device with numbered components labeled 1 to 4DK
text_image
Technical diagram of a circular device interior with numbered components for identificationPRODUKTOVERSIGT - DETALJERET
ROBOT ST∅VBEHOLDER
text_image
Technical diagram of a robotic vacuum cleaner with labeled parts including open casing, internal compartments, and housing.DK
text_image
>0.5m >0.5mDK
TÆND OG OPLAD
natural_image
Technical line drawing of a mechanical component with a circular base and internal structure (no text or symbols)MOPPEINDSTILLING
natural_image
Technical line drawing of a mechanical housing or enclosure with internal components and mounting brackets (no text or symbols)Bemærk:
natural_image
Technical line drawing of a mechanical device with a circular housing and internal components, showing no text or symbols.Bemærk:
natural_image
Diagram of a mechanical device with a circular base and an open lid, showing internal components and directional arrows (no text or symbols)natural_image
Illustration of a printer and a mechanical device with a hand holding a pointer (no text or symbols)natural_image
Line drawing of a printer with open lid and base (no text or symbols)Bemærk:
natural_image
Technical line drawing of a robotic vacuum cleaner with internal components and a separate housing (no text or symbols)natural_image
Technical line drawing of a robotic vacuum cleaner with a circular housing and attached clamped component (no text or symbols)SIDEB∅RSTE
natural_image
Cross-sectional diagram of a device showing internal components and a handle (no text or symbols)natural_image
Line drawing of a hand holding a tool interacting with a cylindrical object (no text or symbols)natural_image
Line drawing of a hand holding a brush applying powder to a cylindrical object (no text or symbols)TRAPPESENSOR
natural_image
Line drawing of a robotic vacuum cleaner with a hand cleaning the component (no text or symbols)FEJLFINDING
Problem Lösning
text_image
Technical diagram of a robotic vacuum cleaner with numbered parts for identification and assembly.-
Anturi
-
Virtapainike
-
Kotipainike
-
Kansi
-
Sivuharja
-
Harja
-
Latauselektrodit
-
Harjan suojus
-
Mopin pidike
TUOTTEEN KUVAUS - YKSITYISKOHTAISET TIEDOT
ROBOTTI PÖLYSÄILIÖ
text_image
Technical diagram of a device with labeled components, showing front, top, and side views.FI
text_image
>0.5m >0.5mVIRRAN KYTKEMINEN JA LATAUS
natural_image
Technical line drawing of a mechanical component with a circular base and curved opening (no text or symbols)LAKAISUTILA
natural_image
Technical line drawing of a mechanical housing or enclosure component (no text or symbols visible)Huom.:
natural_image
Technical line drawing of a mechanical device with a circular housing and internal components, showing no text or symbols.Huovm.:
natural_image
Diagram of a mechanical device with a circular housing and an open lid, showing internal components and directional arrows (no text or symbols)natural_image
Illustration of a printer and a mechanical device with a hand inserting a pencil into a container (no text or symbols)natural_image
Illustration of a printer with open lid and base (no text or symbols)Huom.:
natural_image
Technical line drawing of a mechanical component with a circular top and internal parts, showing a close-up view of a curved housing (no text or symbols)natural_image
Technical line drawing of a robotic vacuum cleaner with a circular housing and attached clamped component (no text or symbols)SIVUHARJA
natural_image
Cross-sectional diagram of a mechanical device with internal components and a handle (no text or symbols)natural_image
Line drawing of a hand holding a cylindrical object with a handle, no text or symbols presentLeikkaa hiukset
natural_image
Line drawing of a hand holding a brush applying powder to a cylindrical object (no text or symbols)Puhdista lika
PUDOTUSANTURI
natural_image
Line drawing of a robotic vacuum cleaner with a hand cleaning the component (no text or symbols)VIANMÄÄRITYS
Ongelma Ratkaisut
PRODUKTÜBERSICHT – ALLGEMEINES

text_image
Exploded diagram of a robotic vacuum cleaner with numbered parts for identification- Saugroboter
Zubehör:
text_image
Technical diagram of a robotic vacuum cleaner with numbered parts for identification and assembly.text_image
>0.5m >0.5mnatural_image
Technical line drawing of a mechanical component with a curved pipe or spring (no text or symbols)WISCHFUNKTION
natural_image
Technical line drawing of a mechanical housing or enclosure component (no text or symbols visible)Hinweis:
natural_image
Technical line drawing of a mechanical device with a circular housing and a separate view showing internal components (no text or symbols)Hinweis:
natural_image
Technical line drawing of a mechanical component with an open lid and internal structure (no text or symbols)natural_image
Illustration of a printer and its corresponding wafer, showing mechanical components and a hand holding a pointer (no text or symbols present)natural_image
Illustration of a printer with open lid and base (no text or symbols)Hinweis:
natural_image
Technical line drawing of a mechanical component with no visible text or symbolsnatural_image
Technical line drawing of a mechanical component with no visible text or symbolsSEITENBÜRSTE
natural_image
Cross-sectional diagram of a mechanical device with a hand holding a tool (no text or symbols visible)natural_image
Line drawing of a hand holding a cylindrical object with a handle, labeled 'Haarschneider' at the bottom (no other text or symbols)Haarschneider
natural_image
Line drawing of a hand holding a brush applying powder to a cylindrical object (no text or symbols)Schmutz beseitigen
CLIFF-SENSOR
natural_image
Line drawing of a hand inserting a small component into a circular device (no text or symbols)FEHLERBEHEBUNG
text_image
Exploded diagram of a robotic vacuum cleaner with numbered parts for identification- Robotstofzuiger 7. Borstel
Toebehoren:
2.Uitneembaredweilplaat 9. Zwabber - Stofopvangbak 10. Laadstation
- Zijborstel 11. Voedingskabel
- Filterscherm
- Reinigingsgereedschap
NL
PRODUCTOVERZICHT - STOFZUIGER

text_image
Technical diagram of a robotic vacuum cleaner with numbered parts for identification and assembly.text_image
>0.5m >0.5mnatural_image
Technical line drawing of a mechanical component with a circular base and curved arm (no text or symbols)DWEILMODUS
natural_image
Technical line drawing of a mechanical housing or enclosure component (no text or symbols visible)Opmerking:
natural_image
Technical line drawing of a robotic vacuum cleaner with internal components and a separate housing (no text or symbols)Opmerking:
natural_image
Diagram of a mechanical device with an open lid and internal components, showing no text or symbols.natural_image
Illustration of a printer and its internal components, showing a hand inserting a pencil into a container (no text or symbols present)natural_image
Illustration of a printer with open lid and internal compartments (no text or symbols)Opmerking:
natural_image
Technical line drawing of a mechanical component with no visible text or symbolsnatural_image
Technical line drawing of a robotic vacuum cleaner with a circular housing and attached component (no text or symbols)ZIJBORSTEL
natural_image
Cross-sectional diagram of a mechanical device with internal components and a handle (no text or symbols)natural_image
Line drawings showing two hands performing a manual tool on cylindrical objects, with no text or symbols present.natural_image
Line drawing of a robotic vacuum cleaner with a hand cleaning the component (no text or symbols)PROBLEEMOPLOSSING
text_image
Exploded diagram of a robotic vacuum cleaner with 11 labeled parts including cover, casing, and electrical plug.text_image
Technical diagram of a robotic vacuum cleaner with numbered parts for identification and assembly.text_image
>0.5m >0.5mWŁĄCZANIE I ŁADOWANIE
natural_image
Technical line drawing of a mechanical device with a circular base and internal components (no text or symbols)PL
TRYB MOPA
natural_image
Technical line drawing of a mechanical housing or enclosure with internal components (no text or symbols)Uwaga:
natural_image
Technical line drawing of a mechanical device with a circular housing and internal components, showing no text or symbols.Uwaga:
natural_image
Technical line drawing of a mechanical component with an open lid and internal components (no text or symbols)natural_image
Illustration of a printer and its internal components, showing a hand inserting a component into a container (no text or symbols present)natural_image
Illustration of a printer with open lid and base (no text or symbols)Uwaga:
natural_image
Technical line drawing of a mechanical device with a circular housing and internal components, showing a curved assembly (no text or symbols)natural_image
Technical line drawing of a mechanical device with a circular top and curved base (no text or symbols)SZCZOTKA BOCZNA
natural_image
Diagram of a device with an antenna inserted into a circular housing (no text or symbols visible)PL
natural_image
Line drawing of a hand holding a cylindrical object with a handle, no text or symbols presentPrzecinanie włosów
natural_image
Line drawing of a hand holding a tool near a cylindrical object with granular dots (no text or symbols)Czyszczenie brudu
CZUJNIK SPADKU
natural_image
Line drawing of a robotic vacuum cleaner with a hand cleaning the component (no text or symbols)ROZWIĄZYWANIE PROBLEMÓW
Problem Rozwiązanie
text_image
Technical diagram of a robotic vacuum cleaner with numbered parts for identification and assembly.text_image
>0.5m >0.5mALLUMER ET CHARGER
natural_image
Technical line drawing of a mechanical assembly with a circular housing and internal components (no text or symbols)MODE SERPILLIÈRE
natural_image
Technical line drawing of a mechanical housing or enclosure with internal components (no text or symbols)Remarque :
natural_image
Technical line drawing of a mechanical component with a circular housing and a separate view showing internal components (no text or symbols)Remarque :
natural_image
Diagram of a mechanical device with a circular housing and internal components, showing no text or symbols.natural_image
Illustration of a printer and its internal components being placed into a container (no text or symbols present)natural_image
Illustration of a printer with open lid and base (no text or symbols)Remarque :
natural_image
Technical line drawing of a mechanical component with no visible text or symbolsnatural_image
Technical line drawing of a mechanical component with no visible text or symbolsBALAI LATÉRAL
natural_image
Diagram of a mechanical device with a handle and internal components (no text or symbols)natural_image
Illustration showing two-step assembly process: one being cut with a tool, the other holding a brush with dots (no text or symbols)natural_image
Line drawing of a robotic vacuum cleaner with a hand adjusting the component (no text or symbols)DÉPANNAGE
Problème Solution
CARACTÉRISTIQUES DU PRODUIT
Taille 358 × 97 mm
Puissance nominale 80 W
Tension nominale 14,6 V/14,8 V
Tension de charge 20 V
text_image
FSC www.fsc.org 100% From well- managed forests FSC® C000000RVC-D4000LIN_20_01