
Series 2300 EP2331 - Coffee maker PHILIPS - Free user manual and instructions
Find the device manual for free Series 2300 EP2331 PHILIPS in PDF.
| Product type | Fully automatic coffee machine |
| Brand | Philips |
| Model | Series 2300 EP2331 |
| Dimensions (W x H x D) | 247 x 366 x 434 mm |
| Weight | 7 to 7.5 kg |
| Power cord length | 1000 mm |
| Water tank | 1.8 L, removable |
| Bean hopper capacity | 275 g |
| Coffee grounds bin capacity | 12 servings |
| LatteGo capacity (milk container) | 250 ml |
| Adjustable dispensing nozzle height | 85-145 mm |
| Main functions | Whole beans, ground coffee, cappuccino, latte macchiato, hot water, steam (depending on model) |
| Water filter | AquaClean (descaling reduction) |
| Maintenance | Descaling with Philips product, weekly cleaning of the brew group, lubrication every 2 months |
| Safety | Automatic shut-off, overheat protection, air detection |
| Main spare parts | Brew group, AquaClean filter, LatteGo, classic milk frother |
| Warranty | International (see provided leaflet) |
| Material | Plastic and stainless steel (parts in contact with food) |
Frequently Asked Questions - Series 2300 EP2331 PHILIPS
User questions about Series 2300 EP2331 PHILIPS
0 question about this device. Answer the ones you know or ask your own.
Ask a new question about this device
Download the instructions for your Coffee maker in PDF format for free! Find your manual Series 2300 EP2331 - PHILIPS and take your electronic device back in hand. On this page are published all the documents necessary for the use of your device. Series 2300 EP2331 by PHILIPS.
USER MANUAL Series 2300 EP2331 PHILIPS
2300 series 3300 series
ENUSERMANUAL
DA BRUGERVEJLEDNING
DE BENUTZERHANDBUCH
SR YNYTCTBO 3A KOPNUHTHeB
SQ MANUALI PERDORIMIT
UK NOCIBHVK KOPNCTYBAHA

2300 Series
3300 Series
3300 Series


| 2300 series 3300 series | A19 | A20 | A21 | A22 | A23 | A24 |
| Classic Milk Frother EP3321 EP3323 EP3324 EP3326 EP3329 | √ | √ | √ | √ | √ | × |
| LatteGo EP2330 EP2331 EP2333 EP2334 EP2336 EP2339 EP3341 EP3343 EP3347 EP3349 | √ | √ | √ | √ | × | √ |

Contents
Machine overview (Fig. A) 4
Control panel (Fig. B) 4
Introduction 5
Before first use 5
Brewing drinks 7
Adjusting machine settings 9
Removing and inserting the brew group 11
Cleaning and maintenance 12
AquaClean water filter 14
Setting the water hardness 16
1. Descaling procedure (30 min.) 16
Ordering accessories 17
Troubleshooting 17
Technical specifications 23
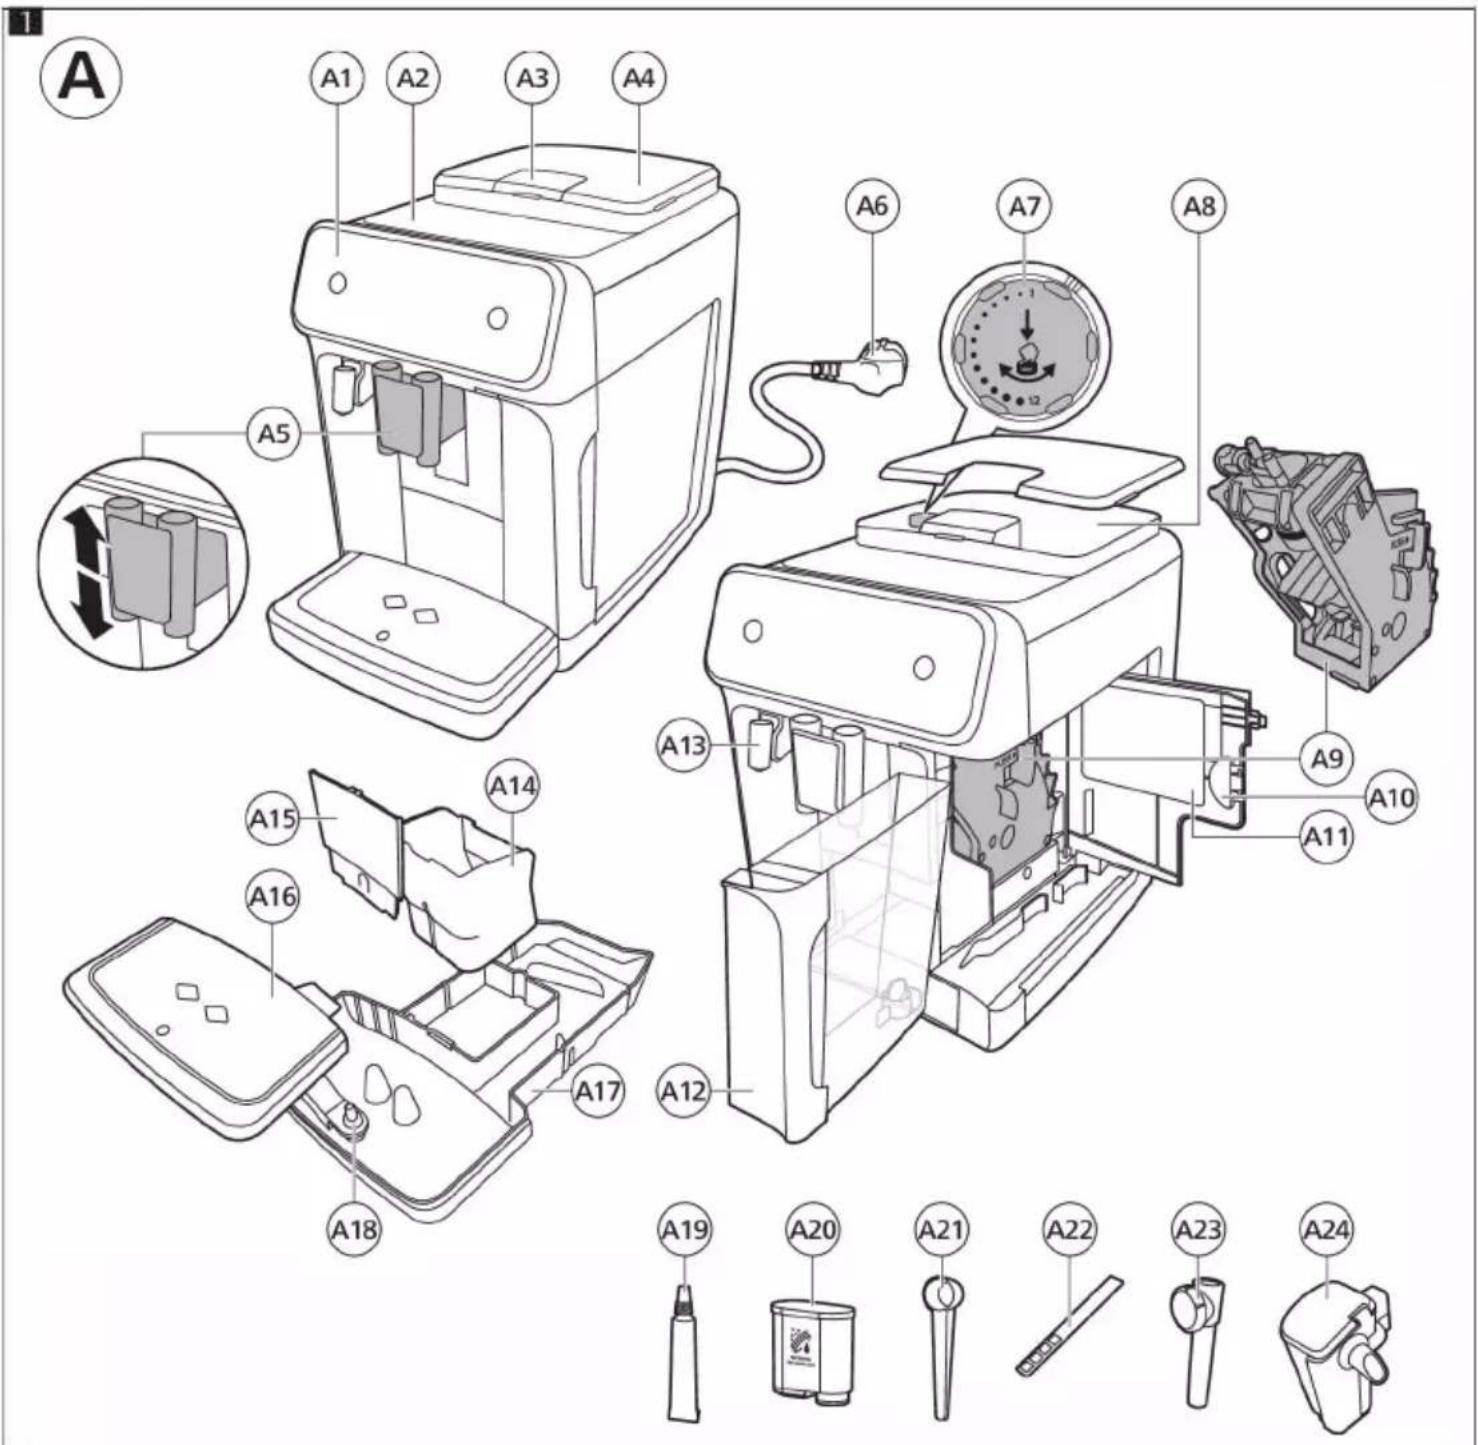
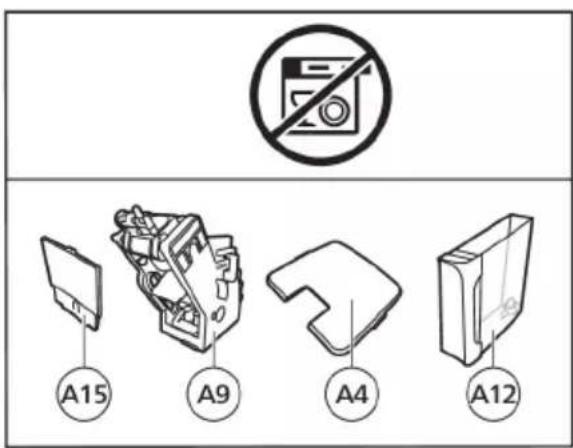
Machine overview (Fig. A)
A1 Control panel A10 Service door
| A2 Cup holder A11 Data label with type number | |
| A3 Pre-ground coffee compartment A12 Water tank | |
| A4 Lid of bean hopper A13 Hot water spout | |
| A5 Adjustable coffee spout A14 Coffee grounds container | |
| A6 Mains plug A15 Front panel of coffee grounds container | |
| A7 Grind setting knob | A16 Drip tray cover |
| A8 Coffee bean hopper | A17 Drip tray |
| A9 Brew group | A18 'Drip tray full' indicator |
| Accessories | |
| A19 Grease tube | A22 Water hardness test strip |
| A20 AquaClean water filter | A23 Classic milk frother (specific types only) |
| A21 Measuring scoop | A24 LatteGo (milk container) (specific types only) |
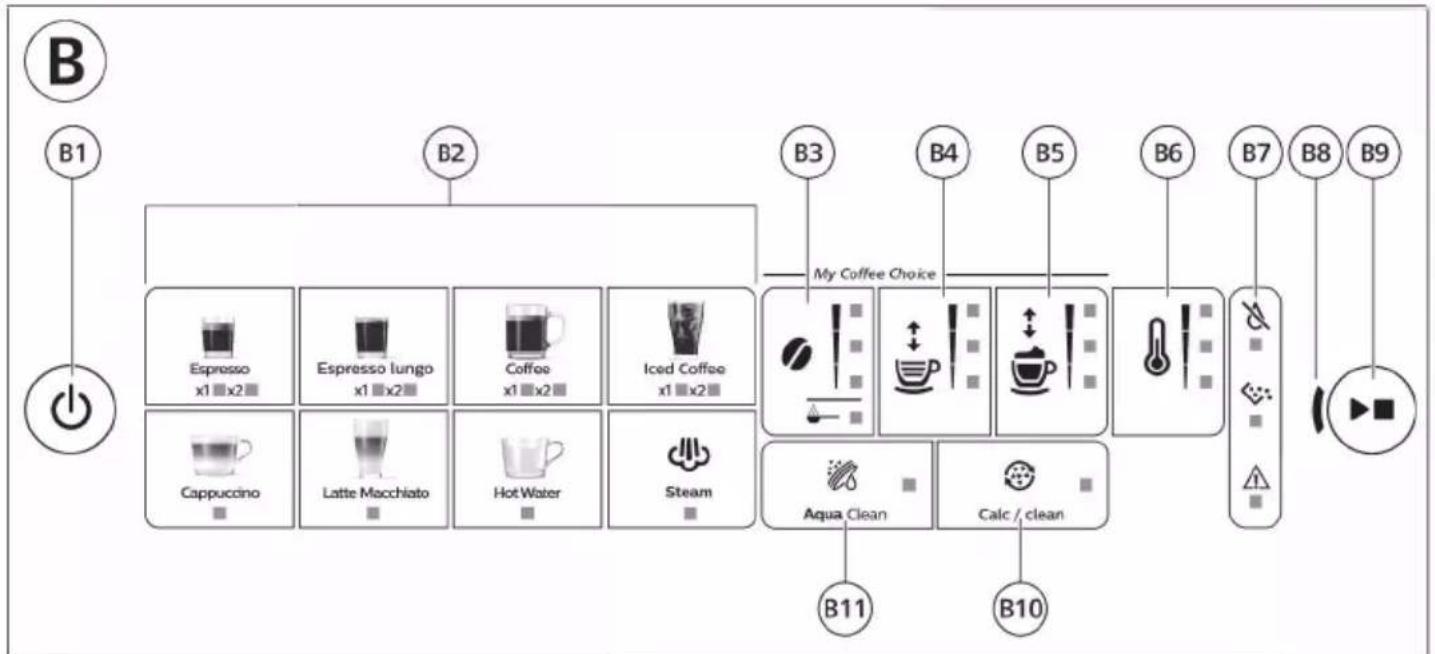
Control panel (Fig. B)
Refer to figure B for an overview of all buttons and icons. Below you find the description.
Some of the buttons/icons are for specific types only.
B1 On/off button B7 Warning icons
B2 Drink icons* B8 Start light
B3 Aroma strength/pre-ground coffee icon B9 Start/stop button
B4 Drink quantity icon B10 Calc / Clean icon
B5 Milk quantity icon (specific types only) B11 AquaClean icon
B6 Coffee temperature icon (specific types only)
- Drink icons (specific types only): espresso, espresso lungo, coffee, iced coffee, cappuccino, latte macchiato, hot water, steam
Introduction
Congratulations on your purchase of a Philips fully automatic coffee machine! To fully benefit from the support that we offer, please register your product at www.philips.com/welcome.
Read the separate safety booklet carefully before you use the machine for the first time and save it for future reference.
To help you get started and to get the best out of your machine, we offer support in multiple ways. In the box you can find:
1 The quick start guide with picture-based usage instructions and information on cleaning and maintenance.
2 The separate safety booklet with instructions on how to use the machine in a safe way.
3 For online support (this extended user manual, frequently asked questions, videos, etc.), scan the QR code on the cover of this booklet to download the Coffee+ app, or visit www.philips.com/coffee-care.
There are multiple versions of this espresso machine, which all have different features. Each version has its own type number. You can find the type number on the data label on the inside of the service door (see fig A11).
This machine has been tested with coffee. Although it has been carefully cleaned, there may be some coffee residues left. We guarantee, however, that the machine is absolutely new.
The machine automatically adjusts the amount of ground coffee that is used to make the best-tasting coffee. You should brew 5 coffees initially to allow the machine to complete its self-adjustment.
Make sure you rinse the LatteGo (milk container) or the classic milk frother before first use.
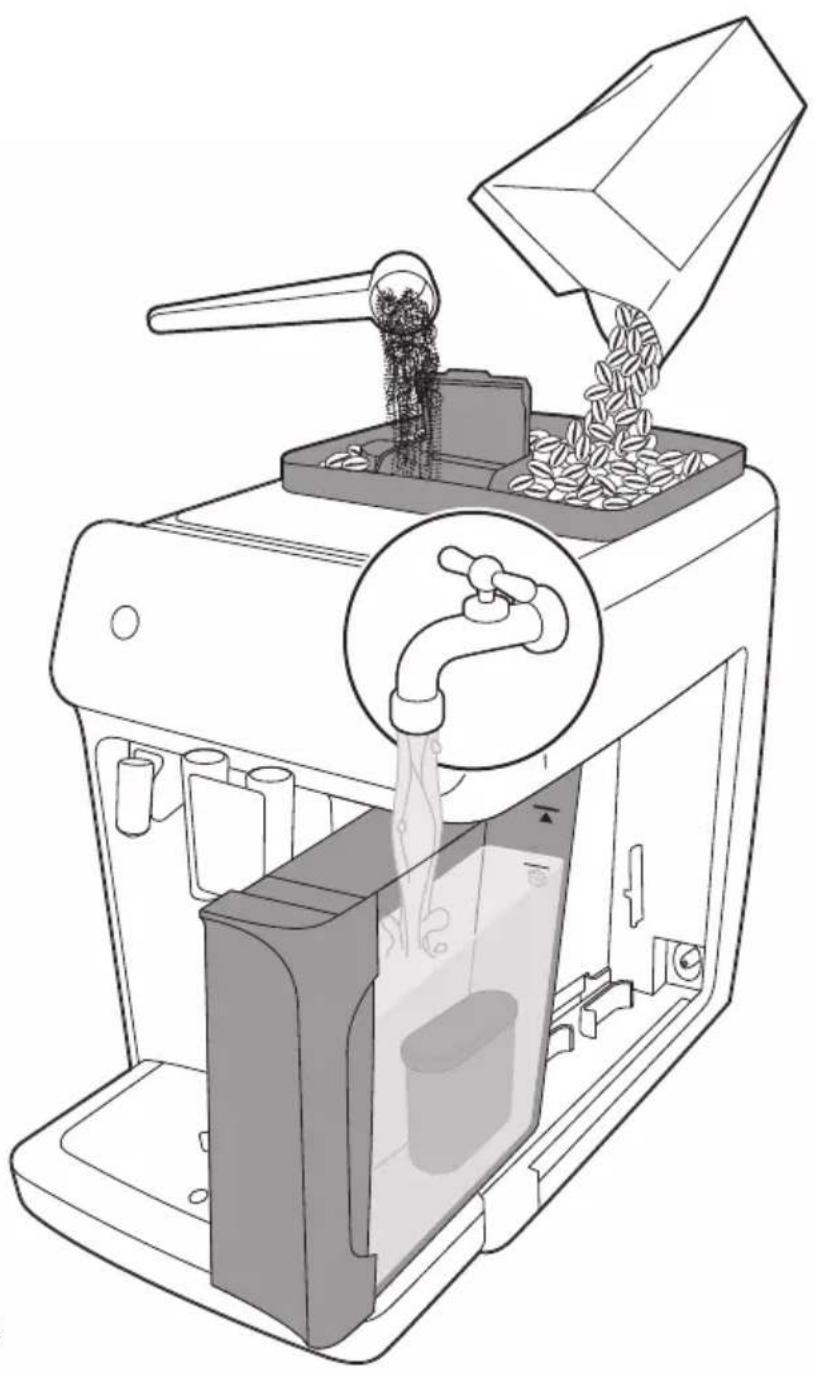
Before first use
1. Setting up the machine
After you have switched on the machine, some water may be dispensed from the hot water spout or coffee spout. This is normal.

2. Activating the AquaClean water filter (5 min.)
For more information see chapter 'AquaClean water filter'.
3. Setting the water hardness
See chapter 'Setting the water hardness' for step-by-step instructions. The default water hardness setting is 4: hard water.
4. Assembling LatteGo (specific types only)

5. Assembling the classic milk frother (specific types only)
Brewing drinks
General steps
1 Fill the water tank with tap water and fill the bean hopper with beans.
2 Place the lid (A4) on the coffee bean hopper (A8).
3 Press the on/off button to switch on the machine.
- The machine starts heating up and performs the automatic rinsing cycle. During heating up, the lights in the drinks icons light up and go out slowly one by one.
- When all lights in the drink icons light up continuously, the machine is ready for use.
4 Place a cup under the coffee dispensing spout. Slide the coffee dispensing spout up or down to adjust its height to the size of the cup or glass you are using (Fig. 1).
Personalizing drinks
This machine allows you to adjust the settings of a drink to your own preference. After selecting a drink you can:
1 Adjust the aroma strength by tapping the aroma strength icon (Fig. 2). There are 3 strengths, the lowest is the mildest and the highest is the strongest.
2 Adjust the drink quantity by tapping the drink quantity (Fig. 3) and/or the milk quantity icon (specific types only). There are 3 quantities: low, medium and high.
1 You can also adjust the coffee temperature to your own preference (see 'Adjusting the coffee temperature').
Brewing coffee with beans
1 To brew a coffee, tap the drink icon of your choice.
The aroma strength and quantity lights go on and show the previously selected setting.
- You can now adjust the drink to your preferred taste (see 'Personalizing drinks').
2 Press the start/stop button.
- The light in the drink icon flashes while the drink is being dispensed.
3 To stop dispensing coffee before the machine is finished, press the start/stop button again.
To brew 2 coffees at the same time, tap the drink icon twice. The 2 × light lights up.
Brewing milk-based drinks with LatteGo (milk container)
A LatteGo consists of a milk container, a frame and a storage lid. To avoid leakage, make sure the frame and the milk container are properly assembled before you fill the milk container.
1 To assemble LatteGo, first insert the top of the milk container under the hook at the top of the frame (Fig. 4). Then press the bottom part of the container. You hear a click when it locks into place (Fig. 5).
Note: Make sure that the milk container and the frame are clean before you connect them.
2 Slightly tilt LatteGo and put it on the hot water spout (Fig. 6). Then press it home until it locks into place (Fig. 7).
3 Fill LatteGo with milk up to the level indicated on the milk container for the drink you are brewing (Fig. 8). Do not fill the milk container beyond the maximum indication.
If you have personalized the milk quantity, you may need to fill the milk container with more or less milk than indicated for this drink on LatteGo.
Always use milk coming directly from the fridge for optimal results.
4 Place a cup on the drip tray.
5 Tap the milk-based drink icon of your choice.
You can now adjust the drink to your own preference (see 'Personalizing drinks').
6 Press the start/stop button.
- The light in the drink icon flashes while the drink is being dispensed. When you brew a cappuccino or latte macchiato, the machine first dispenses milk and then coffee.
- To stop dispensing milk before the machine has dispensed the preset amount, press the start/stop button.
7 To stop dispensing the complete drink (milk and coffee) before the machine is finished, press and hold the start/stop button.
Frothing milk with classic milk frother
Always use milk coming directly from the fridge for the best foam quality.
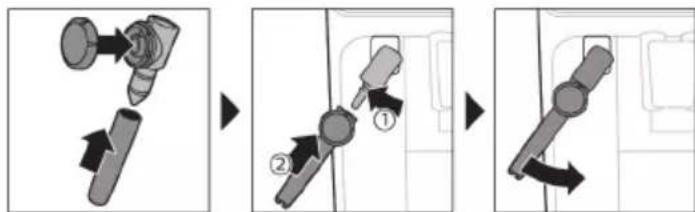
1 Tilt the black silicone handle on the machine to the left and slide the milk frother onto it (Fig. 9).
2 Fill a milk jug with with approx. 100 ml milk for cappuccino and approx. 150 ml milk for latte macchiato.
3 Insert the milk frother approx. 1 cm into the milk.
4 Tap the steam icon (Fig. 10).
- The light in the steam icon goes on and the start light starts pulsing.
5 Turn the knob on the classic milk frother to the milk frothing icon (Fig. 11) if you want to froth milk. Turn the knob on the classic milk frother to the flat milk icon (Fig. 12) if you want heat up milk.
6 Make sure that the icon on the knob of the classic milk frother is aligned with the black arrow.
7 Press the start/stop button to froth the milk (Fig. 13).
The machine starts heating up, steam is forced into the milk and the milk is frothed.
8 When the milk foam in the milk jug has reached the required volume, press the start/stop button again to stop frothing milk.
i Never froth milk longer than 90 seconds. The frothing automatically stops after 90 seconds.
i You do not have to move the milk jug during milk frothing to get the best milk froth quality.
Brewing coffee with pre-ground coffee
You can choose to use pre-ground coffee instead of beans, for example if you prefer a different coffee variety or decaffeinated coffee.
1 Press the on/off button to switch on the machine and wait until it is ready for use.
2 Open the lid of the pre-ground coffee compartment and pour one leveled measuring scoop of pre-ground coffee into it (Fig. 14). Then close the lid.
3 Place a cup under the coffee dispensing spout.
4 Select a single drink.
5 Press the aroma strength icon for 3 seconds (Fig. 15).
- The pre-ground coffee light goes on and the start light starts pulsing.
6 Press the start/stop button.
7 To stop dispensing coffee before the machine is finished, press the start/stop button again.
i With pre-ground coffee you can only brew one coffee at a time.
i Pre-ground coffee is not a setting that is saved as a previous selected strength setting. Each time you want to use pre-ground coffee, you need to press the aroma strength icon for 3 seconds.
i When you select pre-ground coffee, you cannot select a different aroma strength.
Brewing iced coffee (specific types only)
The coffee is brewed with warm water. Brew over ice cubes for optimal results.
1 Take a glass and fill it two-thirds with ice cubes.
2 Place the glass under the coffee dispensing spout.
3 Tap the iced coffee icon.
The aroma strength and quantity lights go on.
- You can now adjust the drink to your preferred taste.
We recommend using aroma strength 3.
4 Press the start/stop button.
5 To stop dispensing coffee before the machine is finished, press the start/stop button again.
6 For a special iced coffee treat, top it up with cold milk.
Dispensing hot water
1 If attached, remove LatteGo or the milk frother.
2 Tap the hot water icon.
The drink quantity lights go on and show the previous selected drink setting for hot water.
3 Adjust the hot water quantity to your preference by tapping the drink quantity icon (Fig. 3).
4 Press the start/stop button.
The light in the hot water icon flashes and hot water is dispensed from the hot water spout (Fig. 18).
5 To stop dispensing hot water before the machine is finished, press the start/stop button again.
Adjusting machine settings
Adjusting the stand-by time
1 Press the on/off button to switch off the machine.
2 When the machine is switched off: press and hold the Calc / Clean icon (Fig. 19) until the Calc / Clean light and the Aroma strength lights go on (Fig. 20).
3 Tap the Aroma strength icon to select the required stand-by time: 15, 30, 60 or 180 minutes. Respectively 1, 2, 3 or 4 lights of the Aroma strength icon light up.
4 When you have finished setting the stand-by time, press the start/stop button. The machine switches off.
5 Press the on/off button to switch on the machine again.
Adjusting the highest default setting of your drinks
The machine has 3 default settings for each drink: low, medium, high. You can only adjust the quantity of the highest setting. The new quantity can be stored as soon as the start light starts to pulse.
Before you start programming the quantity of a milk drink, assemble LatteGo and pour milk in it.
1 To adjust the highest quantity setting, press and hold the icon of the drink you want to adjust for 3 seconds.
- The upper light of the drinks quantity icon and the upper light of the milk quantity icon (specific types only) starts to pulse and the start/stop button starts to pulse, indicating that you are in programming mode.
2 Press the start/stop button. The machine starts to brew the selected beverage.
- The start light lights up continuously at first. When the machine is ready to store the adjusted volume, the start/stop light starts to pulse.
3 Press the start/stop button again when the cup contains the desired quantity of coffee or milk.
- In case of cappuccino or latte macchiato, first the milk will be dispensed. Press the start/stop button when the cup contains the desired milk quantity. The machine automatically starts dispensing the coffee. Press the start/stop button again when the cup contains the desired quantity.
After you have programmed the new highest default quantity for a drink, the machine will dispense this new amount each time you select the highest quantity of this drink.
i You can only adjust the highest default quantity level.
If you want to go back to the default quantity settings, see 'Restoring factory settings'.
Adjusting the coffee temperature
Machines without temperature icon
1 Press the on/off button to switch off the machine.
2 When the machine is switched off: press and hold the coffee quantity icon until the lights in this icon go on (Fig. 21).
3 Tap the quantity icon to select the required temperature: normal, high or max.
- Respectively 1, 2 or 3 lights are on.
4 When you have finished setting the coffee temperature, press the start/stop button.
5 Press the on/off button to switch on the machine again.
If you do not switch off the machine yourself, it will switch off automatically after some time.
Machines with temperature icon (EP3300 only)
1 Select the drink of your choice.
2 Tap the coffee temperature icon repeatedly to select the desired temperature.
Restoring factory settings
The machine offers you the possibility to restore the drinks default settings at any moment.
i You can only restore the default settings when the machine is switched off.
1 Press the on/off button to switch the machine off.
2 Press and hold the espresso icon for 3 seconds.
- The middle lights in the drink setting icons light up. The start/stop light starts to pulse, indicating that the settings are ready to be restored.
3 Press the start/stop button to confirm you want to restore the settings.
4 Press the on/off button to switch on the machine again.
Adjusting grinder settings
You can change the coffee strength with the grind setting knob inside the bean container. The lower the grind setting, the finer the coffee beans are ground and the stronger the coffee. There are 12 different grind settings you can choose from.
The machine has been set up to get the best taste out of your coffee beans. Therefore we advise you not to adjust the grind setting until you have brewed 100-150 cups (approx. 1 month of use).
You can only adjust the grind settings when the machine is grinding coffee beans. You need to brew 2 to 3 drinks before you can taste the full difference.
Do not turn the grind setting knob more than one notch at a time to prevent damage to the grinder.
1 Place a cup under the coffee dispensing spout.
2 Open the lid of the coffee bean hopper.
3 Tap the espresso icon and then press the start/stop button.
4 When the grinder starts grinding, press down the grind setting knob and turn it to the left or right. (Fig. 22)
Deactivate the beeps of the control panel
1 Press the on/off button to switch off the machine.
2 When the machine is switched off, tap and hold the coffee icon until the light in the icon goes on. The start light starts flashing.
3 Tap the coffee icon again to deactivate the beeps of the control panel. The light in the coffee icon goes out.
4 Press the start/stop button to confirm your choice.
5 Press the on/off button to switch on the machine again. The beeps of the control panel have now been deactivated.
Note: If the light in the coffee icon does not go on after tapping and holding the icon, this means that the beeps of the control panel already have been deactivated. To activate them again, tap the icon again and confirm by pressing the start/stop button.
The beeps in the on/off button and in the start/stop button cannot be deactivated.
Removing and inserting the brew group
Go to www.philips.com/coffee-care for detailed video instructions on how to remove, insert and clean the brew group.
Removing the brew group from the machine
1 Switch off the machine.
2 Remove the water tank and open the service door (Fig. 23).
3 Press the PUSH handle (Fig. 24) and pull at the grip of the brew group to remove it from the machine (Fig. 25).
Reinserting the brew group
Before you slide the brew group back into the machine, make sure it is in the correct position.
1 Check if the brew group is in the correct position. The arrow on the yellow cylinder on the side of the brew group has to be aligned with the black arrow and N (Fig. 26).
- If they are not aligned, push down the lever until it is in contact with the base of the brew group (Fig. 27).
2 Slide the brew group back into the machine along the guiding rails on the sides (Fig. 28) until it locks into position with a click (Fig. 29). Do not press the PUSH button.
3 Close the service door and place back the water tank.
Cleaning and maintenance
Regular cleaning and maintenance keeps your machine in top condition and ensures good-tasting coffee for a long time with a steady coffee flow.
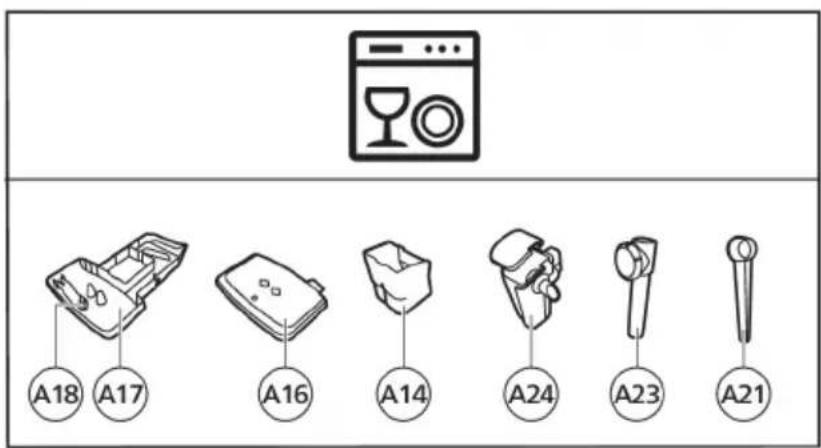
Consult the table below for a detailed description on when and how to clean all detachable parts of the machine. You can find more detailed information and video instructions in the Coffee+ app and on www.philips.com/coffee-care. See figure D for an overview of which parts can be cleaned in the dishwasher.
Detachable parts
When to clean How to clean
| Brew group Weekly Remove the brew group from the machine (see 'Removing and inserting the brew group'). Rinse it under the tap (see 'Cleaning the brew group under the tap'). | ||
| Monthly Clean the brew group with the Philips coffee oil remover tablet (see 'Cleaning the brew group with the coffee oil remover tablets'). | ||
| Classic milk frother After every use First dispense hot water with the milk frother attached to the machine for thorough cleaning. Then remove the milk frother from the machine and disassemble it. Clean all parts under the tap or in the dishwasher. | ||
| Pre-ground coffee compartment | Check the pre-ground coffee compartment weekly to see if it is clogged. | Unplug the machine and remove the brew group. Open the lid of the pre-ground coffee compartment and insert the spoon handle into it. Move the handle up and down until the clogged ground coffee falls down (Fig. 30). Scan the QR code to download the Coffee+ app for detailed video instructions, or go to www.philips.com/coffee-care |
| Coffee grounds container | Empty the coffee grounds container when prompted by the machine. Clean it weekly. | Remove the coffee grounds container while the machine is switched on. Rinse it under the tap with some washing-up liquid or clean it in the dishwasher. The front panel of the coffee grounds container is not dishwasher-safe. |
| Drip tray Empty the drip tray daily or as soon as the red 'drip tray full' indicator pops up through the drip tray (Fig. 31). Clean the drip tray weekly. | Remove the drip tray (Fig. 32) and rinse it under the tap with some washing-up liquid. You can also clean the drip tray in the dishwasher. The front panel of the coffee grounds container (fig. A15) is not dishwasher-safe. | |
| Detachable parts | When to clean How to clean | |
| LatteGo After every use Rinse LatteGo under the tap or clean it in the dishwasher. | ||
| Lubrication of the brew group | Every 2 months Consult the lubrication table and lubricate the brew group with the Philips grease (see 'Lubricating the brew group'). | |
| Water tank Weekly Rinse the water tank under the tap | ||
Cleaning the brew group
Regular cleaning of the brew group prevents coffee residues from clogging up the internal circuits. Scan the QR code on the cover of this booklet for support videos on how to remove, insert and clean the brew group, or visit www.philips.com/coffee-care
Cleaning the brew group under the tap
1 Remove the brew group (see 'Removing and inserting the brew group').
2Rinse the brew group thoroughly with water. Carefully clean the upper filter (Fig. 33) of the brew group.
3 Let the brew group air-dry before you place it back. Do not dry the brew group with a cloth to prevent fibers from collecting inside the brew group.
Cleaning the brew group with the coffee oil remover tablets
Only use Philips coffee oil remover tablets.
1 Put a cup under the coffee spout. Fill the water tank with fresh water.
2 Put a coffee oil remover tablet in the pre-ground coffee compartment.
3 Tap the coffee icon and then press the aroma strength icon for 3 seconds to select the pre-ground coffee function (Fig. 2).
4 Do not add pre-ground coffee. Press the start/stop button to start the brewing cycle. When half a cup of water has been brewed, unplug the machine.
5 Let the coffee oil remover solution act for at least 15 minutes.
6 Insert the mains plug back into a wall socket and switch on the machine to complete the brewing cycle. Empty the cup.
7 Remove the water tank and open the service door. Remove the brew group (see 'Removing the brew group from the machine') and rinse it thoroughly under the tap.
8 Reinsert the brew group and water tank and place a cup under the coffee spout.
9 Tap the coffee icon and then press the aroma strength icon for 3 seconds to select the pre-ground coffee function (Fig. 2). Do not add pre-ground coffee. Press the start/stop button to start the brewing cycle. Repeat this twice. Empty the cup.
Lubricating the brew group
Lubricate the brew group every 2 months, to ensure that the moving parts continue to move smoothly.
1 Apply a thin layer of grease on the piston (grey part) of the brew group (Fig. 34).
2 Apply a thin layer of grease around the shaft (grey part) in the bottom of the brew group (Fig. 35).
3 Apply a thin layer of grease to the rails on both sides (Fig. 36).
Cleaning LatteGo (milk container)
Cleaning LatteGo after every use
1 Remove LatteGo from the machine (Fig. 37).
2 Pour out any remaining milk.
3 Press the release button and remove the milk container from the frame of LatteGo (Fig. 38).
4 Clean all parts in the dishwasher or under the tap with lukewarm water and some washing-up liquid.
Cleaning the classic milk frother
Cleaning the classic milk frother after every use
Clean the milk frother each time you use it for hygiene reasons and to avoid the build-up of milk residues.
1 Place a cup under the milk frother.
2 Tap the steam icon and then press the start/stop button to start dispensing steam and to remove any milk that may be left inside the milk frother.
3 To stop dispensing steam after a few seconds, press the start/stop button again.
4 Clean the milk frother with a damp cloth.
Daily cleaning of the classic milk frother
1 Let the milk frother cool down completely.
2 Tilt the milk frother to the left and remove the metal part and the silicone part (Fig. 39).
3 Disassemble the three parts (Fig. 40) and rinse them with fresh water or clean them in the dishwasher.
4 Let the three milk frother parts air dry, reassemble the parts and reattach the milk frother to the machine.
Aquaclean water filter
Your machine is AquaClean enabled. You can place the AquaClean water filter in the water tank to preserve the taste of your coffee. It also diminishes the need for descaling by reducing limescale build-up in your machine. You can purchase an AquaClean water filter from your local retailer, from authorized service centers or online at www.philips.com/parts-and-accessories.
Aquaclean icon and light
Your machine is equipped with an AquaClean water filter light (Fig. 41) to indicate the status of the filter. Use the table below to see what actions are required when the light is on or when it is flashing.
| Aquac Clean | When you use the machine for the first time, the AquaClean light starts flashing orange. This indicates that you can start using the AquaClean water filter. If you do not activate an AquaClean water filter, the light will switch off automatically after a while. |
| Aquac Clean | Once you have installed the filter and activated it with the AquaClean icon, the AquaClean light turns blue to confirm that the AquaClean water filter is active. |
| Aquac Clean | When the filter is exhausted, the AquaClean light starts flashing orange again to remind you to replace the filter with a new one. |
| Aquac Clean | When the orange AquaClean light is off, you can still activate an AquaClean filter, you will need to descale the machine first. |
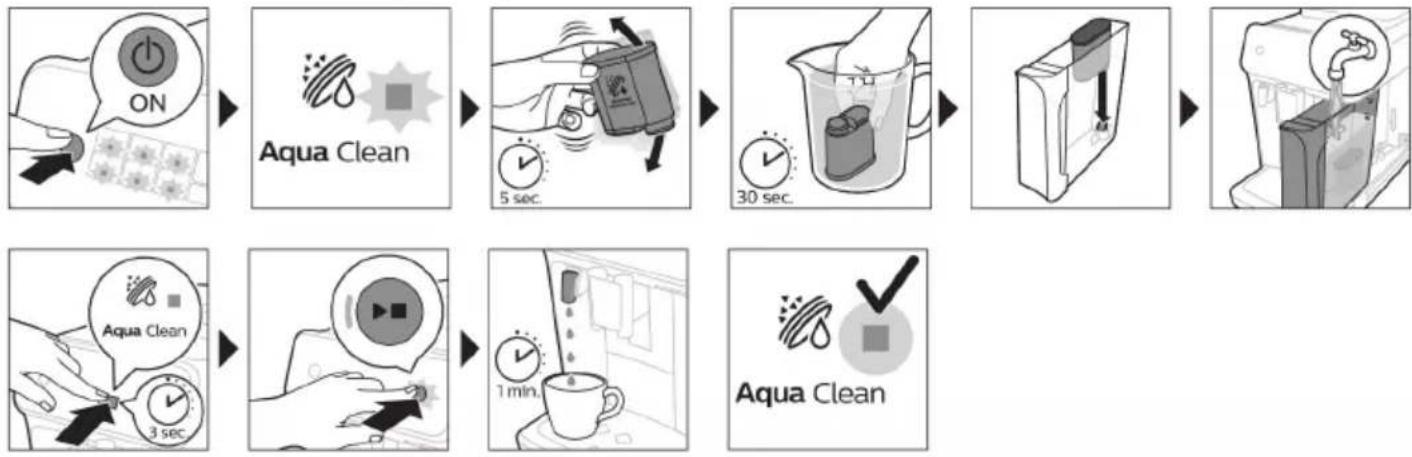
Activating the AquaClean water filter (5 min.)
The machine does not automatically detect that a filter has been placed in the water tank. Therefore you need to activate each new AquaClean water filter that you install with the AquaClean icon.
When the orange AquaClean light is off, you can still activate an AquaClean water filter, but you will need to descale the machine first.
i Your machine has to be completely limescale-free before you start to use the AquaClean water filter.
Before activating the AquaClean water filter, it has to be prepared by soaking it in water as described below. If you don't do this, air might be drawn into the machine instead of water, which makes a lot of noise and prevents the machine from being able to brew coffee.
1 Make sure that the machine is switched on.
2 Shake the filter for about 5 seconds (Fig. 42).
3 Immerse the filter upside down in a jug with cold water and shake/press it (Fig. 43).
4 The filter is now prepared for use and can be inserted into the water tank.
5 Insert the filter vertically onto the filter connection in the water tank. Press it down to the lowest possible point (Fig. 44).
6 Fill the water tank with fresh water and place it back into the machine.
7 If attached, remove the LatteGo.
8 Place a bowl under the hot water spout/milk frother.
9 Press the AquaClean icon for 3 seconds (Fig. 45). The start light starts to pulse.
10 Press the start/stop button to start the activation process.
11 Hot water will be dispensed from the hot water spout/milk frother (3 min.).
12 When the activation process is finished, the blue AquaClean light goes on to confirm that the AquaClean water filter has been activated correctly.
Replacing the AquaClean water filter (5 min.)
After 95 liters of water have flowed through the filter, the filter will cease to work. The AquaClean light turns orange and starts to flash to remind you to replace the filter. As long as it flashes, you can replace the filter without having to descale the machine first. If you do not replace the AquaClean water filter, the orange light will go out eventually. In that case you can still replace the filter but you first need to descale the machine.
When the orange AquaClean light flashes:
1 Take out the old AquaClean water filter.
2 Install a new filter and activate it as described in chapter 'Activating the AquaClean water filter (5 min).
Replace the AquaClean water filter at least every 3 months, even if the machine does not yet indicate that replacement is required.
Deactivating the AquaClean reminder
If you do not want to use Philips AquaClean water filters anymore, you can always deactivate the AquaClean reminders (AquaClean light flashing orange):
1 Press the on/off button to switch off the machine.
2 When the machine is switched off, press and hold the AquaClean icon until the light in this icon goes on. The start light starts flashing.
3 Tap the AquaClean icon again to deactivate the reminders. The light in the AquaClean icon goes off.
4 Press the start/stop button to confirm your choice.
5 Press the on/off button to switch on the machine again. The AquaClean reminders are now deactivated.
Note: The activation of a new AquaClean filter will automatically re-activate the AquaClean reminders.
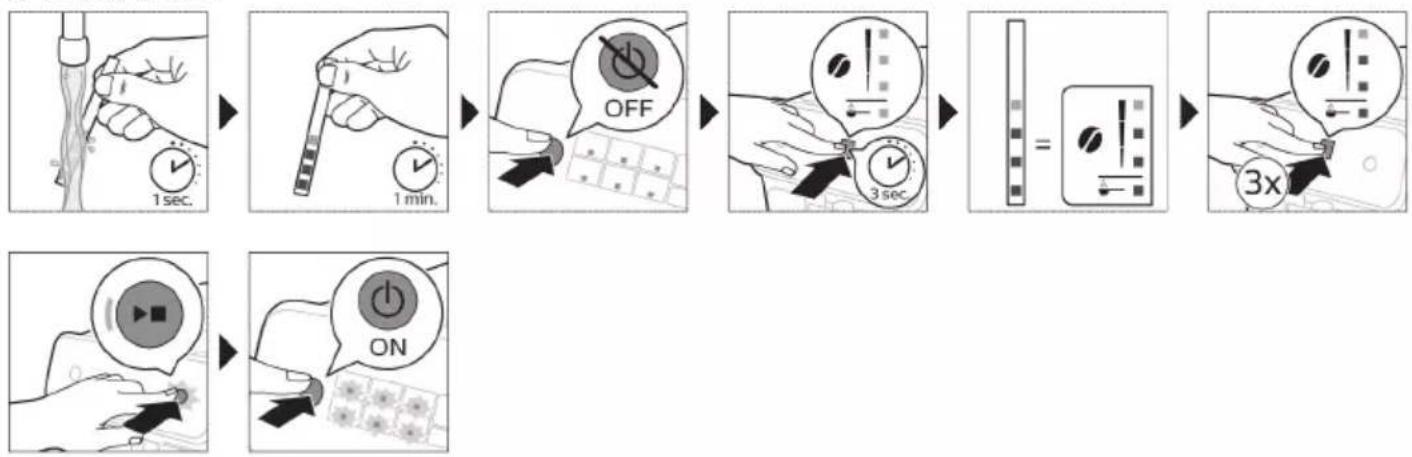
Setting the water hardness
We advise you to adjust the water hardness to the water hardness in your region for optimal performance and a longer lifetime of the machine. This also prevents you from having to descale the machine too often. The default water hardness setting is 4: hard water.
Use the water hardness test strip supplied in the box to determine the water hardness in your region:
1 Immerse the water hardness test strip in tap water or hold it under the tap for 1 second (Fig. 46).
2 Wait 1 minute. The number of squares on the test strip that turn red indicate the water hardness (Fig. 47).
Set the machine to the correct water hardness:
1 Press the on/off button to switch off the machine.
2 When the machine is switched off, tap and hold the aroma strength icon until all lights in the icon go on (Fig. 2).
3 Tap the aroma strength icon 1, 2, 3 or 4 times. The number of lights that are on should be the same as the number of red squares on the test strip (Fig. 48). When there are no red squares on the test strip (so all squares are green) please select 1 light.
4 When you have set the correct water hardness, press the start/stop button.
i Since you only set the water hardness once, the aroma strength function is used to select the water hardness. This does not affect the aroma strength of the drinks you make afterwards.
Descaling procedure (30 min.)
Please use Philips descaler only. Under no circumstances should you use a descaler based on sulfuric acid, hydrochloric acid, sulfamic or acetic acid (vinegar) as this may damage the water circuit in your machine and not dissolve the limescale properly. Not using the Philips descaler will void your warranty. Failure to descale the appliance will also void your warranty. You can buy Philips descaling solution in the online shop at www.philips.com/coffee-care.
When the Calc / Clean light switches on, you need to descale the machine.
1 Make sure that the machine is switched on.
2 If attached remove LatteGo or milk frother.
3 Remove the drip tray and the coffee grounds container, empty them and put them back into place.
4 Remove the water tank and empty it. Then remove the AquaClean water filter.
5 Pour the whole bottle of Philips descaler in the water tank and then fill it with water up to the Calc / Clean indication (Fig. 49). Then place it back into the machine.
6 Place a large container (1.5 l) under the coffee dispensing spout and the water spout.
7 Press the Calc / Clean icon for 3 sec. and then press the start/stop button.
8 The first phase of the descending procedure starts. The descending procedure lasts approx. 30 minutes and consists of a descending cycle and a rinsing cycle. During the descending cycle the Calc / Clean light flashes to show that the descending phase is in progress.
9 Let the machine dispense the descending solution until the display reminds you that the water tank is empty.
10 Empty the water tank, rinse it and then refill it with fresh water up to the Calc / Clean indication.
11 Empty the container and place it back under the coffee dispensing spout and the water spout. Press the start/stop button again.
12 The second phase of the descending cycle, the rinsing phase, starts and lasts 3 minutes. During this phase the lights on the control panel go on and off to show that the rinsing phase is in progress.
13 Wait until the machine stops dispensing water. The descending procedure is finished when the machine stops dispensing water.
14 The machine will now heat up again. When the lights in the drink icons light up continuously, the machine is ready for use again.
15 Install and activate a new AquaClean water filter in the water tank (see 'Activating the AquaClean water filter (5 min.)').
- When the descending procedure is finished, the AquaClean light flashes for a while to remind you to install a new AquaClean water filter.
Tip: Using the AquaClean filter reduces the need for descaling!
What to do if the descending procedure is interrupted
You can exit the descending procedure by pressing the on/off button on the control panel. If the descending procedure is interrupted before it is completely finished, do the following:
1 Empty and rinse the water tank thoroughly.
2 Fill the water tank with fresh water up to the Calc / Clean level indication and switch the machine back on. The machine will heat up and perform an automatic rinsing cycle.
3 Before brewing any drinks, perform a manual rinsing cycle. To perform a manual rinsing cycle, first dispense half a water tank of hot water by repeatedly tapping the hot water icon and then brew 2 cups of pre-ground coffee without adding ground coffee.
If the descending procedure was not completed, the machine will require another descending procedure as soon as possible.
Ordering accessories
To clean and descale the machine, only use the Philips maintenance products. These products can be purchased from your local retailer, from the authorized service centers or online at
www.philips.com/parts-and-accessories. To find a full list of spare parts online, enter the model number of your machine. You can find the model number on the inside of the service door.
Maintenance products and type numbers:
- Descaling solution CA6700
- AquaClean water filter CA6903
Brew group grease HD5061 - Coffee oil remover tablets CA6704
Troubleshooting
This chapter summarizes the most common problems you could encounter with the machine. For support, download the Coffee+ app through your app store, or by scanning the QR code on the cover of this booklet. Support videos and a complete list of frequently asked questions are available on
www.philips.com/coffee-care. If you are unable to solve the problem, contact the Consumer Care Center in your country.
Warning icons
| Warning icon | Solution |
| The 'water tank empty' light is on - The water tank is almost empty. Fill the water tank with fresh water to the maximum level indication. - The water tank is not in place. Place back the water tank. | |
| The 'empty coffee grounds container' light is on - The coffee grounds container is full. Remove and empty the coffee grounds container while the machine is switched on. Wait at least 5 seconds before you reinsert the container. | |
| The alarm light is on - The coffee grounds container and/or the drip tray is not in place or not placed correctly. Place back the coffee grounds container and/or the drip tray and make sure they are in the correct position. - The service door is open. Remove the water tank and make sure the service door is closed. | |
| The alarm light is flashing - The brew group is not in place or not placed correctly. Remove the brew group and make sure it is locked into place. See chapter 'Removing and inserting the brew group' for step-by-step instructions. - The brew group is blocked. Remove the brew group and rinse it with water under the tap. Then lubricate the brew group and place it back into the machine. See chapter 'Cleaning and maintenance' for step-by-step instructions. | |
| The alarm light is on and the start light flashes. Some air is trapped inside the machine. To release the air from the machine, fill the water tank with water, place a cup under the classic milk frother and press the flashing start/stop button. Be careful: small jets of hot water will be dispensed from the classic milk frother to release the air. | |
| Aqua Clean | AquaClean light is flashing: place or replace the AquaClean water filter and activate it. See chapter 'AquaClean water filter' for step-by-step instructions. |
| Calc / clean | Descaling light is on continuously: Descale the machine. |
| Excess Coffee | The lights in the drink icons light up and go out one by one. The machine is heating up and/or trying to release the air that was drawn into the machine. Wait until all drink lights light up continuously. |
| Cappuccino | The lights of all warning icons are flashing. Reset the machine by unplugging it and plugging it back in. Before switching the machine back on, follow these steps: - Remove the AquaClean water filter from the water tank. - Place back the water tank. Push it into the machine as far as possible to make sure it is in the right position. - Open the lid of the pre-ground coffee compartment and check if this is clogged with coffee powder. To clean it, insert a spoon handle into the pre-ground coffee compartment and move the handle up and down until the clogged ground coffee falls down (Fig. 30). Remove the brew group and remove all ground coffee that has fallen down. Place back the clean brew group. - Switch the machine back on. If the problem is solved the AquaClean filter was not prepared well. Prepare the AquaClean filter before placing it back by following steps 1 and 2 in chapter 'Activating the AquaClean water filter (5 min). If the lights continue to flash, the machine could be overheated. Switch the machine off, wait 30 minutes and switch it on again. If the lights are still flashing, contact the Consumer Care Center in your country. For contact details, see the international warranty leaflet. |
Troubleshooting table
This chapter summarizes the most common problems you could encounter with the machine. Support videos and a complete list of frequently asked questions are available on www.philips.com/coffee-care. If you are unable to solve the problem, contact the Consumer Care Center in your country. For contact details, see the warranty leaflet.
Problem Cause Solution
| The drip tray fills up quickly. | This is normal. The machine uses water to rinse the internal circuit and brew group. Some water flows through the internal system directly into the drip tray. | Empty the drip tray daily or as soon as the red 'drip tray full' indicator pops up through the drip tray cover. Tip: place a cup under the dispensing spout to collect rinsing water that comes out of it. |
| The 'empty coffee grounds container' light remains on. | You emptied the coffee grounds container while the machine was switched off. | Always empty the coffee grounds container while the machine is switched on. Remove the coffee grounds container, wait at least 5 sec. and then insert it again. |
| The machine prompts to empty the coffee grounds container even though the container is not full. | The machine did not reset the counter the last time you emptied the coffee grounds container. | Always wait approx. 5 seconds when you place back the coffee grounds container. In this way the coffee grounds counter will be reset to zero. |
Problem Cause Solution
| Always empty the coffee grounds container while the machine is switched on. If you empty the coffee grounds container when the machine is switched off, the coffee grounds counter won't reset. | ||
| The coffee grounds container is too full and the 'empty coffee grounds container' light did not go on. | You removed the drip tray without emptying the grounds container. | When you remove the drip tray, also empty the coffee grounds container even if it contains only a few coffee pucks. In this way the coffee grounds counter will be reset to zero, re-starting to correctly count the coffee pucks. |
| I cannot remove the brew group. | The brew group is not in the correct position. | Reset the machine in the following way: close the service door and place back the water tank. Switch the machine off and back on again. Try again to remove the brew group. See chapter 'Removing and inserting the brew group' for step by step instructions. |
| I cannot insert the brew group. | The brew group is not in the correct position. | Reset the machine in the following way: close the service door and place back the water tank. Leave the brew group out. Switch the machine off and unplug it. Wait for 30 sec. and then plug the machine back in and switch it on. Then put the brew group in the correct position and reinsert it into the machine. See chapter 'Removing and inserting the brew group' for step by step instructions. |
| The coffee is watery. The brew group is dirty or needs to be lubricated. | Remove the brew group (see 'Removing the brew group from the machine'), rinse it under the tap and leave it to dry. Then lubricate the moving parts (see 'Lubricating the brew group'). | |
| The machine is performing its self-adjustment procedure. This procedure is started automatically when you use the machine for the first time, when you change to another type of coffee beans or after a long period of non-use. | Brew 5 cups of coffee initially to allow the machine to complete its self-adjustment procedure. | |
| The grinder is set to a too coarse setting. | Set the grinder to a finer (lower) setting. Brew 2 to 3 drinks to taste the full difference. | |
| The coffee is not hot enough. | The temperature is set too low. Set the temperature to the maximum (see 'Adjusting the coffee temperature'). | |
Problem Cause Solution
| A cold cup reduces the temperature of the drink. | Preheat the cups by rinsing them with hot water. | |
| Adding milk reduces the temperature of the drink. | Regardless of whether you add hot or cold milk, adding milk always reduces the temperature of the coffee. Preheat the cups by rinsing them with hot water. | |
| Coffee does not come out or coffee comes out slowly. | The AquaClean water filter was not prepared properly for installation. | Remove the AquaClean water filter and try to brew a coffee again. If this works, make sure that you have prepared the AquaClean water filter properly before you place it back. See chapter 'AquaClean water filter' for step-by-step instructions. |
| After a long period of non-use, you need to prepare the AquaClean water filter for use again and then place it back. See step 1 - 3 of chapter 'Activating the AquaClean water filter'. | ||
| The AquaClean water filter is clogged. | Replace the AquaClean water filter every 3 months. A filter that is older than 3 months can become clogged. | |
| The grinder is set to a too fine setting. | Set the grinder to a coarser (higher) setting. Note that this will impact the coffee taste. | |
| The brew group is dirty. Remove the brew group and rinse it under the tap (see 'Cleaning the brew group under the tap'). | ||
| The coffee dispensing spout is dirty. | Clean the coffee dispensing spout and its holes with a pipe cleaner or needle. | |
| The pre-ground coffee compartment is clogged | Switch off the machine and remove the brew group. Open the lid of the pre-ground coffee compartment and insert the spoon handle into it. Move the handle up and down until the clogged ground coffee falls down (Fig. 30). | |
| The machine circuit is blocked by limescale. | Descale the machine with Philips descaler. Always descale the machine when the descaling light starts to flash. | |
| The machine grinds the coffee beans, but coffee does not come out. | The pre-ground coffee compartment is clogged. | Switch off the machine and remove the brew group. Open the lid of the pre-ground coffee compartment and insert the spoon handle into it. Move the handle up and down until the clogged ground coffee falls down (Fig. 30). |
Problem Cause Solution
| The milk does not froth. Machines with LatteGo: LatteGo is incorrectly assembled. | Make sure that the milk container is properly assembled to the frame of LatteGo ('click'). | |
| Machines with LatteGo: the milk container and/or frame of LatteGo are dirty. | Disassemble LatteGo and rinse both parts under the tap or clean them in the dishwasher (see 'Cleaning LatteGo after every use'). | |
| Machines with classic milk frother: the milk frother is dirty. | Thoroughly clean the milk frother (see 'Cleaning the classic milk frother') | |
| The type of milk used is not suitable for frothing. | Different types of milk result in different amounts of froth and different froth qualities. We have tested the following milk types which proved to deliver a good milk froth result: semi-skimmed or full-fat cow's milk and lactose-free milk. | |
| Milk is leaking from the bottom of the LatteGo milk container. | The frame and the milk container are not assembled properly. | First insert the top of the milk container under the hook at the top of the frame. Then press the bottom part of the container. You hear a click when it locks into place. |
| The machine seems to be leaking. | The machine uses water to rinse the internal circuit and brew group. This water flows through the internal system directly into the drip tray. This is normal. | Empty the drip tray every day or as soon as the 'drip tray full' indicator pops up through the drip tray cover. Tip: Place a cup under the dispensing spout to collect rinsing water and reduce the amount of water in the drip tray. |
| The drip tray is too full and has overflowed which makes it look like the machine is leaking. | Empty the drip tray every day or as soon as the 'drip tray full' indicator pops up through the drip tray cover. | |
| The water tank is not fully inserted and air is drawn into the machine. | Make sure the water tank is in the correct position: remove it and insert it again pushing it as far as possible. | |
| The brew group is dirty/clogged. Rinse the brew group. | ||
| The machine is not placed on a horizontal surface. | Place the machine on a horizontal surface so that the drip tray does not overflow and the 'drip tray full' indicator works properly. | |
| The water tank is not fully inserted and air is drawn into the machine. | Make sure the water tank is in the correct position: remove it and insert it again pushing it as far as possible. | |
Problem Cause Solution
| I cannot activate the AquaClean water filter and the machine asks for descending. | The filter has not been installed or replaced in time after the AquaClean water filter light started to flash. This means your machine is not completely limescale free. | Descale your machine first and then install the AquaClean water filter. |
| The new water filter does not fit. | You are trying to install another filter than the AquaClean water filter. | Only the AquaClean water filter fits into the machine. |
| The rubber ring on the AquaClean water filter is not in place. | Place back the rubber ring on the AquaClean water filter. | |
| The machine is making a loud noise. | It is normal that your machine makes noise during use. | If the machine starts to make a different kind of noise, clean the brew group and lubricate it (see 'Lubricating the brew group'). |
| The AquaClean water filter was not prepared properly and air is now drawn into the machine. | Remove the AquaClean water filter from the water tank and properly prepare it for use before you place it back. See chapter 'AquaClean water filter' for step-by-step instructions. | |
| The water tank is not fully inserted and air is drawn into the machine. | Make sure the water tank is in the correct position: remove it and insert it again pushing it as far as possible. |
Technical specifications
The manufacturer reserves the right to improve the technical specifications of the product. All the preset quantities are approximate.
Description Value
| Size (w x h x d) 247x366x434 mm |
| Weight 7 - 7.5 kg |
| Power cord length 1000 mm |
| Water tank 1.8 litres, removable |
| Coffee bean hopper capacity 275 g |
| Coffee grounds container capacity 12 pucks |
| LatteGo (milk container) capacity 250 ml |
| Adjustable spout height 85-145 mm |
| Nominal voltage - Power rating - Power supply See data label on inside of service door (fig. A11) |
Obsah
Prehled pristroje (obr. A) 24
Ovladacipanel (obrazekB) 24
Uvod 25
Prid prvnim pouzitim 25
VaRení nápojǔ 27
Uprava nastaveni pristroje 29
Vyjmuti a vlozeni varne sestavy 32
www.philips.com/coffee-care.
Nár Calc/Clean-indikatoren beynder at lyse, skal du afkalke maskinen.
www.philips.com/coffee-care.
i Alternatively, you can adjust the temperature of the cafe to suit your preferences.
www.philips.com/coffee-care.
i Det finnes flere varianter av donne ekpressomaskinen, alle med ulike funksjoner. Hver variant har sitt eget typenummer. Du finner typenummeret på datamerket på innsiden av servicedoren (se fig. A11).
i Denne maskinen er testet med kaffe. Den er blitt grundig rengjort, men det kan likevel forekomme kafferester. Vi garanterer imidlertid at maskinen er helt ny.
Aquaclean-vannfilter
Maskinen din er klargjort for AquaClean. AquaClean-vannfilteret kan plasseres i vanntanken for Å bevare kaffesmaken. Det reduserer och behovet for avkalking ved Å redusere kalkavleiring i maskinen. Du kan
Adverselik- Løsning on
Personalizar as bebidas
Apart from the predefinida, another programa that uses a quantidade predefinida is the definir a bebida. A definir a bebida is a way to select a bebida in a given way. Apart from the definir a bebida, there are also two other programa: definir a bebida (the first one is called definir a bebida).
Encomendar acessórios
www.philips.com/coffee-care.
1 Per kete aparat ekspresi ekzistojne disa versione, te gjitha me karakteristika te ndryshme. Secili version permban nje numer lloji. Numrin e llojt mund ta gjeni ne etiketen e te dhénave ne pjesen e brendshme deleeres se sherbimit (shihni Fig. A11).
Kjo makineri eht estuar me kafe. Ndonese eht pastruar me kujdes, mund te ket mbetje kafeje. Megjithate, ju garantojme se makina eht absolutisht re.
Vodni filter AquaClean
IapaoKeuun afoyaalou u e to klaoikó eapntma yia afoya
Tia tn 3eAioiTo noiotnTa afo, xnooOnoeite naVta yala aneuOeiaac ao to uyEio.
B2 IkoHn 3a HauNTkn* B8 CBeTInHeH INdKaTop 3a Haayao
B3 IkoHa 3a cnla Ha apomata/npeIbapntelno cmJnHO kafe
B9 Ctapr/cton 6yTo
B4 IkoHa 3a KOJnueCTBO Ha HAnrTkata B10 IkoHa 3a Calc / Clean
B5 IkoHa 3a KOJInuEcTBo MJIaKO (cAmO 3a OnpeJeIeHIMoJIeJI)
B11 IkoHa AquaClean
B6 IkoHa 3a TempepaTpya Ha KaΦeTo (cAmo 3a onpeDeJIeHmOdeJI)
* IkoHn 3a Hapntkn (cAmO cneuФuHn Buidoe): ecnpco, bJrro ecnpco, kafe, JedeHo Kafe, KanyuHNO, NaTe MaKnato, ropeua Boda, npa
BbVeJeHne
ПоздраьВаме Ви 3а пokупкаТа На нально abTomatИчнота Кафемшина Ha Philips! 3a за се ВьзползВаTe ИЗцЯно OT пeДлагаHATA OT Habс пОДрьЖКа, PerinctprupaTe пюдуктс ИН WWW.philips.com/welcome.
Ipei Da n3noJ3BaTe MaunHaTa 3a NpBn NbT, npOeTeTe BnMaTeHNo OTdElnHaTa 6poWypa C HΦopMaζηa 3a 6e3oNaChOCT n a 3ana3eTe 3a cnpaBkA B 6bndeue.
3a da 3aNoUHeTe da n3noJ3BaTe KaΦeMaunHaTa n Da noJyUte Ha- do6pOTo OT He, Hne npednaIame PoJdpbXka No pa3nUnHn HauHH. CbDbpXaHne Ha kyTnaT:
1 PbkoBoCTBO 3a 6bp3 cTapT cnHcTpkykun 3a ynoTpe6a, 6a3npaHn Ha cHIMKn, n HΦopMaun 3a nouchBaHe n NOdPbxxka.
2 OTeJIHaTa KnJxKa 3a 6e3OpacHocT c HcTpyKuN 3a TOBa KaK Da n3NoJ3Bame MaunHaTa no 6e3OpaceH naH.
3 3a OHlaH NpOdpbXka (TOBa pa3wnpeHO pBKOBOCTBO 3a NOTpe6nteJ, YecTo 3aDaBAHN Bbnpocn, BndeOKlnIOBE nT.H.), cKaHpaIte QR kOda Ha KOpuTaHa Ta3N KHNKka, 3a Da n3TeJIInTe npiloxeHneTo Coffee+, nII nocetete www.philips.com/coffee-care.
i CbIeCTBvBaT MHOKeCTBO BepCn Ha Ta3N MaUHa 3a ecnpeco, KaTO BCaKa OT T8X NMa pa3JIuHn xapaKTepeNCTnK. BcKa BepCn NMa cBoi co6CTBeH Homep Ha TnI. MoKeTe Da OTKpNeTe Homepa Ha TnPa Ha eTKeTa C daHHN OT BbTpewHaTa CTpaHa Ha cepBn3HaTa BpaTuKhA (BVxTe qnr. A11).
TataMaaHaeTeCTBaHa cKafe.BbnpeknYe eNouchteHa BHMMaTeJHo,B He r MoKe Da HMa OCTaTbUOT Kafe. TapaHTnpame o6aue, Ye MaunHaTa e a6cOJIOTHO HOBA.
MaunHaTa aBtOMaTHUHO hactpoINBa KOJIuYeCTBOTO cMJIaHO Kafe, KoETo ce n3NoJ3Ba 3a npnroTBHe Ha KaFe c Hau-Do6bp Bkyc. IpbBOHaJaHOr Tp8Ba da npnroTbnte 5 KaFeTa, 3a da no3BOJInTe Ha MaunHaTa Da n3BbPshcAmOpErylnpaHe.
Tp6Ba Ia n3PnAkHeTe LatteGo (cBbT 3a Mnko) IIn KlaCnueckaTa npNCtAbka 3a pa3neHbaHe Ha MmKOTO npEi nbpBaTa ynoTppe6a.
PnroTbIHe Ha Kafe OT npeBapnteHcMJIHO KaFe
Ioo jeaHne moKeTe da n3noJ3BaTe npedBapntelHo cMnaHO Kafe BmecTo Kafe Ha 3bph,Ha npimep, aKo npedNoHTate npyR Bd Kafe nn6e3KofoHOBo Kafe.
1 HaTnCHeTe 6yToHa 3a Bk#./n3K#., 3a da BkIooHte MaunHaTa, n n3yaKaIe da 6bJe roTOBa 3a n3NoJ3BaHe.
2 OTbOpTe KaNaka Ha OTdJeHHeTO 3a PpeBapnteJHo CMJHaHO KaFe Nn3CnPeTe eHa paBaHa MePteJHa JbXnUka PpeBapnteJHo CMJHaHO KaFe B OTdJeHHeTO (ΦIr. 14). CneTToBa 3aTbOpTe KaNaka.
3 NocTaBeTe yaaa noi cyuypa 3a kafe.
4 I36epete eHnHnHa HnNTka.
5 HaTnchTe NkOHaTa 3a cnla Ha apomata 3a 3 cekyHn (Φnrg. 15).
- INHДИКaTOPHaTа CBETЛинa 3a npeДВapNTeJIHо CMЛЯНо Kaфe CBETBa, a INHДИKaTOPHaTа CBETЛинa 3a CTapТиранe 3aNoчБа дулсира.
6 Hatachte 6yToHa 3aTapT/CTon.
7 3a da cnpete haIINBaHeTo Ha Kafe, npedn MaunHaTa da e npNKIOUHla, HATNCHeTe 6yToHa 3a CTAPT/CTON THOBO.
C npedBapnteHcMJIHO KaFe MoKeTe Da npIroTBaTe cMo IIO eNHO KaFe HabeHbX.
I IpeBapnteJHo cMnHOTo Kafe He e HacTpoJa, KOaTO ce 3aIncBa KaTo npExDxOJHO n36paHa HAcTpoJa 3a cnlaTa. BceKn PbT, KOrato NcKaTe Da n3NoJ3BaTe npEdBapnteJHo cMnHOp KaFe, Tp86Ba da HaTnCHeTe NKoHaTa 3a cnla Ha apomata 3a 3 cekyHdN.
1 Korato n36peTe npedBapuTeHNo cMnaHo Kafe, He moxete da n36peTe npyra cnla Ha apomata.
PnroTBaHe Ha JeDeHo Kafe (cAmo CpeuHn BnOBe)
i KafoTo ce npiroTBa c TOnla Boda. PniroTBeTe Bbpxy Ky6yeTa JeI 3a NaH-do6pn pe3yIaTn.
1 B3eMeTe cTBkIeHa yaaHn HAnbJIHeTe DBe TpeTn OT He C Ky6eTa nei.
2 NocTabete yauata npd uyuya 3a kafe.
3ДOKOCHTe IKOHaTa 3a JIeHNO kafe.
CBeTINHHnTe INHnKaTOpn 3a cnJaTa Ha apOMaTa N KOJIueCTBOTO npOJbIJaBaT da CBeTЯT.
Cera moxete da perylnipate Hanntkata cnopei npednoHTAHn O T Bac Bkyc.
I IpnopbUbaMe Da n36peTe cNla Ha apOMaTa 3.
4 HaTnchete 6yToHa 3a TaP/TcTOn.
5 3a da cnpeTe HaIINBaHeTo Ha KaFe, npeNi MaIINHaTa Da e npNKJIIOUHnla, HATNCHeTe 6yTOHa 3a CTAPT/CTON THOBO.
63a cneuHaHO n3KyuweHHe cJeHeo Kaede, OonbHHeTe CbC CTyHeO MnaKO.
Пускане на горецьда
1 Ako e noctabeHo, oTcTaHeTe LatteGo nI npCtAbKaTa 3a pa3neHbAHe Ha MIAKOTo.
2ДokocheteИКОнТа3a ropeuaBoJa.
CBeTINHHnTE INHnKaTOpn 3a KOJIuYeCTBOTO Ha HAnNTkAta Ce BKJIIOUyBaT IN NOKa3BaT NOcJIeIHO n36paHaTa HAcTpoiKa 3a HAnNTka c Ropeu a BOda.
3 3aJaTe KOJInuEcTBOTO ropeuBa BOda cnpoeI npeIIOHTAHnra TcN, KaTo DOKoCHeTe NkOHaTa (Φur. 3) 3a KOJInuEcTBO Ha HAnNTkata.
4 HaTnchTe 6yToHa 3a TapT/cToN.
- CbETnnHHnT nHnKaTOp B nKoHaTa 3a ropeuBa BOda cBeTba n OT yUypa (Φnr. 18) 3a ropeua BOda notuHa ropeuA BOda.
5 3a da cnpeTe HaJIINBaHeTo Ha ropeua BOda, npeiMaunHaTa Da e npNKJIOUHna, HATnCHete 6yTOHa 3a CTapT/CTOn THOBO.
Pereynipane Ha HacTrojKeTe Ha MaunHaTa
PerylnpaHe Ha BpeMeTo 3a RotOBHOCT
1 HatncheTe 6yToHa 3a BkJ./n3KJ, 3a Ja n3KJIIOHTe MaunHata.
2 Korato MaunHaTa e n3KIOUeHa: HaTnCHTe n 3aIpbXTe nKOHaTa (Φnrg. 19) Calc / Clean, dokato JAMnukte 3a „Calc / Clean" n „Cnla Ha apomata" CBetHaT (Φnr. 20).
3Дokocheteикohata 3a cnlaTHa apomata,3a n36epeTe Heo6xOIMOTO BpeMe Ha roTOBHOCT:15,30, 60 nnn 180 mnhyn.PecneKtNBHO CBETBaT 1,2,3 nnn 4 lamnukn Ha nkohata 3a cnlaHa apomata.
4 Korato CTe roTOBn C HAcTpoBHaHeTo Ha BpeMeTo Ha rTOBHOCT, HaTncHete 6yToHa cTapT/CTOn. MaunHaTa Ce n3KJIIOUBA.
5 HaTnCHeTe 6yToHa 3a BKNIOUBAHe/UNKIOUBAHe, 3a Da BKIOUHTe MaunHaTa OTHOBO.
Pereylnipane Ha Hau-roJaMaTa HacTroPkA No Ppa36npaHe 3a BaushTe HapNTK
Maushnata pa3nojara c 3 hactpoiKn no noidpa3bupahe 3a Bcra Ka Hnntka: Hncka, cpeHa, BncoKa. Moxete da perylnpate camo kolnueCTBOTO Ha ha-rolmaTa hactpoiKa. Hoboto kolnueCTBO moxe da ce cbxpanu BeDnHa r om CBeTInHHnT INdNKaTOP 3a CTap T 3anOHe da npLncpa.
i IpeNi Da 3aOnuHete Da 3aDaBaTe KOJIInueCTBOTO Ha HAnITkata C MIAKO, crIIOBeTe LatteGo n HaneiTe MJIaKO B Hero.
1 3a da pergylnpate NaB-BnCOKata NaCTPOkA 3a KOJIneCTBO, HATNCHeT N 3aDpbjXTe IKoHaTa 3a HaNTKata, KOrTo NCKaTe Da pergylnpate, 3a 3cekyHdN.
- TOpHaTa INHdNkAToPHa CBeTInHa Ha INKoHaTa 3a KOJInueCTBO Ha HAnITKaTa, KaKTo I RopHaTa INHdNkAToPHa CBeTInHa Ha INKoHaTa 3a KOJInueCTBO Ha MJIaKOTo (cAmO 3a OnpeJeIeHn MoJeIi) 3aNoUBa Da NpLcnpa. ByTohBt 3a CTapT/CTOnbIbIoo 3aNoUBa Da NpLcnpa, 3a Da NOKaKe, Ye cTe B peXIM Ha npOrpaMnpaHe.
2 HaTnchete 6yToHa 3a>CTapr/CTon. MaunHaTa 3anOuBa da npiroTbna 36paHaTa HanntKa. - ИнданkaTophaТа CBETлИнha 3a CTapTираHe OTHaЧАо CBETи HeNpeKьСHTо. KOraTO MaшинATAe IrotOBa Дa CBxpaHn 3aДaDEHnOбeM, CBETЛINHnIrTNДИNKaTOp 3a CTapT/CTon 3aNoUyBa Дa pyLcnapa.
3 HaTncheTe 6yToHa 3a cTapT/CTOnHOBO, KOrato yAshaTa CbIbpxa XeJaHOTo KOJIuYeCTBO KaΦe IJI MJIaKO. - Ako npiroTBte KaanyuHOn nn NaTe MaKnaTo, nbpBo ige 6bJe haJIaTo MIAKO. HaTnchete 6yToHa 3a CTapr/CToN, KOrato yaaTa CbIbpxka JeNaHOTo KOJnueCTBO MIAKO. MaunHaTa 3aNoUBa aBTomatnuHo da HauNbKaΦeTo. Hatnche 6yToHa 3a CTapr/CToN DTHOBO, KOrato yaaTa CbIbpxka JeJaHOTo KOJnueCTBO.
CleKaTo CTe npOrpaMnPaJIHOBOTO Ha-ROJMAKOJNueCTBO NO NOpra36IpaHe 3a DaJeHa HAnNTKa, MaINHaTa 3aJaDeHOTo HOBO KOJNueCTBO BCEKN PbT, KOrato N36epeTe Ha-ROJMAOTO KOJNueCTBO OT Ta3N HAnNTKa.
Moxete da peylnape camo haB-Bucokoto HnBO 3a KOJIueCTBO no nopa36npahe.
i Ako nckate da ce Bbphete o6paTHo KbM HacTpoKnTe c KOJIuYeCTBa IIO NOIoppa36npaHe, BVxTe "Bb3ctaHOBAHe Ha cTaHdapTHnTe fapuHn HacTPOKn".
i Ako He n3KJIIOUHTe MaUNHaTa CamN, Tc Ce n3KJIIOUBA aBTOMaTNUHc CneI n3BeCTHO BpeMe.
MaunnncnkoHa 3a Tempepatpata (cmo moeep EP3300)
1 N36epete HannTka no Baaw n36op.
2 HaTnchete HeKoJIKKoKpaTHO 6yToHa 3a peryInpaHe Ha TeMnePaTypTa Ha KaΦeTo, 3a Da n36epTe JeHaHaTa TempePaTypa.
Bb3ctaHOBraHe Ha 6pHnTe HacTpoKn
AknBipaHe Ha BodHnA qnlTbp AquaClean (5 mIn.)
iMaunHaTHe 3acuHa aBtOMaTuHNo daH B pe3epBoapa 3a BoJa e nocTaBeH cIeIOBaTeHnTo TpaBa Da aKTbupaTe BCEKn HOB cNITbp AquaClean, KOHTo nocTabrTe, Upe3 IKoHaTa AquaClean.
Korato opaXeBaTa INndKaTOpHa CBetInHa Ha AquaClean e n3KlnOueHa, Bce oSe moXeTe da aKTINbPaTe.
fntbpa AquaClean, Ho nbpBO ige Tpr6Ba Da nouCTnte HAKuna OT MaunHaTa.
iMaunHaTa Tp6Ba Da e HaBnHO NouchTeHa OT HaKIn, PpeN Da 3aNoCHe Ta N3POn3BaTe BODHnA qntbp AquaClean.
Ipei Da aKTHBnPaTe BODHnA qunTbp AquaClean, Tp6Ba Da rO noDrotBnTe, KaTO rO hAKnCHe TBB BOa, KaKTo e OINcAHO nO-dOny. Ako He rO HApPabNte, B MaunHaTa MoKe da BJe3e Bb3dUx BmecTo BOda, KoETo Cb3DaBA MHOrO wum I npeu Ha MaunHaTa da npriOTBra Kafe.
1 PpOBepeTe dAaMmaHHaTa e BKnUoyeHa.
2 Pa3klaTeTe ΦnIbpa OKoNo 5 cekyHn (ΦnIg. 42).
3 NotoneTe fntbpa Hao6paTHo B KaHa cBc CtydeHa BoJa I ro (Φnrg. 43) pa3KlaTeTe/npNTucHeTe.
4 ΦιπTpɒbT Buee e rθoB 3a ynoTpe6a n Moke da ce noCTaB VbB BOДнЯ pe3epBoap.
5 ΠbXHeTe ΦnITbpa BepTnKaIHO Bbpxv Bpb3KaTa 3a ΦnITbpa Bbb BoHnpe3epBoap. HAtncHeTe ro NaOJy Do Na-NNCKata Bb3MOxHa ToUka (ΦnF. 44).
6 HanbHHeTe BoDnna pe3epBoap c npraCHa Boga n rO noCTaBeTe o6paTHo B MaunHaTa.
7 Ako e nocTaBeHo, oTcTaPaHeTe LatteGo.
8 NocTabete Kya nOuHcyura 3a ropeua BOda/npncTabkaTa 3a pa3neHbHe Ha MmraKO.
9 HaTnCHeTe NkOHaTa AquaClean 3a 3 cekyHn (Φnrg. 45). INnKaTopHaTa cBeTnHa 3aNoUBa da npynCupa.
10 Hatachete 6ytoHa 3a cTAP/CTOP, 3a da 3anoyHe npoueca no aKtBnpuhe.
11 Ot chyupa 3a ropeuza BOJa/npncTabKaTa 3a pa3neHbHe Ha mJko Ie ce n3JIee ropeua BOJa (3 MInH).
12 Korato npocebT no aKTnBaaue e 3aBpweH, cHra Ta HndkaTopHa CBetlnHa Ha AquaClean ce BKIOUba, 3a da nOTBbpDn, ye BODnAe qnIbP AquaClean e aKTnBupan npabnHo.
HactpoTe MaunHaTa Ha npaBnHaTa TBbpOCT Ha BOdaTa:
1 HatncHeTe 6yToHa 3a BKJ./n3KJ., 3a Ja n3KJIIOHTe MaunHaTa.
2 Korato MaunHaTa e N3KJIoueHa, IOKOChTe n 3aIpbXkTe IKoHaTa 3a CnlaTa Ha apomTa, IOKaTO BCnUKN HnDnKaTOPHn CBetTInHn Ha IKoHaTa ce BKIOuOat (Φur. 2).
3 HaTnchHeTe NkOHaTa 3a cnla Ha apomata 1, 2, 3 nIe 4 nbTu. bpoT uHdkaTopHn CBeTlnHn, KOITo ca BkIoueHn, Tp8Ba Da e CbUraT KaTo 6poR UepBHeN KBaIpaTueTa no TeCT JeHTata (Φur. 48). Korato Bbpy TeCT JeHTaTa HЯMa UepBHeN KBaIpaTueTa (BCuHKn ca 3eJeHn), N36peTe 1 uHdkaTopHa CBETInHa.
4KoratoCTe3aandaI npabunHaTa TBbpOcT Ha BODaTa,HaTuschete 6yToHa 3a cTapT/cton.
TbI KaTO TBbpOCTTa Ha BOdaTa ce 3aJaBa cAmo BeHbX, yHKcYra Ta 3a CnlaTa Ha apOMaTa ce I3IOJI3Ba, 3a Da ce n36epe TBbpOCTTa Ha BOdaTa. TOBa He BInRe Bbpxu CnlaTa Ha apOMaTa Ha HAnITKITE, KONTO nprirotBAre CeI ToBa.
www.philips.com/coffee-care.
Korato nHnkaTophata cbetlnha Calc/Clean 3anoyhe da cbetn, Tp6Ba da npemaxhe ta hakina ot MaunHaTa.
1 PpOBepeTe DaJIIMaUHHaTa e BKlUoyeHa.
2 Ako e noctabeHo, oTcpaHeTe LatteGo nI npncTabKaTa 3a pa3neHbAHe Ha MIAKOTO.
3 I3BaIeTe TaBnUkKaTa 3a OTcEJdaHe n CbJa 3a yTaIka OT KaΦe, I3PpA3Hete rN n rN BbpHete Ha MeCTaT a NIM.
4 N3BaJeTe pe3epBoapa 3a Boda n ro N3npa3HeTe. CJIe TOBa npemaxheTe BOHnA JITbp AquaClean.
5 N3neIte 2aIata 6ytNlka npenapa 3a npemaxBahe Ha hakn Ha Philips B pe3epBoap a 3a BoJa n Ho HAnbJHHeTe Do HnBOTo Calc / Clean (ФИг.49).CleД TOBa rnoCTaBeTe o6paTHO B MaunHaTa.
6 NocTaBeTe roJAM cbI (1,5 n) noJyUpya 3a KaFe u 3a BOJa.
7 HaTnCHeTe NkOHaTa 3a Calc / Clean 3a 3 cek, cIeN KoETo HaTnCHeTe 6yToHa 3a CTapT/CTon.
8 Ctaptnpa nbpBaTa 0a3a Ha npoceDpypTa no npemaxBaHe Ha hKnI. PpoeDpypTa no npemaxBaHe Ha hKnI npoDbJIkaBa OKOIO 30 MNHyTn I ce cbCTOn OT cKbI Ha npemaxBaHe Ha hKnI n cKbI Ha n3PnlaKaBaHe. I O BpeMe Ha cKbIa 3a NoocCTBaHe Ha hKnI INdNkAToPHa Ta CBetlnHa Calc / Clean MInrA, 3a Da NOKaKe, Ye 0a3aTa NO NoocCTBaHe Ha hKnI e B XOD.
9 Octabete MaunHaTa da nyska pa3Tbopa 3a npemaxBaHe Ha hakn, dokato dinCnpeT Bn npedynpeN, pe3epBoapbT 3a BOda e npa3eH.
10 I3npa3HeTe pe3epBoapa 3a BODa, I3PnAKeHTe rI rO HaNbJIHeTe OTHOBOC NITeHa BOda DO o6o3NaueHneTo Calc / Clean.
11 ɪnʒpəaʒheTe cBdaɪ ng oʊctabete o6paTHO nɒd yʊypa 3a ḤaɪnBaH e Ḥa Kɑf e N Bɔda. Ḥaɪnchete 6byToHa CTAP/T/CTON THOBO.
12 CtapTupa BToPata 3 MInHyTu. IIO BpeMe Ha Ta3n 4a3uHdKAtOpHITe CBETJINH Ha KOHTPOHnI NaHeI Ce BKJIouBaT N3KJIouBaT, 3a Da NOKaKAT, Ye a3aTa Ha N3PJaKBaHe e B XoJ.
13 ɪЗчakайт, ṬOKaTo MaʌnHaTa CnPe ἀ ΑνСka Bɔda. ΠροцeДураТо NO noʊncTbaHе Na haKɪn e 3aBbprSeHa, KOraTo MaʌnHaTa CnPe ἀ ΑνСka Bɔda.
14 Cera MaunHaTa ige ce 3arpee oTHOBo.MaunHaTa e rOTOBa 3a N3NOJ3BaHe OTHOBO, KOrato HndnKaTOpHnTe CBETJIHH B IKOHnTe 3a HAnNTKn CBetrT HePpeCTaHHO.
15 NocTaBeTe n akTnBnpaIte HOB BOeH fNtbp AquaClean B pe3epBoapa3a BODa (BX. 'AkTnBnpaHe Ha BOdHnA fNtbp AquaClean (5 MIn.)').
Korato npoceDypaTa no NoocTbHe Ha HAKnE 3aBbPseHa, INdNkATOpHaTa CBETInHa Ha AquaClean mIra 3a n3BeCTHO BpeMe, 3a Da BN HAnOMHn Da NocTabTe HOB BOeH fNITbP AquaClean.
CbBET:ИЗползВаHeTo Ha ФилТьpa AquaClean hamalЯBa hyжdata ot npemaxBaHe Ha haKun!
KaKBo Da npaBnTe, aKO npoceDypaTa NO npemaxBaHe Ha NaKIn 6bIe npeKbcHaTa
Mожete Да ИЗлесе OTnpоцурета NO npemaxbahe Ha NaKIN, KaTO HaTnCHe6yToHa 3a BKJ./I3KJI. Na KOHTPOnHЯпел. Ако npоцурета NO npemaxbahe Ha NaKIN 6bde npeKbChata, npeДи DA 3aBbPshn DOKpaHaprabTe CLEdHOTo:
1 N3npa3HeTe n 3nIpaKHeTe cTapaTeJHo pe3epBOapa 3a BOda.
2 HanbJIHeTe pe3epBoapa 3a BODa c nIteHa BODa DO o6o3HaueHneTo 3a HnBO Calc/Clean (HaKIn/PlOuNCTBaHe) n BKJIOUeTe OTHOBO MaunHaTa. MaunHaTa ige 3arpee n Ie n3PbHn aBTOMaTUneH zIKbJI Ha n3PnAkaBae.
3 Ппеди да пиговате кakвито ида билно habинту, Изпьлнete рчeh сикьл на Изплakbahe. 3a дa ИЗпьлнITE сикьл на рьчно ИЗплakbahe, на-наррд ИЗсиnete поювин Ворен pezeрбогap ropeша ВODа, КATO HeKoJIKOKpaTHO ДOKOCBaTe ИКОнATA 3a ropeша ВODа, И сLEд ТОВа пиговетe 2 чши п徝варптелно смляно kaфe, 6e3 дa добавerte смляно kaфe.
1 Ako npoceDypaTa no npemaxBaHe Ha hakn He e 3aBbPshnla, MaunHaTa Ie NOcKa n3BbPswBaHe Ha HOBa TaKaBa npoceDpya Bb3MOxHO No-CKopo.
Ha ciK KaBOMaunHIO MoXHa HalaTByBaTH peeENT HanoIO 3a BnaCHMn BnoO6aHHaMn. Bn6paBUn Hani, BN MOxTe BnKOHaTN HabeDeHI HNXue II.
1 HaIaHTyBaTn MiHCTb, HATNCHyBUn 3HaOcK MiHocTi (MaI.2). E TpN TUN N MiHocTi: HaMeHUn - HaM'KUn, a HaIBuUn - HaMiCHiUn.
2 HaIaHTyBaTn 6'EM haIOU,HaTncHyBUn 3HaUOK 6'Emy (MaI.3) HanoIO Ta/a6o 6'My MoIoka (JInIe Ira OkpeMIX MoIeJIe).E Tpru TINn 6'EMV: MaIIN, cepenHt Ta BeJIrkN.
i Bu TakoK MoKeTe HalaStyBaTn Tempeatpy KaBn 3a BnaChHmN BNoO6aHHaMn (DVB. 'HaHaStyBaHHaTempeatpy KaBn').
ПригOTуВаHHЯ Кави 3 КавOBИХ Зерн
1 Lio6 npiroToyBaTn KabY, HATNCiTB 3Haayok nOtpi6Horo HanoHO.
- IHHaTOpM iuHocTi o6'Emy 3aropjIbC Ta noka3yIb nonepdHbO Bn6paHe HaJaWtYBaHHa.
PeIeHT HAnIO TeNep MoXHa HalaWtYBaTn 3a BlaChIM CMAKOM (INB. 'CTBopeHHra BlaChnx HanoIB').
2HaTnCHiB KONky NoaTk/3ynnHeHHA
- IHHaKApOp Ha 3HaUKy HanoiB 6IIma€ niJ qac 3IbAHnHaNoIO.
3 306 npnnnntnoaay kABn, nepw hIX KaBOMaunHa 3aBepuNTb npriotyBaHHra, 3HOBy HaTNCHTb KNONky NOATKy/3ynnHeHH
106 odnoacno npirotybntn 2 nopui KaBn, HATNCiTb 3naOK HanoIO dbiu. 3aropaeTbcraHndkaTop 2x.
ПригOTуВаHHЯ HabIOiB i3 MoLOka 3a ДОПOMΟΤΟМоLOчHOi cnCTeMn LatteGo (KoHTeINHepa dIЯ мOLOKa)
LatteGo cknaadaTbca 3 KOHTeHepa dJa MOJoka 3 2 Yactn Ta KpiuKn dJa 36epirAHn. Uo6 3anobirn npotikaHHIO, 36epiTB MoJOnUHy cnCTemy HaJeXHM uHOM, nepH HIX 3aONBHn KOHTeHep dJa MOJoka.
1 Ⅲo6 3i6paTn LatteGo, cnoaTkU BCTaBTe BepxHIO qactHy KOHTeHepa Ira MoIoka nIraOcK y BepxHiJ qactNHI KopnyCy (MaI.4).PiCJI zboRo HaTncHITb Ha HIXHIO qactHy KOHTeHepa. KoJI N KOHTeHep CTaHe Ha MicSe, BV noCyTe KlaCaHnR (MaI.5).
PnmiTka. KOnTeHep IJIa MoIoka Ta Kopnyc i3 HocNKOM MaIoTB 6yTu YNCTiMn NepeD npEiHaHHaM.
2 3nerka haxnilitb LatteGo Ta noctabTe Ioro Ha Byzol nodaui rapyoi Boi (MaI.6).Piicna zboRo HATnCHiTb Ha HbOro do fikcauii (MaI.7).
3 3anobHitb LatteGo monokomdo pibn haNOIO, 3a3haeHoro Ha KOHTeHepi (MaI.8). He 3anOBHouTe KOHTeHep Ira MOJOKa Bnue P03HaKmMakcImaJIbHOrO o6'Emy.
iJaKsO 6'M MoIoka HaIaSWToBaHO iHdNbIyalbHo, MoXJIbBO, IOBeJeTbc3aIOBHTn KOHTeHep dIra MoIoka 6IbShm YI MeHShm 6'MOM, HIX yKa3aHO IJRA cBoRo HANO Ho LatteGo.
HnHaNkpaUoro Cmaky 3aBXnBnKOpNCToByTe MoJIOKo 3XOJIoNJbHnKa.
4 NocTaBTe yawKy Ha loTOK nKpaneJIb.
5 HaTnchItb 3Haayok nToPi6HOro HanoIO 3 MOJOKOM.
- Peçent hanoio Telep moxha halaHTyBaTn 3a BnaCHmN BnoO6aHHaMn (DVB. 'CTbopeHnBnachnx hanoiB').
6 HaTnchitb KhoNky noaTky/3ynHHeHH
- Iндикатор на значку habоь 6лmae пд уac 3лваньня habою.Яksвибракete nprirotуbatn KaNYuHNo abo late makiato, kabOMaunHa cNouaTky habNBae MOnoko, a NOTIM - KabY.
- Ⅲo6 npinnHnTn noaCy moLoka, nepw hix KaBOMaunHa 3iIne nepedyctaHOBHeHn o6'em, HATNCiTb KONKy NOaTKy/3ynHeHHra
7 7 npnnnnt noauy roTOBOro haOIO (KaBn 3 MoNOKOM), nepH hIX KaBOMaunHa 3aBepHTb nprirotyBaHHa, HATNCHTb i ytpmYte KONky NOaTKy/3ynHeHHA
CπiHeHЯ MOJOKa 3a ДОПOMOROю KlaacnUHO r cπiHOBaça mOJOKa
Lio6do8rHaikpaIoro cniHOBaHHraBxN BnKOpncToByTe MoJOKo 3XoJOnJIbHnka.
1 Haxnilitb cOpHy cniliKHObBy pyUkHa KaBOMaunHi liBOpyu i nocyHbTe cPiHIOBaMoloka Ha Hei (MaJI.9).
2 3anOBHITb EMKICTb MONOKOM npn6Jn3Ho Ha 100 Mm dJa KaNyUHO Ta npn6Jn3Ho Ha 150 Mn dJa NaTe MaKiato.
3 3aHypTe cniHIOBaU y MoIOKo npu6n3HO Ha 1 cm.
4 HaTnchItb 3Haayok napi (MaJI.10).
- IHHaKATop Ha 3HaKy napn 3aIropaTbCra, a IHaKATop nOaTky 6JIIMaE.
574 YkpaIHcbKa
5 506 cniHnTMOLOKO, NOBepHITb peryIaTOp Ha KJIacNCHOMy cniHOBaCi do 3NaUka (MaJ.11) cniHeHHa MoIoka. 506 niirpiTm MOLOKO, NOBepHITb peryIaTOp Ha KJIacNCHOMy cniHOBaCi do 3NaUka (MaJ.12) NiirpIBaHHa 6e3 nHH.
6 IpekeonHaTeca, 3NaOc Ha pyuCi KlaCnHOro CniHOBaCa MoLoka BnpBnHO 3 OOpHO CTpiJIO.
7 HaTnCHiTb KhoNkTy noaTkY/3ynHHeHHr 106 cniHInm MoIOKo (MaI. 13).
KabomamaHaNouHae HarpiBaTncb,napa HaHHTaETbcB MOLOKO,IBOHO NINHTbcra.
8 KoliMoNoHaPiHaBrLeuKyIJaMOkOaDocraHaHeo6xHOro 6'My,3HOByHaTusChiKHOnky noaTKy/3ynHHHRAO63ynHHTn CnIHIOBaHHMoloka.
Hikon He cnHIOte MOLOKo IOBwe 90 cekyHd. CnHOBaHHaBTOMaTHHO BmNkaETbcra Ype3 90 cekyHd.
106 otprmatn cinihe He MOnoK Ho HauBnOoi kocti, He pyxaTe rIeK dJe MoLoKaPiJcHOBaHHa.
ПригOTуВаHHЯ Кави 3 РОпeрeДньо 3МeЛeHиx 3epeH
3amictb KaBOBnX 3epeH MoxHa Bn6paTn NonepeHbO 3MeJeHy KaBy, HapnKlaI, kIo Bn BiJaTe nepeBary iHOMy copTy KaBn a6o KaBi 6e3 KofoiHy.
1 HaTnCHiB KhoNky "YbIMK./BumK," 06 yBIMKHyTN KaBOMaunHy, i3aueKaIte, DOKn BOHa NiIroTyEcTbcra do po6oTu.
2 BiikpnIe KpnKy Biicky Ira nonepedHbO 3meJeHO KaBn Ta 3acnTe Tyn OndHy MipHy loKky 6e3 Bepx npnepeDhbo 3meJeHO KaBn (MaI.14).PiCna 0boro 3akpnTe KpnKy.
3 NocTaBTe yawky niD ByzOJ noJaqi KaBN.
4 Bn6epitb oDnH Hani.
5 HaTnchItb 3Haayok MiucHOcti Ha 3 cekyHnn (MaJ.15).
- IHHkaTOp 3NaUka nonepedHbO 3MeJeHoI KaBn 3aRopAeTbcS, a iHnKaTOp noaTky 6JIIMae.
6 HaTnchItb KhoNkY noaTky/3ynHHeHHra
7 706 npnnnntnoaay kabn, nepu hix kaBOMaunHa 3aBepuNTb npiroTyBaHHa, 3HOBy HaTNCiTB KhoNky noatky/3yynHeHH
13 nonepenbo 3meJeHO KaBn MOxHa npriToyBaTn JInse OndHy nopciIO KaBn 3a OdnH pa3.
HaTaBnHnNaepa3yKabNHe 36epiraTbcraK nonepaHbBn6paHnHaAHTyBaHHmucnoi. Opay, KOnn Bn 6baXaTe npiroTuBaTH nopeaHbO 3MeJeHy KabY, Tpe6a HaTncHyTN 3HaQOK mUHOCTI npotrrom 3cekynd.
I KxO Bn6paHo IonepeHbO 3MeJeHy KaBy, BN He 3MOXeTe Bn6paTn iHsy MiunHicTb.
ПригOTуВаHHЯ Кави 3 ЛьбOM (Лишев Okремnx моделях)
i Cen Hani IOTyETbC3 TeIIOBOIOU. IJIa ONTImaJIbHOpe3yIbTaTy 3aBapIOte KaBy B cKJHky 3 KybukamN JbOdy.
1 Bi3bmitcKJIaHky Ta HAnOBHITb II Ha DiBi TpeTnHi Ky6uKaMn IbOdy.
2 NocTaBte cKJHky niD By3OJ noJaqi KaBN.
3 TopKHItbc3HaUKa KaBn 3 JbOdom.
- BBimKHyTbcra iHdkaTopu miucHOCTi ta kiIbKOcTI.
- Peçent HanoTo Tenep MoXHa HaJaU TyBaTu 3a BJaCHIM CMaKOM.
1 PaIIMo Bn6paTn 3HaueHHe MlOHOCTi 3.
4 HatnchItb KhoNky noaTky/3ynHeHH.
5 506 npnnnnt noauy kabn, nepsh hix KabomaaHna 3aBepuNTb npnroTyBaHHra, 3HOBy HaTNCHTb KhoNky noatKy/3yynHeHHra
6 5o6 3po6ntu kaby 3 nbOdom ue cmaHio,doaTe Do Hei xoJOnHe MoIOKO.
Poaa rapyoi BOn
1 Kaio n iEHaHo LatteGo a6o cniHOBaMoloka, BnMiTb Ioro.
2HaTnCHiTb3NaUOKrapaQoi BOJN.
- IIndnkaTopn o6'Emy HanoIO 3aIopraTbCra Ta NOKa3yOToB nonepeHbO Bn6paHe HanaSTyBaHHЯ dIra rapayoi BOi.
3 HanaHTyTe 06'EM rapaoyi BOIN 3a BnAChHMn BNOIO6aHHaMn, HATNCHyBUn 3HaOOK 06'Emy HanoIO (MaJ.3).
4 HatncHtB KhoNky noaTky/3ynHeHH.
-Блимас iндикатор Ha 3нauку rapяоi BODn, i rapячa BODa 3лИBaetbcr 3 Byzna noDAu i rapяоi BODn (MaI.18).
5 506 npnnnnt noauy rapaoyo BOn, nepH hix KaBOMaunHa 3aBepuNTb npiroTyBaHHra, 3HOBy HATNCiTB KONKy NOaTKy/3ynHeHH
HajauTyBaHHa KabOMaHHn
HanaHTyBaHHaY acy ouiKyBaHHa
1 HaTnCHiTb KhoNkY "YbIMK./BmK.", 0o6 BmMKnHyt NaBOMaunHy.
2 Koli KaBOMaunHy BmKHyTo, HATnCHiTb i yTpmyTe 3NaOc (MaI. 19) Calc/Clean (BudaneHnaKny), Dokn He 3aropTbcra iHdNkatOp Calc/Clean (BudaneHnaKny) i Aroma strength (MiuchtB) (MaI. 20).
3 Hatncitb 3NaOcMiHocTi, 06Bn6paTn Heo6xIDn yac ouikyBaHHa: 15, 30, 60 a6o 180 xbuiH. BiIOBiINO 3aIopAITbcra 1, 2, 3 a6o 4 iNDkaTopn 3NaUka MiHocTi.
4HaIaIyBaBnUacOiyBaHHa,HaTCHITb KHOHKy NOaTKy/3ynHeHHa.KabOMaunHa BmKHeTbcra.
5 Hatncihb Khonky "YbIMK./BmK.", 063HOBy ybIMKHyTu KabOMaunHy.
PerguobHHaMaKcImalbHoro CtaHdapTHoro 6'My HanoiB
KabomauHa Ma€ 3 cTaNapTHi HalaTuBaHHa 6'My dIra KoxHoro HaIOU: MaII, cepeHi i BeINKn. MoXHa HalaTuBaTN IInse MaKcImaJIbHN O6'EM. HObe 3NaueHHa 6'My MoXHa 36epertn, KOJI 3a6JImaE iHdNkatop Nowatky.
I Iepsh hix noatn nporpaMyBaTu 6'em HanoIO 3 MoIokOM, 36epiB LatteGo Ta HauNtTe Tyn MoIoka.
1 Lio6 hanaityBaTn MaKcImaIbHe 3HaueHnra 06'Emy, HATNCiTb i yTpmyTe 3Haoyk Heo6xidHoro HanoIO npotraom 3 cekynd.
Bepxhi iHdkaTop 3NaKa o6'My haNO Ta Bepxhi iHdkaTop 3NaKa o6'My MoIoka (JIiNe dIg Okpemix MoJeIe) nouHaIOb 6nMaTn. Ppi cIbOMy 6nMaHHK KOnkN NoaTkY/3ynHeHHBk3ye Ha Te, 0o BN nepe6yBaTe B pexnmi nporpaMyBaHH.
2 Hatncihb KhoNky noaTky/3ynnHeHHra KaBOMaunHa nouHae rOtyBaTu Bn6paHn Hani.
- Cnepuy iHdkaTOp noaTk y ropntb 6e3nepepbHo. KoI KaBOMaunHa roTOBa 36epeTn HalaSTOBaHm o6'em, iHdkaTOp noaTk/3ynnHeHHnNouHae 6JImaTn.
3 HaTnchItb KhoNky noaTk/3yHHeHHra pa3, KOJI yaIka MICTNTIme 6axaHn o6'em KaBn a6o MoJOKa.
-Пдчспготьаннкanyuho a6o laTe MaiaTo cNoaTky 3JInBaTcMy MoJOKo.HaTncHtB KHonKy noaTKy/3yNHeHHKOLn YAshaMiCTNTme 6axaHm O6'EM MOJOKa.KabOMaSHA na ABTomaTHNOH NOUHe 3JIbATn Kaby. HAtncHtB KONkY noaTkY/3yNHeHHepe pa3, KOJn YAshaMa MICTNTMe 6axaHm O6'Em.
Iicra nporpaMyBaHHa HOBOrMaKcImaJIbHOrO CTaHdapTHOro 6'Emy HanoIO KaBOMaUNHa 3JIbATmHe HOBn OB'Em 7Op3y, KOJI Bn BVbIpaTmMe MaKcImaJIbHn OB'Em 7bOro HaNoIO.
Moxha HalaTByBaTn IiIe MaKcImaIbHni pBeHb cTaHdapTHoro o6'Emy.
i 106 BiHOBNTn CtAndapTHi HalaW TyBaHHra 6'Emy, nVB. "BiHOBHeHHra 3aBODcbKnx HaalaW TyBaHb".
www.philips.com/coffee-care. Orla, uactnH, kIMoKHa MNTu B nocydomnHi MaunHi, nB. Ha pnc. D.
| 3нимни частени Перiodичесь очшени | Спосіб оочшени |
| БлOk 3abarювannah YSOTINKHe BnIMMtB 6Iok 3abarювannah 3 kabOMaShinH (ДИВ. 'BиIMMaHHa T a BCTaHOBLeHNNa 6IokU 3abarювannah').ПрOMиTe IyOro pId KpaHOM (ДИВ. 'ОчшelenH 6Ioka 3abarювannah BODIO 3-ПID KpaHa'). | |
| LlOMiCsAу OChIuYIte 6Iok 3abarювannah 3a ДОПOMorOTo Ta6JIeTKn Philips dIЯ BVIDaJIeHNNa KabOBOrO MaCla (DИВ. 'ОчшelenH 6Ioka 3abarювannah 3a ДОПOMOrOTo Ta6JIeTKn dIЯ BVIDaJIeHNNa KabOBOrO MaCla'). | |
| Класун спIHOBaч молOKa | Пися Кожног ВИКористань LlOb VIXKOHaTn peTeIbNe OOUIeHNH, cNoUATKU ЗлIMTe raporu BODU 3I cInHIOBaUma MOLOKa, Пд'ЕнHOrO Do KaBOMaShinH. Пися Zboro ВиIMMtB cIINIOBaM OLOKA 3 KabOMaShinH Ta po36eRt b IyOro. OuchIbTe BCI ChactHIn BODIO 3-ПID Кранa abO B NocydOmniHm MaSHNl. |
| Вidсik дlya палегнbo ЗмELeHоi KabN | LlOTINKHe nepeBirpIte,ЧИ He ЗабИСВа BIDcI dIЯ палегнbo 3MeIeHоI KabN. BiIMMtB 6Iok 3abarювannah. BiIDKpyte KprUcky ВidсICу dIЯ поЕрнBo 3MeIeHоI KabN ta BCTaBTE pykU pyKU TуД. PPyaIte pykU BrOpU TA BHNZ, ДОКи NaBtA 3MeIeHа KabA He BIVaIpe (MaI. 30). ВidсKaHyIte QR-KoD, StOb 3aBaHTaXHTN 3aCTocuHOK Coffee+ I pepeIgIHyTn DeTalbHI BIDEoiHCTpyKzII, a60 nepeiДITb Ha caIIT www.philips.com/coffe- care |
| Кonteinerдя КавOBоI rуши | СпорожнIoTe кonteiner дlya KABOBоI rуши 3a РЯВи ПовIDOMLeHry Na CnPJIe КавOMaShinH.ЧИstIbTe IyOro LlOTINKHe. |
| ЛотOK дlya Крanelь | СпорожнIoTe loTOK dlya Крanelь сIODHа abO KoIy ЧERBOHи iNDIkaTOp IyOro ЗАПОВЕннЯ пIDнЯВСЯ наД ЛOTKOM (MaI. 31).ЧИstIbTe ЛOTOK dlya Крanelь сIOTINKHe. |
3HIMHi qactnH NepioDnHyictb OunuEHH
Cnoci6 ouuueHHa
OuHnHnLaTeGo (moIouHoI cnCTeMn)
OuHueHHa LatteGo nicJa KoxHoRo BnKOpncTaHHa
1 3HimiTb LatteGo 3 KaBOMaunn (MaJI. 37).
2BunHTe MoLOKO, 30 3aNshnlo8.
3 HatncHtB KhoNkpy po36JIoKYBaHHra Ta BnIMtB KOHTeHep dIy MoJoka 3 Kopnyc LyatteGo (MaJI. 38).
4 Ounchte BcI cactHn B nocydomnHi MaunHi a6o niKpaHOM y TeNlB ODi 3 MmHIM 3acobom.
OuHnHnKlaCnHOro cPiHOBaHa MoLoKa
OuHnHnKlacnHOro cniHOBaHa MoIoka nicJ KoxHoR O BnKOpncTaHH
OuHyTe cniHIOBaM OJOKa nCJI KoxHO BnKOpNCTaHHa 3 ririEHIuHN npuH i I JIaNo6irAHn HaKoHueHHIO 3aIIuKIB MOJOKa.
1 NocTaBTe yawky niD cnIHOBaY MOLOka.
2 TopKhItbcr 3HaUka napn HataChitb KhoNky noaTk/3yHHeHHra, o6 po3noaTu noaay napn BuaNTM MOnOko, 0o 3aIuunloCry CnIHOBaMoNoKa.
3 3ynnnnt noa npe3 kInbKa ceKHy, 3HOBy HaTNCiB KHONKy NOaTKy/3ynnHeHH.
4 OuHCTbTe cniHIOBa MOnoka BOJIOrO raHjipKOIO.
UoHHe OunuHnKJacnHoro CnIHOBaHa MOLOKa
1 DaIte cniHIOBaCy MOJOKa NOBHCtIO OXJOHOHTN.
2 Haxniltb cniHOBaMoloka libopyu i BnmiMb metaJIeBy Ta cnIkoHOby qactHH (MaJ. 39).
3 Po36epiTb Tpru cactnHn (MaI. 40) Ta npomnTe ix nuCTOIO BOIOIO a6o nOMnTe B nocydomnHi maunHi.
4 3auekaTe,IOKNTPn YactHn CnIHIOBaHa MOnoka BnCOxHyTb.ToNi 3HOBy 36epiB NOrO NiID'EnHaIte KO KabOMaunHn.
3amHouTe fIbTp IaOuAquaClean npHaMHi KoxHi 3 mciCi, HabItb JaKIO KaBOMaUNHa He NOBIDOMJIe Ipo Heo6xHicTb TaKOi 3aMiHN.
ДeaktnBaця Нагадувань по зamHy ФльТра AquaClean
Якwo BV 6iNbwe He BnKOpNCToBvBaTmMeTe φiNbTpNi Дя ВOnI AquaClean, BiKlIoUItb HaraNyBaHnHa AquaClean (iHdNkaTop AquaClean 6IImaE opaHxkeBm):
1 HaTnCiHt b KOnkny "YbIMK./BumK.", 0o6 BmMKnHytn KaBOMaunHy.
2 Koli KaBOMaHIny BmKHyTo, HAtuChiTb i yTpMnyTe 3Haoyok AquaClean, IOKn IOno iHdkaTop He 3arOpntbcra. IHdkaTop noatky 6JImMaTme.
3 HaTnCHTb 3NaUOK AquaClean ue pa3, 0o6 DeakTnByBaTu HaraDyBaHHa. IHnKaTOp 3NaUka AquaClean 3raCHE.
4ДляпдтбердженивборуHaTиСHTьКHONKyNoaTky/3yПинEHЯ.
5 HaTnChiB KhoNky "YbIMK./BmK.", 06 3HOBy yBIMKHyTN KaBOMaunHy. HaraNyBaHny npo 3amHy fiNbTp a AquaClean deakTubObaHo.
Iopada.BnKOpncTaHnHaJIbTpA AquaClean 3MeHwE nepioDnHiCtB BuaJaeHHaKaNpy.
Ioo pObTu, kUo npOeDpy BuaJeHnHaKIny nepepBaHo
IpoceDpy BuaJIeHnHa KaHnMy MoKHa nepePBaTn, HATNCHyBn KHOKNy yBIMKHeHH/ BUMKHeHH Ha naHeJI KepyBaHH. KaIIO npOcEdupy BuaJIeHnHa KaHnPy nepePbAoNo NOBHorO 3aBepWeHH, 3pO6iNb HAcTyUHe.
1 CnpoJxHtB pe3epByap IJIa BOi Ta peTeIbHO cnoLoCHItb Ioro.
2 HanobHitb pe3epByap IJRA BOIN YNCTOIO BOIOIO IO No3NaUcKn Calc/Clean (BuaJIeHHaHKnny) i 3HOyBIMKHITb KaBOMaunHy. KaBOMaunHa HarpiTbcra NIKn ABOTMaTHUHO npOMBaHHa.
3 Nepsh hix rotybaTn 6yI haOi, BUKOHaTe zIKn npomBaHHBpyHy. Iio6 BUKOHaTn zIKn npomBaHH BpyHy, cnoaTKy HanoIOBHy 3nnIte pe3epByap IJra rapYoi BOH, 6araTopa3oBO HaTnCKaUOn 3NaoyK rapaoyI BoN, a Notim npiroToYte DBi YaSKn nonpeedHbO 3MeJeHOi KabN 6e3 IoDaBaHH MaJeHOI KabN.
I YaKIo npOeDpy 6yIe nepepBaHOb, KaBOMaShHa nOtpe6bYBaTmE 5e OndHOro cIKJy BnJaJIeHHa HAKIny YAKOMora ckopiIe.
3amOBJIeHnI npJIaIaIaI
Дя Oчишени Кавомшини Видалени Habку ВИКористову Te Лше спцьhi 3acobn Philips,яki MOжн рпдбати B Micseвх Магаших,В abTOpIN3OBaHnx cepBicnX ueTpax a6o Ha cTopiHci www.philips.com/parts-and-accessories. 3naTN NOBHI cncOK po3xIDnX akcecyapIB OHnaH, BBeITb HOMep moJI BaIoI KABOMShHH.Homep moJI moKha 3NaTI Na BHyTpIshNI CTOpOH i DBepaT IЯ obcnyrobyBaHHJ.
. www.philips.com/coffee-care 7777 IN,Coffee+7779x77777777
(771010)37nn ninn 7n 7w nn nnn nnn nnn nnn
77nnn,nnnnnnnnnnnnnnnnnnnnnnnnnn
nwnnnnnnnnnnnnn.777777
n nn nnn nn nn nn nn nn nn nn nn nn nn nn nn nn nn nn nn nn nn nn nn nn nn nn nn nn nn nn nn nn nn nn nn nn nn nn nn nn nn nn nn nn nn nn nn nn nn nn nn nn nn nn nn nn nn nn nn nn nn nn nn nn nn nn nn nn nn nn nn nn nn nn nn nn nn nn nn
7777y/7y9n
2
3.27n 17777777777777777777777777777
y 777777777777777777
i
i
n97n nni0n no nn
nno 700 x77 nnn
- 2.(21-)
3.DIN
nnnnnn7n nn 3 n2,1
4.1X7
5.
i
EP3300) 10000000
- 2.
ninnnn
JNT 7NIN7UN 7U 7TNNN 7N NIN7N INN NIN
1
- 2.
nannnnn7 nannn nnynnnn nnynnnn nn. nnnnnnnnnnnnnnnnnnnnnnn
- 4.
nnonnnnnnn
n7n nnnn nn nnnnnnnnnnnnnnnnnnnnnnnnnnnnnnnnnnnnnnnnnnnnnnnnnnnnnnnnnnnnnnnnnnnnnnnnnnnnnnnnnnnnnnnnnnnnnnnnnnnnnnnnnnnnnnnnnnnnnnnnnnnnnnnnn
n nn nn nnn7 7 7 nn nn nn nn nn nn nn nn nn nn nn nn nn nn nn nn nn nn nn nn nn nn nn nn nn nn nn nn nn nn nn nn nn nn nn nn nn nn nn nn nn nn nn nn nn nn nn nn nn nn nn nn nn nn nn nn nn nn nn nn nn nn nn nn nn nn nn nn nn nn nn nn nn nn nn nn nn nn nn nn nn nn nn nn nn nn nn nn nn nn nn nn nn nn nn nn nn nn nn nn
197 197 3 2 017 7 7 7 7 7 7 7 7 7 7 7 7 7 7 7 7 7 7 7 7
.777777777
A
1.797
2.791
3.177
4

D707 D. www.philips.com/coffee-care
.07n7n77n77n77
D
nnon
| הכלה הכלה הכלה הכלה הכלה הכלה הכלה הכ,/.().().().().().().().().().().().().().().().().(). |
| ................................................... ............................... ................... ............. ........ ... .. . . . . . . . . . . . . . . . . . . . . . . . . . . . . . . . . . . . . . . . . . . . . . . . . . ? . . . . . . . . . . . . . . . . . . . . . . . . . . . . . . . . . . . . . . . . . . . . . . . . . . . . . . . . . . . . . . . . . . . . . . . . . . . . . . . . . . . . . . . . . . . . . . . . . . . 、 . . . . . . . . . . . . . . . . . . . . . . . . . . . . . . . . . . . . . . . . . . . . . . . . . 。 . . . . . . . . . . . . . . . . . . . . . . . . . . . . . . . . . . . . . . . . . . . . . . . . . ; . . . . . . . . . . . . . . . . . . . . . . . . . . . . . . . . . . . . . . . . . . . . . . . . . . . . . . . . . . . . . . . . . . . . . . . . . . . . . . . . . . . . . . . . . . . . . . . . . . ⁄. ⁄. ⁄. ⁄. ⁄. ⁄. ⁄. ⁄. ⁄. ⁄. ⁄. ⁄. ⁄. ⁄. ⁄. ⁄. ⁄. ⁄. ⁄. ⁄. ⁄. ⁄. ⁄. ⁄. ⁄. ⁄. ⁄. ⁄. ⁄ ⁄ ⁄ ⁄ ⁄ ⁄ ⁄ ⁄ ⁄ ⁄ ⁄ ⁄ ⁄ ⁄ ⁄ ⁄ ⁄ ⁄ ⁄ ⁄ ⁄ ⁄ ⁄ ⁄ ⁄ ⁄ ⁄ ⁄ ⁄ ⁄ ⁄ ⁄ ⁄ ⁄ ⁄ ⁄ ⁄ ⁄ ⁄ ⁄ ⁄ ⁄ ⁄ ⁄ ⁄ ⁄ ⁄ ⁄ ⁄ ⁄ ⁄ |
| . . . . . . . . . . . . . . . . . . . . . . . . . . . . . . . . . . . . . . . . . . . . . . . . . > ⁄ ⁄ ⁄ ⁄ ⁄ ⁄ ⁄ ⁄ ⁄ ⁄ ⁄ ⁄ ⁄ ⁄ ⁄ ⁄ ⁄ ⁄ ⁄ ⁄ ⁄ ⁄ ⁄ ⁄ ⁄ ⁄ ⁄ ⁄ ⁄ ⁄ ⁄ ⁄ ⁄ ⁄ ⁄ ⁄ ⁄ ⁄ ⁄ ⁄ ⁄ ⁄ ⁄ ⁄ ⁄ ⁄ ⁄ ⁄ ⁄ ⁄) ⁄ ⁄ ⁄ ⁄ ⁄ ⁄ ⁄ ⁄ ⁄ ⁄ ⁄ ⁄ ⁄ ⁄ ⁄ ⁄ ⁄ ⁄ ⁄ ⁄ ⁄ ⁄ ⁄ ⁄ ⁄ ⁄ ⁄ ⁄ ⁄ ⁄ ⁄ ⁄ ⁄ ⁄ ⁄ ⁄ ⁄ ⁄ ⁄ ⁄ ⁄ ⁄ ⁄ ⁄ ⁄ ⁄ ⁄ ⁄ ⁄ ⁄ 7 ⁄ ⁄ ⁄ ⁄ ⁄ ⁄ ⁄ ⁄ ⁄ ⁄ ⁄ ⁄ ⁄ ⁄ ⁄ ⁄ ⁄ ⁄ ⁄ ⁄ ⁄ ⁄ ⁄ ⁄ ⁄ ⁄ ⁄ ⁄ ⁄ ⁄ ⁄ ⁄ ⁄ ⁄ ⁄ ⁄ ⁄ ⁄ ⁄ ⁄ ⁄ ⁄ ⁄ ⁄ ⁄ ⁄ ⁄ ⁄ ⁄ √ √ √ √ √ √ √ √ √ √ √ √ √ √ √ √ √ √ √ √ √ √ √ √ √ √ √ √ √ √ √ √ √ √ √ √ √ √ √ √ √ √ √ √ √ √ √ √ √ √ ⁄ √ √ √ √ √ √ √ √ √ √ √ √ √ √ √ √ √ √ √ √ √ √ √ √ √ √ √ √ √ √ √ √ √ √ √ √ √ √ √ √ √ √ √ √ √ √ √ √ ⁄ ⁄ ⁄ ⁄ ⁄ ⁄ ⁄ ⁄ ⁄ ⁄ ⁄ ⁄ ⁄ ⁄ ⁄ ⁄ ⁄ ⁄ ⁄ ⁄ ⁄ ⁄ ⁄ ⁄ ⁄ ⁄ ⁄ ⁄ ⁄ ⁄ ⁄ ⁄ ⁄ ⁄ ⁄ ⁄ ⁄ ⁄ ⁄ ⁄ ⁄ ⁄ ⁄ ⁄ ⁄ ⁄ ⁄ ⁄ ⁄ / ⁄ ⁄ ⁄ ⁄ ⁄ ⁄ ⁄ ⁄ ⁄ ⁄ ⁄ ⁄ ⁄ ⁄ ⁄ ⁄ ⁄ ⁄ ⁄ ⁄ ⁄ ⁄ ⁄ ⁄ ⁄ ⁄ ⁄ ⁄ ⁄ ⁄ ⁄ ⁄ ⁄ ⁄ ⁄ ⁄ ⁄ ⁄ ⁄ ⁄ ⁄ ⁄ ⁄ ⁄ ⁄ ⁄ ⁄ ⁄ ⁄ ⁄ ⁄ ⁄ ⁄ ⁄ ⁄ ⁄ ⁄ ⁄ ⁄ ⁄ ⁄ ⁄ ⁄ ⁄ ⁄ ⁄ ⁄ ⁄ ⁄ ⁄ ⁄ ⁄ ⁄ ⁄ ⁄ ⁄ ⁄ ⁄ ⁄ ⁄ ⁄ ⁄ ⁄ ⁄ ⁄ ⁄ ⁄ ⁄ ⁄ ⁄ ⁄ ⁄ ⁄ ⁄ ⁄ ⁄ ⁄ ⁄ ⁄ ⁄ |
7
www.philips.com/coffee-care
7nnn nn
1.(7)
2.71
3
7 7777777777777777
7
n97 nnn7 nn7 0 ny nnnn7
09797n97n7n7n7n7n7n7n
- UN
3UN
.(27)
.7wnnnn nn n 7n, n
4n7
5.ning
6.0D7
7
8.7917
9UUXI
n. 7nn nn n7 nn7 nn7 nn7 nn7 nn7 nn7 (2 nn)
.0DnN 17n.Dy9 n7y
n nn nni7 iin
77777777777777777777777777
- JINN7 JINN W NIN 7wn nn nnnn 7in 7y yown
www.philips.com/coffee-care
Calc / Clean
1.Ⅱ 2.II 3.D 4.A
Calc / Clean -7 ty dNIN INN7DIN 0977y NNN77y 77y D98 5 .n7 nIN INN7.(49)
6.7 8nOi
Cale / Clean nnnn nn nnnn nn nnnn nn nnnn nn nnnn nn
9.171
177 177 177 177 177 177 177 177 177
10.Calc
.(175)AquaClean 10n n7v9n n7) 7Dn AquaClean 7u uTN Dn non 7v9n Utn dDn 17nn7 7n7 n7 n7 n7 n7 n7 n7 n7 n7 .AquaClean 7u
11
12
13.□n
14.1U
15
I 1
709" n nn nn nn nn nn nn
y9n nn nyn nn .nnn nn nn nn nn nn nn nn nn nn nn nn nn nn nn nn nn nn nn nn nn nn nn nn nn nn nn nn nn nn nn nn nn nn nn nn nn nn nn nn nn nn nn nn nn nn nn nn nn nn nn nn nn nn nn nn nn nn nn nn nn nn nn nn nn nn nn nn nn nn nn nn nn nn nn nn nn nn nn nn nn nn nn nn nn nn nn nn nn nn nn nn nn nn nn nn nn nn nn nn nn
1
2
JINIOINNIOYIITND
JIN0 197 2017 700
1
D
NnNnNnNnNnNnNnNnNnNnNnNnNnNnNnNnNnNnNnNnNnNnNnNnNnNnNnNnNnNnNnNnNnNnNnNnNnNnNnNnNnNnNnNnNnNnNnNnNnNnN
77n 1900 nXn7 7n.7u nn7 uTn 790 nn,nnn 77n 7n nn
.
:
CA6700 nnnn nn
AquaClean CA6903 10
HD5061 7
CA6704 n7 n7n7n7
n7n n9
PHILIPS and the Philips Shield
Emblem are registered trademarks of Koninklijke Philips N.V. and are used under license.
This product has been manufactured by and is sold under the responsibility of Versuni Holding B.V., and Versuni Holding B.V. is the warrantor in relation to this product.

- Contents
- Machine overview (Fig. A)
- Control panel (Fig. B)
- Introduction
- Before first use
- Setting up the machine
- Activating the AquaClean water filter (5 min.)
- Setting the water hardness
- Assembling LatteGo (specific types only)
- Assembling the classic milk frother (specific types only)
- Brewing drinks
- General steps
- Personalizing drinks
- Brewing coffee with beans
- Brewing milk-based drinks with LatteGo (milk container)
- Frothing milk with classic milk frother
- Brewing coffee with pre-ground coffee
- Brewing iced coffee (specific types only)
- Dispensing hot water
- Adjusting machine settings
- Adjusting the stand-by time
- Adjusting the highest default setting of your drinks
- Adjusting the coffee temperature
- Machines without temperature icon
- Machines with temperature icon (EP3300 only)
- Restoring factory settings
- Adjusting grinder settings
- Deactivate the beeps of the control panel
- Removing and inserting the brew group
- Removing the brew group from the machine
- Reinserting the brew group
- Cleaning and maintenance
- Cleaning the brew group
- Cleaning the brew group under the tap
- Cleaning the brew group with the coffee oil remover tablets
- Lubricating the brew group
- Cleaning LatteGo (milk container)
- Cleaning LatteGo after every use
- Cleaning the classic milk frother
- Cleaning the classic milk frother after every use
- Daily cleaning of the classic milk frother
- Aquaclean water filter
- Aquaclean icon and light
- Activating the AquaClean water filter (5 min.)
- Replacing the AquaClean water filter (5 min.)
- Deactivating the AquaClean reminder
- Setting the water hardness
- Use the water hardness test strip supplied in the box to determine the water hardness in your region:
- Set the machine to the correct water hardness:
- Descaling procedure (30 min.)
- What to do if the descending procedure is interrupted
- Ordering accessories
- Troubleshooting
- Warning icons
- Troubleshooting table
- Technical specifications
- Obsah
- www.philips.com/coffee-care.
- Aquaclean-vannfilter
- Adverselik- Løsning on
- Personalizar as bebidas
- Encomendar acessórios
- Vodni filter AquaClean
- IapaoKeuun afoyaalou u e to klaoikó eapntma yia afoya
- BbVeJeHne
- PnroTbIHe Ha Kafe OT npeBapnteHcMJIHO KaFe
- PnroTBaHe Ha JeDeHo Kafe (cAmo CpeuHn BnOBe)
- Пускане на горецьда
- Pereynipane Ha HacTrojKeTe Ha MaunHaTa
- PerylnpaHe Ha BpeMeTo 3a RotOBHOCT
- Pereylnipane Ha Hau-roJaMaTa HacTroPkA No Ppa36npaHe 3a BaushTe HapNTK
- MaunnncnkoHa 3a Tempepatpata (cmo moeep EP3300)
- Bb3ctaHOBraHe Ha 6pHnTe HacTpoKn
- AknBipaHe Ha BodHnA qnlTbp AquaClean (5 mIn.)
- HactpoTe MaunHaTa Ha npaBnHaTa TBbpOCT Ha BOdaTa:
- KaKBo Da npaBnTe, aKO npoceDypaTa NO npemaxBaHe Ha NaKIn 6bIe npeKbcHaTa
- ПригOTуВаHHЯ Кави 3 КавOBИХ Зерн
- ПригOTуВаHHЯ HabIOiB i3 MoLOka 3a ДОПOMΟΤΟМоLOчHOi cnCTeMn LatteGo (KoHTeINHepa dIЯ мOLOKa)
- CπiHeHЯ MOJOKa 3a ДОПOMOROю KlaacnUHO r cπiHOBaça mOJOKa
- YkpaIHcbKa
- ПригOTуВаHHЯ Кави 3 РОпeрeДньо 3МeЛeHиx 3epeH
- ПригOTуВаHHЯ Кави 3 ЛьбOM (Лишев Okремnx моделях)
- Poaa rapyoi BOn
- HajauTyBaHHa KabOMaHHn
- HanaHTyBaHHaY acy ouiKyBaHHa
- PerguobHHaMaKcImalbHoro CtaHdapTHoro 6'My HanoiB
- OuHnHnLaTeGo (moIouHoI cnCTeMn)
- OuHueHHa LatteGo nicJa KoxHoRo BnKOpncTaHHa
- OuHnHnKlaCnHOro cPiHOBaHa MoLoKa
- OuHnHnKlacnHOro cniHOBaHa MoIoka nicJ KoxHoR O BnKOpncTaHH
- UoHHe OunuHnKJacnHoro CnIHOBaHa MOLOKa
- ДeaktnBaця Нагадувань по зamHy ФльТра AquaClean
- Ioo pObTu, kUo npOeDpy BuaJeHnHaKIny nepepBaHo
- 3amOBJIeHnI npJIaIaIaI
- n97n nni0n no nn
- nno 700 x77 nnn
- EP3300) 10000000
- ninnnn
- nnonnnnnnn
- 7
- n nn nni7 iin
- 709" n nn nn nn nn nn nn
- D
- n7n n9
Brand : PHILIPS
Model : Series 2300 EP2331
Category : Coffee maker