ProMax Pressure Well Automatic 3000/15 - Water pump OASE - Free user manual and instructions
Find the device manual for free ProMax Pressure Well Automatic 3000/15 OASE in PDF.


| Product type | Submersible water pump for wells/bores |
| Brand | Oase |
| Model | ProMax Pressure Well Automatic 3000/15 |
| Supply voltage | 220-240 V AC |
| Frequency | 50 Hz |
| Power consumption | 750 W |
| Protection rating | IPX8 |
| Suction connection | G1 |
| Max flow rate | 3000 l/h |
| Max delivery head | 60 m |
| Max pressure | 6.0 bar |
| Max immersion depth | 20 m |
| Cable length | 30 m |
| Diameter | 98 mm |
| Height | 1085 mm |
| Weight | 13.2 kg |
| Functions | Automatic control with flow control, dry-run protection, integrated non-return valve |
| Use | Discharge of clear water or rainwater, irrigation, watering, water intake from barrels or tanks |
| Maintenance | Regular cleaning at least 2 times a year, frost protection, cleaning of non-return valve |
| Safety | 30 mA differential protection, damaged cable must be replaced by a professional |
| Spare parts | Available on Oase website (www.oase-livingwater.com) |
| Max. sprinkler connection | 3 |
| Permitted sand quantity | 50 g/m³ max |
Frequently Asked Questions - ProMax Pressure Well Automatic 3000/15 OASE
User questions about ProMax Pressure Well Automatic 3000/15 OASE
0 question about this device. Answer the ones you know or ask your own.
Ask a new question about this device
Download the instructions for your Water pump in PDF format for free! Find your manual ProMax Pressure Well Automatic 3000/15 - OASE and take your electronic device back in hand. On this page are published all the documents necessary for the use of your device. ProMax Pressure Well Automatic 3000/15 by OASE.
USER MANUAL ProMax Pressure Well Automatic 3000/15 OASE
natural_image
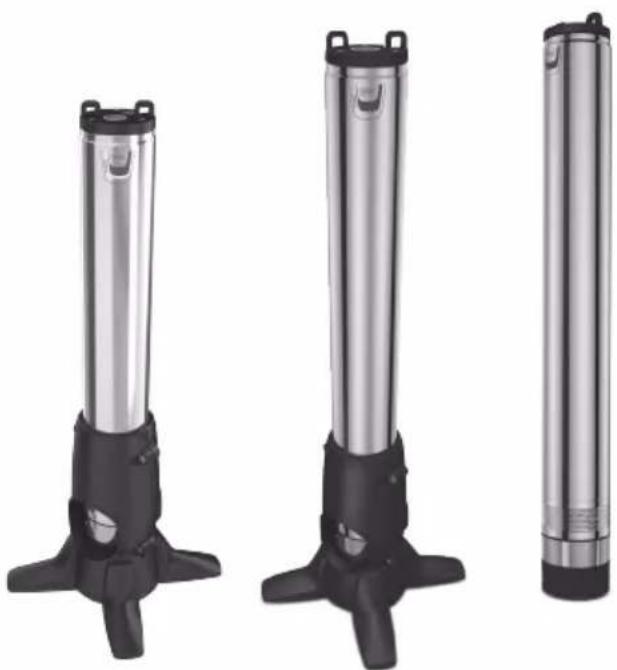
Two black-and-white photos showing outdoor garden installation: one person using a hose to clean a circular pipe, the other handling a water pump outdoors.ProMax Pressure Automatic 5500/5 & 6000/8 ProMax Pressure Well Automatic 3000/15 & 6000/8
DE Gebrauchsanleitung
EN Operating instructions
FR Notice d'emploi
NL Gebruiksaanwijzing
ES Instrucciones de uso
PT Instruções de uso
IT Istruzioni d'uso
DA Brugsanvisning
NO Bruksanvisning
SV Bruksanvisning
FI Käyttöohje
HU Használati útmutató
PL Instrukcja użytkowania
CS Návod k použití
SK Návod na použitie
SL Navodila za uporabo
HR Uputa o upotrebi
RO Instructiuni de folosintă
BG Упътване за употреба
UK Посібник з експлуатації
RU Руководство по эксплуатации
CN 使用说明书
natural_image
Three cylindrical metal pens with black and metallic handles, shown from different angles (no text or symbols visible)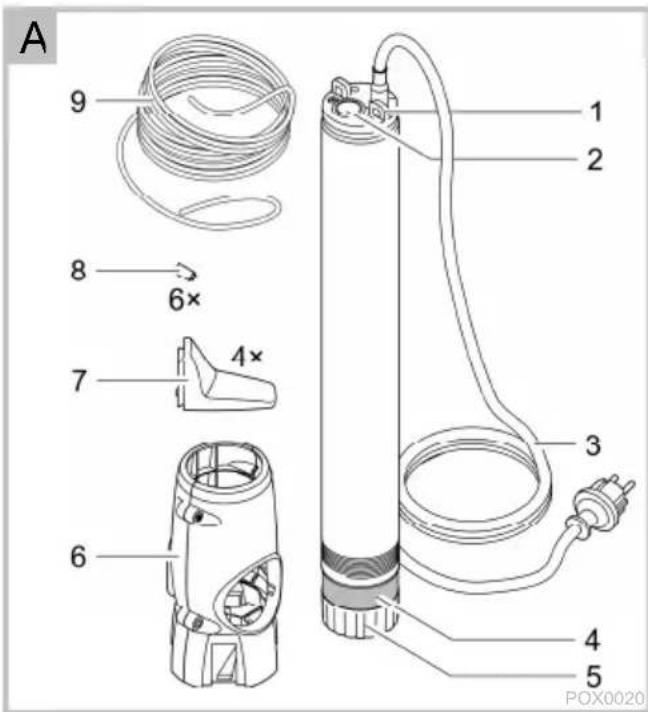
natural_image
Technical diagram showing a mechanical assembly with a magnified inset of a component (no text or symbols)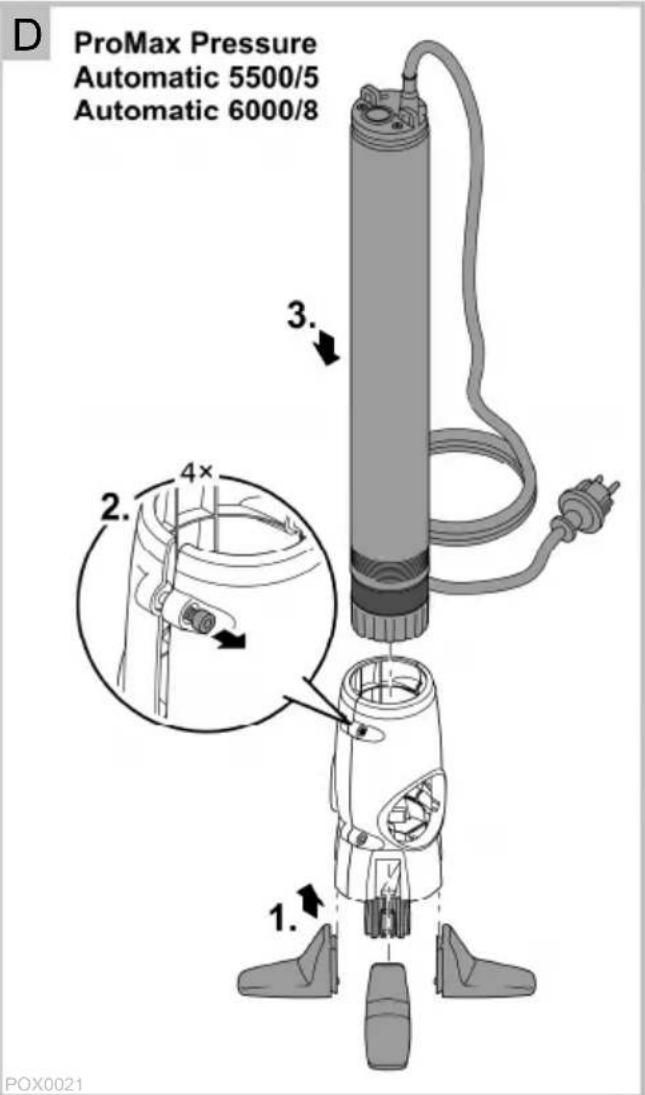
Translation of the original Operating Instructions

WARNING
- This unit can be used by children aged 8 and above and by persons with reduced physical, sensory or mental capabilities or lack of experience and knowledge if they are supervised or have been instructed on how to use the unit in a safe way and they understand the hazards involved.
- Do not allow children to play with the unit.
- Only allow children to carry out cleaning and user maintenance under supervision.
- Ensure that the unit is fused for a rated fault current of max. 30mA by means of a fault current protection device.
- Only connect the unit if the electrical data of the unit and the power supply correspond. The unit data is to be found on the unit type plate, on the packaging or in this manual.
-
Before reaching into the water, disconnect all electrical units in the water from the mains.
-
Only operate the unit if no persons are in the water.
- If a power connection cable is damaged, have it immediately replaced by OASE, an authorised customer service or a qualified electrician to prevent electric shock.
SAFETY INFORMATION
Electrical connection
- Extension cables and power distributors (e.g. outlet strips) must be suitable for outdoor use (splash-proof).
- Protect the plug connection from moisture.
- Only connect the unit to a correctly fitted socket.
Safe operation
- Never operate the unit if the housing is defective!
- Never operate the unit if an electrical cable is defective!
- Never carry or pull the unit by the electrical cable.
- Route cables such that they are protected from damage and do not present a tripping hazard.
- Never carry out technical changes to the unit.
- Only carry out work on the unit that is described in this manual. If problems cannot be overcome, please contact an authorised customer service point or, if in doubt, the manufacturer.
- Only use original spare parts and accessories for the unit.
INFORMATION ABOUT THIS OPERATING MANUAL
You made a good choice with the purchase of this product ProMax Pressure Automatic 5500/5, 6000/8, Well Automatic 3000/15, 6000/8.
Prior to commissioning the unit, please read the instructions of use carefully and fully familiarise yourself with the unit. Ensure that all work on and with this unit is only carried out in accordance with these instructions.
Adhere to the safety information for the correct and safe use of the unit.
Keep these instructions in a safe place! Please also hand over the instructions when passing the unit on to a new owner.
Warnings used in these instructions
The warning information is categorised by signal words, which indicate the extent of the hazard.

WARNING
- Indicates a possibly hazardous situation.
- Non-observance may lead to death or serious injuries.

NOTE
Information for the purpose of clarification or for preventing possible damage to assets or to the environment.
Cross-references used in these instructions
☐ A reference to a figure, e.g. figure A.
→ Reference to another section.
PRODUCT DESCRIPTION Overview
| ☐ A | ProMax Pressure | ||
| Well Automatic 3000/15, 6000/8Automatic 5500/5, 6000/8 | |||
| 1 | Fastening lugs for the rope | ● | ● |
| 2 | Connection, pressure side G1 | ● | ● |
| 3 | Power connection cable | ● | ● |
| 4 | Screen, suction side | ● | ● |
| 5 | Pump base | ● | ● |
| 6 | Foot | ● | - |
| 7 | Mounting feet | ● | - |
| 8 | Rubber pads for supporting the pump for horizontal installation | ● | - |
| 9 | Fixing rope, 20 m | ● | ● |
Intended use
Only use the product described in this manual as follows:
- For pumping clear water or rain water.
- For irrigating and watering.
- For pumping the water out of water butts/rain barrels or cisterns.
- Use for private purposes only.
- Operate in accordance with instructions. (→ Technical data)
Possible incorrect use
The following restrictions apply to the unit:
- Not suitable for salt water.
- Not suitable for drinking water.
- Do not use for long-term operation (e.g. continuous recirculation of the water in a pond).
- Do not use in conjunction with chemicals, foodstuff, easily flammable or explosive substances.
- Do not connect to the drinking water supply.
INSTALLATION AND CONNECTION Connecting the pressure hose
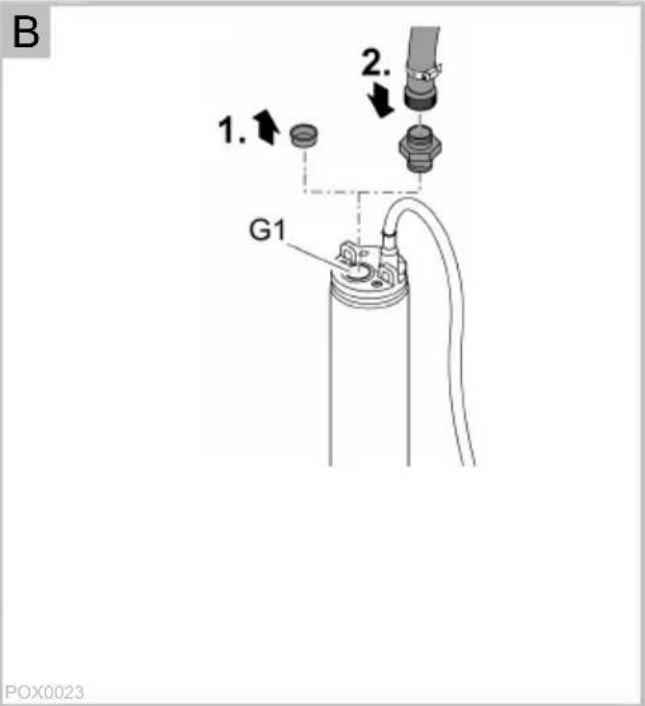
An optimum flow rate is achieved with a hose inside diameter of 25 mm (1").
How to proceed:
□ B
- Remove the protection cap.
- Connect the pressure hose and adapter to the connection on the pressure side.
- Recommendation: Use a quick-release coupling.
Installing the pump in a bored well or shaft
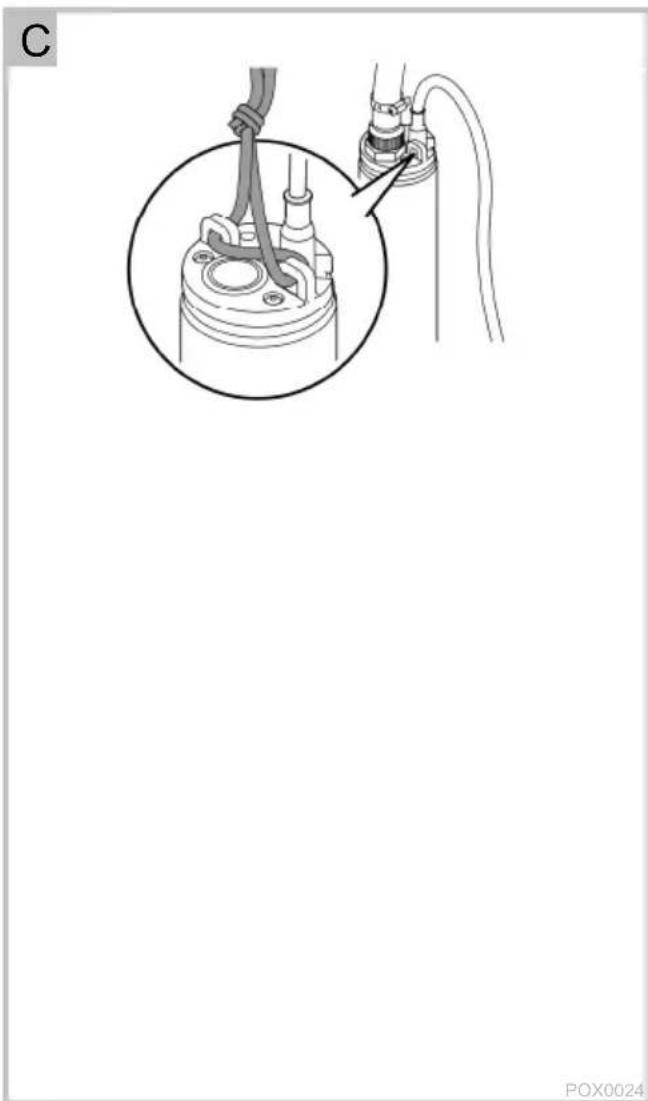
□ C
- Attach the fixing rope with a double knot to the lugs and lower the pump into the bored well or shaft.
- Use the fixing rope to fix the pump at a height of at least 1 m above the bottom of the well or shaft.
- This prevents it from drawing in dirt particles.
- Ensure that the screen on the suction side is at least 150 mm below the surface of the water.
- Do not carry the pump by its power connection cable.
- From a well or shaft depth of 5 m, fix the power connection cable to the fixing rope at a distance of 5 m from the pump (strain relief).
Vertical installation of the pump with the stand
(Only ProMax Pressure Automatic 5500/5, 6000/8)
The pump can be vertically installed with the stand in a tank or well.
- Ensure that the screen on the suction side is at least 150 mm below the surface of the water.
- If the water contains sand and/or is soiled, install the pump in a raised position or use ProMax Floating Intake (57772).
How to proceed:
□D
- Push the mounting feet onto the stand.
- Undo the Allen screws until the opening of the stand is wide enough to fit onto the pump.
- Push the pump into the stand.
- Tighten the Allen screws until the pump is fixed in the stand.
Horizontal installation of the pump with the stand
(Only ProMax Pressure Automatic 5500/5, 6000/8)
The pump can be horizontally installed with the stand in a shallow tank or well.
- The pump has to be aligned exactly horizontally.
- Ensure that the water to be pumped does not contain any sand.
How to proceed:
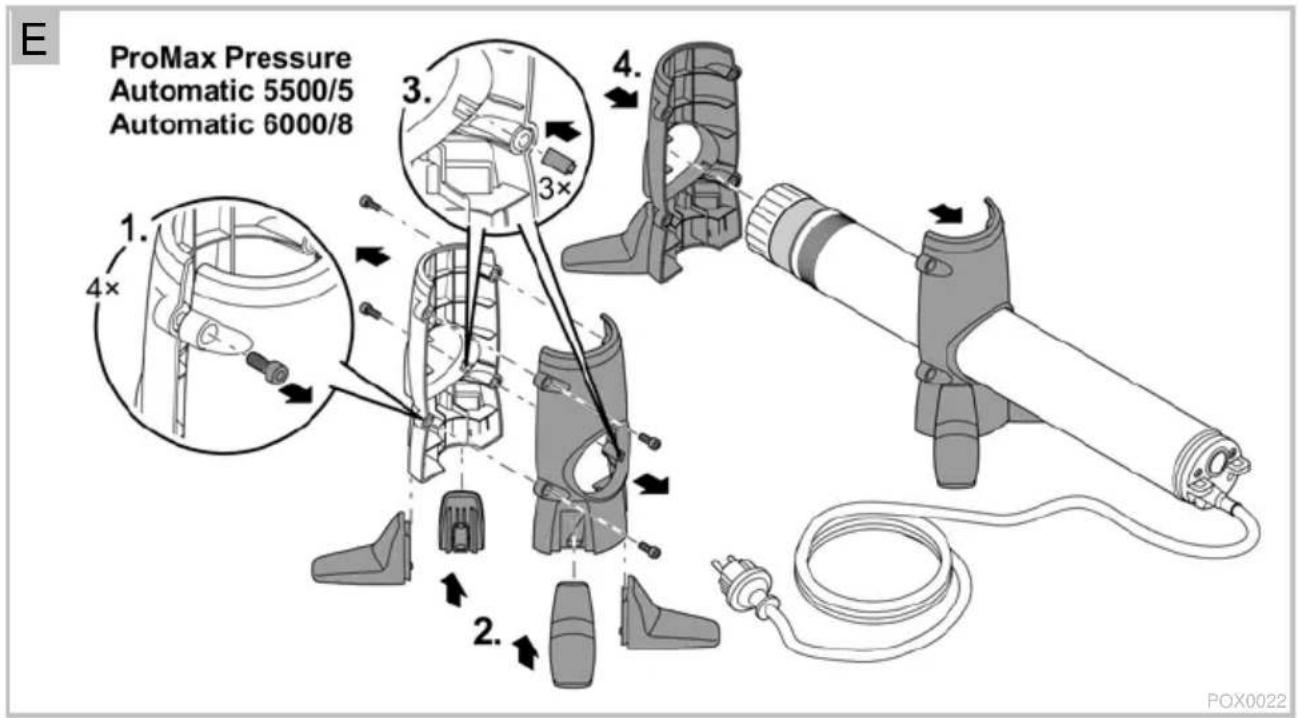
□ E
- Remove the Allen screws.
– The stand consists of two sections. - Push two mounting feet onto each stand section.
- Push three rubber pads each into the grooves of the opening of the stand sections.
- Fit rubber pads to both stand sections.
- Push both stand sections onto the pump.
- The stand sections should be spaced as far apart as possible to ensure the stability of the pump.
OPERATION
The pump control system switches the pump on and off automatically.
- The pump control system (flow control) measures the flow and switches the pump off if the water flow stops.
- The pump switches off when there is insufficient water, protecting it from being damaged by running dry.
- The integrated non-return valve prevents water from flowing back into the pump from the pressure hose when it is switched off. The non-return valve also prevents damage to the pump resulting from water hammer.
Starting up the pump

WARNING
Dangerous electrical voltage!
Death or severe injury from electrocution.
- Only connect the pump to the power supply when there are no persons in or reaching into the water.
-
Before stepping into or reaching into the water, switch off all units located in the water.
-
Insert the power plug into the socket.
– The pump is ready for operation. - The pump switches on automatically when water is used and the pressure in the pressure line falls below 3.5 bar.
- The pump switches off automatically when no more water is used and the maximum pressure in the pressure line is reached.

NOTE
If the water is sandy (e.g. in a new fountain) and the unit is operated for a short time only, sand may accumulate in the pump, causing the non-return valve or running unit to jam.
- Allow the pump to run for approx. 1 hour without interruptions until the sandy water has been removed completely.
Taking the pump out of operation
- Disconnect the power plug.
REMEDY OF FAULTS
| Malfunction | Cause | Remedy |
| Pump does not start. | Power supply interrupted | Check the fuse and electrical plug connections. |
| Pump switches off after a short running period. | Overload protection has switched the pump off due to overheating. | Clean the intakeAllow the pump to cool down. |
| The well has run dry. | Wait until there is sufficient water in the well. | |
| The pump is running but is not delivering, or the delivered quantity is insufficient | Pressure hose blocked | Route the pressure hose without kinks.Check the outlet and clean if necessary |
| Intake blocked | Clean the intake | |
| Air in the pressure hose | Expel the air from the pressure hose. | |
| If applicable:Non-return valve incorrectly fitted in the pressure hose or clogged | Correctly fit the non-return valve.Clean the non-return valve. | |
| The non-return valve is blocked with sand. | Clean the non-return valve. (→Cleaning the non-return valve)If the pump still does not start up, contact OASE. | |
| Impeller defective or worn | Contact OASE.The impeller may only be replaced by the OASE Service. | |
| The impeller is clogged with sand. | Clean the non-return valve. (→Cleaning the non-return valve)Position the pump horizontally and flush it with sand-free water until all the sand has been completely flushed out. If the pump still does not start up, contact OASE.- The impeller may only be replaced by the OASE Service. |
MAINTENANCE AND CLEANING
NOTE
Recommendation on regular cleaning:
- Clean the unit as required but at least twice per year.
- Do not use aggressive cleaning agents or chemical solutions as they could attack the housing or impair the function of the unit.
- Recommended cleaning agent for removing stubborn limescale deposits:
- Pump cleaning agent PumpClean from OASE.
- Vinegar- and chlorine-free household cleaning agent.
- After cleaning, thoroughly rinse all parts in clean water.
Cleaning the non-return valve
Sand can block the non-return valve of the pump so that it cannot close properly. The non-return valve has to be cleaned.
Prerequisite:
- The pressure hose and adapter have been dismantled.
ProMax Pressure Automatic 5500/5, 6000/8, Well Automatic 6000/8
How to proceed:
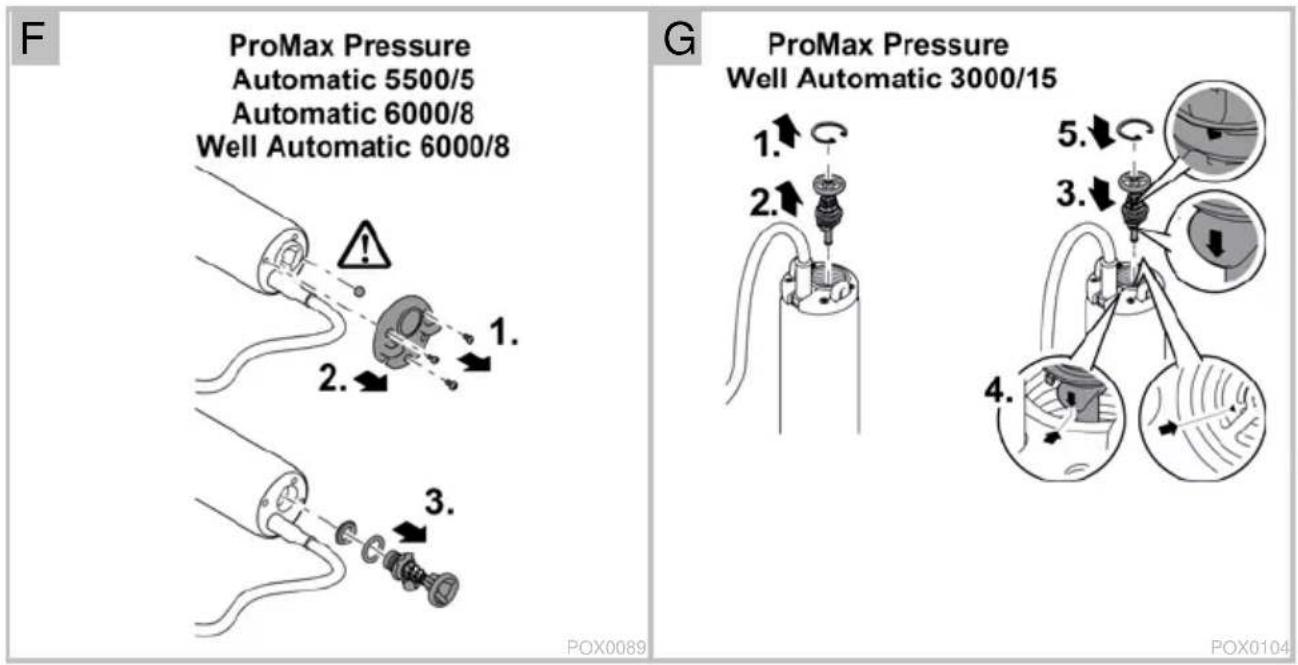
□F
- Remove the screws.
-
Carefully remove the cover.
– The ball of the vent valve will fall out. Ensure that you do not lose the ball. -
Pull out the non-return valve.
-
Thoroughly clean the non-return valve with clean water.
-
Reassemble the parts in the reverse order.
-
Prior to installing, allow the pump to convey clear water for a few minutes (e.g. in a basin) to completely remove any sand residue. (→ Installation and connection)
ProMax Pressure Well Automatic 3000/15
How to proceed:
□G
- Use suitable locking ring pliers to remove the locking ring.
- Pull out the non-return valve.
- Thoroughly clean the non-return valve with clean water.
- Reassemble the parts in the reverse order.
- Prior to installing, allow the pump to convey clear water for a few minutes (e.g. in a basin) to completely remove any sand residue. (→ Installation and connection)
WEAR PARTS
The following components are wear parts and may only be replaced by the OASE Service.
- Impeller unit
STORAGE/OVERWINTERING
The unit is not frost proof. If the unit is installed in a frost-protected place, it does not need to be removed in case of minus temperatures. If the unit is not installed in a frost-protected place, it must be removed and stored if minus temperatures are expected.
How to correctly store the unit:
- Drain the unit as far as possible, clean thoroughly and check for damage.
- Empty all hoses, pipes and connections as far as possible.
- Thoroughly clean the unit, check it for damage and replace any damaged parts.
- Store the unit in a dry and frost-free place.
- Protect open plug connections from moisture and dirt.
DISPOSAL

NOTE
Do not dispose of this unit with domestic waste.
- Render the unit unusable beforehand by cutting the cables and dispose of the unit via the return system provided for this purpose.
SPARE PARTS
The use of original parts from OASE ensures continued safe and reliable operation of the unit.
Please visit our website for spare parts drawings and spare parts.

www.oase-livingwater.com/spareparts-di
TECHNICAL DATA
| ProMax Pressure | Automatic | Well Automatic | ||||
| 5500/5 | 6000/8 | 3000/15 | 6000/8 | |||
| Connection voltage | V AC | 220 - 240 | 220 - 240 | 220 - 240 | 220 - 240 | |
| Rated frequency | Hz | 50 | 50 | 50 | 50 | |
| Rated power | W | 800 | 1100 | 750 | 1100 | |
| Protection type | IPX8 | IPX8 | IPX8 | IPX8 | ||
| Connection, pressure socket | G1 | G1 | G1 | G1 | ||
| Connection max. sprinklers | 2 | 5 | 3 | 5 | ||
| Max. hose length per sprinkler | m | 50 | 50 | 50 | 50 | |
| Flow rate | max. | l/h | 5500 | 6000 | 3000 | 6000 |
| Head height | max. | m | 35 | 57 | 60 | 57 |
| Pressure | max. | bar | 3.5 | 5.7 | 6.0 | 5.7 |
| Immersion depth | max. | m | 20 | 20 | 20 | 20 |
| Permissible quantity of sand in the pumped water | max. | g/m^3 | 50 | 50 | 50 | 50 |
| Power connection cable | Length | m | 30 | 30 | 30 | 30 |
| Dimensions | ∅ | mm | 98 | 98 | 74 | 98 |
| Height | mm | 763 | 871 | 1085 | 814 | |
| Weight | kg | 13.3 | 15.1 | 13.2 | 13.8 | |
AFVOER VAN HET AFGEDANKTE APPARAAT

OPMERKING
www.oase-livingwater.com/onderdelen-di
TECHNISCHE GEGEVENS
OPSTILLING OG TILSLUTNING
INSTALLATION OCH ANSLUTNING
www.oase-livingwater.com/spareparts_in- ternational-di
TEKNISKA DATA
www.oase-livingwater.com/nahradnidily-di
TECHNICKÉ ÚDAJE
natural_image
Abstract curved line drawing with no text or symbols
- ProMax Pressure Automatic 5500/5 & 6000/8 ProMax Pressure Well Automatic 3000/15 & 6000/8
- Translation of the original Operating Instructions
- WARNING
- SAFETY INFORMATION
- Electrical connection
- Safe operation
- INFORMATION ABOUT THIS OPERATING MANUAL
- Warnings used in these instructions
- NOTE
- Cross-references used in these instructions
- Intended use
- Possible incorrect use
- INSTALLATION AND CONNECTION Connecting the pressure hose
- Installing the pump in a bored well or shaft
- Vertical installation of the pump with the stand
- Horizontal installation of the pump with the stand
- OPERATION
- Starting up the pump
- Death or severe injury from electrocution.
- Taking the pump out of operation
- MAINTENANCE AND CLEANING
- Cleaning the non-return valve
- ProMax Pressure Automatic 5500/5, 6000/8, Well Automatic 6000/8
- ProMax Pressure Well Automatic 3000/15
- WEAR PARTS
- STORAGE/OVERWINTERING
- DISPOSAL
- SPARE PARTS
- AFVOER VAN HET AFGEDANKTE APPARAAT
- OPMERKING
- OPSTILLING OG TILSLUTNING
- INSTALLATION OCH ANSLUTNING
Brand : OASE
Model : ProMax Pressure Well Automatic 3000/15
Category : Water pump