
HKW-600 - Car Bluetooth kit SIEMENS - Free user manual and instructions
Find the device manual for free HKW-600 SIEMENS in PDF.

| Product Type | Bluetooth hands-free car kit |
| Brand | Siemens |
| Model | HKW-600 |
| Dimensions of electronic unit | 110 x 120 x 30 mm (L x W x H) |
| Weight of electronic unit | Approx. 110 g |
| Power supply | 10.8 V to 16 V (ignition cable supports 24 V) |
| Power consumption | max. 2 A in operation, max. 1 mA standby |
| Operating temperature | -25 °C to +70 °C |
| Speaker output power | max. 7 W (at 4 Ω) |
| Wireless technology | Bluetooth (short range) |
| Phone compatibility | Siemens mobile phones with Bluetooth, S55, SX1, other Bluetooth brands; series 65 with optional passive cradle |
| Main functions | Hands-free duplex calls, phonebook, call lists, voice recognition (if phone compatible), mute, call transfer |
| Package contents | Electronic unit, cable harness, display with base, display bracket, speaker, external microphone, 3 safety connectors, 3 flat fuses (3 A), 2 cable connectors, mounting screws |
| Safety | Professional installation recommended; do not obstruct unit ventilation; follow vehicle safety instructions |
| Maintenance and cleaning | Clean with a soft, slightly damp cloth, no detergents or chemicals |
| Optional accessories | Car passive cradle (with external antenna and charger), Phone-In adapter cable for car stereo connection |
| Approvals | CE (directives 89/336/EEC, 92/59/EEC), e1 (directive 72/245/EEC), FCC part 15 |
Frequently Asked Questions - HKW-600 SIEMENS
User questions about HKW-600 SIEMENS
0 question about this device. Answer the ones you know or ask your own.
Ask a new question about this device
Download the instructions for your Car Bluetooth kit in PDF format for free! Find your manual HKW-600 - SIEMENS and take your electronic device back in hand. On this page are published all the documents necessary for the use of your device. HKW-600 by SIEMENS.
USER MANUAL HKW-600 SIEMENS
The Car Kit Bluetooth (hereafter referred to as "Car Kit") is intended for the following phones:
- Siemens mobile phones with a Bluetooth interface.
- Siemens mobile phones S55, SX1 and mobile phones with a Bluetooth interface from other manufacturers can also be used with limited functionality.
- Siemens mobile phones of the 65 Series or later without a Bluetooth interface (use with optional holder possible).
These installation instructions only provide basic information. Because the different car makes and car radio connections require different installations, the assembly must be performed in line with the individual circumstances.
Safety precautions
Please read the operating instructions and the safety precautions carefully before use!

Remember to comply with legal requirements and local restrictions when using the phone. This could apply e.g. when driving or at petrol stations.

General and vehicle-specific guidelines for the installation of add-on devices must be observed; where applicable, professional assistance should be sought (in the case of electrical fusing, wiring, contact with hot components, contact with fuel, etc.).

The installation of the com-
ponents must not impede:
- The driver's freedom of movement, safety or line of vision
• The safety of any passenger (especially in the event of an accident)
- The vehicle's safety mechanisms (airbag, seat belts, etc.)

Take care during installation! Young children may choke on small parts.

The device is only suitable for 12V operation.
For further details, please refer to the operating instructions for your mobile phone.

Do not install the device in environments where there is danger of explosion.

If your car is fitted with metallised windows, this may impair the reception of the phone. For optimum signal reception, always use an external antenna. Your phone and the Car Kit must be equipped with an external antenna for installation.

Improper use and opening of the components invalidates the warranty.
Please note:

Please dispose of unwanted telephones and accessories in accordance with the relevant legislation.

Only use Siemens original accessories. In this way you will avoid possible health risks and damage to the product and ensure compliance with the relevant provisions.
Installation
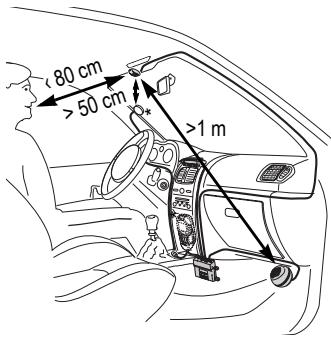
Microphone, Display, Loudspeaker
When performing the installation, please note the following:
- Distance from the microphone ⑩ to the loudspeaker ⑧ preferably >1 m
- Distance from microphone ⑩/ microphone cable to the phone > 50 cm
- Distance from the microphone ⑩ to the user's mouth < 80 cm
Avoid installing the microphone directly in the air flow of the sunroof, window or ventilation.
* Antenna and mobile holder are not included in the scope of supply.
Run the cable for the external microphone ⑩, the display ⑥ and the loudspeaker ⑧ correctly to suit the individual requirements of your vehicle.
Avoid damaging, bending or squashing the cables.
Microphone
First clean the area where you want to attach the external microphone ⑩ using a suitable grease-dissolving cleaning agent. The adhesive pad will only adhere permanently to a grease-free surface.
Secure the external microphone ⑩ pointing towards the speaker at the required location using the adhesive pads.
Display
Make sure you mount the display ⑥ in a position that allows the driver optimal visual contact and access.
You can attach the display ⑥ directly to the dashboard or fix it with the help of the display holder ⑦.
Direct installation of the display
First clean the area where you want to attach the display ⑥ using a suitable grease-dissolving cleaning agent. The adhesive pad will only adhere permanently to a grease-free surface.
Mount the display ⑥ using the adhesive pads.
Installation using the display holder
Mount the display holder ⑦ on-to the dashboard with the adhesive pad supplied or with appropriate screws*.
Then press the display ⑥ into the display holder ⑦ until it clicks into place.
Loudspeaker
The inclination and the rotation of the loudspeaker ⑧ can be adjusted. Loosen the set screw in the base, install the loudspeaker ⑧ and tighten the screw.
Secure the loudspeaker ⑧ in a suitable location (such as the passenger-side footwell).
The screws can be found in the base of the loudspeaker ⑧.
Wiring loom
Electrical connections
When connecting the Car Kit to the wiring loom ③ ensure that the function and operation of other devices are not compromised (e.g. voltage drop).
Disconnect the car battery correctly before installing the wiring loom ③ and the electronics box ①.
Connect the B 12V+ line (red) to the positive terminal of the car battery.
Connect the D line (brown) to the negative terminal of the car battery.
Connect the C line (violet) to the vehicle electrical system so that 12V+ or 24 V+ are applied when the ignition is switched on.
Only use spade fuse connectors ④ for connecting the cable and then insert 3A spade fuses ⑤ into the spade fuse connectors ④.
To safeguard the wiring loom professionally, the fuses must be mounted between the end of the wiring loom supplied and the connector from the vehicle.
Connecting the loudspeaker cable to the wiring loom
Connect the white/black loudspeaker cable + G to the green/black E loudspeaker connection using a cable connector ⑨.
Connect the black loudspeaker cable H to the green loudspeaker cable F using a cable connector ⑨.
Connecting the radio\*
The Car Kit can be connected to your car's audio system via the phone-in connection of your car radio. The loudspeakers of the audio system are then used as a play-back system for the Car Kit. Please use the optional phone-in adapter cable to ensure an optimal connection to the radio.
Connect the connector cable H of the wiring loom ③ to the phone-in connection of your car radio via the optional phone-in adapter.
Then connect the connector cable G directly to the signal-conducting pole of the phone-in connection of your car radio.
If the voltage levels of the Car Kit and phone-in connection differ, the voltage levels can be adjusted with the phone-in adapter cable.
There is a wiring diagram and further information on the phone-in adapter cable on the Siemens website:
www.siemens-mobile.com/phoneinadapter
Radio Muting\*
Please refer to the car radio manufacturer's instructions.
The radio signal can be switched automatically to mute during phone calls. Connect the radio mute control line A to the mute input of the car radio.
Electronics box
Please make sure that the electronics box ① is not mounted on or between metal objects. Only then can good radio communication be ensured.
Make sure that the electronics box ① is securely mounted.
Ensure that the ventilation slots on the electronics box ① are not covered (at least 2 cm space) and the installation does not cause interference with any other devices.
Do not place the connector cable behind the electronics box ① or wrap it around the electronics box ① as this may lead to interference.
Insulate any unused cable ends with insulating tape.
Feed the lines for the following components carefully to the electronics box ① without damaging them and then connect them with the electronics box ①:
- Wiring loom ③,
- Display ⑥,
- External microphone ⑩,
- Mobile holder cable (optional)
Ensure the connectors are securely plugged in.
Feed the cable of the external microphone ⑩ around the clip provided for strain relief (see diagram).
Secure the electronics box ① in the passenger-side footwell (for example) with two screws ②.
Reconnect the car battery following installation.
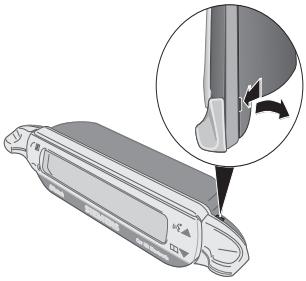
Dismantling the display
To detach the display ⑥ from the display holder ⑦ insert a screwdriver into the narrow opening between the two elements.
Press the display ⑥ gently out of the display holder ⑦ and remove the display.
natural_image
Illustration of a mechanical component with an inset showing a close-up of a curved pipe or valve (no text or symbols present)Features
With the Car Kit Bluetooth you can enjoy optimal communication in your car with full-duplex handsfree talking and superb ease of use. You can speak on the phone as if you were talking to the passenger next to you.
Bluetooth™ technology
The Bluetooth word mark and logos are owned by the Bluetooth SIG, Inc. and any use of such marks by Siemens is under license. Other trademarks and trade names are those of their respective owners.
The Car Kit communicates with the phone via Bluetooth™, a short range radio link.
To make this communication possible, the Car Kit and the phone must be linked with each other. For more information please read "Establishing the first connection with the telephone", p. 9.
Display – functionality of the keys
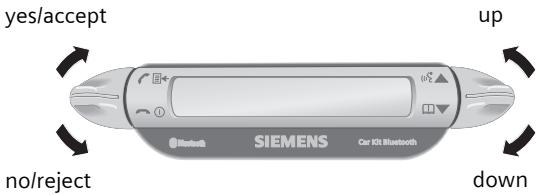
The Car Kit is operated by the display keys which can be pressed both upwards and downwards.
- The key on the left is for confirming/rejecting
- The key on the right allows you to browse through the lists.
The symbols below are used to represent the four different actions.
yes/accept
no/reject
up
down
When a long press is required, "long press" is written in the user guide.
In all other cases, pressing the key briefly is enough.
Initial operation
Establishing the first connection with the telephone
Note
For details of how to establish a Bluetooth connection, please refer to the operating instructions for your phone.
- Activate the Car Kit's log-on mode by a long press of the key.
- Activate your phone's Bluetooth interface and begin a search on your phone for Bluetooth devices in the area that are ready to receive.
- When the Car Kit is found, your phone will ask you to type in a PIN number as confirmation
- The PIN number is shown on the Car Kit's display.
- After the confirmation the Car Kit shows the identification of the phone on the display and then switches into stand-by mode. For phones from other manufacturers it is likely that confirmation on the phone will be required before the switch to stand-by mode.
From then on, the Car Kit is ready for use. The Car Kit and the phone can communicate with each other and will recognise each other in the future.
Use with multiple phones
The Car Kit memorises the connection of a maximum of four phones with which it can be operated alternately.
If a fifth phone is connected, the entry for the phone which has not been in contact with the Car Kit for the longest period will be deleted.
When the Car Kit is activated, it searches for the last phone it was connected with. If this is not found, it searches for other saved phones. Those it finds are shown on the display. The user can then select one of these.
Using the Car Kit with a different phone
- Switch off the Car Kit by pressing with a long press.
- Deactivate the Bluetooth interface of the last phone that was connected.
- Switch on the Car Kit by pressing with a long press. It searches for the last active phone but does not find it.
- The Car Kit will now search for other saved phones and show them in the display.
- Choose the desired device:

Shows the next phone found (if available).

Shows the previous phone in the list (if available).

The phone indicated will be connected.
Use with an optional mobile holder
Note
For details, please refer to the operating instructions for your mobile holder.
You can equip the Car Kit with an optional mobile holder. This will enable more functions:
- Use with an optional external antenna is possible.
- Charging the phone after inserting into the mobile holder.
- Use of the Car Kit with a Siemens phone which does not have Bluetooth functionality.
When you insert the phone into the mobile holder, the phone and Car Kit connect via the mobile holder's connector.
First steps
Switching on the Car Kit
- Start the Car Kit by switching on your car's ignition or by pressing with a long press.
- The Car Kit searches for the last phone to be used. This will be shown in the display.
From then on, the Car Kit is ready for use.
Accepting a call

accepts the call.
Rejecting a call

rejects the call.
Ending a call

ends the call.
Functions
Valid for all functions unless stated otherwise:

Tap/long press: Car Kit switches to stand-by mode.
Stand-by mode
In stand-by mode, the Car Kit offers the following functions:

Call lists

Long press: log-on mode

Long press: switches off the Car Kit

Phonebook

Voice recognition (if supported by phone)
Making a call from the phonebook

Phonebook
Shows the phone's phonebook.

Access the phone-book.

Select entry.
Multiple phone numbers can be saved under one entry in the address book.

Select entry.

Begin the call.
Other phonebook functions

Moves up one entry.

Long press: moves up 10 entries.

Moves down one en- try.

Long press: moves down 10 entries.
Making a call from the call lists

Call lists
Shows the phone's call lists.
There is a choice of three call lists:
- Dialled numbers
- Missed calls
- Accepted calls
The call lists are only shown if there is at least one entry in them.

Select call list.

Activate call list.

Select entry. (For further functions see "Other phonebook functions")

Start call.
During a call

Louder.

Quieter.

Hold call.

Long press: Activate/deactivate the microphone muting.

End call.
Second call
| End current call. | |
| Put current call on hold and accept second call. | |
| Toggle between two calls. | |
| Long press: end all calls. |
Transferring a call
| Long press: transfer current call to the Car Kit. |
To continue the call on the phone, press the corresponding display key on the phone (if supported by the phone).
Display symbols
| Signal strength | |
| Phone's charging status | |
| Log-on mode (Pairing) | |
| Dialled numbers | |
| Missed calls | |
| Accepted calls | |
| Incoming call | |
| Outgoing call | |
| Current call | |
| Current call/second call |
| d | Call on hold |
| d | Toggle between two calls |
| d | Interface error (if supported by phone) |
| ‡ | List selections |
| ♂ | Home phone number |
| ♀ | Work phone number |
| ♂ | Mobile phone number |
| ◀ | Louder |
| ◀ | Quieter |
| × | Microphone muting active/inactive |
Troubleshooting
Car Kit does not work
- Check line connections
- No operating voltage, check line connection
- Phone not on or connection to Car Kit not active
- Check fuses
- Operating voltage too high or too low
Loud background noise at called party's end
- Microphone installed in the air flow of the sunroof, window or ventilation
- Distance from micro-phone/microphone cable to phone < 50 cm
Poor voice and audio quality
- Car Kit outside permitted operating temperature
• Volume too low (adjust volume via phone)
- Connection to radio (phone-in mode): Phone volume too high (reduce volume via phone and then increase it if necessary via radio)
Loud echo
- Distance between the microphone and loudspeaker < 1m
Weak microphone signal (your partner on the phone barely hears you)
- Distance from microphone to the user's mouth > 80 cm
- Microphone not pointed at speaker
Poor reception quality
- No network available
• Alter the phone's position - If your car is fitted with metallised windows, this may impair the reception of the phone. Observe the vehicle manufacturer's recommendations and install the relevant (external) antenna or an optional mobile holder.
Phone is not found/problems with Bluetooth connection
- Establishing the first connection with the phone, see p. 9
- Since the last time the phone was used with the Car Kit, at least four other phones have been used. Log the phone on again.
- Make sure that the electronics box is not mounted on or between metal objects
- Reduce the distance between the electronics box and the phone
Car radio is permanently switched to mute
- The radio mute control line connector may be reversed with the chassis
Automatic Car Kit switch-on/off does not work/ the Car Kit does not switch itself off
- Check that the ignition line is connected to the car ignition
Technical data and approval
| Power supply | 10.8 V+ to 16 V+ |
| Car ignition adapter cable, optionally also to 24V | |
| Current input | max. 2 A max. 1 mA (idle current) |
| Operating temperature | -25 C to +70 C |
| Loudspeaker output power | max. 7 W (into 4 Ohm) |
| Weight (electronics box) | approx. 110 g |
| Housing dimensions (electronics box) | ca. 110 x 120 x 30 mm (LxWxH) |
CE Car Kit complies with the following EU directives:
89/336/EC "Electromagnetic Compatibility"
92/59/EC "Guideline for General Product Safety"
e1 Model approved in accordance with Directive 72/245/EC and as amended by Directive 95/54/EC "Electromagnetic Compatibility in Automobiles".
Declaration of conformity
CE
Siemens Information and Communication mobile hereby declares that the phone described in this user guide is in compliance with the essential requirements and other relevant provisions of European Directive 1999/5/EC (R&TTE). The declaration of conformity (DoC) concerned has been signed. Please call the company hotline if you require a copy of the original or: www.siemens-mobile.com/conformity
CE 0681
FCC
This equipment complies with Part 15 of the FCC Rules. Operation is subject to the following conditions: (1) This device may not cause harmful interference, and (2) this device must accept any interference received, including interference that may cause undesired operation.
Maintenance
The product should be cleaned with a soft, slightly damp (not wet) cloth.
Do not use cleaning agents, colourants or other chemical substances.
Accessories
Mobile holder with electrical connections, comprising:
- Car Kit Upgrade (Base module for mobile holder/mobile holder antenna with cable for electronics box)
- Mobile Holder Antenna/Mobile Holder
With these additions, the following extra functions are available: antenna connection, phone charging, safer storage of the phone in the car. Phones without Bluetooth functionality from the 65th generation or above can be used.
For connecting to the car radio:
- Phone-In adapter cable
Products are available from specialist dealers or visit our online shop at:
Customer Care
We offer fast, individual advice!
You have several options:
Our online support on the Internet:
www.siemens-mobile.com/customercare
We can be reached any time, any place. You are given 24 hour support on all aspects of our products. Here you will find an interactive fault-finding system, a compilation of the most frequently asked questions and answers, plus user guides and current software updates to download.
When calling customer service, please have ready your receipt and your car kit, and if available, your Siemens Service customer number.
You can also get personal advice about our range of products on our Premium Hotline:
United Kingdom 0906 9597500
(0.75 £ per minute)
Qualified Siemens employees are waiting to offer you expert information about our products and installation.
In some countries repair and replace services are impossible where the products are not sold through our authorised dealers.
If repair work is necessary, please contact one of our service centres:
Abu Dhabi 0 26 42 38 00
Argentina 0 80 08 88 98 78
Australia....13 00 66 53 66
Austria....05 17 07 50 04
Bahrain 40 42 34
Bangladesh....0 17 52 74 47
Belgium....0 78 15 22 21
Bolivia 0 21 21 41 14
Bosnia Herzegovina....0 33 27 66 49
Brazil 0 80 07 07 12 48
Brunei 02 43 08 01
Bulgaria....02 73 94 88
Cambodia 12 80 05 00
Canada 1888770211
China 02138984777
Croatia 0 16 10 53 81
Czech Republic......2 33 03 27 27
Denmark 35 25 86 00
Dubai 043966433
Egypt....0 23 33 41 11
Estonia 06 30 47 97
Finland 09 22 94 37 00
France....01 56 38 42 00
Germany 0 18 05 33 32 26
Greece 0 80 11 11 11 16
Hong Kong 28 61 11 18
Hungary 06 14 71 24 44
Iceland 5 11 30 00
India 22 24 98 70 00 Extn: 70 40
Indonesia 0 21 46 82 60 81
Ireland 18 50 77 72 77
Italy 02 24 36 44 00
Ivory Coast....05 02 02 59
Jordan 0 64 39 86 42
Kenya....2 72 37 17
Kuwait 2454178
Latvia 7 50 11 18
Lebanon 01 44 30 43
Libya 02 13 50 28 82
Lithuania 8 52 74 20 10
Luxembourg 43 84 33 99
Macedonia 02 13 14 84
Malaysia....+60377124304
Malta....+35 32 14 94 06 32
Mauritius 2 11 62 13
Mexico 01 80 07 11 00 03
Morocco 22 66 92 09
Netherlands 0 90 03 33 31 00
New Zealand 08 00 27 43 63
Nigeria 0 14 50 05 00
Norway....22 70 84 00
Oman 79 10 12
Pakistan 02 15 66 22 00
Paraguay 8 00 10 20 04
Philippines 0 27 57 11 18
Poland....08 01 30 00 30
Portugal 8 08 20 15 21
Qatar 04 32 20 10
Romania 02 12 04 60 00
Russia....8 80 02 00 10 10
Saudi Arabia 0 22 26 00 43
Serbia 01 13 80 95 50
Singapore 62 27 11 18
Slovak Republic 02 59 68 22 66
Slovenia 0 14 74 63 36
South Africa 08 60 10 11 57
Spain....9 02 11 50 61
Sweden....0 87 50 99 11
Switzerland 08 48 21 20 00
Taiwan 02 23 96 10 06
Thailand 027221118
Tunisia 71 86 19 02
Turkey 02165797100
Ukraine 8 80 05 01 00 00
United Arab Emirates....0 43 66 03 86
United Kingdom 087 05 33 44 11
USA 1888770211
Vietnam....84 89 30 01 21
Zimbabwe 04 36 94 24
Car Kit Bluetooth (de)
Lieferumfang
natural_image
Illustration of a mechanical component with an inset showing a close-up of a curved pipe or valve (no text or symbols present)Leistungsmerkmale
www.siemens-mobile.com/conformity
CE 0681
FCC
• Phone-In Adapter Cable
Kundenservice (Customer Care)
Microfono, display, altoparlante
natural_image
Illustration of a mechanical component with an inset showing a close-up of a curved component (no text or symbols present)Caratteristiche
• Phone-In Adapter Cable (cavo adattatore phone-in)
Siemens Original Accessories
www.siemens-mobile.com/shop
natural_image
Illustration of a mechanical component with an inset showing a close-up of a curved pipe or valve (no text or symbols present)Caractéristiques
www.siemens-mobile.com/conformity
CE 0681
FCC
Service clients (Customer Care)
natural_image
Illustration of a mechanical component with an inset showing a close-up of a curved component (no text or symbols present)Características
natural_image
Diagram of a device handle with an inset showing a mechanical component (no text or symbols present)Facilidades
www.siemens-mobile.com/conformity
CE 0681
FCC
- Phone-In Adapter Cable
www.my-siemens.com/customercare
- Safety precautions
- Please note:
- Installation
- Microphone, Display, Loudspeaker
- Microphone
- Display
- Direct installation of the display
- Installation using the display holder
- Loudspeaker
- Wiring loom
- Electrical connections
- Connecting the loudspeaker cable to the wiring loom
- Connecting the radio\*
- Radio Muting\*
- Electronics box
- Dismantling the display
- Features
- Bluetooth™ technology
- Display – functionality of the keys
- Initial operation
- Establishing the first connection with the telephone
- Note
- Use with multiple phones
- Using the Car Kit with a different phone
- Use with an optional mobile holder
- First steps
- Switching on the Car Kit
- Accepting a call
- Rejecting a call
- Ending a call
- Functions
- Stand-by mode
- Making a call from the phonebook
- Other phonebook functions
- Making a call from the call lists
- During a call
- Troubleshooting
- Car Kit does not work
- Loud background noise at called party's end
- Poor voice and audio quality
- Loud echo
- Weak microphone signal (your partner on the phone barely hears you)
- Poor reception quality
- Phone is not found/problems with Bluetooth connection
- Car radio is permanently switched to mute
- Automatic Car Kit switch-on/off does not work/ the Car Kit does not switch itself off
- CE Car Kit complies with the following EU directives:
- Declaration of conformity
- CE
- CE 0681
- FCC
- Maintenance
- Accessories
- Customer Care
- www.siemens-mobile.com/customercare
- Car Kit Bluetooth (de)
- Lieferumfang
- Leistungsmerkmale
- Kundenservice (Customer Care)
- Microfono, display, altoparlante
- Caratteristiche
- Caractéristiques
- Service clients (Customer Care)
- Características
- Facilidades
- www.my-siemens.com/customercare
Brand : SIEMENS
Model : HKW-600
Category : Car Bluetooth kit