Matchmaster Powder Dispenser - Scale RCBS - Free user manual and instructions
Find the device manual for free Matchmaster Powder Dispenser RCBS in PDF.

User questions about Matchmaster Powder Dispenser RCBS
0 question about this device. Answer the ones you know or ask your own.
Ask a new question about this device
Download the instructions for your Scale in PDF format for free! Find your manual Matchmaster Powder Dispenser - RCBS and take your electronic device back in hand. On this page are published all the documents necessary for the use of your device. Matchmaster Powder Dispenser by RCBS.
USER MANUAL Matchmaster Powder Dispenser RCBS
natural_image
Black and white photo of a RCBS precision analyzer instrument with digital display and control panel (no visible text or symbols on the device itself)PRODUCT INSTRUCTIONS
Table of Contents
| Section Page | |
| Safety Information 1 | |
| General Information 4 | |
| Before Using the MatchMaster 4 | |
| Display Indicators 5 | |
| Function Key Description 5 | |
| Menu Settings 7 | |
| Calibration 7 | |
| Select Powder Type 8 | |
| Auto Dispense Mode 8 | |
| Interrupt Dispensing 9 | |
| Manual Dispensing Mode 9 | |
| Manually Dispensing with Trickle Key 9 | |
| Using Match Mode | 9 |
| Quick Drain Feature | 10 |
| Open Drain Warning | 10 |
| Clean Tube Seals | 11 |
| Bluetooth Download/Connect to RCBS App | 12 |
| Bluetooth Operation | 12 |
| User Defined Powder Configuration | 14 |
| Error Messages | 15 |
| Storage and Shipping | 15 |
| Checking the Firmware Version | 15 |
| Appendix 1: Default Powder Configuration Settings | 16 |
| Appendix 2: 7-Segment Display Characters | 16 |
| Appendix 3: Powder Kernel Weight Reference | 17 |
| Appendix 4: Detailed Explanation of Powder Dispense Parameters | 18 |
| Appendix 5: Powder Dispense Parameter Step Function | 19 |
| Warranty 21 |
IMPORTANT SAFETY INFORMATION
IMPORTANT: PLEASE READ ALL INFORMATION FIRST
Like any scale, you control the accuracy of your RCBS MatchMaster. Before using the scale, read this instruction manual carefully to fully learn how to safely operate the scale.

WARNING! Failure to properly operate the scale can result in severe personal injury and/or equipment damage.
If you have read these instructions and still do not understand some operation, call us at 1-800-533-5000 and a technician will assist you. This instruction manual contains specific safety and operating information. It should be considered a permanent part of your reloading equipment and remain with the equipment at all times for easy reference.

SAFETY
Reloading is an enjoyable and rewarding hobby that can be conducted safely. However, as with any hobby, carelessness or negligence can make reloading hazardous. This product has been designed from the beginning with the user's safety in mind. When reloading, safety rules must be followed. By observing these rules, the chance of a hazardous occurrence causing personal injury or property damage is minimized.
RELOADING SAFETY
• Always wear safety glasses.
- Understand what you are doing and why. Read handbooks and manuals on reloading. Talk to experienced reloaders. Write or call suppliers of equipment or components if you have questions or are in doubt.
- Read and understand all warnings and instructions accompanying your equipment and components. If you do not have written instructions, request a copy from the manufacturer. Keep instructions for future reference.
- Do not rush or take short cuts. Establish a routine and follow it at a leisurely pace.
- Do not smoke while reloading, or reload near sources of heat, sparks or flame.
- Observe good housekeeping in the reloading area. Keep tools and components neat, clean and orderly. Promptly and completely clean up any spills.
- Keep your hands and fingers away from “danger” spots and pinch-points where they might be injured.
- Keep all reloading equipment and components out of reach of children.
- Keep all packing material out of reach of children.
- This device is not intended for use by individuals with restricted physical, sensory or mental capacities or those with a lack of experience and/or knowledge, including children, unless they are supervised by an individual who is responsible for their safety or have received training in operating the device.
- Stay alert. Reload only when you can give your undivided attention. Do not reload when tired, ill, rushed or under the influence of drugs or alcohol.
Because RCBS ^® has no control over the choice, assembly or use of components or other reloading equipment, RCBS assumes no liability, expressed or implied, for the use of ammunition reloaded with this product.
PRIMERS AND POWDER
- Store powder beyond the reach of children and away from heat, dampness, open flames and electrical equipment. Avoid areas where static electricity is evident.
- DO NOT have more than one can of powder on the bench at one time. Powder cans should be stored away from the bench to avoid picking up the wrong one.
- DO NOT use any powder unless its identity is positively known. The only positive identification is the manufacturer's label on the original canister. Discard all mixed powders and those of uncertain identity.
- DO NOT store powder in the unit after a reloading session. Over time the powder will damage the powder hopper.
LOADING DATA
• DO NOT SMOKE WHILE RELOADING
• OBSERVE ALL WARNINGS ABOUT THE USE OF MAXIMUM LISTED LOADS.
- Use only laboratory tested reloading data. We recommend the SPEER Reloading Manual.

WARNING
This digital scale is for use with smokeless powders only. Do not use with black powder (used in muzzle loading firearms). If black powder should come in contact with an electrical spark, an explosion may occur, resulting in serious injury or death.
CALIBRATION
Calibration should be performed before every use. Prior to calibration, scale should be turned on and allowed to warm up for at least 15-20 minutes. The warm up process should be performed prior to every use if scale has been off for more than 30 minutes. Calibration is performed WITHOUT scale pan on the platen. To calibrate correctly, follow the CALIBRATION section of this instruction manual. A scale with improper calibration will cause an incorrect charge weight which may exceed the maximum recommended load. Re-check frequently during use with the calibration weights provided. If accuracy is found to be out of tolerance, the scale must be recalibrated.
PRECAUTIONS
Digital scales are very reliable devices. However, here are some events which may result in an inaccurate reading:
- Change in temperature. If the temperature changes more than 40^ in 1 hr., you must re-calibrate the scale. Allow scale to stabilize for 15-20 minutes prior to use.
- Changes in scale location or an uneven working surface which is not level. Use level bubble to check working surface.
- Wind makes scales unstable. Use wind cover only if in area where there is an air current that can not be controlled, especially in Match mode.
- Off center placement of weight on the platen. Ensure weight is placed in center of platen.
- Movement of the scale during operation.
- Unfilled dispense tube. After initial set up dispense one charge of 60gn to ensure the dispense tubes are filled with powder, to avoid over/under dispense charges.
- Use only the two calibration weights supplied for accuracy.
- Calibration weight accuracy is crucial. Keep weights clean and carefully stored. If dropped or damaged, have weights inspected against known standards. Contact RCBS Customer Service.
-
Static electricity can cause erratic behavior in the scale, causing weight being displayed to change frequently. If static build-up is evident, wipe scale with an anti-static sheet, or use anti-static spray. Spray on clean soft cloth first. Do not allow spray to get into mechanism.
-
Take precautions from allowing powder or any other foreign debris from getting inside the load cell area. The only way for powder to get inside the load cell area is if the platen is removed and if the tubes are removed when still full of powder. To prevent this from happening ensure the platen is always in place when there is powder in the reservoir. Also ensure the powder from the reservoir and dispense tubes has been completely emptied prior to removing tubes for cleaning. If platen needs to be removed, to clean spilled powder, ensure both tubes are capped to prevent powder from falling out of tubes into load cell area.
- Do not press on the platform with your hand. You can damage the load cell.
RECORD KEEPING
- Keep complete records of reloads. Apply a descriptive label to each box showing the date produced, and the primer, powder and bullet used. Labels for this purpose are packed with SPEER bullets. Never attempt to guess at the identity of your ammunition.
NOTE: The scale was shipped in protective packaging. Save and use for transporting or long-term storage of the unit. See last page for address and Toll-free Customer Service phone number.
Disposal of Electric and Electronic Equipment
(Applicable in the EU and other European countries with separate collection systems)
This equipment contains electric and/or electronic parts and must therefore not be disposed of as normal household waste. Instead, it should be disposed at the respective collection points for recycling provided by the communities. For you, this is free of charge.
If the equipment contains exchangeable (rechargeable) batteries, these too must be removed before and, if necessary, in turn be disposed of according to the relevant regulations (see also the respective comments in this unit's instructions).
Further information about the subject is available at your community administration, your local waste collection company, or in the store where you purchased this equipment.

FCC Statement
This device complies with part 15 of the FCC Rules. Operation is subject to the following two conditions: (1) This device may not cause harmful interference, and (2) this device must accept any interference received, including interference that may cause undesired operation.
This equipment has been tested and found to comply with the limits for a Class B digital device, pursuant to Part 15 of the FCC Rules. These limits are designed to provide reasonable protection against harmful interference in a residential installation. This equipment generates, uses and can radiate radio frequency energy and, if not installed and used in accordance with the instructions, may cause harmful interference to radio communications. However, there is no guarantee that interference will not occur in a particular installation. If this equipment does cause harmful interference to radio or television reception, which can be determined by turning the equipment off and on, the user is encouraged to try to correct the interference by one or more of the following measures:
- Reorient or relocate the receiving antenna.
- Increase the separation between the equipment and receiver.
- Connect the equipment into an outlet on a circuit different from that to which the receiver is connected.
- Consult the dealer or an experienced radio/TV technician for help.
Shielded interface cable must be used with the equipment in order to comply with the limits for a digital device pursuant to Subpart B of Part 15 of FCC Rules. Specifications and designs are subject to change without any notice or obligation on the part of the manufacturer.
GENERAL INFORMATION
The scale should be stored at 4^ F\~122°F (-20°C \~50°C) and used at 50^ F\~86°F (10°C \~30°C), with humidity below 60%. It should never be stored outside of the specified temperatures, which can damage the load cell. If the scale has been sitting at a cool temperature, remove it from the carton and allow it to sit at room temperature for about 30 minutes before using.
Carefully unpack the scale. Look for and identify the following items:
- Scale with Platen
- AC Power Adapter
• One 20 gram and one 50 gram Weights - Powder Pan
- 2 Tube Caps
- Wind cover
- 1 Drain Straw
- Brush
- Instruction Manual
The scale was shipped in protective packaging which should be saved and used for transporting the scale. This packaging is also recommended for long term storage of the unit.
POWER SUPPLY (ADAPTER):
Input: 100VAC \~ 240VAC 50Hz / 60Hz
Output: 12VDC 1 A
Power Consumption:
Max current: 156 mA
Min current:120 mA
SPECIFICATION:
3.0\~1000.0 grains ± 0.1 grain (Standard mode only)
3.00\~300.00 grains ± 0.04 grain (Match mode only)
(1GM = 15.432 GN)
Note: Accuracy is compromised if used under minimum weight.
IMPORTANT:
Treat the scale as you would any fine instrument. MatchMaster is physically very fragile and the load cell can be damaged by the following:
- Pushing down or dropping the scale.
- Pulling up on the platen in such a way that it binds in the load cell.
- A sudden, violent physical shock to the scale.

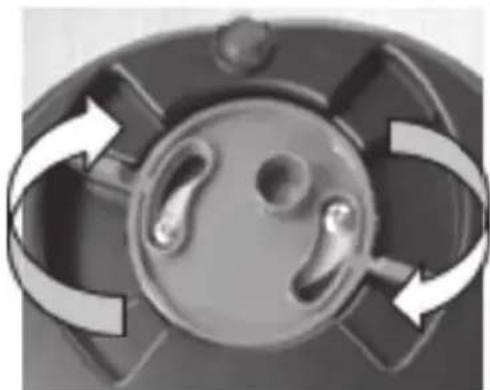
(IMPORTANT!) BEFORE USING THE MATCHMASTER
1. DEACTIVATE THE TRANSPORTATION PROTECTION MECHANISM

CAUTION: The transportation protection mechanism (located at the side of the unit) must be deactivated before using the MatchMaster to prevent potential damage.
Turn on the MatchMaster and press [ZERO] key while counting down. Unstable numbers will show on the display. Turn the M4x8 transportation protection screw clockwise (Photo 1) until numbers on the display stabilize. If the last two numbers are still moving slightly the scale is still stable. When finished, the screw will be recessed 1\~2mm from the surface (Photo 2). Do not exceed a torque of 8 in-lbs (10 kg-cm) as this may damage the mechanism.

natural_image
Abstract curved arrow graphic pointing inward, no text or symbols presentPhoto 1
natural_image
Circular object with a small symbol on a dark surface (no text or symbols visible)Photo 2
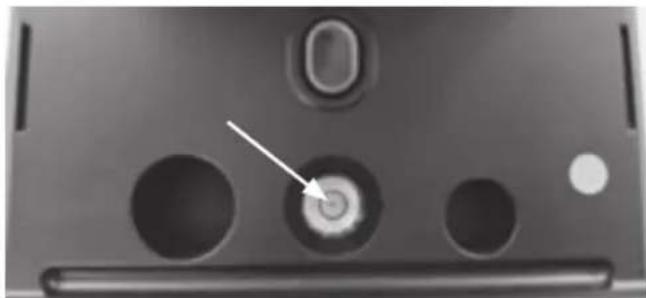
2. ADJUST FEET TO ENSURE SCALE IS LEVEL
Adjust the leveling feet on the front of the MatchMaster, until the bubble is centered in viewing window (Photo 3). Tips: Turn foot clockwise to raise higher. Turn foot counterclockwise to lower. Turn both feet clockwise to move bubble to the front. Turn both feet counterclockwise to move bubble to the back.
natural_image
Close-up of a device's front panel showing three circular ports and a central button (no text or symbols visible)Photo 3
3. STABLE WORK SURFACE
MatchMaster is a high precision scale that is extremely sensitive to vibrations, especially when being operated in Match Mode. Ensure your MatchMaster is used on a solid stable work surface which is isolated from any other reloading activities. Any movement, air currents, or vibrations during operation can alter the dispensing and cause an over or under charge condition.
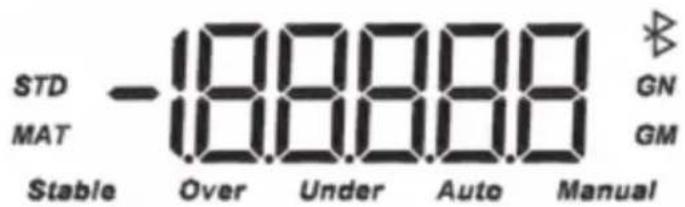
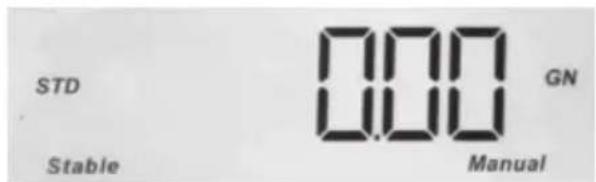
SCALE DISPLAY INDICATORS
STD: Standard mode
MAT: Match mode
GN: weight in Grains
GM: weight in Grams
Stable: indicates the weight is Stable
Over: indicates the powder weight in the pan is higher than the set value, display flashes
Under: indicates the powder weight in the pan is lower than the set value
Auto: indicates in Automatic Dispense Mode
Manual: indicates in Manual Dispense Mode
*: Bluetooth connection indicator
text_image
STD MAT Stable Over Under Auto Manual GN GM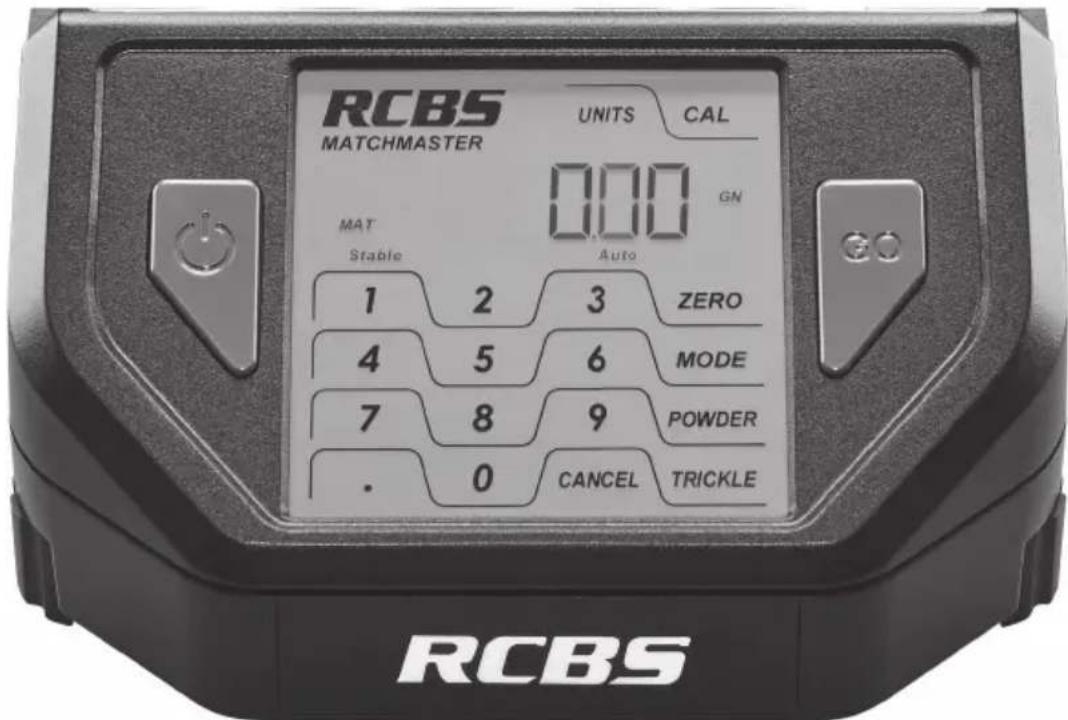
text_image
RCBS MATCHMASTER UNITS CAL 000 GN MAT Stable Auto 1 2 3 ZERO 4 5 6 MODE 7 8 9 POWDER . 0 CANCEL TRICKLE RCBSFUNCTION KEY DESCRIPTION (refer to control panel photo above)
[ ]key powers the scale on and off. When you turn the scale on the display will first show 99999 and will go through a quick count down and display to 0.0 GN (grain mode). "Stable" indicates when ready to use. When the scale is not in use the scale should be turned off and unplugged.
GO: Press [GO] key to dispense the powder once you have entered a given charge. Or press key to stop during dispensing. Pressing [GO] again will resume dispensing.
ZERO: Key is used to re-zero the scale. For example, to weigh powder in a powder pan, you would first place an empty pan on the scale platen and press [ZERO] key to re-zero the scale. This will automatically subtract the weight of the pan from the scale.
POWDER: There are four default powder dispense speed settings (1-4), refer to table in Appendix 1 (pg. 16). These will work in either Standard or Match Mode. Switching from Standard to Match or Match to Standard will automatically switch to the correct default set of parameters.
To set dispense speed, press the appropriate number key, followed by the [POWDER] key. Typically Large to Small Extruded powders would be run at the slower dispense speeds while Ball and Flake type powders would be run at the faster dispense speeds. Keep in mind there are many different powder types with different kernel weights and shapes which attribute to differing flow rates. This prevents some powder types from being run at the faster dispense settings. For example, if you try to run a Large Extruded powder at a Powder Dispense Speed of 4, you will experience an overcharge condition. On the other end of the spectrum, if you run a Ball type powder at a Powder Dispense Speed of 1, the dispense speed will be extremely long. The following speeds are available:
- Powder Dispense Speed 1 (Slowest Dispense Rate)
- Powder Dispense Speed 2
- Powder Dispense Speed 3
- Powder Dispense Speed 4 (Fastest Dispense Rate)
Example: To select a powder dispense speed of 2, press [2] key, followed by [POWDER] key.
TRICKLE : Hold it to manually dispense the powder.
CANCEL: Clear the data or stop the operation.
CAL: Key is used to calibrate the scale. You should calibrate your scale each time you begin a new reloading session. See the calibration section for full details.
UNITS: Key switches scale from GN (grains) to GM (grams). The default is GN.
MODE: Key is used to view/enter menu settings for dispense mode, match/standard mode, Bluetooth, powder type and sound (buzzer). To access and change menu settings, the following keys are used:
- Depress [MODE] key
- Use [2] or [8] key to scroll menu items
- Depress [GO] key to select a menu item
- Use [4] or [6] key to scroll setting values
- Depress [GO] key to select the desired value
The table on the next page lists the menu items along with their available setting values with descriptions. Asterisks denote default setting values (Auto dispense defaults to "on", etc.)
| Menu(use keys [2] or [8]) | Setting value(use keys [4] or [6])(*=default) | Description |
| Auto on*/oFF Auto dispense | ||
| MAtCh on/oFF* Match mode | ||
| bLE | see Bluetooth Setting for more details | |
| nAME Composed of 5 digits | (0~9) | |
| AB Set bluetooth parameters | AB(default AB = 00) | |
| PoWdE | see pg.14, User Defined Powder Configuration for more details | |
| uSr Configure user defined powder configuration 06~20 | ||
| A Powder Size 1~4 | ||
| B Standard/match mode: 0=match,1=standard | ||
| C Weight unit: 0=gm, 1=gn | ||
| D Minimum operation value for large tube: 1~40 | ||
| E Expected large tube stop point:1~99 | ||
| F Expected small tube stop point:0~99 | ||
| G | G_1G_2 Angle and response time for short trickle: 0,0~9,9 | |
| H Expected start point for short trickle:0~99 | ||
| I | I_1I_2 Angle and response time for short trickle: 0,0~9,9 | |
| Sound on*/oFF Buzzer sound | ||
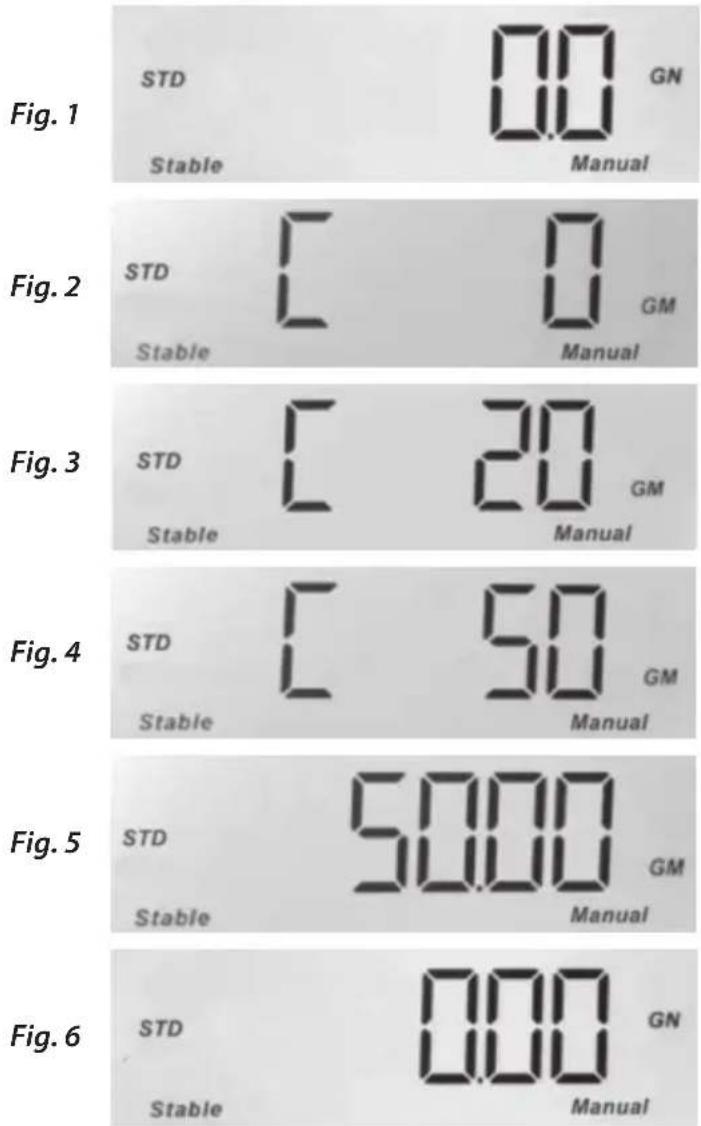
CALIBRATION
Always warm up the scale 15-20 minutes before calibration. Always calibrate your scale before use. This must be done WITHOUT the powder pan on the platen. To calibrate the scale, follow the steps below:
- Be sure the powder pan has been removed from the scale platen. When you turn the scale on, the display will show 99999 across the display for a few seconds and then counts down to display 0.0 GN (grains mode). Once "Stable" is displayed, the scale is ready to be calibrated. See Fig. 1 (next page). Note: The unit will automatically switch to STD (standard) mode (Match mode "oFF") when the calibration process is initiated.
- Next please press [CAL] key on the scale. The display will show C 0, and "GM" will be displayed in the lower right hand corner of the display. See Fig. 2.
- When the display shows C 0 and "Stable" shows up, press the [CAL] key again.
-
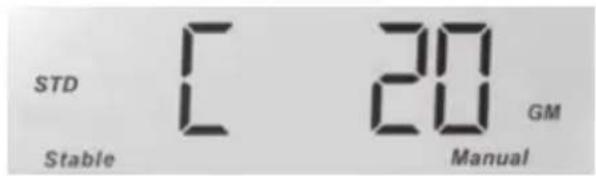
When the display shows C 20, place a 20 gram weight on the platen and when "Stable" is displayed, press the [CAL] key. See Fig. 3.
-
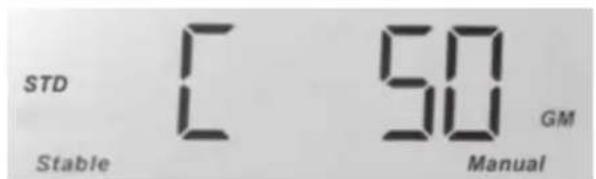
When the display shows C 50, remove the 20 gram weight and add the 50 gram weight to the platen. When "Stable" is displayed, press the [CAL] key. See Fig. 4.
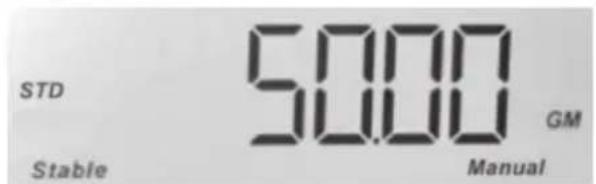
- Now the display will show 50.00g. See Fig. 5. Remove weight from the platen, and place in the weight holders. The display will automatically switch to 0.0 GN (grains) and the scale will beep to confirm calibration is complete.
- Next place the powder pan on the platen and press the [ZERO] key to zero the weight of the pan. The display will show 0.0 GN and is now ready to operate. See Fig. 6.
Notice: During the calibration process, ERROR will be displayed if an incorrect weight is used. Please use only the calibration weights that are provided with the MatchMaster.
SELECT POWDER TYPE BEFORE DISPENSING
Before start, use number key and [POWDER] key to select powder dispense speed. If dispense speed is not selected before dispensing, "Err03" will display.
Note: If selected dispense speed dispenses on target but dispense time is long, select the next higher dispense speed. If the dispense speed selected is fast but causes an overcharge, select the next lower dispense speed.
AUTOMATIC DISPENSE MODE (Factory Default setting)
This allows powder charges to automatically dispense from the unit once an empty scale pan is placed onto the unit and the scale is stable. Follow the steps below to use Auto mode:
-
Press [MODE] key and "Auto" will display. Press [GO] to enter setting. Use [4] or [6] to choose "on" and Press [GO] to set as automatic dispense mode and display shows "Auto".
-
Enter the desired charge weight and press [GO] key to dispense the first charge.
-
Return the empty scale pan onto the scale platen. When the display shows "0.0" the MatchMaster will automatically dispense the charge.
INTERRUPT DISPENSING
• To interrupt and change charge weight:
Dispense charge and leave powder in the scale pan, press [CANCEL] key to interrupt and temporarily change to Manual mode. The display shows "Manual", allowing for changing of the charge weight.
- To continue dispensing from interruption (resume):
Empty scale pan and return it to the scale platen. Press [GO] key to continue auto dispense and the display shows "Auto".
- During dispensing the [GO] button can be depressed to stop dispensing. The [CANCEL] button is depressed to change to Manual Mode and the charge weight can be changed.
When new charge weight is entered, depress [GO] button to continue dispensing to new charge weight.
MANUAL DISPENSING MODE
To operate the MatchMaster in manual dispensing mode if desired, follow the steps below to switch to Manual from the default Auto dispensing mode:
-
Press [MODE] key and display will show "Auto". Press [GO] to enter setting. Use [4] or [6] to choose "oFF" and Press [GO] to set as manual dispense mode and display shows "Manual".
-
Use the number keys to key in the desired weight, and press [GO] key to start the dispensing process. The decimal point must be used to enter charges using tenth grain increments. (e.g., 45.5) Use [CANCEL] key to clear the value and enter new charge weight.
Valid values are: 3.0 - 1000.0 (Standard Mode) and 3.0-300 (Match Mode).
Note: To discard charge weight, press [ZERO] or [CANCEL] key and return to scale mode.
-
After the dispenser has finished dispensing the charge, remove scale pan, empty and return pan to platen. Press [GO] key again to dispense the same weight again. Continue this process if you do not want to change the powder charge.
-
If you need to change the weight, key in the new weight as in Step #1 and press [GO] key.
-
If you are dispensing powder and wish to exit dispensing mode, press [CANCEL] key.
MANUALLY DISPENSING OPERATION WITH TRICKLE KEY
Press [TRICKLE] key to dispense the powder slowly. Release [TRICKLE] key to stop dispensing.
USING MATCH MODE:
Match mode has a resolution of 0.02gn with an accuracy of 0.04gn for a range of 3.00-300.00gn.; however, dispense time will increase. This is for the serious reloader who wants to reduce their velocity extreme spread.
To activate Match Mode, press [MODE] key and "Auto" will display. Use [2] or [8] to choose "MAtCh" and press [GO] key to enter submenu. Use [4] or [6] to choose "on" setting and Press [GO] to set as match mode and display shows "MAT".
Note: The scale is extremely sensitive to wind, vibration, and even static while dispensing in Match Mode. Use wind cover to operate only if necessary. Operation when humidity is above 60% will increase the chance of overshooting, with some Ball type powders. Refer to Appendix 3 (Powder Kernel Weight) for list of various powders and their approximate kernel weight. Remember when dispensing Medium or Large Extruded powder, where the kernel weight is very close to or is heavier than .04gn (which is the accuracy limit of the MatchMaster scale in Match Mode), there is the potential that dispensing only one kernel of powder can create an overcharge condition.
QUICK DRAIN FEATURE
Follow these steps to quickly drain the remaining powder from your dispenser:
- Move MatchMaster along work surface until the back half of the unit is accessible, but making sure the center of mass marking does not go past the edge of the surface (Photo 4). If the mark is positioned beyond the edge, the entire unit might overturn and be damaged.

text_image
Center of mass markPhoto 4
- Insert the provided straw into the center hole of the drain disk. Place powder canister under straw.
- Using the tabs, rotate the drain disc to open it as shown below (Photo 5). You may need to tap on the top of the dispenser to start the powder to drain. The MatchMaster has an audible alarm that will sound when drain is open, this will remain on until drain is closed.
- Use the provided small brush to clean powder off the reservoir.
- When the bulk of the powder has been drained, remove the plastic Hopper from the MatchMaster, this will allow for better access and aid in cleaning the reservoir.
- When "drAin" appears, press [TRICKLE] to rapidly dispense both tubes to clear powder from the inside of the dispense tubes. Press [CANCEL] to stop tube rotation. Make sure there is a scale pan on the platen to catch the powder being dispensed.
- When finished, be sure to rotate and close the drain disc as shown below (Photo 6).
natural_image
Close-up of a mechanical component with circular features and curved arrows indicating rotation or motion (no text or symbols)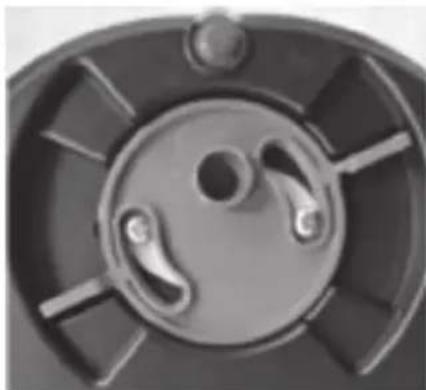
natural_image
Close-up of a mechanical component with circular and radial features (no text or symbols visible)Photo 6Photo 5
OPEN DRAIN WARNING
If the drain spout is left open; when the MatchMaster is powered on, "drAin" will appear and flash on the display. Buzzer also sounds if buzzer is set to "on". This alerts the user that the drain has been left open and needs to be closed prior to adding powder to the reservoir.
CLEAN TUBE SEALS
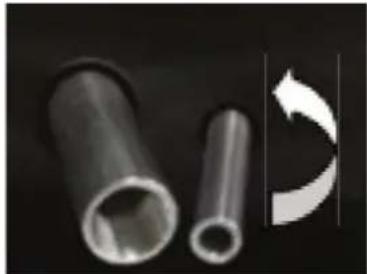
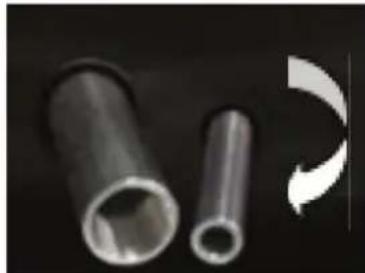
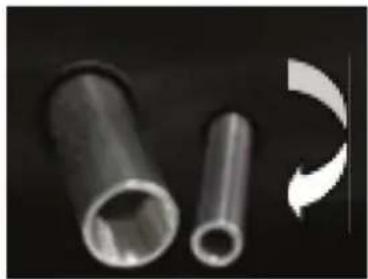
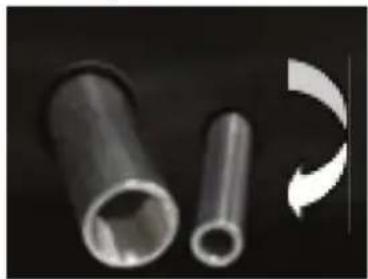
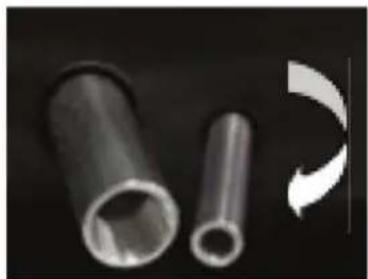
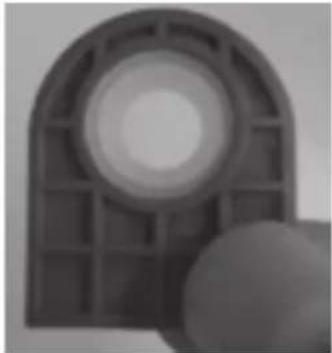
Sometimes powder can get lodged in the tube seals. It is recommend to periodically remove tubes and seals to clean. Turn tubes in a counter-clockwise direction to remove them. Remove seal covers by sliding them up out of the main housing.
Rub seals slightly to ensure seals return to circular shape before placing seals back to seal cover. Insert seal covers back gently. Reinstall tubes by turning tubes clockwise. Then check each tube for any gap between seals and the tube by moving the tube forward and backward. If seals move with tubes, that means the tube is well installed. Otherwise, remove the tube and try to install the tube again starting with rubbing the seals.
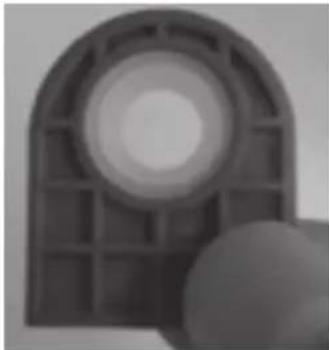
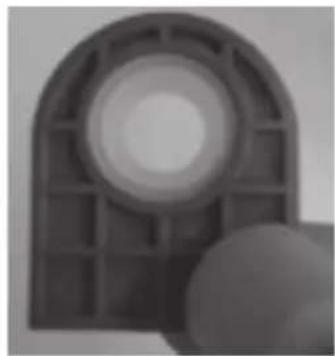
When reinstalling both large and small dispense tubes ensure that both tubes are threaded fully onto motor. This is easily identified by noticing the two witness marks on each of the tubes. With the powder reservoir empty and the tubes installed both witness marks should be visible, see photo. If only one witness mark is visible the tube is not threaded onto the motor shaft fully. Remove tube and check to ensure there is no debris or powder lodged in the threads. Reinstall tube and thread tube completely onto motor shaft until both witness marks are visible.
natural_image
Two metallic cylindrical pipes with a curved arrow symbol on the right side (no text or labels)Remove Tubes
natural_image
Two metallic cylindrical pipes with hollow centers, one partially visible and the other with a curved arrow indicating rotation (no text or symbols)Install Tubes
natural_image
Close-up of a mechanical component with a circular hole and grid pattern (no visible text or symbols)
text_image
1 WITNESS LINES VISIBLE TUBES NOT INSTALLED CORRECTLY
text_image
2 WITNESS LINES VISIBLE TUBES INSTALLED CORRECTLYBLUETOOTH DOWNLOAD/CONNECT TO RCBS APP (optional)
- Download the RCBS App from the App Store (Apple ^® devices) or Google Play (Android ^™ devices). Turn on Bluetooth on your mobile device and open the RCBS app.
- Sign up by selecting a Username and Password and entering the other requested information.
- Register your device by naming it ("MatchMaster" is a good choice) and entering its serial number.
- Swipe down on the arrow at the bottom of the screen to connect your device. You will arrive at the Home screen.
- If you are properly connected, you will see a green icon in the upper-right corner of the screen. If you need to update or adjust your connected device, tapping this icon will take you to the Manage Devices screen.
- On the Home screen itself, you will see four main functions: Dispense Powder, Calibrate, Configurations and Load Log.
Note: If app "locks up" (iPhone/iPad), close app by double clicking home screen button then swiping up on RCBS App window.
text_image
1 RCBS 2 Sign Up Username First Name Last Name Email Password Confirm Password Durable United Device SIGN UP 3 Register Device Device name Serial Number REGISTER 4a Connect your device to RCBS MATCHMASTER SKIP 4b 5a Matchmaster01 5b Matchmaster01 MANAGE DEVICE Add Device 4c Verizon LTE 4:43 PM 100% MATCHMASTER Ready to calibrate? Chances of an overthrow can be reduced when your Matchmaster is calibrated. LET'S CALIBRATE Load Log Powder Settings Dispense Calibrate iPhone® is a registered trademark of Apple Inc. Android™ is a trademark of Google Inc.BLUETOOTH OPERATION
Bluetooth Setting
Press the [MODE] key and use [2] or [8] to choose "bLE". Press [GO] to enter the Bluetooth settings menu. You can choose from the following settings:
-
"nAME"—the Bluetooth name consists of five digits (0–9). Press [GO] to save the name.
-
"AB" — These are the settings for the Bluetooth parameters.
"A" governs the Pair/Unpair mode settings:
0 = Unpair mode (default)
1 = Pair mode
"B" controls the Link Password settings:
0 = Link Password disabled (default)
1 = Link Password enabled
Press [GO] to save your A and B parameters.
Unpair mode does not bind your mobile device with the MatchMaster. Since the MatchMaster is BLE-enabled, it can still connect to the app without going through the traditional Bluetooth pairing process. Pairing with the device is still offered as an option for extra security.
To operate in Pair mode, you must ensure that the MatchMaster is ready to pair each time you use it. The RCBS logo will flash when the MatchMaster is ready to pair. At that point, the app should be able to connect to your MatchMaster.
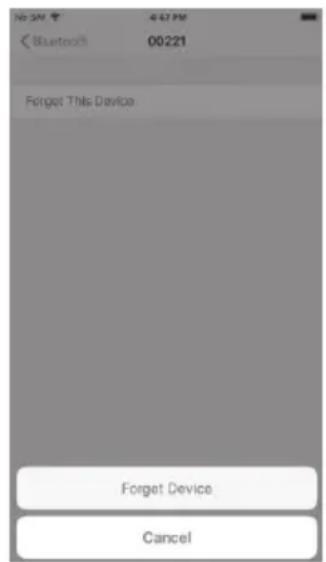
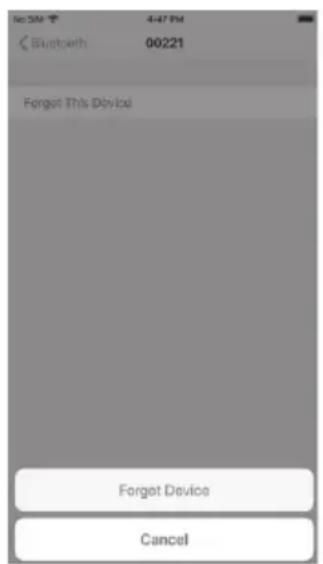
Troubleshooting in Pair Mode (iOS/Apple ^® devices)
If you are having trouble connecting to your MatchMaster device, even after successfully pairing with it the first time, take the following steps:
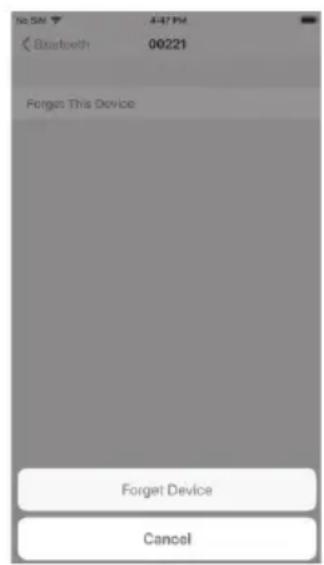
- In your Bluetooth settings, locate the RCBS MatchMaster and press its blue info icon.
- Choose "Forget This Device".
- Now you can follow the pairing steps above to reconnect your app to the MatchMaster.

text_image
No SN 4:47 PM Settings Bluetooth Bluetooth Now discoverable as "iPhone" MI DEVICES 00221 Not Connected ① OTHER DEVICES MI Phone To join an Apple Watch with your iPhone, go to the Watch 480.Step 1

text_image
NSM 407PN < Bluetooth 00221 Forget This DeviceStep 2

text_image
Bluetooth 00221 Forget This Device Forget Device CancelStep 3
NOTE: This type of connection problem can occur because iOS does not unbind from Bluetooth-connected devices by default, even when you disconnect from them. For this reason, the user has to 'forget' the MatchMaster manually to re-establish the connection.
Set Bluetooth Link Password
Press [MODE] key and Use [2] or [8] to choose "bLE". Then press [CAL] key. The display shows "PW". After entering the new password, press [GO] key to save. Default password is 00000.
Clear Bluetooth Link and Wait for Pairing
Press [MODE] key and Use [2] or [8] to choose "bLE". Then press [ZERO] key instead of [GO] key, the display shows "CLinK" and then press [GO] key to clear Bluetooth link and wait for pairing. If it is connected, it will disconnect first.
USER DEFINED POWDER CONFIGURATION
This section is for those who want to increase the efficiency of their dispensing and make improvements on the current default powder configuration settings. Since there are four different dispense speeds and several different MatchMaster units, default settings are established to accommodate all. Having the ability to adjust these settings allows the user to fine tune the powder dispense configuration parameters and increase performance.
Press [MODE] key and Use [2] or [8] to choose "PoWdE". Then press [GO] key, the display shows the last edited "uSr" configuration. Press [GO] key to enter this user configuration and modify values or [CANCEL] key to exit. User defined Parameters will only be saved after pressing [GO] after the last parameter, "I", is entered. After [GO] is depressed "Test" will display. This allows the user the option to step through parameter settings "E-I" individually. Detailed instructions of this process can be found in Appendix 5 (pg. 19). If you choose not to step through the powder configuration simply depress [CANCEL] when Test is displayed. The parameters entered will be saved and dispensing can be started.
Note: At any time during the process, press [CANCEL] key to exit without saving any parameters. When using one of the uSr defined powder configurations (uSr 06-20), you can not switch between standard and match mode as you can when using the default settings. If wanting to switch between standard and match the uSr configuration must be modified. This is accomplished with parameter "B".
- uSr: enter 6\~20 to configure user defined powder (uSr 6\~20). Press "Go" to edit parameter A\~I. After entering each parameter, press "Go" to enter the next parameter.
Detailed descriptions for parameters A\~I (see Appendix 4, Detailed Explanation of Powder Dispense Parameters)
- A: Powder Size 1\~4
1 = Large-Heavy (Lg. Extruded or Lg. Ball Powders)
2 = Medium (Med-Small Extruded or Med. Ball Powders)
3 = Small (Small Extruded or Small Ball Powders)
4 = Small-Light (Lg and Sm Flake or Small Extruded & Ball Powders)
- B: Standard/match mode setting: 0=match, 1=standard
- C: Weight unit: 0=gm, 1=gn
- D: Minimum operation value for large tube: 1\~40 gn.
- E: Expected large tube stop point: 1\~99.
- F: Expected small tube stop point: 0\~99. The smaller number means the small tube will be expected to stop nearer to the target weight.
- G: G_1G_2 Angle and response time for long trickle: 0,0\~9,9
a. Rotating time for long trickle = (G_1+1)*100ms . (0=Min Rotation, 9=Max Rotation)
b. Response time for long trickle = (G _2 +1)*250ms (0=Min Response, 9= Max Response)
-
H: Expected start point for short trickle: 0-99.
-
I: I_1I_2 Angle and response time for short trickle: 0,0\~9,9
a. Rotating time for short trickle = (I _1 +1)*25ms. (0=Min Rotation, 9=Max Rotation)
b. Response time for short trickle = (I _2 +1)*250ms. (0=Min Response,9= Max Response)
Note: for parameters E-I, it is essential to take in account the momentum of the powder, when adjusting parameters. This is the benefit of the step function, which allows the user to set a parameter and visualize the end result for the parameter only. Ex: "E" parameter is set to stop at 5 gn from target. The tube will stop at 5 gn from target; however, the momentum of powder will take the result to 3 gn from target.
Press [CANCEL] anytime to exit the setting and return to weighing.
ERROR MESSAGES
| ERR01 Invalid uSr parameter value or use of undefined uSr |
| ERR02 Invalid input range. Example: attempt to select uSr 99 |
| ERR03 Powder type not specified |
| ERROR Other error |
STORAGE AND SHIPPING
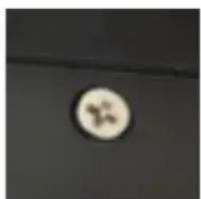
Before storing or shipping the MatchMaster, please activate the transportation protection mechanism by turning the screw at the side counter-clockwise, then removing it or leaving it in a "popped out" state (see photo below). To do this, turn on MatchMaster and press zero key while scale is counting down. Numbers displayed will be stable. Rotate transportation screw counter-clockwise until numbers on the display are no longer stable, this informs the user the protection mechanism is activated. If the screw is removed please be sure to keep the screw with the unit for use next time. If the screw is missing, any M4x8 fl at head screw or round head screw can be used. After activating the transportation protection mechanism, place MatchMaster into its original package and ensure that it is stored at 4^ F\~122°F (-20°C \~50°C).

natural_image
Abstract graphic with curved arrow and circular element (no text or symbols)Turn counter-clockwise
natural_image
Close-up of a circular metallic object with a star-like mark on its surface (no text or symbols visible)Protection activated (screw popped out or removed)
CHECKING THE FIRMWARE VERSION
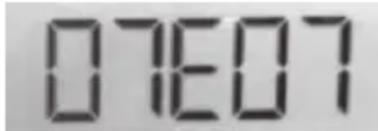
Switch on MatchMaster and press [UNIT] key while counting down, and display will show "02028". To check the main board's firmware, press [ZERO] and the display will show "XXX". The main board's firmware version is 02028XXX. To check the touch board's firmware, press [.] (to left from the number 0) The display will show "17005" and then "XXX". The touch board's firmware version is 17005XXX.
The Bluetooth ^® word mark and logos are registered trademarks owned by Bluetooth SIG, Inc. and any use of such marks by RCBS/Vista Outdoor Inc. is under license. Other trademarks and trade names are those of their respective owners.
Appendix 1: DEFAULT POWDER CONFIGURATION SETTINGS
| POWDER DISPENSE SPEED | SLOW FAST | |||||||
| 1 2 3 4 | ||||||||
| POWDER EXAMPLE | RELODER50RELODER 15 300-MP BULLSEYE | |||||||
| MODE | STANDARD | MATCH | STANDARD | MATCH | STANDARD | MATCH | STANDARD | MATCH |
| A | 1 | 1 | 2 | 2 | 3 | 3 | 4 | 4 |
| B | 1 | 0 | 1 | 0 | 1 | 0 | 1 | 0 |
| C | 1 | 1 | 1 | 1 | 1 | 1 | 1 | 1 |
| D | 22 | 22 | 22 | 22 | 15 | 15 | 6 | 6 |
| E | 18 | 18 | 8 | 8 | 7 | 7 | 3 | 3 |
| F | 35 | 35 | 26 | 26 | 20 | 20 | 10 | 10 |
| G | 43 | 33 | 61 | 41 | 50 | 31 | 41 | 21 |
| H | 25 | 25 | 20 | 20 | 15 | 15 | 5 | 5 |
| I | 12 | 14 | 22 | 13 | 23 | 03 | 22 | 13 |
Appendix 2: 7-SEGMENT DISPLAY CHARACTERS
| Char | Display | Char | Display | Char | Display |
| A |  | M | 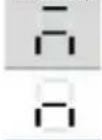 | Y | 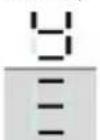 |
| B | N | Z | |||
| C |  | O |  | 0 |  |
| D |  | P |  | 1 |  |
| E | Q | 2 | |||
| F |  | R 3 |  |  | |
| G | 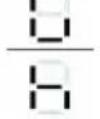 | S |  | 4 |  |
| H | T | 5 | |||
| I | 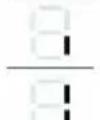 | U 6 | 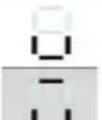 |  | |
| J | V 7 | ||||
| K | 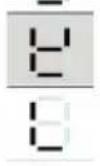 | W | 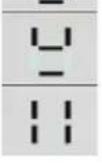 | 8 | 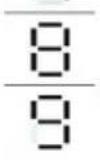 |
| L | X 9 |
Appendix 3: POWDER KERNEL WEIGHT
| Approximate Kernel Weight Reference | |||||
| Item | Powder Type Powder | Manufacturer | Powder Preferred Dispense Speed * | Unit Weight (Gn) | |
| 1 | Extruded Hodgdon Retumbo 1 - | ||||
| 2 | Extruded Alliant Reloder 33 1 0.0570 | ||||
| 3 | Extruded Hodgdon H50BMG 1 0.0680 | ||||
| 4 | Extruded IMR IMR 7828 1 0.0388 | ||||
| 5 | Extruded Alliant Reloder 50 1 - | ||||
| 6 | Extruded Hodgdon | H4350 | 1 0.0278 | ||
| 7 | Extruded Hodgdon | H4831SC | 1 0.0362 | ||
| 8 | Extruded Alliant | 4000-MR | 1 - | ||
| 9 | Ball | Hodgdon | H335 | 1 or 2 | - |
| 10 | Extruded IMR | 4350 1 or 2 | - | ||
| 11 | Ball | Hodgdon | H414 | 2 0.0048 | |
| 12 | Extruded | Vihtavuori | N165 | 2 | - |
| 13 | Extruded | Vihtavuori | N150 | 2 | - |
| 14 | Extruded Hodgdon | Varget | 2 0.0198 | ||
| 15 | Extruded Alliant | Reloder 22 | 2 0.0300 | ||
| 16 | Extruded Alliant | Reloder 19 | 2 0.0400 | ||
| 17 | Extruded Alliant | Reloder 7 | 2 0.0084 | ||
| 18 | Extruded Alliant | Reloder 17 | 2 0.0260 | ||
| 19 | Extruded | Vihtavuori | N135 | 2 | 0.0094 |
| 20 | Extruded | Vihtavuori | N140 | 2 or 3 | - |
| 21 | Extruded | Alliant | Reloder 15 | 2 or 3 | 0.0163 |
| 22 | Ball | Hodgdon US 869 | 3 0.0084 | ||
| 23 | Ball | Alliant | 300-MP 3 0.0009 | ||
| 24 | Ball | Hodgdon | H380 | 3 | - |
| 25 | Ball | Winchester | 296 | 3 | - |
| 26 | Ball | Alliant | 2000-MR | 3 0.0050 | |
| 27 | Ball | IMR | 4227 | 4 0.0042 | |
| 28 | Ball/Flake Vihtavuori | 3N37 | 4 | - | |
| 29 | Extruded | IMR | 4895 | 4 | - |
* If you find that one powder dispense speed provides inconsistent results, try another powder Dispense Speed setting (1-4). Remember a setting of 1 will yield slower dispense times, whereas a setting of 4 will yield faster dispense times and may result in an overcharge condition.
Appendix 4: DETAILED EXPLANATION OF POWDER DISPENSE PARAMETERS (Ex=Example)
A - Powder Size - Powders have different flow characteristics based on their shape and weight. This parameter will determine the correct transition speed for the Large tube based on the powder size. It also stops the scale short of the desired target weight, but within tolerance, by the amount listed below for each setting. This is important for large-heavy powders where a kernel of powder can weigh in excess of 0.07gn.
Ex. if dispensing Lg-Heavy extruded powder where kernel weight is 0.07gn. and target weight is 250.00gn. the scale will stop if within 0.04gn from target weight, which is 249.96gn. If dispensing were to continue and one kernel was dispensed the end result would be 250.03gn. which is still within tolerance; however if 2 kernels were dispensed, an overcharge condition would result.
1=Large-Heavy (Lg. Extruded or Lg. Ball Powders) (0.04 gn from Target weight)
2=Medium (Med-Small Extruded or Med. Ball Powders) (0.02 gn from Target weight)
3=Small (Small Extruded or Small Ball Powders) (0.02 gn from Target weight)
4=Small-Light (Lg and Sm Flake or Small Extruded & Ball Powders) (0.00 gn from Target weight)
Note: The "A" parameter prevents overcharge condition without sacrificing dispense times. If you find that the dispense weight is consistently short of desired Target weight by 0.02 or 0.04gn, try increasing the Parameter "A" value.
B - Mode - Sets the dispensing mode to either Standard Mode or Match Mode.
- Match Mode (+/-.04gn) = 0
- Standard Mode (+/- .1gn) = 1
C - Units - Sets the correct units that are to be used.
- Grams = 0
- Grains = 1
D - Large Tube Operation - Controls Large tube operation (1-40).
- If target weight is greater or equal to D the Large tube will Rotate.
- If target weight is less than D the Large tube will Trickle, or will not be used.
- D will normally not need to be adjusted from default setting, unless the target weight is approximately 22 grains or less, and is equal to or up to two units greater than D. This condition can cause an over charge condition with certain powders. If this happens increase the D parameter to one over the target weight.
E - Large Tube Stop Point - Controls when the large tube stops from target weight, each division represents 0.5gns. (Range 1-99)
Ex: If E=5, then (5) X (0.5gn) = 2.5 gn.
Large Tube will stop 2.5 gn from target.
F - Small Tube Long Trickle Start - Stop of Small tube constant rotation, each division represents 0.02gns. (Range 0-99);
Ex: if F=20, then (20) x (0.02) = .40gn.
Small Tube Long Trickle operation will start at .12gn from target.
G - Small Tube Long Trickle Operation - Rotation time and response time for long trickle, (G_1, G_2) . (Range 00-99)
- G1 = Controls the time of rotation before stop (0-9); where 0=100ms and 9=1000ms)
- G2 = Controls the response time between stop and start of rotation (0-9); where 0=250ms and 9=2500ms)
Ex: Fastest Dispense = (90); Max time of rotation, Minimum response time.
Ex: Slowest Dispense = (09); Min time of rotation, Maximum response time.
H - Small Tube Short Trickle Start - Stop of Small tube Long Trickle, each division represents 0.02gns. (Range 0-99);
Ex: if H=6, then (6) x (0.02)=.12gn.
Small Tube Short Trickle operation will start at .12gn from target.
I - Small Tube Short Trickle Operation - Angle and response time for Short Trickle, (I_1,I_2) (Range 00-99)
- 11 = Controls the time of rotation before stop (0-9); where 0=25ms and 9=250ms
- I2 = Controls the response time between stop and start of rotation (0-9); where 0=250ms and 9=2500ms)
Ex: Fastest Dispense = (90); Max time of rotation, Minimum response time.
Ex: Slowest Dispense = (09); Min time of rotation, Maximum response time.
Appendix 5: POWDER DISPENSE PARAMETER STEP FUNCTION
This feature allows the user the ability to step through the user defined powder dispense parameters, E thru I.
- Upon completion of setting Powder Dispense Parameters, A-I; depress "GO" to save, "Test" will display.
- If you choose not to run test and step through parameters, E-I; depress the "Cancel" button to exit out of Test and begin dispensing.
- If a test is desired on the recently set Powder Dispense Parameters depress "GO" to begin step operation.
- Enter target dispense weight and depress "GO".
- Unit will dispense until it reaches parameter "E", dispensing will stop and the display will flash between the dispensed weight and Parameter "E". If unit finishes dispensing and displays Parameter "A", the parameters entered caused an overcharge condition. When this happens the unit will default back into user configuration and the parameters will need to be modified. Make sure parameter "A" represents the size of powder being used.
- If parameter "E" does not need to be changed, press "GO" to accept and continue to parameter "F".
- If parameter "E" needs to be changed, depress the "CAL" button. Parameter "E" will display, the value to the right of E will be changed, the value to the left of E will not change as this is the recommended setting and is displayed only as a reference. Enter desired value and press "GO" to accept.
-
After parameter has been changed:
-
Empty scale pan
- Enter charge weight
- Depress "GO" to dispense.
text_image
07607- Unit will dispense until it reaches parameter "E". If value is acceptable depress "GO" to continue Step process to parameter "F", if not repeat steps 7-8 above.
-
Unit will dispense until it reaches parameter "F".
-
If value is accepted depress "GO" to continue Step process and test parameter "G".
- If value needs to be modified follow the same process as described in steps 7-8 for parameter "E".
Note: when step process is run it will start over and step through previous parameters, i.e., dispense until parameter "E" and stop, depress "GO" to accept and continue to parameter "F"
-
If Parameter "F" has been accepted and "GO" is depressed, the Long Trickle operation, parameter "G" will begin and trickle until Parameter "H" is reached.
-
Display will flash between weight and parameter "G".
- If "G" is acceptable depress "GO" to display parameter "H"
- If parameter "G" needs to be changed depress the "CAL" button. Parameter "G" will display. Change the value and select "GO" to accept.
- Empty Scale pan
- Enter charge weight
- Depress "GO" to dispense
-
Unit will step through Parameters, E-G, depress "GO" at each step to accept; if parameters produce desired results. If not, depress "CAL" at any step to modify value.
-
When Parameter "H" is displayed and accepted, depress "GO" to accept and proceed to Parameter "I".
-
If Parameter "H" needs to be modified, depress "CAL" and modify the value to produce desired stop point. Select "GO" to accept.
- Empty Scale pan
- Enter charge weight
- Depress "GO" to dispense
-
Unit will again step through all previous Parameters. Follow process above to accept or modify parameters.
-
If Parameter "H" has been accepted and "GO" is depressed, the Short Trickle operation, parameter "I" will begin and trickle until the desired target dispense charge is reached.
-
Display will flash between weight and parameter "l".
- If "I" is acceptable depress "GO" to accept and complete Step Process.
- If parameter "I" needs to be changed depress the "CAL" button. Parameter "I" will display. Change the value and select "GO" to accept.
- Test will appear on the display, depress "GO" to continue test
- Empty Scale pan
- Enter charge weight
- Depress "GO" to dispense
-
Unit will step through all Parameters, depress "GO" to accept if parameters produce desired results. If not, depress "CAL" to modify any of the values.
-
When step process reaches Parameter "I" and all values have been accepted, depress "GO" to exit out of Step Function. Empty scale pan, enter desired charge weight and begin dispensing using your new User defined Powder Dispense Parameters.
ONE YEAR LIMITED WARRANTY
Your MatchMaster Powder Scale/Dispenser is warranted to be free from defects in material or workmanship for one year from the date of purchase. This warranty is extended only to the original consumer purchaser. All RCBS products are intended for non-commercial use by hobbyists. Any other use of these products will void the warranty. Should you believe that your MatchMaster Powder Scale/Dispenser is defective in material or workmanship, you must return it to RCBS, postage paid for evaluation. If defective, the product will be repaired or replaced at RCBS' option, at no charge.
Send a dated proof of purchase to RCBS for return shipping and handling, along with the MatchMaster Powder Scale/Dispenser to:
RCBS
605 Oro Dam Blvd East
Oroville, California 95965
Warranty services cannot be provided without meeting the above requirements.
THIS ONE YEAR LIMITED WARRANTY DOES NOT COVER DEFECTS OR DAMAGE RESULTING FROM: CARELESSNESS, MISUSE, COMMERCIAL USE, ABUSE, IMPROPER INSTALLATION, MODIFICATION, OR NORMAL WEAR AND TEAR. THE IMPLIED WARRANTIES OF MERCHANTABILITY AND FITNESS FOR A PARTICULAR PURPOSE ARE LIMITED TO THE DURATION OF THIS ONE YEAR LIMITED WARRANTY. RCBS IS NOT LIABLE FOR DAMAGES IN EXCESS OF THE PURCHASE PRICE OF THE PRODUCT AND UNDER NO CIRCUMSTANCES SHALL RCBS BE LIABLE FOR CONSEQUENTIAL OR INCIDENTAL DAMAGES. HOWEVER, SOME STATES DO NOT ALLOW LIMITATIONS ON INCIDENTAL, OR CONSEQUENTIAL DAMAGES, SO THE ABOVE LIMITATION OR EXCLUSION MAY NOT APPLY TO YOU.
The above warranty provides the sole and exclusive warranty available to the customer in the event of a defect in material or workmanship in the reloading product. This warranty gives you specific legal rights, and you may also have other rights which vary from State to State.
CONTACT US:
RCBS
605 Oro Dam Blvd East
Oroville, California, 95965
1-800-533-5000 (US or Canada)
E-mail: rcbs.tech@vistaoutdoor.com
Website: www.rcbs.com
Sommaire
CONSERVATION DES INFORMATIONS
natural_image
Simple curved arrow pointing inward, no text or symbols presentPhoto 1

natural_image
Close-up of a circular metallic object with a small mark on a dark surface (no text or symbols visible)2. AJUSTEZ LES PIEDS DE LA BALANCE POUR VOUS ASSURER QU'ELLE EST À NIVEAU
natural_image
Close-up of a device's front panel showing circular ports and a central button (no text or symbols visible)Photo 3
3. SURFACE DE TRAVAIL STABLE
text_image
STD Stable 1 2 GM ManualFig. 3
text_image
STD Stable 20 GM ManualFig. 4
text_image
STD C 50 GM Stable ManualFig. 5
text_image
STD 50.00 GM Stable ManualFig. 6
text_image
STD Stable 0.00 GN 0.00 ManualCHOISIR LE TYPE DE POUDRE AVANT LA DISTRIBUTION
natural_image
Close-up of a mechanical component with circular features and curved arrows indicating rotation or motion (no text or symbols)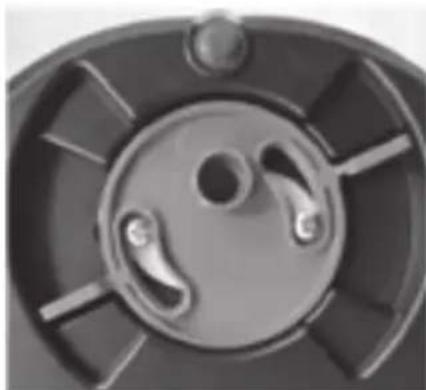
natural_image
Close-up of a mechanical component with circular and radial features (no visible text or symbols)Photo 6Photo 5
AVERTISSEMENT DE DRAIN OUVERT
natural_image
Two metallic cylindrical pipes with a white arrow indicating rotational motion (no text or symbols)Retirer les tubes
natural_image
Two metallic cylindrical pipes with a curved arrow indicating rotation (no text or symbols)Installer les tubes
natural_image
Close-up of a mechanical component with a circular hole and grid pattern (no visible text or symbols)
text_image
1 REPÈRE VISIBLE : TUBES INCORRECTEMENT INSTALLÉS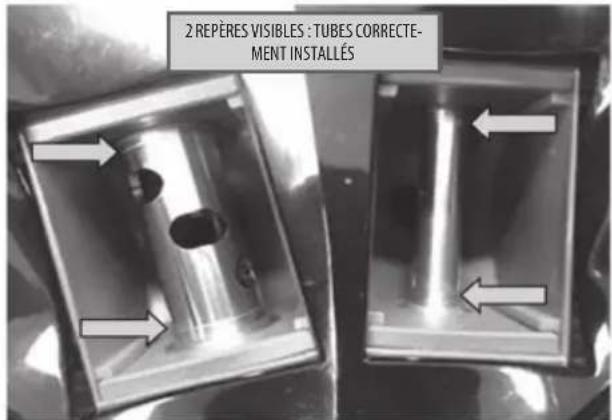
text_image
2 REPÈRES VISIBLES : TUBES CORRECTE- MENT INSTALLÉSTÉLÉCHARGEMENT/CONNEXION À L'APPLICATION RCBS VIA BLUETOOTH (facultatif)
text_image
No SN 4:07 PM Settings Bluetooth Bluetooth Now is recoverable as "Omnic" MY DEVICES 00221 Not Connected ① OTHER DEVICES MI Phone To pair an Apple Watch with your iPhone, go to the Watch 800.Étape 1

text_image
No SM 4:07 PM Bluetooth 00221 Forget This DeviceÉtape 2
text_image
16:30 42 PM Bluetooth 00221 Forget This Device Forget Device CancelÉtape 3
natural_image
Abstract curved arrow graphic with a circular element and a small symbol inside (no text or labels)natural_image
Close-up of a circular object with a star-like symbol on its surface, against a dark background (no text or symbols visible)- Grammes = 0
- Grains = 1
605 Oro Dam Blvd East
605 Oro Dam Blvd East
natural_image
Abstract curved arrow graphic pointing inward, no text or symbols presentFoto 1

natural_image
Close-up of a circular metallic object with a small symbol on the surface (no text or markings visible)Foto 2
2. AJUSTE LAS PATAS PARA ASEGURAR QUE LA BÁSCULA ESTÁ NIVELADA
natural_image
Close-up of a device's front panel showing circular ports and a central button (no text or symbols visible)Foto 3
3. SUPERFICIE DE TRABAJO ESTABLE
natural_image
Close-up of a mechanical component with three curved arrows indicating rotational or directional motion (no text or symbols)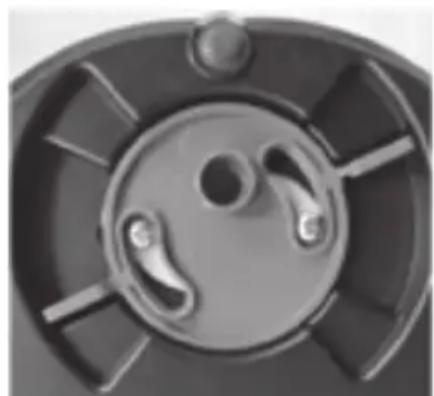
natural_image
Close-up of a mechanical component with circular and radial features (no visible text or symbols)Foto 6Foto 5
ADVERTENCIA DE DRENAJE ABIERTO
natural_image
Two metallic cylindrical pipes with a white arrow symbol indicating rotation or refresh (no text or labels)Quitar tubos
natural_image
Two metallic cylindrical pipes with hollow centers, one partially offset by a curved arrow (no text or symbols visible)Instalar tubos
natural_image
Close-up of a mechanical component with a circular hole and grid pattern (no visible text or symbols)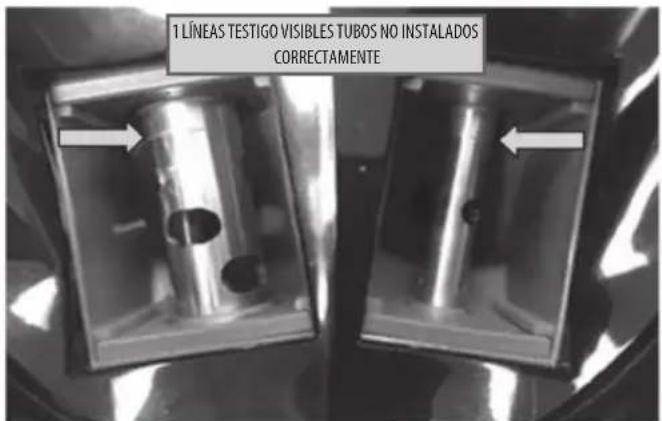
text_image
1 LÍNEAS TESTIGO VISIBLES TUBOS NO INSTALADOS CORRECTAMENTE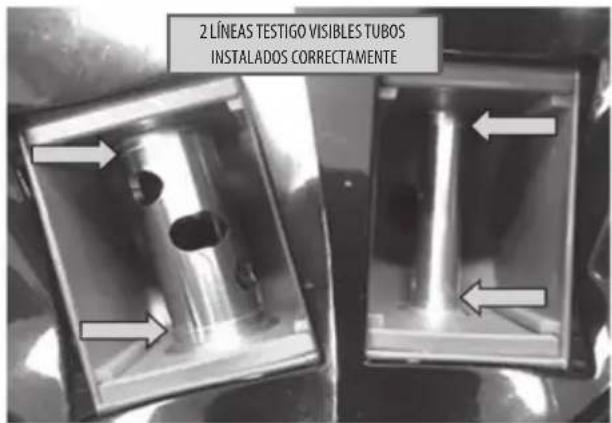
text_image
2 LÍNEAS TESTIGO VISIBLES TUBOS INSTALADOS CORRECTAMENTEtext_image
No SN 4:47 PM Settings Bluetooth Bluetooth Now discoverable as "iPhone" MI DEVICES 00221 Not Connected ① OTHER DEVICES MI Phone To join an Apple Watch with your iPhone, go to the Watch 480.Paso 1

text_image
No. SM 4:47 PM Bluetooth 00221 Forget This DevicePaso 2
text_image
No.5M 447 PM Bluetooth 00221 Forget This Device Forget Device CancelPaso 3
natural_image
Abstract curved arrow graphic with a circular symbol inside, no text or symbols presentnatural_image
Close-up of a circular object with a star-like symbol on a dark surface (no text or symbols visible)605 Oro Dam Blvd East
Oroville, California 95965
605 Oro Dam Blvd East
Oroville, California, 95965
natural_image
Simple curved arrow pointing inward, no text or symbols presentBild 1

natural_image
Close-up of a circular metallic object with a small symbol on the surface (no text or markings visible)Bild 2
2. FÜSSE SO EINSTELLEN, DASS DIE WAAGE GERADE STEHT
natural_image
Close-up of a device's front panel showing circular ports and a central button (no text or symbols visible)Bild 3
natural_image
Top-down view of a mechanical component with three circular slots and directional arrows indicating rotation (no text or symbols)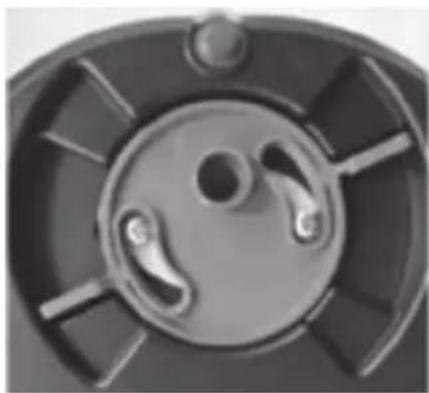
natural_image
Close-up of a mechanical component with circular and radial features (no text or symbols visible)Bild 6Bild 5
WARNUNG BEI GEÖFFNETEM ABLASS
natural_image
Two metallic cylindrical pipes with hollow centers, one with a curved arrow indicating rotation (no text or symbols)Rohre herausnehmen
natural_image
Two metallic cylindrical pipes with a curved arrow indicating rotation (no text or symbols)Rohre einsetzen
natural_image
Close-up of a mechanical component with a circular recess and grid pattern (no visible text or symbols)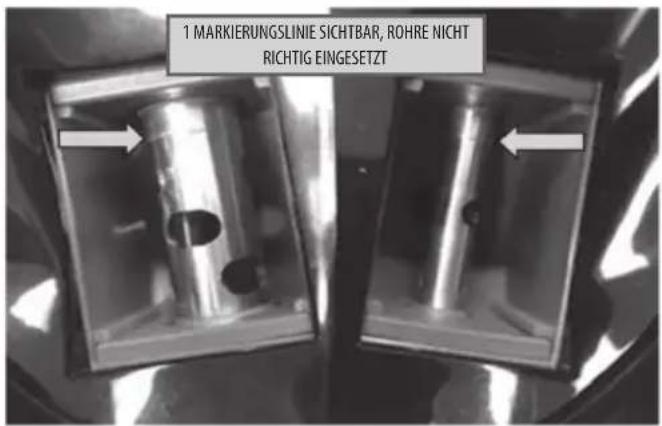
text_image
No SN 4:47 PM Settings Bluetooth Bluetooth Now discoverable as "Phone". My Devices 00221 Not Connected OTHER DEVICES Mi Phone To join an Apple Watch with your iPhone, go to the match app.Schritt 1

text_image
Re SM 4:47 PM < Bluetooth 00221 Forget This DeviceSchritt 2
text_image
No. 5M 44719 Bluetooth 00221 Forget This Device Forget Device CancelSchritt 3
natural_image
Abstract curved arrow graphic with a circular element and cross symbol (no text or labels)natural_image
Close-up of a circular object with a star-like symbol on a dark surface (no text or symbols visible)- Gramm = 0
- Körner = 1
605 Oro Dam Blvd East
Oroville, California 95965, USA
605 Oro Dam Blvd East
Oroville, California, 95965, USA
natural_image
Simple curved arrow pointing inward toward a circular object with a plus symbol (no text or labels)Foto 1
natural_image
Close-up of a circular object with a small symbol on its surface, against a dark background (no text or symbols visible)Foto 2
2. REGOLARE I PIEDINI PER IN MODO CHE LA BILANCIA SIA IN BOLLA
natural_image
Close-up of a device's front panel showing three circular ports and a central button with an arrow pointing to the center (no text or symbols visible)Foto 3
3. SUPERFICIE DI LAVORO STABILE
text_image
STD Stable 1 0 GM ManualFig. 3
text_image
STD C 20 GM Stable ManualFig. 4
text_image
STD C 50 GM Stable ManualFig. 5

text_image
STD 50.00 GM Stable ManualFig. 6
text_image
STD Stable 0.00 GN 0.00 Manualnatural_image
Close-up of a mechanical component with circular features and curved arrows indicating rotation or motion (no text or symbols)
natural_image
Close-up of a mechanical component with circular and radial features (no visible text or symbols)Foto 6Foto 5
AVVISO DI SCARICO APERTO
natural_image
Two metallic cylindrical pipes with hollow centers, one with a curved arrow indicating rotation (no text or symbols)Rimozione tubi
natural_image
Two metallic cylindrical pipes with hollow centers, one partially rotated by a curved arrow (no text or symbols visible)Installazione tubi
natural_image
Close-up of a mechanical component with a circular hole and grid pattern (no visible text or symbols)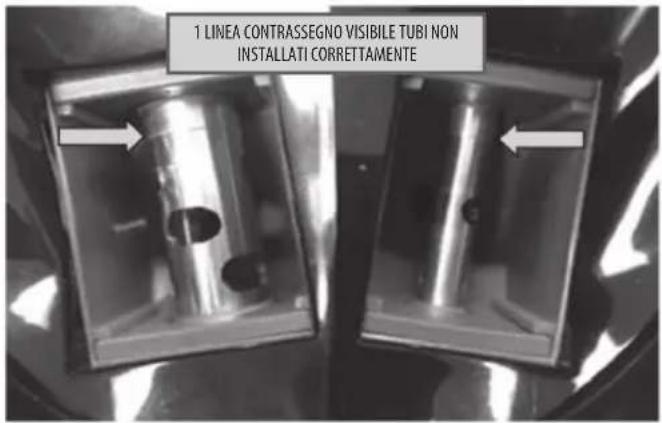
text_image
1 LINEA CONTRASSEGNO VISIBILE TUBI NON INSTALLATI CORRETTAMENTE
text_image
2 LINEE CONTRASSEGNO VISIBILI TUBI INSTALLATI CORRETTAMENTEtext_image
No SN 4:47 PM Settings Bluetooth Bluetooth Now discoverable as "iPhone" MI DEVICES 00221 Not Connected ① OTHER DEVICES MI iPhone To pair an Apple Watch with your iPhone, go to the Watch 400.Passaggio 1

text_image
No. SM 4:47 PM Bluetooth 00221 Forget This DevicePassaggio 2

text_image
No.5M 447 PM Bluetooth 00221 Forget This Device Forget Device CancelPassaggio 3
text_image
Girare in senso anti- rario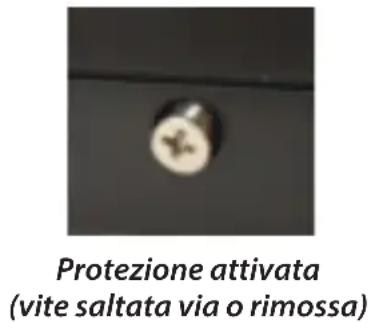
605 Oro Dam Blvd East
Oroville, California 95965
605 Oro Dam Blvd East
Oroville, California, 95965
1-800-533-5000 (USA o Canada)
E-mail: rcbs.tech@vistaoutdoor.com
Sito Web: www.rcbs.com
RCBS®
PRECISIONEERED RELOADING EQUIPMENT
We think we make the world's best reloading equipment.
If you agree, please tell your friends.
If you disagree, tell us—we want to do something about it!
Customer Service
1-800-533-5000 (U.S. or Canada)
E-mail rcbs.tech@vistaoutdoor.com, or visit www.rcbs.com
RCBS • 605 Oro Dam Blvd. East • Oroville, CA 95965

text_image
CE c LISTED US Intertek TÜV SÜD GS geprüfte Sicherheit RoHS03/20
RCBS ^® is a registered trademark of Vista Outdoor Inc.